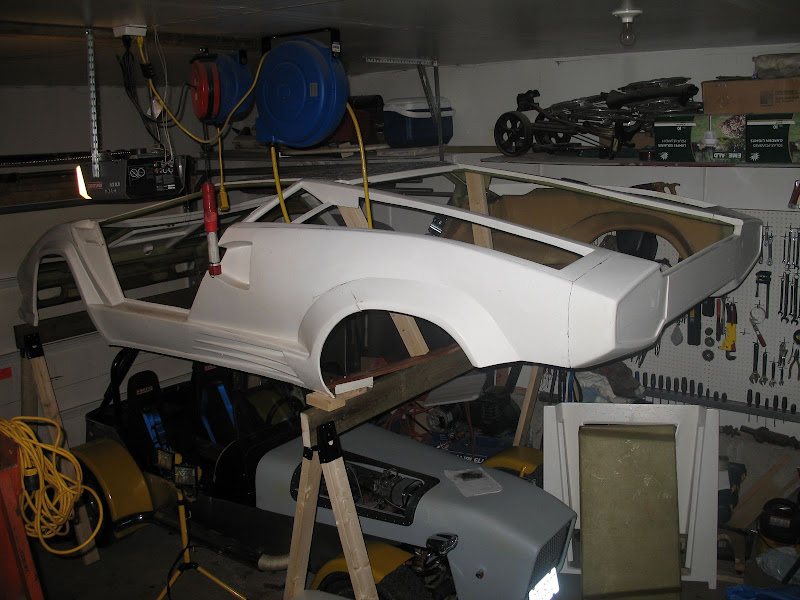
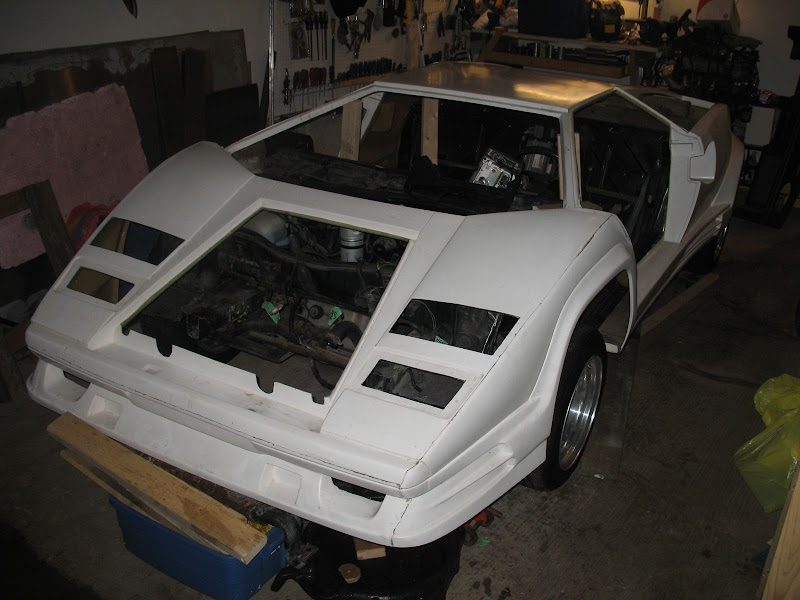
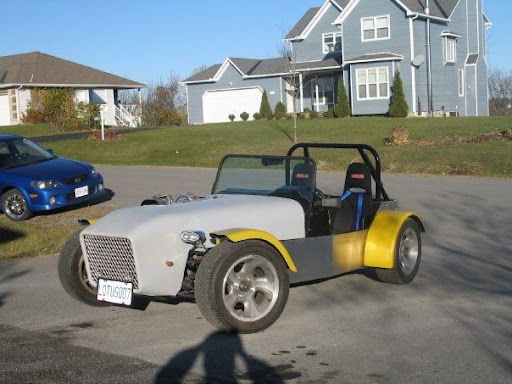
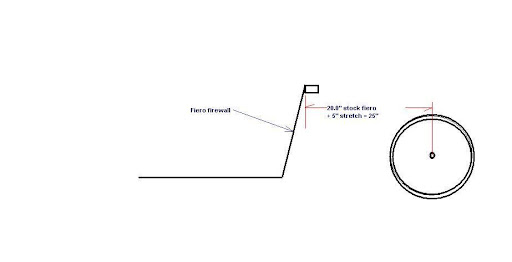
I am building a 25th Anniversary Countach replica on an 1988 Fiero Chassis. The Replica i Bought was designed around a Fiero chassis stretched 5" in the passenger compartment, this is good for me since I am 6'-4" tall, it give me more room to lean the seat back. Since the stretch was done in the passenger compartment the engine area is stock size...
Back Ground Information
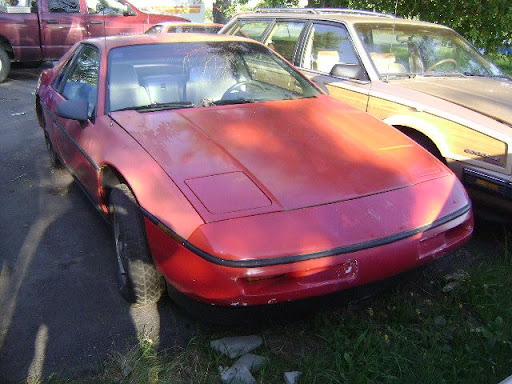
In October 2008 I picked up a 25th Anniversary Lamborghini Countach replica, and a month later I bought a 1988 Fiero (2.5L 5 Speed) for the base of the kit. The Fiero only had 76000Km on it and I got it really cheap. When I went of inspect the car if was raining really hard and I was very hard to see underneath. I looked in the major rust areas (Canadian car and we put lots of salt on the roads during the winters…) and found a bit of rust but nothing major, so I bought it. I was told the car was stored for 7 years in a barn, and the car looked clean. 
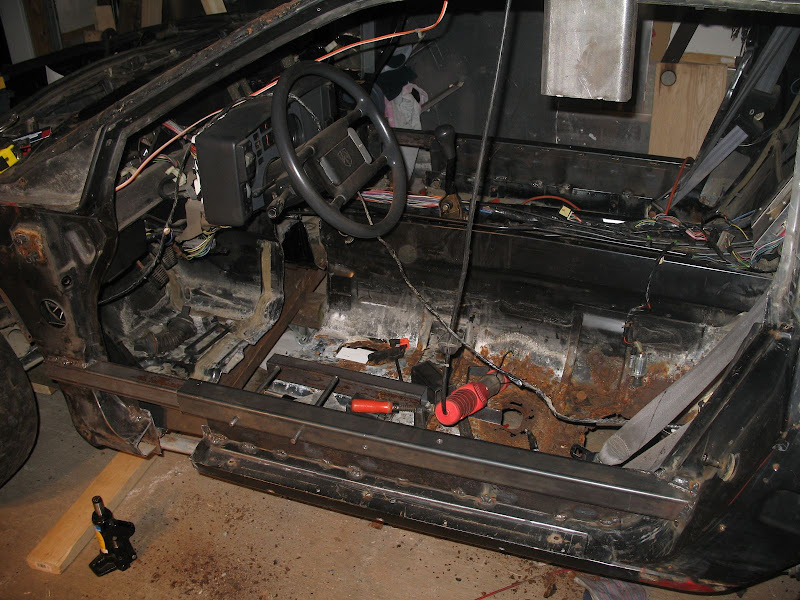
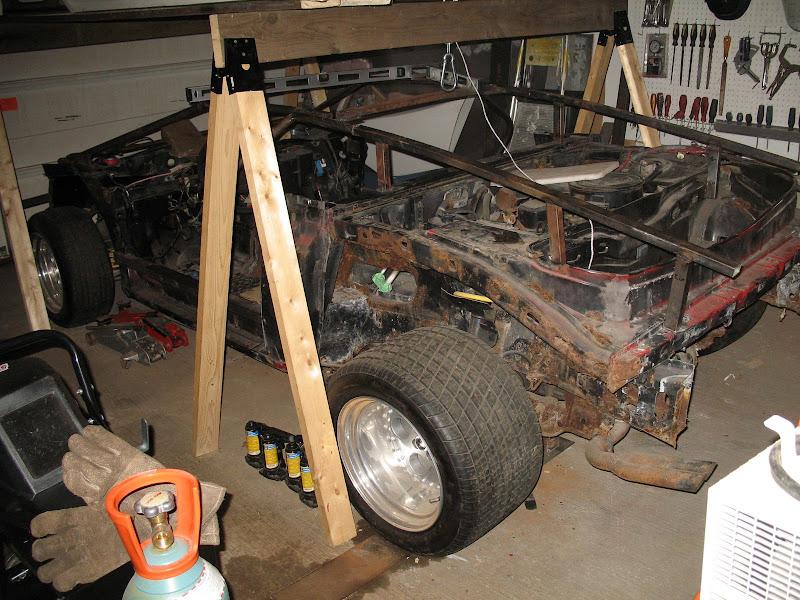
Over the next few weeks I stripped the Fiero to the bare chassis. This is when I got a bit of a surprise, the front half of the car looked almost new, very little rust, the back rear passenger side had a bit of surface rust and a hole near the battery tray. BUT the rear driver side had a football sized hole in the floor under the seat, the sheet metal around the fuel filler tube area was really rusty and at the back of the wheel well. I figure the car must have sat on a wet spot in the barn for so many years and caused this damage. The hole in the floor didn’t concern me since I was going to cut it out and drop the pan 2” anyway (I’m 6’-4” tall).
Stretching the Chassis
The kit I bought was designed to fit on a Fiero that is stretched in the passenger compartment, which is different than the more common engine compartment stretch. I like this idea, because it is a lot simpler and gives you a lot more passenger room. The only place that you would notice the difference is the rear window is at about a 45° angle rather than vertical. 
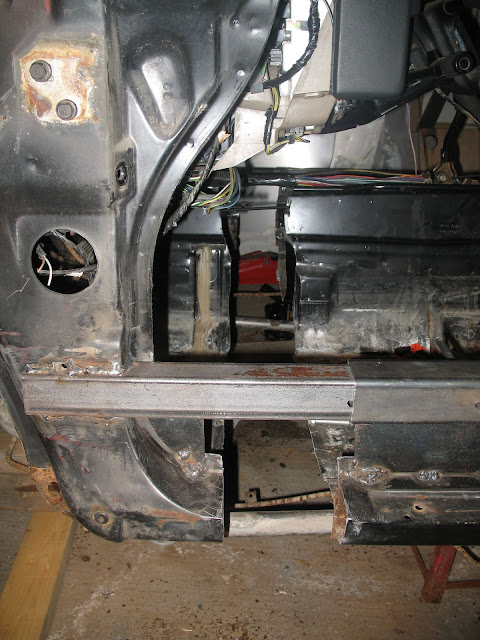
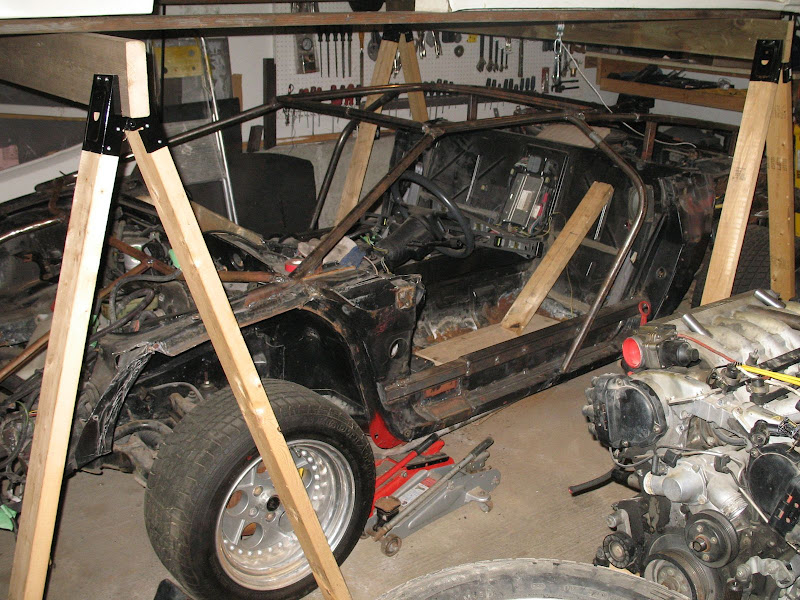
To do my stretch I put the Fiero up on stands, then I made a cart (I used steel casters so there was no roller compression) and slid it under the front suspension frame members. I levelled the car, using jacks supporting the rear half of the car and the cart supporting the front. Next I bought 2” x 2” x 0.10 wall and 1.75” x 1.75” x 0.10” wall square tubing. I made a telescoping tube that over lapped by 4 feet. Since there was only 0.05” play over the 4’ overlap I wasn’t too concerned with alignment. I also drilled 3/8” holes at 5” centers (5” being the length of the stretch) thru the telescoping tube assembly then welded them into the door frames. Next I cut the chassis across just in front of the shifter, then I pulled the front half until the holes in the telescoping tubes lined up and slid a 3/8” steel rod thru. This worked really well, the chassis stayed aligned. 
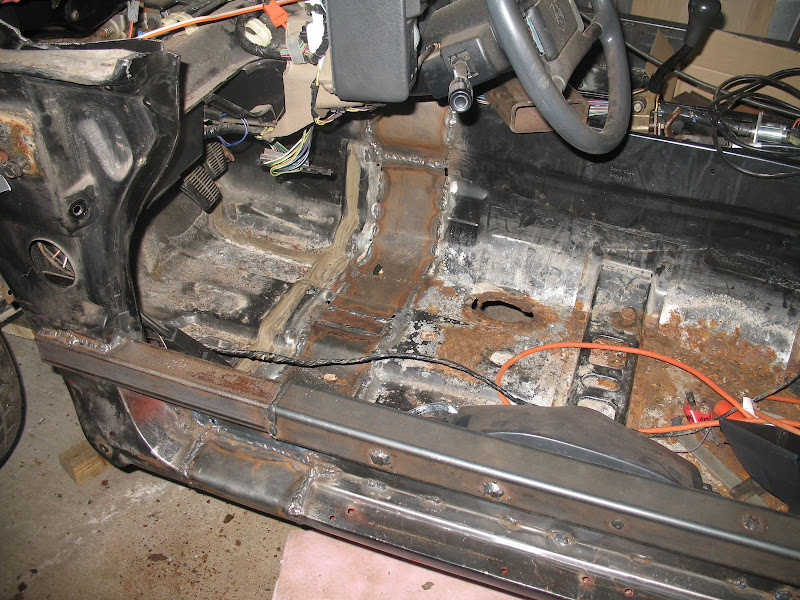
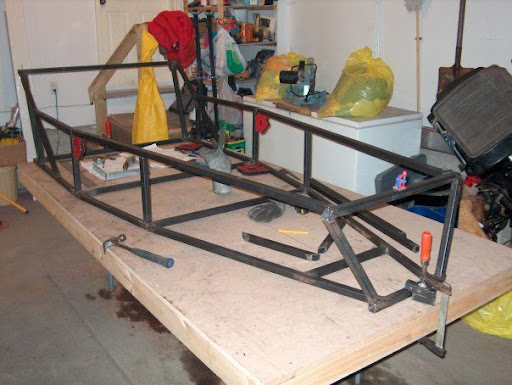
I then dropped the body on and tacked in the body support structure. The body is now removed and I will be adding more structure to the chassis then it will be stripped and sand blasted and painted. 
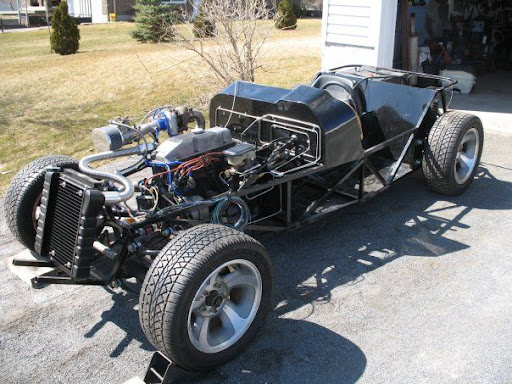
I have now turned my attention to the engine/transmission...
Engine Choice
Since the 1988 Fiero I bought had a 2.5L engine I had planned to replace it with a 3.8L Supercharged GM Engine to give the Countach kit more performance (having a less than 100Hp motor in a Countach replica isn’t right). I found an engine that was just pulled for a Pontiac GTP that had blown the transmission, I was able to get the engine, harness and ECU at a really god price. I started doing research of how the swap is done and collecting ECU pin out info, and sourcing and pricing for items used in the swap. 
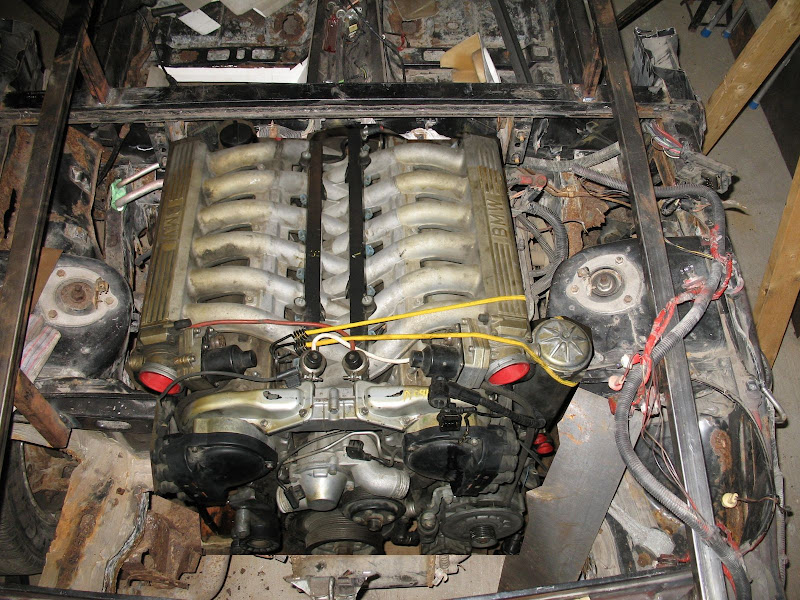
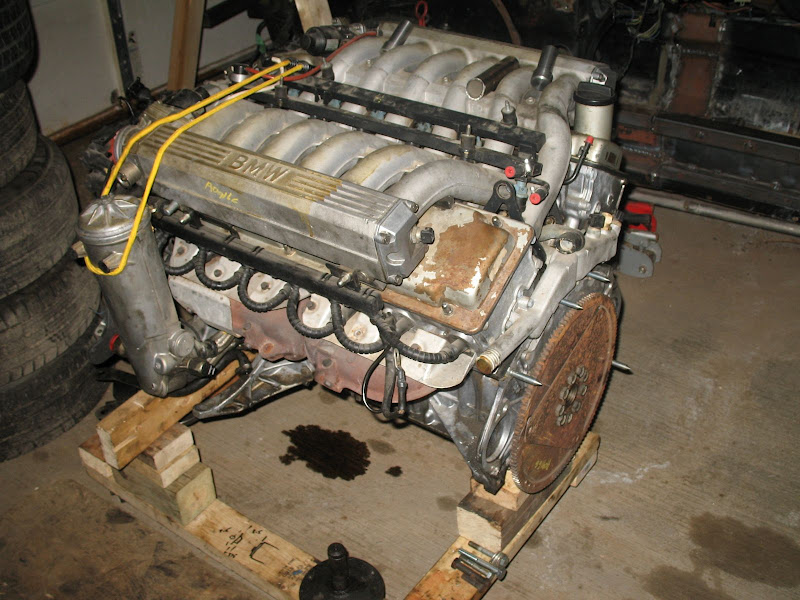
During my search on the web for Fiero engine swap information I came across a BMW V12 mated to a Audi FWD transaxle swap into a Diablo Replica, this caught my attention because; 1) the engine is all aluminium (almost the same weight as the 3.8L V6) , 2) the engine looks similar to a Lamborghini V12 (in the Diablo) and 3) it’s a V12… and I was surprised to find that these engines were fairly inexpensive and very durable. (you can buy a whole early 90’s BMW 750 V12 for under $2000 strip the engine out and sell the remaining parts and make more than you spent on the car back) The only problem is that the BMW V12 is put into a Diablo Replica which has an 11” stretch in the engine compartment (and even at that it’s a tight fit) and since I did my stretch in the passenger compartment I had a stock Fiero engine compartment. There is NO way I was going to fit a V12 in there…or was there… After a little more research I found some people putting V8 engine longitudinally into stock Fiero chassis using a Cadillac 425THM, 325THM or 325-4L Auto transmission, see Link Below http://www.fieroaddiction.com/SBCLa.html After reading this information I decided to do some more research on the reversed installation method mention at the bottom. This seems more logical way of doing the swap, most of your weight is in front of the axle, your belts and accessories (alternator, starter, AC compressor…) are all facing the rear so you have easier access to them, and the orientation is similar to the real Countach. Before I went out to buy an engine I wanted to make sure that I could make it work, my biggest issue was with this 
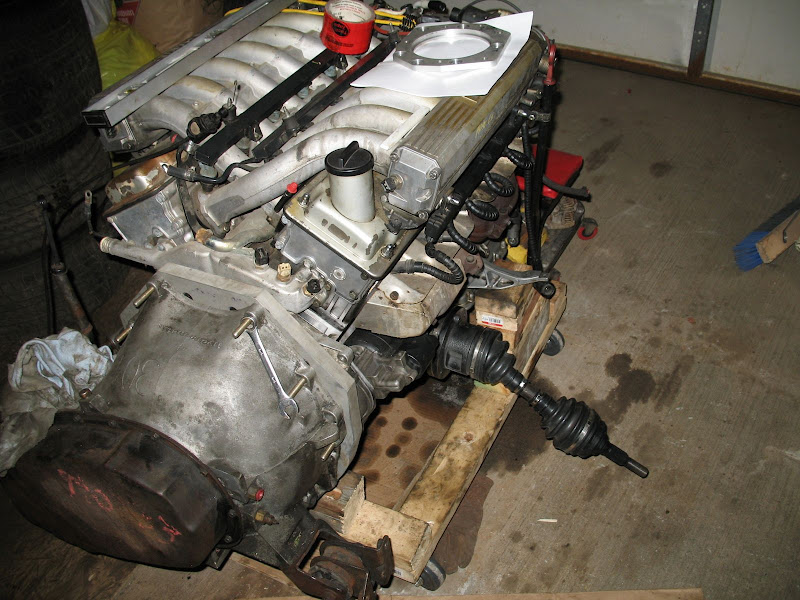
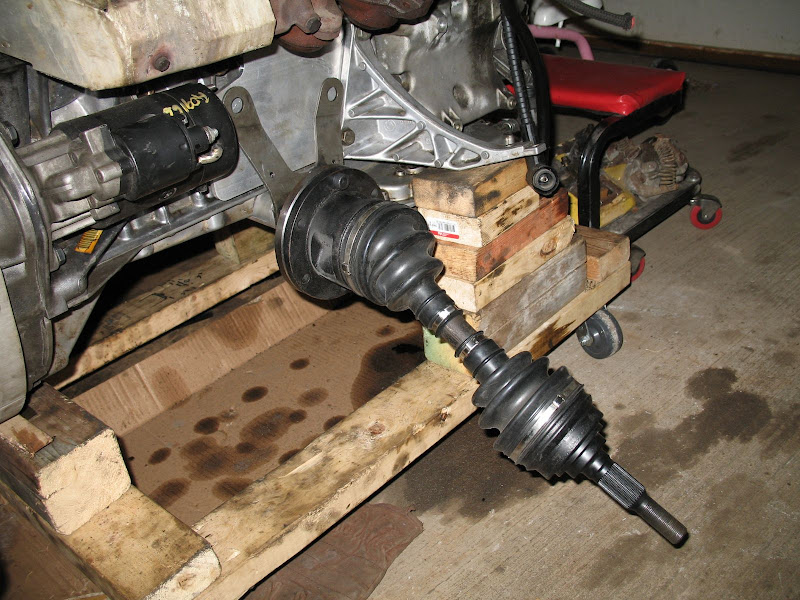
transmission/differential setup the left hand axle has to go under the engine. When the GM V8 engines are used the oil pan is notched to allow the axle to pass under. The problem with the BMW engine is the block is lower the GM block, I knew that I would defiantly have to go thru the oil pan but I wasn’t sure if it would clear the bottom of the engine block. I found some drawing on the web showing the V12 engine, using these drawings I was able to make my own scale using a known dimension and have in access to a 325THM transmission I was able to figure that the axle would just clear the block…with this info I decided to buy a V12 engine and proceed further.
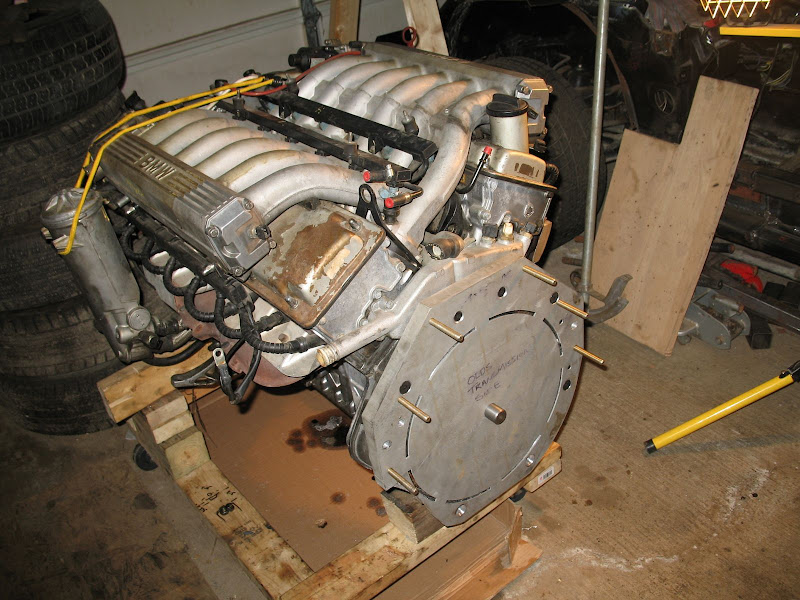
Issues mating the V12 to the 325THM Transmission
Q1) Can the transmission be mated to the V12? A1) Yes, you have to make a spacer from a V12 Bell Housing (so you adapter plate clears the water cooling jacket above the flywheel), make an adapter plate, a spacer and a triangular plate to attach the flywheel to the torque converter.
Q2) will the drive shaft clear the block? 
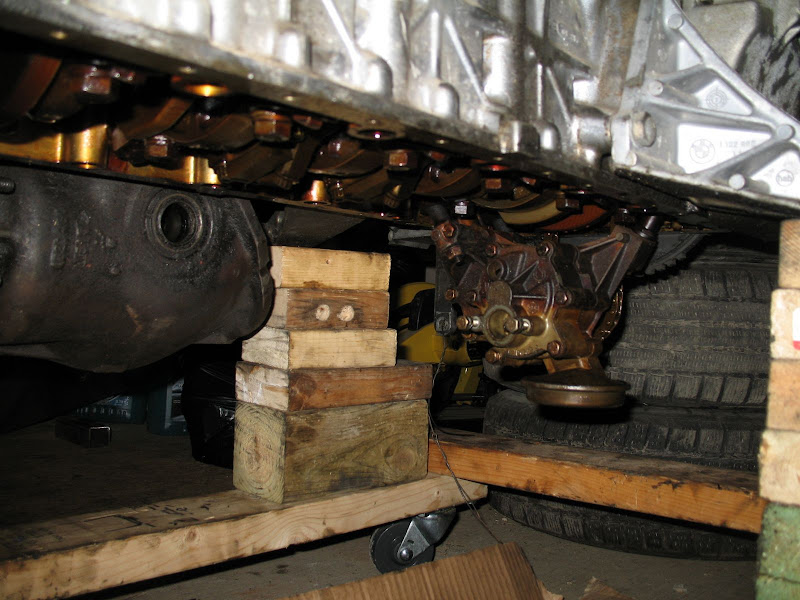
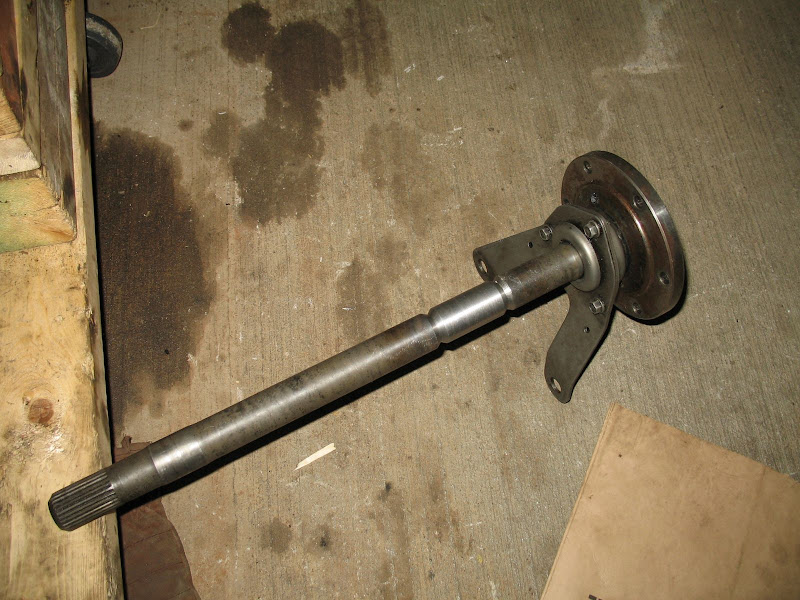
A2) Yes, you have to make a adaptor plate/spacer to rotate the differential 180° and space it out to pass under the Main Bolts (or the crank will hit the axle shaft)
Q3) Do you have to modify the engine? A3) Yes, you have to cut some material off on the left side of the block and oil pan to allow the transmission to fit in. you will also have to machine a hole thru the oil pan and weld in a tube to pass the axle thru.
Q4) Do you have to modify the Transmission? A4) Yes, you have to remove a couple of tabs off the differential to allow the short axle to fit the opposite side and to clear the oil pan. You also have to make a coupler to bridge the gap created by the transmission to differential space/adapter.
Q5) What is the weight distribution of this set up A5) I am estimating with the transmission and 50% of the engine in front of the axle that the weight distribution will be a about 80% in front of the axle
Welcome to the fourm. Wish I could help with your questions...for my Countach project I stayed with the non-stretch, Fiero engine. This was my first project like this so I didn't want to get in over my head.
88lambo, you should move this thread over to the construction zone, that's where I plan to post mine, I'm also building Countach. Maybe Cliff, who owns & runs the forum would move it for you. Sweet project you have going, that V-12 is going to be awesome! John
Are you gong to add additional strengthening/reinforcement to that stretch. It looks like the only real strength there is the telescoping box section. Have you considered putting some box section into the rockers as well and maybe some 'real thick' plate along the tunnel walls, otherwise what's top really stop the frame from bending. Seems to me that this is a lot like doing a soft top. Archie has posted some stuff in the past on what he does to strengthen a frame when removing the top and he goes overboard to reinforce it to prevent flexing.
The axle is going' through' the oil pan via a tube? Won't the rise and drop of the suspension cause it to bind in the tube? or are you limiting the movement somehow?
Originally posted by ltlfrari: The axle is going' through' the oil pan via a tube? Won't the rise and drop of the suspension cause it to bind in the tube? or are you limiting the movement somehow?
The axle that goes thru the oil pan on a TH325/425 setup is really an extension axle and it rides in a bearing mounted on the other side of the engine. It also has a flange that the CV axle attaches to.
axle is supported on a bearing attached to the other side of the block and half shaft bolted to it
auto sucks i agree but to fit this into a stock engine compartment, unless you go completley nuts and put a manual tranny with a v-drive unit in, but the whole tunnel would be filled and diff would sit under engine pushing it up quite high.
i will be building the tranny and adding a shift kit with a racing ratchet shifter (simular to a triptonic)
i do have an crazy idea that may work by modifying the 5 speed Fiero tranny but i'll do that later with the one in the car, i just want to get the car on the road...
Great thread... don't spill all the beans at once though and then leave us for months languishing in suspense wondering "Is he dead?" "Was it all just photoshopped?" "Did the Italian mafia frown on his imposter?" You [i]should[i/] show us some pictures of that diff spacer if you have some before it was installed, and tell us what you have planned for an exhaust system... with a longitudinal layout, you should be able to come up with something really nice.
ohh cool, I really need to start a build thread too...I made the mistake of mislabeling my original thread about what transmission to use in my 89 Lambo replica...We have something in common on these builds, both doing V12's and both are building 89 style cars..Sweet..looks like you have lots of experience on this kinda thing too...I'll be watching this thread...I can probably help in sourcing parts you may require for your build( Countach wise anyway)
Don't worry i will be posting more photos. the Transmission is mounted to the engine right now so i can get a location for my tube to go thru the oil pan, which i actually just finish doing. i will be taking it to work along with the axle (i am adding a 2.25 in section to the axle so it clears the block) to be welded together. I will take photos tomorrow. once i have completed the pan and axle and bolted everything together for the final check i will be taking it all a part to have the transmission rebuilt. I will take photos of all the bits aligned on the floor so you can get an idea of how everything goes together...
Don't worry about me not finishing it, I always finish my stuff, here is a list of major projects i ave completed
1) 1978 - Motorized go-cart with Suziki 185TS Dirt bike engine (5 Speed) - 14 years old 2) 1987 - 2 years to Designed and Built a 17' 115HP speed boat (still use it every summer) 3) 1994 - 2 years restoring and 1971 Opel GT (Sold it Last summer) 4) 2004 - 4 years building and Lotus 7 Replica from scratch just with basic frame plans, all steel tube frame and aluminum body (No Fiberglass) 5) 2008 - Lambo drivable chassis fall 2010 spring 2011 latest, finished summer 2012
For people using the BMW V12 Getting the engine to run on BMW ECU's can be a Pain!!!, check out www.choiceautowiring.com he makes a EMS using GM components and ECU's. He has done quite a few V12 Diablo's
All body parts, hinges, lights I have real style tail lights, latches, lambo dash and gauge pod, lambo fiberglass seat pans (not sure if i will use these or go with Mr Mikes Fiero Leather covers), emblems
I am using older bmw headlights assemblies, they line up perfectly with the lambo light pods i have.
I don't have the inner door structure so if you have any photos or drawings i would appreciate it. i would like operating windows, does yours have them?
Oh btw i am a mechanical designer and i have made drawings of most on the pieces i have made. i plan on making a illustrated V12 installation instruction booklet (i use make maunals for military vehicles 15 years ago, our company had a slow period so they sent me to the publication division which i eventually headed up for a bit...thank god i have been back in design for the last 10 years, i didn't find writing publications exciting...)
for the roll down windows , I had a guy in England make me steel frames. He's the only guy so far that has made a curved version, which was a must for my build, I also sourced curved glass from Pilkington Automotive Glass UK. I was able to get both my windscreen as well as all remaining glass from there. For my BMW V12 build I have the Audi 5000s 5 speed transmission, shifter kit ( Mike Orlando) for the trans, custom made adapter plate to mate up the trans and the M70, a custom made flywheel with pilot bushing/bearing, and finally a clutch and clutch plate. I have a friend name Mark that has a genuine 89 Countach that has helped me immensely on reference and photos. I've taken many photos of his car, even helped him with parts as well. So the name of the game is to get the cars on the road, I just have to make mine as oem as possible as Mark wants me to show it next to his at shows, so if you take a look at my old thread you will see some of the parts I've collected to get it there. Anyway I can help , just let me know
I never got my paid for seat shells snicker snicker..... I'm gonna go with modded seats from a fiero as well and have Mr Mikes do the proper cover for it..Any idea of who made your kit? how authentic are you going for on your build?
the kit came from a companey in Toronto, Ontario, Canada...15 or so years ago these guys made 12-15 turnkeys and sold them, in 1997 the owner shut down the company but one of the employees bought a kit from him to build for his grandson, well he never did anything with it and it sat in his sisters garage for 11 years. He claims they pulled the molds from a real Countach, but who knows. it looks accurate, but a bit wider than what the Lambo specs say...the only major difference is since the kit was designed to be stretched in the passenger compartment the rear window is at a 45° angel rather than vertical. too hide this they went with an older style engine cover (dome style with a horizontal grill and another small grill near the trunk) I would like to get rid of the rear bumper, i never liked it (See photo below). so if anyone has a older style countach kit and are willing to pull molds of the lower section where the 25th anniversary bumper should be, let me know
Will, how are you going to get the V12 with the audi transaxle into the car, isn't that package to long for the countach? it barely fits the Diablo with a 11" stretch. are putting the axles at an angle? or cutting part of the firewall????
Howdy, short answer is that I want the firewall closer to where the Countach's should be, behind the door sill. This will move the firewall forward considerably. the Engine is 29.5, the trans is 26.5, and the adapter plate is 1.375 so approx 57.375" long total. Building an 89 version also gives us a bonus in that the 89 has a rear valance that sticks out further than the older model and with the addition of the 89 lower bumper , this combination should conceal the trans end...I've been told it's doable...and there's this
I would check carefully on your dimensions. This is what i get...i could be wrong
engine is 29.5 long, adapter plate 1.375" from adapter plate to center line of transmission axle flange is Approximately 8"-12" - totaling 38.875" to 42.875"
From Firewall of Fiero to centerline of axle is 20" add 5" for the 25th anniversary stretch = 25" See sketch. if you take 38.875" - 25" = 13.875" is distance to move firewall forward...???
are you planing to move the footwell forward also? i know the Countach footwell goes up beside the wheel a bit.
look at my photo that shows the chassis structure, the bent tubes that go from the rockers to the roof actually go right behind the door sill, it's quite a bit forward of the rear firewall...
Ok you have to remember that the front of the engine is actually going to be facing the rear of the car...
Photo one is the short axle mounted to the differential where it should be (passenger side)
This is the drive shaft that goes thru the oil pan into the differential, i am extending it 2.25"...Before you guys say anything about cutting a hardened axle and welding in a piece of round bar, let me explaing what this is... yes the axle is hardened steel, so is the spacer AISI C-1045 High Strength Precision Ground Steel Shafting, good to 100,000 PSI tensile strength. also i am getting the armor guys at work to weld it, where i work we make steel armor kits for military vehicles and our welders have to weld the hardened steel with special mig wire so it doesn't loose its hardness or strength
Next 2 photos are of what the axle on the opposite side will look like, the axle shown is for the opposite side I don't have this one made yet. I won't know its proper length until i get the engine onto the cradle.
Notice the carrier bearing the supports this side of the axle (thats the next thing i'm doing drilling holes in the support plate bolted to the engine block (try to find it )
I would check carefully on your dimensions. This is what i get...i could be wrong
engine is 29.5 long, adapter plate 1.375" from adapter plate to center line of transmission axle flange is Approximately 8"-12" - totaling 38.875" to 42.875"
..I suppose this would depend on the kit and where the stretch is - I have seen kits where the stretch is behind the firewall, as such that would give you more room for an engine.
BTW - nice work so far, I wish I had the skill (and ambition) to do something like this. However, once it is done and you are bored with it, I would probably be glad to take it off your hands.
I think my calulations are wrong, the v12/audi fits into the Diablo with an 11" stretch in the engine compartment, so if the countach is only a 5" stretch then you would only need to find 6" OOPs Sorry....i didn't mean to scare you Will
as for selling it, not for a long time...But my Lotus 7 is for sale...see photo above
lol, got me worried, though I measured three times, can't hurt to check one more time lol...oh, the stretch is definitely behind the firewall on this one...
Will
[This message has been edited by 25thCountach (edited 04-13-2010).]
Storage guy called (a month early again this year, sheesh 
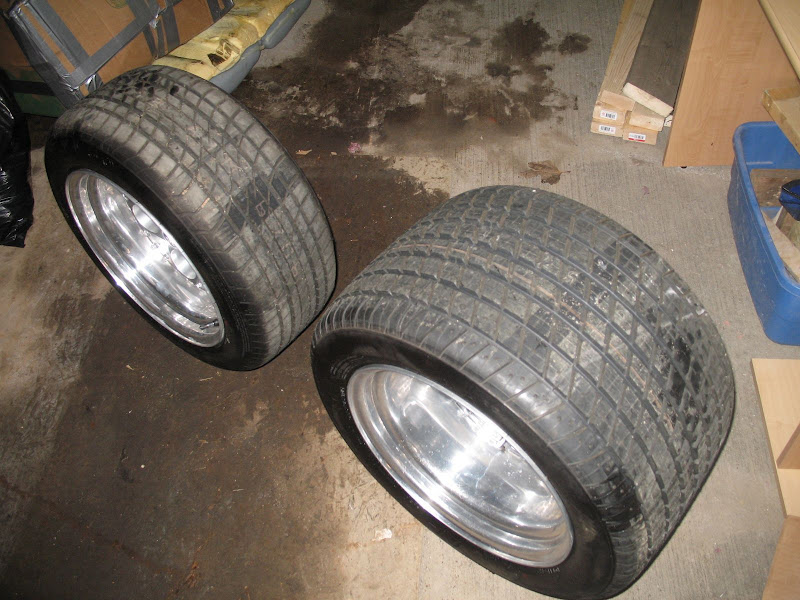
) wants the Lotus 7 out saturday, i have very little room in the garage, I really need a work shop its hard to convince my wife that we need to spend 25G's on a work shop for my toys...next tatic, Her "getaway"/Spa in Loft above the workshop
this will require a stretch on a stock fiero right??? that spacer/flipper is pretty thick... that is why i am asking.
engine compartment is stock, i did the 5" stretch for the countach wheelbase in the passenger compartment.
yes spacer is 3" thick but i have a 1.25" spacer on the end of the engine to get the 1" thick adapter plate to clear the coolant water jacket (2.25" total) going the opposite direction. I added the diff spacer 1) to put the axle under the Main Bolts to clear the crank 2) to put more weight in front of the axles. The back of the engine should be about 2" away from the tube at the top of the firewall. i will have to modify the passenger side lower firewall a little to get the back of the transmission in...
I overlaid the engine onto the chassis, this is what i believe it will look like installed...
Nice work on your V-12 install so far, back in the day (late '80's) when I ran the shop at Exotic Dream Machines, we built a Countach with a sbc and a TH325 set in the car reversed like your doing and the car worked very well.
OMG ! that is such an incredible combo ! while im not a fan of replica cars... i am a FAN of swaps and "outside the box" concepts and fabrication ideas
definitely bookmarking this build !
------------------
87 Fiero GT 5sp with Vortec L35 4300 Turbocharged V6 Bully Stage 2 clutch Syclone intake manifold and engine management with Moates adapter and chip burner Air/water intercooler and Devil's Own progressive water/alky injection 50lb injectors, 3 bar map sensor, Walboro fuel pump and Jabasco Intercooler pump LM1 wideband on custom manifolds and 3" stainless exhaust system T31/T04B H3 turbo and a S10 caliper conversion. Murphy's Constant Matter will be damaged in direct proportion to its value Murphy's Law of Thermodynamics Things get worse under pressure. Arthur C. Clarke "Any significantly advanced technology is indistinguishable from magic"
Took the oil pan to work last week, they couldn't weld the tube into it (cast aluminum is very porous and you just end up chasing cracks so they wouldn't even try) so after a bit of research i found a Epoxy/aluminum filler that can be submersed in oil/gas/diesel should be here Tuesday. I have to do a bit more cleaning of the oil pan...
I'm hoping to get the axle back sometime this week also, then i can finish up the carrier bearing mounting plate. Once this is done then i will take everything a part and have the tranny rebuilt. I also found a great tranny builder Locally, every "car" person i talked to gave me the same name, and he just happens to be the most reasonable priced builder also...
I sold my 3800SC engine yesterday, so i did some garage cleaning to make room for the Lotus...
Going to try to get the original cradle/engine/transmission out of the car in the next couple of weeks and start rust repair and cradle mods...