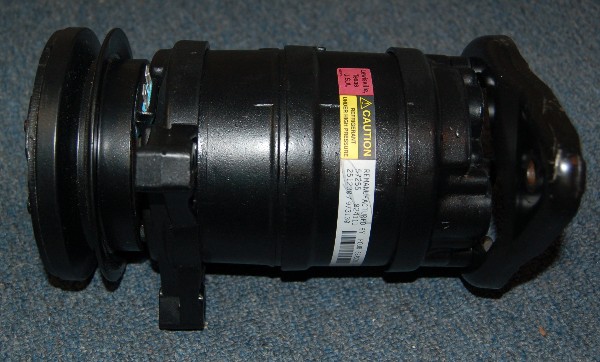
My compressor, (original) has the Harrison decal on it, it Says Model # 1131469, but doesn't say hr6, vr5 or anything like that only has a place for the 2 switches on the end, none in the side.(1986-2.8 , "V" groove) So, What is it I've got? What to ask for ? Thanks
Until I find contradicting data Lou, and from what I've learned so far, I would say that you have a DA6 compressor. You can replace the DA6 with a HR6. As mentioned in this thread, they are identical externally.
That is correct. If fact, when replacing the compressor I think you should always replace a DA6 with an HR6. The "HR6" designation stands for "Harrison, Revised, 6 cylinder." The "Revised" means that it had been re-engineered by GM/Harrison to address the known wear problems with the bare aluminum cylinder barrels in the earlier DA6. Since compressor lubrication is an even bigger issue with R-134a as the refrigerant than it is with R-12, the HR6 becomes even more desirable.
[This message has been edited by Marvin McInnis (edited 03-11-2010).]
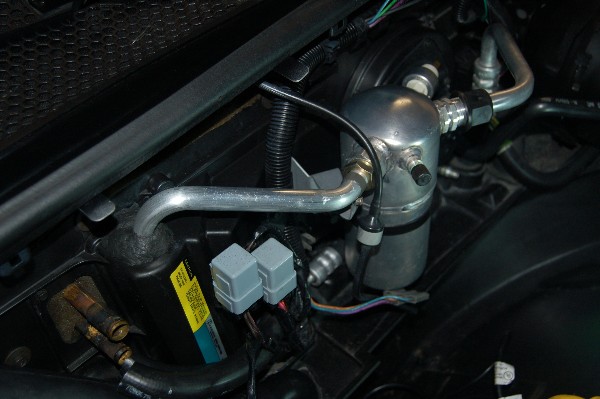
The new, (remaufactured), HR6 compressor has arrived:
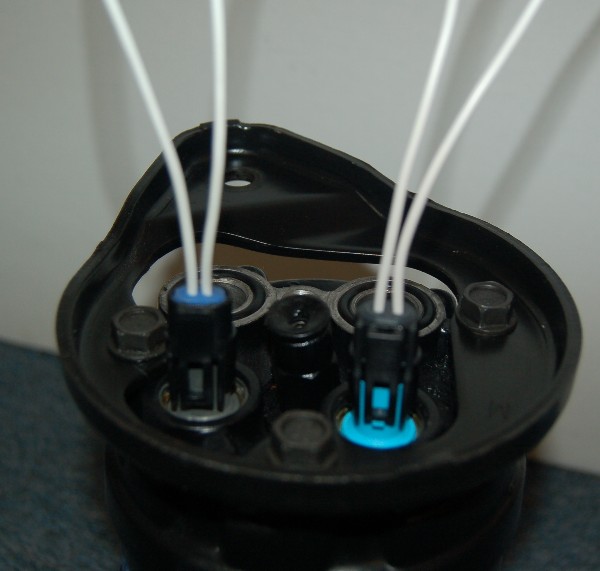
The proper switches also arrived and are installed: The gray one is the condenser fan switch. The blue one is the high pressure cut-off switch.
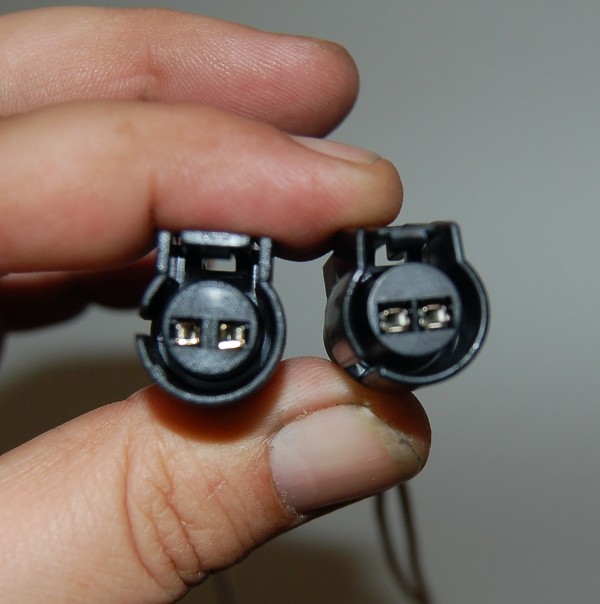
Here's the 2 terminal connectors for the switches: Note that the slots in them are clocked differently for each of the plugs. (They can't be accidentally connected to the wrong switch...) I guess you have to make sure you get the right connector for each switch if they don't come with the switch.
One wire from each of the switches is to be spliced into the OE harness, replacing the old style connectors. The other wire from each switch is to be connected to ground. The old compressor switches grounded through the compressor case, (thus their single wire). These switches must be separately grounded.
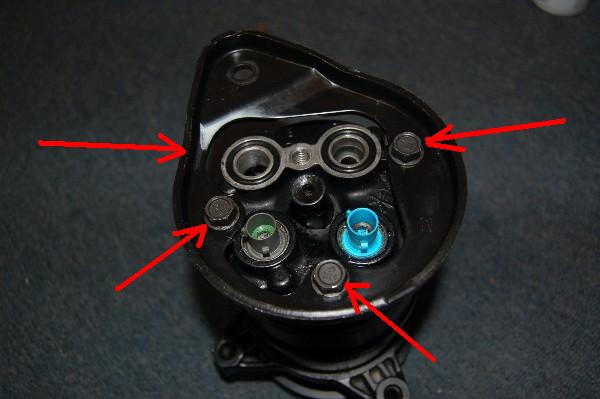
Before you turn in your old compressor core make sure you keep your old rear mounting bracket and the 3 bolts for it. New compressors will not come with these parts. The bolts can be replaced of course, but the mounting bracket is Fiero specific.
[This message has been edited by randye (edited 03-11-2010).]
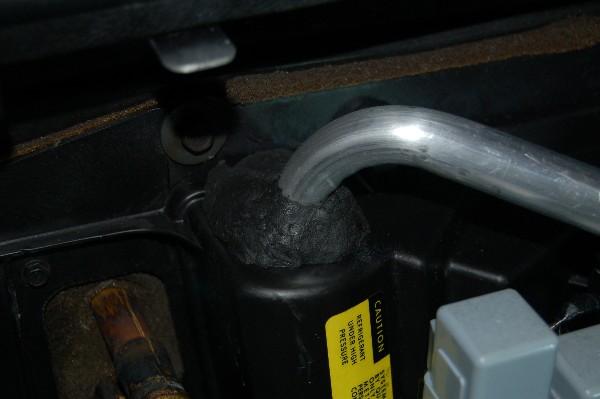
My new accumulator is filled with 4oz of Ester oil and installed:
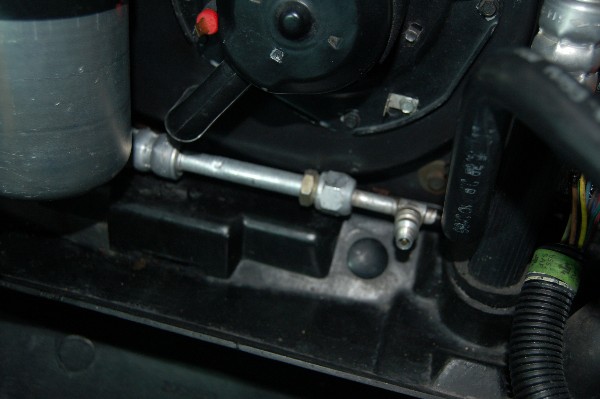
The new variable orifice tube is safely installed inside the high pressure line and reinstalled in the car:
The black "tar" sealant is put back around the evaporator tubes and housing: Not as neat a job as from the factory, but at least I was able to reuse it.
I guess this ends my initial questions about which compressor I had and the other misc. questions. Unless there is interest from anyone with the rest of this project, I'll end it here.
THANK YOU to everyone who helped with information and tips. I really appreciate the help. Now to get this all back together and working!
Good progress! I hope you saved some of that ester oil to put directly into the new compressor.
I can also see that you still need to put R-134a adapter fittings on the service ports.
4 oz. in the accumulator and 4 oz. in the compressor. I didn't forget. Interestingly, the compressor came from Factory Air with 1.5 oz. of something called "ICE 32" already in it.
Adapter fittings are on the bench. I need to determine if I need to remove the schrader valves on the OE system when I install them.
This system should be up and running by late tomorrow or sometime Saturday. I'm waiting on a friend that owns a commercial A/C business to stop by with a vacuum pump, manifold gages and some nifty test equipment, (leak, IR temperature, etc.)
4 oz. in the accumulator and 4 oz. in the compressor. I didn't forget.
For completeness, I'll mention that both lubricants used with R-134a, ester oil and PAG, are highly hygroscopic ... i.e. they readily absorb moisture from the air, so you should try to keep the compressor and refrigerant lines plugged until final assembly. That will help keep moisture out of the desiccant in the accumulator, too.
quote
I'm waiting on a friend that owns a commercial A/C business to stop by with a vacuum pump, manifold gages and some nifty test equipment, (leak, IR temperature, etc.)
FWIW, you can buy a vacuum pump and manifold gauge set suitable for nonprofessional use at Harbor Freight for less than $100 total if you can wait to buy at their lowest selling prices. For another $100 you can buy the IR thermometer and refrigerant leak detector, too. I currently own all but the leak detector, and they have worked fine for me. Of course, if you have access to professional equipment that's even better.
[This message has been edited by Marvin McInnis (edited 03-11-2010).]
I went and searched my threads on the HR6 replacement and the V5 install for my Aurora powered car and it appears that I was able to remove and reuse the switches from my "siezed" HR6 into the new HR6. I ended up buying new switches for the V5 compressor.
For leak testing I vacuum down the system through the suction port for at least 90 minutes. 30 minutes is the minimum if I am in a hurry but I do not like going that short in time. Then I shut off the valves in the gauge set and let it sit for at least 6 hours. Overnight is even better. After that I just check and see if the vacuum has held and if so I am ready to introduce freon. It is a good idea to have a digital scale to weigh the amount of freon you put in the car. Most of the time I just wait until the system is not cycling at idle anymore and the air is coming out of the vents cold. Then I unhook everything and go for a drive to get some cool air over the condenser. If the air coming out of the vents gets to at least 42 to 45 degrees then I am getting close. The rule of thumb for 134a used to be to use about 80% of the published amount of r-12 normally used in the system. More than that and you may end up with excessively high pressures and temps in the system.
The rule of thumb for 134a used to be to use about 80% of the published amount of r-12 normally used in the system. More than that and you may end up with excessively high pressures and temps in the system.
Charlie
Randy, I found some of my tech information from GM, heres what it says. Most cars will take anywhere between 5-10% less R134a (by weight) than the recommended R-12 charge. It seems somewhere down the line I wrote down that I always used 94% as my magic number and never had an issue with having too much in the system. Every car is different however, I would start with 90% and if it doesnt seem enough, add just a little more.
I know you have heard nothing but conflicting information regarding your AC system from the start, so having all these hugely different numbers thrown around can be confusing. Like I said, try undercharging it a little at first then add more until you are satisfied.
-Joe
Thanks for the evac and charging tips guys! I really want to do this correctly. Positives sent for you Joe and for "snoop". Having never attempted this before, it would be great if I had success after all this trouble! Honestly, if *I* can do this, anyone should be able to. I sure can't see paying an A/C shop $1,200.00 or higher when I have probably $400 in parts and supplies in this so far and my own, (free), labor. Plus I know I pay much better attention to detail on my "baby" than they would...
I know some folks hate it when a thread dies without a "conclusion", so I thought I would update my A/C "adventure".
I finally got the new HR6 compressor mounted, but had to modify the rear compressor bracket slightly, as I had installed a set of the Fiero Store sprint headers. The rear compressor bracket was hitting one of the header tubes, and while it would mount up ok, I didn't want it rubbing on the header tube, so I ground off aprox. 1/8" off one side of the bracket. Fit like a glove after that.
I wired in the new 2 terminal switches and ran a ground wire up along the firewall to a point near the battery where I had a ground terminal already installed.
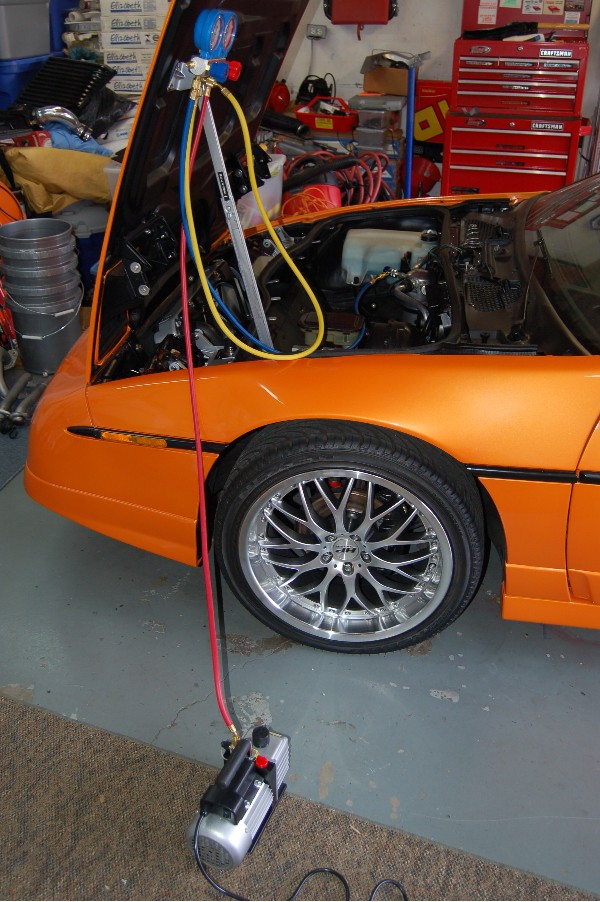
After waiting 2 days for a friend that runs a commercial A/C business to find time to help me evacuate and charge the system I finally gave up on him and went to Harbor Freight and bought a vacuum pump and manifold gages. With coupons and the sale they had going on, the pump and gages were approx. $110.00 Not a bad deal, and I have them to use on my other cars now if needed.
I evacuated the system with the pump. It worked pretty fast being just a 2.5 cfm pump and I managed to get the system down to 30" Hg in just a few minutes then shut off the gage valves and turned off the pump and disconnected the hose at the adapter fitting on the accumulator. I had intended to let the system sit on vacuum for an hour or two, but got distracted on some other business and forgot about it until the following morning! When I checked the gages the next day the system had stayed right on 30" Hg for 14-16 hours.....I assumed I didn't have any leaks at that point.
I reconnected the manifold gage hoses and then filled the system with 134a while watching the gages and reffering to a pressure / temperature chart for 134a. The whole process was actually very easy.
The great news is that the A/C is blowing COLD now and after running it for a few hours I don't seem to have any leaks and the compressor is actually much quieter than the old one it replaced.
The "not so great news" is that it appears that you DO NOT need the extra ground wires for the new 2 terminal switches. In testing the HVAC system I found that my radiator fan was ON constantly, even when the HVAC was in the OFF position and the coolant temp was cold. I discovered that disconnecting the ground wires for the switches returned the fan to normal operation for both the cooolant temp switch and the A/C function. It appears as though the new switches probably *do* still ground through the compressor body on the HR6...or I have defective low pressure switch. It really doesn't matter though, as the HVAC head unit also turns on the fan just fine. I will try just hooking up the ground wire for the high pressure cut-off switch by itself as that one is really needed for insurance against damage to the system and it didn't seem to malfunction when it was grounded along with the low side switch. (The compressor clutch worked normally before and after disconnecting the ground wire) I could have probably saved myself a little bit of wiring and soldering, but who knew?
Thanks again to everyone who offered advice and tips. If the compressor holds up, it looks like this adventure was very successful *and* I learned how to do the A/C myself. A nice sense of accomplishment and a whole lot cheaper than taking it to an A/C shop
[This message has been edited by randye (edited 03-24-2010).]
The only thing in your post that makes me pause is the part about shutting off the pump within a few minutes of starting the vacuum process. Vacuuming out the system is to remove all foreign particles and moisture and it requires a minimum of 30 minutes of continuous pumping preferably an hour or two just to be sure. I might be wrong about that but that is what I was told many moons ago. If you don't get all the stuff out before introducing the freon there is a chance it will mix with the freon and promote corrosion in the system. Other than that minor detail, great job!
I ... filled the system with 134a while watching the gages and reffering to a pressure / temperature chart for 134a.
Clarification. You should always charge the system with the specified amount of refrigerant (usually by weight), using the manifold gauges only to confirm proper operation. The correct amount specified for the '88 Fiero is 42 ounces of R-12, which works out to about 34 ounces of R-134a ... or just short of three 12-ounce cans. The pressures will stabilize at the expected values as soon as there is the minimum amount of refrigerant necessary for proper operation, but long before the system is fully charged. For optimum cooling performance you want enough refrigerant in the system during normal operation that the refrigerant level in the evaporator core stabilizes at about half liquid, half vapor.
quote
Originally posted by cptsnoopy:
Vacuuming out the system is to remove all foreign particles and moisture and it requires a minimum of 30 minutes of continuous pumping preferably an hour or two just to be sure.
The purpose of evacuating the system is to remove all non-condensable gases (primarily air) and moisture, and the vacuum pump only needs to run long enough to accomplish that. The air will be virtually all gone as soon as the vacuum exceeds 29 in-Hg, but any water in the system may take more time to "boil off" or come out of the desiccant and lubricating oil. The usual rule of thumb is to run the vacuum pump for 10 to 30 minutes, depending somewhat upon ambient temperature (colder => longer). Once the system stabilizes at maximum vacuum (~30 in-Hg, depending on altitude and local barometric pressure) you can shut off the pump. If the pressure slowly rises with the pump shut off, there is either a leak or some moisture still remaining in the system. In either case you should turn the pump back on until you once again achieve a deep vacuum. If the system will eventually hold full vacuum for more than an hour, you are done. If you can never get it to hold vacuum for very long, then you need to find and fix the leak.
FWIW, it's better to think in terms of "absolute pressure" rather than vacuum when dealing with A/C systems, but unfortunately that's not the convention in the U.S. "Vacuum" is simply the difference between absolute system pressure and absolute atmospheric pressure, which varies significantly with altitude and weather.
[This message has been edited by Marvin McInnis (edited 03-24-2010).]
With summer coming, more a/c threads are starting to pop up. With the new style two terminal pressure switches causing radiator fan problems has anyone found the correct old style one terminal switches? I would like to have new switches that work as expected and not add new problems rather than reuse old ones that might not work at all. Actual part numbers and where to buy would help alot.
I ended up just disconnecting *only* the ground wire for the new 2 wire condenser fan switch on the compressor. The new 2 wire high pressure switch seems fine. I'm still not sure why the condenser fan switch on the compressor kept the radiator fan on constantly Everything works fine now, including the fan, which turns on and off with the engine fan switch just like it should and works with the A/C just like it should.
The compressor mounted fan switch is redundant anyway, as the HVAC control head commands the radiator fan ON whenever the A/C is selected.
My A/C has been working fantastic even at near 90* ambient temp. outdoors. It works so well that my wife has insisted I turn it *down* at times, complaining that she's getting too cold!
The sole problem I've had is when the A/C quit unexpectedly, which put me into a panic, but then I discovered that it was an old compressor clutch relay, (next to the fuel pump relay), that had failed. One of the few *old* re-used parts left on my car. I replaced both the compressor relay and the fuel pump relay with new ones and all has been fine since. Enjoying the car a LOT more since summertime cruising doesn't leave me soaked in sweat now.
...
------------------
[This message has been edited by randye (edited 05-12-2010).]
Randye, glad to hear that your a/c refresh project went well, and thanks for all the info and pics. If I am unable to locate the old style switches I am probably going to follow your lead and use the two terminal switches. The radiator fan thing just makes me wonder if removing the ground wire has any effect on the switch.
With summer coming, more a/c threads are starting to pop up. With the new style two terminal pressure switches causing radiator fan problems has anyone found the correct old style one terminal switches? I would like to have new switches that work as expected and not add new problems rather than reuse old ones that might not work at all. Actual part numbers and where to buy would help alot.
This is a great thread that is very helpful to me. My situation is that my A/C was diagnosed with a compressor hsg leak approx 2 yrs ago and the performance has deteriorated slowly since then. It currently cycles constantly and blows cool, not cold air. I plan to install a reman compressor and switch to 134a. I have an 88GT.
The 4 seasons data I pulled up shows availability of the 1 terminal switches, but the photos show a two terminal switch and there is even a pdf that describes connecting the second terminal to ground. If you click the "attributes" tab and "more info" it gives the pressure settings for these switches. I disagree with several posters that claim these are both High pressure switches. The switches in this link match the description I found in the '88 FSM ((pg 1B-4) that indicate one switch is High pressure and the other is low pressure. FSM also says the low pressure switch is used "on some cars".
Randye, glad to hear that your a/c refresh project went well, and thanks for all the info and pics. If I am unable to locate the old style switches I am probably going to follow your lead and use the two terminal switches. The radiator fan thing just makes me wonder if removing the ground wire has any effect on the switch.
Without tearing apart one of the 2-wire switches, I can't confirm it, but I strongly suspect that they do not ground through the compressor like the old 1 terminal switches since cutting the ground worked. Even if the compressor mounted fan switch is inoperative at this point, I'm not terribly concerned about it. As I mentioned, it's redundant in the system and as long as the HVAC control head and the pressure cycling switch on the accumulator are working properly I don't see a problem. Removing the ground wire from the condenser fan cycling switch DID have an effect on the switch....it prevented it from keeping the radiator fan on constantly when the ignition was on. I suppose it's possible I bought a bad switch, but not having tested it before installing it and charging the system, I don't have a good way to do that now without cracking open the system, and I'm NOT going to do that since it's working beautifully now.
Just re-read through my own thread here again, and for completeness I suppose I should mention that after removing and throughly cleaning the evaporator core, (there was a LOT of "goo" in the fins), I did *not* reinstall that silly "water trap" screen that was glued to the inside face of the evaporator. I've had absolutely ZERO moisture or water droplets coming out of the vents with the blower constantly on it's highest setting and condensate water drips out through the drain tube under the car just like it's supposed to. As a huge plus, the A/C in the car smells great too!
To clean the evaporator core fins, I just sprayed it with brake cleaner, (actually "soaked" it), and blew it out with compressed air several times. "Rinse and Repeat" until completely clean... (WEAR GOGGLES if you do this...it WILL spray back in your face when blowing it out with the air hose!)
[This message has been edited by randye (edited 05-13-2010).]
I have a small leak in my A/C system and this thread got me revved up to replace the compressor which is the source of the leak along with Accumulator and Orifice tube. I've been checking around and found Advance Auto has a Factory Air HR6 reman unit with 12 mo warranty for $161 and they;re running 15% off w/ free shipping until 5/19. I ordered these parts and some O-rings for a total of $205. I plan to re-use my pressure switches. A local shop estimated $700 labor with me providing the parts, so it looks like I'll be doing it myself.
I have a small leak in my A/C system and this thread got me revved up to replace the compressor which is the source of the leak along with Accumulator and Orifice tube. I've been checking around and found Advance Auto has a Factory Air HR6 reman unit with 12 mo warranty for $161 and they;re running 15% off w/ free shipping until 5/19. I ordered these parts and some O-rings for a total of $205. I plan to re-use my pressure switches. A local shop estimated $700 labor with me providing the parts, so it looks like I'll be doing it myself.
BRAVO! You will find that the hardest part is removing and replacing the compressors. Flushing all the A/C lines wasn't difficult, just *very* messy. Beyond that, I found the whole "overhaul" to be actually pretty easy. I'm sure others will have plenty of advice for you, but allow me to offer a few tips:
1. DO NOT OVERTIGHTEN the aluminum A/C fittings. The o-rings do all the sealing work, not the fittings. Just "snug" them up once you have the new o-rings installed.
2. Replace ALL the o-rings in the system with the new 134a ones. All of the o-rings are easy to get to, so just do them all, including the ones at the condenser in front of the radiator. Look under the front of the car and you'll see the fittings at the lower right corner of the condenser. The o-rings for the A/C hoses in the engine compartment are right behind the drivers *butt*, down near the frame rail under the air filter housing. There's a single long screw holding the A/C hose block to the fitting. Just remove that screw and pull the hoses loose from the fitting.
3. Add some of the UV dye to your new oil in the A/C system. IF you do have a leak somewhere else, it will make it MUCH easier to find.
4. Seriously consider taking the evaporator core out and throughly cleaning it. There are many years of "gunk" built up in the fins of that thing and cleaning it will make your overhauled A/C system perform MUCH better, plus it will make your A/C *smell* a whole lot better.
5. Unless you know *exactly* what's in the A/C system now, FLUSH ALL THE LINES with a good A/C flush solvent. Just blow it through the lines with compressed air, but be sure you have the ends of the lines covered with old towels or a length of rubber tubing attached to the lines so that it blows *away* from the car and anything else you don't want soaked. Old refrigerant oil, or stop leak, (God forbid), may be in the system and you'll want it completely clean for optimum performance.
[This message has been edited by randye (edited 05-14-2010).]
The white switch is used to turn on the radiator / condenser cooling fan. The switch closes at pressure of 280 psi. Some have made comments that this is not required, as switching on the AC, the fan is switched on through the Heater / AC control. The white switch could just be a safety backup .
Some are wrong... The Fan switch on compressor IS used! Heater/ac Control in AC Bi Vent and Max will use the radiator fan is true BUT Defog does NOT activate the radiator fan. Test it and see. (Any Electrical schematic for heater/ac control should show it too.) AC compressor can activate the rad fan in Defog mode, and can be a backup for Bi Vent and Max mode, in effort to keep pressure from going to high.
------------------ Dr. Ian Malcolm: Yeah, but your scientists were so preoccupied with whether or not they could, they didn't stop to think if they should. (Jurassic Park)
For those who are considering a/c repair, I just ordered an HR6 reman. comp., orfice tube, and accum. for my '86GT. The total was $177. after this discount was applied which included free 3-4 day delivery to my house.
THanks Randye for digging deep for info. Your questions and the help from other members is greatly appreciated. I recently bought a very nice 87gt that has a compressor with a broken switch - think somebody hit it when changing oil?. I haven't had time to take it off. The owner said the compressor needs replacement- don't know yet. The auto has 250000 miles on it. A friend of mine says to fix the switch and put old freon in it. ANy ideas? I think you did great with the cost of coversion to new a/c. Want to thank everyone for their wholehearted efforts to solve problems.
I see now that summer is coming up fast this thread, (and some others), have started to get more attention again. You gotta love how the A/C threads are almost perfectly attuned to the seasons.
------------------
[This message has been edited by randye (edited 10-19-2012).]
Quick question Randye. Did you use solvent on the line with the muffler and blow that out too? I read some people do , some don't. The a/c system in this car had a compressor failure and who knows what else. Would like to flush everything. THanks again for an awesome thread! CORRECTION JUST SAW THAT YOU STATED ALL LINES FLUSHED SORRY!
------------------ FIEROBUG!!!!!!!!!!
[This message has been edited by fierobug (edited 05-09-2011).]
Quick question Randye. Did you use solvent on the line with the muffler and blow that out too? I read some people do , some don't. The a/c system in this car had a compressor failure and who knows what else. Would like to flush everything. THanks again for an awesome thread! CORRECTION JUST SAW THAT YOU STATED ALL LINES FLUSHED SORRY!
Yep.. ALL lines flushed, even the flex lines from the compressor, (and muffler). Just blow plenty of compressed air thru everything to evaporate any remaining flush chemicals.
Hi randye. I am not sure if I need to buy new o-rings for the hr6 compressor. It came with metal colored seal washers that I don't think I need. Did you use just the O-rings and nothing else? Can I use them from the factory air o-ring pack (green ones) or are they specific size to the compressor? They seem fairly heavy duty. I see that your new compressor picture has black ones on it. Please let me know if I'm on the right path. Thanks.
This whole thread is a brilliant guide for anyone overhauling the Fiero a/c system. If Marvin or Randye (or any other expert) is still watching this discussion, I have a couple of (dumb) questions.
The compressor on my 1988 Fiero Formula has seized mainly, I fear, through lack of use. The system is empty. I want to use this as an opportunity to convert from R12 to R134a since R12 is now illegal in the UK. I have managed to source a remanufactured HR6 compressor, and also a new receiver/drier and orifice tube. I plan to get a local a/c workshop to tackle the removal/flushing/replacement task. But as the car is unusual and parts hard to find, I need to supply all the parts.
I don't yet know what two switches are mounted on the old compressor, nor what colour they are, nor what kind of connectors/pigtails they have, as I can't see until the old compressor has been removed. Here's the question. Can whatever switches are fitted in the old, seized, compressor (which I believe is an HR6 as the car is a 1988 model) be transferred and fitted into the new one?
Or - if not - then which of the various replacement switches should I order to go into the new setup? I will need to order them well before we start work on the replacement/conversion, so I need to know what specific parts to get. The 4 Seasons eCatalog at http://www.factoryairtemp.c...Catalog/Content.aspx has at least three different part numbers, and different colour-codes, for each of them. The images for some seem to include pigtails and o-rings as well, while others just show the switch. I have found the following:
35961 - High pressure - 1 terminal - Red 35974 - High pressure - 2 terminals - Blue 35974 (yup, same part no) - High Pressure - 2 terminals - White or Red 35756 - Low Pressure - 1 terminal - White 35970 - Low Pressure - 2 terminals - Black 35973 - Low Pressure - 2 terminals - Blue or Green and also 35969 and/or 35972 - Cooling Fan Pressure switch
So I'm confused. Clearly I only need two switches. Which two? And will I need different/new connectors or pigtails to go with whatever switches I order?
I hope someone can help out. Being in the UK I have to order the parts to be shipped internationally from the US, so I need to get any order right first time - it's not like I can go back to the shop down the street to return something if it's not the correct part!
[This message has been edited by br1anstorm (edited 10-18-2012).]
Hello! You CAN reuse the old switches, if they are still good, and the original connectors are still good. I would HIGHLY recommend replacing them at this point, however, since replacing them in the future would mean evacuating the system in order to do so.
I made a whole thread a while back on compressor switches with part numbers:
Can whatever switches are fitted in the old, seized, compressor (which I believe is an HR6 as the car is a 1988 model) be transferred and fitted into the new one?
Yes ... provided that they are physically intact (i.e. not broken). Just be sure to use new O-rings when you install them in the new compressor. Incidentally, all new O-rings should be lubricated with mineral oil (not PAG or ester oil) before installation, even in an R-134a system.
Thanks Marvin and RWDPLZ for that really useful info. I had already found one of the other threads you linked to... and have now looked at the other one too. Seems that a lot of owners have travelled the same route that I'm now on!
Clearly it makes sense to order in the replacement switches. If the originals are intact and the wiring good, I may re-use them. But I guess I'd better have the correct spare ones in case they are needed.
One other thing puzzles me slightly. If the original switches fitted into the back of the compressor have a single wire/terminal and are grounded through the body of the compressor, and the new switches have 2 terminals and a pigtail...... where and how do you connect the pigtail (and specifically its earth-wire) into the existing wiring loom? Presumably there isn't a snap-in connector. Which implies a bit of messy splicing in a very inaccessible location!
I know this is an old thread, but just re-read it and lots of good info. However I want to reinforce Ogre's point here...it's not wise to omit the compressor high-pressure fan switch. It IS used.
quote
Originally posted by theogre: Some are wrong... The Fan switch on compressor IS used! Heater/ac Control in AC Bi Vent and Max will use the radiator fan is true BUT Defog does NOT activate the radiator fan. Test it and see. (Any Electrical schematic for heater/ac control should show it too.) AC compressor can activate the rad fan in Defog mode, and can be a backup for Bi Vent and Max mode, in effort to keep pressure from going to high.