Ok well ALL the information to do this brake swap is out on the internet somewhere. Bubbajoe has a good majority of the information on his website, but there is ALOT lacking. All of this other lacking material can be found elsewhere, but I'm going to try to compile it all in this one simple thread....
FRONT Standard Duty.. 84-87 Corvette Left -- 10181205 Right -- 10181206
REAR Left -- 10112652 Right -- 10112652 (same part fits left and right)
Rotors Front -- 88 Corvette Fronts WITHOUT heavy duty brakes Rear -- 88 Corvette Rears WITHOUT heavy duty brakes
Master Cylinder 77 to 82 Corvette
Calipers Front -- 1984-1987 Corvette
Rear -- 1988 to 1996 Corvette
Lug Studs Dorman Part # : 610-323 Advance Auto Parts # 98501 (Pik - a - Nut brand)
Banjo Bolts Front - 10x1.0mm Rear - 10x1.0mm
Mounting Bolts (8) 12M 1.75 x 30mm Hex Head Cap Screws (fronts) (8) 12M 1.75 x 20mm Hex Head Cap Screws (rear)
Brake Lines Any replacement lines have been said to work Lines used here were summit part#: "RUS 692110"
[This message has been edited by Jncomutt (edited 02-20-2015).]
Here are the parts after some cleaning and painting...
The front rotors have to be machine down into just the hubs. We brought our old rotors to a machine shop and they cut them down for us in an afternoon and charged $60 for the pair.
All four rotors need to be redrilled for the 5x100 pattern. Although we did this using a front hub as guide, I wouldn't do it again. It is worth the few bucks to pay a machine shop to do it. Our holes fit and they work fine, but for the amount of time and aggravation, its better off to pay someone. If you have a drill press, and/or, more time than money, then can be achieved using a front hub. Simply knock the old studs out, press on the ring created from Bubba's instructions, and position the hub inside the rotor bore. You can then line the corvette lug holes up with the webbing on the hub, and drill the new holes using the hub as a guide. If you're going to paint the rotor centers, I'd recommend doing so after the drilling, ours got a few scuffs here and there that needed to be touched up.
I've designed a marking jig to fit on the Corvette rotor if you wish to mark and drill the rotors yourself.
The rears went fairly straight forward after modifying a few things that bubbajoe Doesn't mention... After removing the wheel, these are the old brakes (Grand Am Swap):
Disassemble the rear caliper / brake line as you normally would. Pull off the rotor and do whatever you want with the old junk. We also chose to upgrade to the SS hoses as well, so we discarded the rubber during diassembly.
You can try your luck with bolts that fit for the rear, but according to this write up, you're going to use the same bolts as the front. You have to Drill the rear spindles and tap them to the same thread as the front. Using the appropriate drill bit, open the hole and use a 12M 1.75 Tap to make new threads.
There is a small 'ear' on the front edge of the spindle that has to be ground down or cut off. It will be obvious when you try to put the rotor on where you have to make this cut.
Place the ring created from Bubba's drawings onto the hub and install the rotor. Using two or so lug nuts, tighten the rotor against the hub. We found that with the larger taper inside our rotors, the supplied drawing ring didn't work. While the ID and OD were perfect, it was too thin to be usable. We had to make a trip back to our machine shop and have him make us new rings that were twice as thick.
Our next step was to bolt the corvette caliper adapter to the mounting bracket machined from bubba's drawings. We had to slightly work the bracket a bit to get everything to line up, so you may have to as well.
You can now position the preassembled assembly onto the spindle. You will need to check for clearances. When we put ours together, we found that the outer edge of the caliper adapter was rubbing against the rotor. We fixed this by installing washers between the spindle and the mounting bracket. We used blue locktite, and tightened everything down once we were satisfied with fitment.
You can now assemble the caliper as you normally would this type of caliper. The sliders get pushed into the caliper adapter already installed, and then the pads are placed on the caliper adapter. You then position the caliper over the pads, tighten it into place using the screws provided into the already installed slider pins. Reinstall the brake line (in this case new DOT SS by russel from summitracing.com), and you're finished with the backs...
[This message has been edited by Jncomutt (edited 02-16-2020).]
After removing the tire, here are the old front brakes:
Remove the caliper as you normally would, disconnect the brake line and put the old stuff somewhere. Pry the dust cover off the hub, remove the cotter pin, release the nut, and pull off the old hub. While you have the front hubs off, its a good idea to buy new inner and outer wheel bearings, as wel as new seals. Pack em up with grease, and put em in the new rotor.
You need to grind the spindle down so that the mounting bracket can sit flush. After thats done, you'll also need to drill out the threads in the spindle so that the bolts can slide through. We chose to also remove the dust shield and cut it down so only the center protective piece was left. You must also cut this to clear the bracket.
You're now ready to install the new hub. With the longer studs pressed in, put the hub on the spindle, put the new outer bearings in, seat them, put the nut on and tap the dust cap into place.
Tap the rings made from Bubba's drawings onto the new hub. You can now install the rotor, and tighen it into place using two or so lug nuts.
You have to drill the threads out of the caliper adapters, and then bolt the adapter to the mounting bracket. Test fit the adapter over the rotor (you have to install it on the front and rotate it into place as Bubba describes). Again, we had issues with the outer edge of the rotor rubbing the caliper adapter so using the same washers as the rear, we spaced the adapter out just enough so everything fit to our liking. We used blue loctite again and snugged it all up.
Assemble the front calipers as you normally would and tighen the brake hose into place.
Onto the Master cylinder...
[This message has been edited by Jncomutt (edited 06-12-2005).]
First you gotta bench bleed the new MC. Follow the instructions that come with the new one and you'll be all set. There are 2 brake lines that come out of the MC which need to be removed and 2 nuts holding it in place to the booster. Pull the old MC off, put the new one in place and tighten it to the booster. (yea yea, its not cleaned out yet)
Now you will find that the brake lines don't match up to the new MC. The 'thin' line could be used on the front if you needed to. Local parts stores didn't stock the larger hose which uses two different sized fittings so we had to make our own. We rented a flare tool, bough some brake tubing, and reused the old fittings from the stock line. We cut and bent it into shape using a tubing bender and tightened it down. Doesn't leak, worked great.
Next step is to bleed the brakes as you normally would and you're all set! Don't forget to break in the new pads as called for by the manufacturer. Good luck, and happy stopping!
Ok well ALL the information to do this brake swap is out on the internet somewhere. Bubbajoe has a good majority of the information on his website, but there is ALOT lacking. All of this other lacking material can be found elsewhere, but I'm going to try to compile it all in this one simple thread....
Thanks for taking the time & effort to put the scatter together into something comprehensive!
All 4 of the rotors are vented stock. The rotors we used were also slotted and cross drilled and cost a slight bit more. You can get a good number of parts from www.rockauto.com at great a price
Heh, forgot about this post.. They're not 4 rears, its 2 fronts and 2 rears. There is a difference in how far the center of the rotor stick up above the rotor surface.
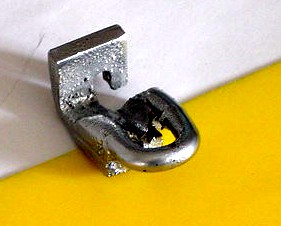
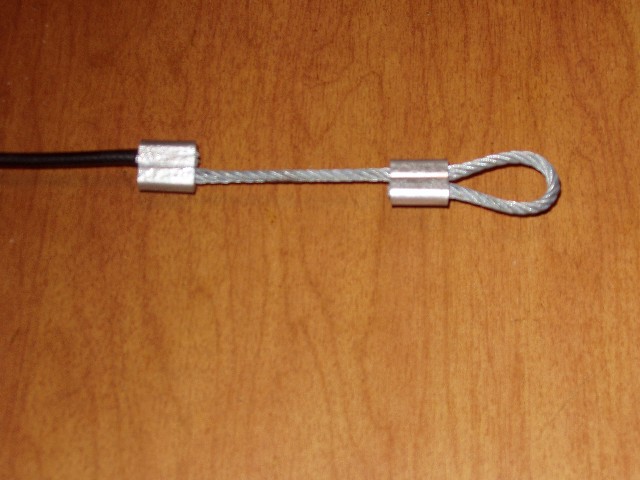
What about the emergency cable for the rear brakes? I would be interested in how this hooks up? Great write up
As Bubba described, he cut the factory 'end' off of the cable, and attached an extra piece of steel cable. You can buy the components for this type of stuff from a local sears hardware store, etc. You can make a loop with the new cable and hook it over the arm on the caliper. Slide the end of the cable into the crimp piece and crush it closed.
I believe J.stricker was able to keep the factory cable end and created a 'loop' from a chain link that the hooked over the arm on the caliper.
Both methods seem as though they would work just as well. The ebrake design isn't the same as the fiero where the harder/further you pull up the harder it clamps on the rotor. The 'vette ebrake only has a specified amount of movement and it stops, the 'tension' isn't quite the same. Basically all you need to do is make the cable so it can pull back on that arm.
[This message has been edited by Jncomutt (edited 06-12-2005).]
Where did you locate the caliper adaptors? Didn't I hear that they were no longer avail from GM?
I bought a set of ebay very cheap. If you can't get them there, others found them at Arts Corvette ( http://www.artscorvetteparts.com ), however they may run a few more bucks from there than on ebay. Push comes to shove, you gotta get em where ya can find em so if you have to pay a few bucks more, atleast you'll get the part. There may be other sources for them as well, just match the bracket to the same year caliper that you're using.
Just to add, I don't know what the difference is between the 85-87 adapter and the 88+ ones. They look to be exactly the same in every size shape and form, except the 85-87 ones say CORVETTE on them...
[This message has been edited by Jncomutt (edited 06-12-2005).]
Excelent write up! I'm almost definitely going to do this once I get my DOHC swap on the road, so it's good to have a comprehensive source of information available. If you don't mind, would you share how much you spent on the brake swap?
We should do a group buy for all the machined parts(adpaters)! Anyone have a connection at a machine shop that can give us a good price? I would buy a set!
We should do a group buy for all the machined parts(adpaters)! Anyone have a connection at a machine shop that can give us a good price? I would buy a set!
I bought my brackets from Sluppy123 here on the forum. I don't know if he is still making them, but he was machining them at his personal shop. He also sold me brackets for the 11.25" swap, which he also might no longer be selling... You can try contacting him for more info....
Just bought a set from Sluppy123 myself, great deal and the parts looks awesome. He told me he has 3 sets left and then it will be a while before he gets more done.
I hope I just didn't miss this but are all 4 of the caliper brackets the same? The fronts didin't show a part number.
Thanks Gary
The rears are different than the fronts. I don't have the exact part number off hand, and so I haven't posted it yet. The parts were ordered directly from Arts Corvette and when I told him what I needed, he knew what I was referring to, and sent the correct parts. I'll admit I've been kinda lazy lately as far as looking this info up. I'll dig it up and besure to come back and edit the original post.
im actually in the process of doing the fronts on my car now as we speak . have been hopeing to find some good pics of the e-brake set-up . i took the specks off of bubba joes site and had a local tech school make the brackets and concentric rings for $100. paid 200 for the calipers with rotors and brackets. got new bearings for $40 , so for all those thinking about doing this you can do the swap cheaper than what has been listed. next get brake pads and drill my rotors and the fronts will be done .
I thought I read where you use all four front rotors????? Is this not true and I need to purchase 2 fronts and 2 rears? I have another thread on this with no good clarifaction.
2 88-96 front rotors 2 88-96 rear rotors 2 84-87 front calipers 2 88-96 rear calipers (i was told by the parts store that 88 rear calipers were only 88) 1 set sluppy brackets
Does this retain the 5x100 pattern? I'm purchasing a set of '99 Camaro 16" wheels and I think they use the 5x114 pattern (4.75") so I want that on the front and back. Is there a write up to convert from 5x100 to 5x114?
When I turn the wheels my brake line bolt hits the shock mount. What do I do? I tried flipping the bracket to change the location of the caliper a little bit, but no help.


.JPG)
.JPG)
.JPG)
.JPG)
.JPG)


.JPG)
.JPG)
.JPG)
.JPG)
.JPG)
.JPG)
.JPG)
.JPG)
.JPG)
.JPG)
.JPG)
.JPG)
.JPG)
.JPG)
.JPG)
.JPG)
.JPG)
.JPG)


 They're not 4 rears, its 2 fronts and 2 rears. There is a difference in how far the center of the rotor stick up above the rotor surface.