1986 automatic GT Original 1986 AC compressor 1987 2.8 V6 engine swapped in
I was able to get my AC going last year and it lasted the whole summer without any problems with the cooling function. In the process, I had them add green dye to the R12. It was showing a leak at the compressor. When I had it re-charged this year, it had only lost a half pound.
Since the re-charge, I could tell the compressor was on its last legs and the mechanic said the same thing. It was getting pretty noisy to the point of being annoying when the windows were down. It has also eaten 4 belts. The first was very old and broke a few minutes after being turned on last year, the second was also older but it lasted all thru the summer. I'm not sure when I finally lost it. I put the third on on a few weeks ago when I noticed the AC wasn't working. I left it too loose and as a result, it burned off very quickly. The fourth one burned off today while going down the interstate.
I could feel the air temp rising as the compressor was dying. Finally, the compressor must have locked up because there was a big puff of smoke from the rear. I've not been under the car but I'm assuming that the smoke was the belt burning off. I switched to VENT at that point and drove a few more miles home without any other problems.
So I'm at a crossroads with parts and services. I have a Formula parts car with AC, that as far as I know, is still a closed system. I assume my system is also still closed unless I lost all my R12 around the shaft when it locked up. Is that what normally happens? I don't know?
My question is, should I bother with the old compressor or should I get a new/reconditioned one that is rated for R134 and do a change-over?
The only reason I'm thinking about the old parts car compressor is that I know my system was fully functioning just hours ago. If I go with R134, I will want to do it completely and correctly which will obviously be more expensive. Of course, trying the old one and failing then doing the conversion would be the MOST expensive way to go about it so there is an obvious degree of gambling involved.
Thoughts?
[This message has been edited by Boostdreamer (edited 06-08-2014).]
If the parts car compressor is known good, replace the shaft seal on it as preventative maintenance, and pop it in. Make sure that system is empty before removing the hoses. Have your tech properly recover the R-12 in the system, replace the accumulator and orifice tube, put the compressor on it, and evacuate and recharge. Also measure and add back in the mineral oil in amount measured from the removed compressor and accumulator.
If the system was running fine on R-12, and you actually have a tech who can service R-12 systems, might as well keep it going without the risk of introducing another non-compatible oil type. The advantage of R-134A of course is the car becomes significantly less expensive to service in the future.
The downsides of the used compressor would be the age of the rubber seals inside, the possibility it's already worn out, and the fact it's a DA6. Best solution in this case would be a brand new compressor, that doesn't come pre-oiled.
Unfortunately, I don't know anything about the parts car compressor other than it's an 88. It did have a belt on so that would indicate that it wasn't seized up prior to being sidelined for other reasons.
the orifice tube goes inline up front by the accumulator. you unbolt the line connection and pull out the old one with needle nose pliers. use new green "O" rings (Oil Them)
hey I was about to ask that...where does the orifice tube go? im doing my ac Tuesday and I need to install it
Behind and below the accumulator, in the line going into the evaporator. On 84's, it's in the evaporator line. 85-88, it's in the really short line just after the high side fitting. For 84's, the special tool makes removal MUCH easier.
Yeah, the orifice tube goes in the silver tube part shown at the top left of RWDPLZ's pic.
I had my R12 sucked out yesterday and went home to install my replacement parts. When I took the old orifice tube out, it was covered with gunk including metal flakes.
Time to back up and re-group. Not going to go back to R12 now. Since I have to flush the lines and components and all that mess, I might as well switch over to R134.
I have a 3800SC to put in at some point. Wouldn't it make sense to use the compressor from THAT engine? It came from the factory with R134 and will obviously work when I do the engine swap.
The question is, will it bolt up to a 2.8 as is? Can I modifiy it in some way to make it work on the 2.8 and still be able to use it on the 3800?
The 3800 has a V5 type compressor. However, unlike the 86-88 Fiero 4 cylinder V5, the 3800 V5 is computer controlled, using a 3-pin switch connected to the high side. Getting this to work in a V6 Fiero would probably be quite difficult. It might be possible to get a Fiero V5 with an R134A control valve to work in a V6 Fiero, but I don't have the electrical diagrams here to see what all would be involved. Probably a lot of rewiring. Then when the 3800 swap is done, the conversion hoses would get the 3-pin switch, and the switches on the back of the V5 would be left unplugged. This would also require the hose assembly from an 86-88 4 cylinder car.
The 3800 has a V5 type compressor. However, unlike the 86-88 Fiero 4 cylinder V5, the 3800 V5 is computer controlled, using a 3-pin switch connected to the high side. Getting this to work in a V6 Fiero would probably be quite difficult. It might be possible to get a Fiero V5 with an R134A control valve to work in a V6 Fiero, but I don't have the electrical diagrams here to see what all would be involved. Probably a lot of rewiring. Then when the 3800 swap is done, the conversion hoses would get the 3-pin switch, and the switches on the back of the V5 would be left unplugged. This would also require the hose assembly from an 86-88 4 cylinder car.
Well, as luck would have it, I just happen to have an '87 Duke with an AC compressor and hose attached!
What would my best option be? I know I have to flush all the lines. Any advantage to changing over to the 4-cylinder hose and compressor? If I do that, wouldn't I still need to modify that hose later to include the pressure sensor for the 3800? That indicates to me that it would be best NOT to use that hose until I do the swap. I plan to mock up my 3800 in another car and then transfer it all over when it is complete.
Should I just stick with 2.8 parts and change to R134 until I do the engine swap?
Yes, perfect time to switch over. It'll make it cheaper and easier to service in the future.
I've looked for compatible accumulators with R134A fitting, the correct inlet and outlet sizes and orientation and another port for the switch, but could never find one. There are good adapter fittings, I posted about them a while back
Low side, Four Seasons part # 59976 High side, Four Seasons part # 59978 valve core removal tool, Four Seasons part # 59302
I found all three items at a Federated Auto Parts store. The Four Seasons website has a page of distributor's logos and Federated is the only one I have in my area that I know of. Cost of the three parts after tax was about $25. They are cheaper on Amazon but still only sold individually at $6-8 each. Search Amazon by part number. I am pressed for time so I bought from my local store.
I had a little trouble with the core tool. It didn't fit the big hi-side valve correctly. It just wouldn't reach deep enough to get a good bite on the valve. I tried several things to get it to work. I drilled the shaft out larger and deeper. I used a cut-off wheel to widen the gap between the "teeth". Then I finally mashed the two teeth together a little bit and it finally went all the way in and grabbed on. Apparently, the inner bore of the valve core tube tapers inward so it was causing a restriction.
[This message has been edited by Boostdreamer (edited 07-13-2014).]
One of the few good things Auto Zone sells is a DVD on AC repair. there's a good segment on flushing lines
Just don't flush the Fiero condenser, it's a parallel flow type.
AutoZone has the flush bottle and hose, a vacuum pump, and gauges available in their Loan-a-tool program. Gonna try to get all that this weekend and see what happens.
O-ring question - When putting the new o-rings in, what should I coat them with? Ester Oil?
Flush question - I'm pretty sure I read NOT to flush the compressor. Does that just apply to POWER FLUSHING? Would it be ok or recommended to drain the old oil out, add a bit of new Ester oil, turn the clutch a few times to cycle the compressor, then drain that last bit of oil out to try to ensure it is as clean as possible and as much of the old oil as possible has been removed?
[This message has been edited by Boostdreamer (edited 07-04-2014).]
I did a search for "flush ac" and found a link to Fiero Warehouse's site. There is a good write-up there with pics.
http://www.ovis.net/~dmkfiero/ It answered my question about coating the o-rings. Yes do it and use Ester oil. Also, this article recommends flushing with denatured alcohol.
I found a recommendation to flush with mineral spirits here:
Do NOT allow A/C flush solution to get into the compressor. It will damage the internal seals. TK posted you can drain the compressor, add new oil, cycle it through by hand by turning the clutch, then draining it out again.
[This message has been edited by Boostdreamer (edited 07-05-2014).]
As far as the flushing procedure goes, I have seen recommendations to flush in the "opposite direction of flow" and also "front to rear". Is either one "wrong"? Both OK?
I have seen recommendations to use Castrol AC flush, Kwik Klean, denatured alcohol, and mineral spirits. I would expect the purpose-made AC flush products are safe to use in the system. I also read that alcohol can damage rubber hoses. I only saw one post about using mineral spirits so what about that? Is it safe to use? Won't harm rubber hoses, o-rings, compresser seals? Won't react with Ester oil in any negative way?
What about using the denatured alcohol or mineral spirits first then follow up with proper flush?
What about the rubber hoses that connect the compressor to the car? Flush or don't flush? Only flush the side without the muffler? Always discard and replace with new?
Is the muffler on the compressor's intake line or it's output line?
AutoZone has the flush bottle and hose, a vacuum pump, and gauges available in their Loan-a-tool program. Gonna try to get all that this weekend and see what happens.
I picked up the tools from AutoZone. The loan-a-tool program works by buying the tools then getting a full refund when you return them. These tools came to a grand total of $368! That's a hell of a hold on my account but at least I will get it back. I can understand how someone with less cash available might need to buy from China Freight, etc.
A little note about the flush bottle. This one has a schrader valve in the lid. This valve has no external threads so there is no way to have a continuous supply of compressed air going to it. You put a few ounces of fluid in the bottle, close the lid, then charge the bottle. You get one good spray then it is empty. Then you have to finish blowing the solvent through with your compressor and the rubber-tipped trigger nozzle that you need to buy.
[This message has been edited by Boostdreamer (edited 07-13-2014).]
I decided to buy mineral spirits instead of denatured alcohol after reading both of their labels. The alcohol is glass cleaner and has been approved as a fuel. Other fuels such as butane can work as a refrigerant but are advised against because of the possibility of fire. I figured the same should apply to denatured alcohol.
The mineral spirits is used to thin paint and clean paint brushes and equipment. That sounds more like the kind of agent that should be used to remove oil. After I flush with the mineral spirits, I'll use the official AC flush solution.
[This message has been edited by Boostdreamer (edited 07-13-2014).]
After more forum searching and reading, I have found more people using mineral spirits with good results. I'm glad I picked it instead of denatured alcohol. In fact, one member posted that he had tried the alcohol and found it to be ineffective and stated that it would not dissolve the old oil in the system. So far, I have not seen a single post advising against using mineral spirits. I also bought AC Pro flush that I will flush with after flushing with the mineral spirits. I want to use the cheap mineral spirits to get the crud out then use the expensive AC Pro flush to flush out any mineral spirits residue and remaining crud, metal flakes, and moisture.
I have also found that while members have repeatedly stated NOT to flush condensors, evaporators, compressers, in-line mufflers, and accumulator/receiver/driers, there are many who have posted that they HAVE flushed the in-line mufflers, condensors and evaporators with success. Everyone agrees that compressors and accumulators cannot be flushed. Everyone agrees that accumulators must be replaced.
My project for today is flushing my AC system. Hopefully, I'll get it all done and vacuumed in time to let it sit over night to be able to determine its ability to hold pressure. If all goes well, I'll have the system charged with R-134a tomorrow by a professional.
[This message has been edited by Boostdreamer (edited 07-06-2014).]
Lunch break! So far, I've gotten all the lines separated from the various components, removed the compressor, and blew compressed air through all the lines and components to ensure they were not super clogged.
I was not able to remove the compressor easily. There were no clear paths to snake it through. I was able to remove the four exhaust springs that are closest to the front of the car. This gave the exhaust system enough wiggle room for me to slide the compressor out beside it. I do not have a full size catalytic converter. There is a fat tube welded in there that looks like a Cherry Bomb but it appears to have been blue when new.
It is time to get something straight once and for all. The evaporator is the small "radiator" that is inside the dash. It is what the interior fan blows the air through which cools the air then it exits through your dashboard vents. The evaporator is a PARALLEL system. This means that the coils inside are configured like a ladder. There are two side paths and multiple "rungs" that connect to both sides. It has been said that a parallel system is difficult if not impossible to flush and any attempt to do so would in fact could be harmful. I cannot verify that. There are plenty of members posting that they DID flush the evaporator. I'm going to attempt to do mine. You'll have to make that call for yourself.
The condensor is the large "radiator" that is mounted in front of your actual engine coolant radiator in the nose of the car. The condensor is a SERIES system. It is one continuous tube that crosses then turns 180* then crosses again multiple times. There should be no problem flushing this component.
My AC mechanic warned me about opening connections that didn't HAVE to be opened (such as those to the condensor). He said that often, those connectors are badly corroded and when you force them open in order to change the o-rings, the threads get ruined and you have to replace components or have them worked on to be corrected. I was leary about mine but after reading so many AC threads, I did not find one instance of anyone posting any difficulty with that problem. I have opened mine and they came apart easily. Perhaps that particular problem is not an issue with Fieros because of the materials that were used. Either way, it doesn't seem to be an issue.
As far as the hose with the muffler on it, I don't see any reason why it couldn't be flushed. One of the tubes connects to the bottom of the "can". It seems to me that if the air were forced from the other end and the tube was held with the end line pointing downward, the flush wouldn't be able to collect in the muffler. Just my thoughts, no research or experience to draw upon. I'm going to flush mine. You'll have to make that decision for yourself.
[This message has been edited by Boostdreamer (edited 07-06-2014).]
I think you have is pretty well correct. Do flush the muffler, evaporator, and the condenser. The good professional A/C flush evaporates fast by blowing air through the parts. I do this often at our shop
[This message has been edited by notwohorns (edited 07-06-2014).]
My AC mechanic warned me about opening connections that didn't HAVE to be opened (such as those to the condensor). He said that often, those connectors are badly corroded and when you force them open in order to change the o-rings, the threads get ruined and you have to replace components or have them worked on to be corrected. I was leary about mine but after reading so many AC threads, I did not find one instance of anyone posting any difficulty with that problem. I have opened mine and they came apart easily. Perhaps that particular problem is not an issue with Fieros because of the materials that were used. Either way, it doesn't seem to be an issue.
I had that happen, had to replace the two hard lines that run under the spare tire tub, and the condenser itself.
It is time to get something straight once and for all.
The condensor is the large "radiator" that is mounted in front of your actual engine coolant radiator in the nose of the car. The condensor is a SERIES system. It is one continuous tube that crosses then turns 180* then crosses again multiple times. There should be no problem flushing this component.
Well, there is a new wrinkle to this information. The condensor's inlet and outlet lines split in two before going into the fins. It appears that it is not a true parallel system nor a true series system. It is a twin-path system for lack of a better (or official) name for it. I can see where all the confusion has come from.
[This message has been edited by Boostdreamer (edited 07-13-2014).]
I had that happen, had to replace the two hard lines that run under the spare tire tub, and the condenser itself.
Ouch! I bet that sucked! I already know that I never want to do this job again. Unfortunately, I may have to. The only local AC guy I trust won't do it. The fact that I'm going to put an old (although rebuilt) compressor won't help my luck any. I prolly should have just bought one. I know I'm going to kick myself sometime but hopefully later than sooner.
As for my progress, I got all the lines and components flushed. Naturally that does not include the compressor nor the accumulator. I swapped out the o-rings at the condenser and re-attached those lines. I coated the o-ring and the threads with Ester oil. My car has an Aero front bumper so I didn't have to remove anything to get to those connections.
I swapped out the o-rings on the orifice tube section and put it back with my new orifice tube. I put Ester oil on the orifice tube o-ring as well as the o-rings at both ends of the tube it sits in. I also put Ester oil on the threads of those fittings.
I did not get the new compressor installed or the hoses that connect it to the car. Since the system would not be closed, I did not install the accumulator. I covered all the open tubes with plastic and rubber banded them on. I'm off again tomorrow for the last day of my big 4-day weekend. I'll have to work more on the AC in the morning. Hopefully, it will be up and running by tomorrow evening so it will be ready to drive to work Tuesday.
Do I remove and discard both the old valve cores from the hi and Lo ports?
Not sure if I was supposed to remove them both but I did and the new R-134a adaptors are on. I hooked up the vacuum pump and ran it for four and a half hours. I'll check the vacuum before bed and again in the morning.
I'm really glad I got the mineral spirits. It was very good at getting the dye out of everything. There must have been a ton of that stuff in there! I also picked up another trick from another thread. Someone posted that the flush could be re-used. Once the flush was mostly clear, I poured the top off leaving the visible debris in the bottom of the pan. Then I wiped the pan out with a paper towel and did it again. I don't know how many times other people flushed their lines but I did mine over and over until there were no black specs or metal flakes. It took a LONG time! There is no way that anyone would have taken the time and effort to do it that thoroughly if I had taken it to a shop.
The gauge was reading 30" Hg while the pump was running. After an hour of being turned off, it was reading 20" Hg. This morning it had not changed from there. Gonna re-check the gauges and run the pump again this evening.
The gauge was reading 30" Hg while the pump was running. After an hour of being turned off, it was reading 20" Hg. This morning it had not changed from there. Gonna re-check the gauges and run the pump again this evening.
Did you close the blue side valve? The pumps can leak when off.
Did you close the blue side valve? The pumps can leak when off.
Mine doesn't have a side valve. I did find out I had been using the gauges wrong. The couplers have valves in addition to the valves near the face of the gauges. All four valves have to be open while pumping. Mine weren't. Looks like I wasted a bunch of time. Starting over.
An article online said to run the pump for 5 minutes, turn it off, and close the hi side valves. The lo side gauge should not change for at least 10 minutes. I did not find this to be a good test. Vacuum can leak through the hoses if the valves are not closed. Instead, I developed a 4 step testing process.
1. Open all 4 valves. Turn on pump. Is the lo-side gauge indicating an increasing vacuum? If yes, run pump for 10 minutes. Close all 4 valves. Turn pump off. Wait 10 minutes. Open all 4 valves and check gauges. Is there a vaccum still showing? If no, you have a leak. If yes, go to step 2.
2. Open all 4 valves. Turn on pump. Is the lo-side gauge indicating an increasing vacuum? If yes, run pump for 30 minutes. Close all 4 valves. Turn pump off. Wait 30 minutes. Open all 4 valves and check gauges. Is there a vaccum still showing? If no, you have a leak. If yes, go to step 3.
3. Open all 4 valves. Turn on pump. Is the lo-side gauge indicating an increasing vacuum? If yes, run pump for 4 hours. Close all 4 valves. Turn pump off. Wait 4 hours. Open all 4 valves and check gauges. Is there a vaccum still showing? If no, you have a leak.
4. You may choose to do an even longer cycle if you wish. The reason for the step increases is to not only check for leaks but to prevent the system from freezing inside. That problem was mentioned while reading other's experiences.
[This message has been edited by Boostdreamer (edited 07-13-2014).]
If you are just doing a preliminary check those times are OK but consider doing a far longer pump down and hold check. 29" of vac is one thing but 400 psi of pressure is another. And you can have a slow leak that 10 minutes will never find. I pump for four hours and check for four hours. Since I'm not doing it as a business I have the time.
If you are just doing a preliminary check those times are OK but consider doing a far longer pump down and hold check. 29" of vac is one thing but 400 psi of pressure is another. And you can have a slow leak that 10 minutes will never find. I pump for four hours and check for four hours. Since I'm not doing it as a business I have the time.
Just a suggestion.
My short tests were definately preliminary checks. No need to run a pump for 4 hours on a system that isn't properly closed. That time would be better spent finding the leak.
[This message has been edited by Boostdreamer (edited 07-13-2014).]
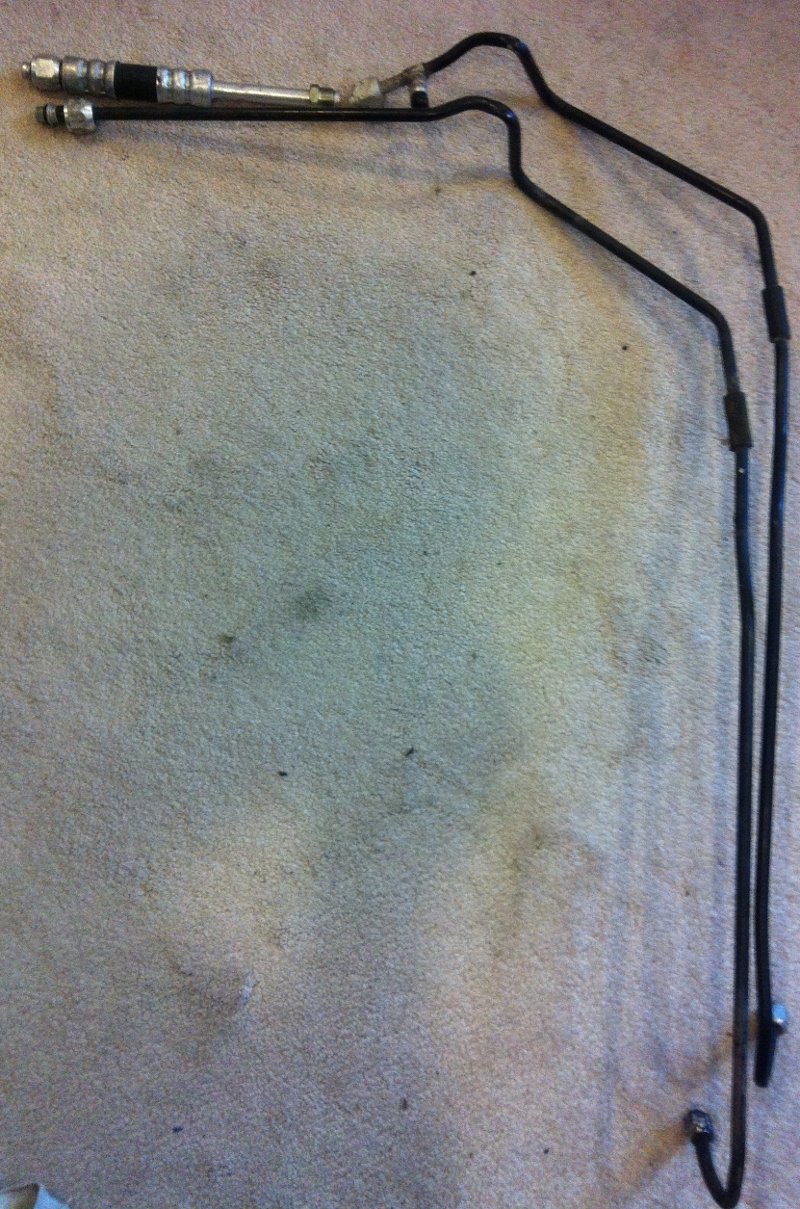
After additional reading, I discovered an extra fitting existed between the spare tire tub and the steering column. I don't know if that fitting is servicable from under the car with the spare tire tub in place but I doubt it. I took the tub out to get to it and opened it up. I'm glad I did, it was the second fitting that felt loose. It has a fat o-ring. I didn't have another green o-ring to match it so I had to run to the store again! I put it all back together and started the vacuum pump process all over again. Everything looks fine.
To get the tub out, there are several 7mm screws and several black plastic "Christmas tree" rivets that have to be popped out. Also, there is a brake line attached to the under-side of the tub. It is attached to the tub with two plastic rivets. You must pop those off from underneath.
The fitting as seen from the top with the spare tire tub removed:
[This message has been edited by Boostdreamer (edited 07-13-2014).]
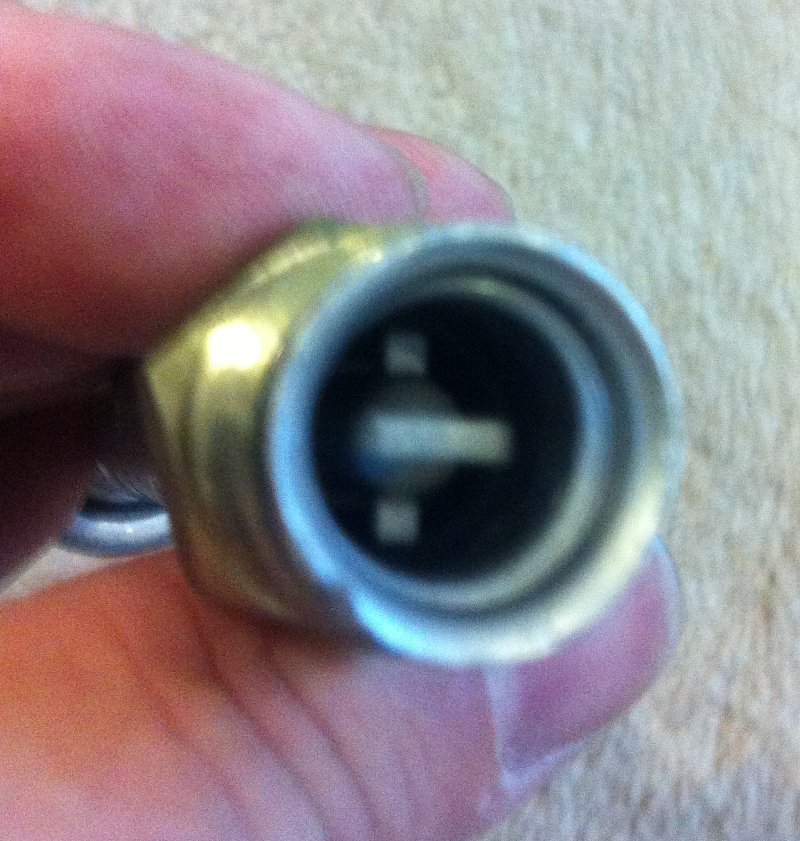
Just to keep all the important information in one thread, the switch that screws into the receiver/drier has a screw between the electrical contact blades. This screw is an adjustment screw that is used to change the shut-off pressure. With R-12, that pressure is 25 PSI. After you change it over to R-134a, the new pressure should be 21 PSI. To make this change, turn the screw just slightly less than one quarter turn counter-clockwise. You will have to run your AC and watch your gauges to get it set perfectly. The reason the switch needs to be changed is because of the difference in the characteristics of the two refrigerants. Many people report that their AC isn't as cold as it once was with R-12. Perhaps they did not adjust their switch? If you want it to be as cold as it can be, you have to adjust it to 21 PSI.
The switch with the screw showing between the blades:
The switch shown in the correct position on the accumulator/receiver/drier:
The switch shown with the wiring harness connected:
[This message has been edited by Boostdreamer (edited 07-13-2014).]
You need 80-90% by weight of the R-12 charge. The R-12 capacity was 2.50 lbs or 42 ounces. 80% gives you 2.0 lbs or 34 ounces of R-134a. 90% of 2.50 gives you 2.25 lbs or 38 ounces of R-134a.
I found a formula for R-12 to R-134a conversions: [(R-12 lbs) x (0.90)]-(0.25 lbs)=R-134a charge in lbs.
I also found a recommendation for 85% of the R-12 so that would put us in the middle of the scale at 2.125 lbs.
There are charts available that show what the pressures and temps are in relation to ambient temperatures. I don't really know how to use that chart to my advantage but I'm guessing they have been made to help in some way! I'm hoping my AC man knows how to dial everything in correctly.


.jpg)
.jpg)
.jpg)
.jpg)
_(307x242)_1.jpg)
.jpg)
.jpg)
.jpg)
.jpg)
 I'm hoping my AC man knows how to dial everything in correctly.


