Pennock's Fiero Forum
  General Fiero Chat
  3d Printed Fiero Center Console Skeleton (Page 1)

Post New Topic  Post A Reply
Email This Page to Someone! | Printable Version

This topic is 2 pages long:  1   2 
Previous Page | Next Page
next newest topic | next oldest topic
3d Printed Fiero Center Console Skeleton by windex42
Started on: 12-27-2019 02:45 AM
Replies: 47 (2925 views)
Last post by: mmeyer86gt/gtp on 11-15-2022 11:47 AM
windex42
Member
Posts: 34
From: Kapolei, HI
Registered: Dec 2019


Feedback score: N/A
Leave feedback

Rate this member

Report this Post12-27-2019 02:45 AM Click Here to See the Profile for windex42Send a Private Message to windex42Edit/Delete MessageReply w/QuoteDirect Link to This Post
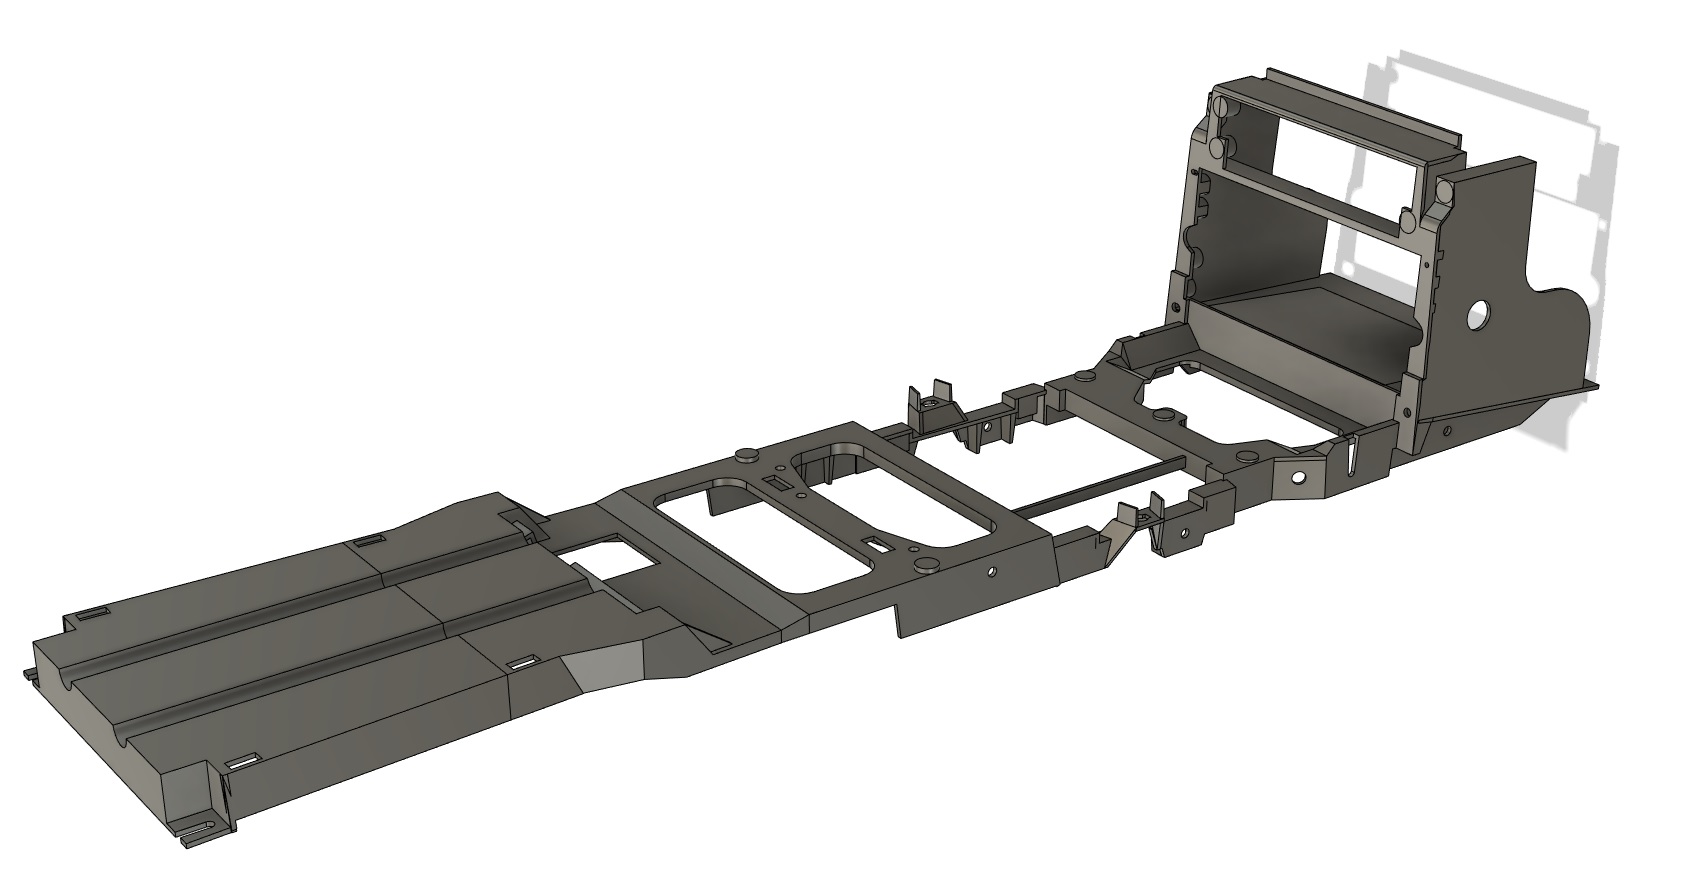
Has anyone had trouble with the Radio/HVAC/Center Console skeleton falling apart?
I've re-created it in CAD, and I made the plans available for 3d printing.
I haven't considered selling a fully printed version yet, but I'm hoping a few of you can try printing your own and let me know how it goes.
You can find all the files you need on Thingiverse
https://www.thingiverse.com/thing:4066829


I'm about 3/4 of the way finished printing it myself, and so far, it's coming out VERY nice.

-==-
Nick
IP: Logged
PFF
System Bot
Cliff Pennock
Administrator
Posts: 11609
From: Zandvoort, The Netherlands
Registered: Jan 99


Feedback score: (2)
Leave feedback


Total ratings: 699
Rate this member

Report this Post12-27-2019 03:24 AM Click Here to See the Profile for Cliff PennockClick Here to visit Cliff Pennock's HomePageSend a Private Message to Cliff PennockEdit/Delete MessageReply w/QuoteDirect Link to This Post
Looks fantastic!

Which 3D printer are you using? I don't think my Cube 3D would be able to print that. 😁
IP: Logged
fierofool
Member
Posts: 12811
From: Auburn, Georgia USA
Registered: Jan 2002


Feedback score:    (13)
Leave feedback


Total ratings: 154
Rate this member

Report this Post12-27-2019 09:15 AM Click Here to See the Profile for fierofoolClick Here to visit fierofool's HomePageSend a Private Message to fierofoolEdit/Delete MessageReply w/QuoteDirect Link to This Post
If the skeleton was disassembled into its 3 pieces and digitized, it might be easier to print. Then the only pieces one would need to produce are the ones that are damaged. Also, the smaller pieces would be accommodated by smaller printers.

I'm guessing that your files were scanned from a complete skeleton, so it may be that some of the fastener holes would be missing and the 3 pieces would be bonded into one piece? I know nothing about 3D printing, so this may be a stupid statement and question.
IP: Logged
mmeyer86gt/gtp
Member
Posts: 3853
From: galt, ca
Registered: Sep 2001


Feedback score:    (161)
Leave feedback


Total ratings: 73
Rate this member

Report this Post12-27-2019 04:23 PM Click Here to See the Profile for mmeyer86gt/gtpSend a Private Message to mmeyer86gt/gtpEdit/Delete MessageReply w/QuoteDirect Link to This Post
i have a printer setup to print this but my biggest area is 16" so it would need to be cut into 3 versions. do you have the obj or other files not the stl files you cannot easily cut up a stl file.
IP: Logged
FieroJimmy
Member
Posts: 737
From: Mechanicsburg, PA
Registered: May 2002


Feedback score: (3)
Leave feedback

Rate this member

Report this Post12-27-2019 06:24 PM Click Here to See the Profile for FieroJimmySend a Private Message to FieroJimmyEdit/Delete MessageReply w/QuoteDirect Link to This Post
That looks great, good job. This might actually be the thing that pushes me to get a 3d printer...
IP: Logged
windex42
Member
Posts: 34
From: Kapolei, HI
Registered: Dec 2019


Feedback score: N/A
Leave feedback

Rate this member

Report this Post12-27-2019 08:40 PM Click Here to See the Profile for windex42Send a Private Message to windex42Edit/Delete MessageReply w/QuoteDirect Link to This Post
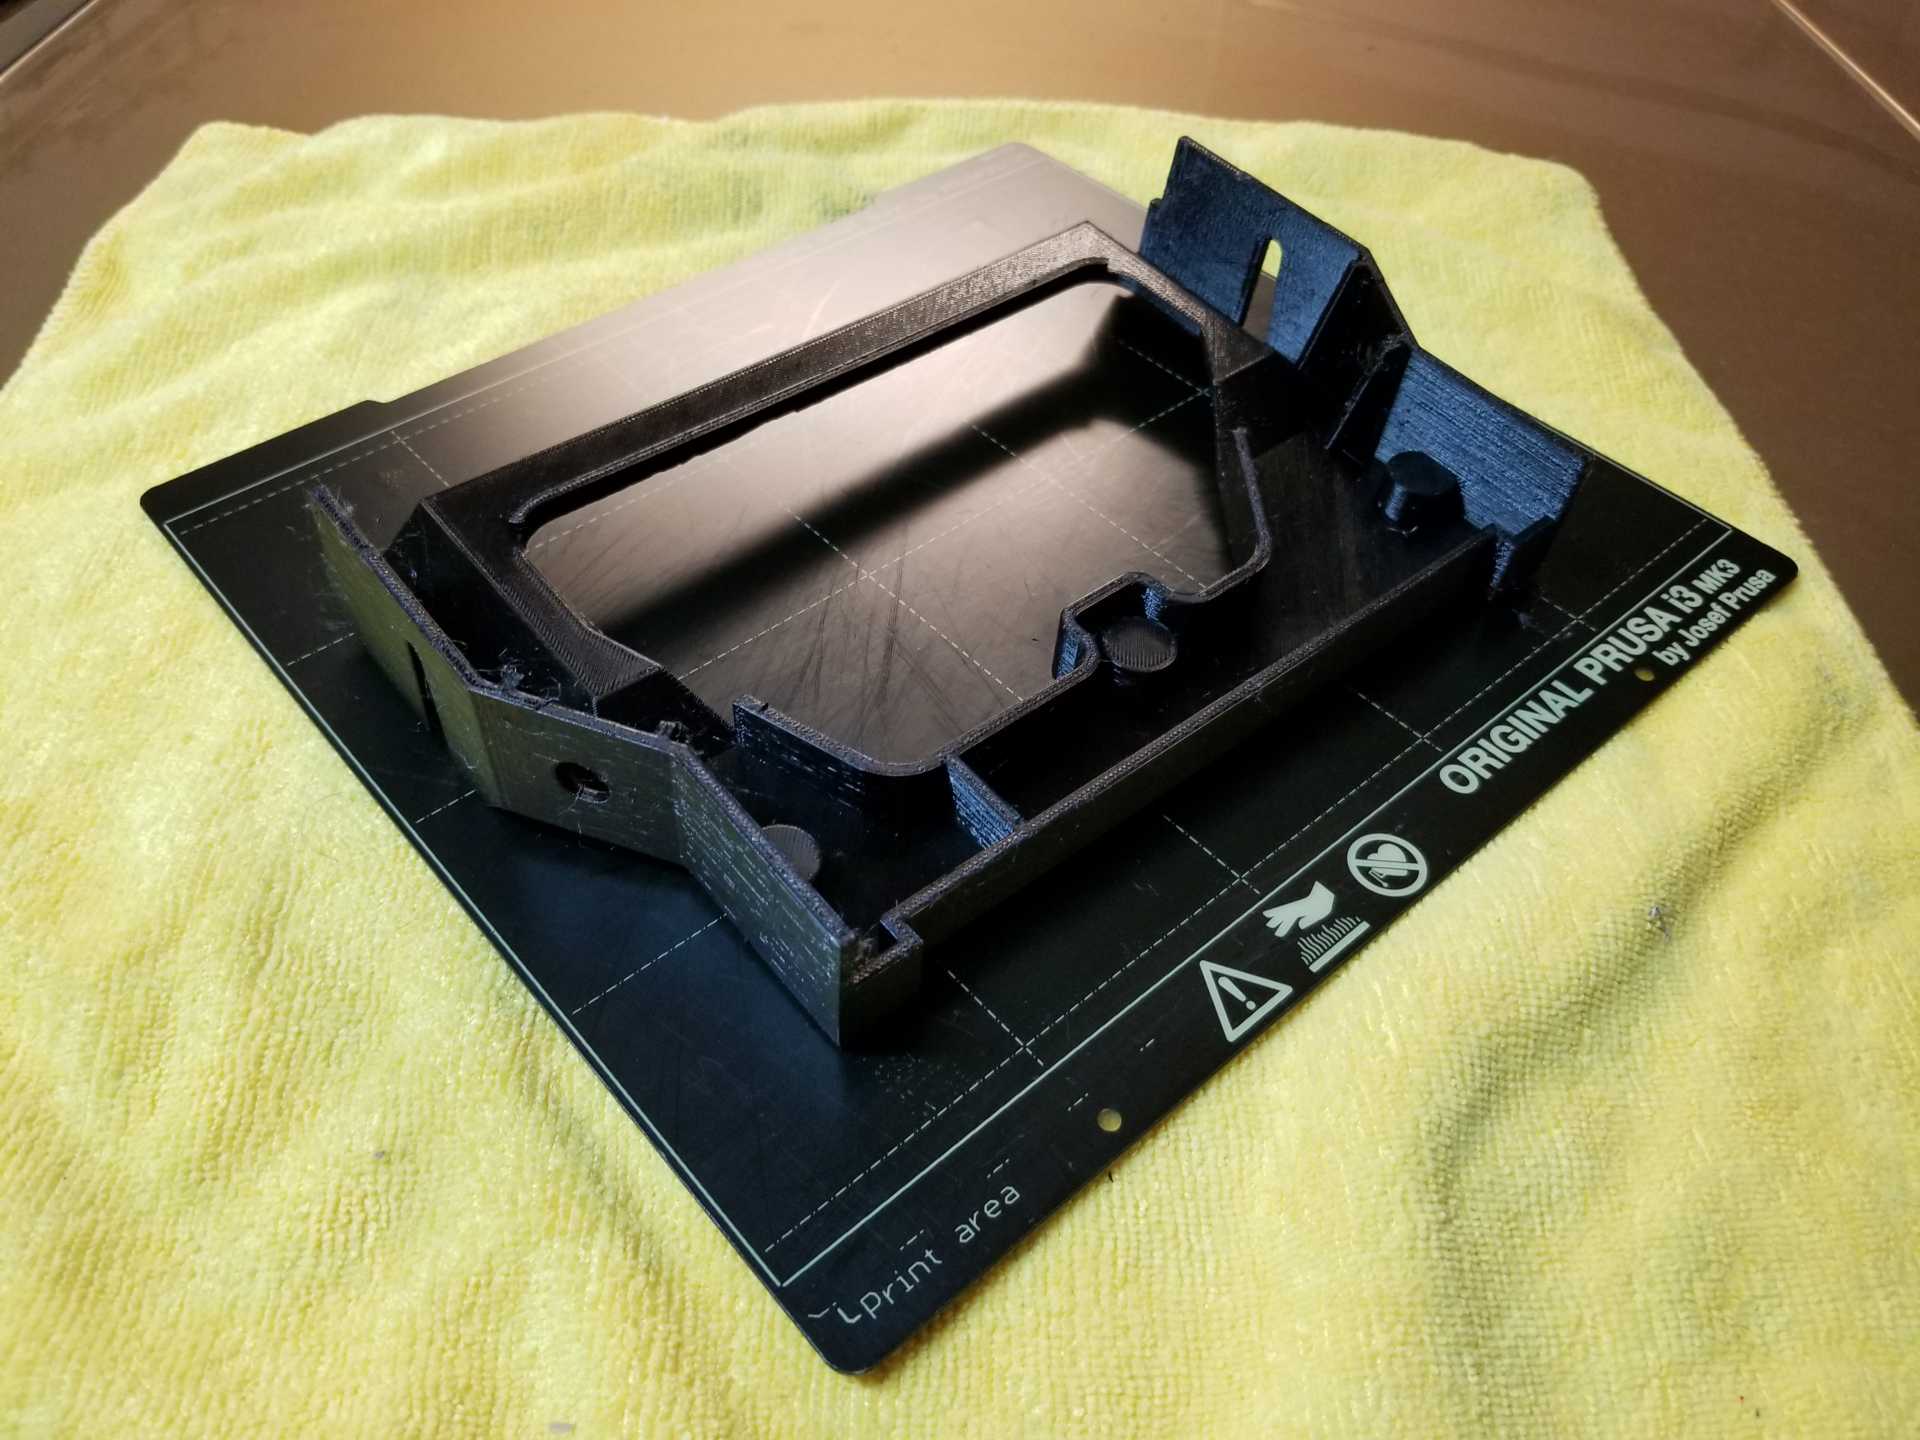
I printed this on a prusa i3 printer. It is about 9 x 8. The cube printer is a lot smaller, I can't imagine how many pieces you would have to break it into. A 16" printer would be amazing! Thingiverse has my STLs, if you want to edit obj files, you will have to do it through Fusion360. Theres a link to my project on thingiverse. That should give you what you need.
IP: Logged
IMSA GT
Member
Posts: 10268
From: California
Registered: Aug 2007


Feedback score:    (8)
Leave feedback


Total ratings: 251
Rate this member

Report this Post12-27-2019 11:37 PM Click Here to See the Profile for IMSA GTSend a Private Message to IMSA GTEdit/Delete MessageReply w/QuoteDirect Link to This Post
You just joined this month, this is your first thread with your only posts so far.....and you came in here with a BANG!!

Welcome to the forum and thank you for doing this project. It has been a plague for almost every Fiero owner.
IP: Logged
420ponies
Member
Posts: 69
From: Corning N.Y.
Registered: Jun 2012


Feedback score: N/A
Leave feedback

Rate this member

Report this Post12-29-2019 02:10 AM Click Here to See the Profile for 420poniesSend a Private Message to 420poniesEdit/Delete MessageReply w/QuoteDirect Link to This Post
[b][/b] Now that is Sweet!! Sign me up for one if they start production.
IP: Logged
88Fingers
Member
Posts: 208
From: Burlington Ontario Canada
Registered: Sep 2018


Feedback score: N/A
Leave feedback

Rate this member

Report this Post12-29-2019 06:49 AM Click Here to See the Profile for 88FingersSend a Private Message to 88FingersEdit/Delete MessageReply w/QuoteDirect Link to This Post
Hello Windex42, next, could you please design and 3d print a lower intake manifold for 2.8-3.4 V6s that will adapt the aluminum heads to the Fiero Middle Intake Manifold? Thank you. This will be a very desirable part.
IP: Logged
windex42
Member
Posts: 34
From: Kapolei, HI
Registered: Dec 2019


Feedback score: N/A
Leave feedback

Rate this member

Report this Post12-29-2019 02:31 PM Click Here to See the Profile for windex42Send a Private Message to windex42Edit/Delete MessageReply w/QuoteDirect Link to This Post
88Fingers,
You would probably want a part like that made out of Aluminum. Someone may have already created what you're looking for. Check this link on Thingiverse
https://www.thingiverse.com/thing:1098194/comments
If I every have mine apart, I can take a look at it though.
I also like the idea of keeping these separate rather than gluing them, but I can't think of a way to screw them all together.

Also, I'm printing the final piece right now, I'll throw up some photos later today.

-==-
Nick
IP: Logged
88Fingers
Member
Posts: 208
From: Burlington Ontario Canada
Registered: Sep 2018


Feedback score: N/A
Leave feedback

Rate this member

Report this Post12-29-2019 08:58 PM Click Here to See the Profile for 88FingersSend a Private Message to 88FingersEdit/Delete MessageReply w/QuoteDirect Link to This Post
Hello Windex42, thank you for the response. I looked at the spacer you referenced. Nice but not the lower intake. There are factory composite intake manifolds done all the time and phenolic material as well I believe. I know this would not be easy but a great part to allow for a nice performance build and weight reduction while keeping the stock look. Thank you for looking into this.....Fred W
IP: Logged
PFF
System Bot
cvxjet
Member
Posts: 3649
From: ca, usa
Registered: May 2010


Feedback score: (1)
Leave feedback

Rate this member

Report this Post12-30-2019 12:56 AM Click Here to See the Profile for cvxjetSend a Private Message to cvxjetEdit/Delete MessageReply w/QuoteDirect Link to This Post
I always thought it would be a great thing to have a lower manifold that would go between the upper Fiero manifold and the aluminum splayed-valve heads.......I am surprised that noone ever did that.

How about maybe the three console parts having holes + tabs for screws to bolt them together.......

If the console is made, can they be made out of something more durable than the plastic GM used originally?
IP: Logged
windex42
Member
Posts: 34
From: Kapolei, HI
Registered: Dec 2019


Feedback score: N/A
Leave feedback

Rate this member

Report this Post12-30-2019 04:09 AM Click Here to See the Profile for windex42Send a Private Message to windex42Edit/Delete MessageReply w/QuoteDirect Link to This Post
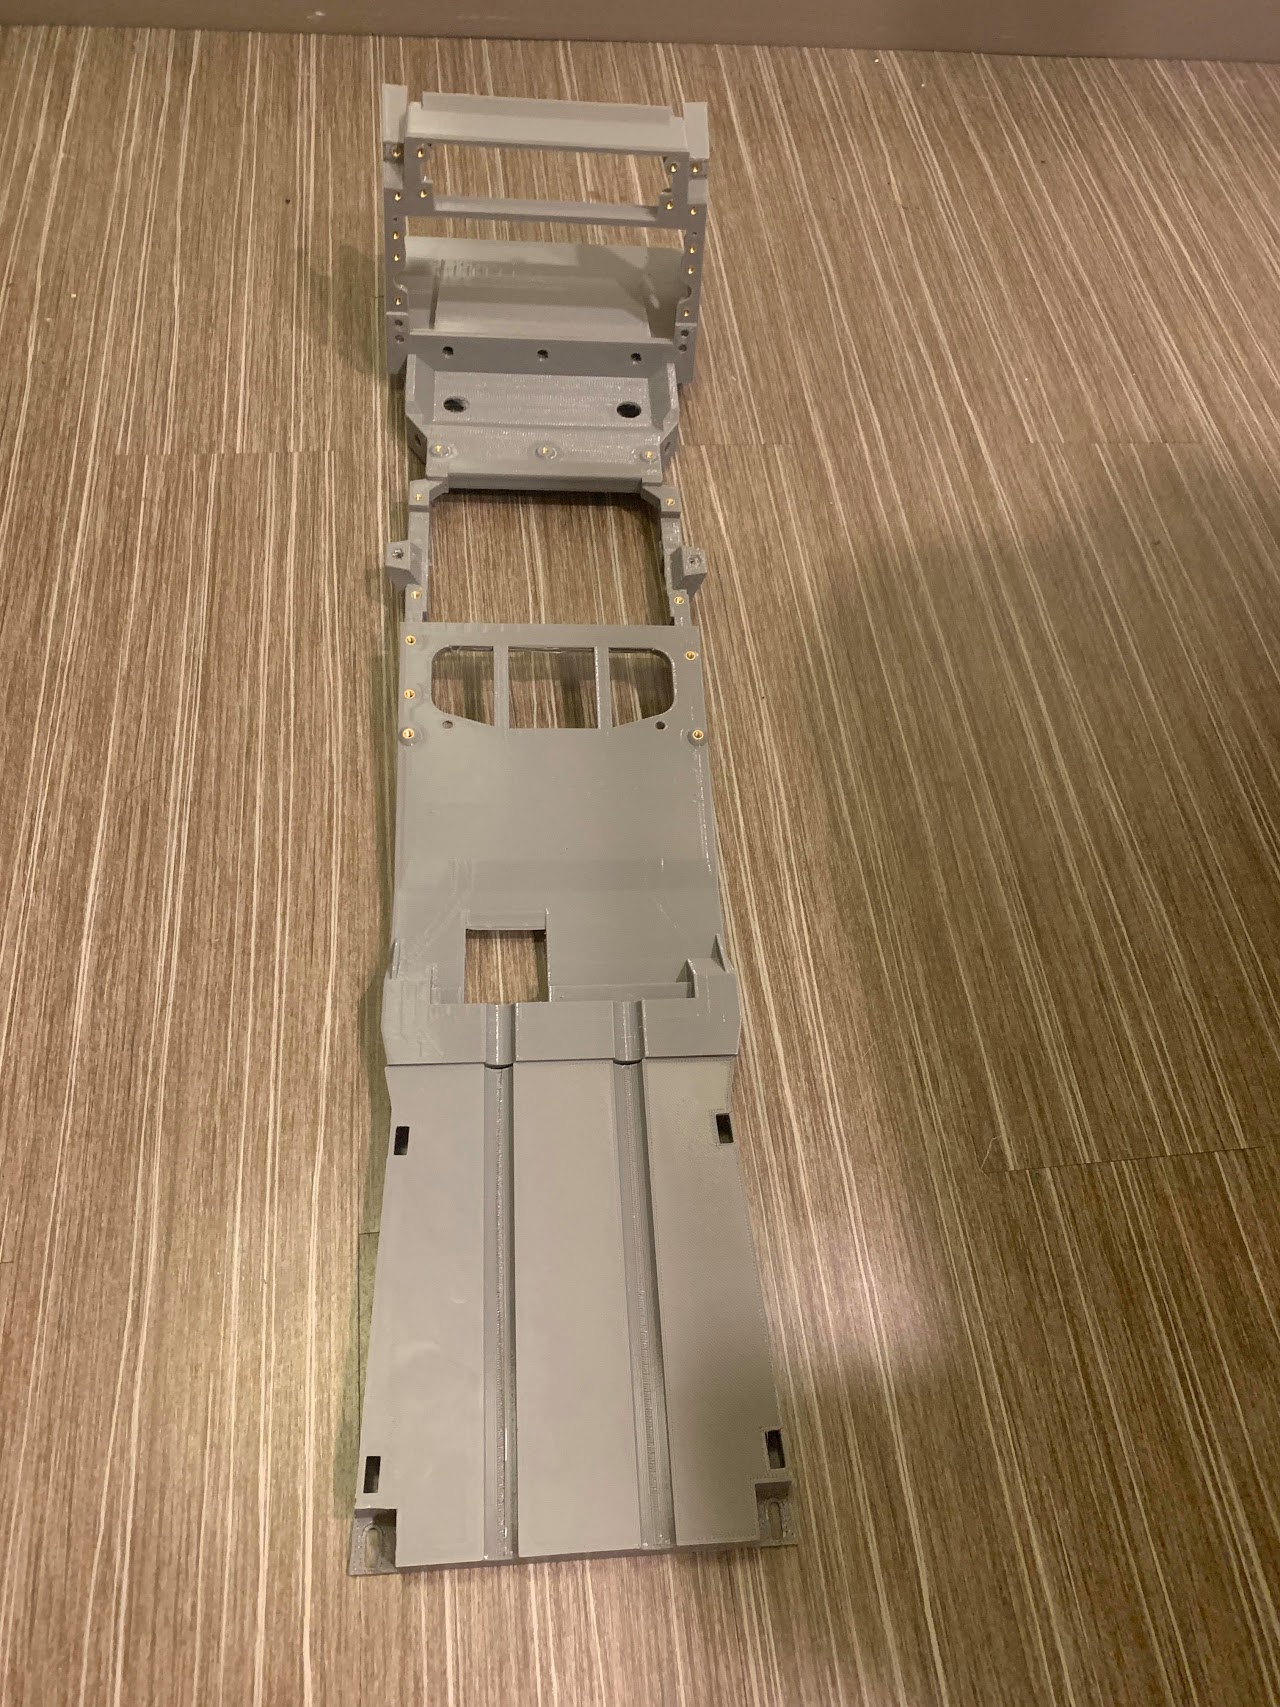
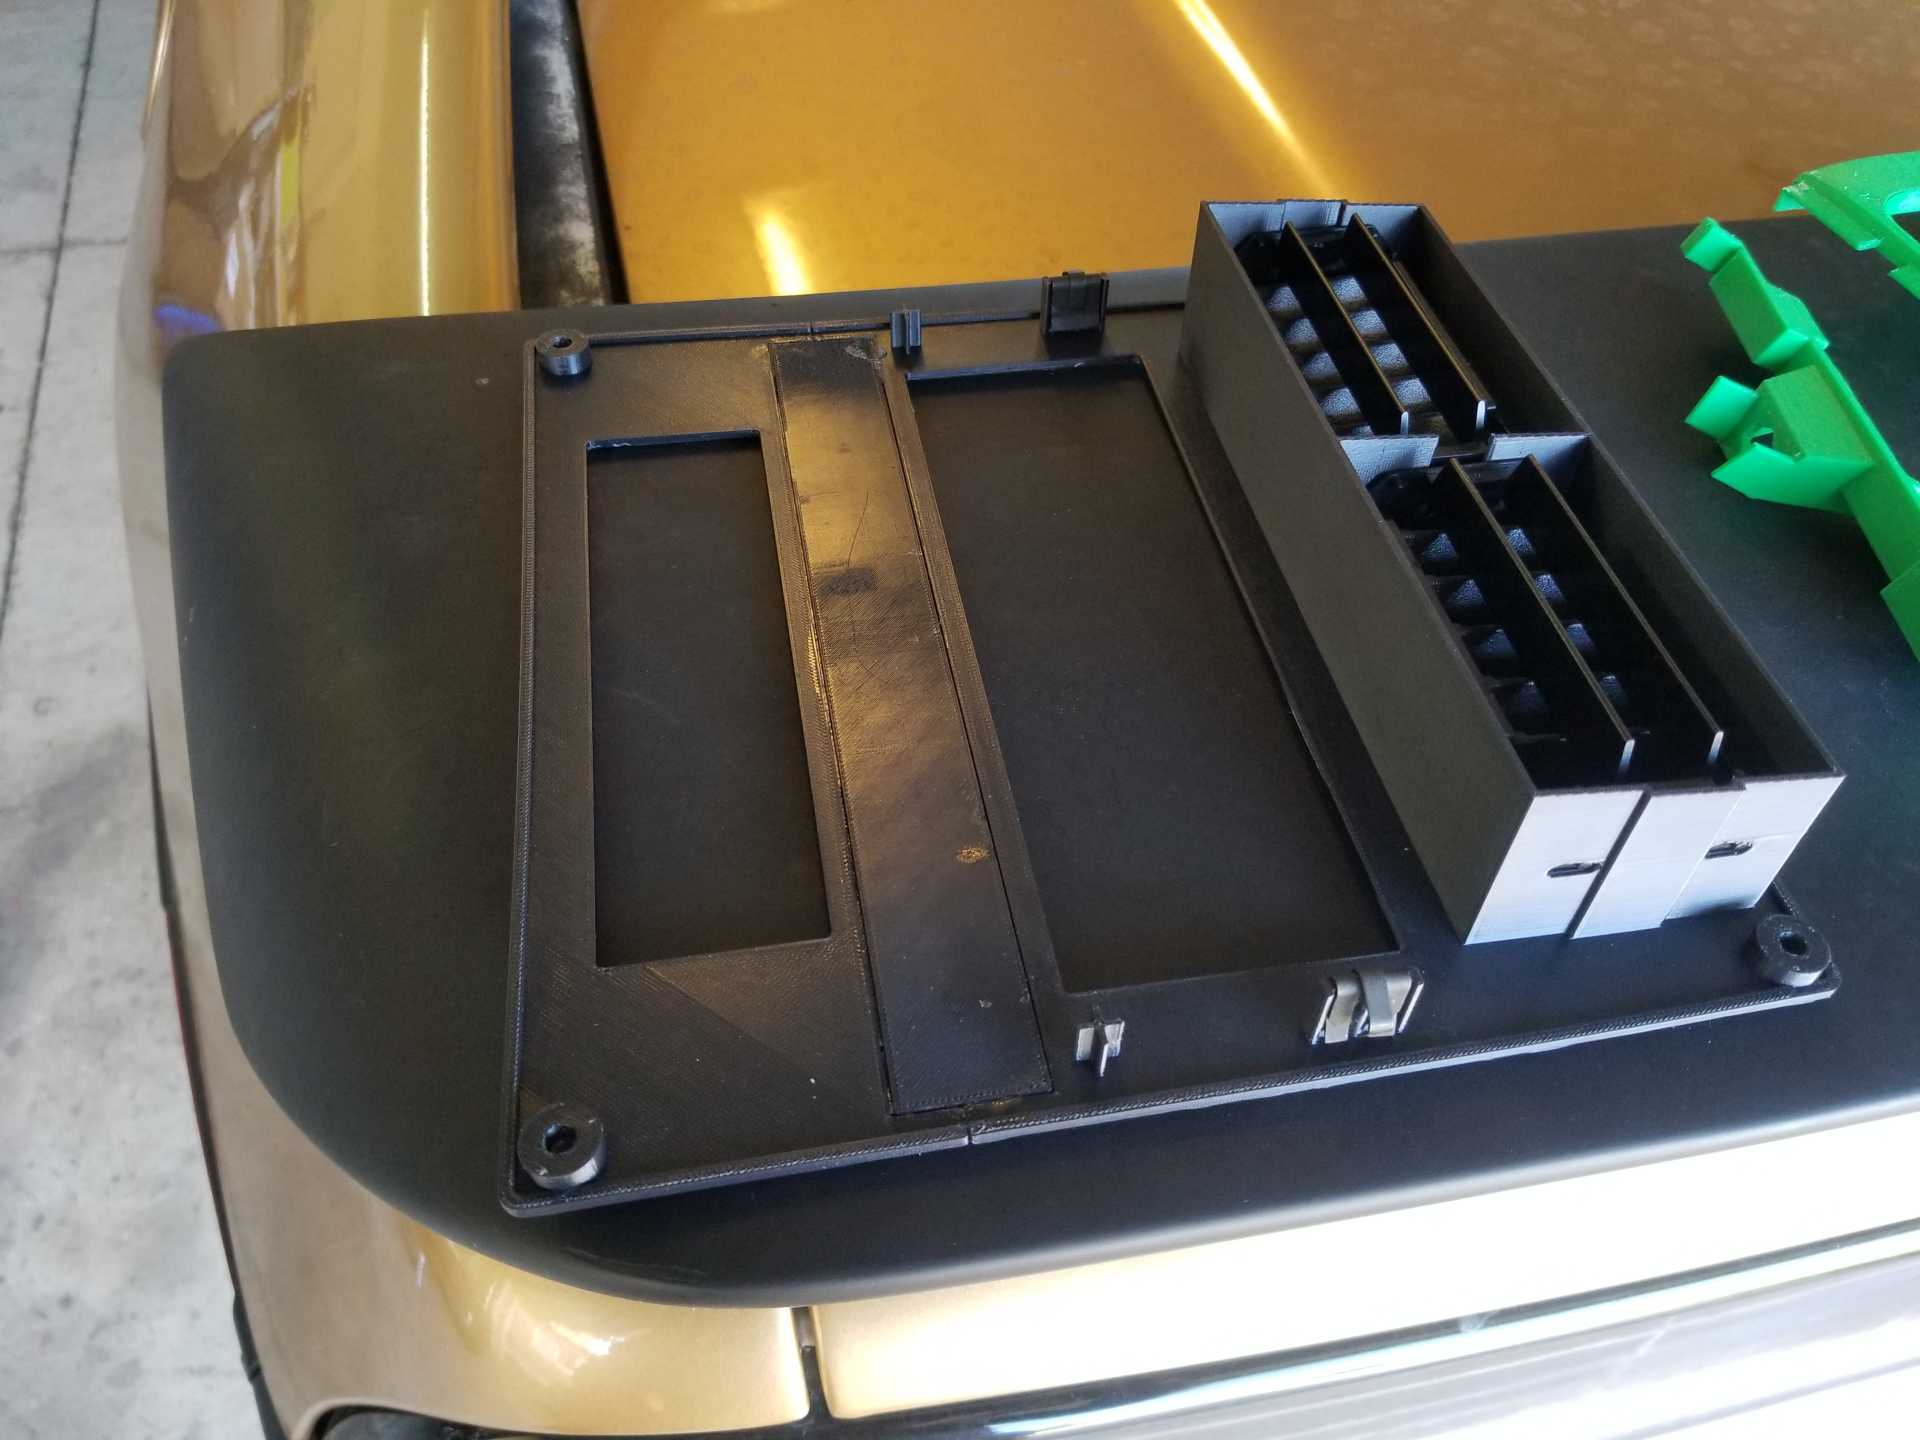
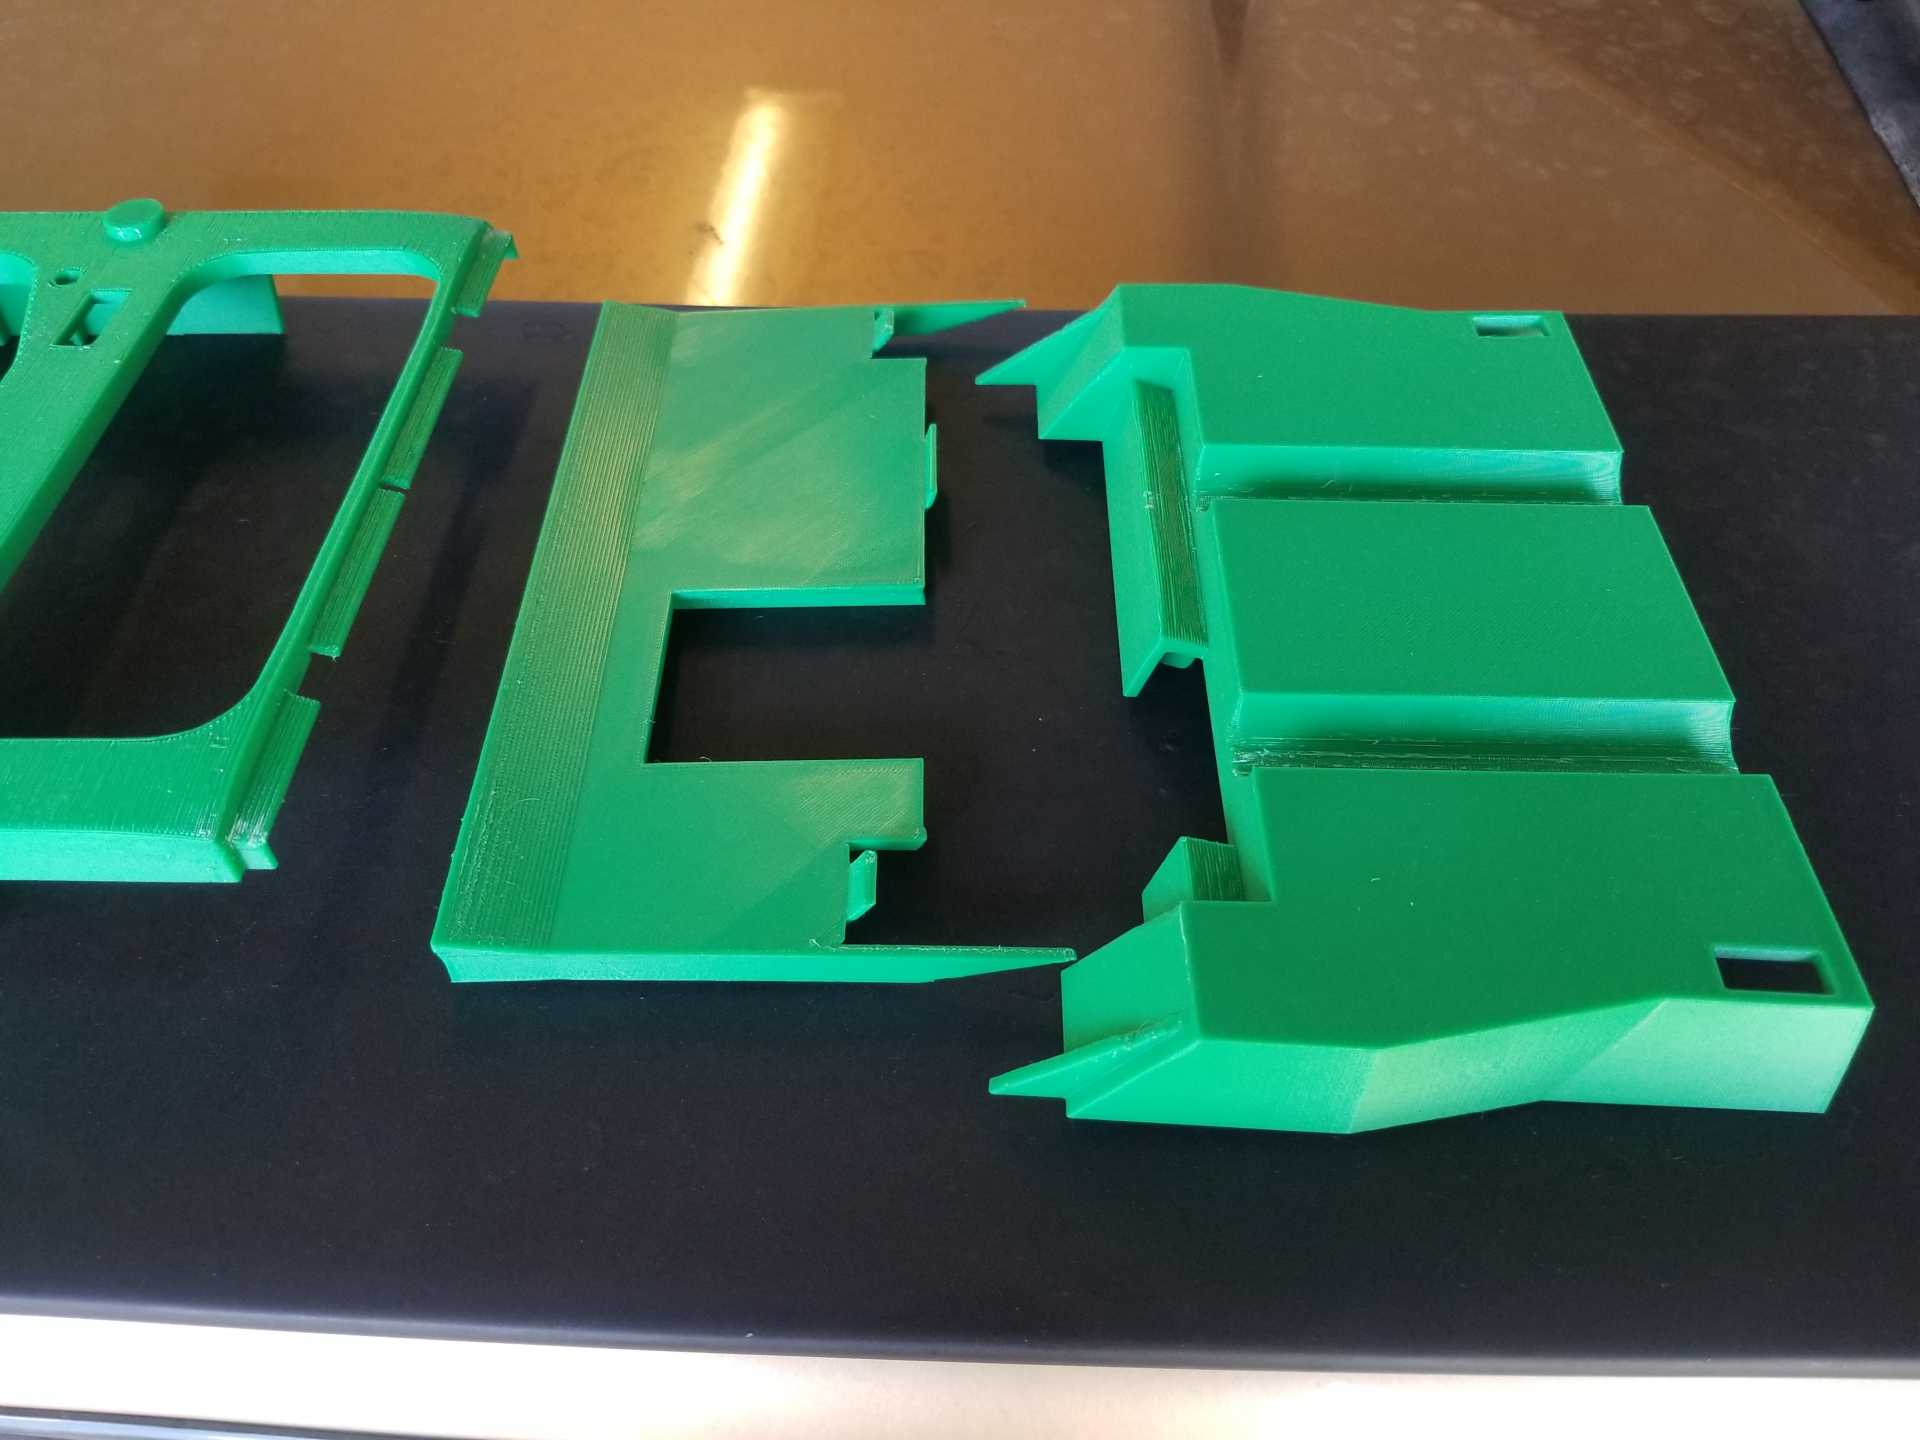
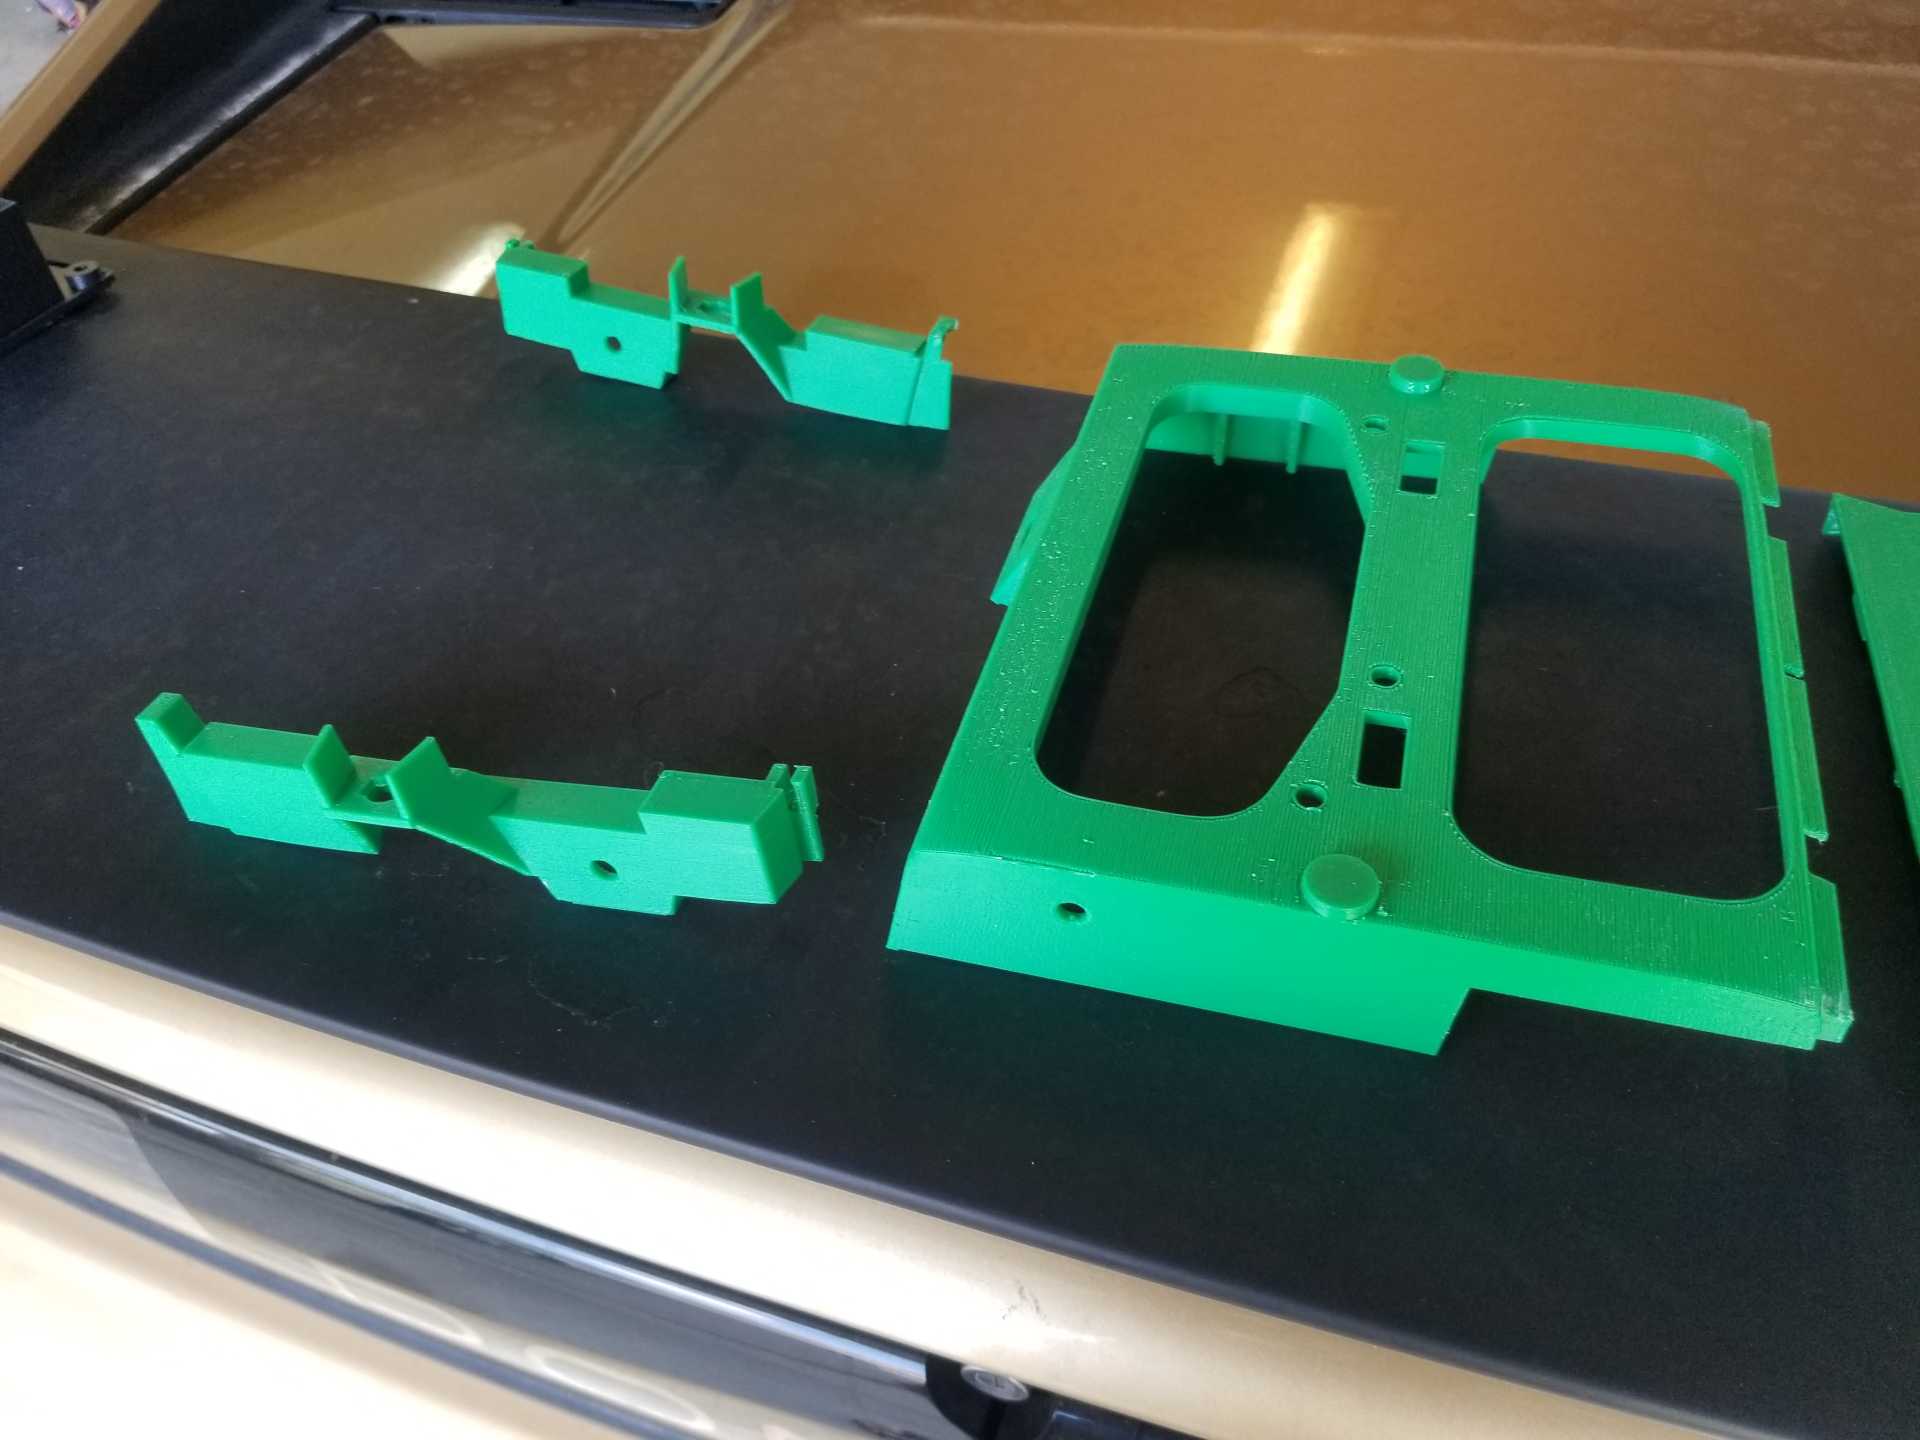
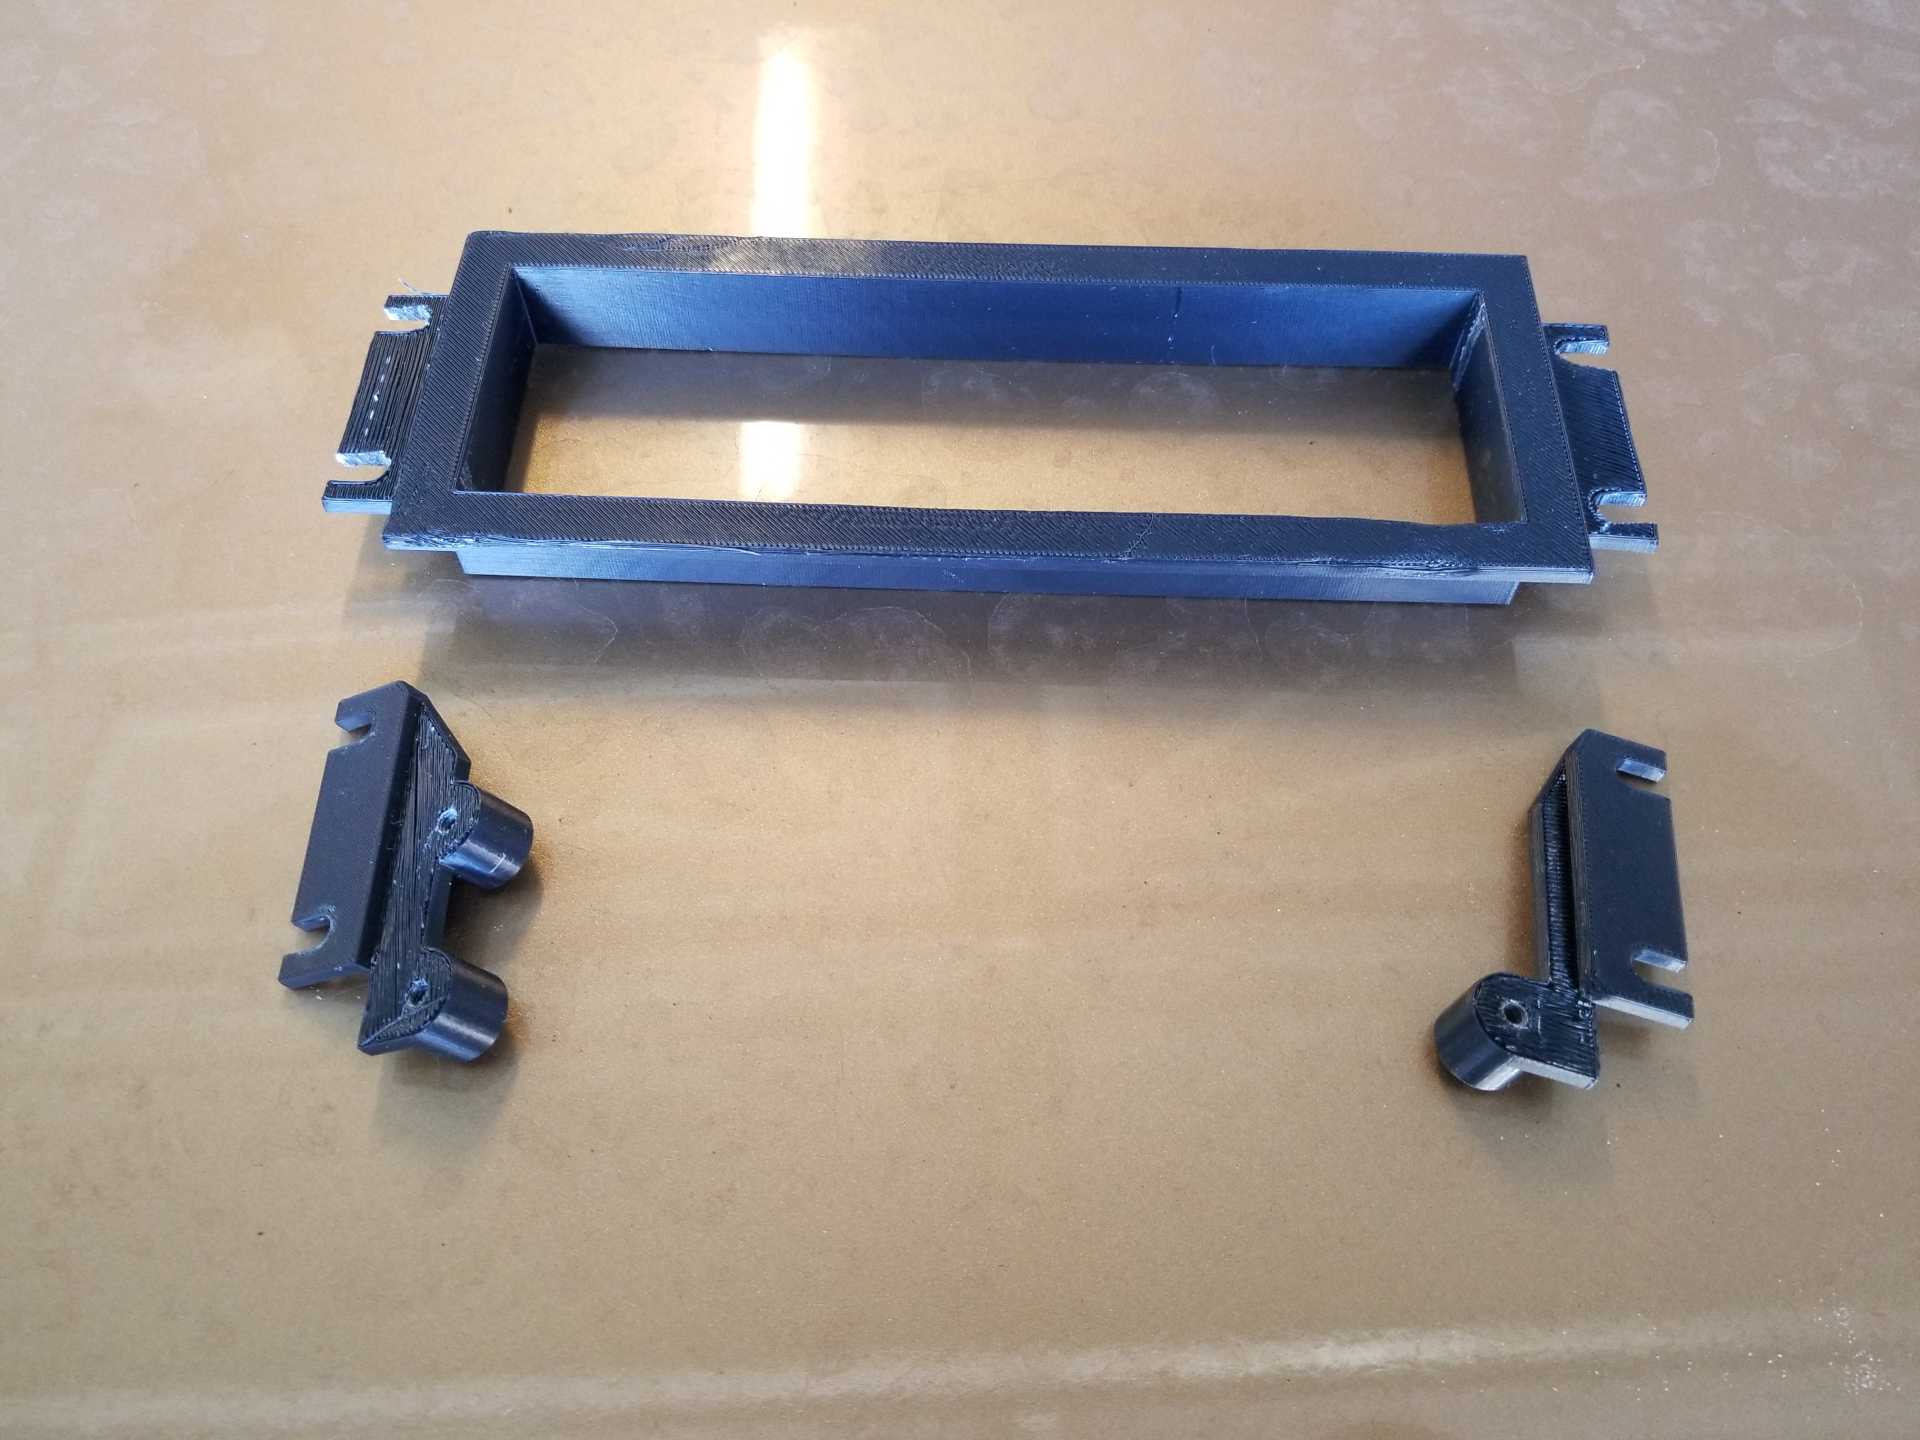
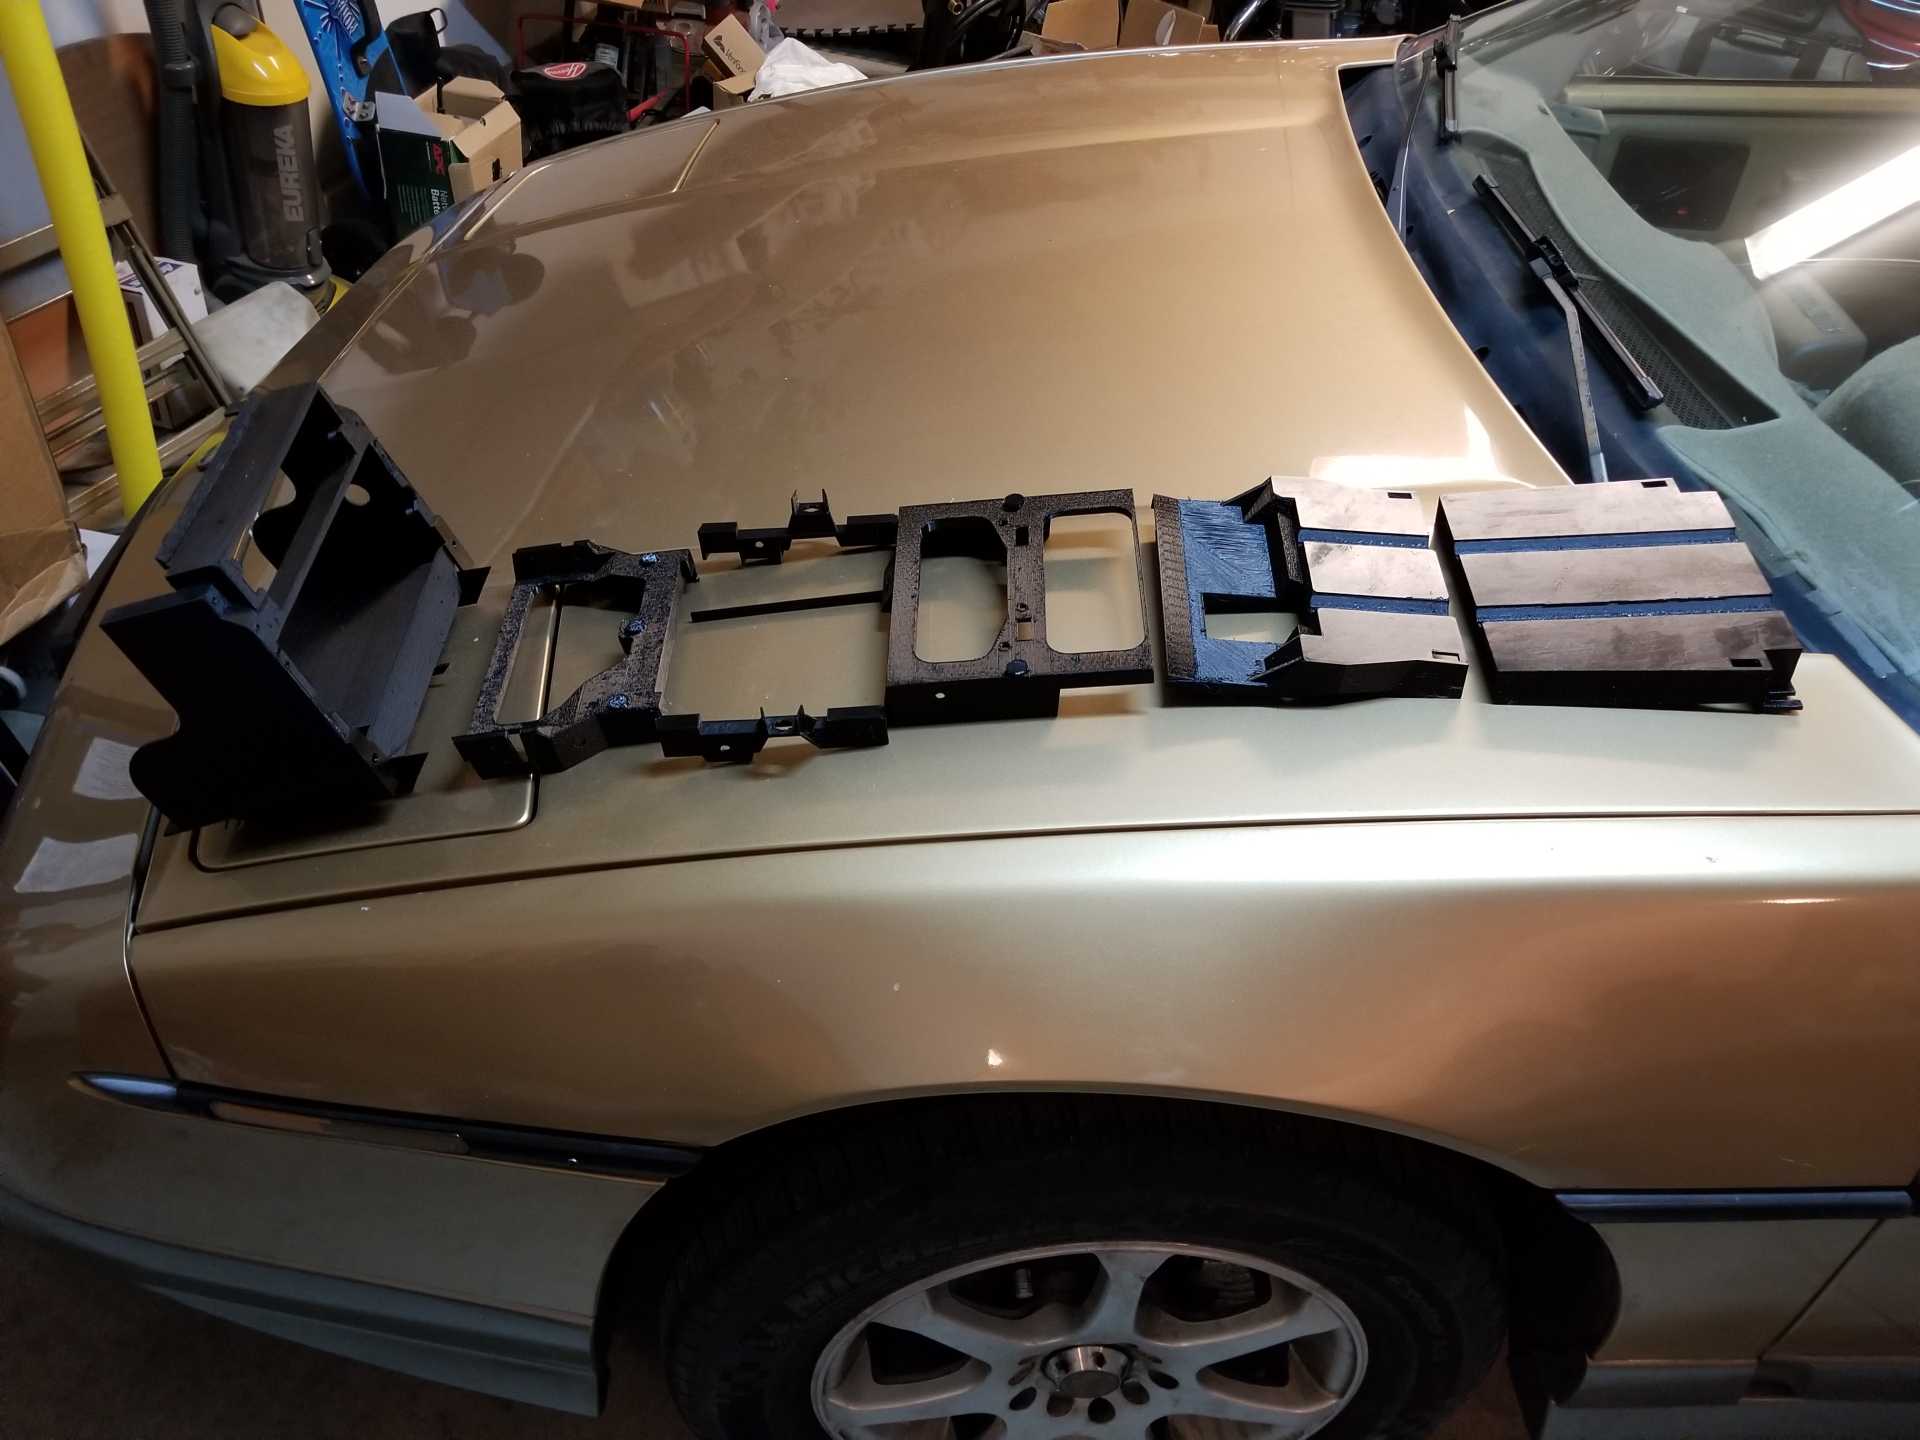
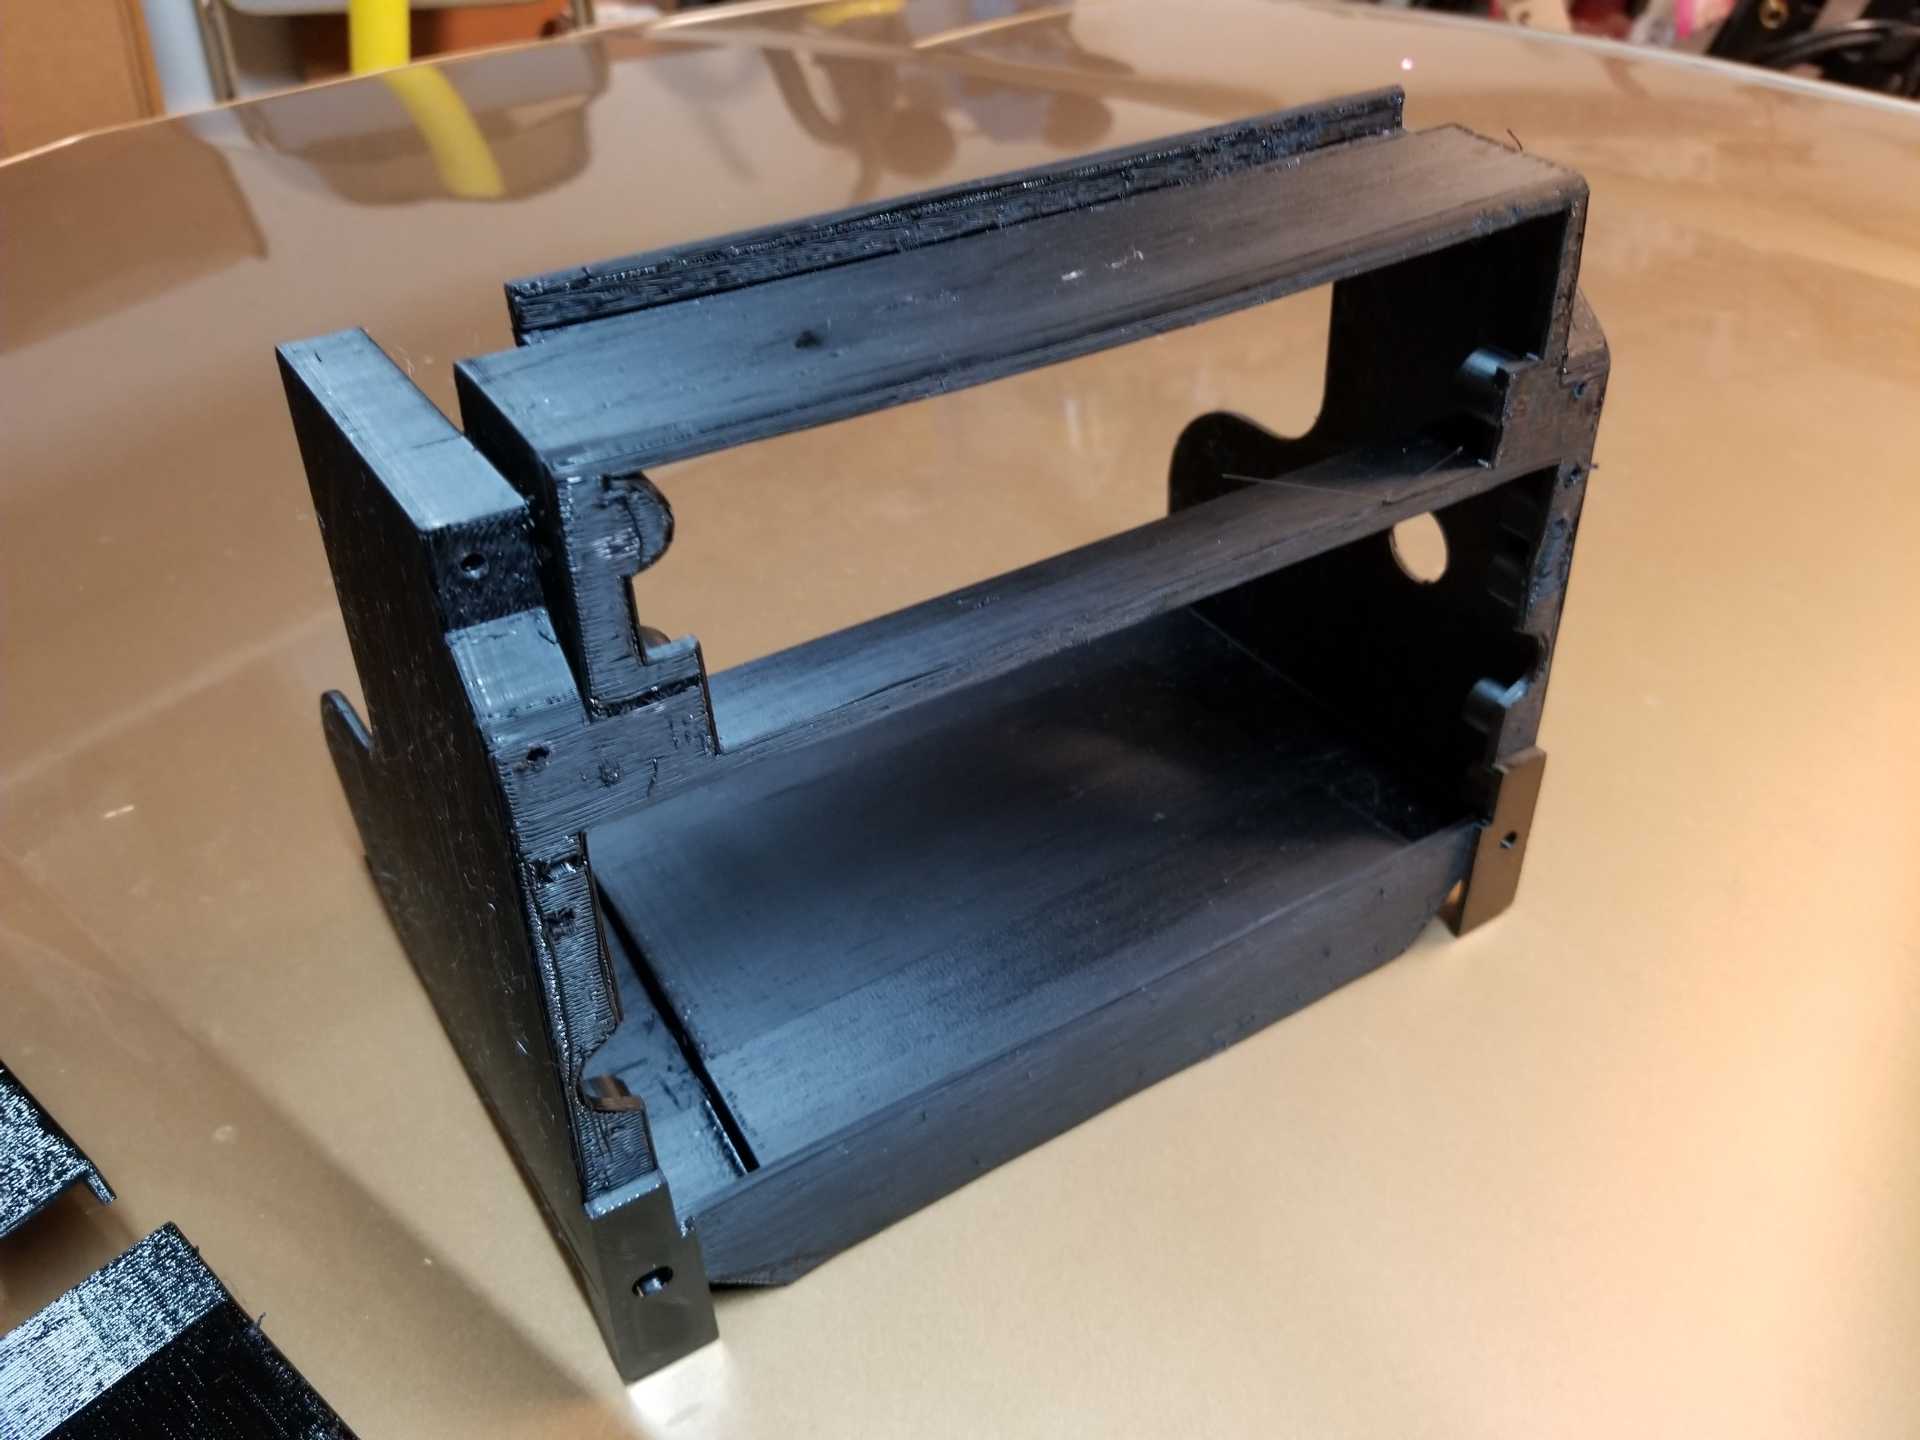
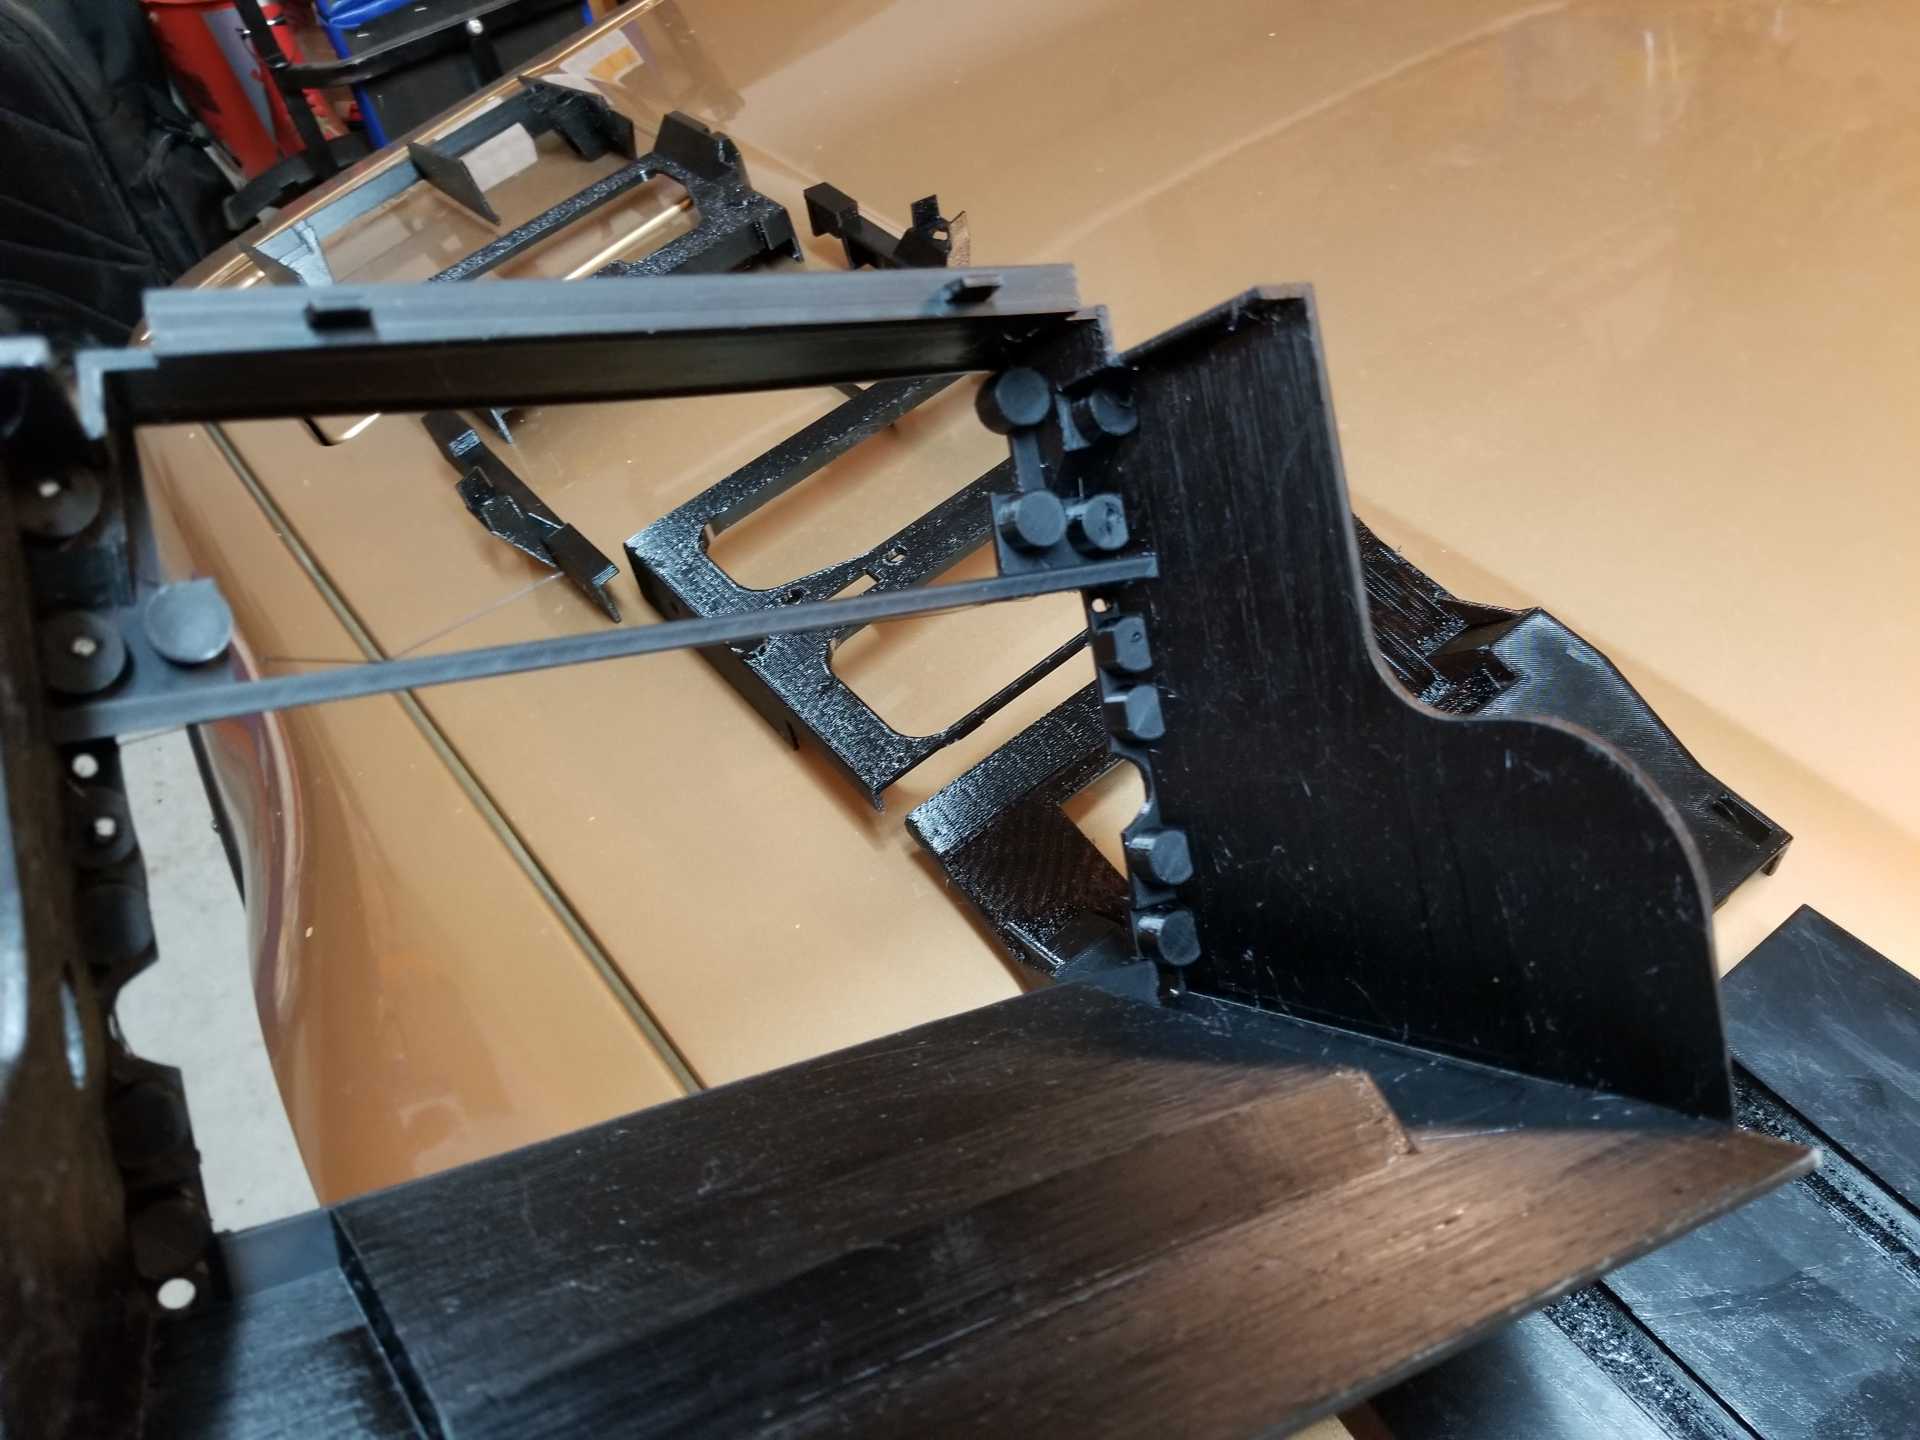
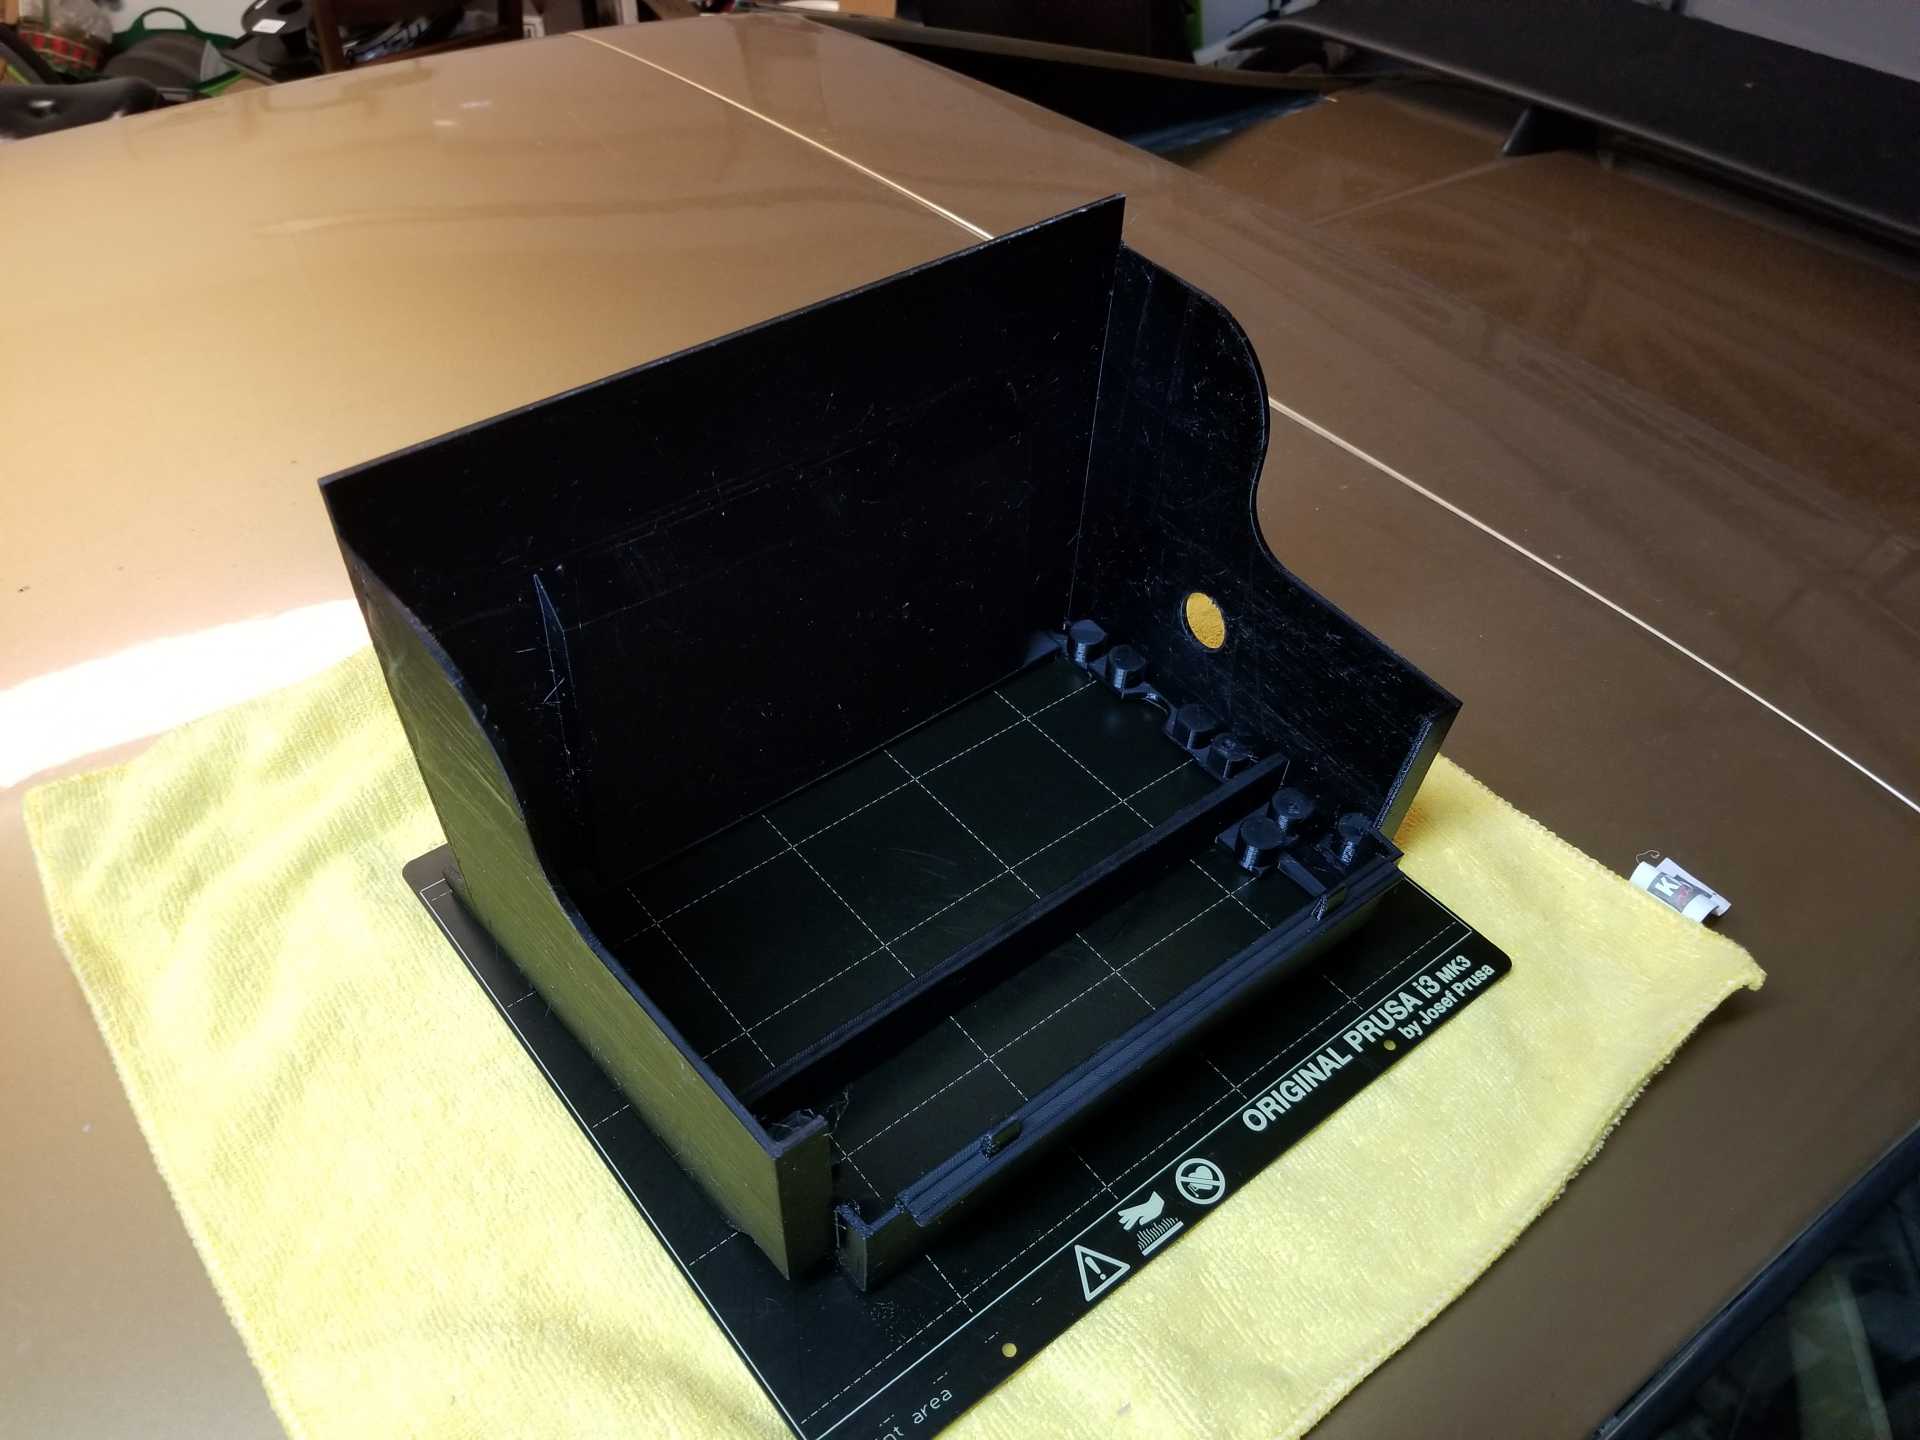
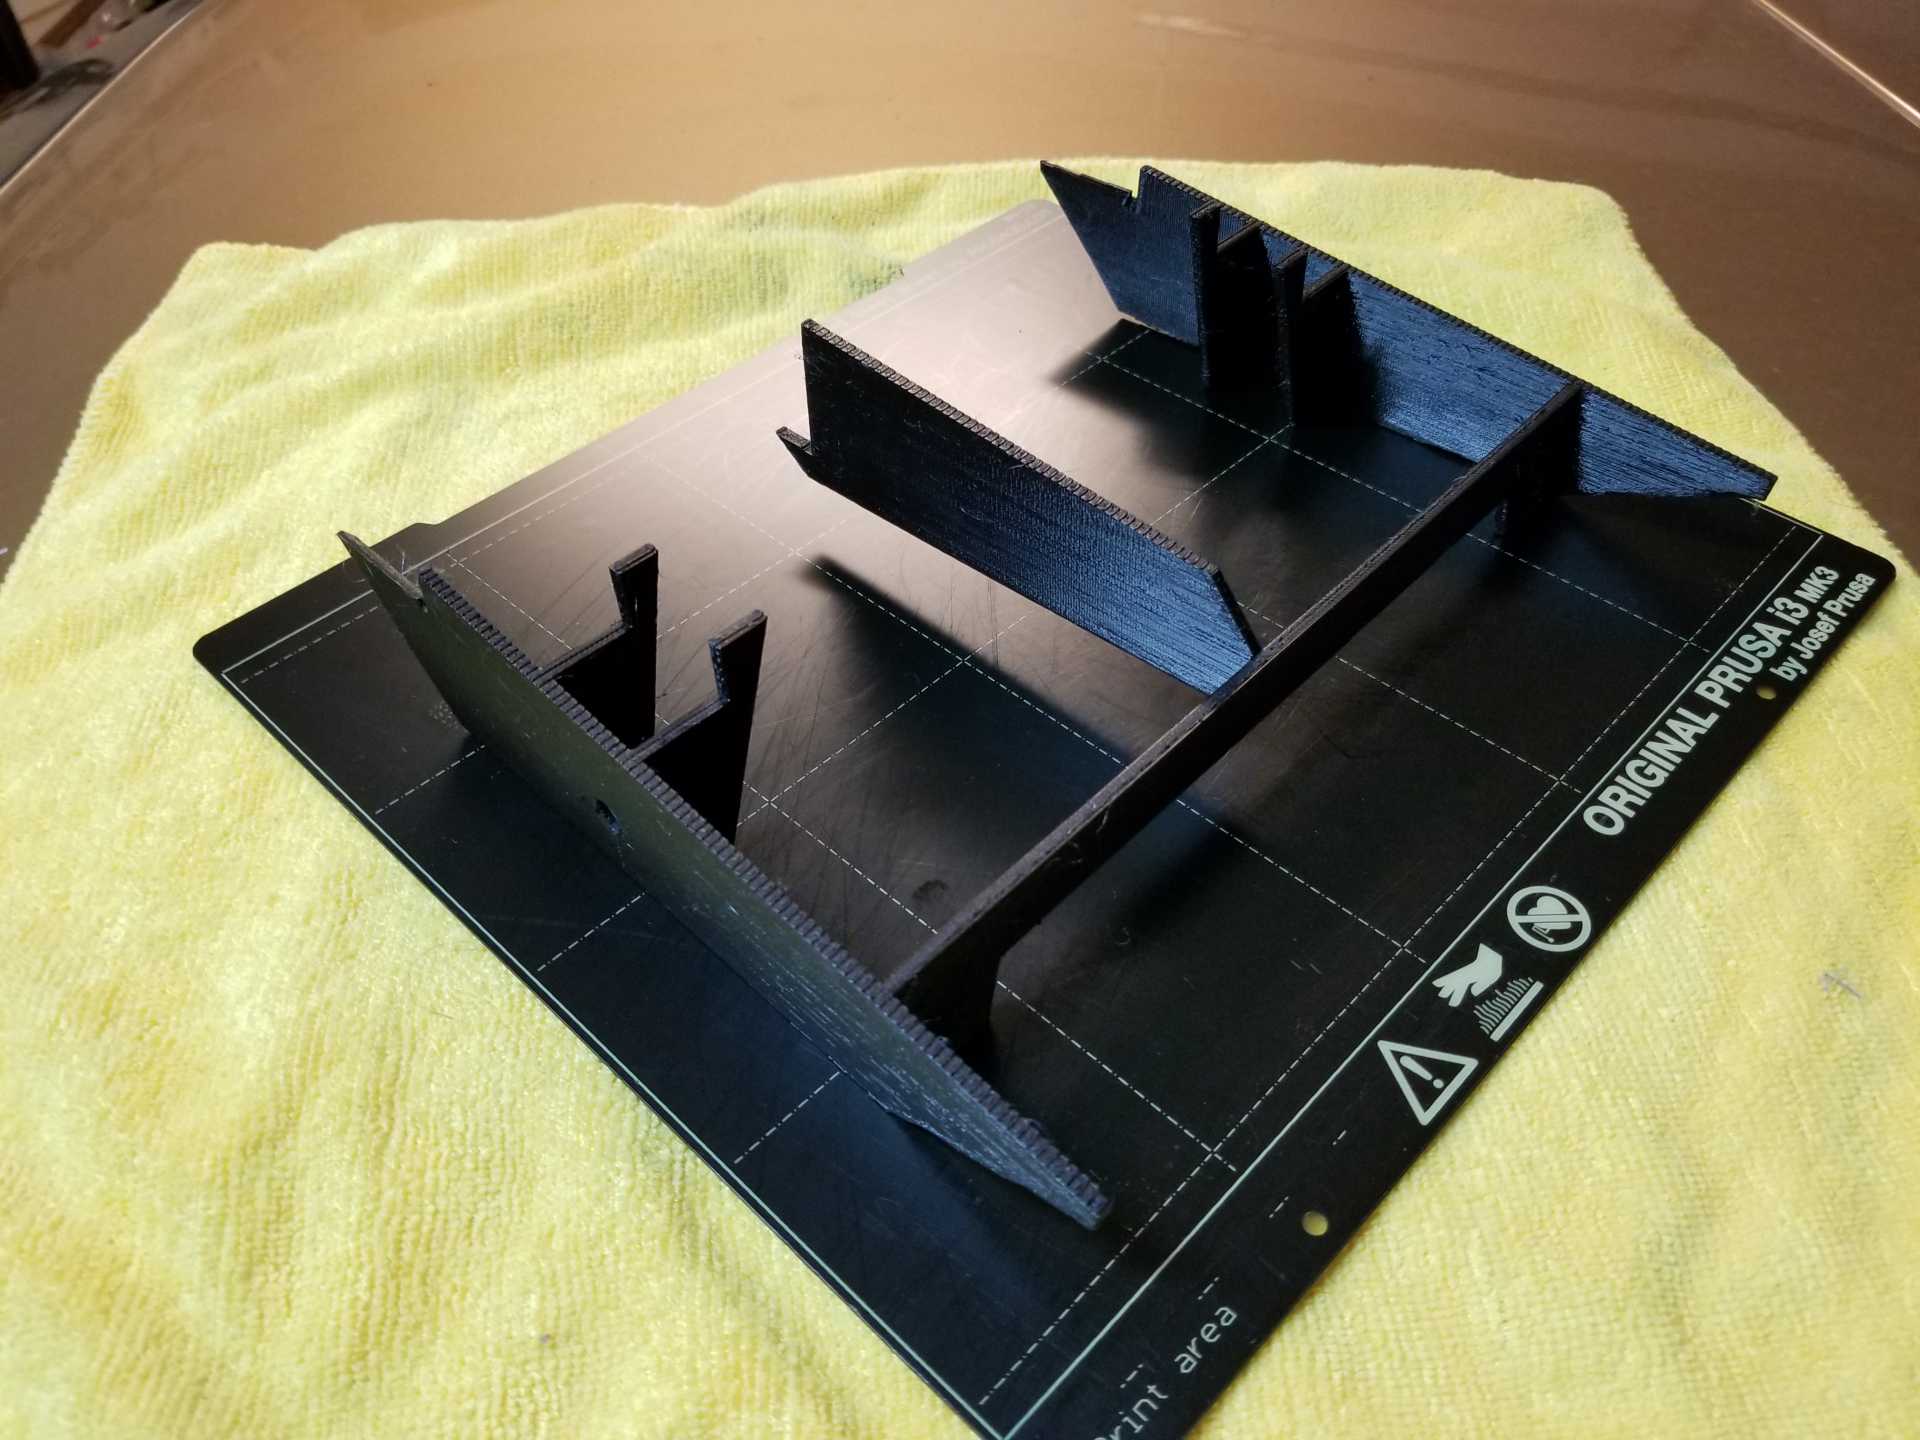
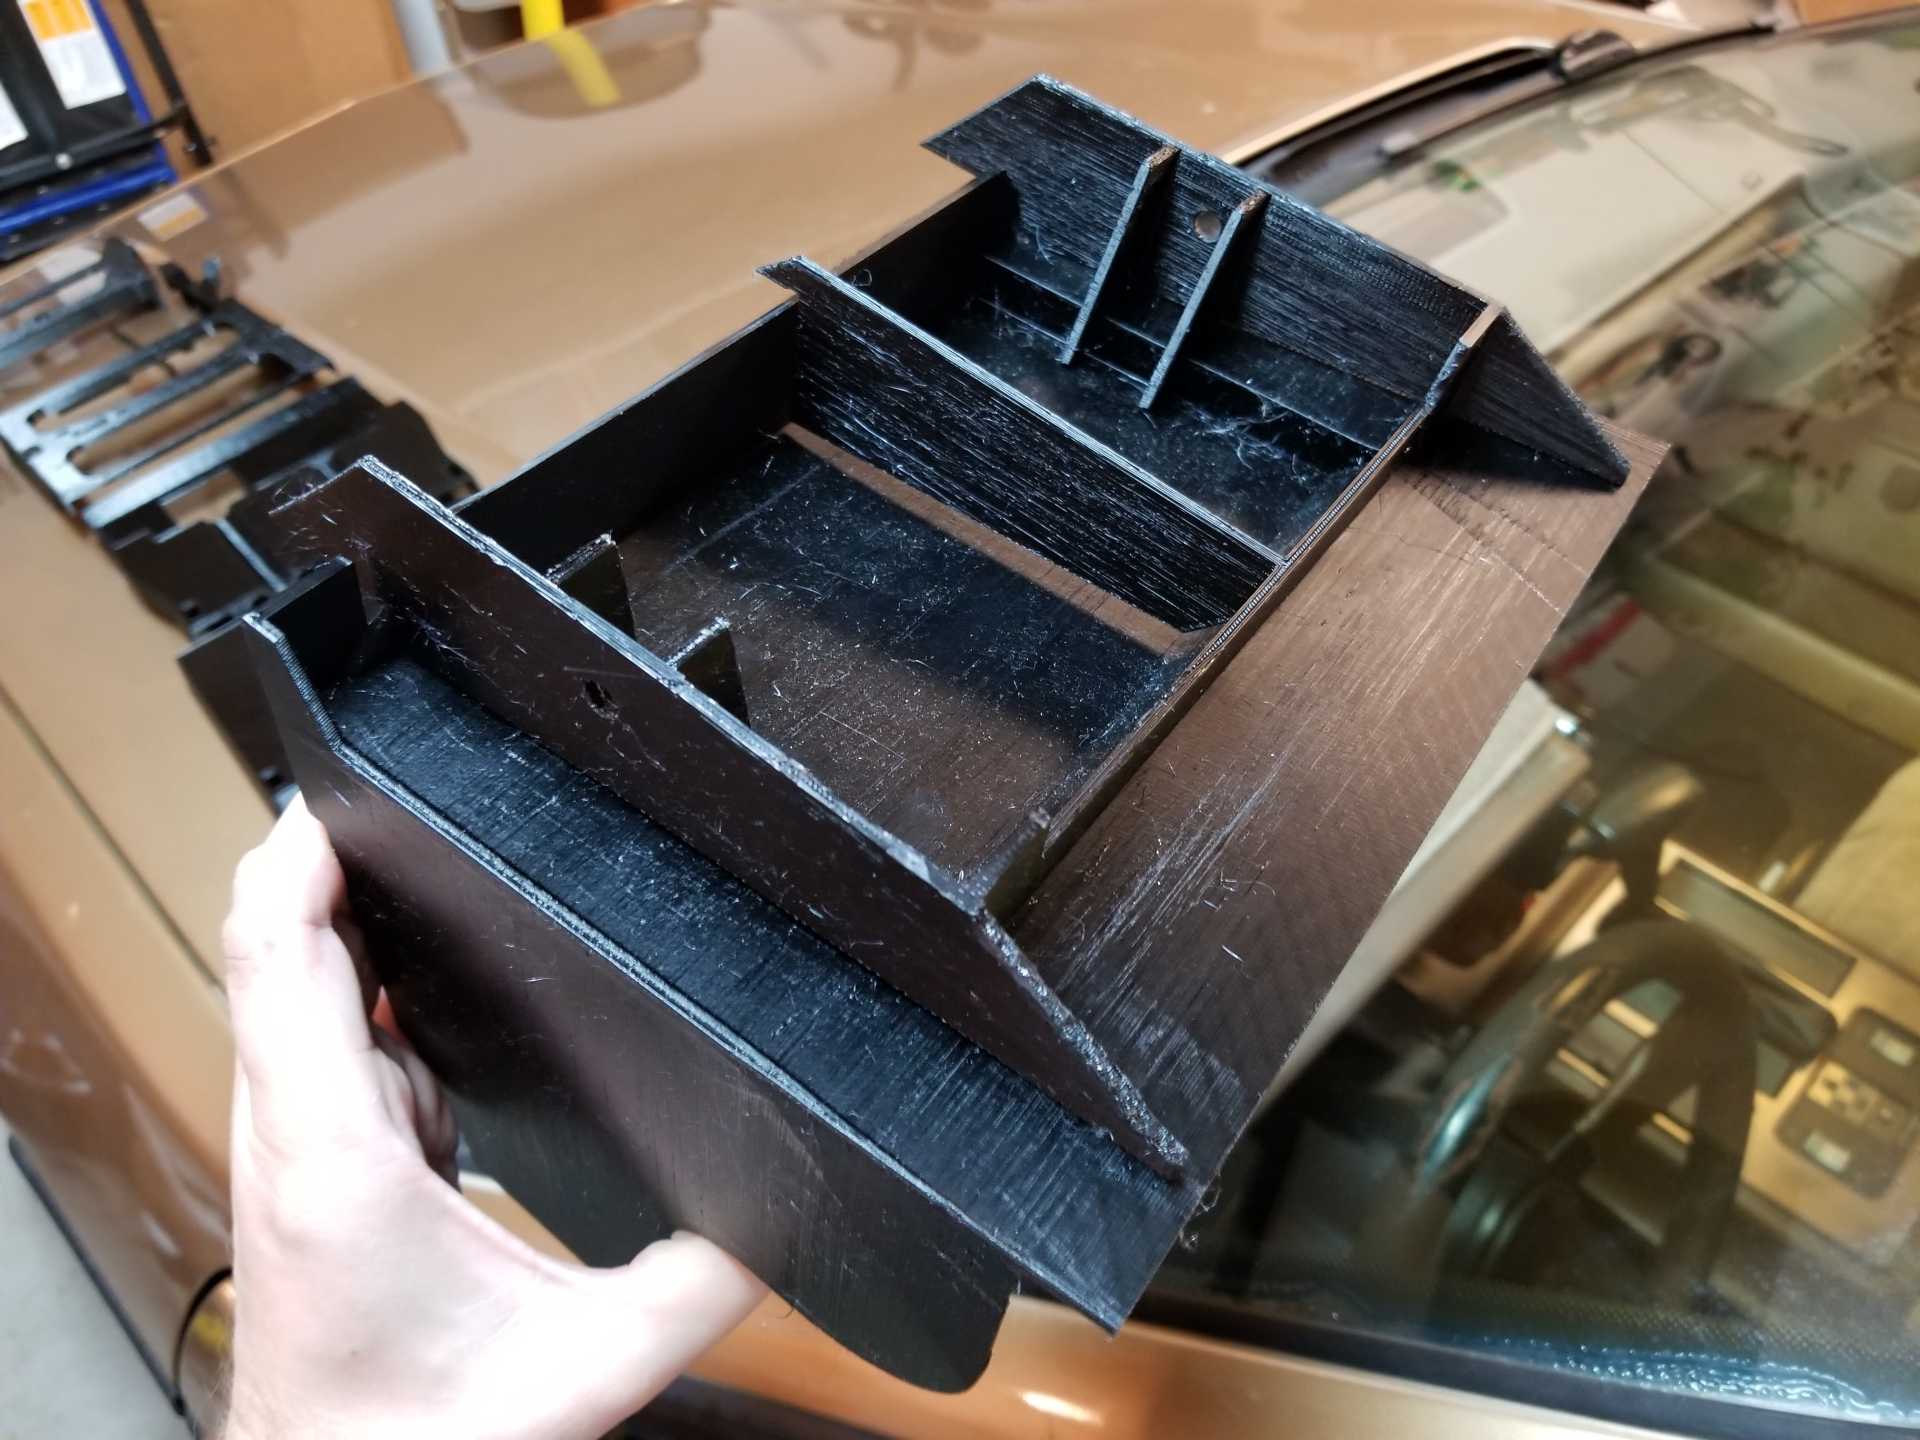
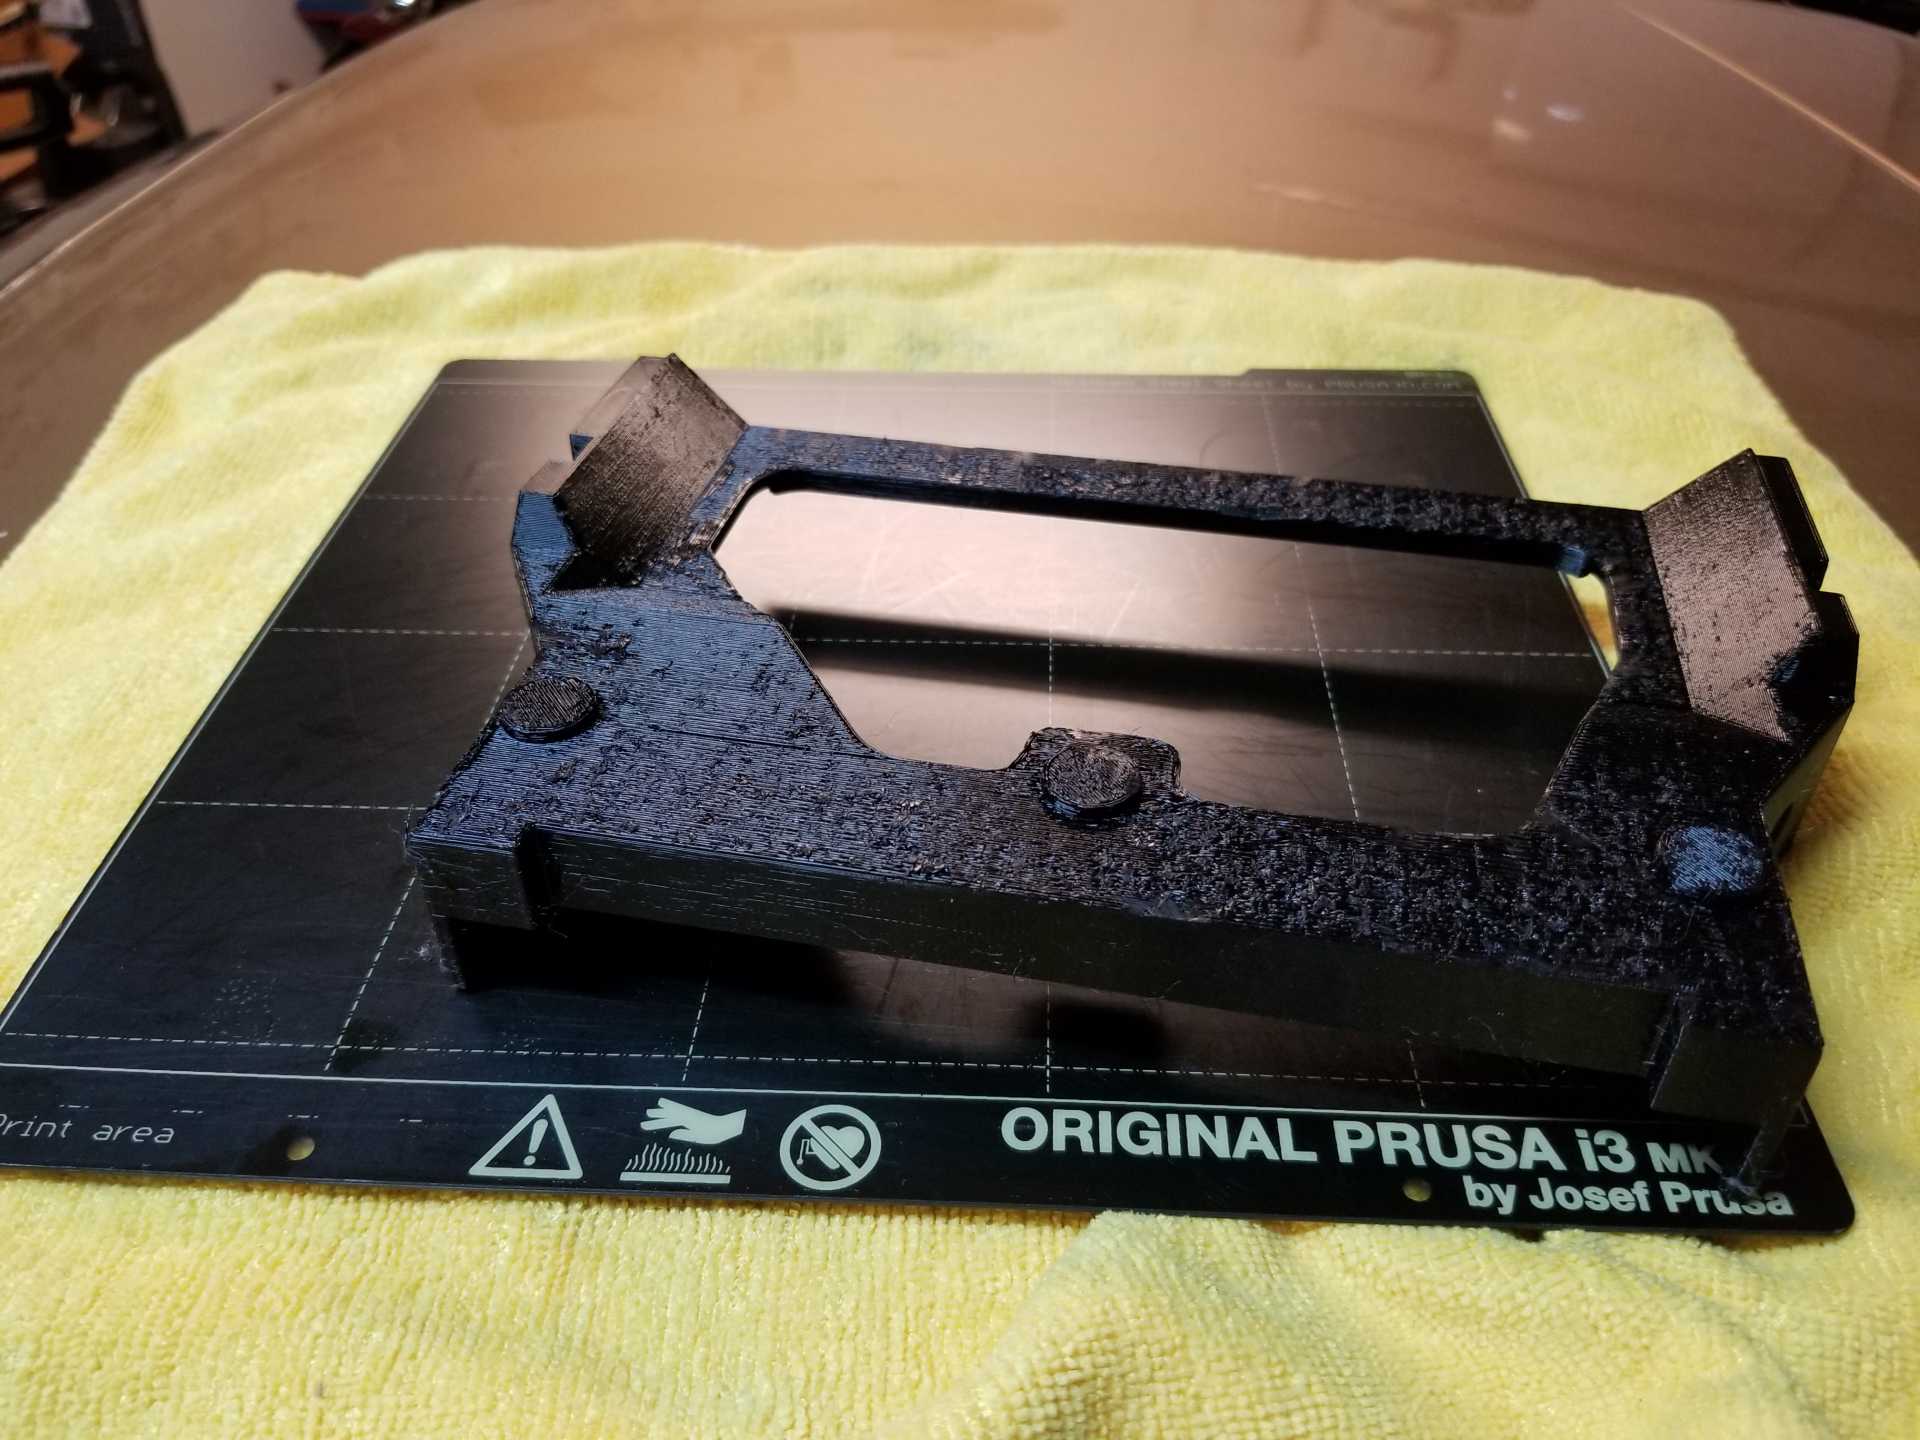
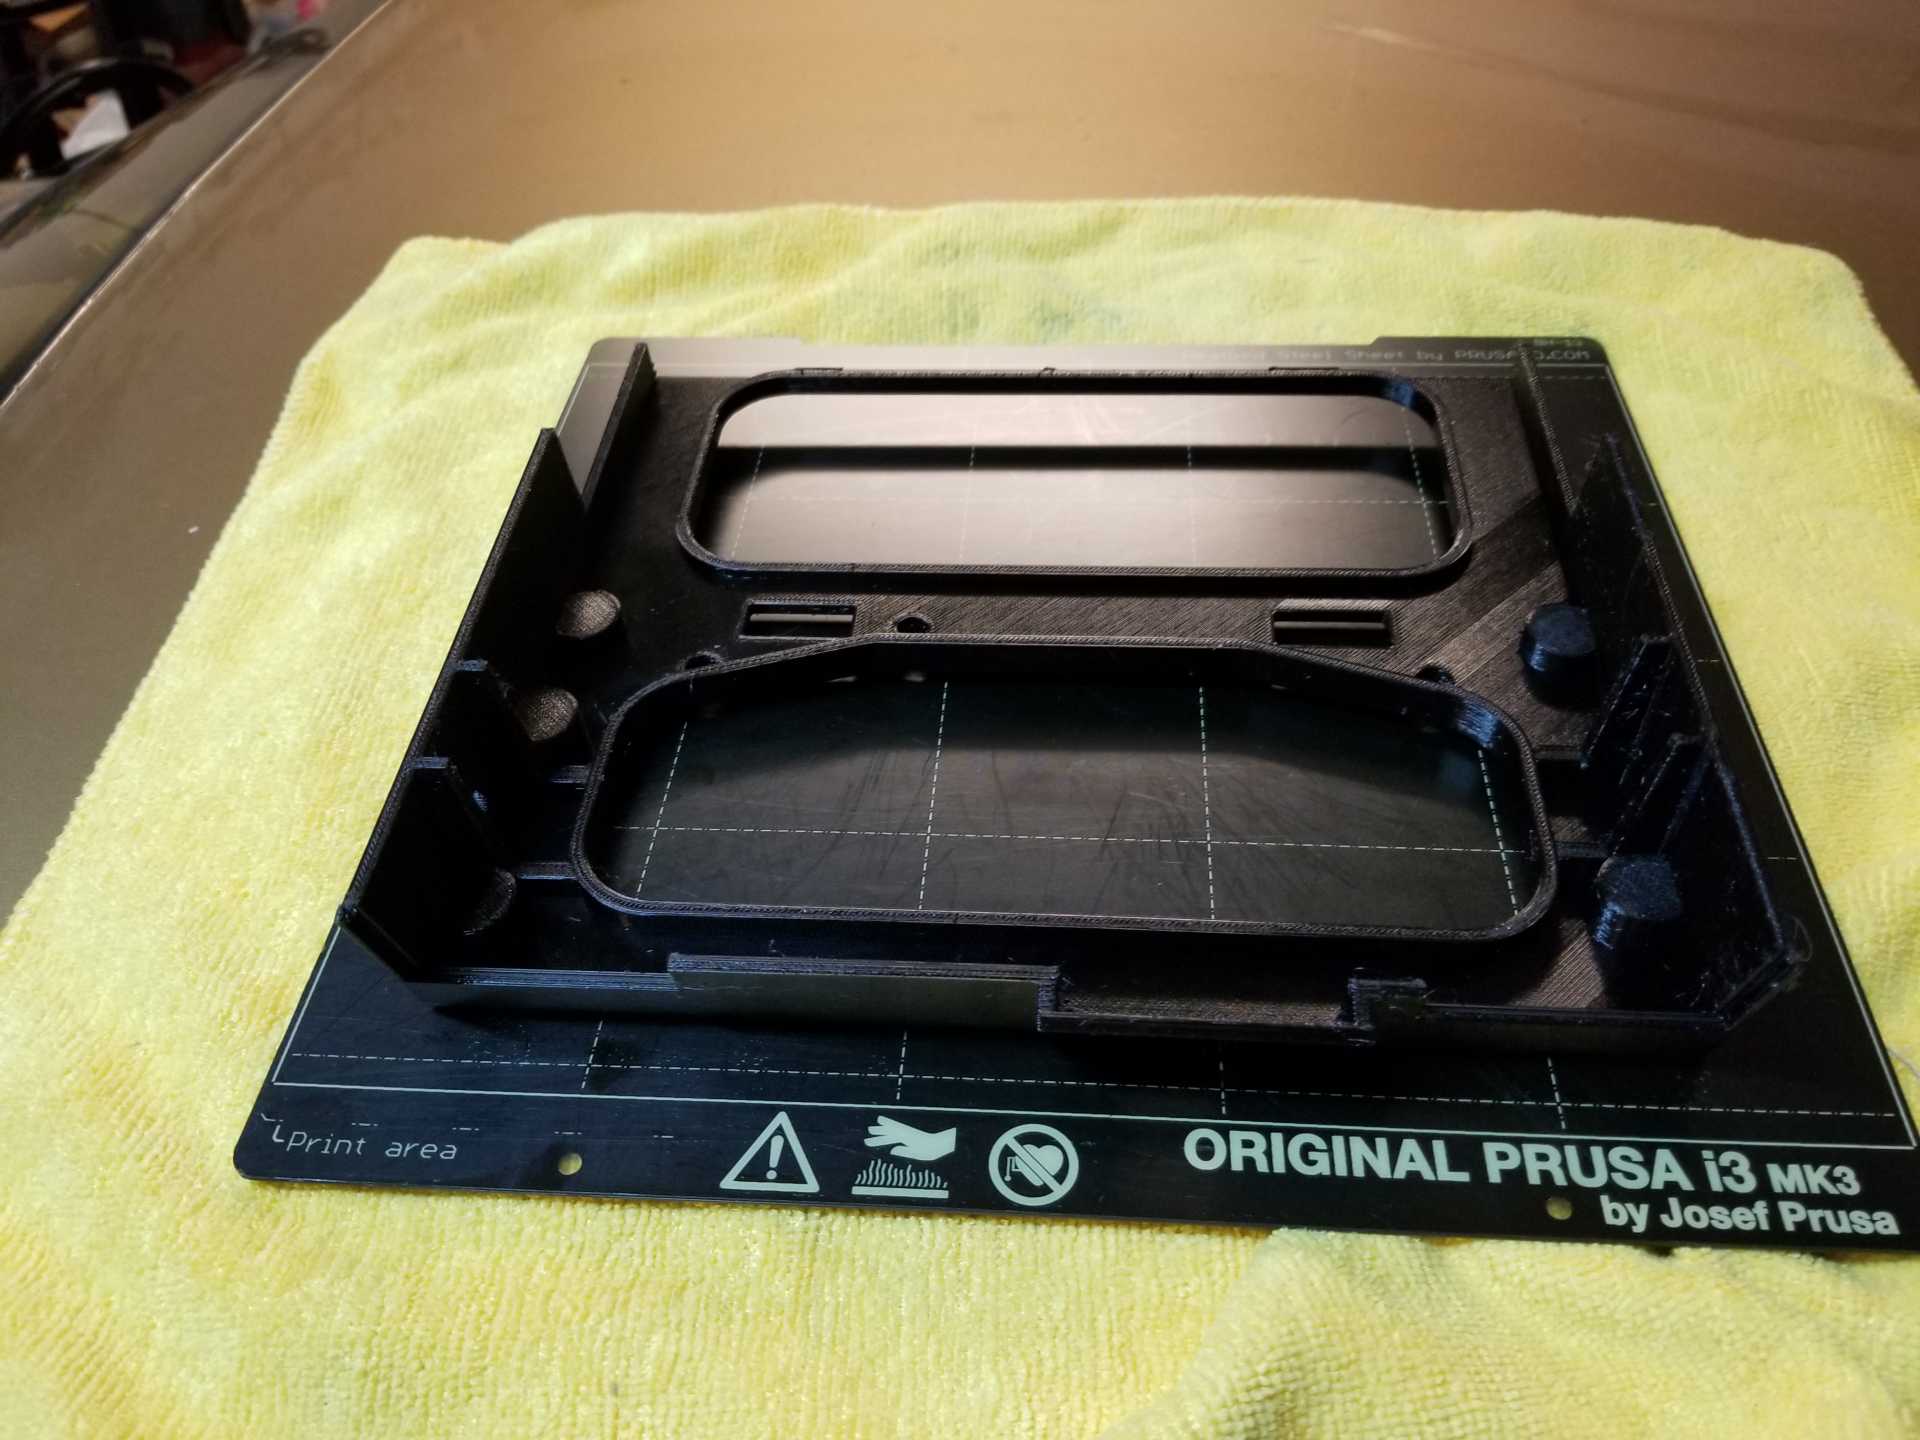
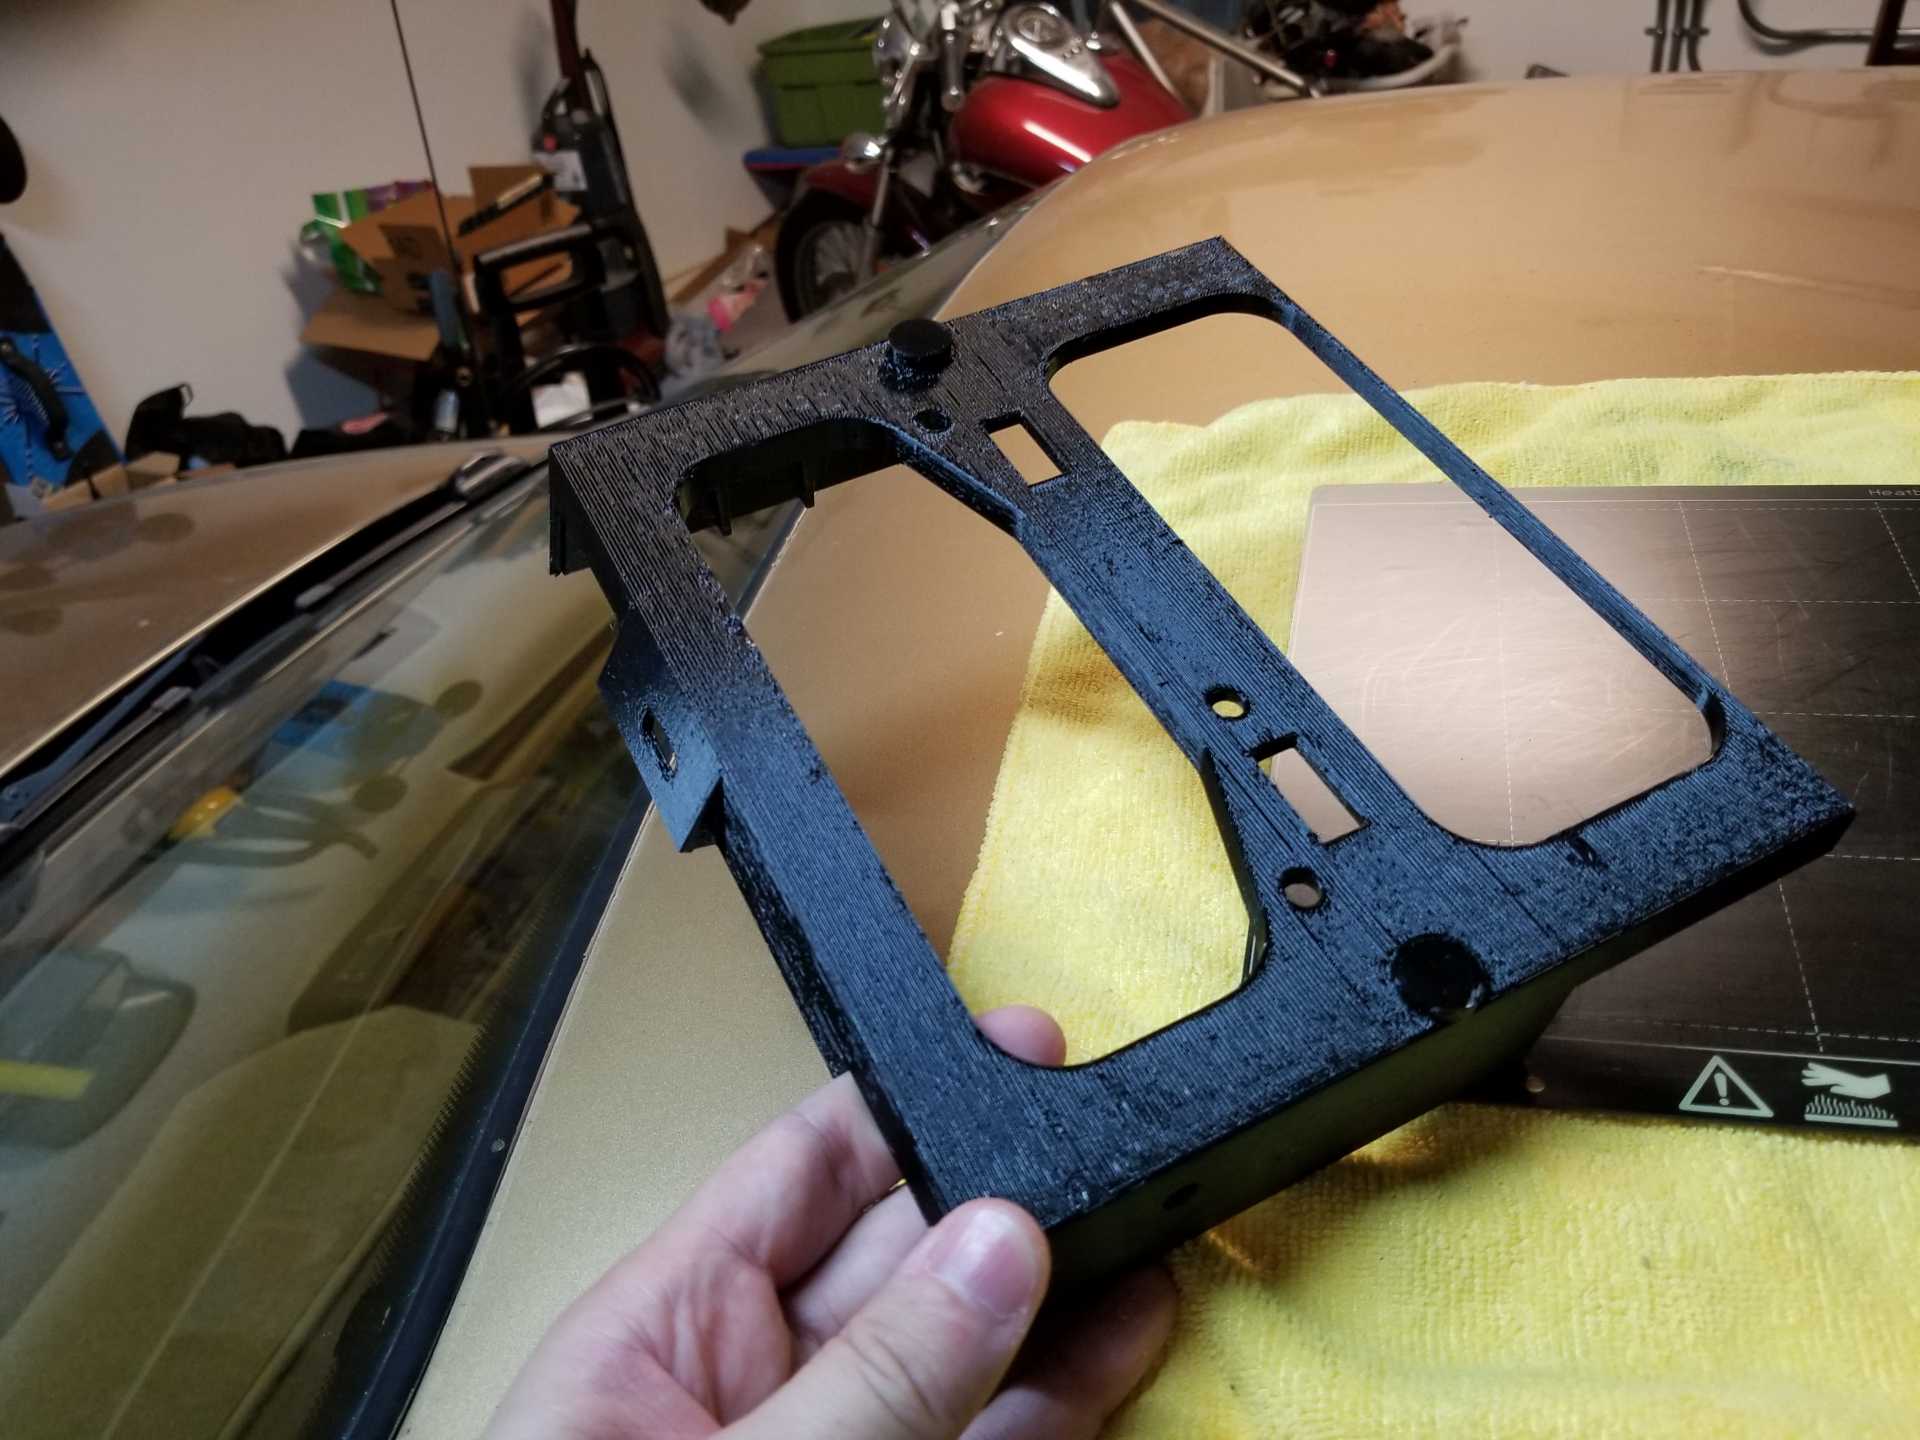
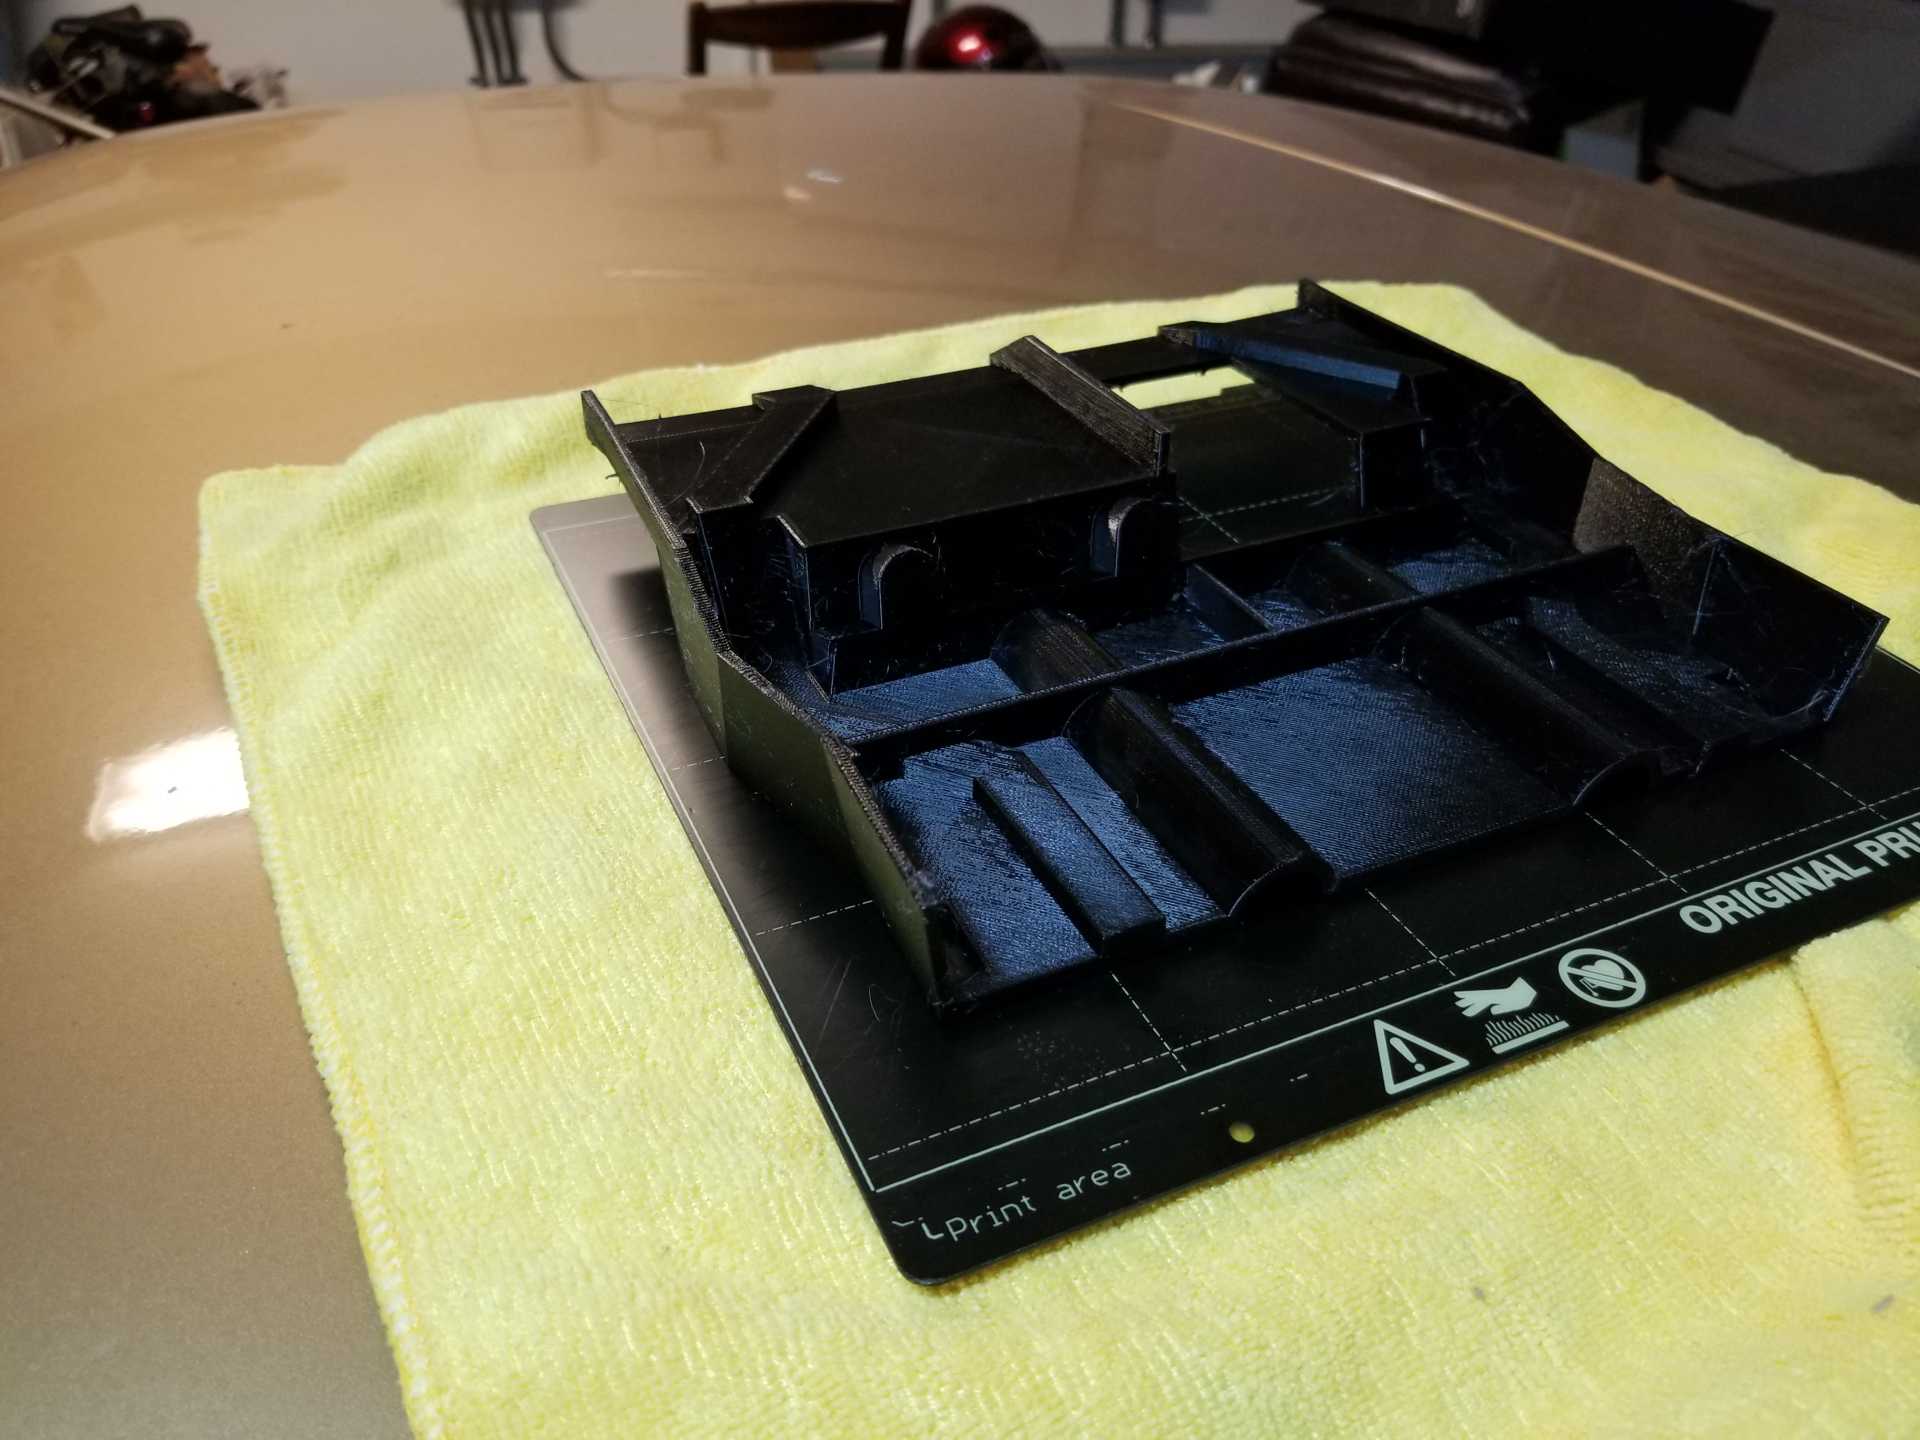
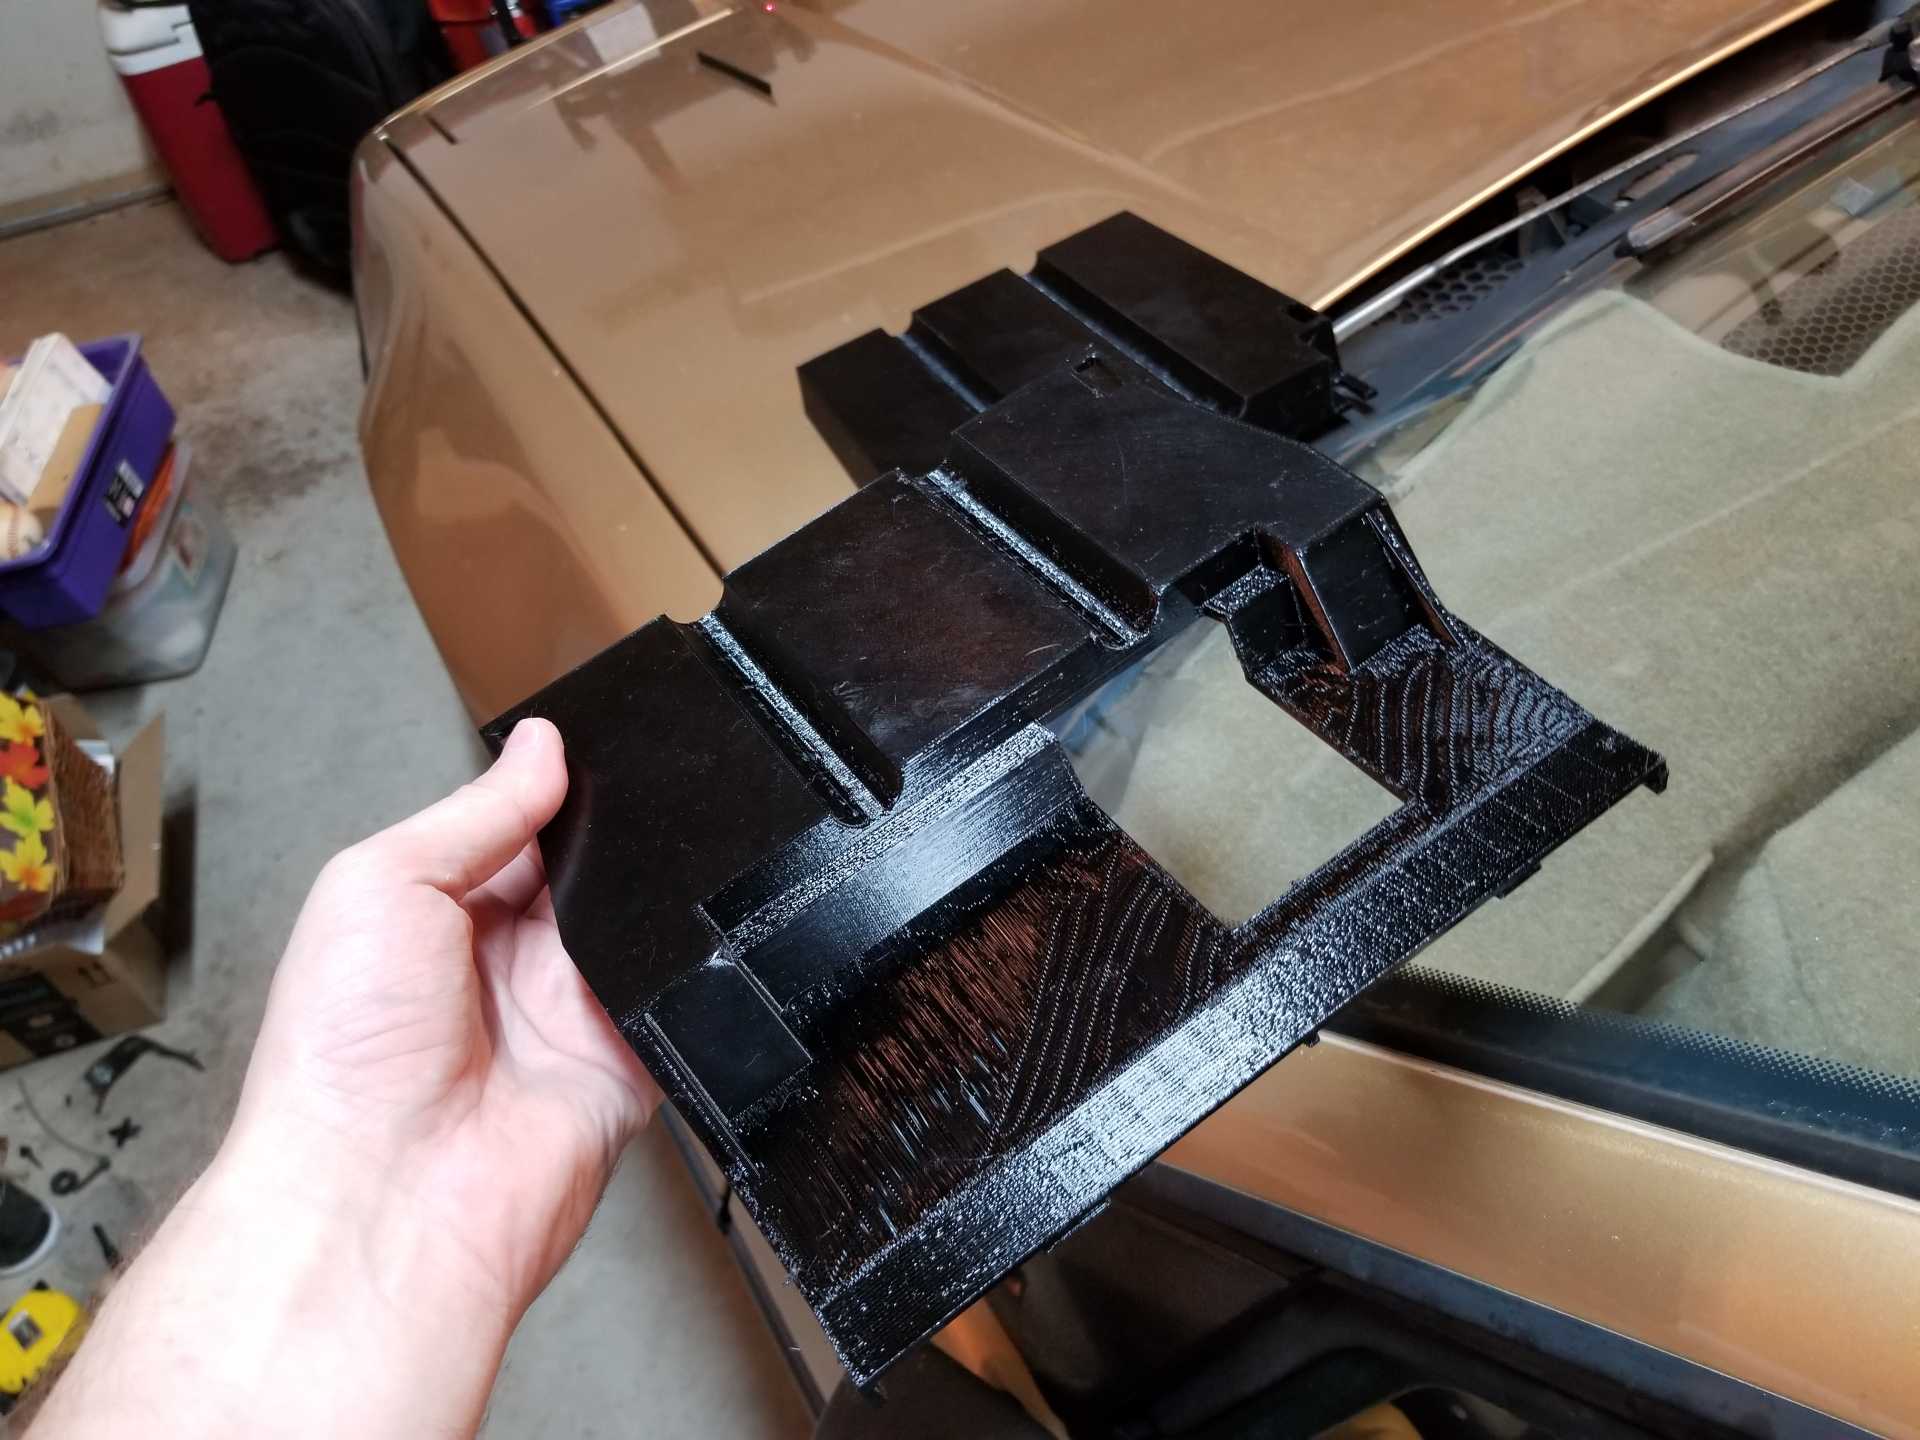
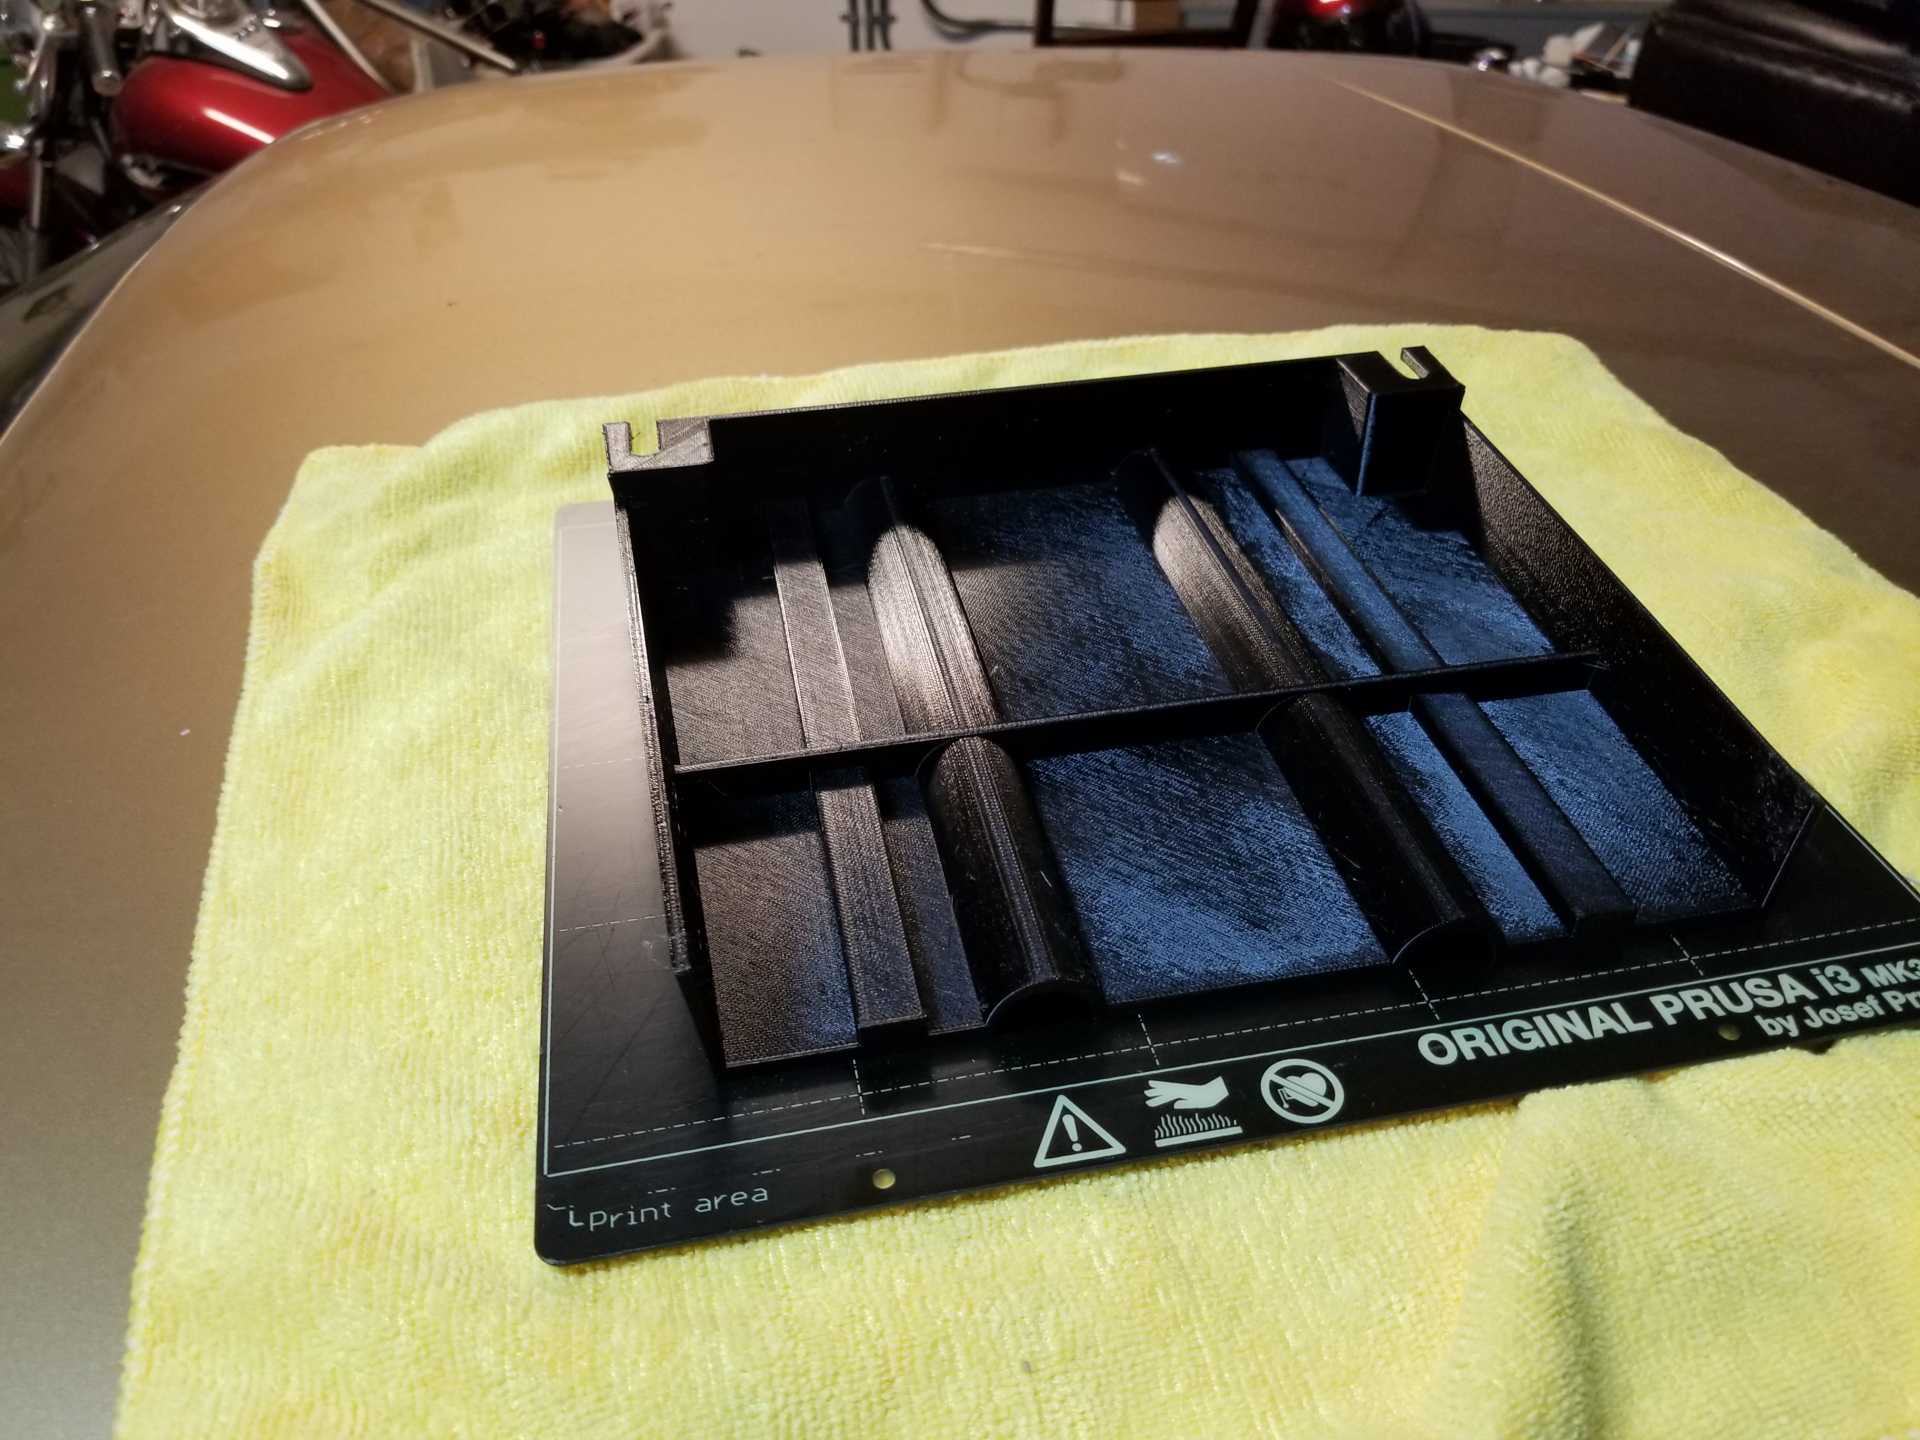
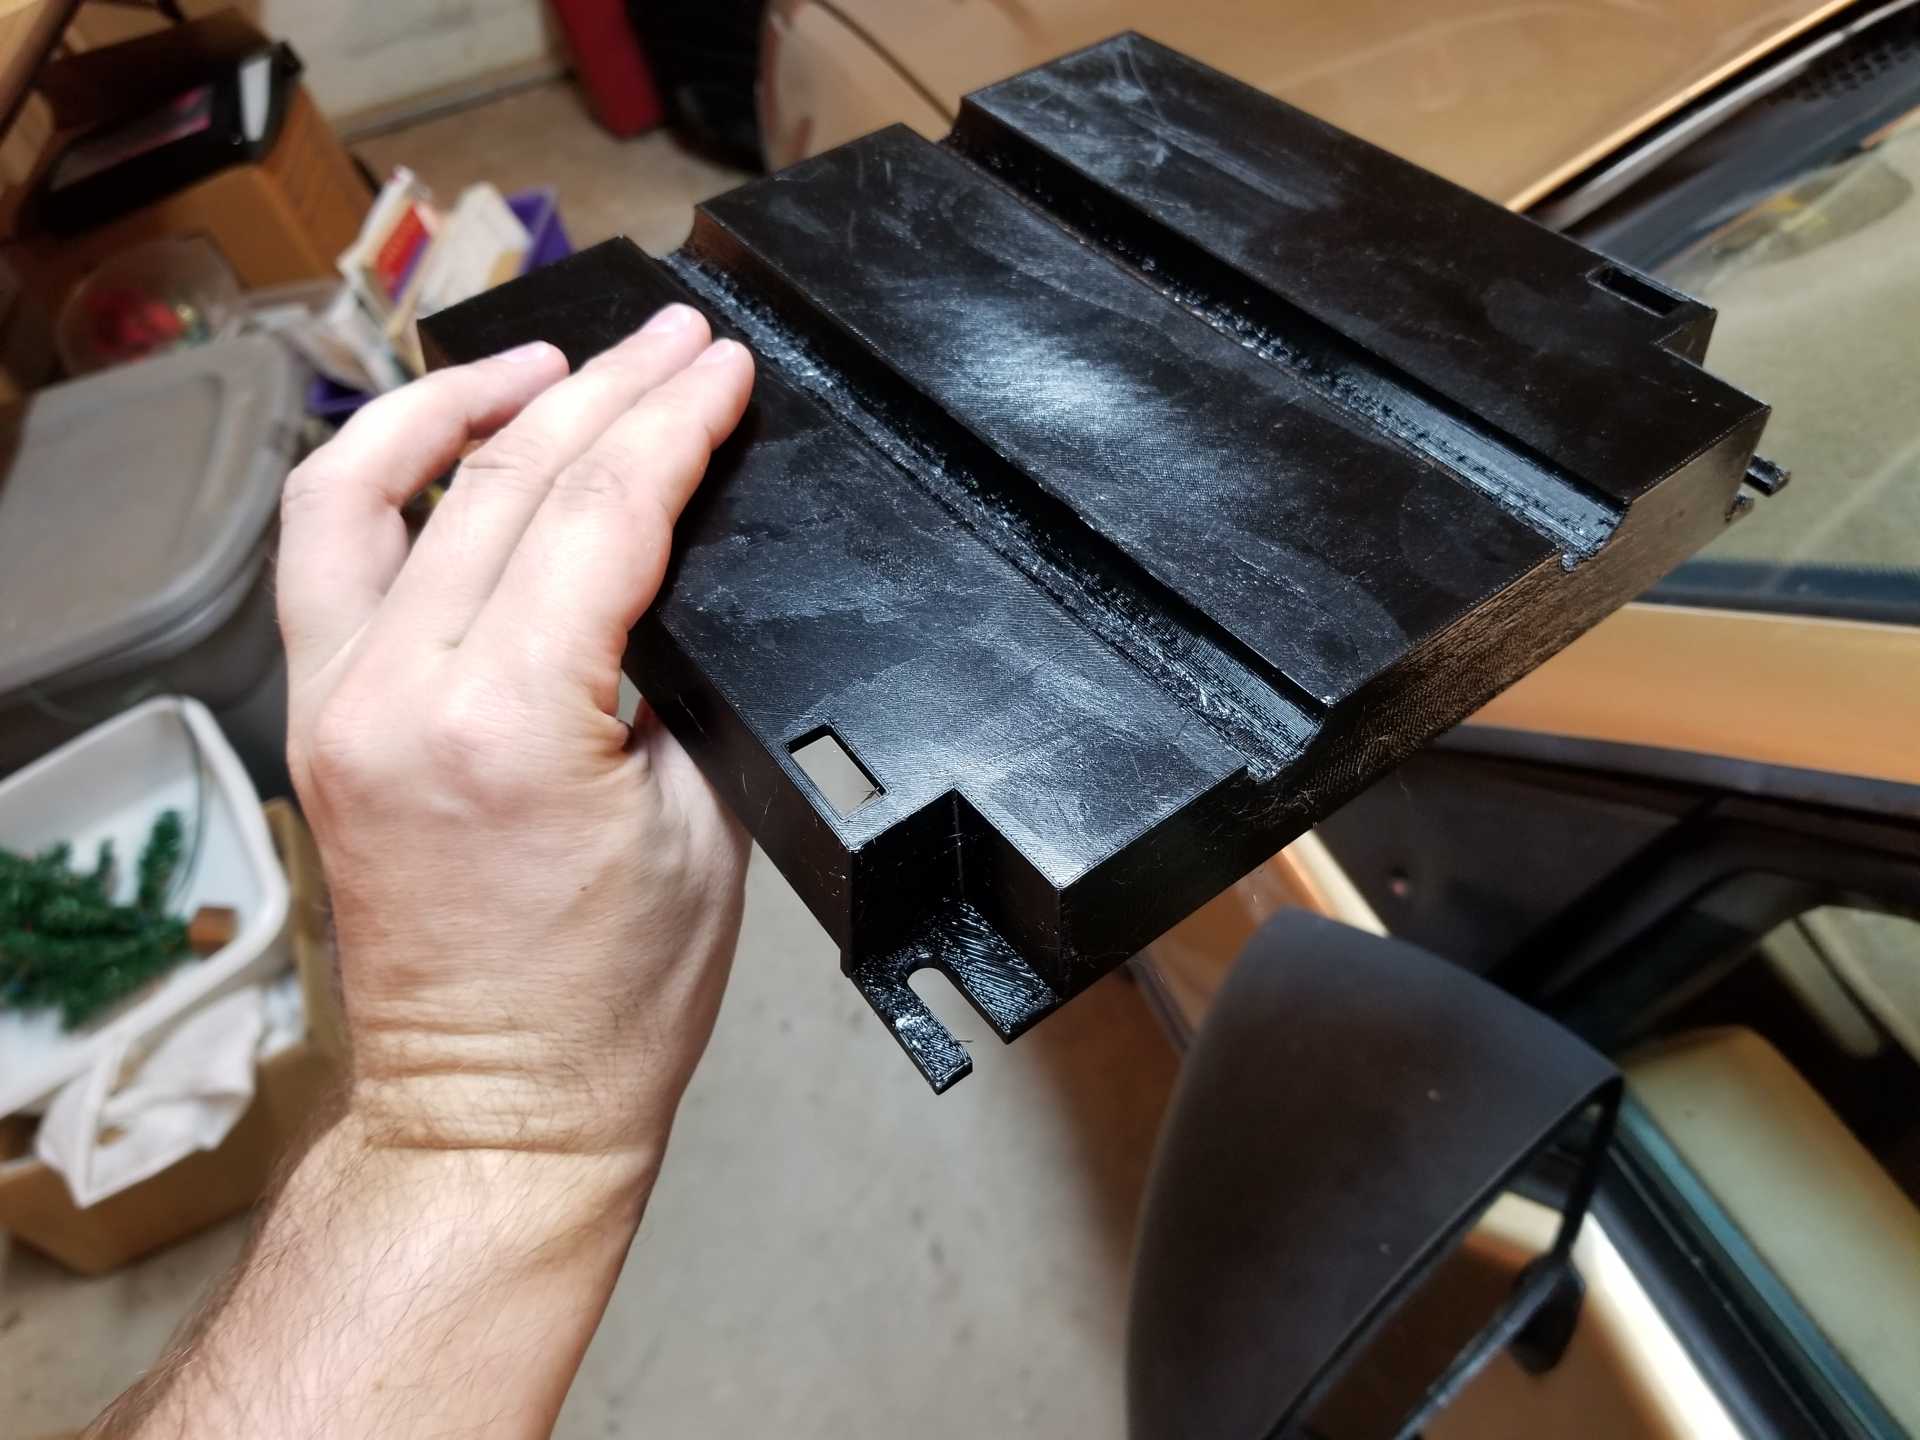
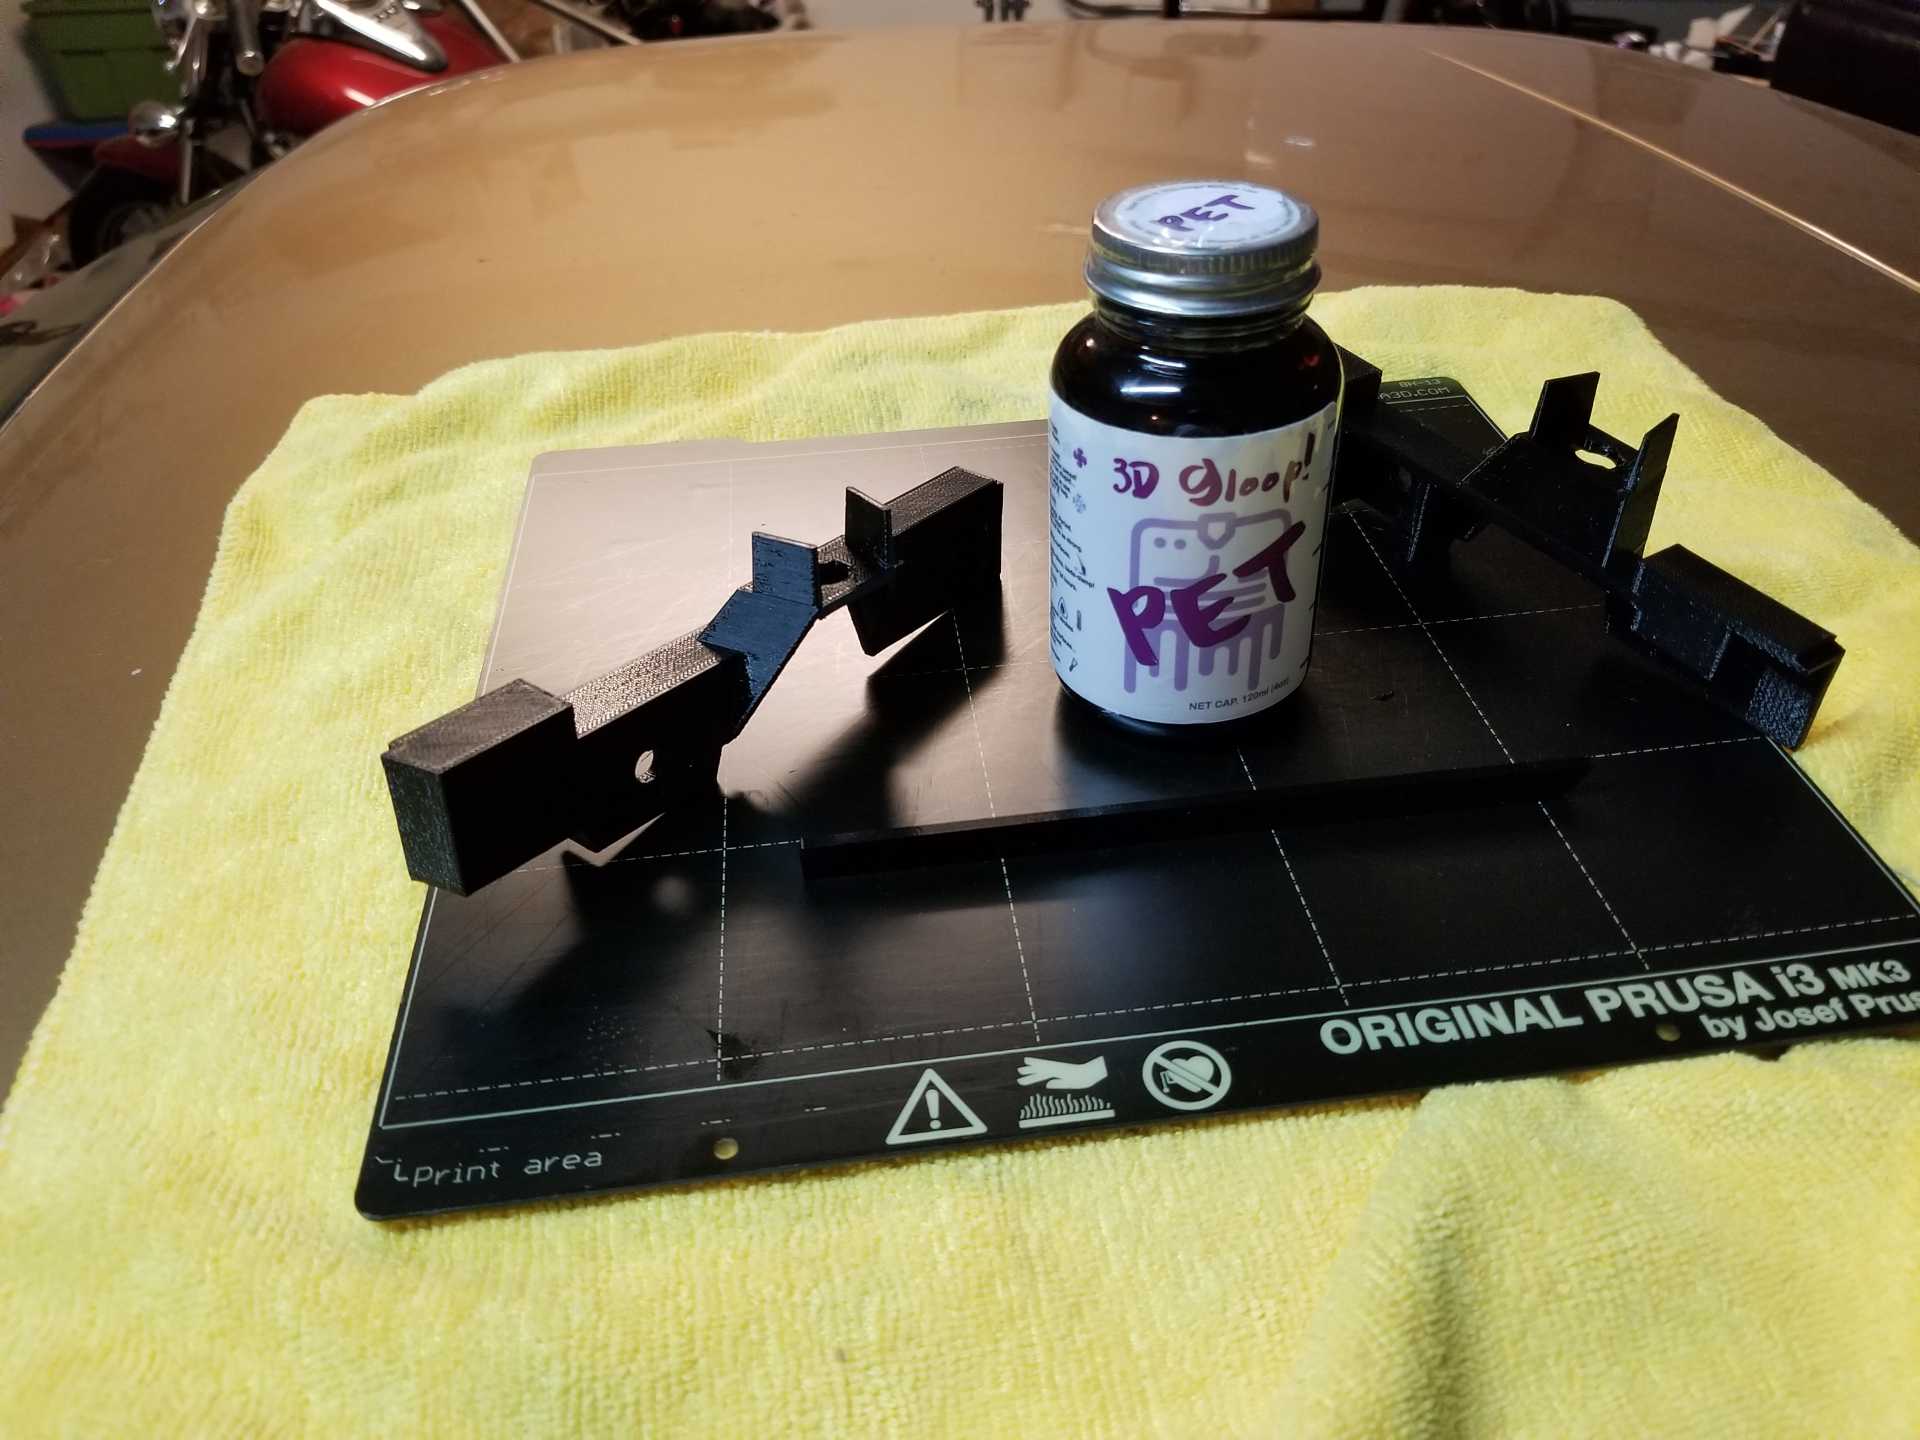
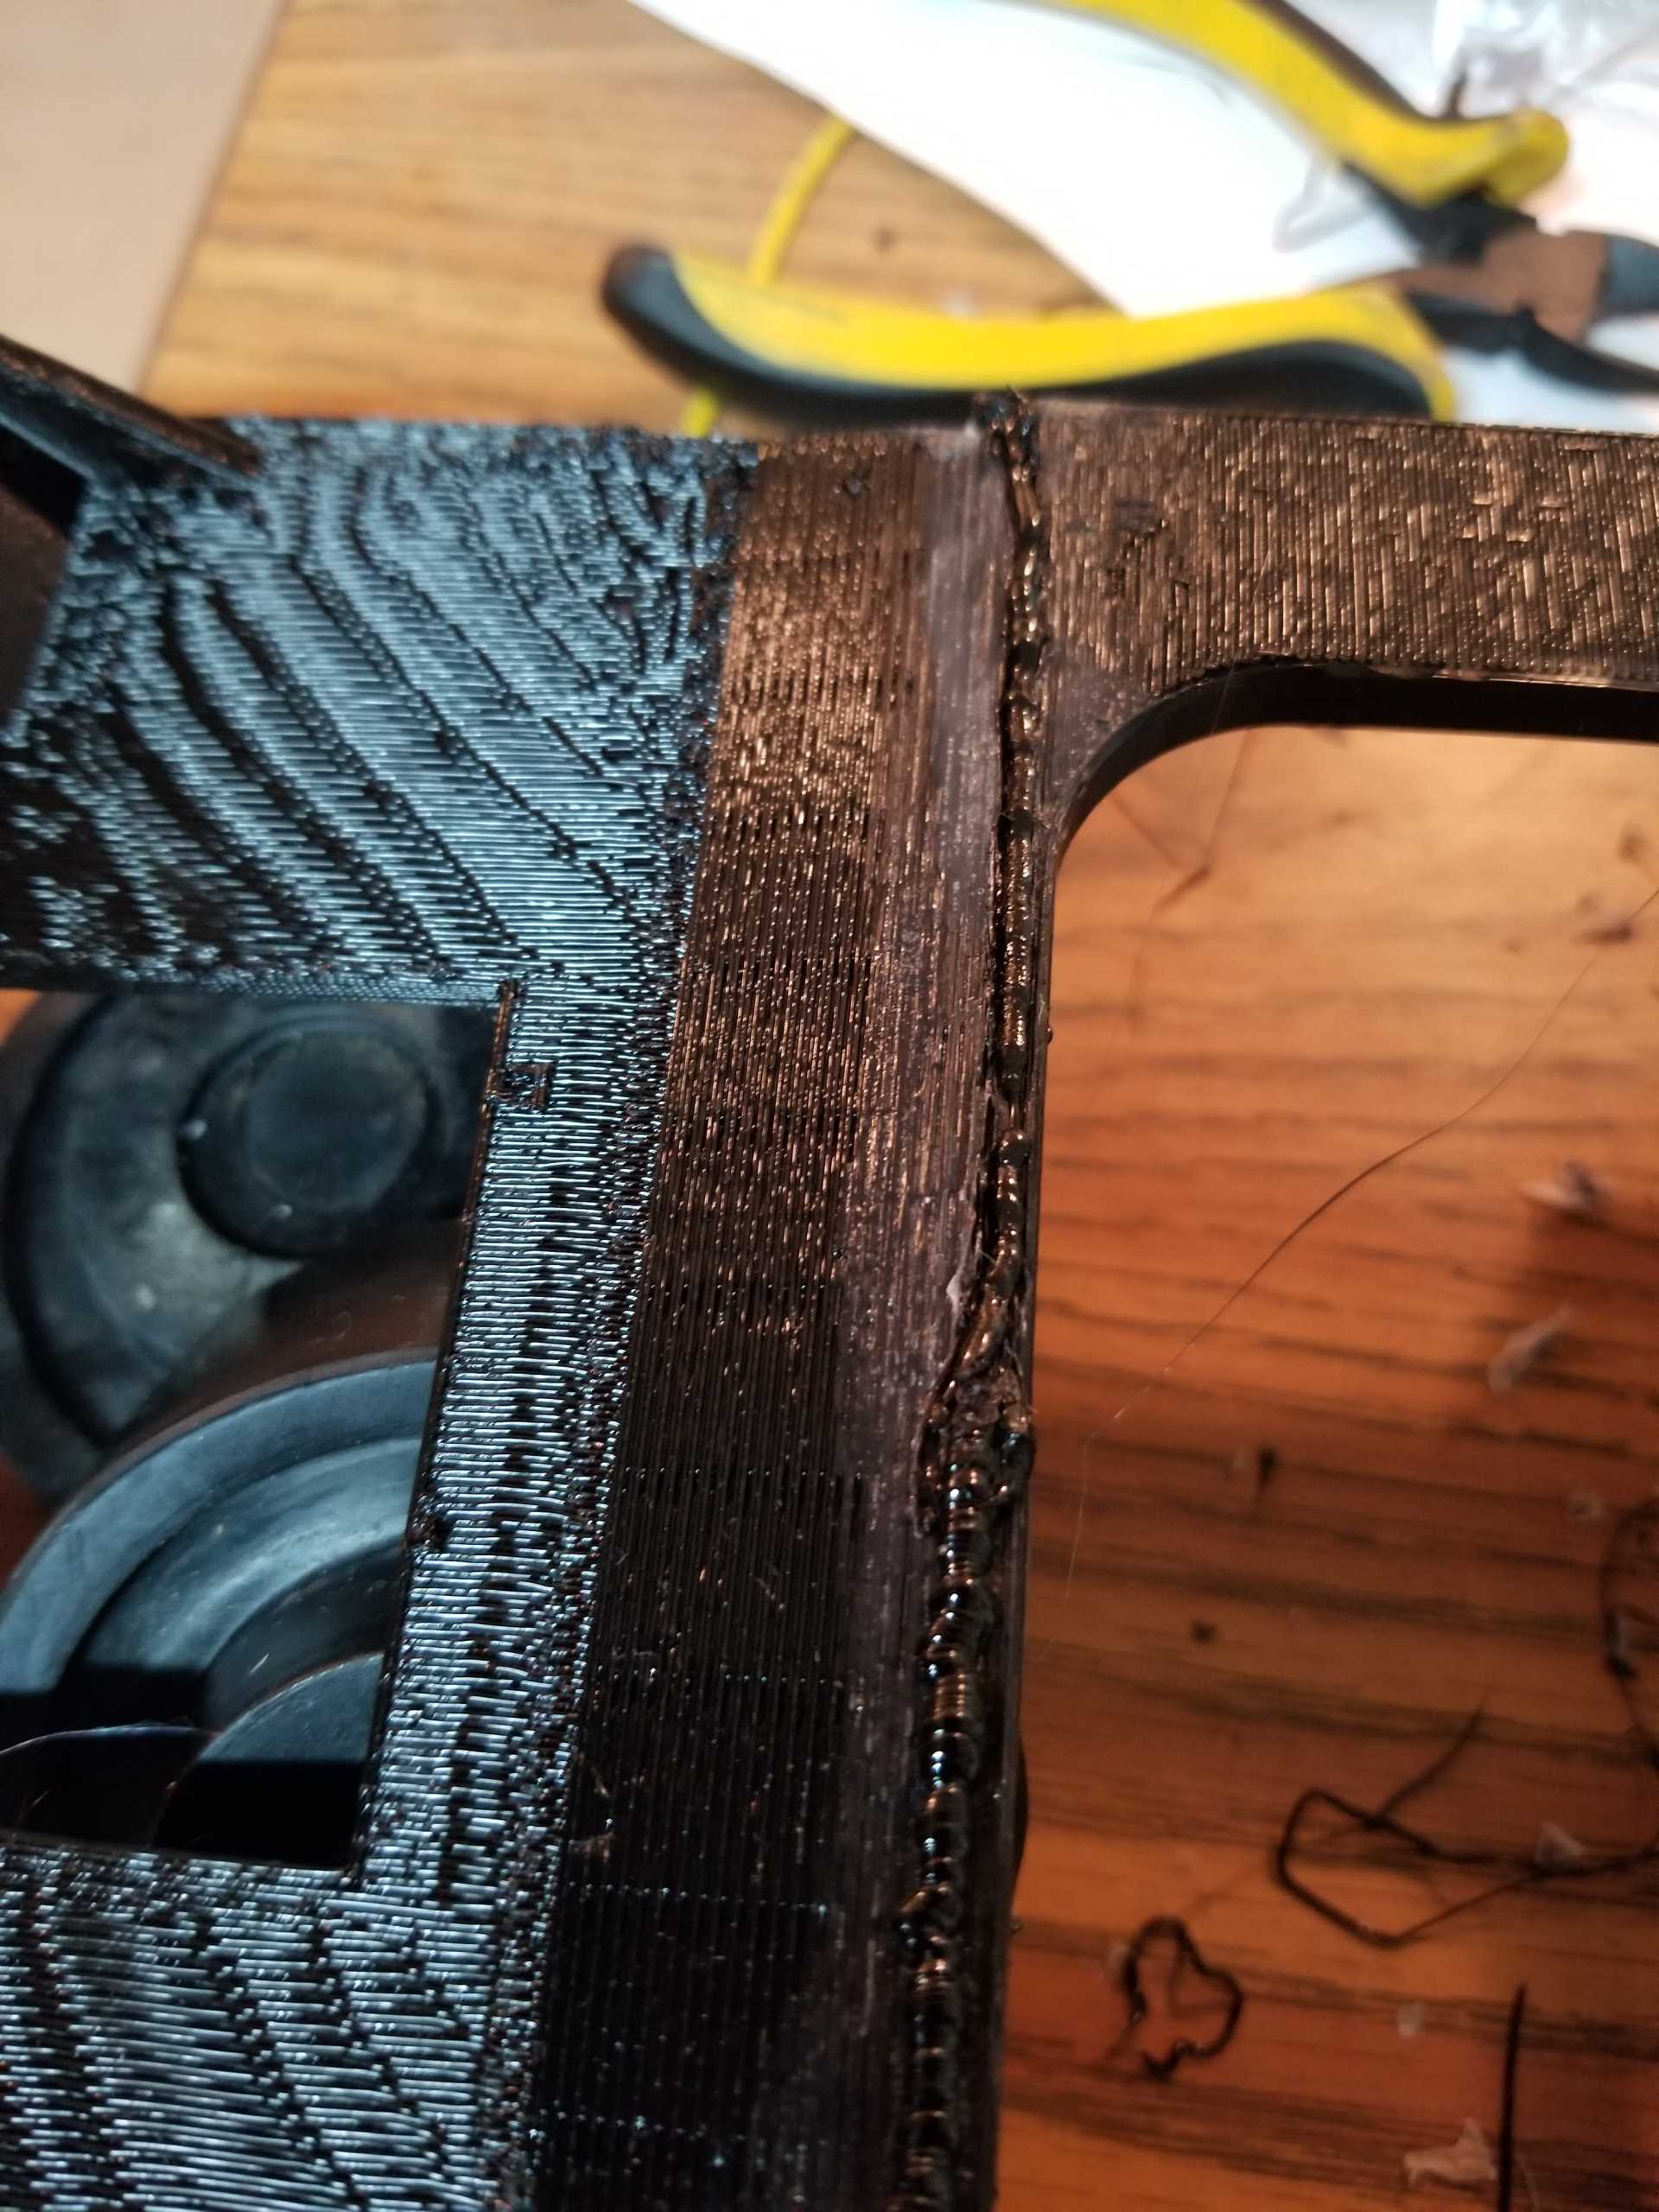
I finished printing each piece, now it's time for a photo shoot and gluing.
I included photos of how each piece lies on the print bed, and a closeup of some of the screw areas.
Gluing might be a bit tricky. With this 3d Gloop, you're supposed to clamp for about 15 minutes... I'm a bit short on clamps these days.
You'll notice some of the sides look a bit ugly. There's a reason for that. Some of the pieces printed better upside down, and the bottoms aren't always as nice looking due to support material.
I would not consider that to be an issue for this project since this piece isn't seen. It does give it a very home-made look though.


IP: Logged
88Fingers
Member
Posts: 208
From: Burlington Ontario Canada
Registered: Sep 2018


Feedback score: N/A
Leave feedback

Rate this member

Report this Post12-30-2019 09:01 AM Click Here to See the Profile for 88FingersSend a Private Message to 88FingersEdit/Delete MessageReply w/QuoteDirect Link to This Post
Hey Windex42, that is still some impressive work man! Kudos to you. Now please make the manifold I require. That will be great. Thanks man!....Fred W
IP: Logged
ltlfrari
Member
Posts: 5356
From: Wake Forest,NC,USA
Registered: Jan 2002


Feedback score: (4)
Leave feedback


Total ratings: 127
Rate this member

Report this Post12-30-2019 09:06 AM Click Here to See the Profile for ltlfrariClick Here to visit ltlfrari's HomePageSend a Private Message to ltlfrariEdit/Delete MessageReply w/QuoteDirect Link to This Post
Impressive.

Hop long did everything take to print?
And, if you don't mind me asking, what do you estimate the cost was in materials to print it all?

------------------
Anything I might say is probably worth what you paid for it, so treat it accordingly!

Dave

www.ltlfrari.com

IP: Logged
darbysan
Member
Posts: 949
From: Las Vegas
Registered: Oct 2014


Feedback score: (4)
Leave feedback

Rate this member

Report this Post12-30-2019 11:03 AM Click Here to See the Profile for darbysanSend a Private Message to darbysanEdit/Delete MessageReply w/QuoteDirect Link to This Post
Nice work. You might try installing them in the vehicle without being glued, just to see how they fit. When I first got my Fiero, it was missing all of the skeleton behind the window switch panel. I made a plywood panel to replace the missing part, to get the armrest to sit level. It may be that some attachment to the frame that the skeleton sits on, and then with the console pieces attached as well, that a multi piece skeleton may work just fine.

For sure, that front piece where the radios install would be a welcome addition to many Fieros.

------------------
'87 GT , '00 3800 Series II SC, 4t65e, Vue Power Steering. (SOLD)

IP: Logged
windex42
Member
Posts: 34
From: Kapolei, HI
Registered: Dec 2019


Feedback score: N/A
Leave feedback

Rate this member

Report this Post01-06-2020 03:27 AM Click Here to See the Profile for windex42Send a Private Message to windex42Edit/Delete MessageReply w/QuoteDirect Link to This Post
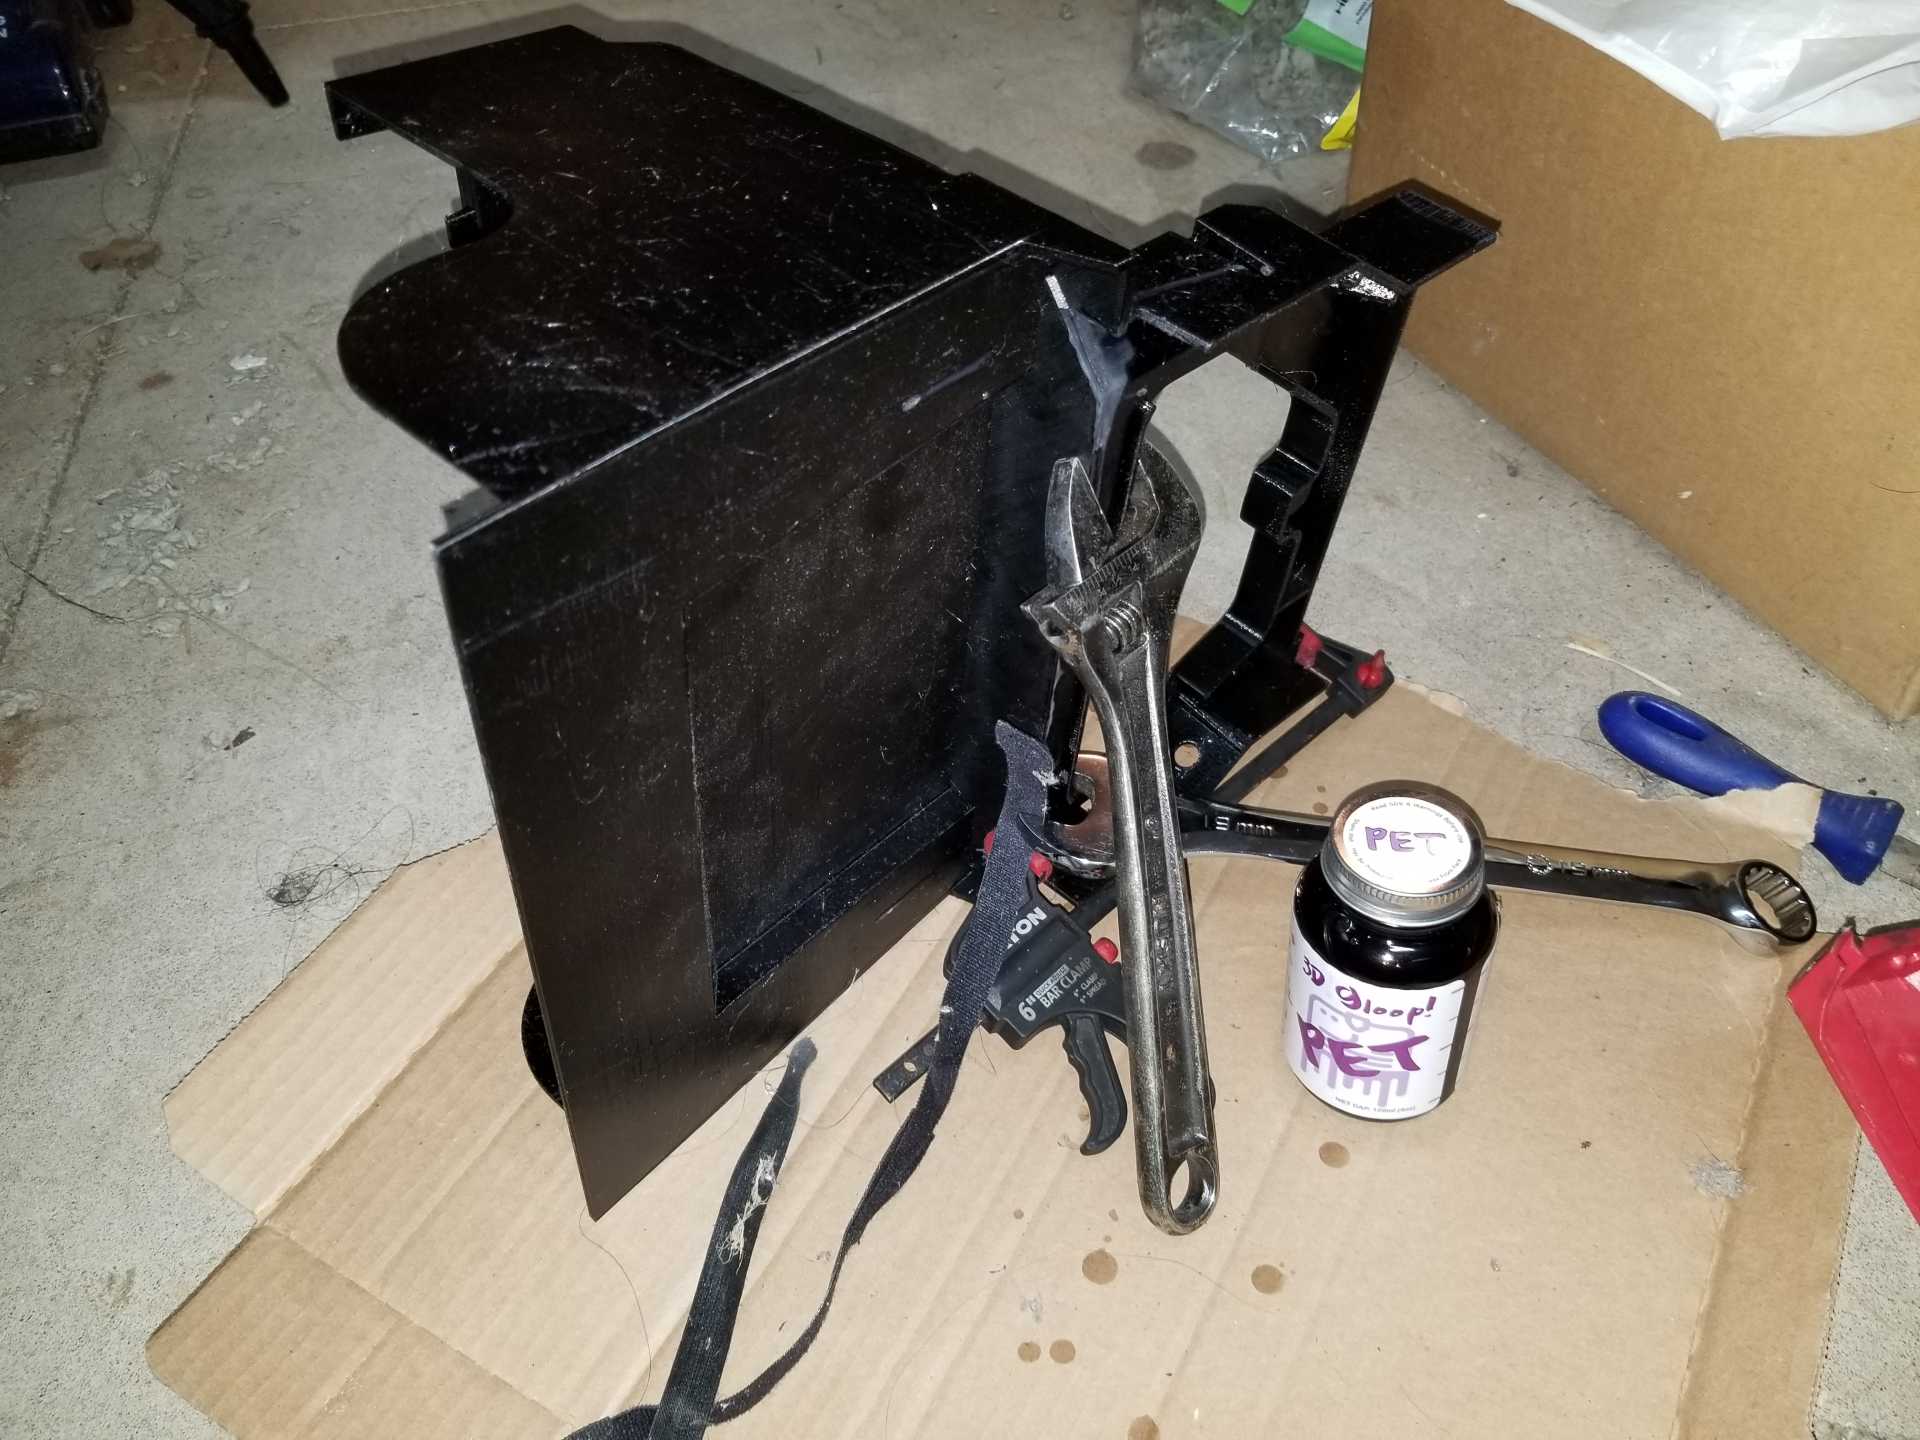
Here's a followup to the project.

At this time, I have it all printed, glued together, drilled, and installed back into the car.
Gluing turned out to be a bit of a challenge. I never seem to have good luck with plastic.

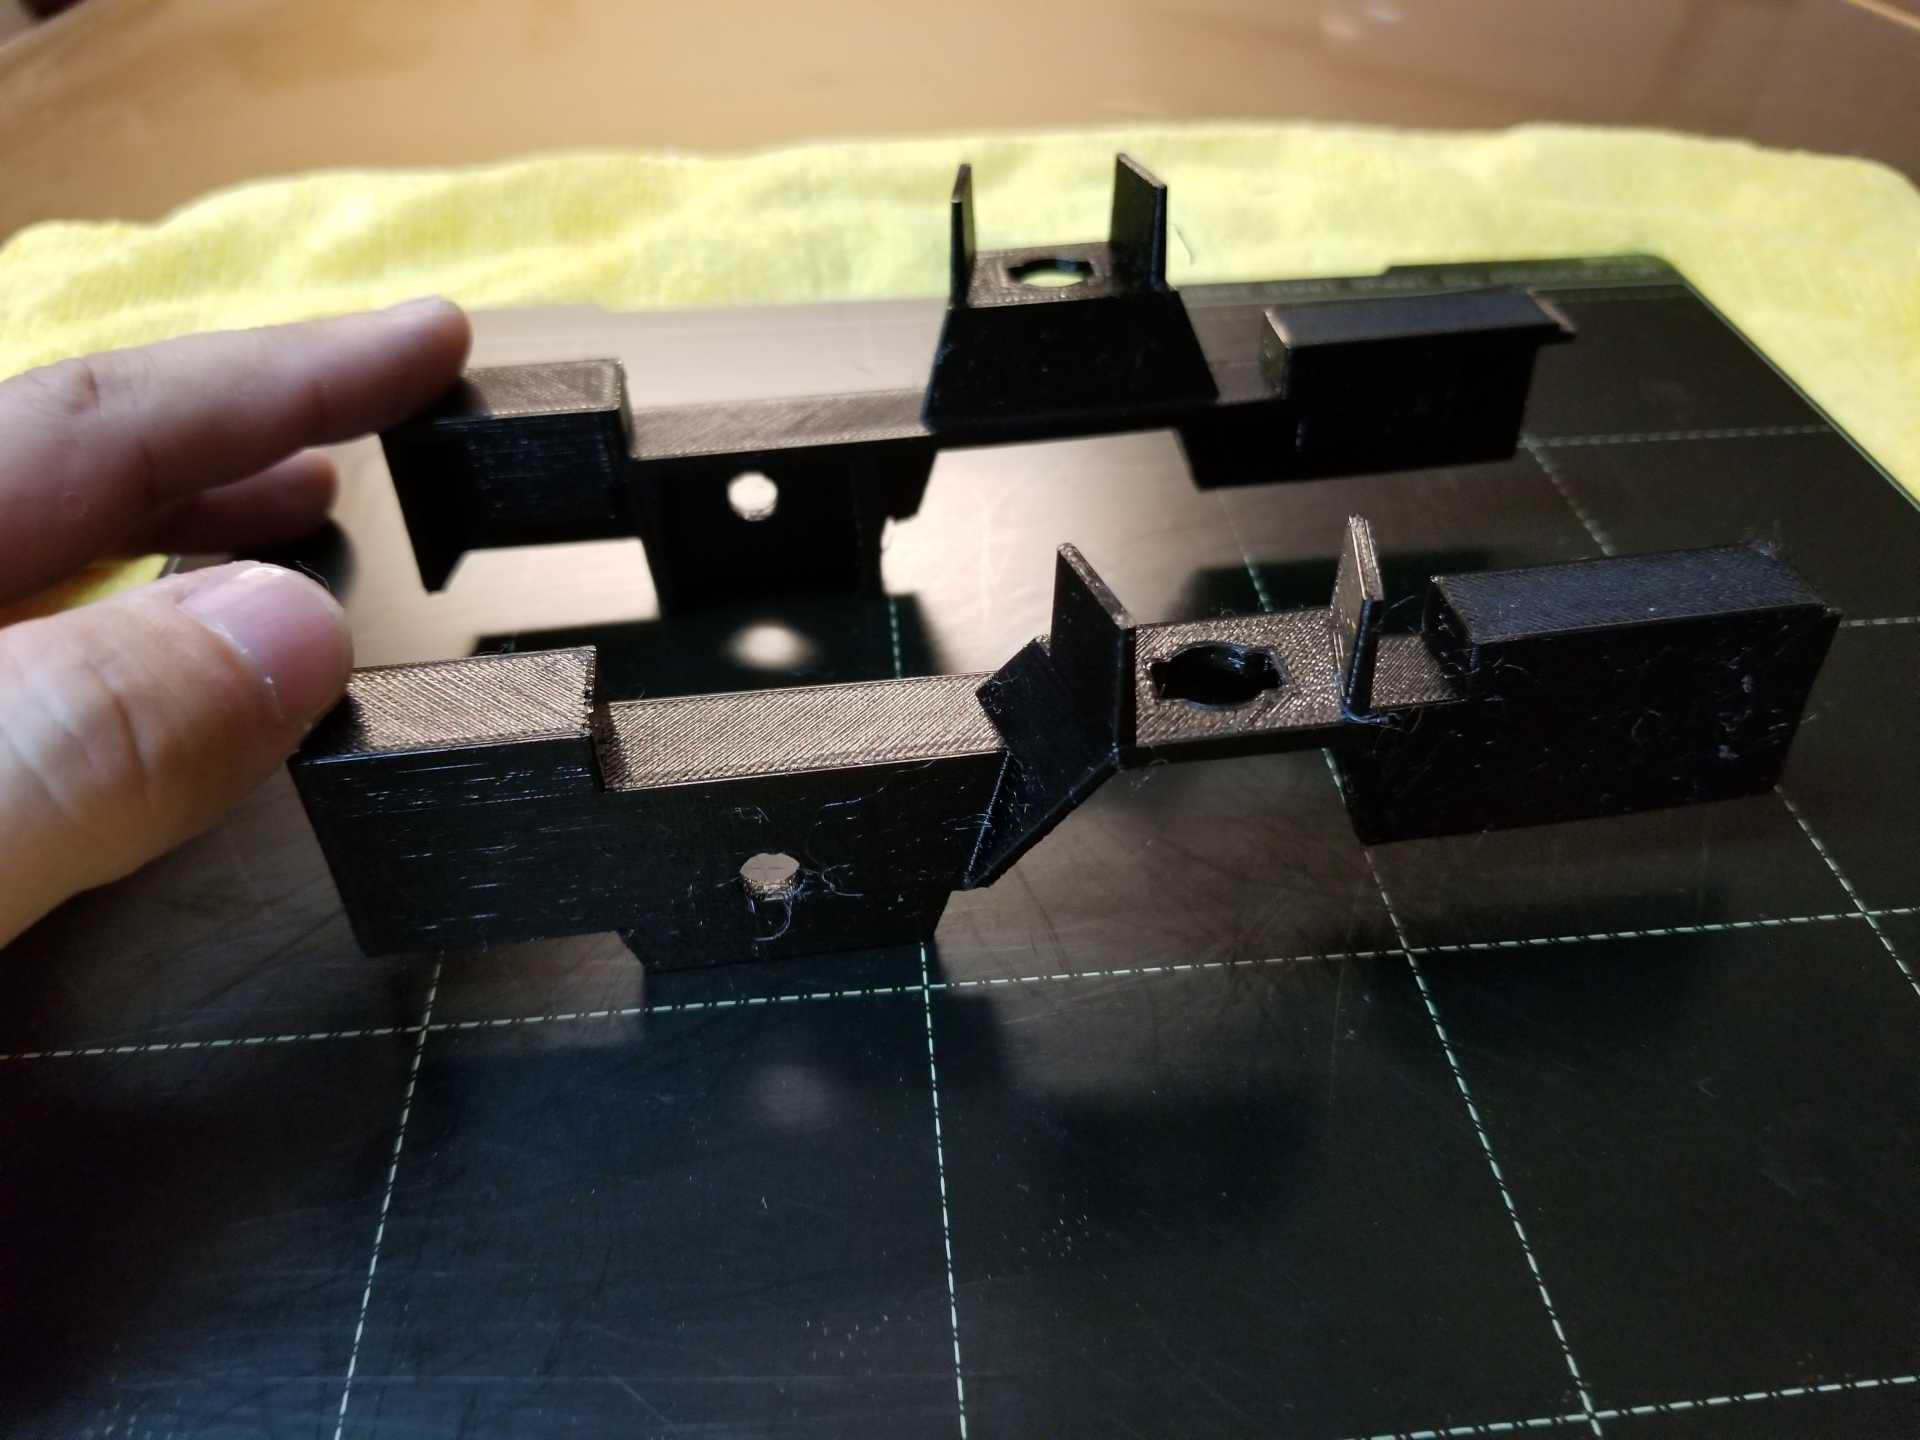
I expected to use 3dGloop PET to adhere all pieces together, but that will NOT be the solution for every piece.
For example:
The Stereo/HVAC piece can glue to the Stand.
The Stereo/HVAC piece can glue to Armrest1
Armrest4 can glue to Armrest5
Unfortunately, I had to find another solution for the following
Armrest3 and Armrest4 do not glue well
Armrest2a, 2b, and 2c do not glue well
The alternative I used was a handheld 3d pen (Link below)
You can use it like a hot glue gun to bond two pieces together. You can use the same filament in the pen that you used to print the pieces.
To get the 3d pen to work best, you should try to use the tip of the pen to melt the 2 pieces as you apply the new plastic. I found a firm zigzag pattern works well to get everything nicely melted
There's another method I haven't tried. Use a soldering iron with a flat blade and extra filament to weld two pieces together. I think it's still important to not only melt the spare filament, but to also get the two pieces nice and hot.

The pen is about $40 on Amazon, but in the past, I got one for $20 and it worked great.
https://www.amazon.com/MYNT...46ZJ?ref_=ast_sto_dp
IP: Logged
TheDigitalAlchemist
Member
Posts: 12453
From: Long Island, NY
Registered: Jan 2012


Feedback score: (5)
Leave feedback


Total ratings: 94
Rate this member

Report this Post01-06-2020 04:10 AM Click Here to See the Profile for TheDigitalAlchemistClick Here to visit TheDigitalAlchemist's HomePageSend a Private Message to TheDigitalAlchemistEdit/Delete MessageReply w/QuoteDirect Link to This Post
Thank you for doing this. Very cool!
IP: Logged
Australian
Member
Posts: 4701
From: Sydney Australia
Registered: Sep 2004


Feedback score: (3)
Leave feedback

Rate this member

Report this Post01-06-2020 04:13 AM Click Here to See the Profile for AustralianClick Here to visit Australian's HomePageSend a Private Message to AustralianEdit/Delete MessageReply w/QuoteDirect Link to This Post
You nerd you legend.
IP: Logged
da.slyboy
Member
Posts: 482
From: Wichita, KS
Registered: Dec 2012


Feedback score: (4)
Leave feedback

Rate this member

Report this Post01-06-2020 10:24 AM Click Here to See the Profile for da.slyboySend a Private Message to da.slyboyEdit/Delete MessageReply w/QuoteDirect Link to This Post
If the fit turns out good, I would be curious on accessing companies that print using metal or other stronger material. Using a stronger material would improve durability and perhaps allow for better customization as it may allow the ability for more/better attachment points. What I find amusing is that I just spent most of this last weekend thinking about this possibility and suddenly this tread comes to the top .
IP: Logged
wftb
Member
Posts: 3692
From: kincardine,ontario,canada
Registered: Jun 2005


Feedback score: (4)
Leave feedback

Rate this member

Report this Post01-06-2020 10:57 AM Click Here to See the Profile for wftbSend a Private Message to wftbEdit/Delete MessageReply w/QuoteDirect Link to This Post
Awesome work. And a lot of people on here could use one of these.

------------------
86 GT built 2.2 ecotec turbo
rear SLA suspension
QA1 coilovers on tube arms

IP: Logged
PFF
System Bot
mmeyer86gt/gtp
Member
Posts: 3853
From: galt, ca
Registered: Sep 2001


Feedback score:    (161)
Leave feedback


Total ratings: 73
Rate this member

Report this Post01-06-2020 04:15 PM Click Here to See the Profile for mmeyer86gt/gtpSend a Private Message to mmeyer86gt/gtpEdit/Delete MessageReply w/QuoteDirect Link to This Post
Although it is a very nice model it has some issues. I am learning fusion360 to work on the small issues. I appreciate all the work that the person did. Lke super appreciate it !! I would love to have a more open conversation with the poster but never responded to me PM's.
IP: Logged
cvxjet
Member
Posts: 3649
From: ca, usa
Registered: May 2010


Feedback score: (1)
Leave feedback

Rate this member

Report this Post04-16-2020 06:48 PM Click Here to See the Profile for cvxjetSend a Private Message to cvxjetEdit/Delete MessageReply w/QuoteDirect Link to This Post
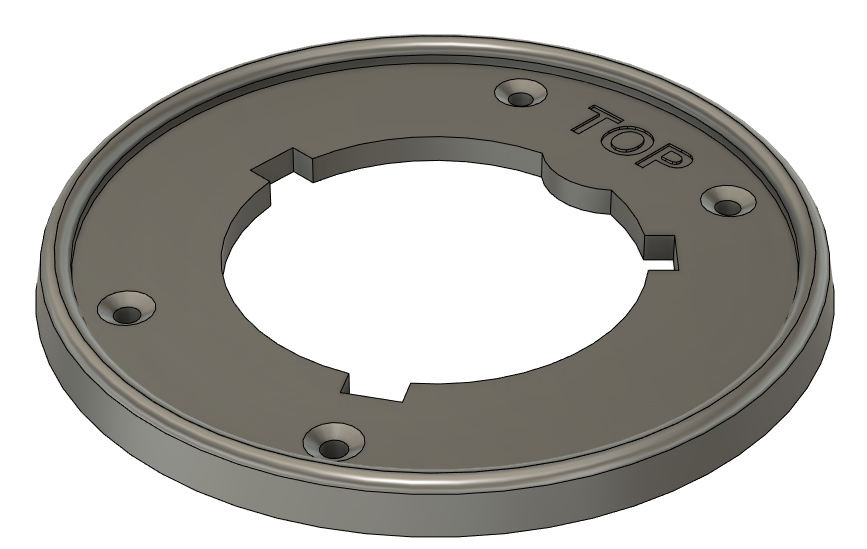
Has there been anymore progress on this situation? I think most people could use a new Skeleton......(I may have 2 screw holes in mine that have not cracked)
IP: Logged
slicknick
Member
Posts: 385
From: Jacksonville, FL
Registered: Feb 2010


Feedback score: N/A
Leave feedback

Rate this member

Report this Post04-17-2020 12:13 PM Click Here to See the Profile for slicknickSend a Private Message to slicknickEdit/Delete MessageReply w/QuoteDirect Link to This Post
Holy moly. this is a HUGE print.

This had to have taken a week if not more of 24/7 printing.

How big is your bed?
IP: Logged
cvxjet
Member
Posts: 3649
From: ca, usa
Registered: May 2010


Feedback score: (1)
Leave feedback

Rate this member

Report this Post04-17-2020 03:06 PM Click Here to See the Profile for cvxjetSend a Private Message to cvxjetEdit/Delete MessageReply w/QuoteDirect Link to This Post
Hey Slick...This is a old post so I brought it up to see what progress had been made......the files are on a link in the first post...Yes it is huge...But the problems with our skeletons are huge also.....

Someone needs to come up with a viable replacement- One guy was doing just that years ago but passed before he could complete it....Then, years later, someone was talking about resurrecting it and he got beat on for "taking the deceased guys idea"......That seemed a bit silly to me; Are we now doomed to never have replacement parts as people who created them pass?
IP: Logged
windex42
Member
Posts: 34
From: Kapolei, HI
Registered: Dec 2019


Feedback score: N/A
Leave feedback

Rate this member

Report this Post04-18-2020 06:23 AM Click Here to See the Profile for windex42Send a Private Message to windex42Edit/Delete MessageReply w/QuoteDirect Link to This Post
As far as progress on this project goes, I haven't made any changes since my last post.
mmeyer86gt/gtp and I talked about collaborating on it to work out all the kinks, he might have some news, hard to say.
There's things I would like to do to improve it, but it's kind of ready as-is.

At this time, if you want to print it, your best bet would be to print on a Prusa i3 printer and glue the parts together.
It could work on other similar printers, but we noticed that some programs don't quite get the geometry right. Prusa's program gets it right.

I'm glad to say that the one I printed for myself is still holding up great.
IP: Logged
IMSA GT
Member
Posts: 10268
From: California
Registered: Aug 2007


Feedback score:    (8)
Leave feedback


Total ratings: 251
Rate this member

Report this Post04-18-2020 11:13 AM Click Here to See the Profile for IMSA GTSend a Private Message to IMSA GTEdit/Delete MessageReply w/QuoteDirect Link to This Post
 
quote
Originally posted by cvxjet:

Hey Slick...This is a old post so I brought it up to see what progress had been made......the files are on a link in the first post...Yes it is huge...But the problems with our skeletons are huge also.....

Someone needs to come up with a viable replacement- One guy was doing just that years ago but passed before he could complete it....Then, years later, someone was talking about resurrecting it and he got beat on for "taking the deceased guys idea"......That seemed a bit silly to me; Are we now doomed to never have replacement parts as people who created them pass?


Just to enlighten people about that guy, I believe his name was Todd and he did NOT understand the products that he was using. He made molds of different parts and then poured plastic resin into the mold to create the part. The issue is that there is NO pourable resin that can be used due to lack of strength, screw tension, and overall abuse. All of his ideas were failures other than maybe the replacement knob for the AC panel. He even had the bright idea to mold the GT tailights and pour them with a clear resin. If you even tried to wash them one time, your hand would push right through the lens. All the pourable resins are designed for prototype use only before actual production using the proper materials.
IP: Logged
mmeyer86gt/gtp
Member
Posts: 3853
From: galt, ca
Registered: Sep 2001


Feedback score:    (161)
Leave feedback


Total ratings: 73
Rate this member

Report this Post04-18-2020 01:35 PM Click Here to See the Profile for mmeyer86gt/gtpSend a Private Message to mmeyer86gt/gtpEdit/Delete MessageReply w/QuoteDirect Link to This Post
i have a prototype made and testing is starting soon. the issue is the virus and getting material. i have been working 2 jobs to stay aflot and keep making this thing happen. hope to have prototyps inthe hands of testers by the end of the month.
IP: Logged
cvxjet
Member
Posts: 3649
From: ca, usa
Registered: May 2010


Feedback score: (1)
Leave feedback

Rate this member

Report this Post04-18-2020 02:02 PM Click Here to See the Profile for cvxjetSend a Private Message to cvxjetEdit/Delete MessageReply w/QuoteDirect Link to This Post
 
quote
Originally posted by mmeyer86gt/gtp:

i have a prototype made and testing is starting soon. the issue is the virus and getting material. i have been working 2 jobs to stay aflot and keep making this thing happen. hope to have prototyps inthe hands of testers by the end of the month.


Rock solid Mr. Meyer! Mine fell apart when I removed it to replace a shifter cable that broke- I can't count high enough to tell you how many pieces it broke into.......
IP: Logged
mmeyer86gt/gtp
Member
Posts: 3853
From: galt, ca
Registered: Sep 2001


Feedback score:    (161)
Leave feedback


Total ratings: 73
Rate this member

Report this Post04-23-2020 02:16 AM Click Here to See the Profile for mmeyer86gt/gtpSend a Private Message to mmeyer86gt/gtpEdit/Delete MessageReply w/QuoteDirect Link to This Post
IP: Logged
Pac-Man
Member
Posts: 20
From: Aberdeen
Registered: Jul 2014


Feedback score: N/A
Leave feedback

Rate this member

Report this Post08-05-2020 11:05 AM Click Here to See the Profile for Pac-ManClick Here to visit Pac-Man's HomePageSend a Private Message to Pac-ManEdit/Delete MessageReply w/QuoteDirect Link to This Post
I am curious if any more progress has been made on this? I know that COVID-19 has really slowed everything down, but this is too great of an innovation for us Fiero lovers!

------------------
"No one ever suggested that what we do is easy. Nothing worthwhile ever is." - Devon Miles

Check out Project: K.I.T.T.
..:: Blog | Facebook | YouTube ::..

The Ultimate Knight Rider Map

IP: Logged
PFF
System Bot
dremu
Member
Posts: 283
From: Livermore CA
Registered: Feb 2019


Feedback score: (1)
Leave feedback

Rate this member

Report this Post08-05-2020 09:29 PM Click Here to See the Profile for dremuSend a Private Message to dremuEdit/Delete MessageReply w/QuoteDirect Link to This Post
If you don't use PETG as the material, gluing becomes easier IME. My go-to print material is ABS and find this stuff works great, though CA glue works too, especially the gel.

For those without 3D printers, it's not the material that costs so much ... a 1 or 2kg spool is, say, $20-50 depending on material and brand, and you wouldn't need a whole spool even for a project this big. It's the printer, which ain't cheap, and has various moving and hot parts which wear out and get clogged, and the sheer time, that cost, when you're making more than one of these or making them as anything other than a labor of love. And even with the best of printers and material, if the power goes out or the head clogs or the material jams or your garage temperature fluctuates or the moon isn't aligned with Venus, the print fails. It's more magic than science, and dark magic at best.

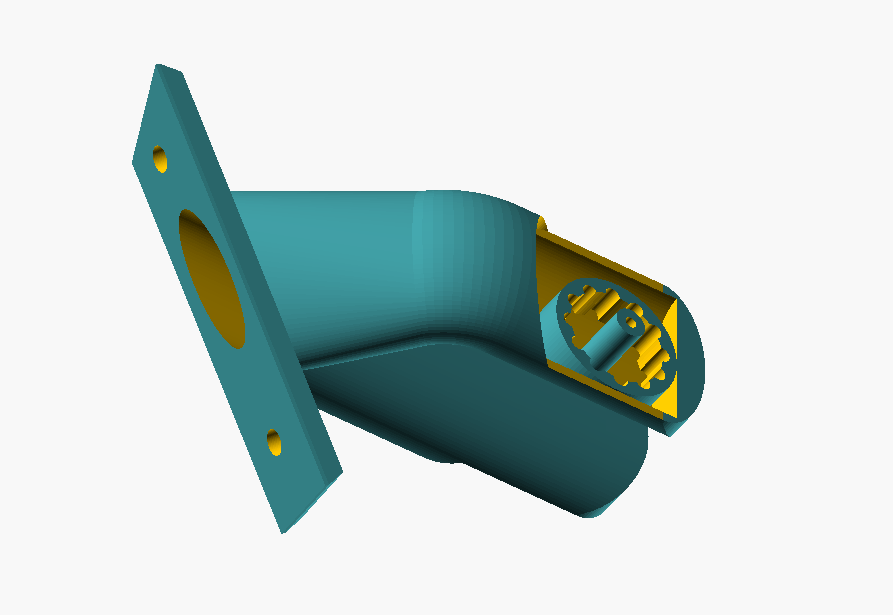
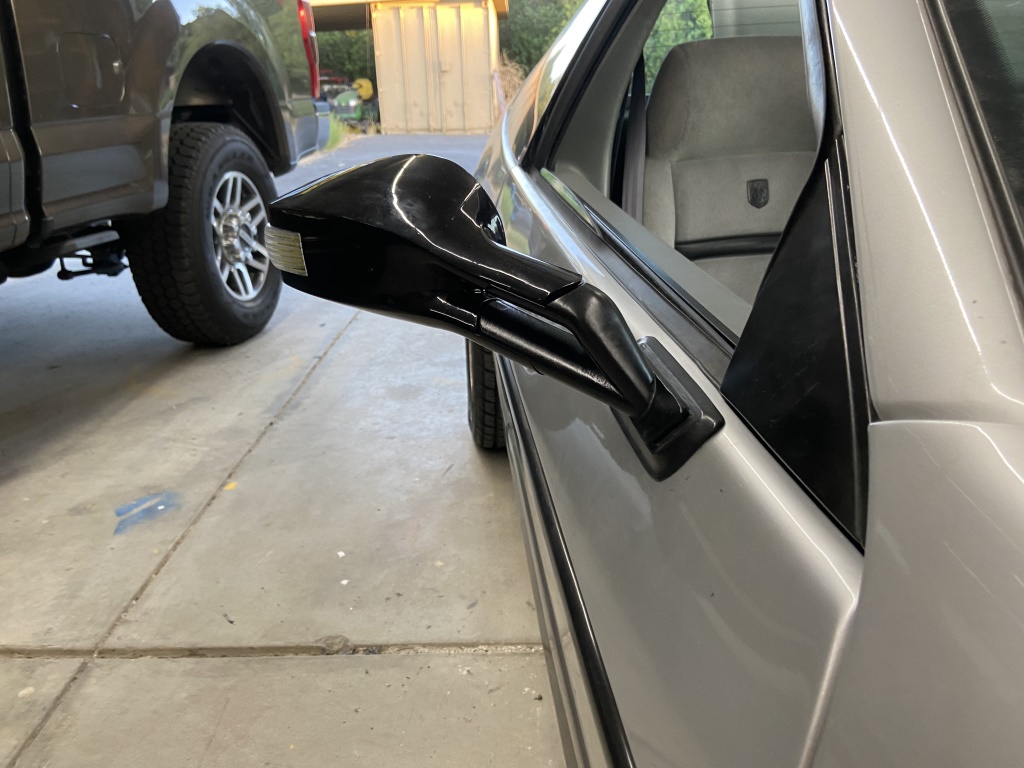
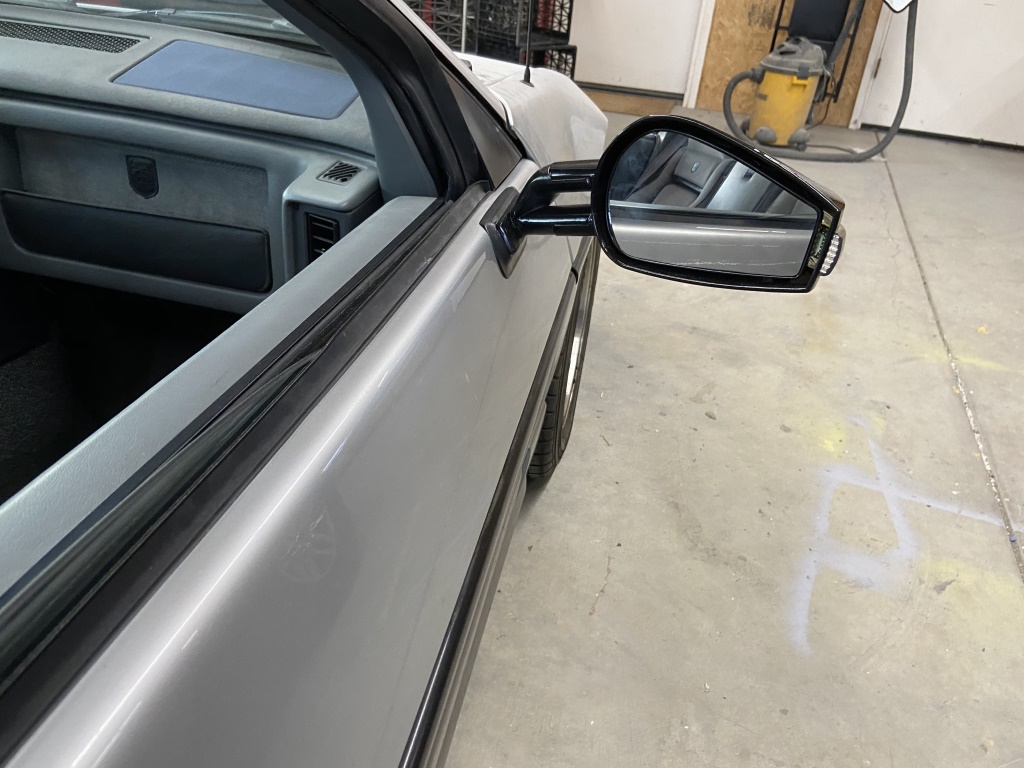
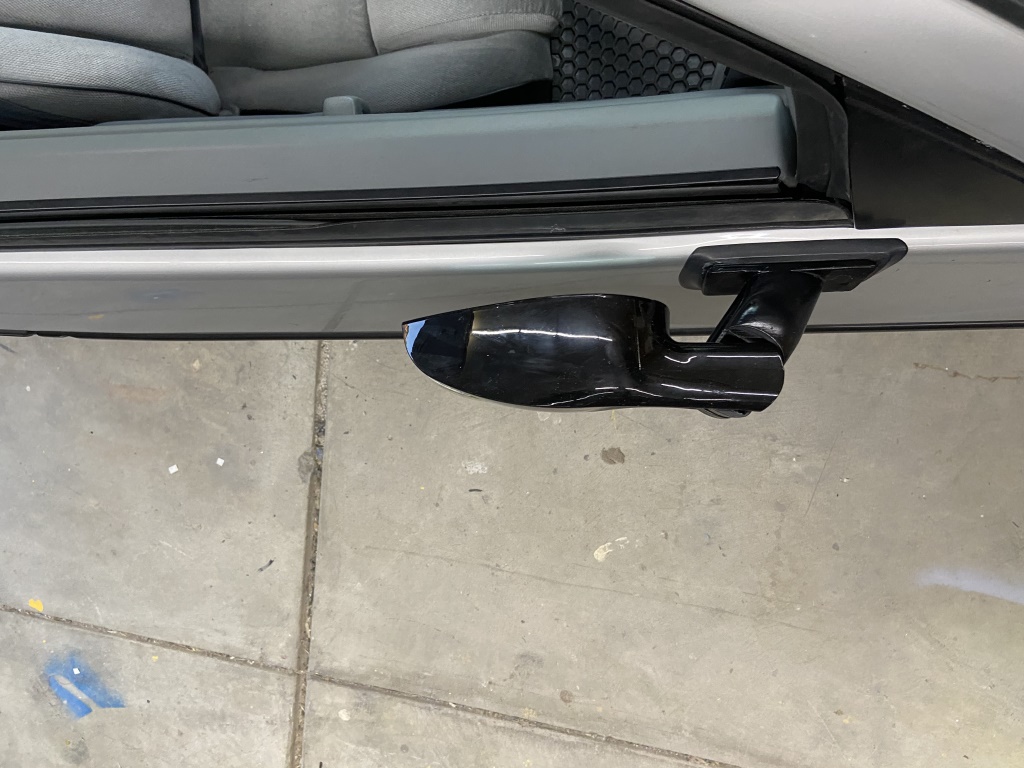
All of that said, I highly recommend them for automotive hobbyists. The ability to make repro pieces like this, in addition to custom pieces, is tremendous. My latest thing was a pair of bases for those Ebay F430-style mirror, that bolt up to the factory mounts. Keeps the ability to fold in, etc etc.


Anyway, don't mean to hijack the thread, but want to make y'all think of what you could do with a printer, if you had one yourself

-- A
IP: Logged
Chief08
Member
Posts: 323
From: Yuma AZ. USA
Registered: Feb 2017


Feedback score: (2)
Leave feedback

Rate this member

Report this Post08-06-2020 03:29 PM Click Here to See the Profile for Chief08Send a Private Message to Chief08Edit/Delete MessageReply w/QuoteDirect Link to This Post
 
quote
Originally posted by mmeyer86gt/gtp:

what i have been doing


That's awesome Shirt, keep up the good work.
IP: Logged
IMSA GT
Member
Posts: 10268
From: California
Registered: Aug 2007


Feedback score:    (8)
Leave feedback


Total ratings: 251
Rate this member

Report this Post08-06-2020 10:37 PM Click Here to See the Profile for IMSA GTSend a Private Message to IMSA GTEdit/Delete MessageReply w/QuoteDirect Link to This Post
Mr. Meyer doesn't plug his fine work, so I'll do it for him

[This message has been edited by IMSA GT (edited 08-06-2020).]

IP: Logged
cvxjet
Member
Posts: 3649
From: ca, usa
Registered: May 2010


Feedback score: (1)
Leave feedback

Rate this member

Report this Post08-06-2020 11:33 PM Click Here to See the Profile for cvxjetSend a Private Message to cvxjetEdit/Delete MessageReply w/QuoteDirect Link to This Post
I have one installed in my car as a test...There were a few adjustments but he is working to correct them........It is a very nice piece.

IP: Logged
windex42
Member
Posts: 34
From: Kapolei, HI
Registered: Dec 2019


Feedback score: N/A
Leave feedback

Rate this member

Report this Post08-06-2020 11:54 PM Click Here to See the Profile for windex42Send a Private Message to windex42Edit/Delete MessageReply w/QuoteDirect Link to This Post
Hi, I do have some updates.

I agree, ABS is much easier to glue, although, it's more difficult to print. The corners warp a bit sometimes. That doesn't matter as much since this piece is mostly unseen - I had to shave off some bits with an X-Acto knife to get them to fit just right
I've improved some of the joining sections between the pieces, so the glue has more surface area to bond

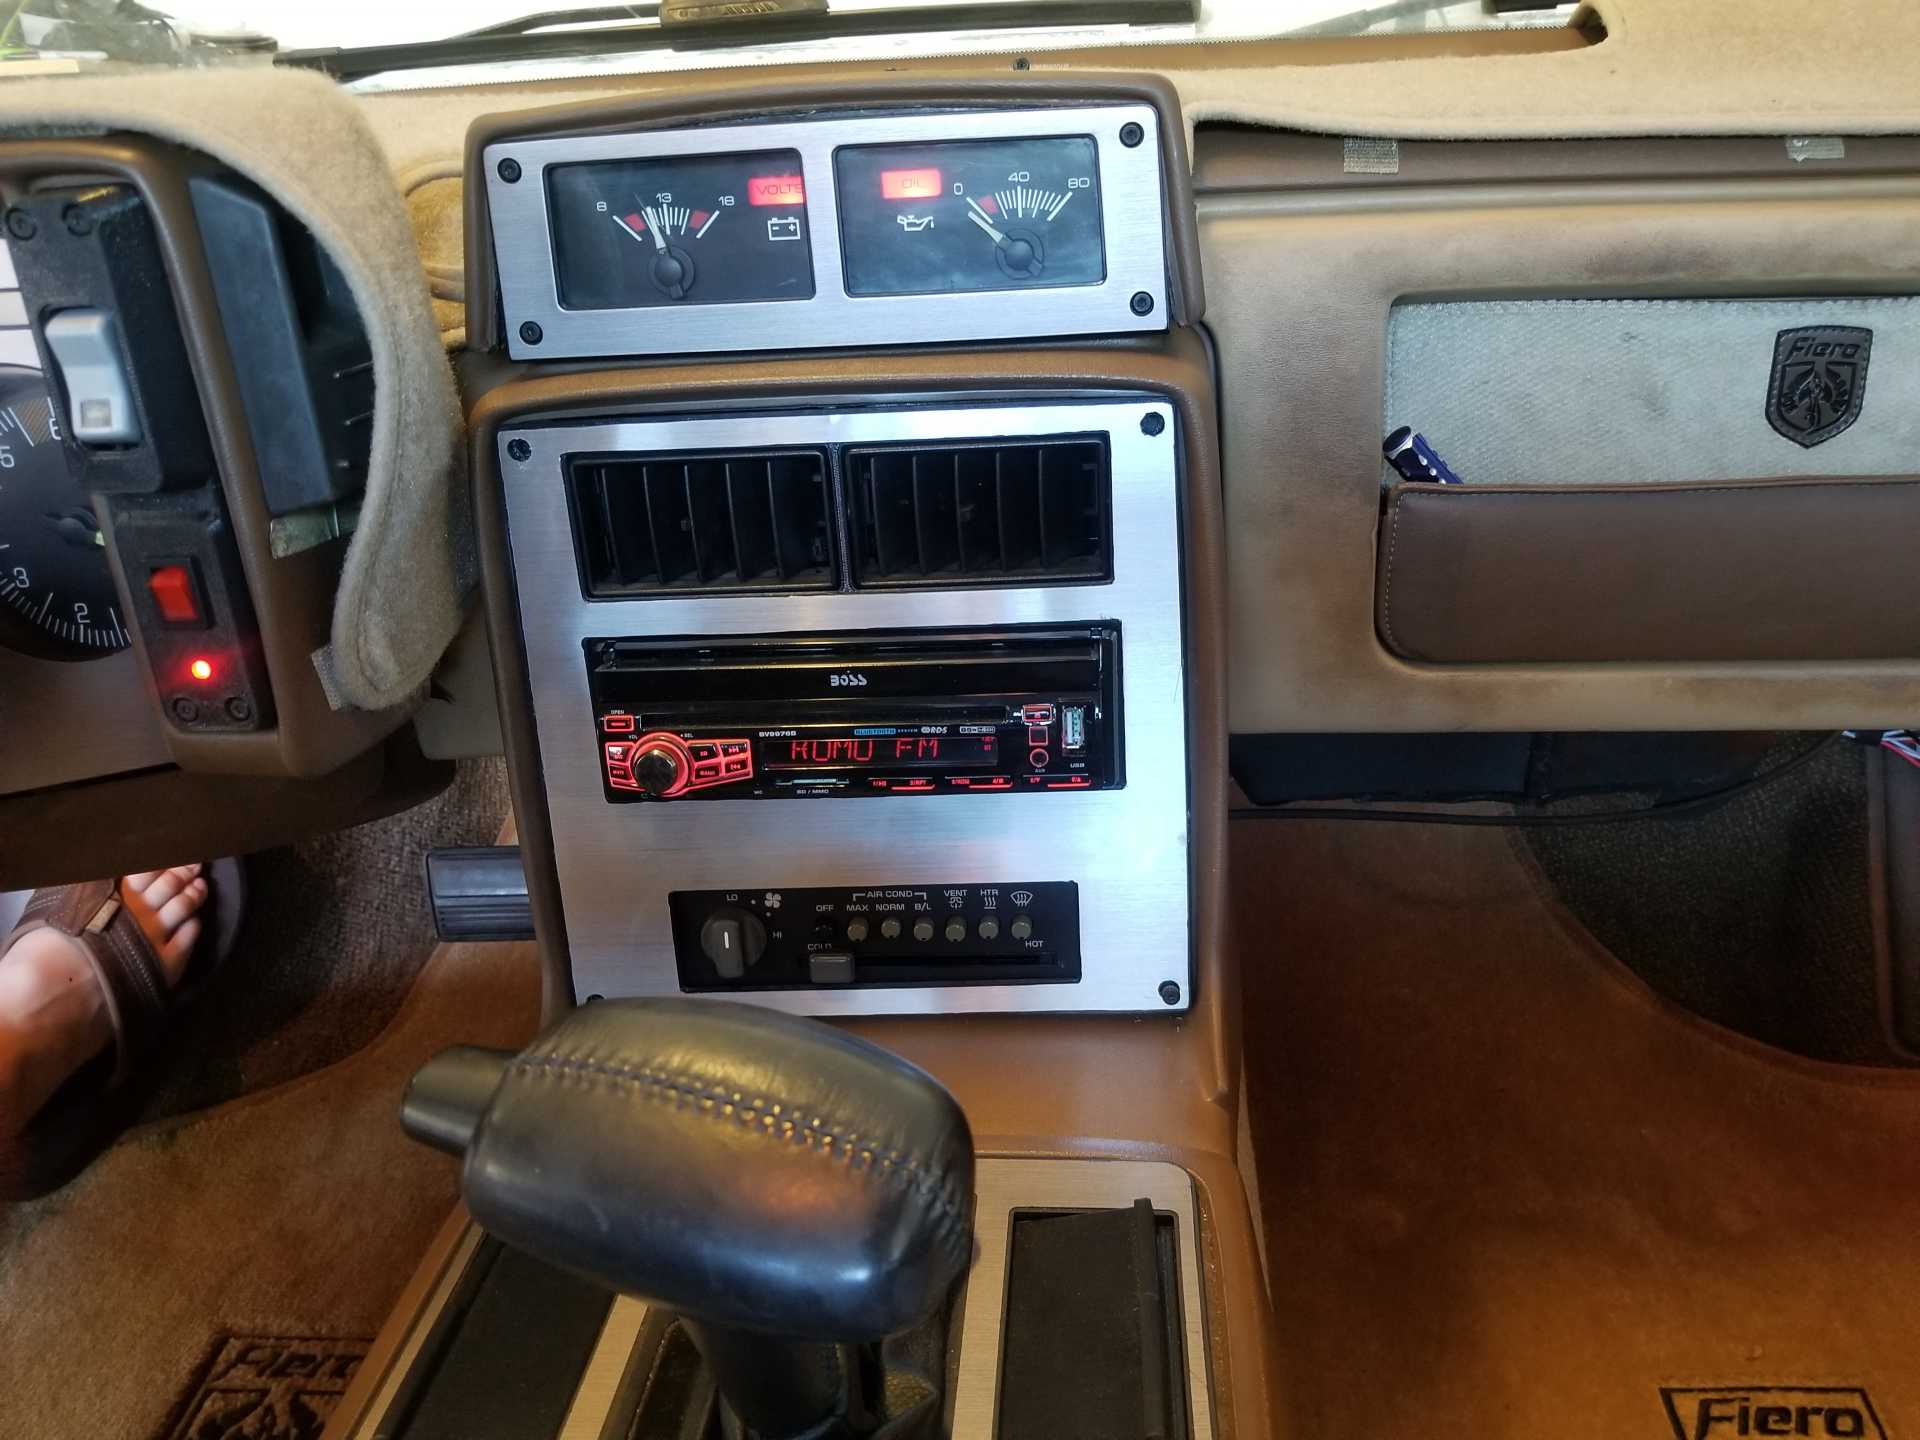
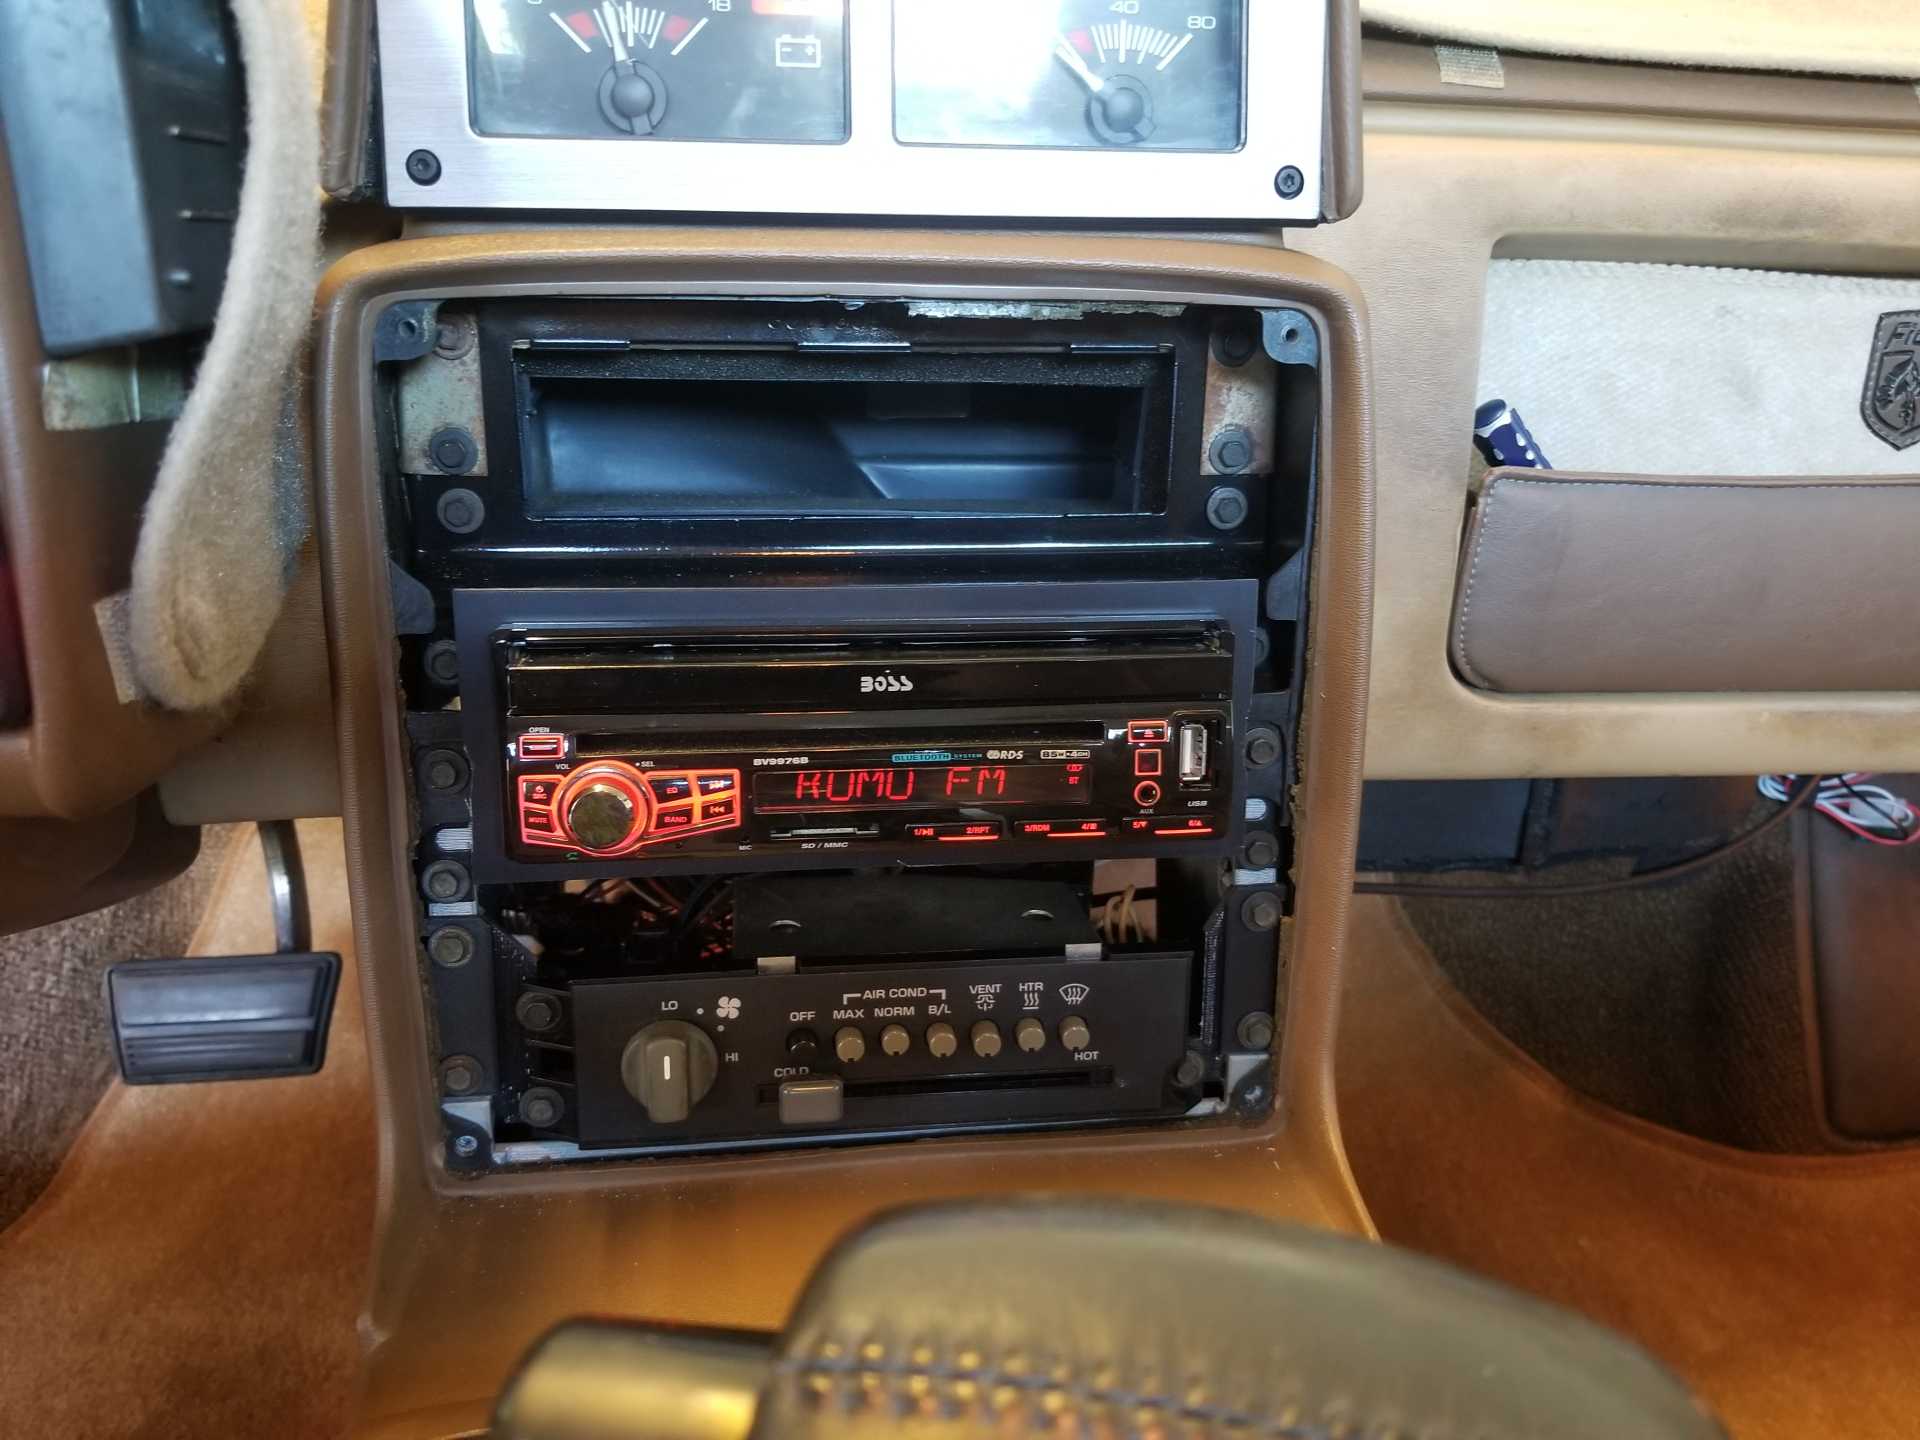
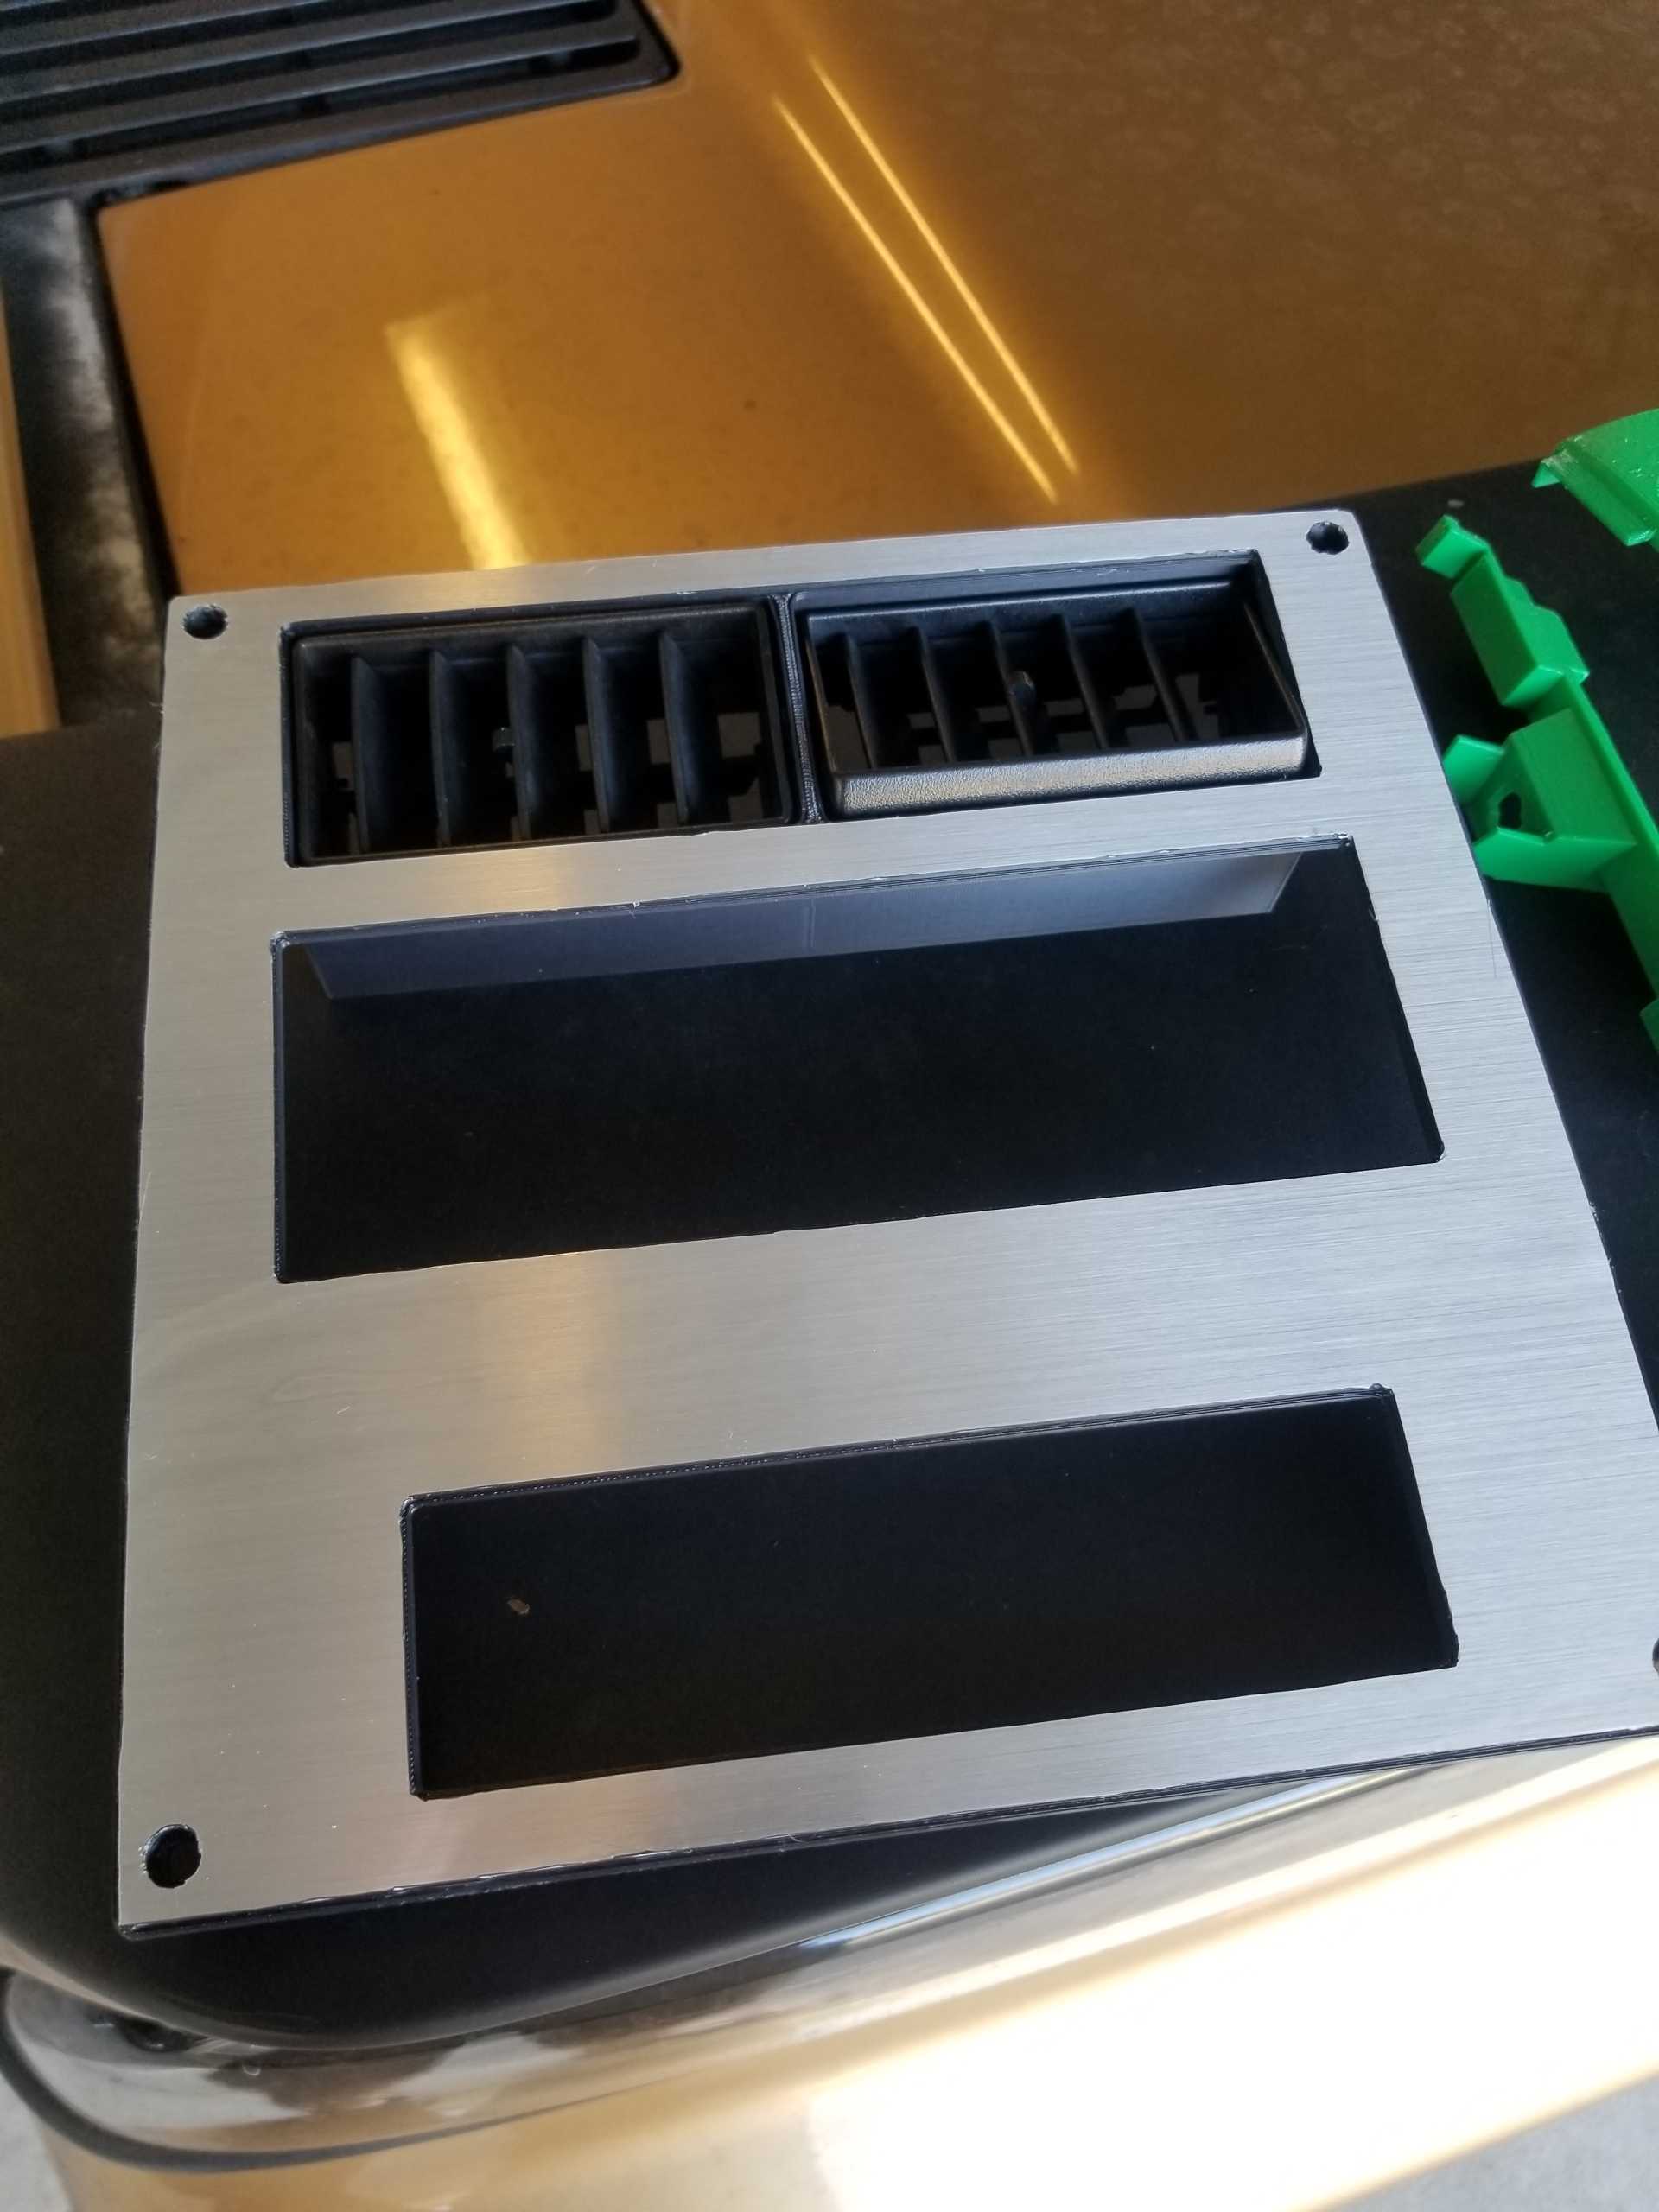
My most recent work has been in the radio area.
I reprinted the entire radio housing to hold a single DIN head unit toward the top, and the HVAC toward the bottom.
I did some other versions for combinations of original radio, single din, and swapped locations.

I'll be happy to help anyone with the actual printing

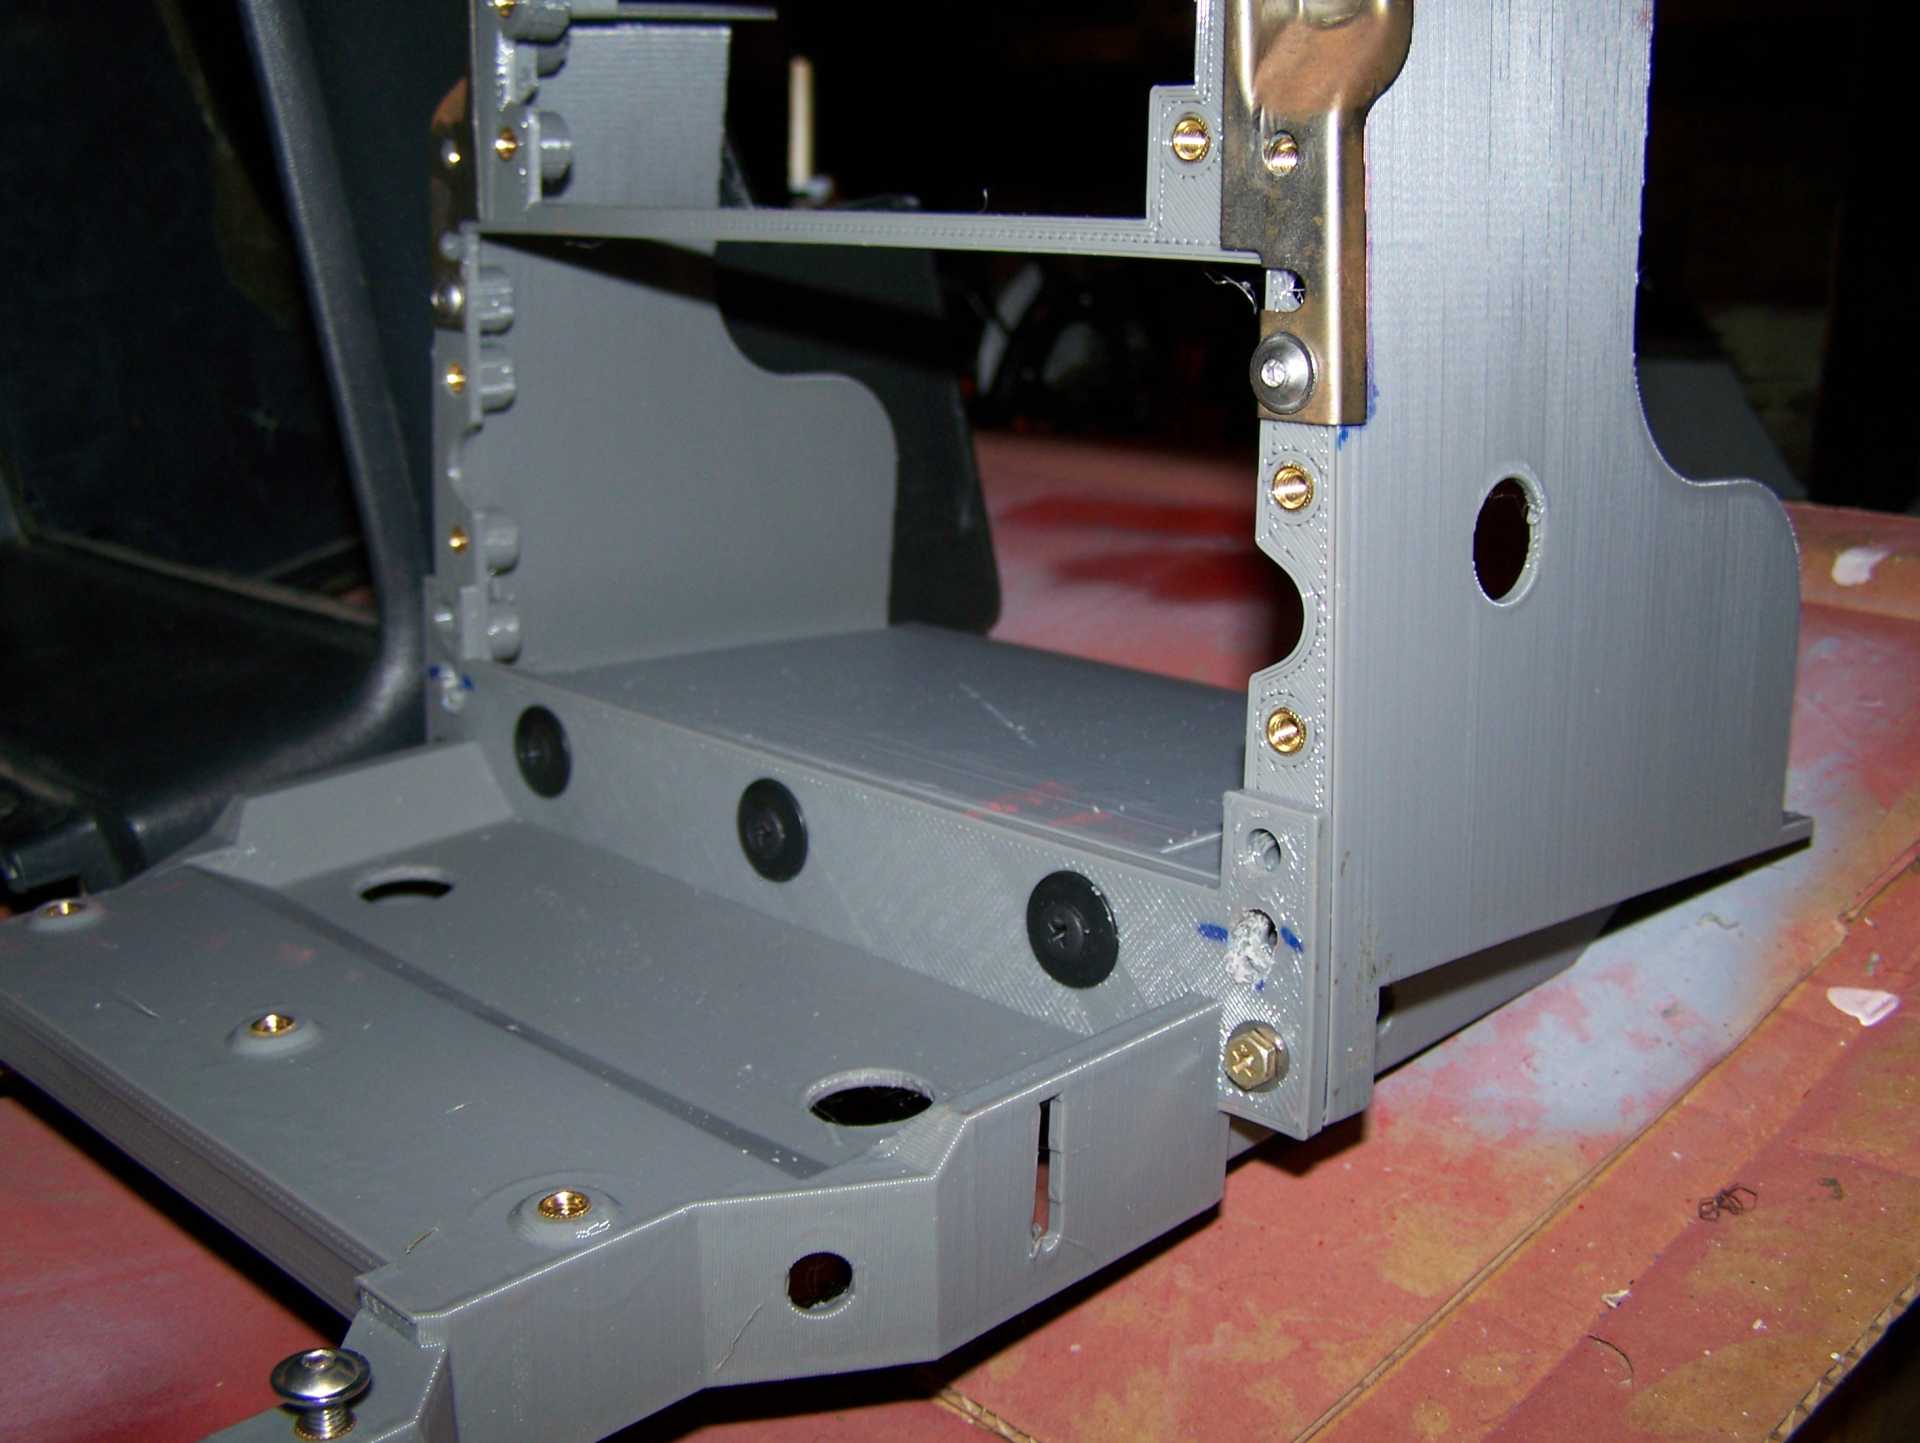
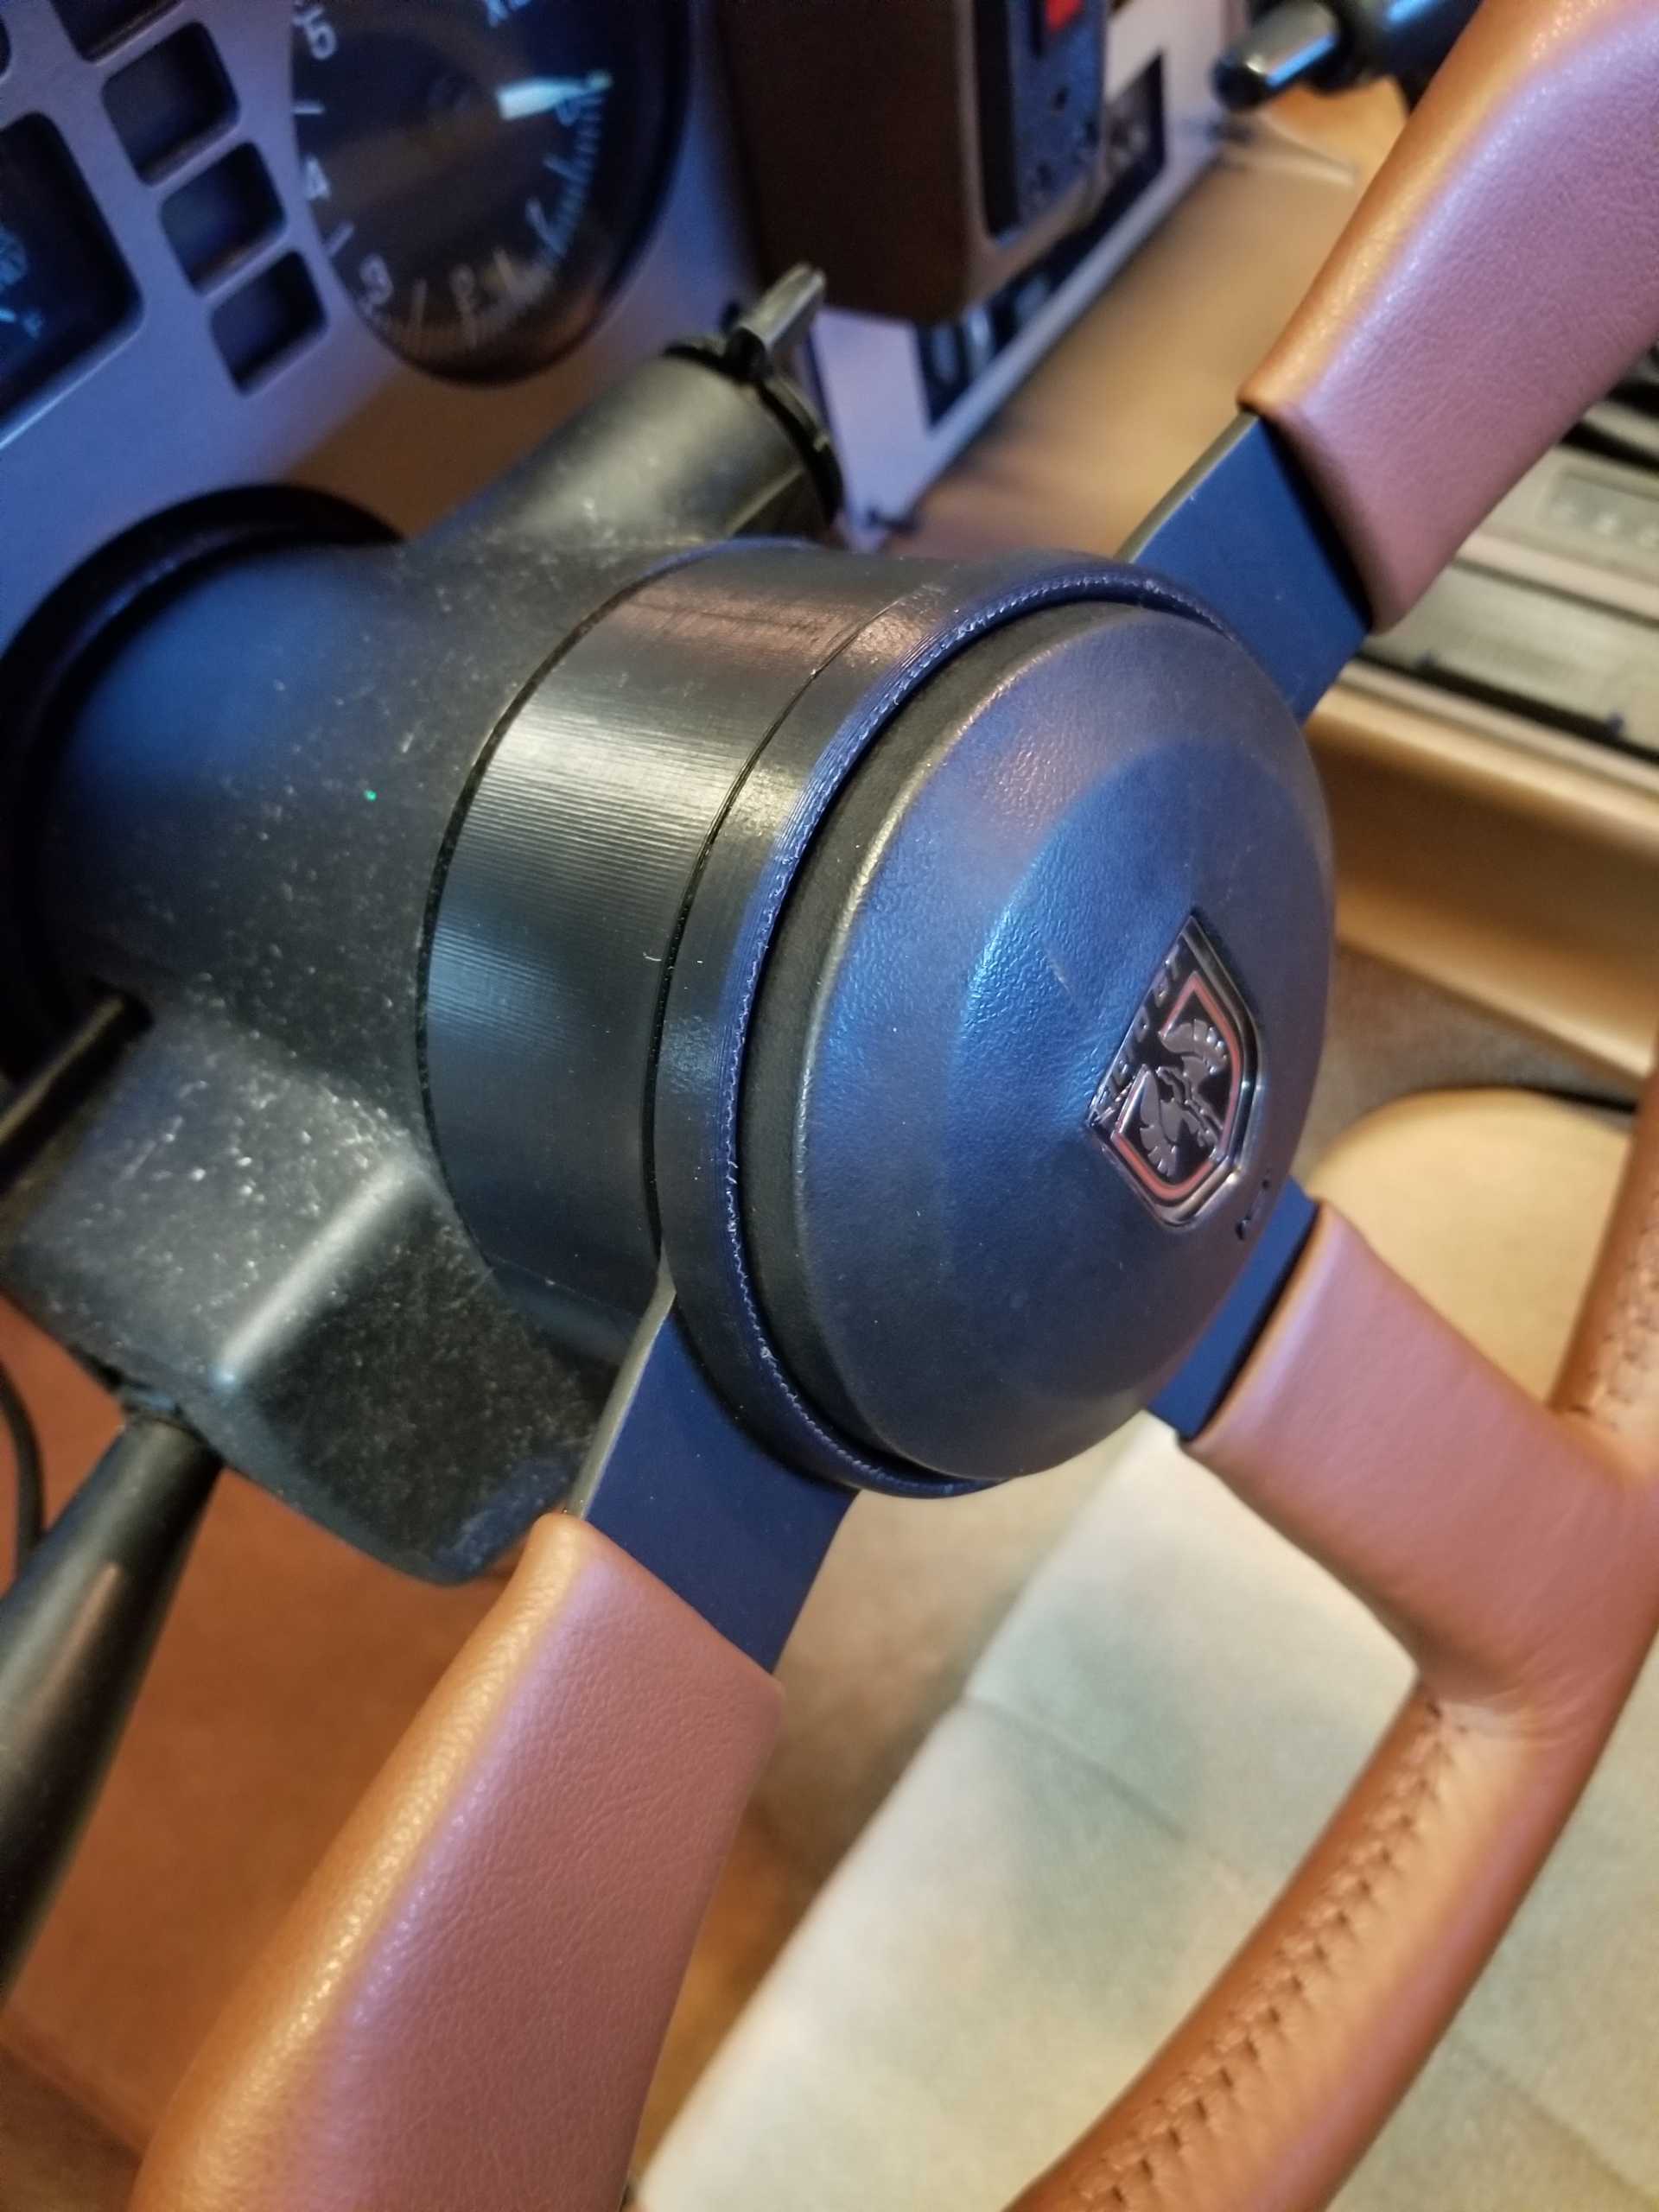
Some related project I've been working on:
Steering wheel trim pieces, stereo bezel, and headlight slides
Here's some photos and such:


IP: Logged
windex42
Member
Posts: 34
From: Kapolei, HI
Registered: Dec 2019


Feedback score: N/A
Leave feedback

Rate this member

Report this Post08-07-2020 12:09 AM Click Here to See the Profile for windex42Send a Private Message to windex42Edit/Delete MessageReply w/QuoteDirect Link to This Post
Wow, three of us all at once? That's great.
I just LOVE what he's done with those brass inserts, very cool.
I didn't want to be the first to speak about what mmeyer86gt/gtp has been working on, so IMSA GT and cvxjet, thanks for sharing the photos, that's some NICE work.

-==-
Nick
IP: Logged
dremu
Member
Posts: 283
From: Livermore CA
Registered: Feb 2019


Feedback score: (1)
Leave feedback

Rate this member

Report this Post08-07-2020 03:22 PM Click Here to See the Profile for dremuSend a Private Message to dremuEdit/Delete MessageReply w/QuoteDirect Link to This Post
Those brass nutserts bring teh seckseh for a truly strong and elegant setup. I did a bunch of pieces for my large-scale RC truck where I just did a hole of the minor diameter and threaded it out, which is kinda kludgy and obviously not as strong.

This, though:


What's the outside surface, the mirror-ish stuff? That *looks* like a match to the factory bezel material, but it's not, I don't think, so that's bloody amazing. Where'd you get it?

-- A
IP: Logged
mmeyer86gt/gtp
Member
Posts: 3853
From: galt, ca
Registered: Sep 2001


Feedback score:    (161)
Leave feedback


Total ratings: 73
Rate this member

Report this Post08-07-2020 11:36 PM Click Here to See the Profile for mmeyer86gt/gtpSend a Private Message to mmeyer86gt/gtpEdit/Delete MessageReply w/QuoteDirect Link to This Post
im around and kicking. i have completed 5 sleketons and it seems all the bugs have now been worked out. One of my printers took a crap this week and i am working on replacing the mother board and getting the settings dialed in then i will be ready to go.

but i will start a new thread because this is not my thread.

[This message has been edited by mmeyer86gt/gtp (edited 08-08-2020).]

IP: Logged
Will
Member
Posts: 14226
From: Where you least expect me
Registered: Jun 2000


Feedback score: (1)
Leave feedback


Total ratings: 237
Rate this member

Report this Post08-08-2020 01:27 AM Click Here to See the Profile for WillSend a Private Message to WillEdit/Delete MessageReply w/QuoteDirect Link to This Post
 
quote
Originally posted by mmeyer86gt/gtp:

im around and kicking. i have completed 5 sleketons and it seems all the bugs have now been worked out. One of my printers took a crap this week and i am working on replacing the mother board and getting the settings dialed in then i will be ready to go.

but i will start a new thread because this is not my thread.


I'm curious... Do you have pics of your most recent version? Even screen caps?

Since the problem with the original is how fragile it is over time and multiple R&R's, robustness should be the driving design consideration for a replacement. I would think that reinforcing the joints and corners would be enough to make it much much tougher, but overall the piece could be 3-4 pounds heavier and be indestructible. Of course weight and print time are directly related...

Being able to separate the pieces while it's installed would be awesome as well. Messing with the shifter or cables would be way less risky for damaging the skeleton, and the front half could be removed without having to remove the back half.

IP: Logged
Previous Page | Next Page

This topic is 2 pages long:  1   2 
next newest topic | next oldest topic

All times are ET (US)

Post New Topic  Post A Reply
Hop to:

Contact Us | Back To Main Page

Advertizing on PFF | Fiero Parts Vendors
PFF Merchandise | Fiero Gallery | Ogre's Cave
Real-Time Chat | Fiero Related Auctions on eBay


Copyright (c) 1999, C. Pennock