Pennock's Fiero Forum
  General Fiero Chat
  (Almost done) - Installing a double din radio and a back up camera

Post New Topic  Post A Reply
Email This Page to Someone! | Printable Version


next newest topic | next oldest topic
(Almost done) - Installing a double din radio and a back up camera by justin87
Started on: 07-08-2019 03:05 PM
Replies: 20 (1839 views)
Last post by: Spadesluck on 09-09-2023 12:57 PM
justin87
Member
Posts: 32
From: Columbia Missouri
Registered: Apr 2019


Feedback score: N/A
Leave feedback

Rate this member

Report this Post07-08-2019 03:05 PM Click Here to See the Profile for justin87Send a Private Message to justin87Edit/Delete MessageReply w/QuoteDirect Link to This Post
I know a lot of people want their Fieros to be stock, and I see a lot of beauty in that, but me personally… I’m somewhere in the middle. I appreciate the stock aesthetic but I am very much spoiled on modern technology and fancy features. That being said, even before I bought my current Fiero (that my son named DeathPunch) I knew I would have to have some of the modern tech I take for granted in my daily driver. Among those bits of tech, the first on my to-do list was a backup camera and a new head unit stereo with CarPlay. (Side note.. car play and android auto are freaking amazing. If you don’t have em or know what they are.. look it up.).

(Obligitory pic of my Fiero for context)


I knew this would be a challenge considering the Fiero’s silly ass 1.5 din stereo size and the fact that I’m pretty sure back up cameras weren’t even invented in the 80s (quick google search tells me they didn’t become mass production items until the 1991 Toyota Soarer.. interesting).

As with any project it was time to decide on a few major goals. 1. I wanted everything to look like it ‘belonged’ in a Fiero. Meaning that, while I knew I’d have to fabricate and modify, I did not want to go the way of making the dash look like something from 2019, but rather still have the unique Fiero interior.. So I’d have to keep the majority of the interior, and the camera would have to be mostly hidden.

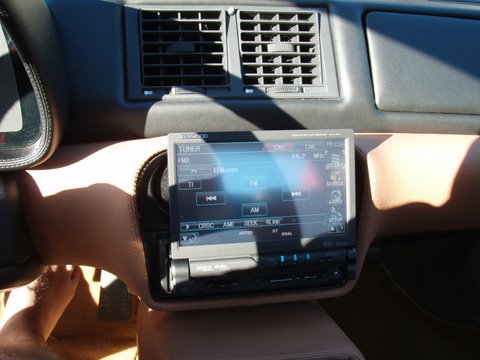
Research began and as a wise man once said.. Good artist create, great artist steal. So to google I went to see if this sort of thing had been done before and how they accomplished it. I knew I couldn’t possibly be the first person to want to do a project like this. As I researched more and more, I wasn’t not super happy with the solutions I found as most had simply cut out the bottom 1.5 din area to accommodate for a lager stereo. Even this solution ran into trouble because it conflicts with the HVAC controls. Additionally, with the radio I had chosen being a touch screen, having it that low on the dash becomes problematic in itself. So at this point I made a couple of decisions. 1) I will have to move the HVAC to the bottom and 2) I would have to recreate the faceplate to make it look like it belonged. I also ran across a project where the owner had rebuild the interior portion of the center console in MDF, solving a heck of a lot of technical issues. This idea stuck in the back of my head.

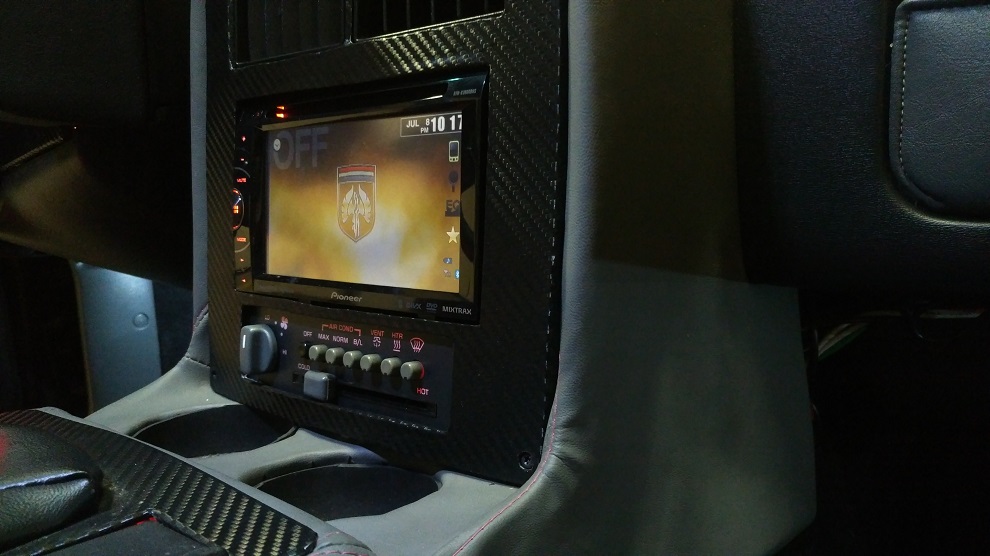
I took some time further to decide on the exact head unit I would go with and came across the Poineer 4400 NEX. I cannot recommend this head unit enough. It Is a total badass. One of the primary features I wanted was apple CarPlay, and this unit has a wireless version of it, so when you turn on the car it automatically syncs with your phone. Unfortunately only a few stereos currently offer this feature, which is why I settled specifically on the 4400nex. There is a newer version of it as well which means the 4400 is cheaper, but even then it still goes for almost 500$. I also went with a $30 back up camera kit I found on Amazon.

A few days later the mail comes in and it is time to start construction.

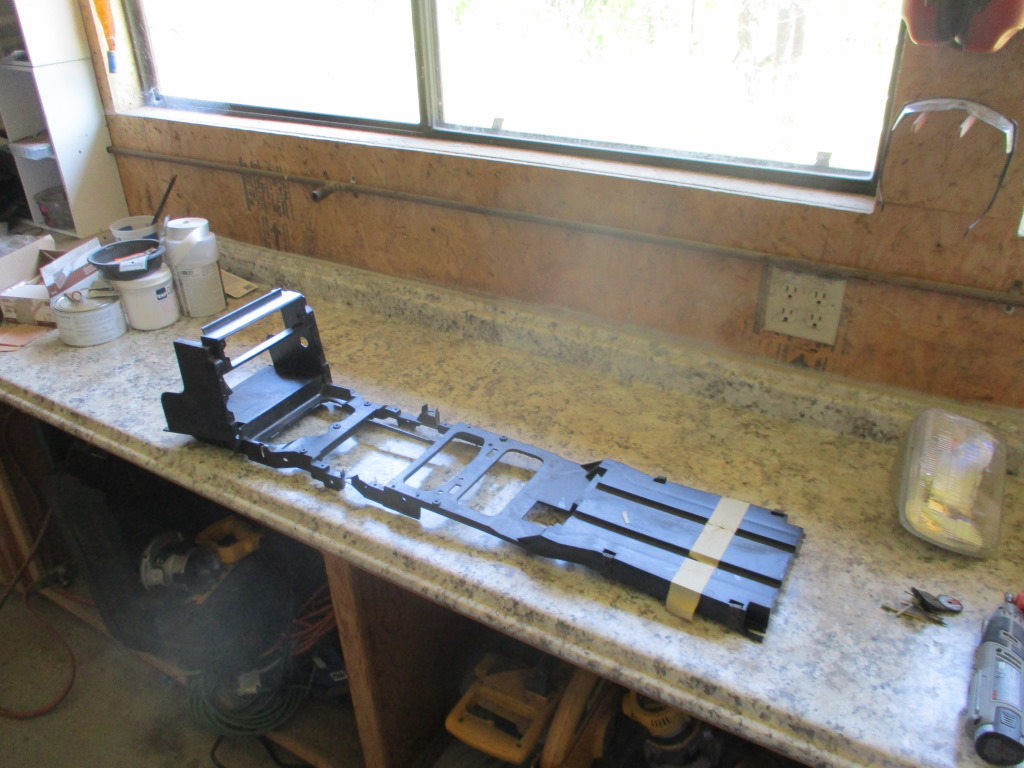
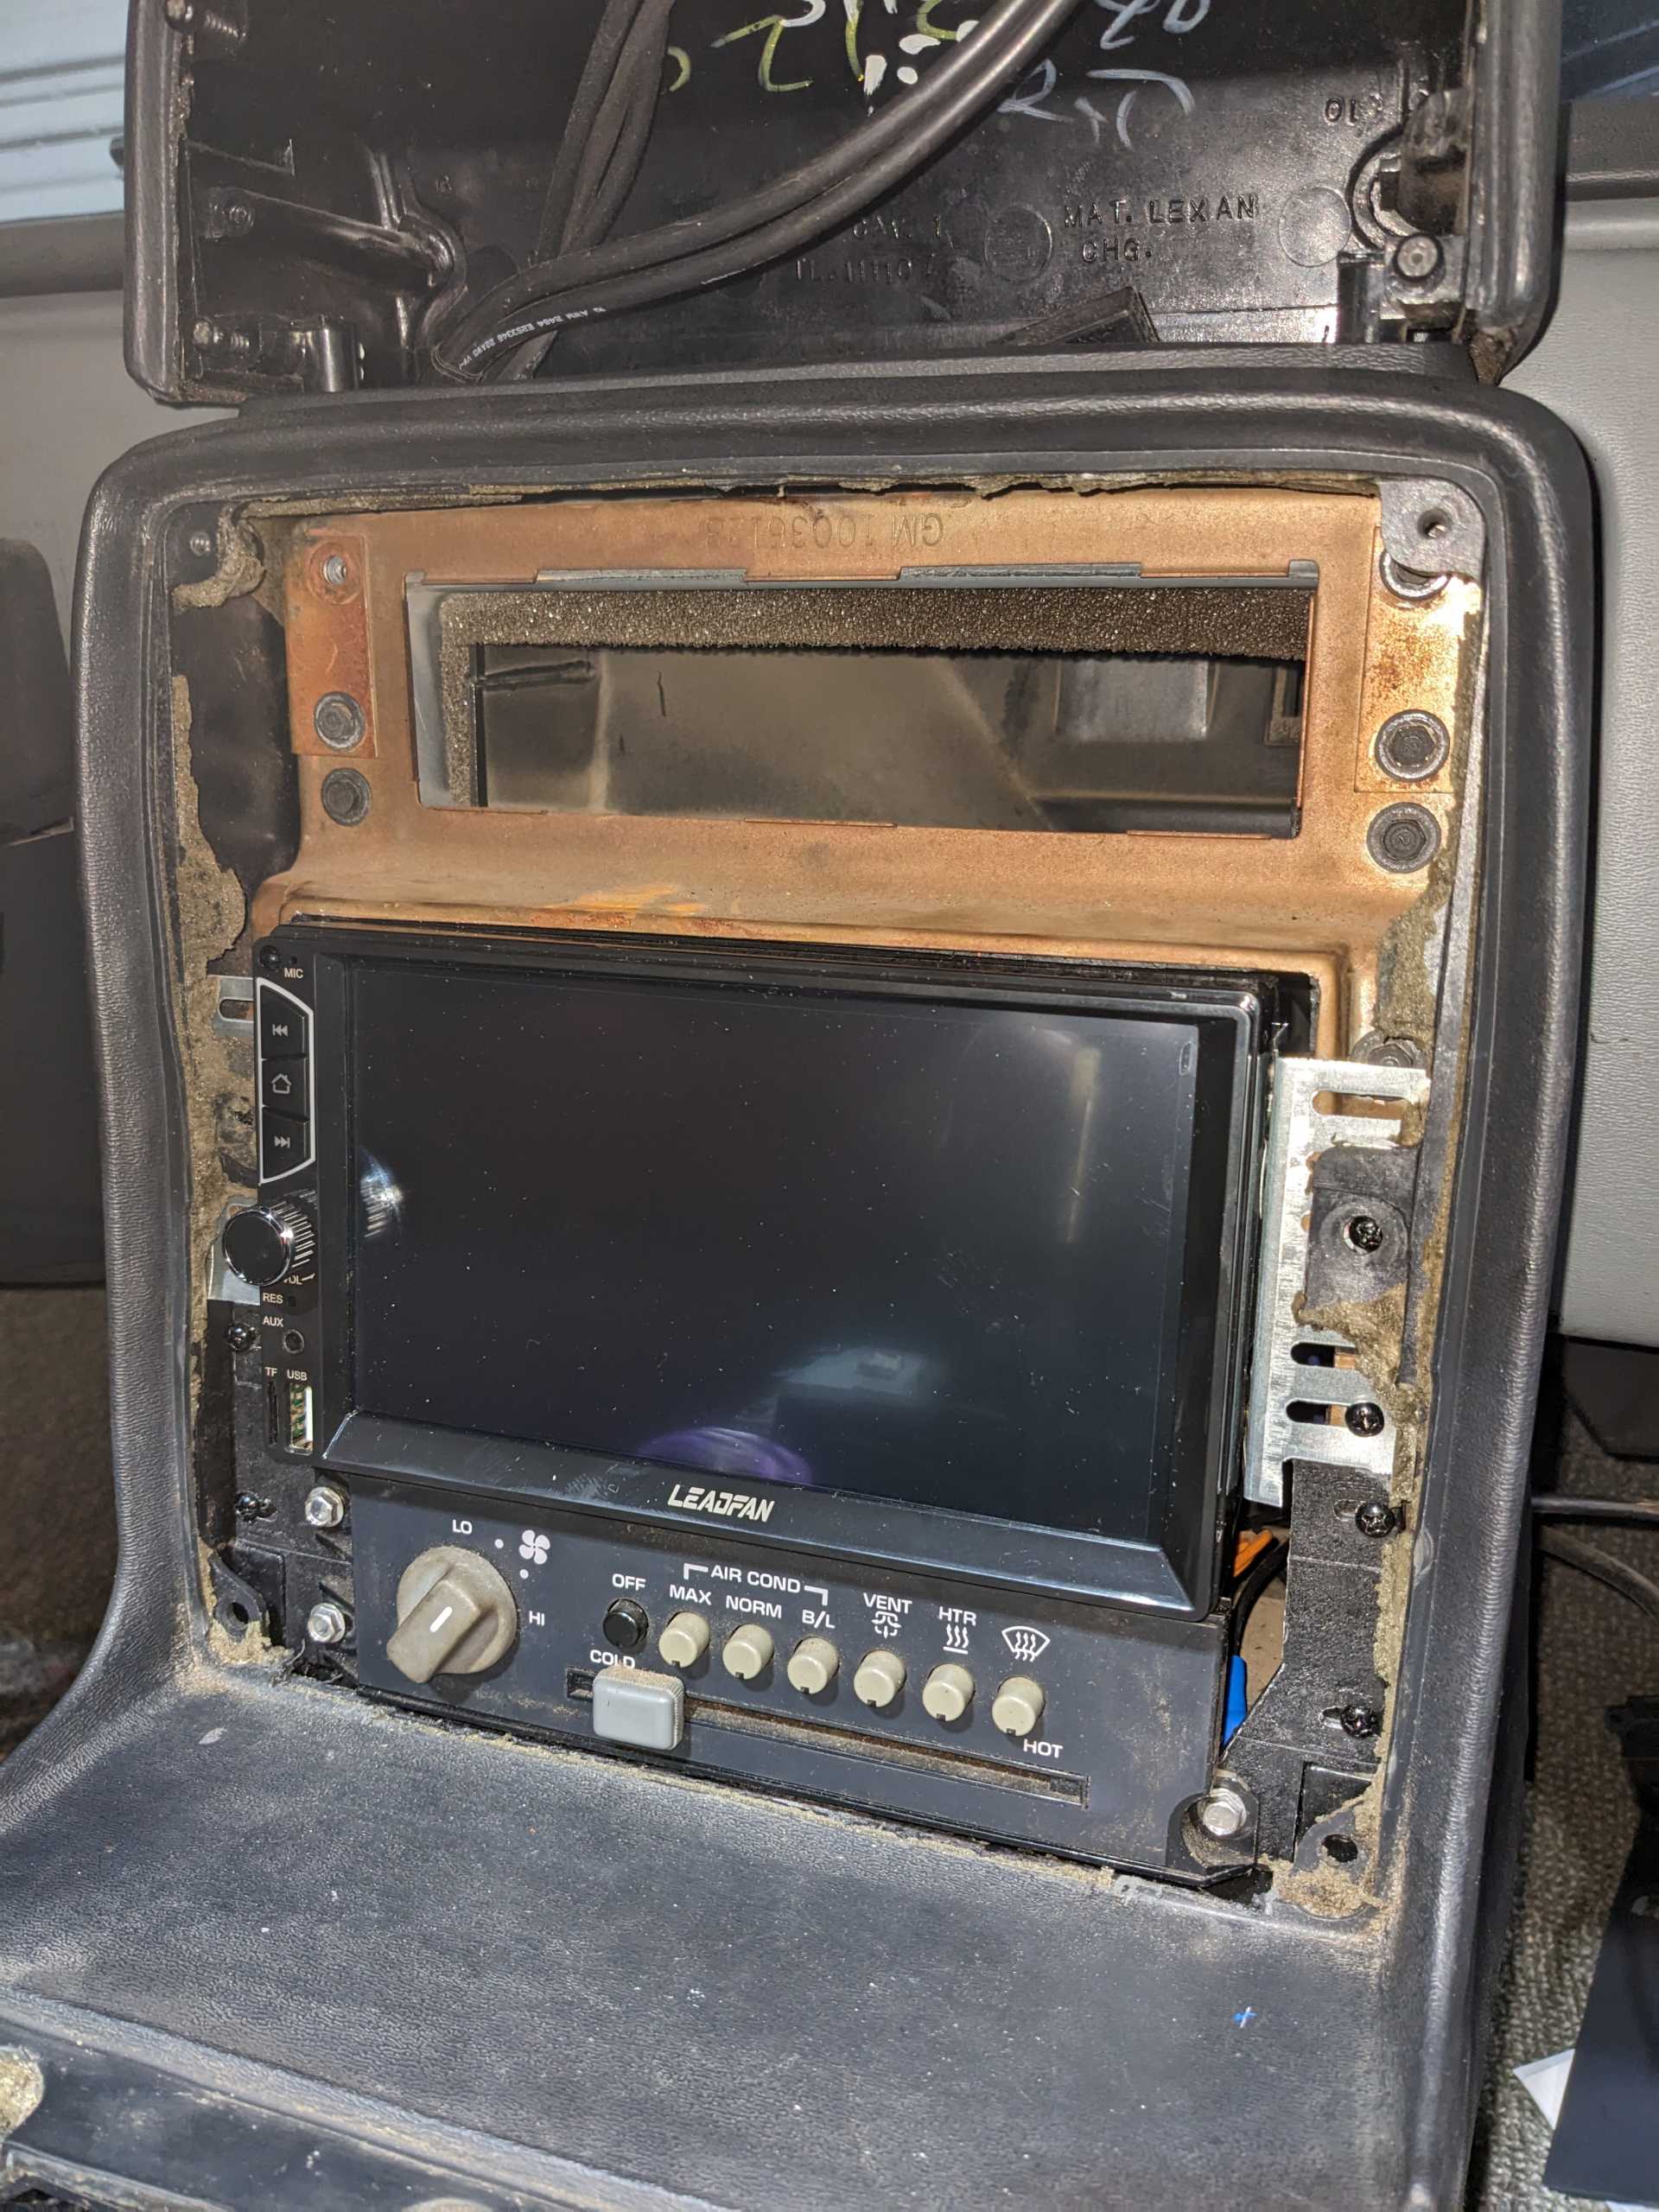
I started by pulling the entire center console. As I did this I found that the inside plastic had shattered and crumbled over the years. Additionally the previous owner had installed a single din radio and made some other modifications. To accomplish what I wanted, I ripped most of this stuff out leaving nothing but the vinyl surround of the original equipment. The plastic innards are actually rather long and go up the entire middle of the car. Most of this I wanted left alone (such as the area near from about the gear shift back. So I took a Dremel and cut the plastic off just slightly in front of the Gear shift area


Next I took he old plastic housing and recreated it with a mixture of quarter inch and half inch pine scraps I happened to have in the garage from a project for my son’s Cub Scout pack earlier in the year. I knew I’d have to modify this later when I tried to get the fit right for everything, so I used a combination of cheap angle brackets and various nuts and bolts so I could move everything around as needed.


In the mean time I took the original faceplate to a buddy of mine who is better at woodworking then I am to create a new faceplate.


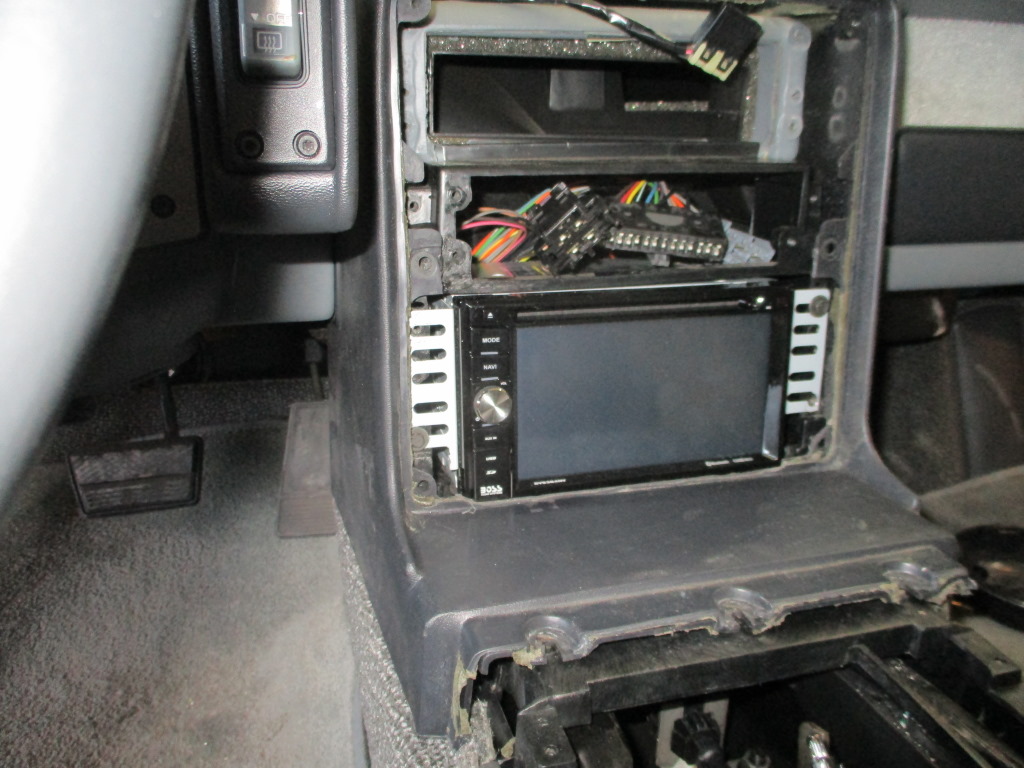
It was around this time that I went ahead and installed the actual back up camera. I don’t have any pictures of this one because it was so quick and I forgot to take pictures of the process.. So just a few things to note. Most aftermarket cameras operate off of the power from he backup lights. My 85gt has the fastback from an 86, but I am pretty sure the install would be the same on a notchie. I removed the left tail light assembly, and had to cut the power and ground to the back up light. (It is the third from the right btw). Additionally there is a power wire on the video RCA cable that needs to be tied into the light power. This sends a signal to the radio to switch to back up camera for display. There are holes in the area where the headlight assembly goes just big enough to feed wire through down near where the license plate goes. This is where I ran the feed to the camera. A smiler hole is available to run up through the trunk area. I hooked all of this up and ran the video RCA wire up the left side near the air intake and to the firewall in front of the motor. At this point I did have to do a bit of drilling to get the RCA through the firewall, so I chose right between where the two wiring groups come into the car near the ECM. I filled the hole with some spare EVA foam and ran the rest of the way up the center console tot he back of the radio. A few testing and some camera adjusting later and I now have a work ing back up camera!.

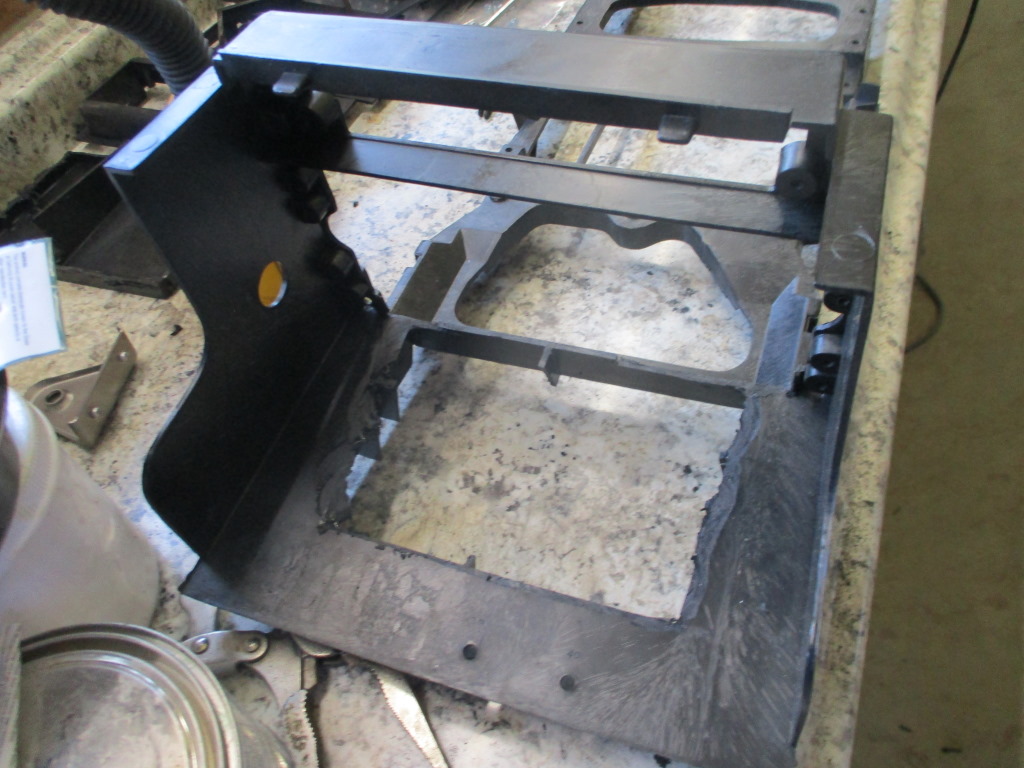
Now that the camera worked, the next step was to work on the housing for the the head unit and how it would fit in relation to everything else. I had created my initial wood box replacement, but it needed supports for the radio. Some measuring and adjustments later and I built the housing box.


Just a side note on fitment… this is one of the main reasons that this sort of project can be such a pain. These cars are 30+ years old. Plastic warps over the years, vinyl changes.. stuff just doesn’t fit together like it used to. Add some creative redneck engineering into the mix over the years and you are now faced with some really interesting engineering problems. Anyway…. So the next step was to get a template for the holes on my faceplate.

The cardboard from a pizza box lid was the perfect solution for a template. It took me some time playing around with it to get it just right. Additionally because the faceplate of the new head unit is motorize and removable, I had to take it off to get my measurements right.


I took my cardboard template and applied it to the wood faceplate and cut everything out. I then put it in the car to check fit


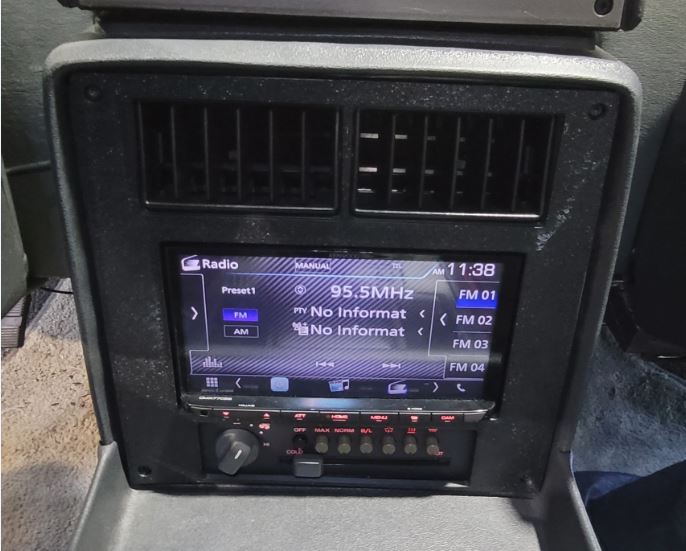
Next problem… Vents. This one was a tough one because it required me to sacrifice the old faceplate. I wish I knew another way, but to keep it looking right, I simply used the Dremel to cut out the old vents and planned to epoxy them to the wood faceplate.

(Picture coming soon).

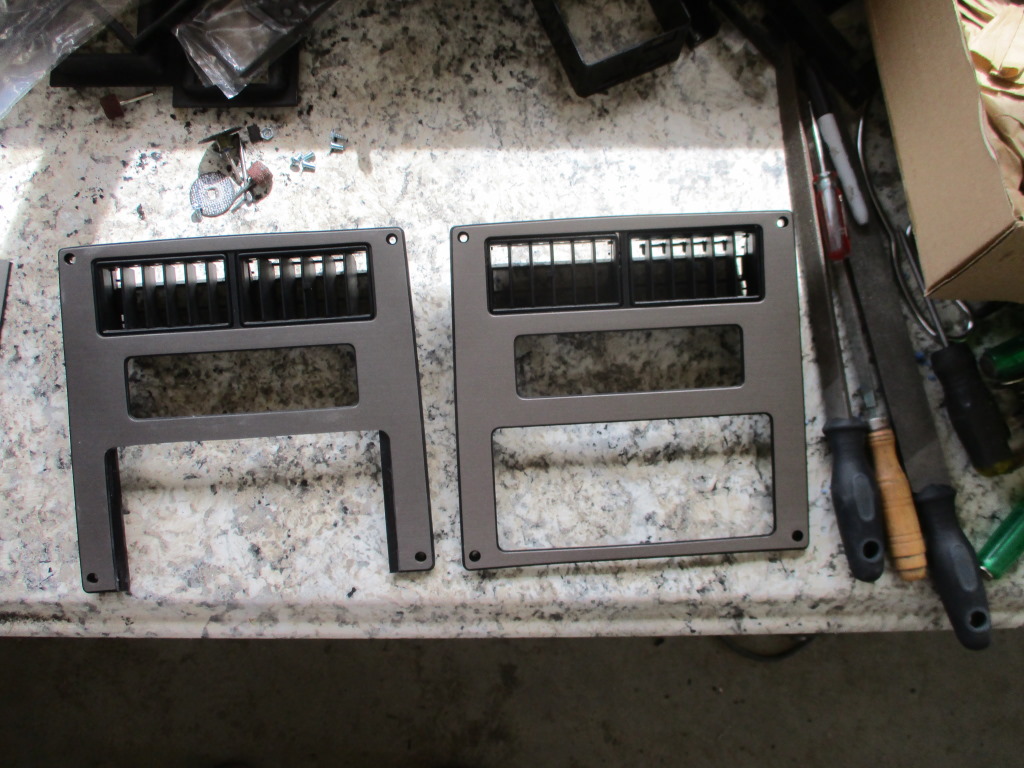
Next problem.. Making it look like the rest of the panels. Fieros come in two major styles, the matrix look found in 88s and the brushed aluminum found in the others. The closest match I could find for this, I found on amazon. A company called VVivid makes car vinyl wrap that looked simple enough to use. They say you can use this stuff without a heat gun, but I have no idea how. It stretches and places so much easier when you use a heat gun. Also, youtube is your friend when using this stuff. Tons of videos out there on how too. I completed the vinyl job and then used epoxy to fix the vents onto the new faceplate.

(Picture coming soon)


This is where I am now. I still need to reinforce the screw holes on the faceplate so it won’t break when I put it into the car and I am TRYING to find some screws that look similar to the Fiero dash torx screws.

[This message has been edited by justin87 (edited 07-08-2019).]

IP: Logged
PFF
System Bot
dremu
Member
Posts: 283
From: Livermore CA
Registered: Feb 2019


Feedback score: (1)
Leave feedback

Rate this member

Report this Post07-08-2019 08:08 PM Click Here to See the Profile for dremuSend a Private Message to dremuEdit/Delete MessageReply w/QuoteDirect Link to This Post
I went the other way, so that I didn't have to mess with moving the climate controls. Yours is fantastic, don't get me wrong, just more work than I wanted to / could do. I'll post up what I did for others to get ideas.

I did have to remove the center phenolic ... thing:


and chop it all to hell, but that's all up front under the radio:


Got a second dash fascia on Ebay to match, so I didn't have to cut up my pristine one


Did have to fill in the sides just a bit with like 1/2" wide strips of ABS -- as you say, the stock radio size is totally stupid. Too tall for 1.5 DIN and too narrow for, well, any DIN. Grrr.

The thing barely fits at the bottom:


There's a ton of wires for the cameras and GPS and radio antennas and all the audio wiring proper, was a pain but eventually I squeezed it all in. I would not characterize using it as ergonomic, since it's alllll the way down


but a steering wheel control mostly fixes that. And yeah, cameras are priceless. I even did one up front on a manual button, to make sure I don't hit parking bollards.

I also dig that it looks almost stock. You'd have to be a Fiero nerd, at least a card nerd, to recognize that something isn't quite right. If you can match the fascia material and the screws, you'll be at the same place. I always enjoy messing with people like that... I get a lot of "this car is HOW old??"

-- A

[This message has been edited by dremu (edited 07-08-2019).]

IP: Logged
justin87
Member
Posts: 32
From: Columbia Missouri
Registered: Apr 2019


Feedback score: N/A
Leave feedback

Rate this member

Report this Post07-09-2019 01:29 AM Click Here to See the Profile for justin87Send a Private Message to justin87Edit/Delete MessageReply w/QuoteDirect Link to This Post
I like what you did there, and as you said it was way less complicated of a solution. Does being so far down affect viewing of the camera? One other solution I didnt mention is that some head units have motorized face plates. I didnt know this before I bought it, but the NEX 4400 actually has a feature to tilt the faceplate up, so mounting it on the bottom really wouldnt have been so bad.

Honestly though, I enjoy doing stuff like this. I bought the fiero as a hobby / project with no end with the specific purpose of doing stuff like this for the fun of it. I can remember the Fiero I had as a teenager that started with a tape adapter and a CD walkman with velcro pads glued to it attached to the center console. Man.. that sucker would eat some batteries (car plug ins were not really standard at the time). This was later replaced by an in-dash CD player that had a real early version of being able to play MP3s (late 90's tech was COOL!). Even then though, the wierd placement of the radio bugged me and I always wondered if I could 'fix' that. This is my attempt to do it. Hopefully I'll get some time this weekend to finish it and post results.

IP: Logged
liv4God
Member
Posts: 733
From: CA
Registered: Feb 2011


Feedback score:    (6)
Leave feedback

Rate this member

Report this Post07-09-2019 01:45 AM Click Here to See the Profile for liv4GodSend a Private Message to liv4GodEdit/Delete MessageReply w/QuoteDirect Link to This Post
I did something pretty much what you are doing. Originally, I had the head unit lower, but with my cupholder mod, it was hard to operate when cups were in. After moving it up, that helped some, but I also noticed a better viewing angle and better road visibility if I look down to adjust the stereo.


Keep it up! You will not be disappointed with the result
IP: Logged
Zentaury
Member
Posts: 70
From: Vancouver, BC, Canada
Registered: May 2019


Feedback score: N/A
Leave feedback

Rate this member

Report this Post07-09-2019 01:50 AM Click Here to See the Profile for ZentaurySend a Private Message to ZentauryEdit/Delete MessageReply w/QuoteDirect Link to This Post
https://m.imgur.com/t/cars/6ywCTxq

That’s how I bought the Fiero... with that touch screen player and the cover bending.i have the original. But like the OP, i want the stock look plus the convenience features.

So probably I will modify the cover.
IP: Logged
darbysan
Member
Posts: 949
From: Las Vegas
Registered: Oct 2014


Feedback score: (4)
Leave feedback

Rate this member

Report this Post07-09-2019 10:15 AM Click Here to See the Profile for darbysanSend a Private Message to darbysanEdit/Delete MessageReply w/QuoteDirect Link to This Post
I did one a while back, and added steering wheel controls. Found these on Amazon, and they work pretty good.

https://www.amazon.com/gp/p..._title?ie=UTF8&psc=1

------------------
'87 GT , '00 3800 Series II SC, 4t65e, Vue Power Steering. (SOLD)

IP: Logged
dremu
Member
Posts: 283
From: Livermore CA
Registered: Feb 2019


Feedback score: (1)
Leave feedback

Rate this member

Report this Post07-09-2019 10:40 AM Click Here to See the Profile for dremuSend a Private Message to dremuEdit/Delete MessageReply w/QuoteDirect Link to This Post
I forgot about motorized head units. I've gotten spoiled by using USB sticks (and now, SD cards) as media. Screen visibility isn't perfect, but the shifter is far enough back and my head is right at ceiling height so it's good enough. Do wish I'd gotten a better camera than the $15 cheapo, but eh, not enough that I'll go to the work to change it out.

There's also a clamp-on style SWC, like this


The clamp was a bit loose, but fixed that by wrapping the wheel in a coupla layers of foam. Also protects it from the teeth on the back side of the clamp, in case I remove the SWC someday.

-- A
IP: Logged
hnthomps
Member
Posts: 5729
From: Columbia, SC
Registered: Jul 2003


Feedback score:    (18)
Leave feedback


Total ratings: 51
Rate this member

Report this Post07-15-2019 08:08 PM Click Here to See the Profile for hnthompsSend a Private Message to hnthompsEdit/Delete MessageReply w/QuoteDirect Link to This Post
I have a pop out screen in my Kenwood head unit that is better than Double DIN (IMO). When combined with a NAV unit, this device suits my purposes quite nicely.


Nelson
IP: Logged
Spadesluck
Member
Posts: 2069
From: Georgia
Registered: Jul 2016


Feedback score:    (8)
Leave feedback

Rate this member

Report this Post07-16-2019 01:01 AM Click Here to See the Profile for SpadesluckSend a Private Message to SpadesluckEdit/Delete MessageReply w/QuoteDirect Link to This Post
 
quote
Originally posted by hnthomps:

I have a pop out screen in my Kenwood head unit that is better than Double DIN (IMO). When combined with a NAV unit, this device suits my purposes quite nicely.


Nelson


Problem with that (all opinion of coarse) is if/when you need to adjust your climate controls the screen will be in the way every time.
IP: Logged
justin87
Member
Posts: 32
From: Columbia Missouri
Registered: Apr 2019


Feedback score: N/A
Leave feedback

Rate this member

Report this Post07-16-2019 08:46 AM Click Here to See the Profile for justin87Send a Private Message to justin87Edit/Delete MessageReply w/QuoteDirect Link to This Post
 
quote
Originally posted by Spadesluck:


Problem with that (all opinion of coarse) is if/when you need to adjust your climate controls the screen will be in the way every time.


I looked at this option and actually I like it and recommend it as an option for other Fiero owners. However.. for me.. I wanted wireless carplay as an option and that is only available on a few radios at the moment. None of which have the pop out screen like the one here. Also... as you said.. No access to AC controls.

The point here was to make a double din look like it 'belonged' in a fiero.

IP: Logged
hnthomps
Member
Posts: 5729
From: Columbia, SC
Registered: Jul 2003


Feedback score:    (18)
Leave feedback


Total ratings: 51
Rate this member

Report this Post07-16-2019 11:15 AM Click Here to See the Profile for hnthompsSend a Private Message to hnthompsEdit/Delete MessageReply w/QuoteDirect Link to This Post
 
quote
Originally posted by Spadesluck:


Problem with that (all opinion of coarse) is if/when you need to adjust your climate controls the screen will be in the way every time.


In this particular vehicle (Amida F355 interior) the HVAC control is on the center console so there are no issues. In a conventional Fiero arrangement, there is still no real issue since the screen can fold in a few seconds and uncover the stock HVAC controls. You can also run the head unit with it fully closed, but obviously cvannot use the NAV feature very well in this configuration.

Nelson
IP: Logged
PFF
System Bot
Tmiester
Junior Member
Posts: 6
From: story city, iowa
Registered: Jul 2018


Feedback score: N/A
Leave feedback

Rate this member

Report this Post07-12-2023 11:10 PM Click Here to See the Profile for TmiesterSend a Private Message to TmiesterEdit/Delete MessageReply w/QuoteDirect Link to This Post
Working on the same thing right now. I 3d printed the a/c relocation bracket out of ABS as well as the air vent holder. I got the files on thingiverse an it is a full kit with faceplate so that it looks factory. 
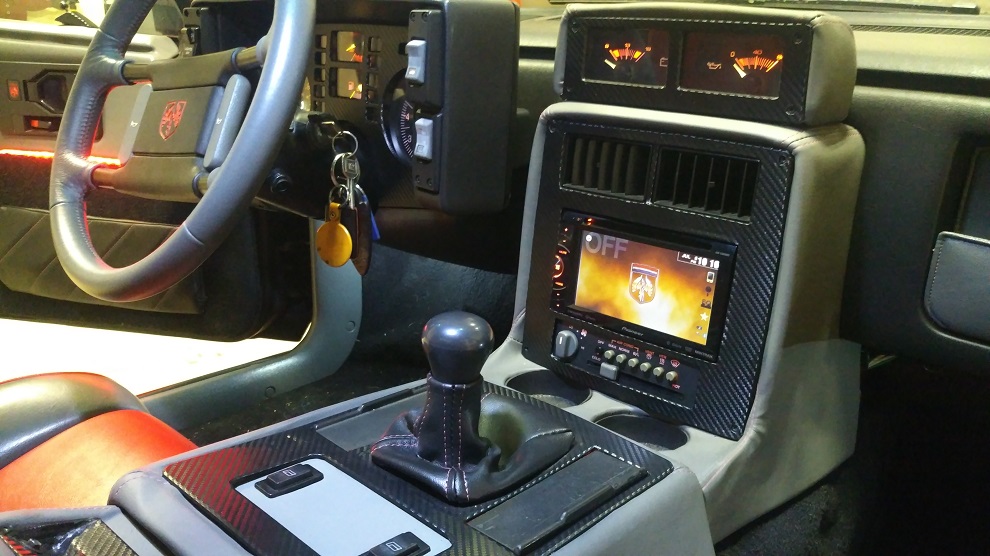
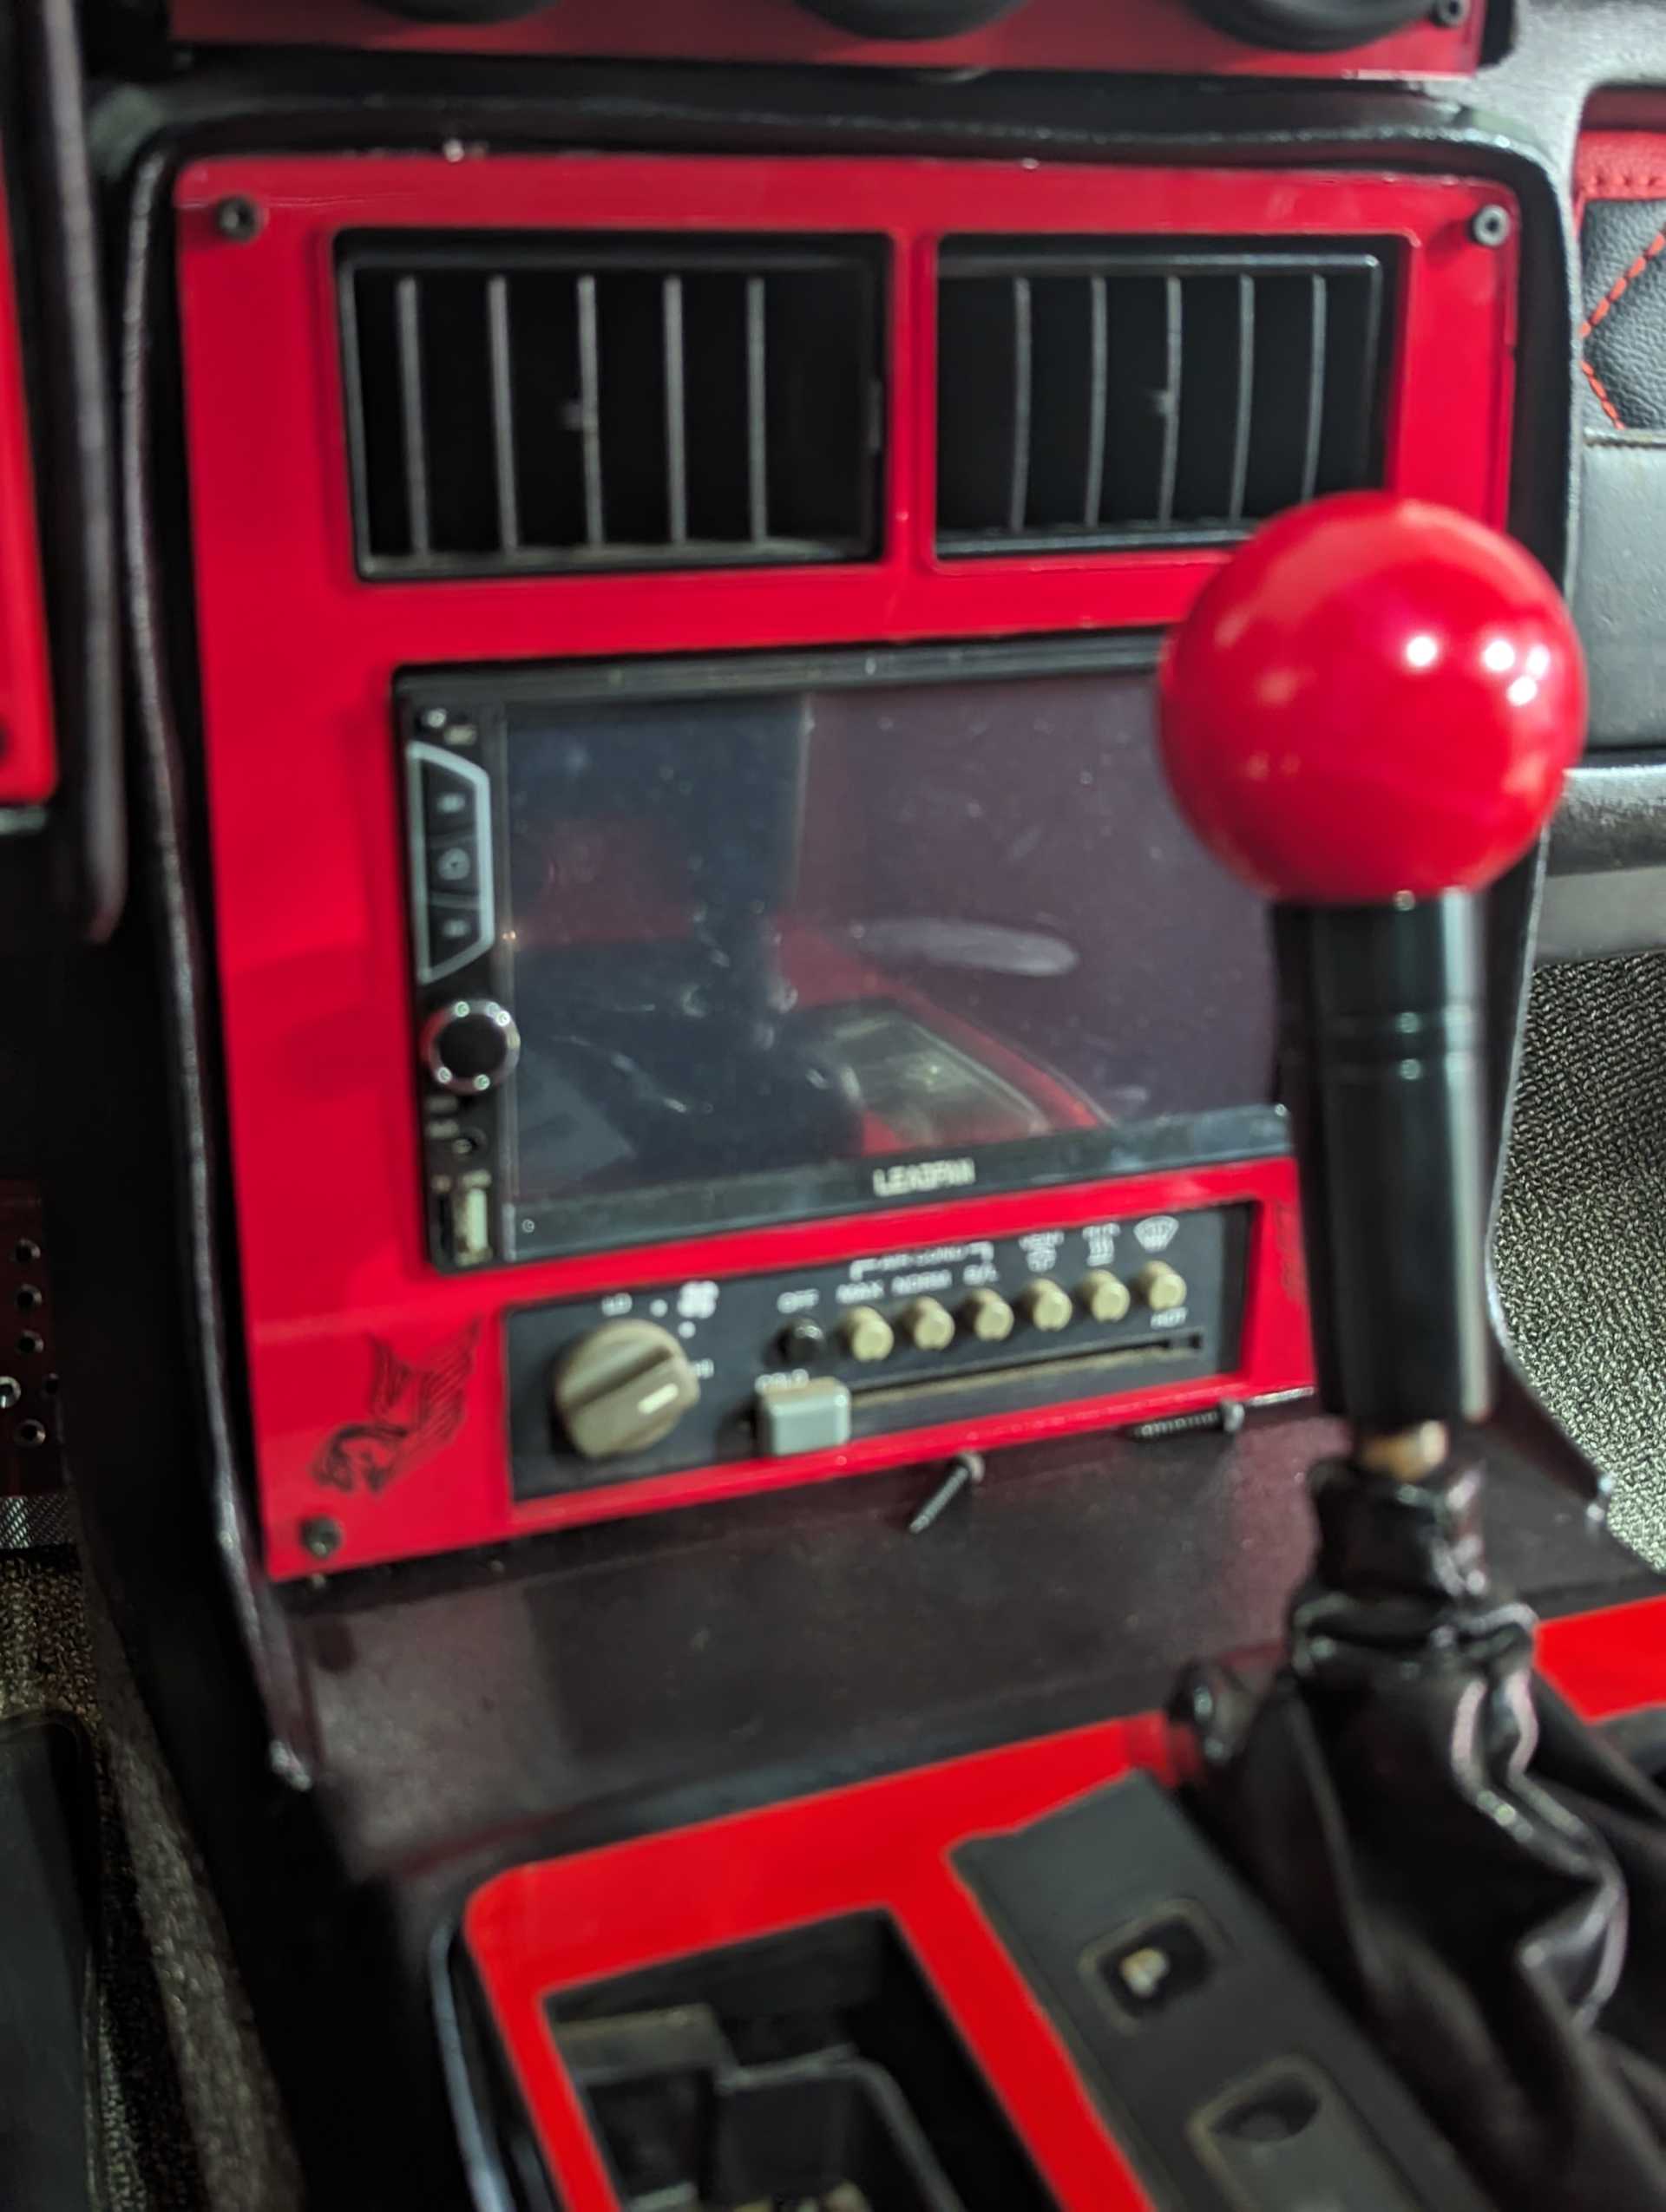
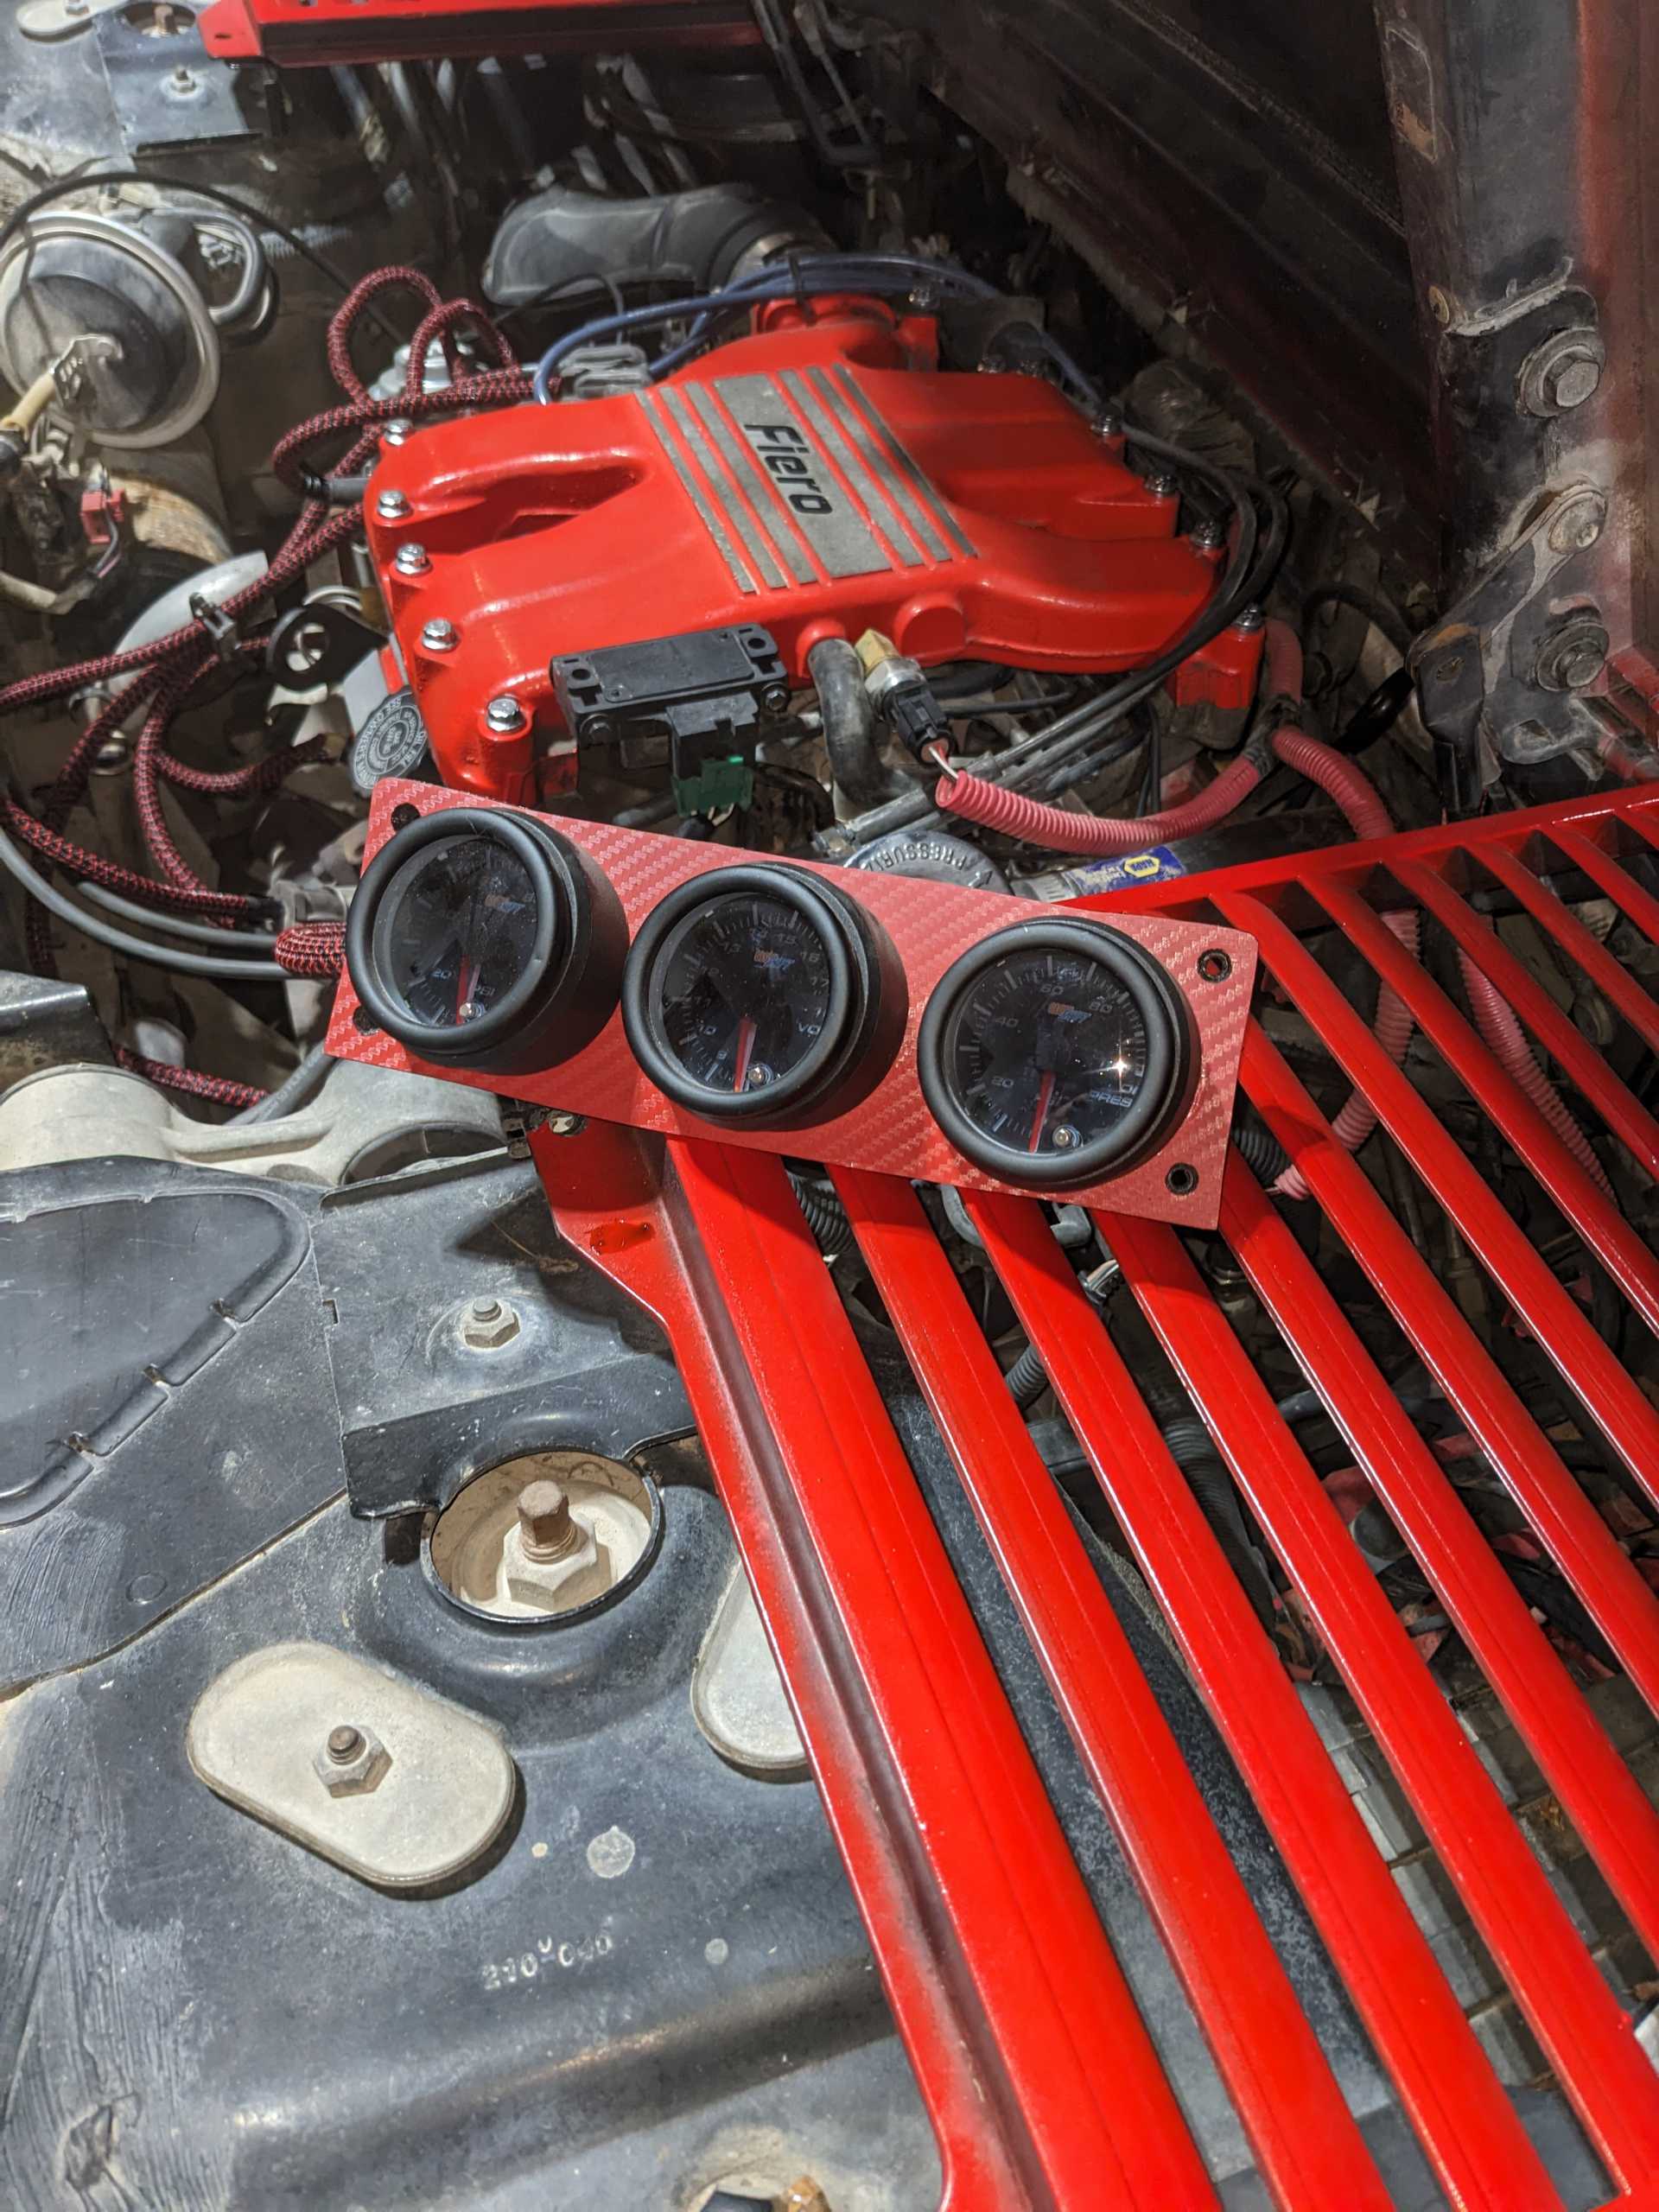
I decided to make me faceplate out of acrilic along with a new rally gauge plate as me first one was 3d printed out of PLA and it can't take the heat inside the car in the summer when parked. 
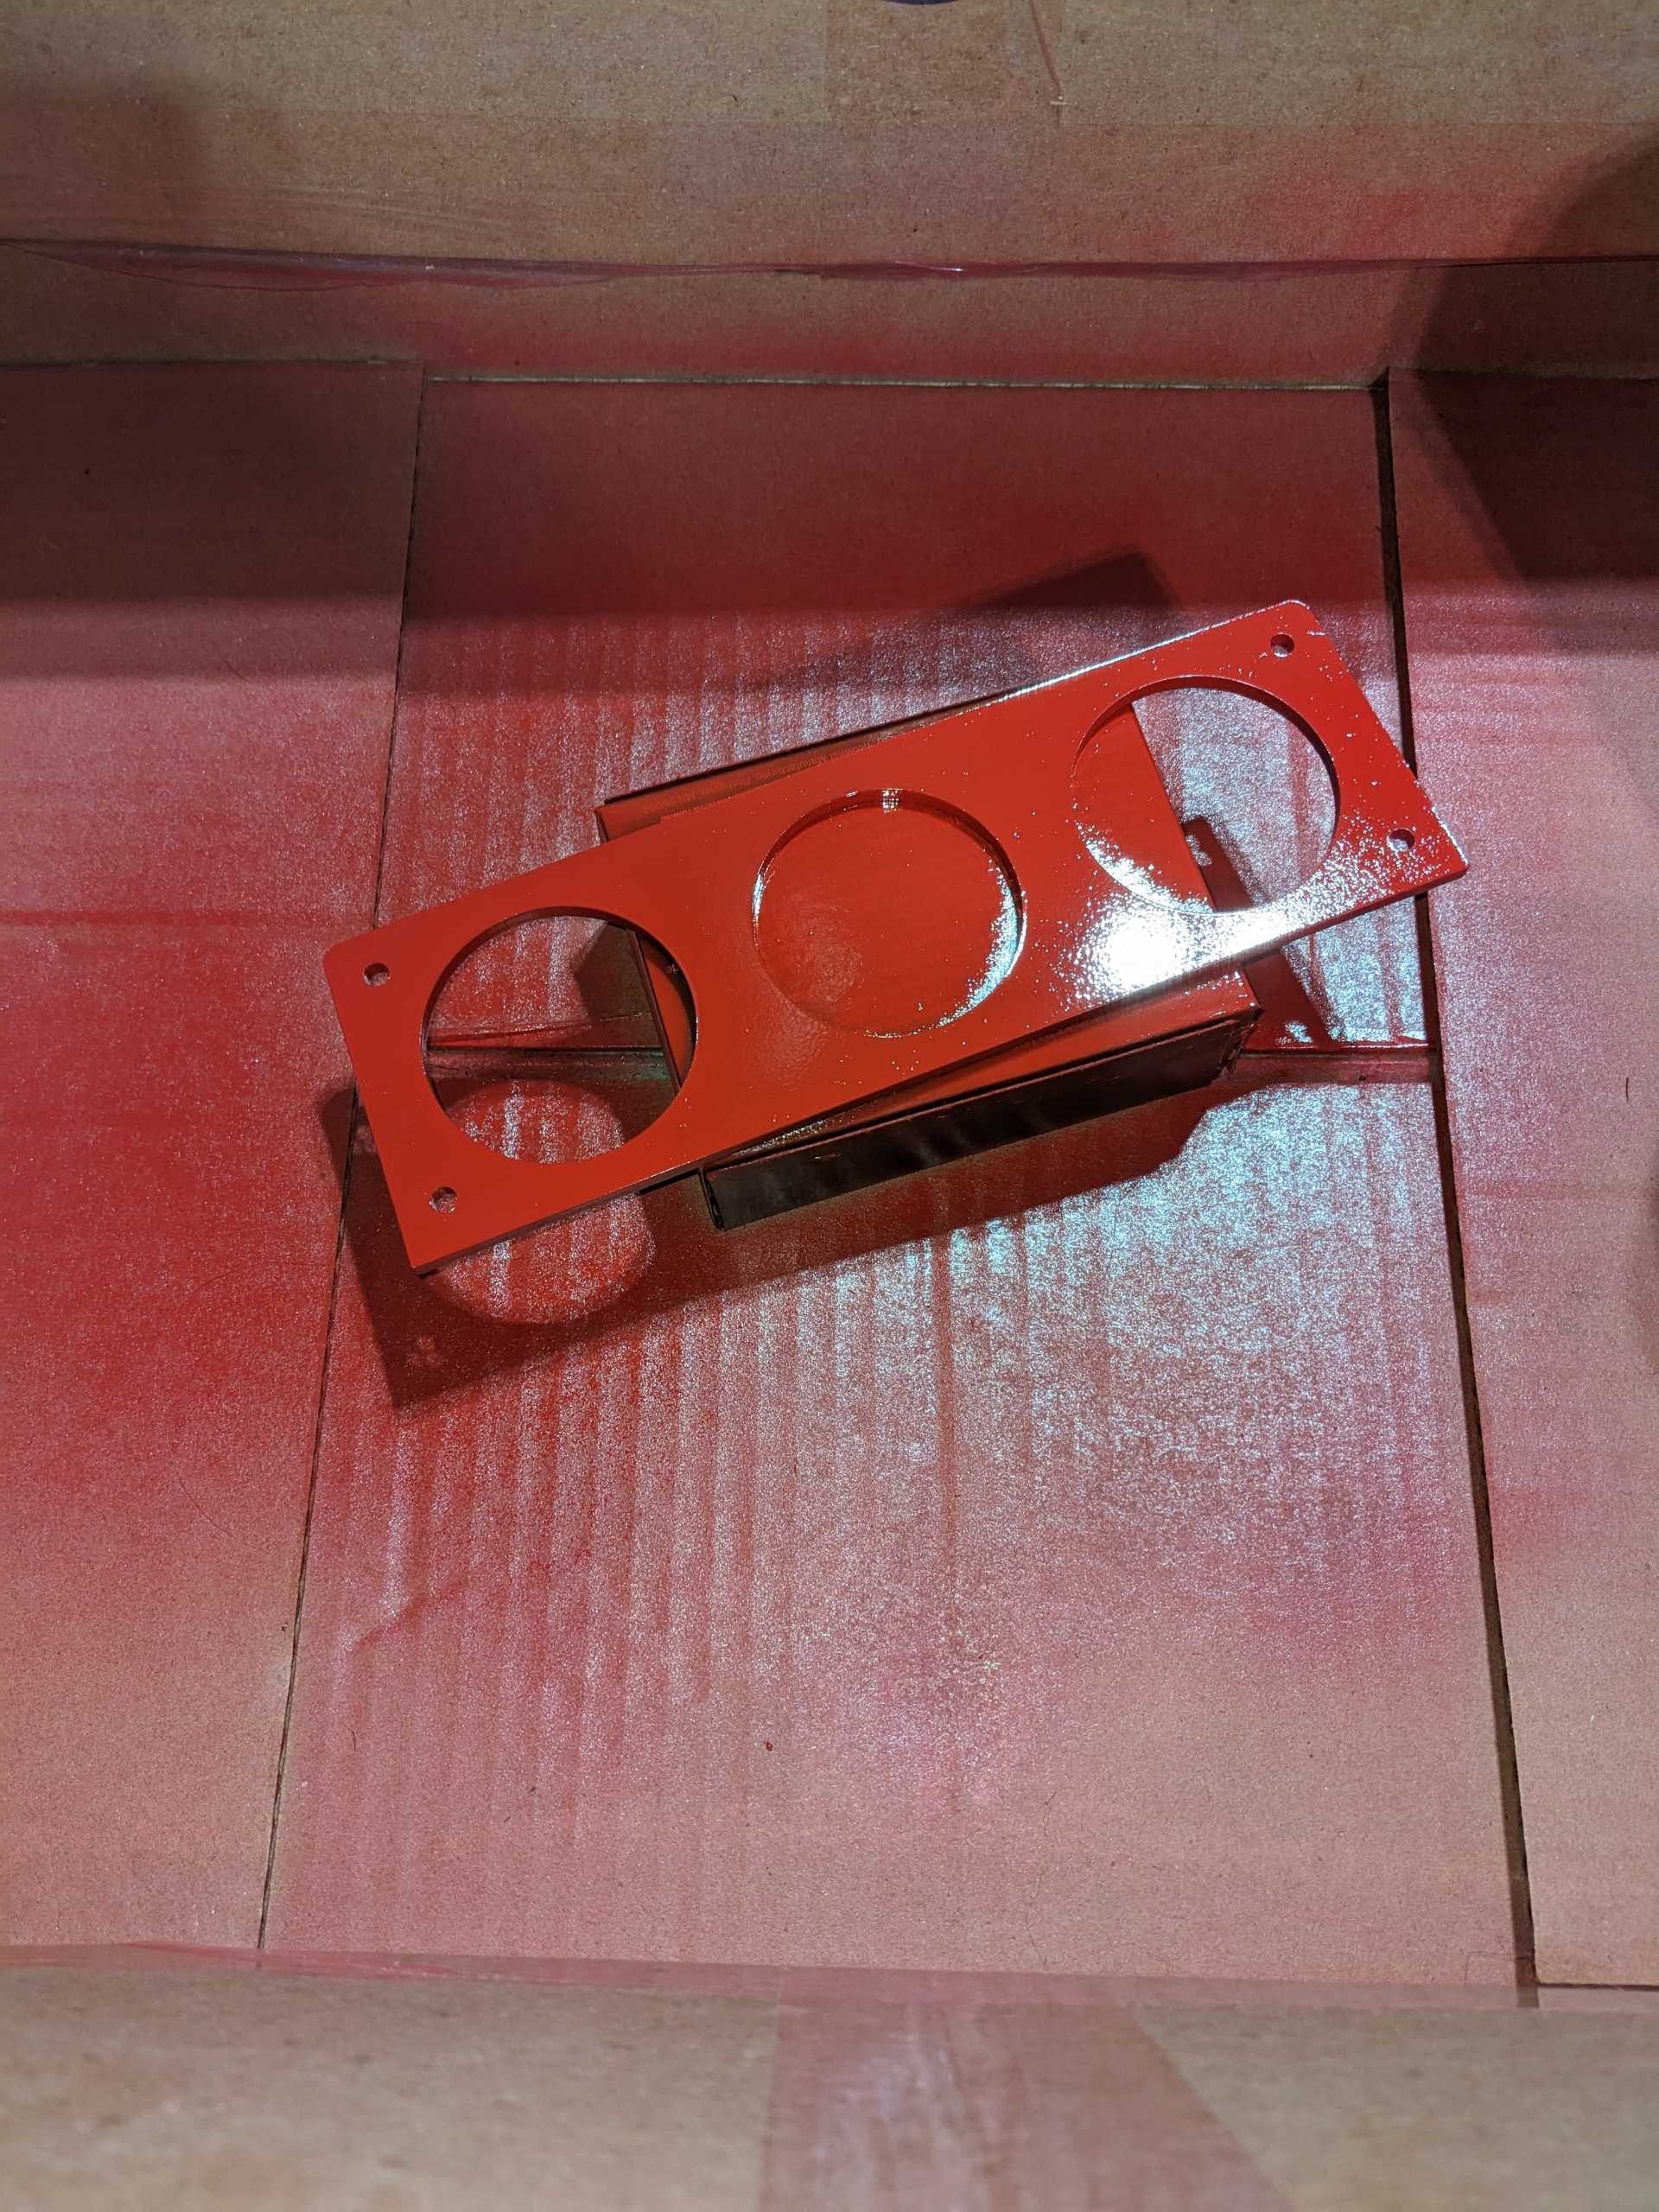
I wanted to back light the faceplate to light up some engraved logos in it. I did have to modify the center console skeleton to accommodate the a/c controls.
IP: Logged
richard in nc
Member
Posts: 225
From: charlotte nc
Registered: Jun 2023


Feedback score: N/A
Leave feedback

Rate this member

Report this Post07-13-2023 05:46 PM Click Here to See the Profile for richard in ncSend a Private Message to richard in ncEdit/Delete MessageReply w/QuoteDirect Link to This Post
i want to see this when its finished.it makes more sense to put the ac controls on the bottom.
IP: Logged
Raydar
Member
Posts: 40726
From: Carrollton GA. Out in the... country.
Registered: Oct 1999


Feedback score:    (13)
Leave feedback


Total ratings: 460
Rate this member

Report this Post07-13-2023 07:37 PM Click Here to See the Profile for RaydarSend a Private Message to RaydarEdit/Delete MessageReply w/QuoteDirect Link to This Post
I bought mmeyer's 3D printed skeleton, designed to accommodate a double DIN head unit. This is the result, in mine.

IP: Logged
Tmiester
Junior Member
Posts: 6
From: story city, iowa
Registered: Jul 2018


Feedback score: N/A
Leave feedback

Rate this member

Report this Post09-04-2023 12:13 AM Click Here to See the Profile for TmiesterSend a Private Message to TmiesterEdit/Delete MessageReply w/QuoteDirect Link to This Post
I got my double din radio relocation done 
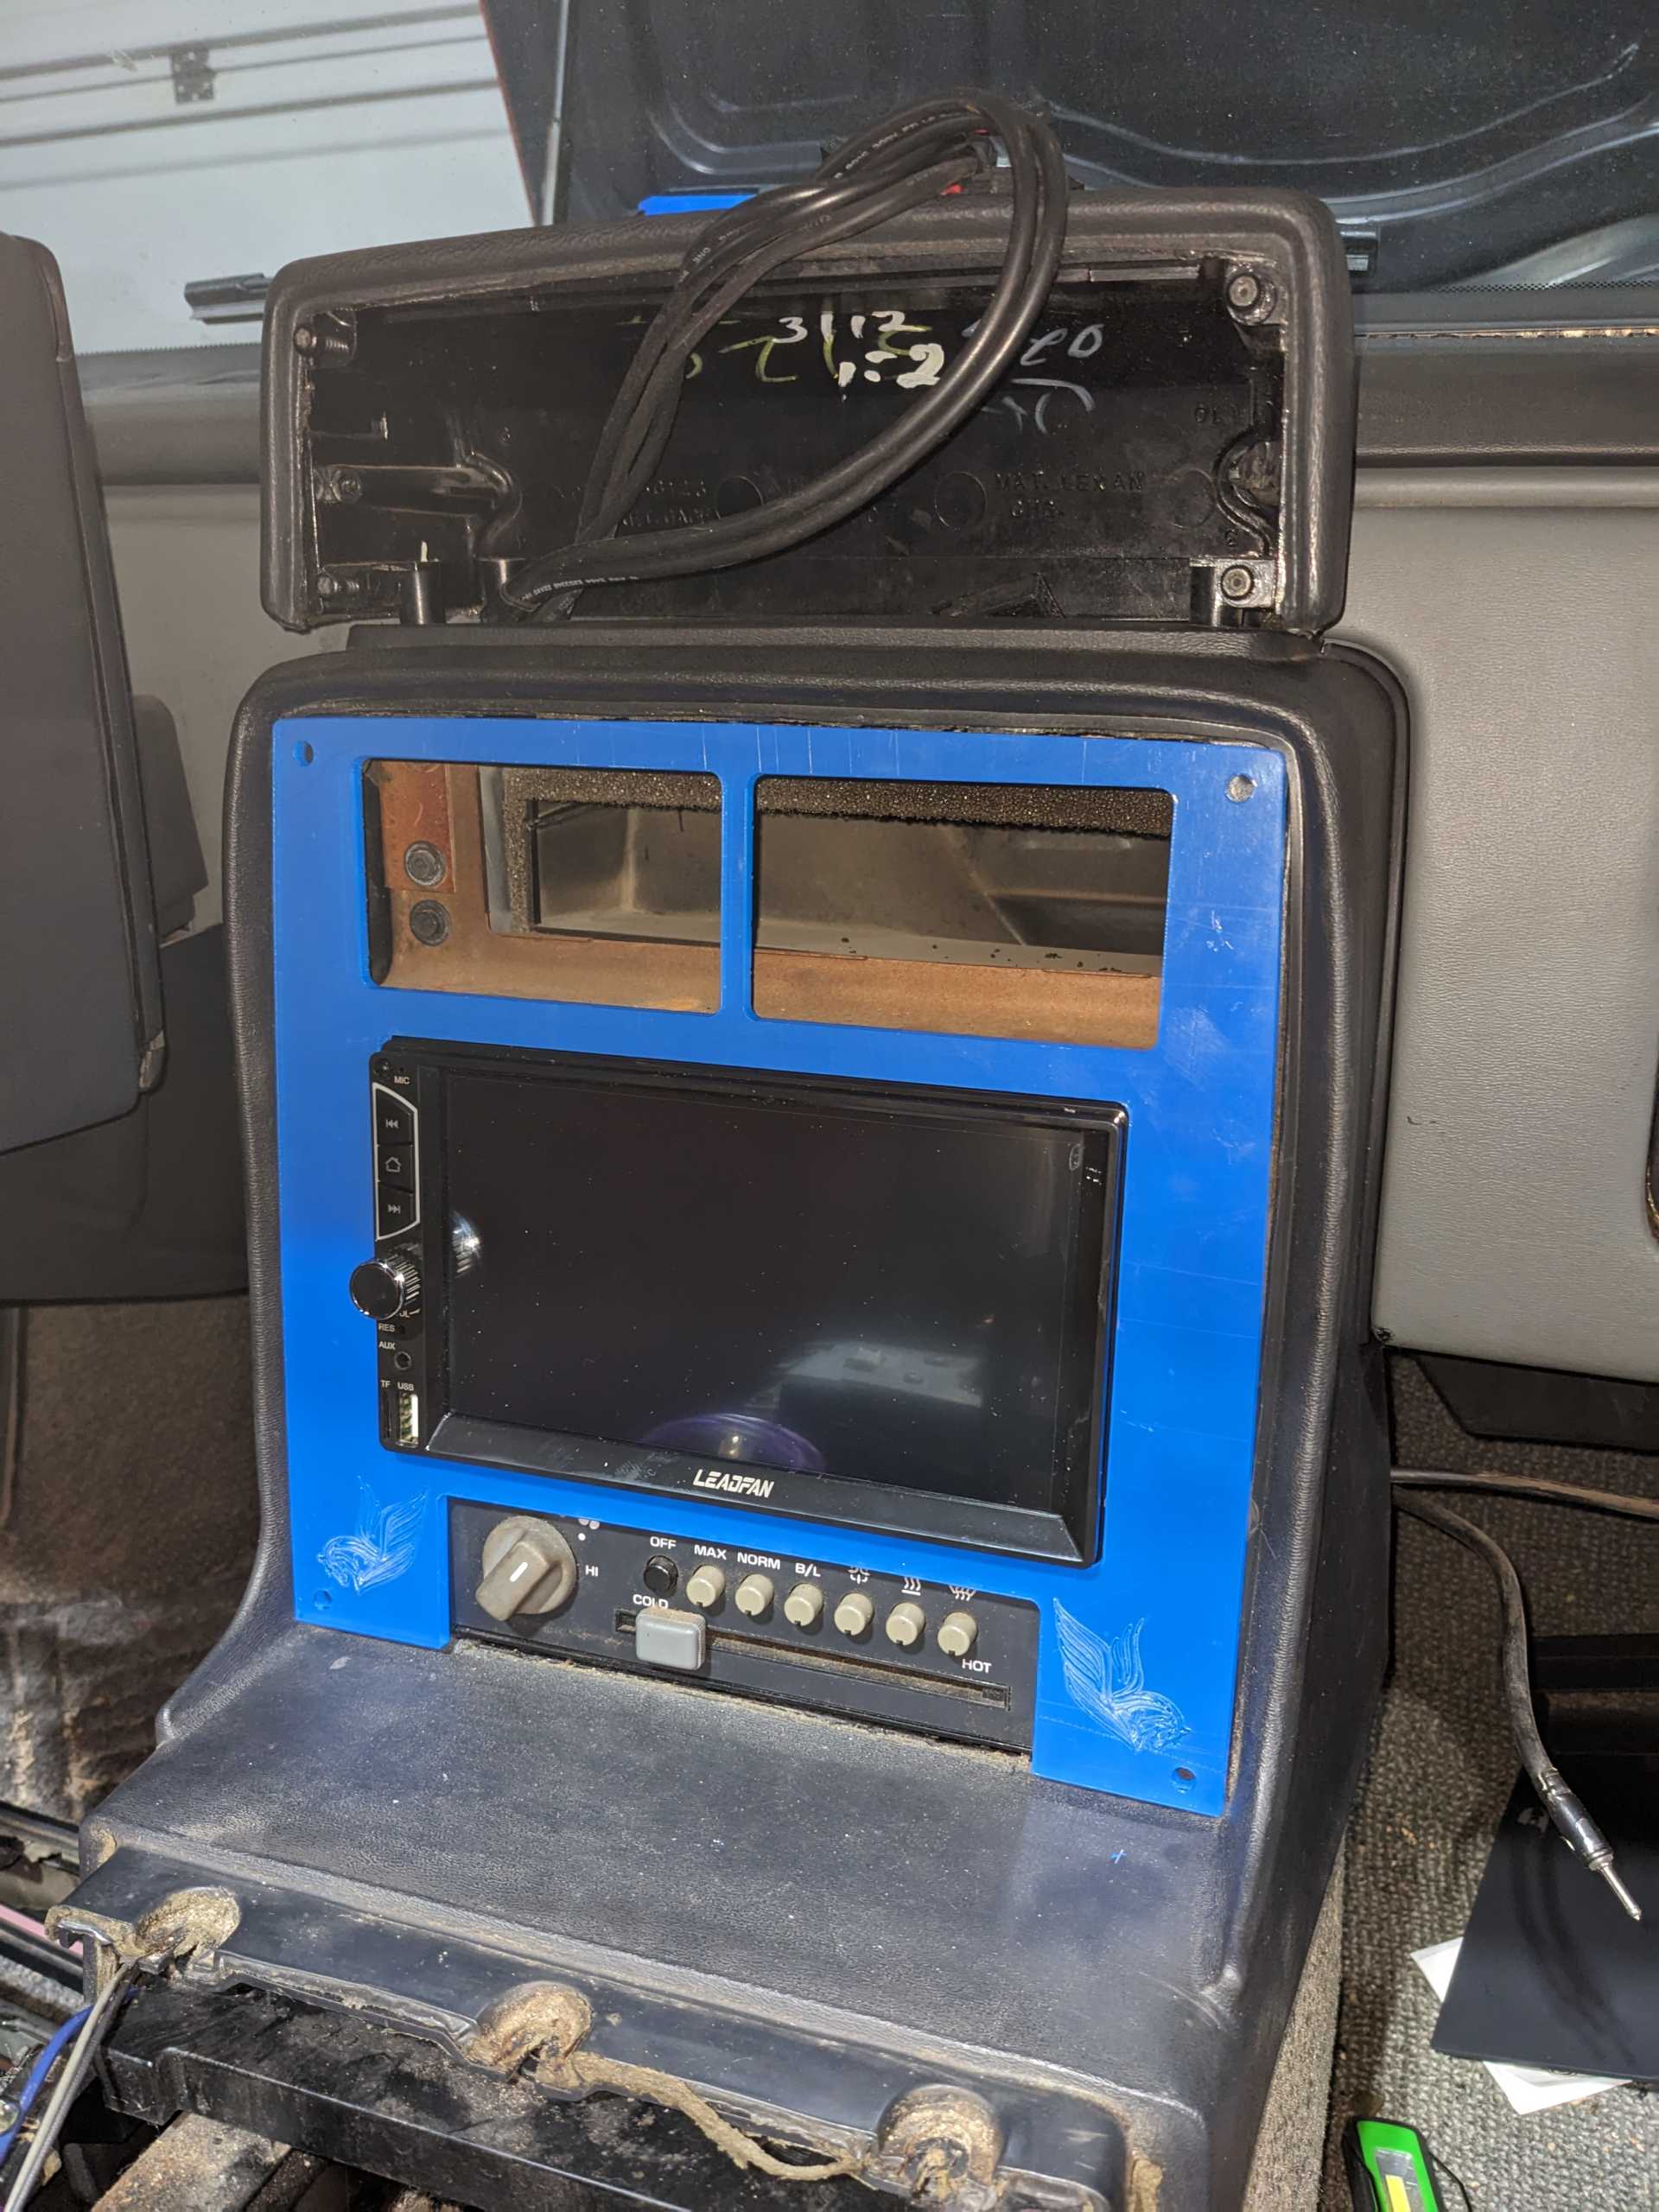
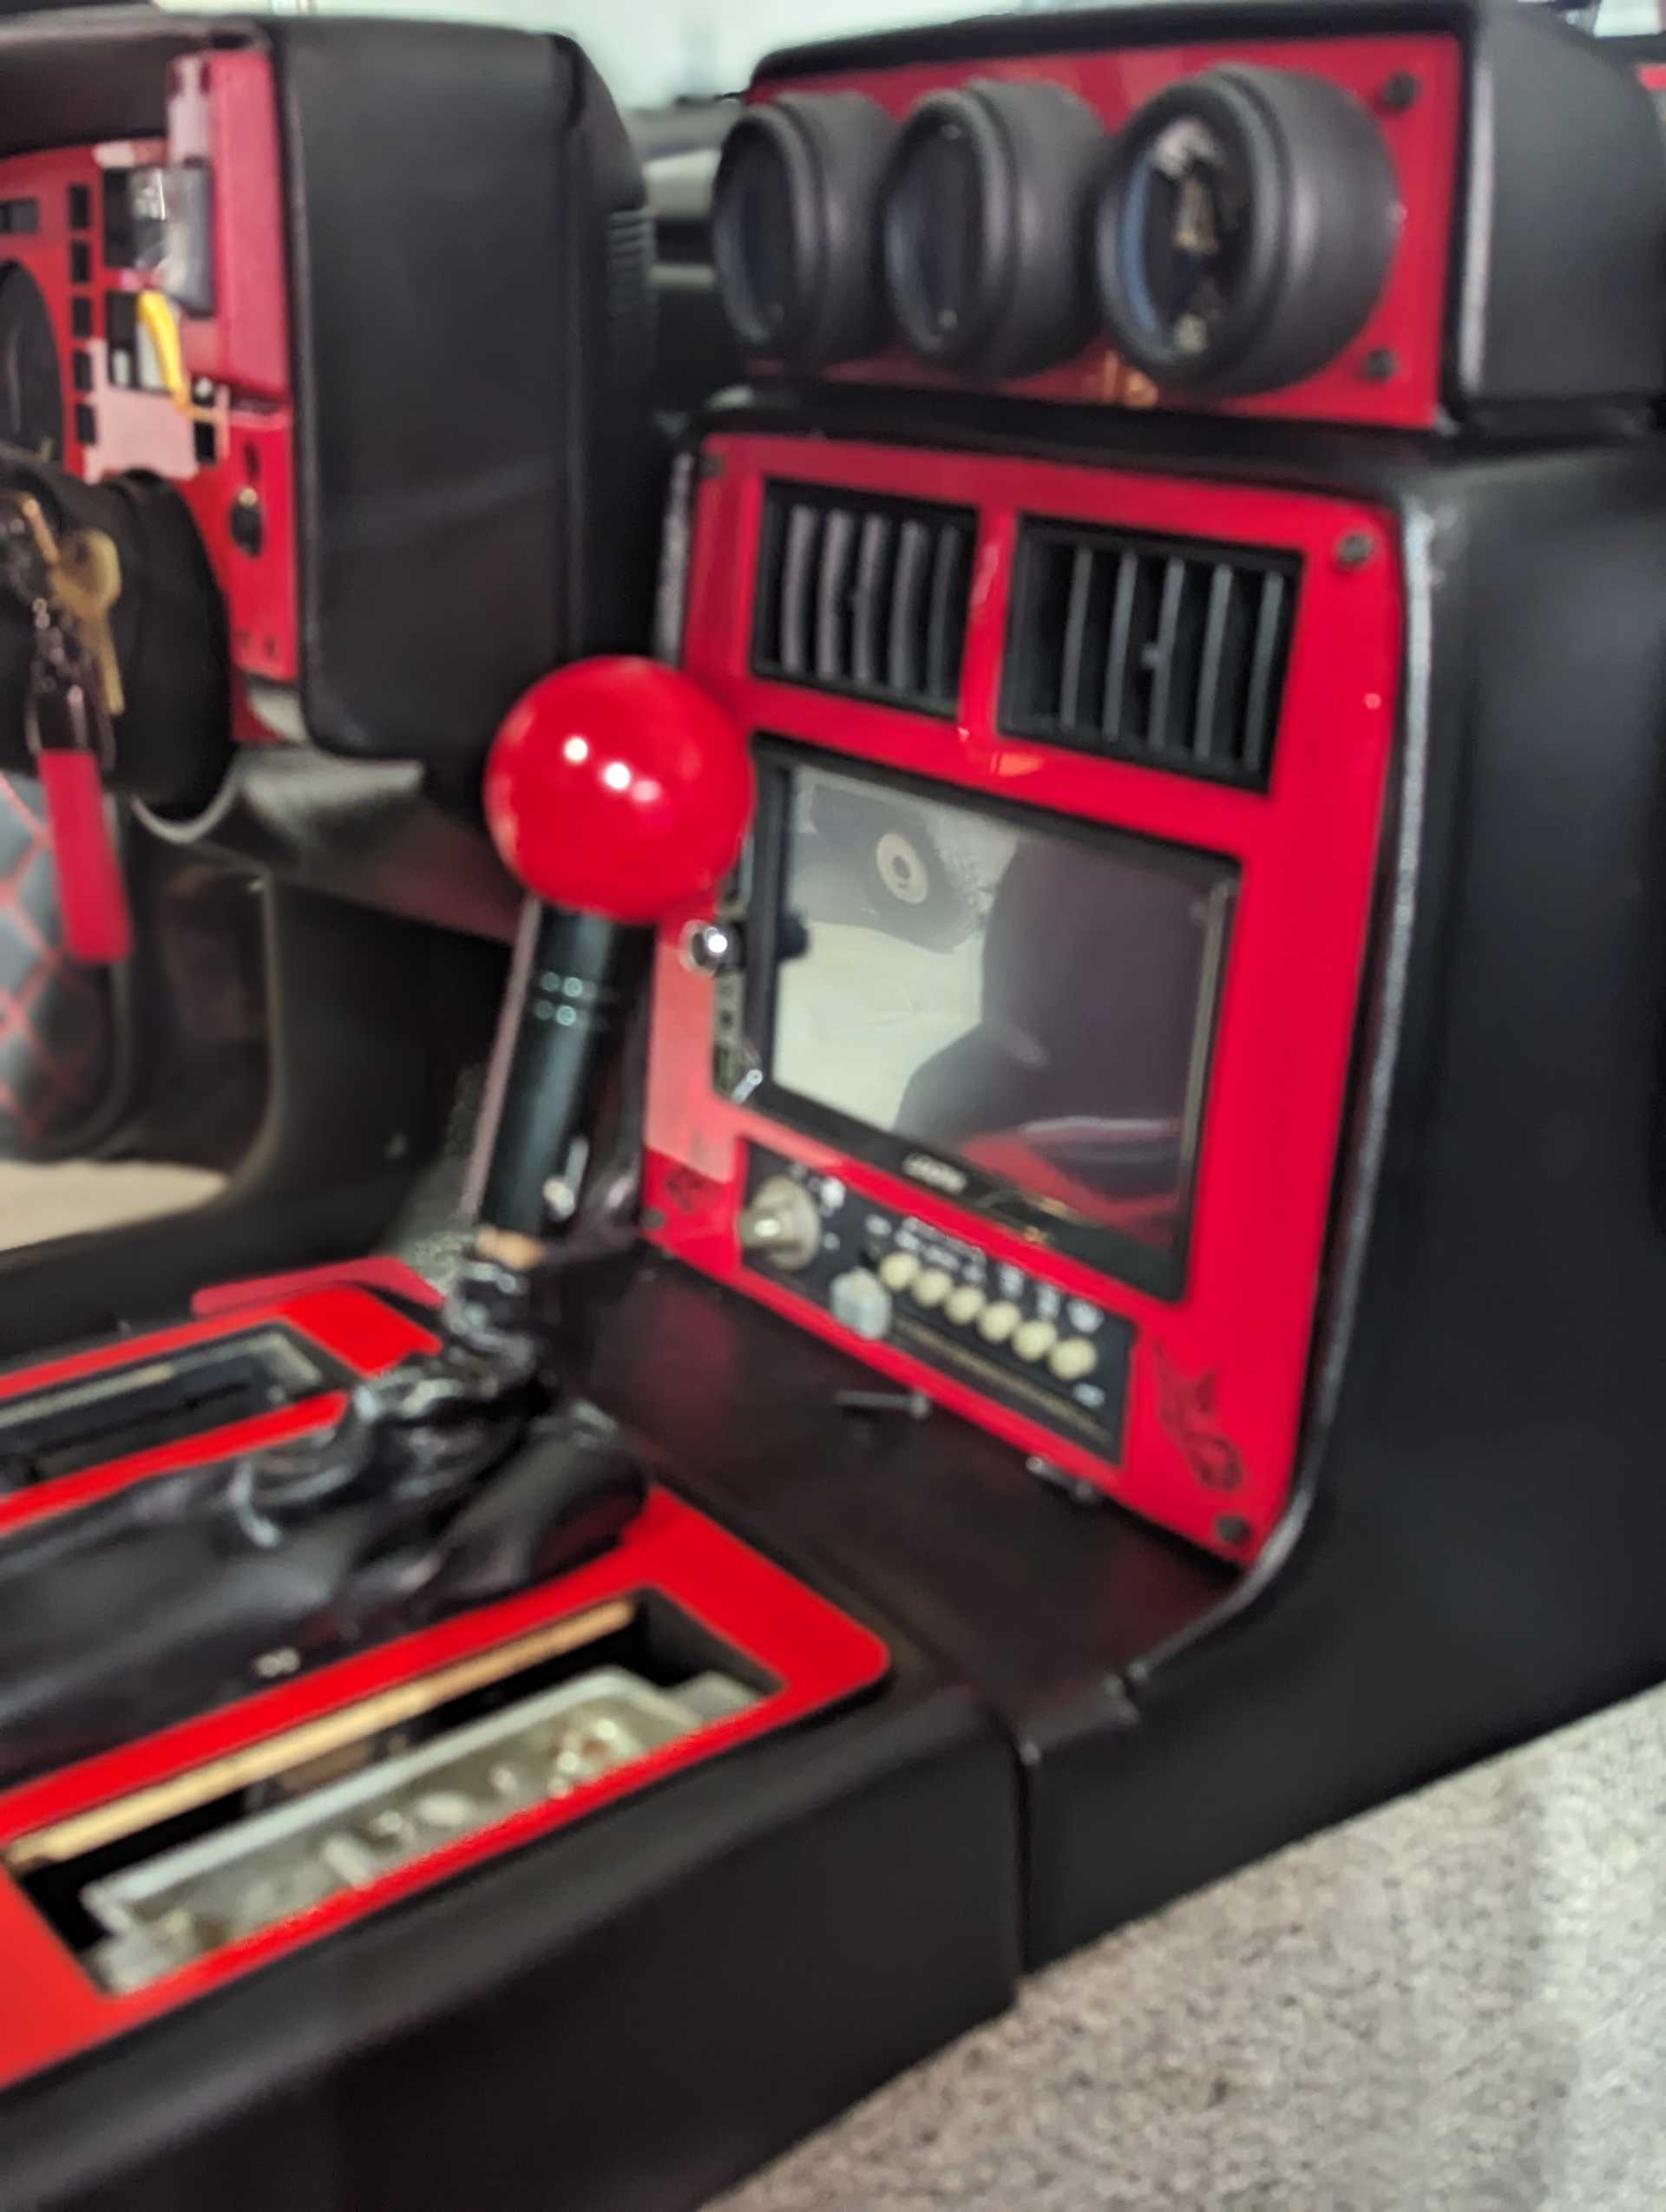
and that snowballed into my 1st stage of redoing the interior of the car. I am going with a black and red color scheme 
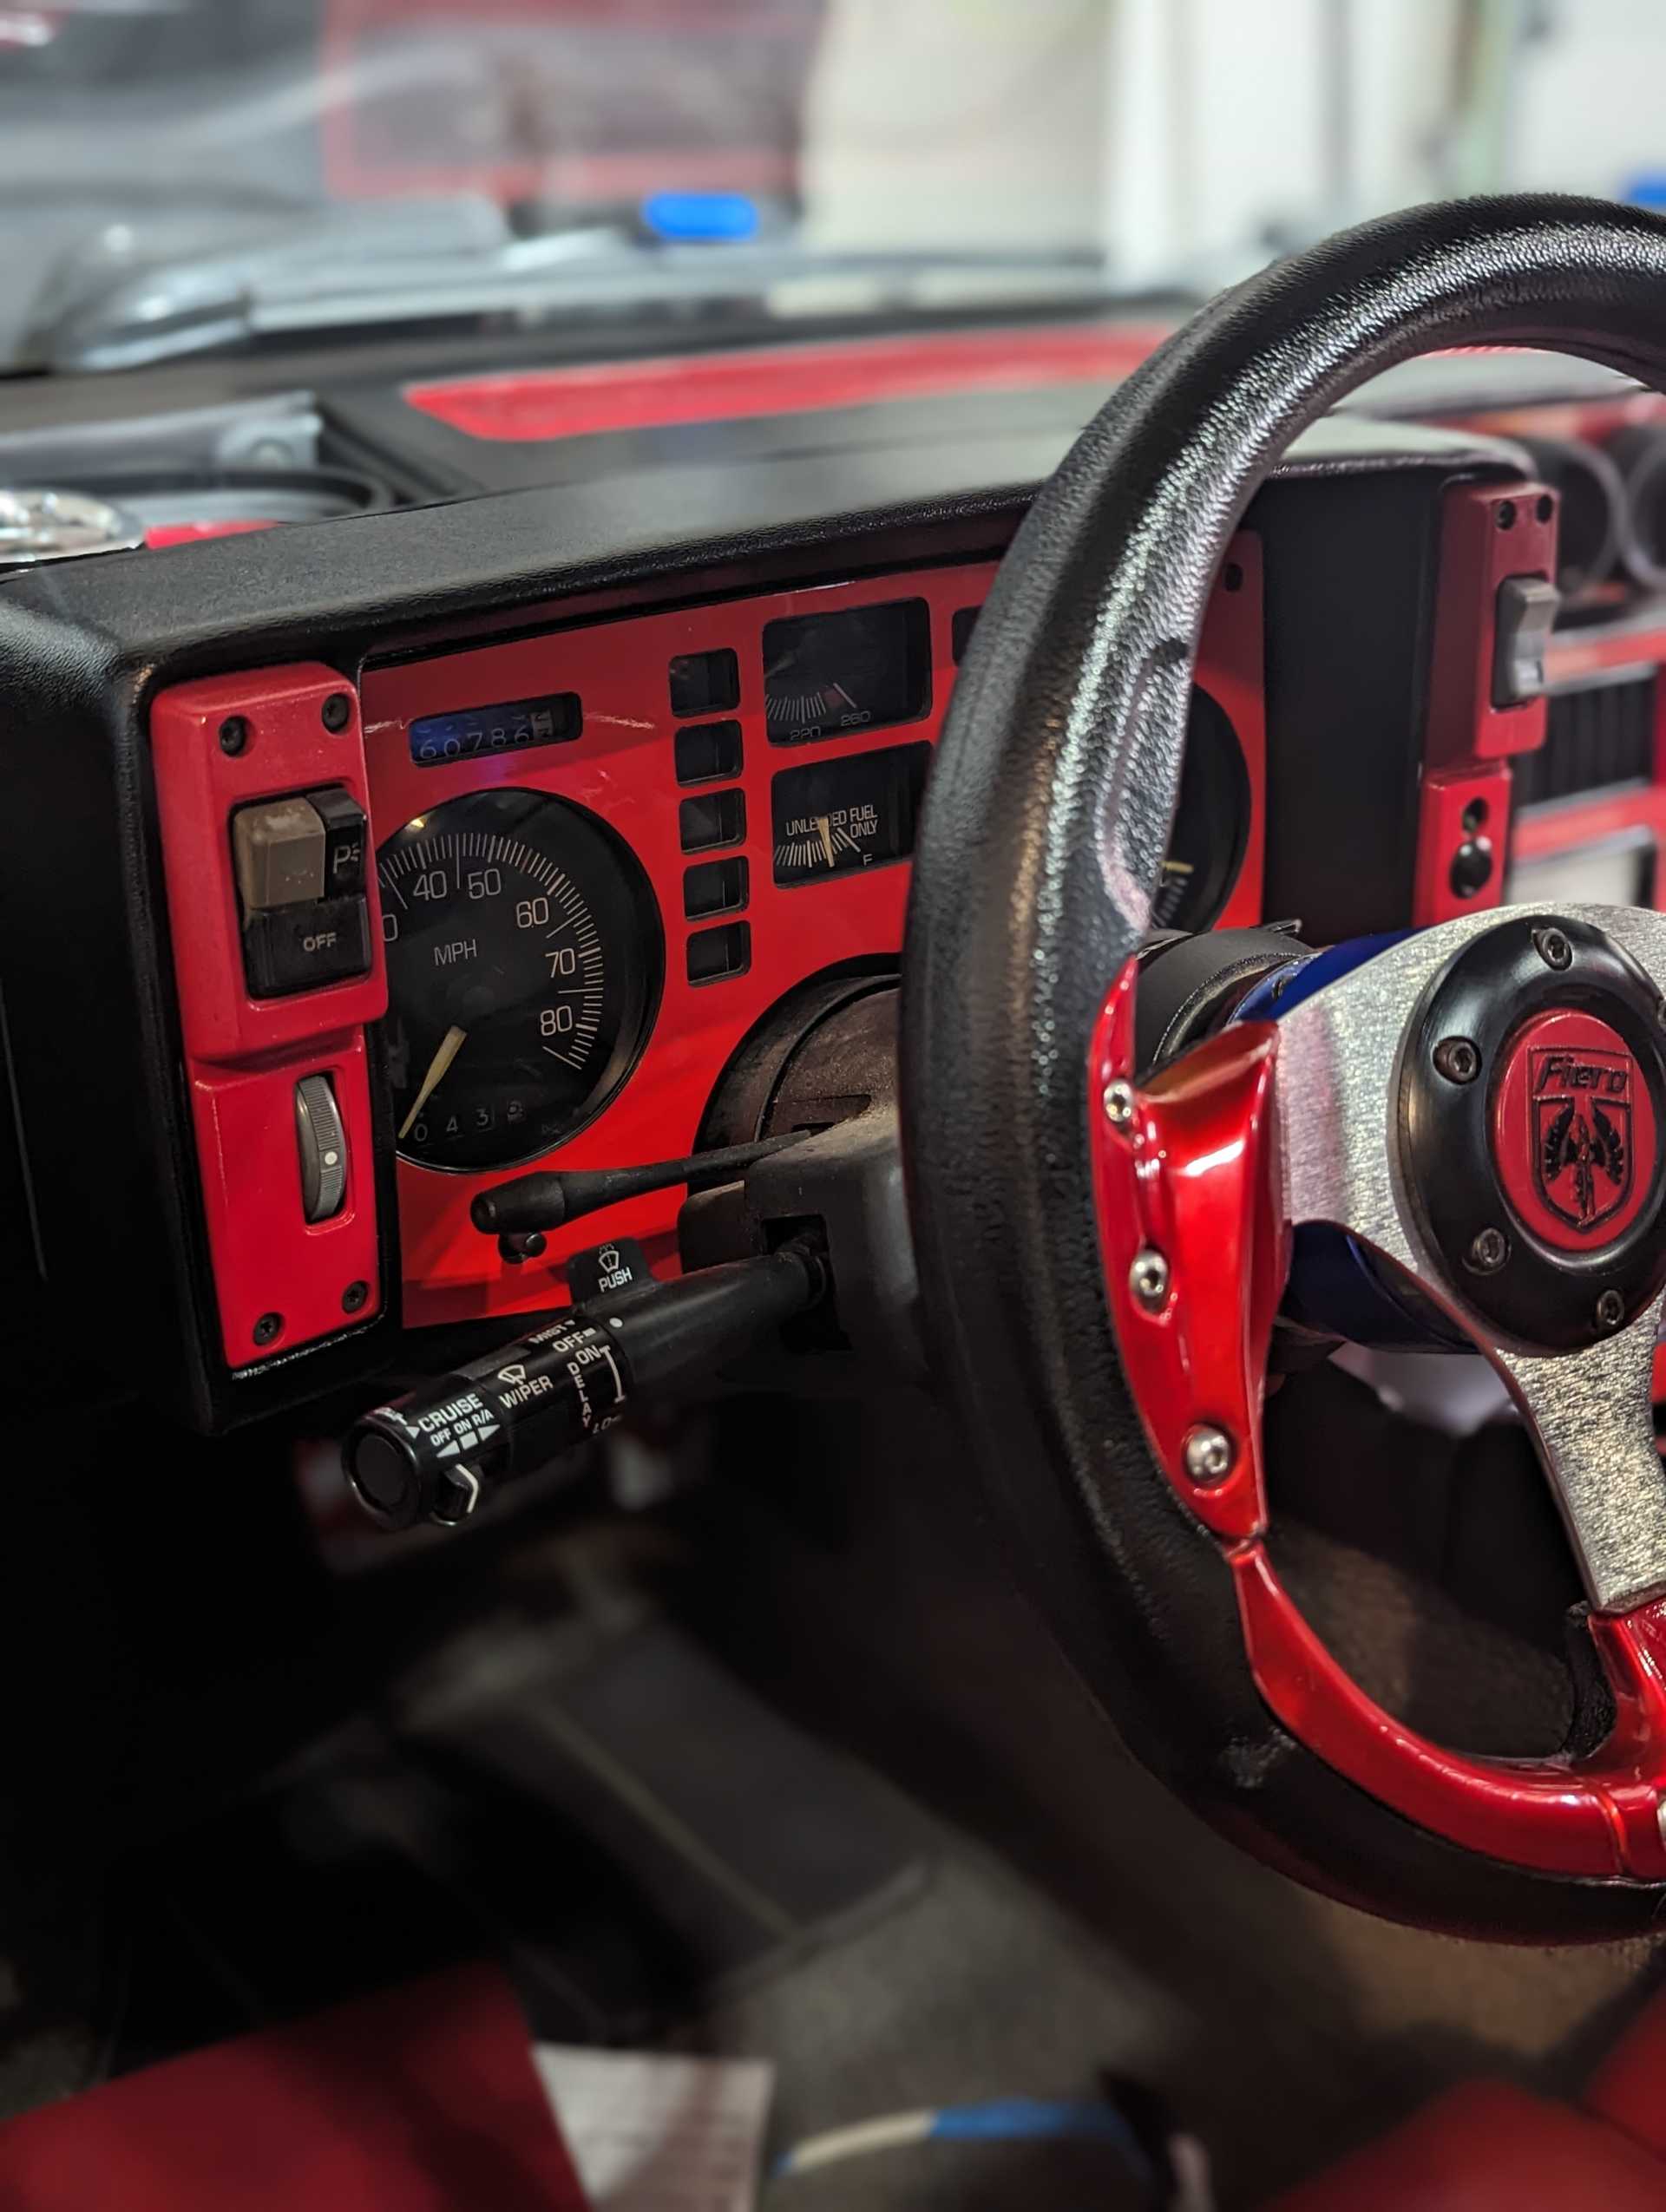
vinal rap on the gauge cluster and around the shifter 3d printed cigarette lighter bezel for two USB ports. 
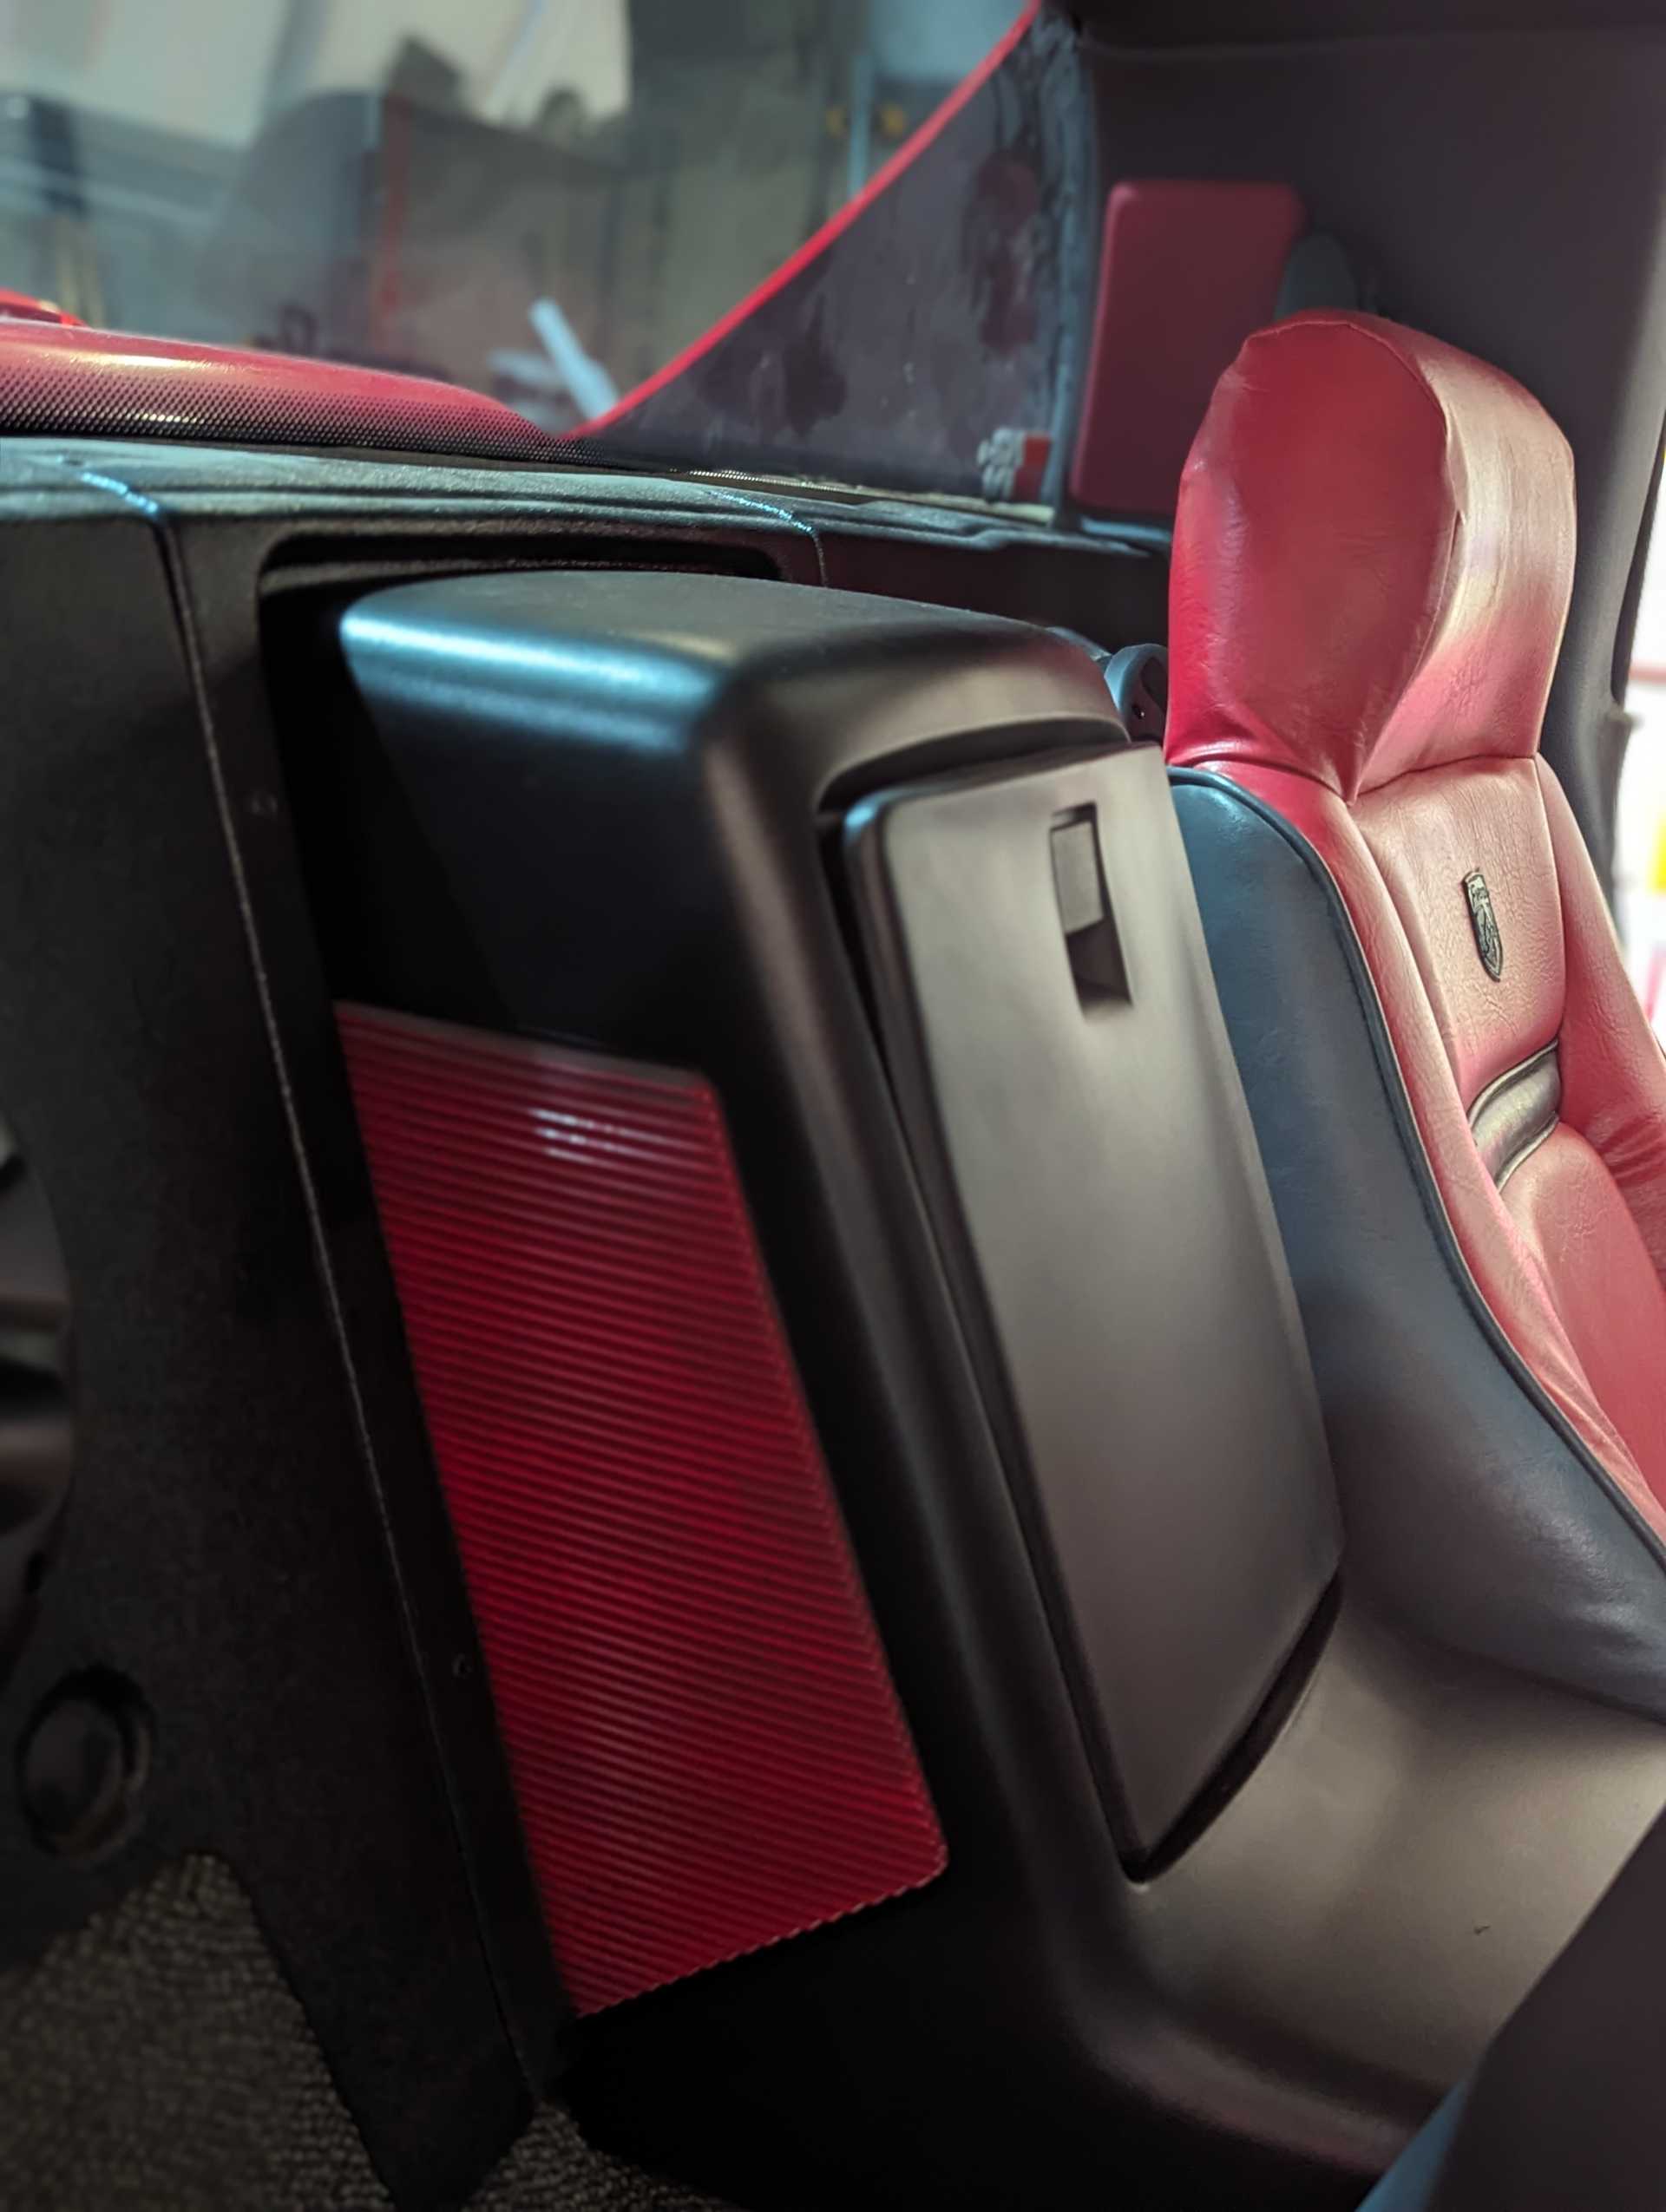
painted the vinal center console black and did red for the vents in it 
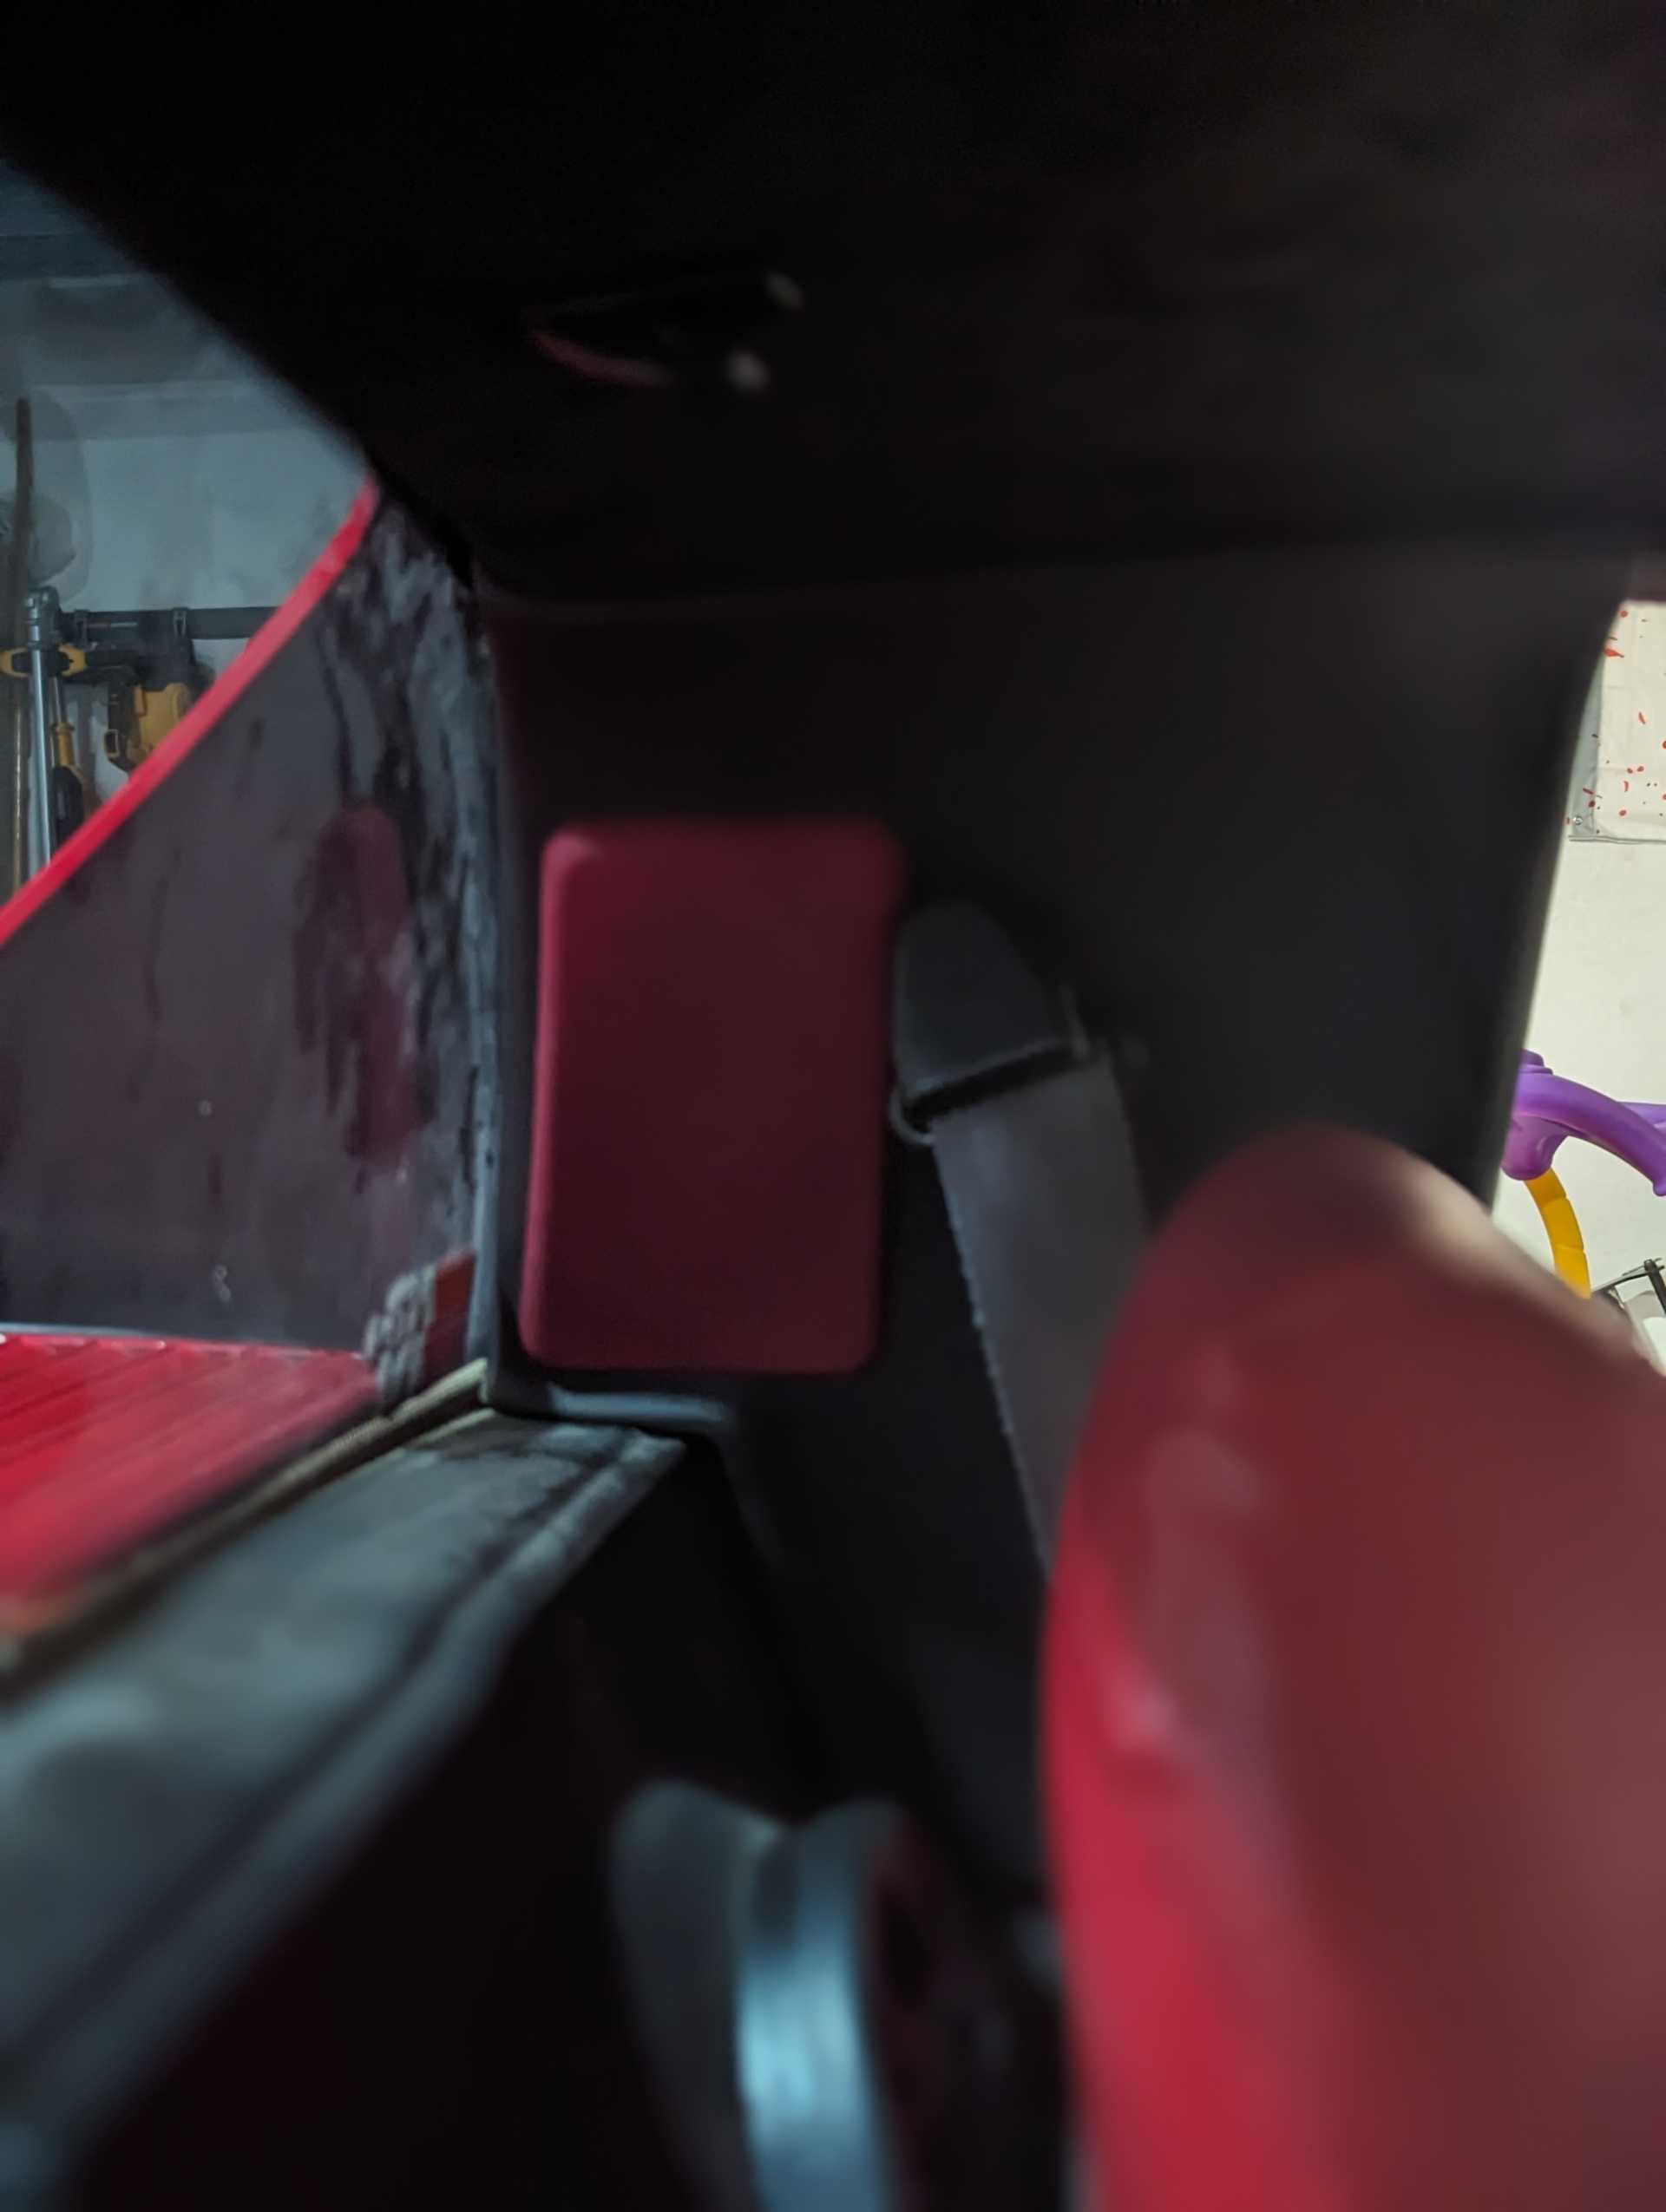
covered the B and A pillars with vinal 
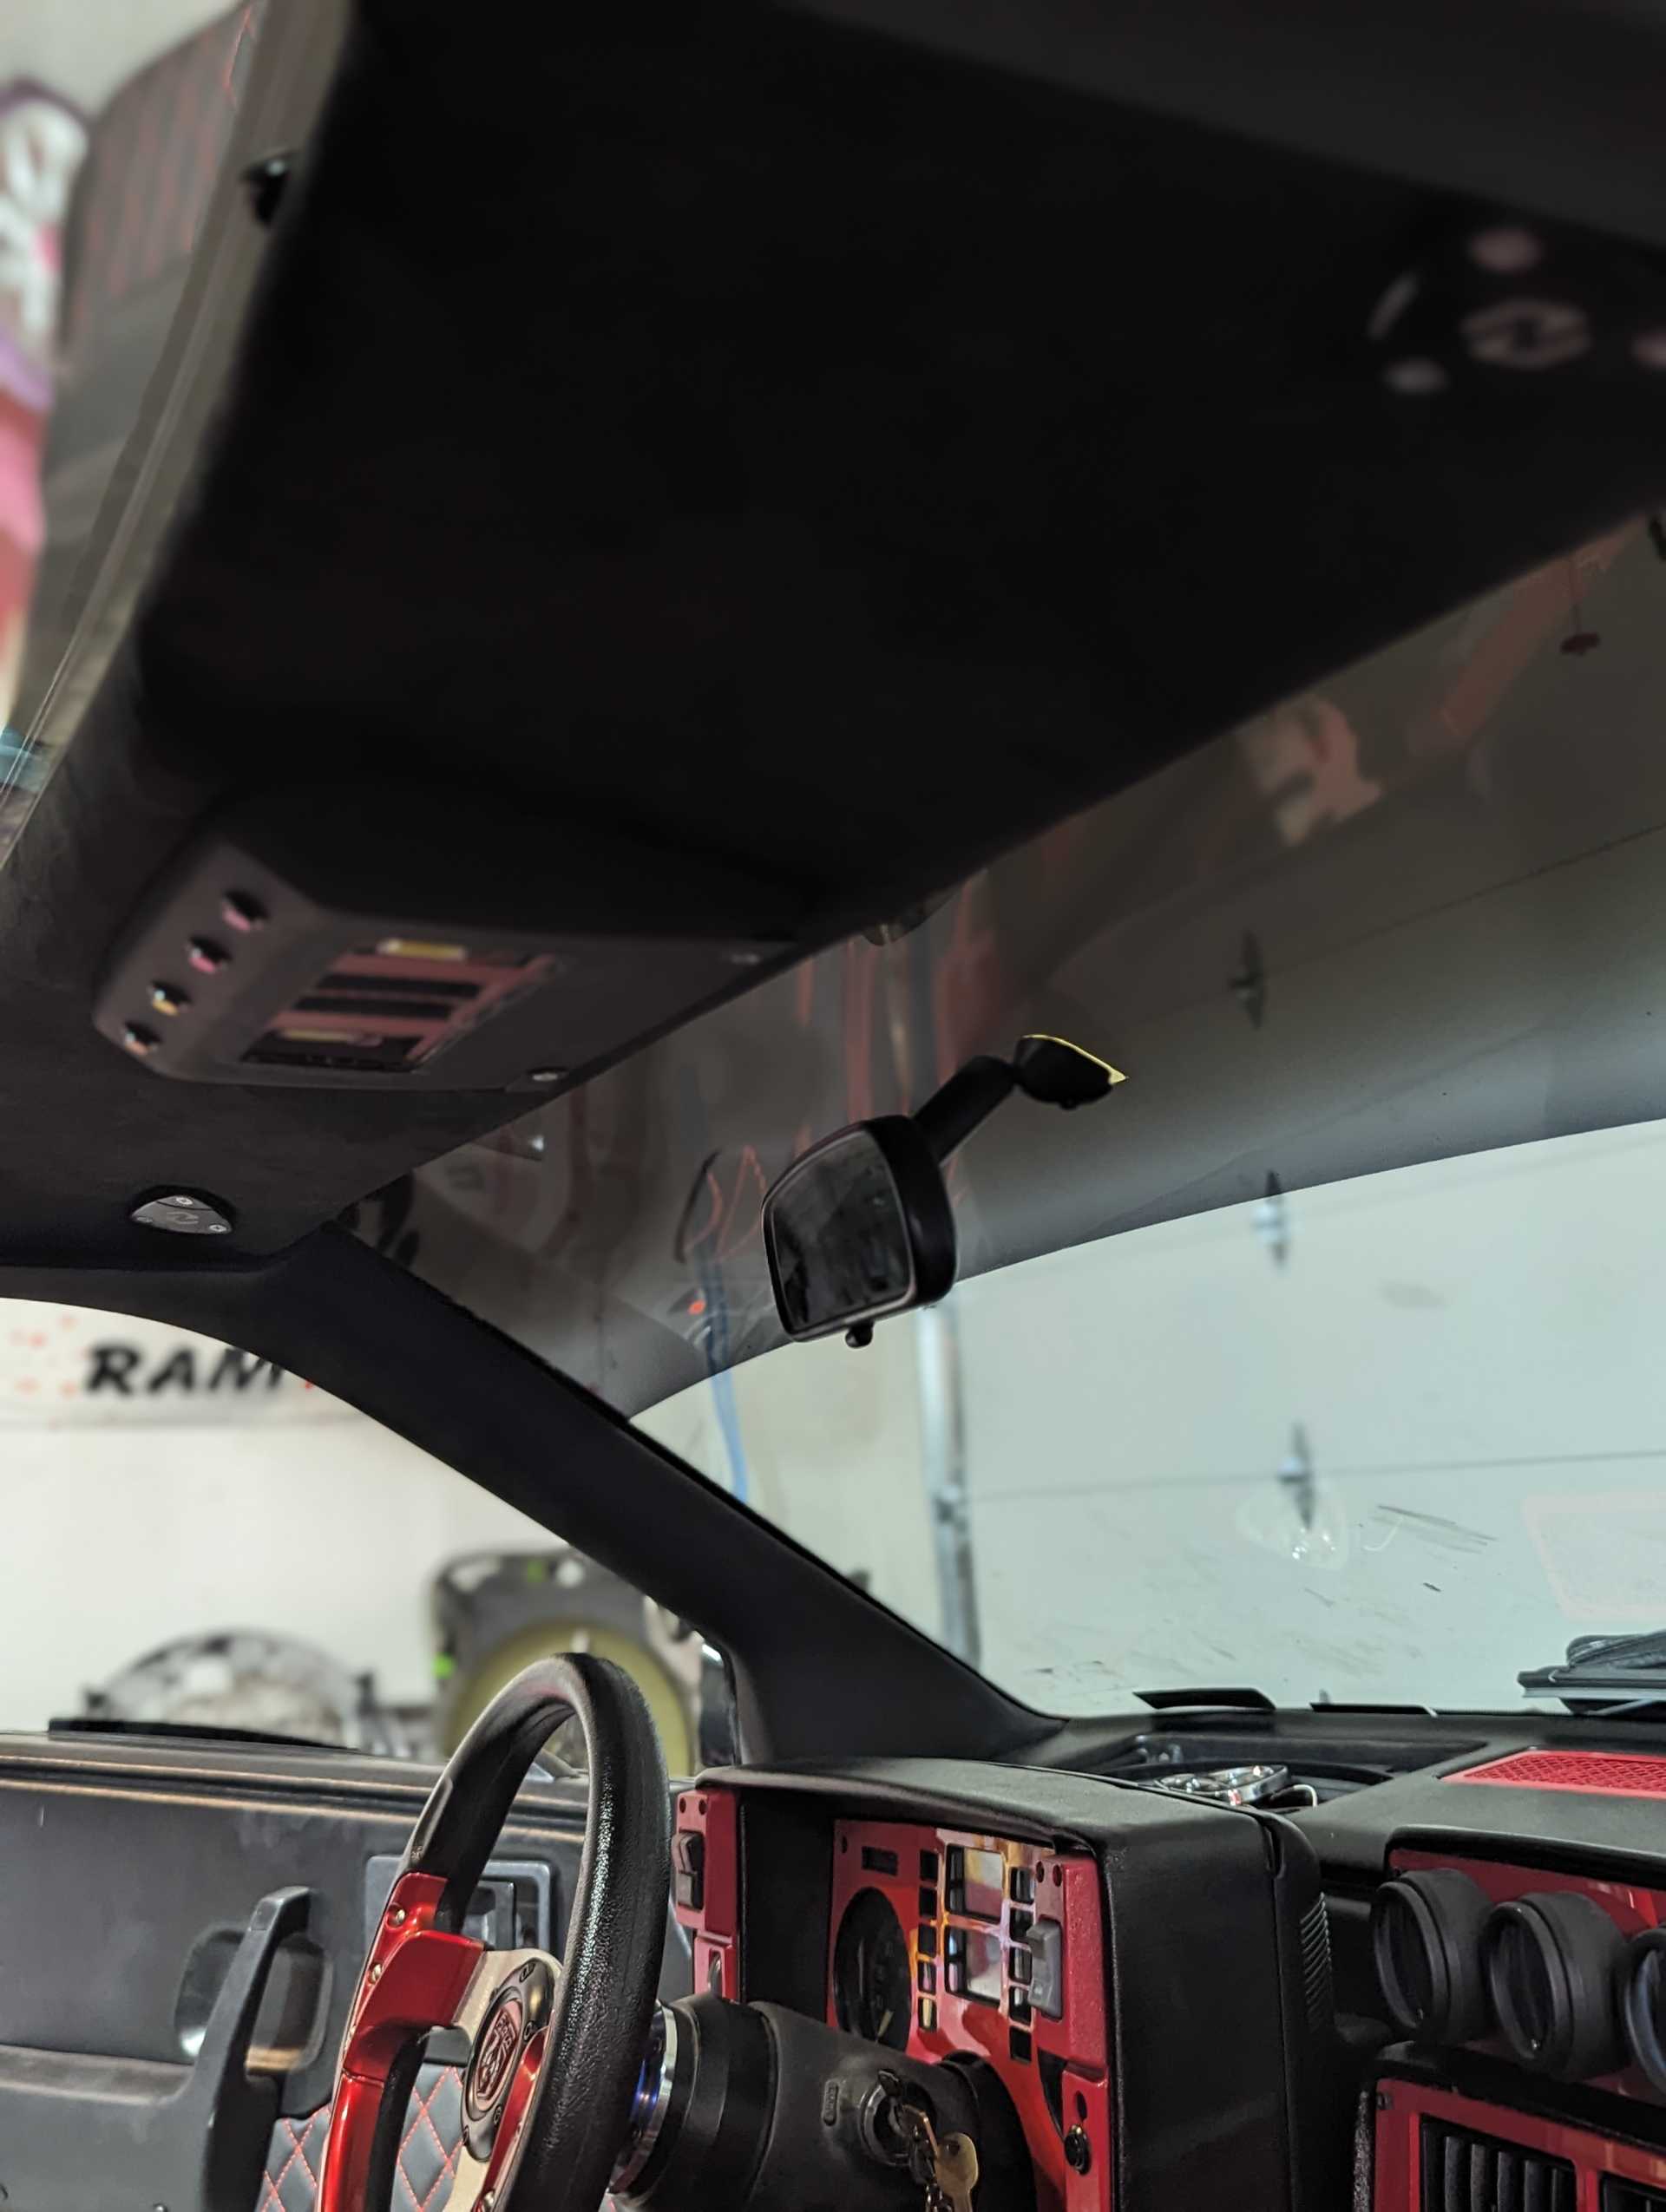
covered the lower door panel with black vinal with red diamond stitching 
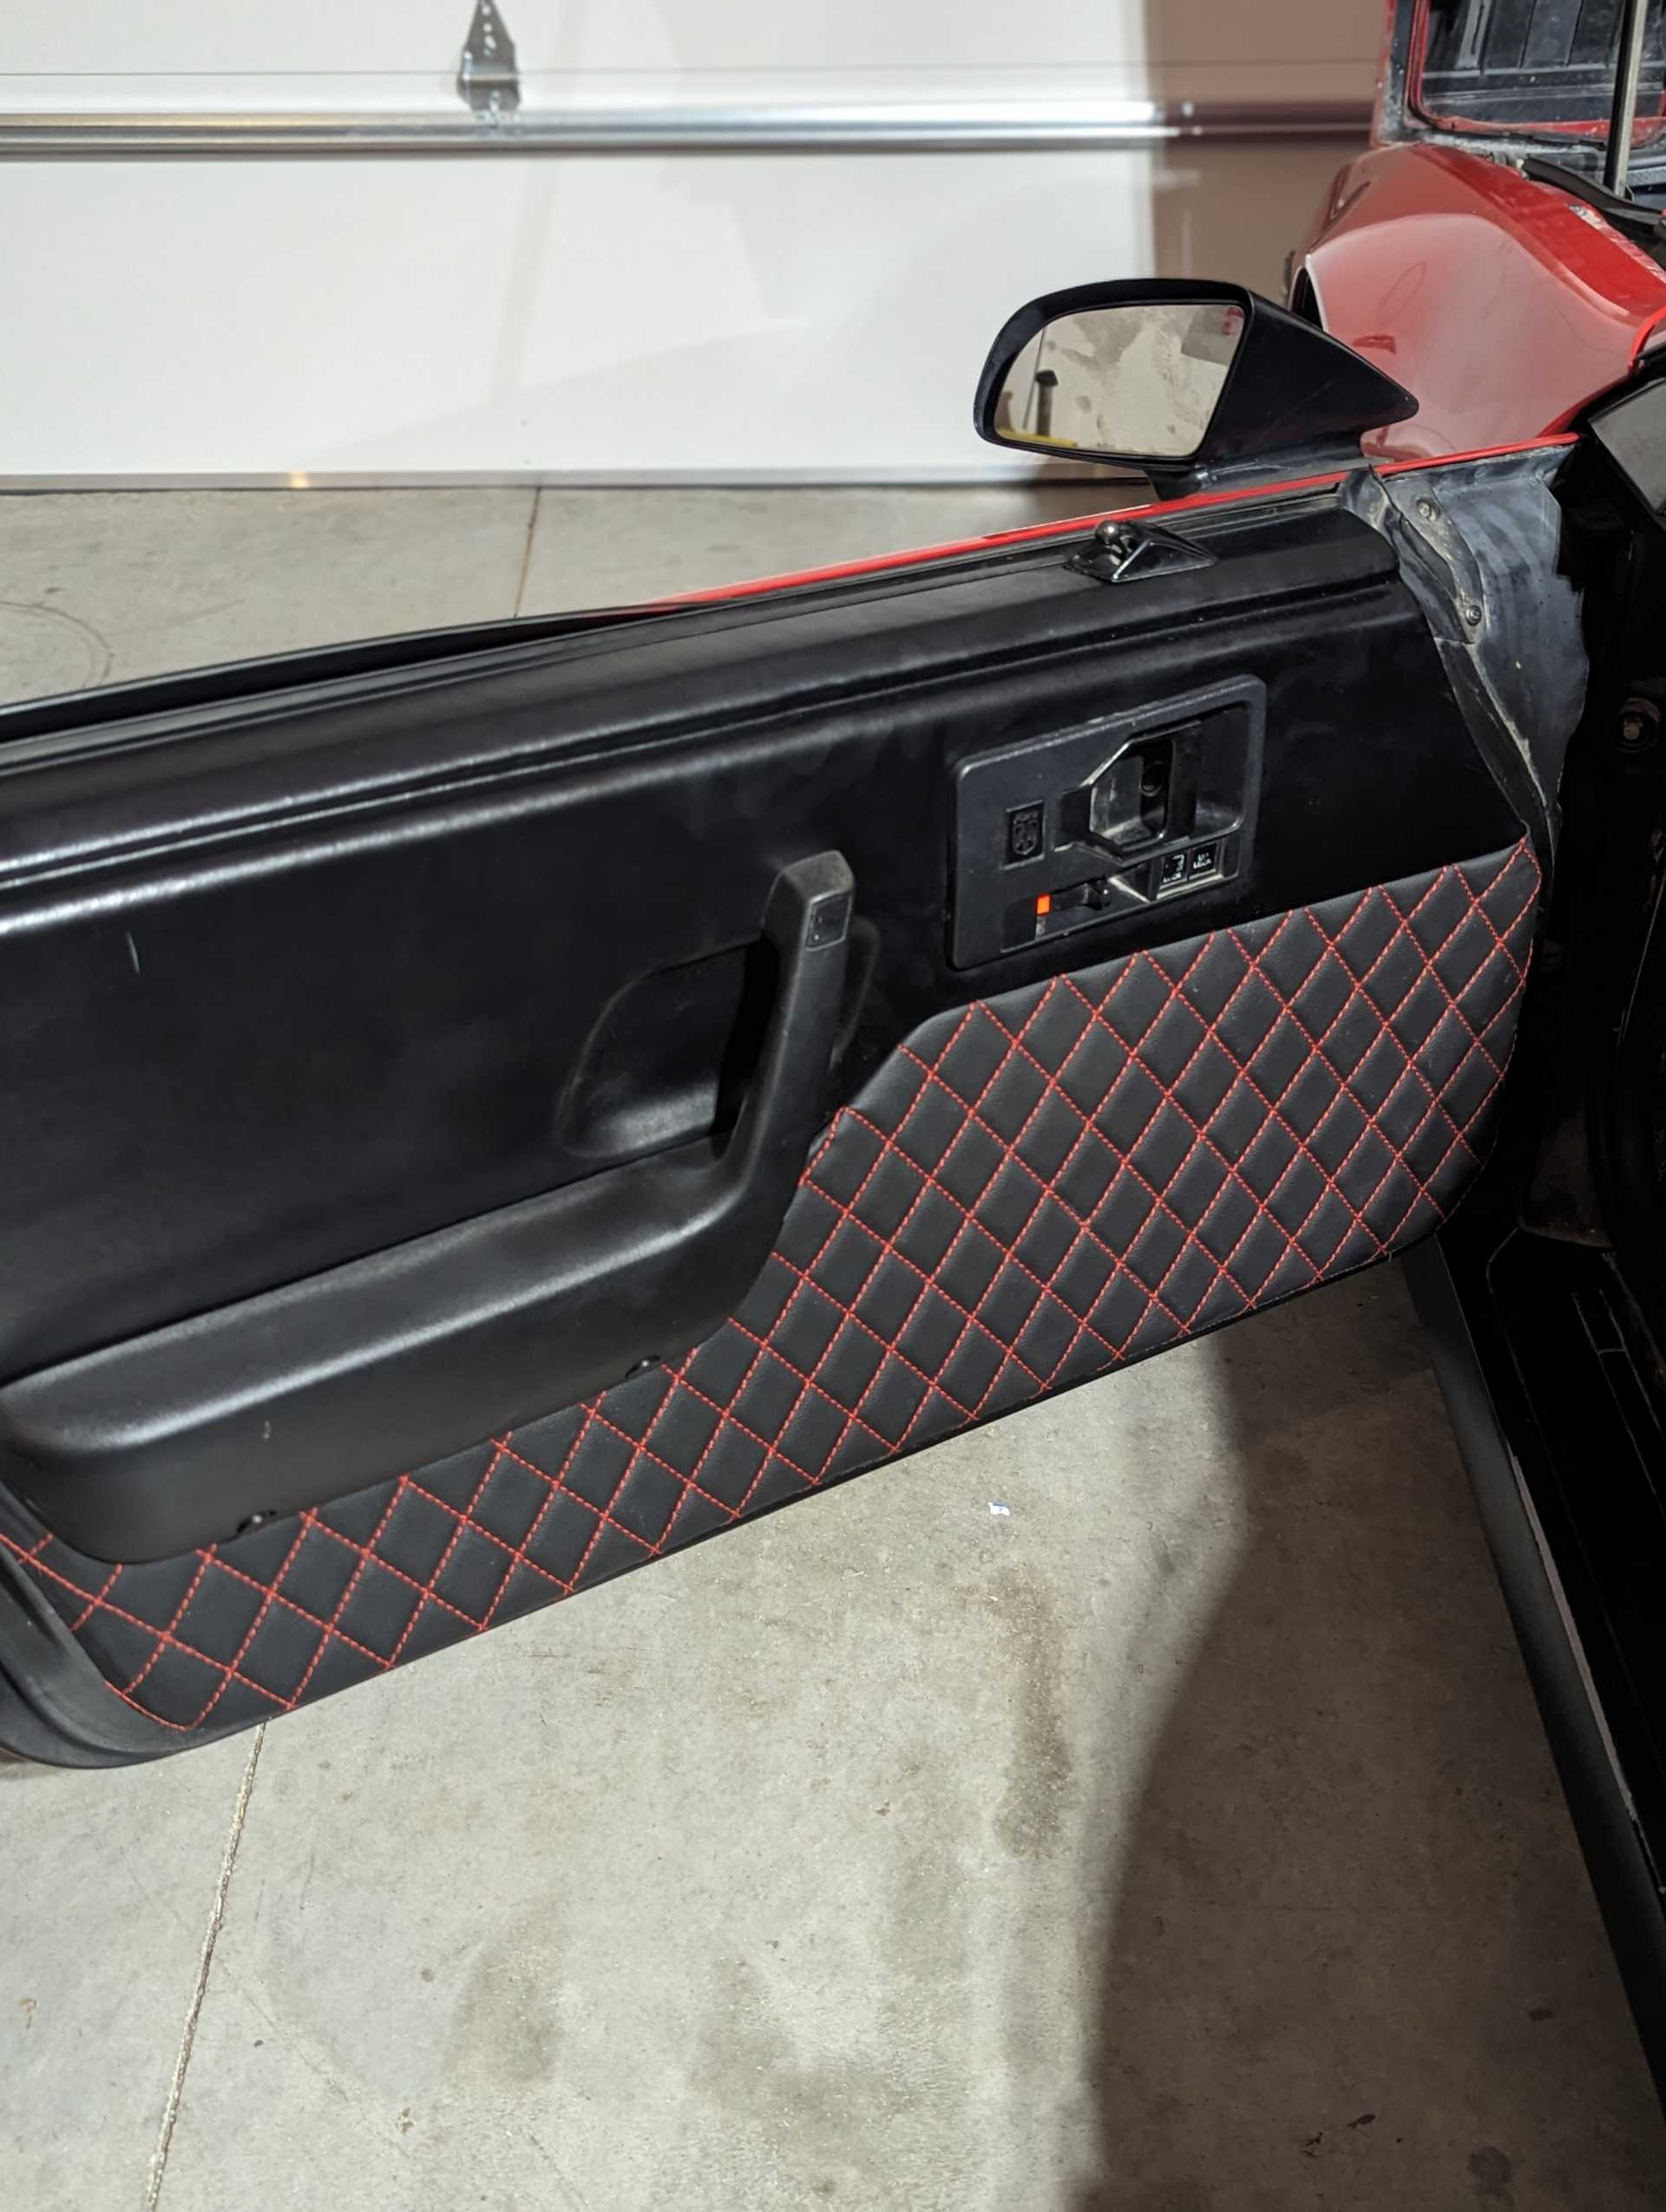
then made a matching map pocket for the dash and hand stitched the OEM fiero logo back on to it 
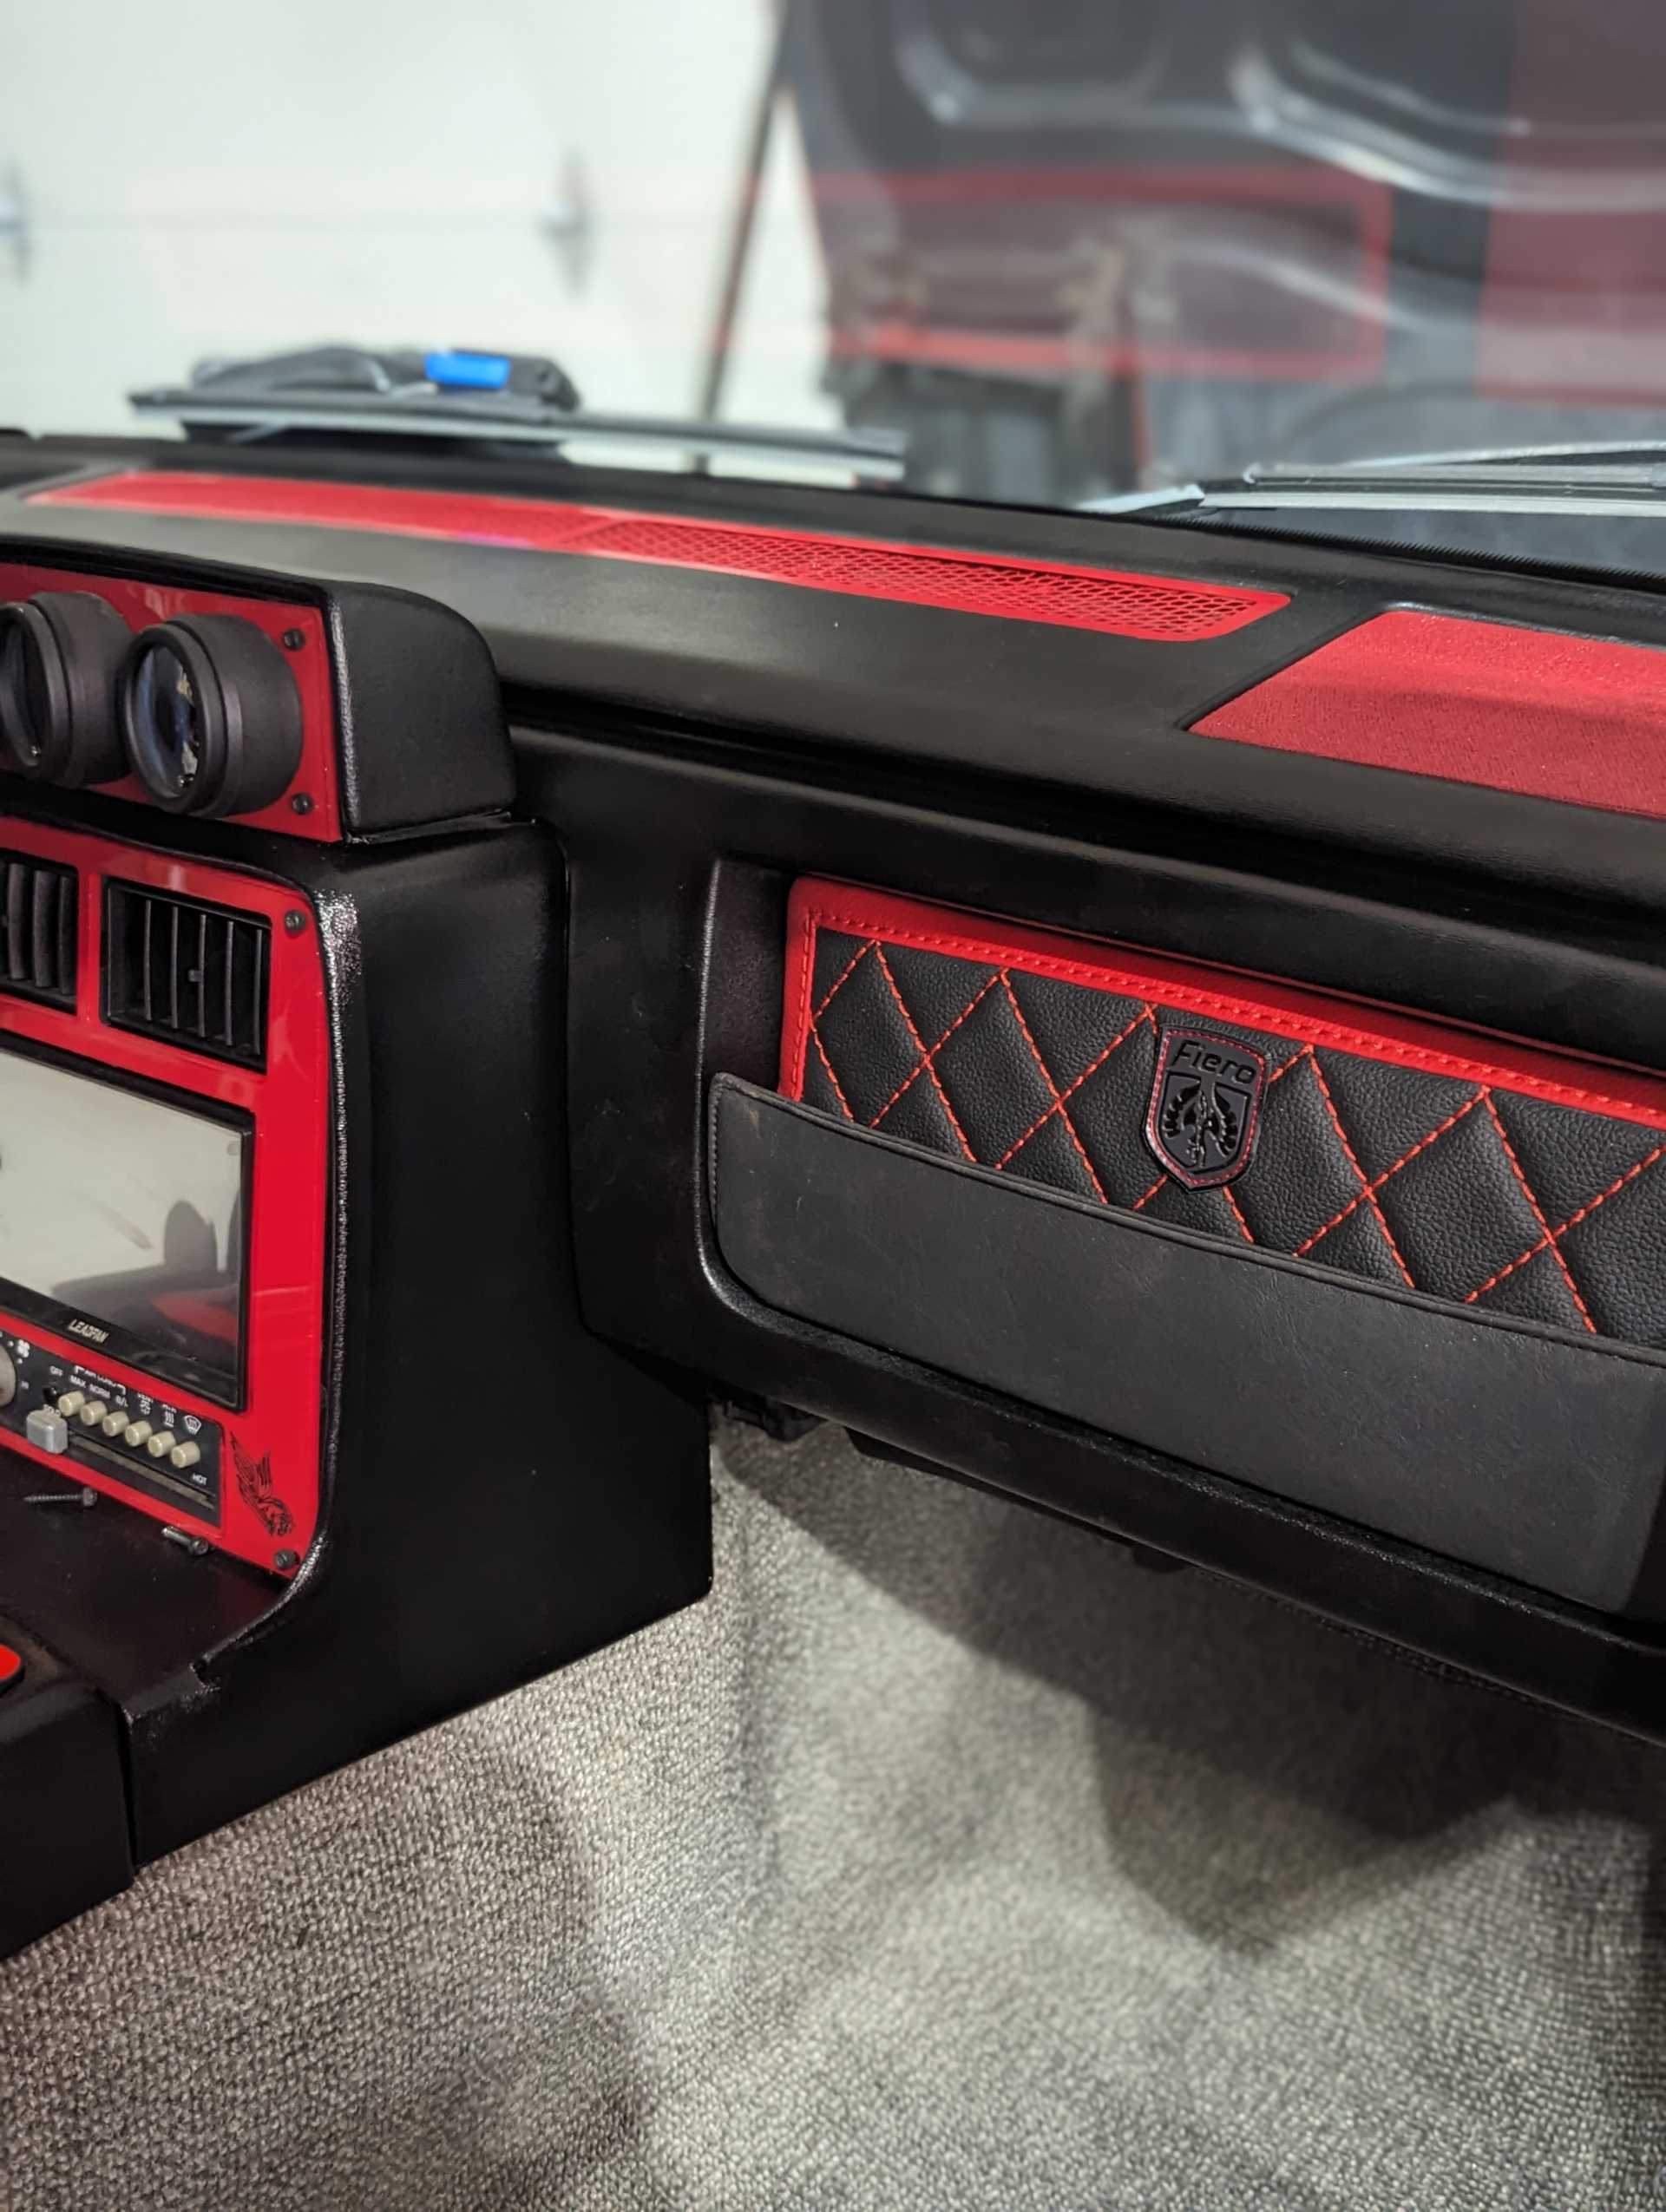
also recovered the headliner in black 
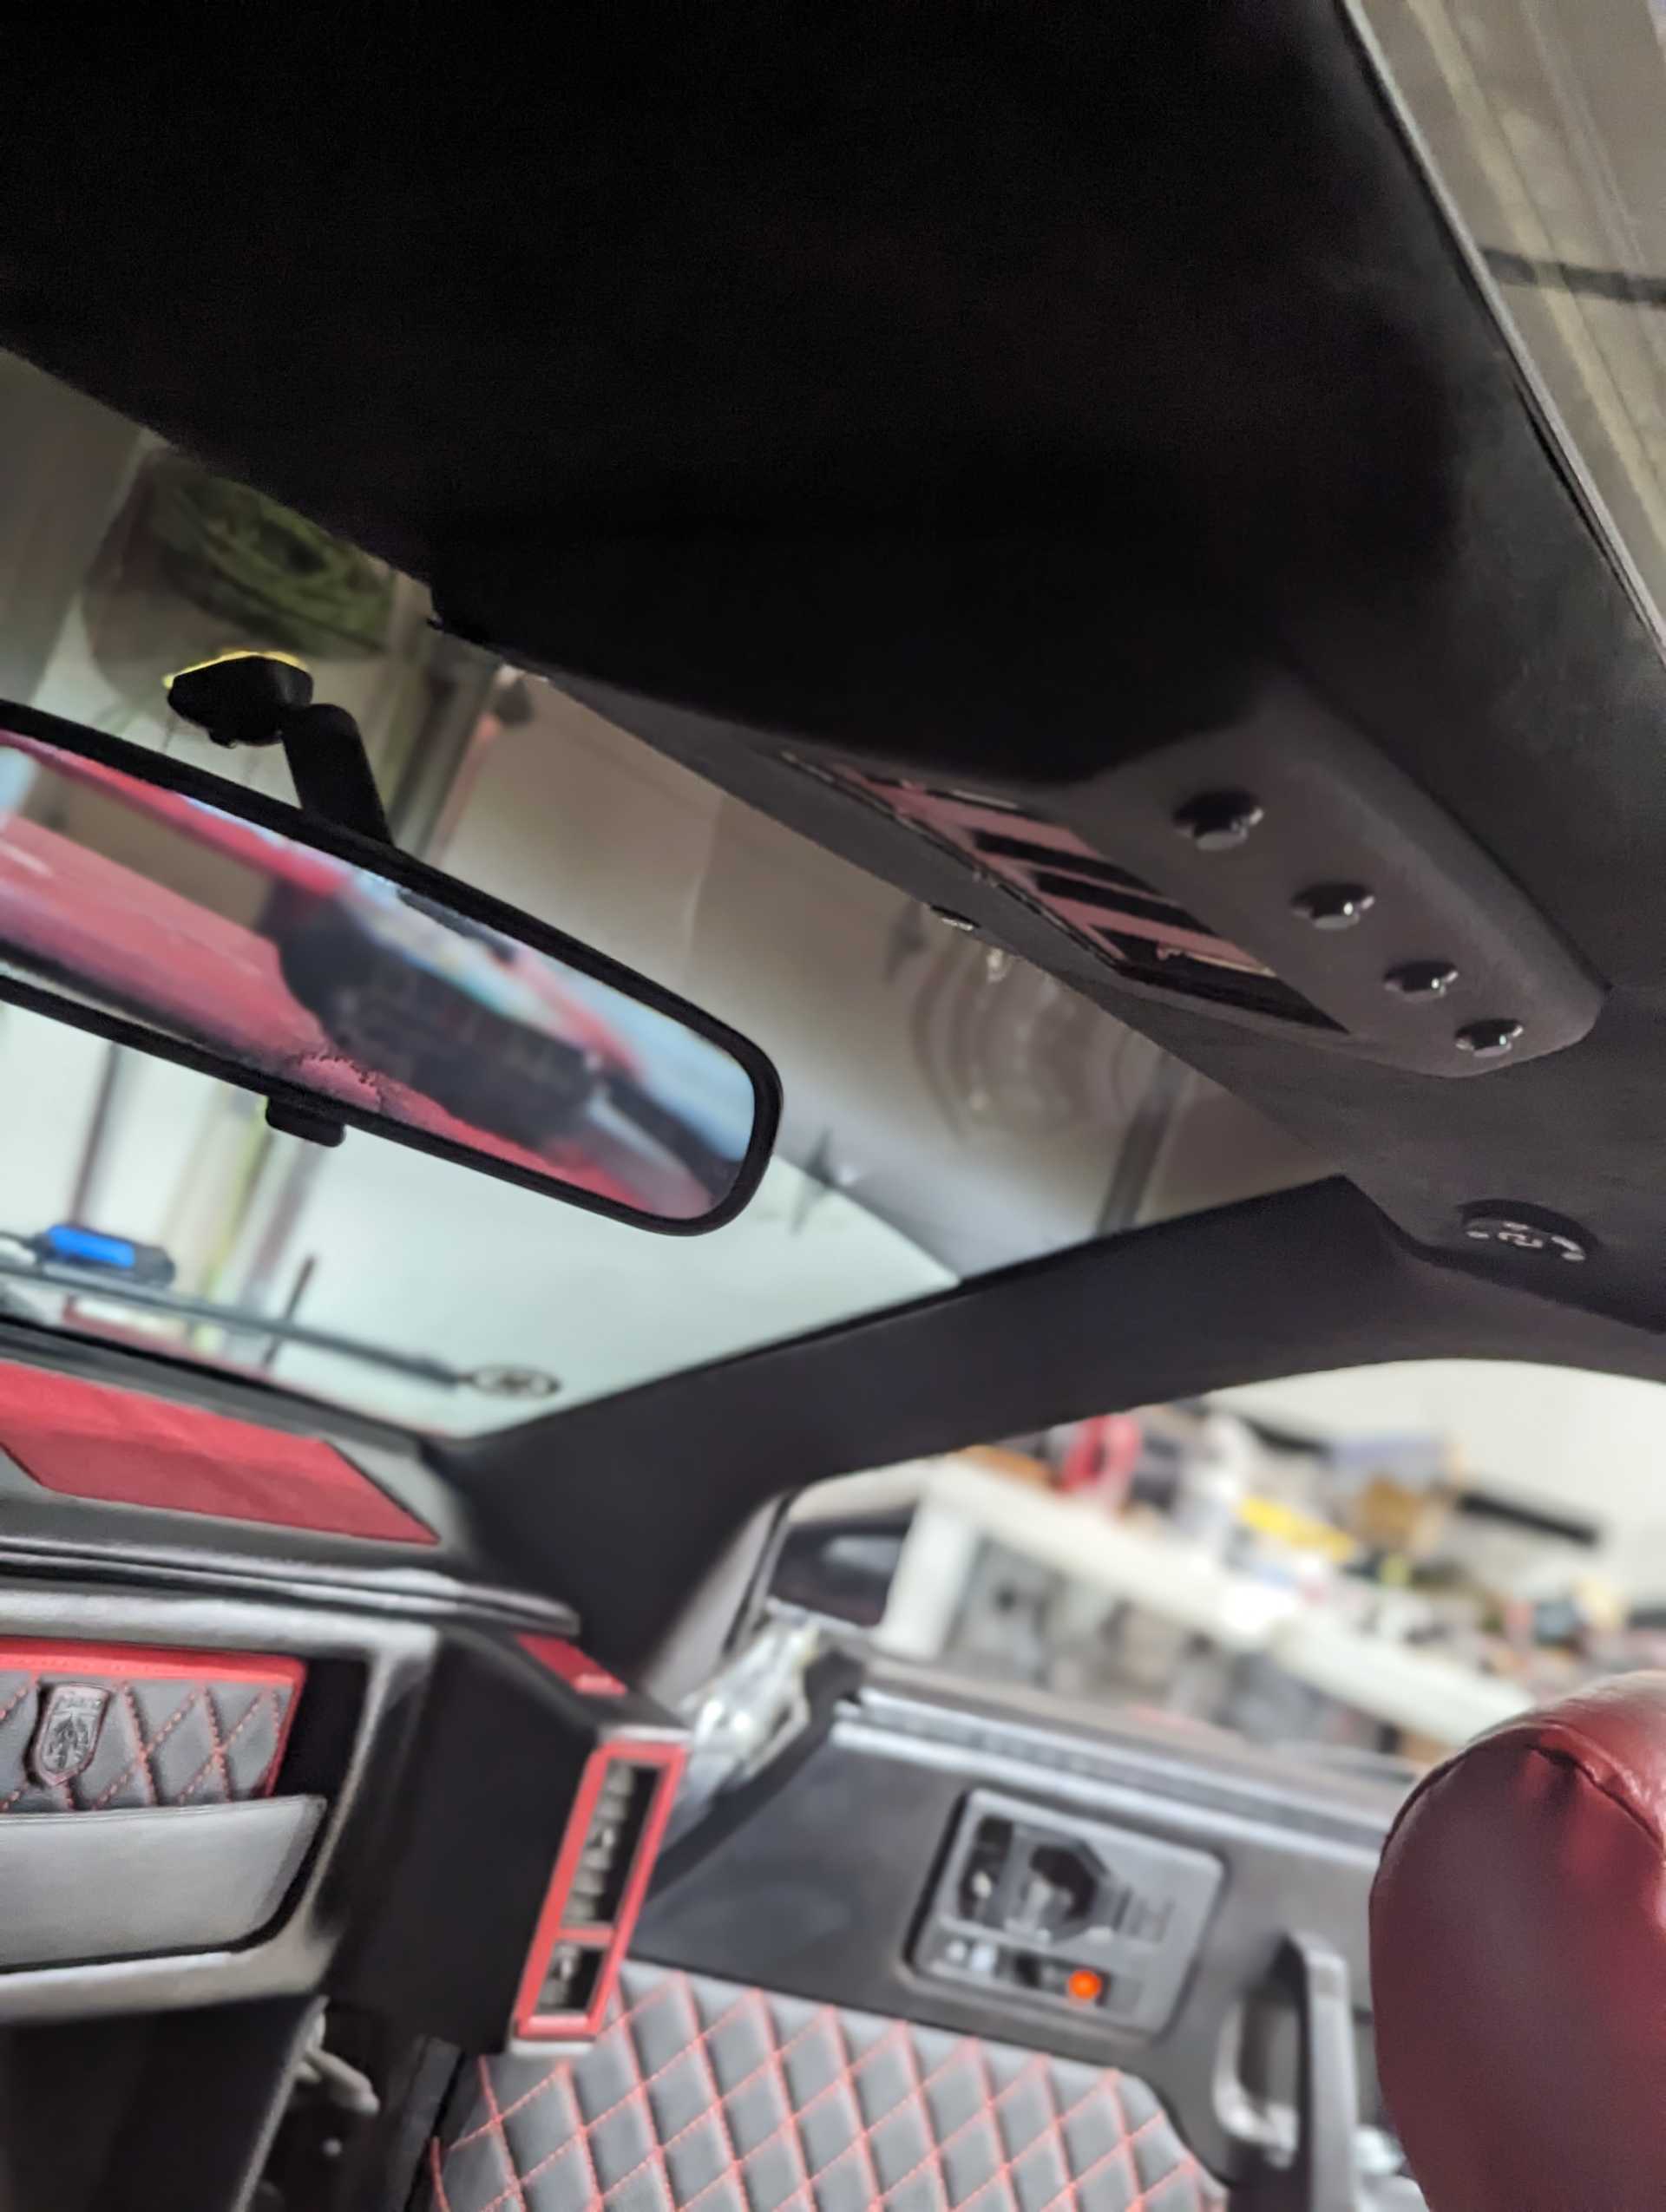
and mercilessly got it all done for the Heartland Fiero show next I am going to cover what got painted with the same vinal used on the pillars that will be this winters project
IP: Logged
richard in nc
Member
Posts: 225
From: charlotte nc
Registered: Jun 2023


Feedback score: N/A
Leave feedback

Rate this member

Report this Post09-04-2023 07:35 AM Click Here to See the Profile for richard in ncSend a Private Message to richard in ncEdit/Delete MessageReply w/QuoteDirect Link to This Post
 
quote
Originally posted by Raydar:

I bought mmeyer's 3D printed skeleton, designed to accommodate a double DIN head unit. This is the result, in mine.


was this mostly a bolt in?was the face plate included?
IP: Logged
Spadesluck
Member
Posts: 2069
From: Georgia
Registered: Jul 2016


Feedback score:    (8)
Leave feedback

Rate this member

Report this Post09-04-2023 12:50 PM Click Here to See the Profile for SpadesluckSend a Private Message to SpadesluckEdit/Delete MessageReply w/QuoteDirect Link to This Post
richard in nc, yes, the mmeyers skeleton is all bolt in. No modifications needed. Faceplate is included.
IP: Logged
Tmiester
Junior Member
Posts: 6
From: story city, iowa
Registered: Jul 2018


Feedback score: N/A
Leave feedback

Rate this member

Report this Post09-04-2023 03:05 PM Click Here to See the Profile for TmiesterSend a Private Message to TmiesterEdit/Delete MessageReply w/QuoteDirect Link to This Post
 
quote
Originally posted by Spadesluck:

richard in nc, yes, the mmeyers skeleton is all bolt in. No modifications needed. Faceplate is included.


There is a file on Thingivers.com. If you search for fiero for the ac relocation kit and it has a faceplate included with the files. That will be a direct replacement for the factory faceplate. I used that for my vents. I just stopped the print when I got the vent holder part of it done. Because I was using acrilic for my faceplate
IP: Logged
Quad GT
Member
Posts: 1612
From: Toronto, Ontario, Canada
Registered: Aug 2002


Feedback score:    (8)
Leave feedback

Rate this member

Report this Post09-04-2023 03:39 PM Click Here to See the Profile for Quad GTSend a Private Message to Quad GTEdit/Delete MessageReply w/QuoteDirect Link to This Post
Wayyyyy to much red
Tone it down
IP: Logged
Australian
Member
Posts: 4701
From: Sydney Australia
Registered: Sep 2004


Feedback score: (3)
Leave feedback

Rate this member

Report this Post09-06-2023 03:55 AM Click Here to See the Profile for AustralianClick Here to visit Australian's HomePageSend a Private Message to AustralianEdit/Delete MessageReply w/QuoteDirect Link to This Post
I wouldn't use a double din these days as you can get rotatable screens now that fit single din with even larger screen sizes.
https://www.aliexpress.com/...g0o.detail.1000002.0

They can be installed different levels also the screen can be lower or higher eg looks like would touch console but can be lifted.
Good work on your installation but just putting it out there as easier installation.

[This message has been edited by Australian (edited 09-06-2023).]

IP: Logged
Spadesluck
Member
Posts: 2069
From: Georgia
Registered: Jul 2016


Feedback score:    (8)
Leave feedback

Rate this member

Report this Post09-09-2023 12:57 PM Click Here to See the Profile for SpadesluckSend a Private Message to SpadesluckEdit/Delete MessageReply w/QuoteDirect Link to This Post
 
quote
Originally posted by Australian:

I wouldn't use a double din these days as you can get rotatable screens now that fit single din with even larger screen sizes.
https://www.aliexpress.com/...g0o.detail.1000002.0

They can be installed different levels also the screen can be lower or higher eg looks like would touch console but can be lifted.
Good work on your installation but just putting it out there as easier installation.


Have you tried that in a Fiero? Not much room and the screen would be in front of the hvac controls. Some may not mind that, but I wouldn't want that personally.
IP: Logged
PFF
System Bot

next newest topic | next oldest topic

All times are ET (US)

Post New Topic  Post A Reply
Hop to:

Contact Us | Back To Main Page

Advertizing on PFF | Fiero Parts Vendors
PFF Merchandise | Fiero Gallery | Ogre's Cave
Real-Time Chat | Fiero Related Auctions on eBay


Copyright (c) 1999, C. Pennock