Not yet. Haven't had a lot of time to spend on it. I've been really busy with work for the last week with all the tornado damage in Alabama and North GA. (I do telecommunications for the power company.)
Wednesday night, I got the pedals hung and the slave cylinder installed. Still have to put the dash back together. Next is the hydraulic line and the front battery box.
A little bit of progress this afternoon. The clutch master cylinder is installed and the hydraulic line installed and connected. Was a bit of a pain as the hydraulic line was off of an '86, and had to be pursuaded into position. Once I re-bent the line where it snakes around the front cradle mount, it got a lot easier.
The master is Rodney's typical top shelf quality.
Norm's battery box is installed.
It's not quite as easy as the instructions would lead you to believe. They mention nothing about an '88. The earlier cars just place the box between the brackets that hold the hydraulic lines. Relocation of the lines is required.
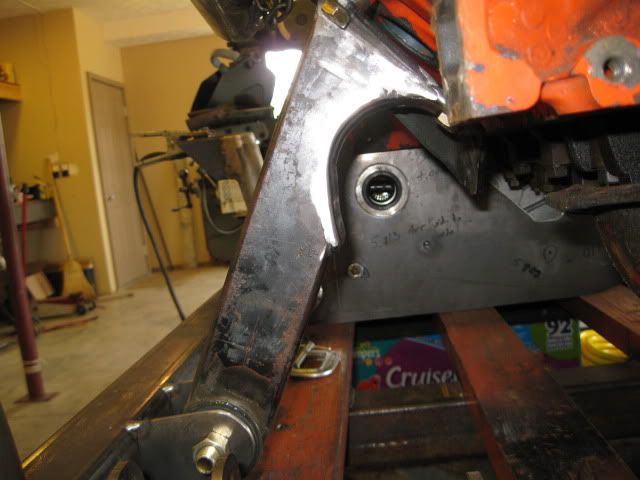
OTOH, the 88 has the hydraulic lines behind the crossmember. So far so good. The 88 coolant pipes, however, go straight up the middle of the front suspension. The right coolant pipe is in the way.
The box can't be moved to the left because there is a mount cast into the top of the rack.
The only options are to remove that mount from the rack or to bend the coolant pipe down a bit in the front. I was able to persuade the pipe downwards a small amount, but it's still an interference fit, against the bottom of the box.
That being the case, I just used foam tape around the edges of the battery box, and have it screwed into the tire well. Until I bend the pipe some more, I may have to remove the box to get the radiator hose off.
Not bagging on Norm, as there really isn't any other way to install a box of this size and configuration. I suspect that Archie's battery box will have the same issues.
[This message has been edited by Raydar (edited 05-08-2011).]
Note: When you're working with the spare tire well, wear gloves of some sort. Even the blue Nitrile ones would be useful. The fiberglass is most uncomfortable. (Read: ate my hands up.)
Made some more progress tonight. I mounted the flywheel, clutch and pressure plate. I found something that may be of interest to those using this clutch with the 4.9.
The bolt circle is fairly tight. I didn't have a stock flywheel to compare to, but I don't remember the stock pattern being this close to the center.
I noticed that when I held the clutch disk against the flywheel, I could feel the center hub rubbing on the bolt heads. This proved to be because I wasn't holding the disk directly in the center. When I used the alignment tool to hold the disk, there was no interference. It did get me to thinking, however.
The center hub is the same diameter as a 24mm impact socket.
That same 24mm socket does not fit within the bolt heads.
With a brand new clutch, I suspect that this wouldn't be a problem. I didn't, however, have a great deal of comfort about what would happen when the clutch wore down a bit.
My solution was to bevel the edges of the hub just a bit. I didn't really remove much material, just enough to knock the "corner" off of that hub.
When I placed the disk against the flywheel, I found that there was now a decent amount of room to move the disk around before it contacted the bolt heads. I suspect that as the friction material wears, the rivets on the disk will now hit the flywheel before the hub hits the bolts.
The finished assembly.
The flywheel bolts were torqued to 70 lb.ft. The pressure plate bolts were torqued to 18 lb.ft.
Everything was assembled with blue (medium) thread locker.
In retrospect, I suppose that I could have tightened the bolts so that the flats were directly facing the center, and still been within specs. I figured it was more important that they were tightened equally.
[This message has been edited by Raydar (edited 05-10-2011).]
One point of interference... On the top of this tranny, there's a square lug, just above the right rear bellhousing bolt. That lug wants to occupy the same space as the 4.9 oil filter mount. About 30 seconds with a cutoff wheel took care of it.
Of course, since this tranny came from a FWD application, and the select cable originally came from the rear, the holes for the Fiero select cable bracket were not of the correct size OR tapped.
That taken care of and the select cable bracket installed. The exhaust crossover had to be removed. It wants to be in the same place as the shift cable bracket. I'm going to have to modify it to clear all the shifting hardware, and have Dean fabricate a new one for me.
Rodney's FWD conversion kit.
The Allante starter.
Notice the position of the starter bulge on the side of the tranny, in relation to where the starter is. Since the Allante starter doesn't have a snout on the end, it doesn't require grinding a chunk out of the tranny case. It's also a much better starter.
I discovered that I had an Isuzu rear tranny mount and a Muncie front tranny mount. They really look a lot like the Getrag pieces. Only different. I spent most of the weekend getting that straightened out and the correct ones picked up from the vendor.
Rear bracket Installed.
I posted earlier about my concern regarding possible interference between the MT right side axle shaft and the Fiero Factory mounting bracket. Here's the FF bracket, with the original 4T60E mounting bracket held in its original position.
The Getrag axle shaft center line is actually about two inches closer to the crankshaft than the 4T60E axle shaft. It was going to hit the 4T60E bracket.
I removed the bottom of the mount where the 4T60E was bolted, leaving the top section and the FF bracket in place.
Holding the axle as near to parallel to the oil pan rail as possible, there is 1.75" to 2" between the axle and the bottom of the modified bracket.
I'm hoping that there's not enough suspension travel to allow the axle to hit the bottom of the bracket, when things are compressed. If that happens, I'll have to remove or redesign that bracket.
Didn't get much else done tonight. Still have to install the shift cables and reinstall the dash and console skeleton. Took a few minutes to add a courtesy light harness to the footwells.
Looking good! I'm looking forward to seeing your opinion on how a Getrag is with the 4.9. I understand you didn't like how the automatic shifted, I think mine shifts just fine, except the final drive ratio is too low for my liking. It may be because you had the unusual F7 4T60 while I have the 4T60E.
And I don't think you'll have a clearance issue, but what do I know.
Matt, I didn't have the F7. AFAIK, that was reserved for the Allante, and maybe the 90 Deville. Mine was the 4T60E. (Had like a dozen wires that I had to do something with, when I rebuilt the azz end of the harness.) It had an overall FDR of 2.97, I believe.
I'm kind of thinking the axle clearance will be okay. I certainly hope so, as welding is not one of the skills I possess. I don't want to just remove that mount. That's one of the things that I like about the Fiero Factory installation. The five point mounting method is solid as a rock, even without a dogbone.
[This message has been edited by Raydar (edited 05-19-2011).]
Matt, I didn't have the F7. AFAIK, that was reserved for the Allante, and maybe the 90 Deville. Mine was the 4T60E. (Had like a dozen wires that I had to do something with, when I rebuilt the azz end of the harness.) It had an overall FDR of 2.97, I believe.
I'm kind of thinking the axle clearance will be okay. I certainly hope so, as welding is not one of the skills I possess. I don't want to just remove that mount. That's one of the things that I like about the Fiero Factory installation. The five point mounting method is solid as a rock, even without a dogbone.
Oh, ok, my mistake. My overall FDR is 2.73. Which is the standard Deville ratio.
What about calling the Fiero Factory and asking them if the mounting system on a manual install is different or not? Besides the 4T60E mount part that you removed.
Oh, ok, my mistake. My overall FDR is 2.73. Which is the standard Deville ratio.
What about calling the Fiero Factory and asking them if the mounting system on a manual install is different or not? Besides the 4T60E mount part that you removed.
The tech who did my swap is no longer there. Had to quit for health reasons. One of our club members called over there for some information about mounts, and was told that they were fabricated on the fly, for each specific install. I might give it a try, though. I also thought about trying to contact one of our long gone former club members who has (had?) a 4.9 Getrag swap, and see how his was done.
Your axle will be very close to that bracket, but engine elevation will probably be the deciding factor. If it does it the bracket, then you might want to consider using an intermediate shaft (or modifying the bracket slightly).
When I was mocking up my SBC/F40 the rear engine mount had to be notched to almost the crankshaft centerline to allow full range of movement, but my engine was quite low and the differential location was rotated up 1" from stock.
Here are a couple of pics when I was checking mine. The crankshaft on the SBC is within 1/8" of the bottom of the block, on the 4.9 it is over an inch above the bottom of the block.: Here is where I wired the axle at full compression and started mocking up the mount:
[This message has been edited by fieroguru (edited 05-19-2011).]
Engine and tranny are on the cradle. No real surprises. The only thing that didn't bolt right up was the front tranny mount. I had to elongate the holes just a bit. Maybe 1/4 inch. One positive thing is that The Fiero Factory welded a 3/16" plate on the top of the front cradle rail, where the tranny bolts down. 88 cradles are known for the tranny mounts tearing out. That's not gonna happen here.
The cradle was nasty as hell. Covered in oil and grit. About a half hour with a bottle of Mean Green, a couple of brushes, and a spray nozzle took care of it. Touched up a few scratches with black enamel. No rust to speak of. (I love living in the south. )
On the cradle, pretty much ready to go into the car. I've been trying to figure out what to do with the exhaust crossover, and was also waiting for some valve cover bolts with pegs to support spark plug wire clips. (Thanks Joe!)
The crossover is going to be a PITA. Most anywhere the pipe can go is already occupied by something. Shift cable bracket, shift arms, coolant hose, etc.
This one is just cobbled together. Not even fastened yet, until I see how everything fits in the car. I'll be using band clamps on it where I can. All it has to do is get me to whodeanie's or someone else who can build me a new crossover.
One pic of it in the car (with the crossover removed)
The cradle is bolted in the car. Nothing is connected.
The interior is mostly back together. Have to mount the instrument pod (will probably do the tach mod while I've got it apart), shift console, ECM and the center console/armrest. Still have to tell the chip to forget about all the 4T60E trouble codes (Yes, the appropriate wires are grounded to make it think it's in Drive) and need to tell it about the front O2 sensor.
I was going to take a couple more pics but my camera battery died.
More pics/progress later.
[This message has been edited by Raydar (edited 05-29-2011).]
What about running the trunk side pipe around the transmission and down lower, and make a lower attachment point to the "Y-pipe"? Hopefully that makes sense.
[This message has been edited by mattwa (edited 11-03-2012).]
That's a thought. I don't have a problem with that, but I'll let whoever does the pipe do it however they're comfortable.
Regarding the clearance between the axle and the right rear bracket... I assembled everything and then placed a jack under the knuckle. With an inch and a half of suspension travel left (the car lifted off the stands since I didn't remove the spring, so I couldn't compress it completely) I still have over an inch of space between the axle and the bracket. I think it will be fine.
[This message has been edited by Raydar (edited 05-29-2011).]
Some progress... All of the power wiring is done. Ran the "Norm's" cable from the front to the engine. Everywhere that it is fastened, or might otherwise chafe, is insulated with a section of heater hose. Had about a foot extra, that I dressed into place under the car. Better that then reterminating the cable, I think. Battery is grounded to the stud that holds the brake booster to the firewall. Ran a #6 from the starter lug, up to the lug next to C500. The engine is grounded to the spaceframe on two corners with #4 wire.
Replaced the section of heater hose under the car that goes from the right side stainless return tube to the heater pipe under the car. (If you ever need to replace a piece of hose that is crimped, it's very simple. Just cut the crimp lengthwise with a cutoff wheel. It'll split and come right off. Be careful not to nick the pipe. Replace the crimp with a regular hose clamp.)
I also bled the clutch. I tried to use a gravity bleed, but the loop in the hardline was nearly as tall as the reservoir. I helped it along with a hand vacuum pump. Took about a half hour from"dry" to "decent pedal". Once all the air was out of the system, the gravity bleed worked better. Got a bit of siphon action going. The clutch is a bit soft until about halfway down, but then you can feel it operating the clutch. Feels much like the regular Fiero clutch.
Still need to pull the wiring in through the firewall, install the instrument pod and ECM, and plug everything in. Also need to add coolant and Syncromesh and fix the stupid exhaust crossover. (Wish I had a box full of "bends" and knew how to weld. )
Not completely reassembled, but getting there. It cranks and runs.
The kludgey crossover doesn't leak at all, strangely enough. I've never put together an exhaust system with crush clamps before, that didn't leak somewhere. So that makes me happy. Still... all it has to do is stay in place until I can get a new crossover fabricated.
The clutch works perfectly. Releases just fine. Catches about 4 inches from the floor. Just a bit higher than the stock Fiero system. The gravity bleed didn't work really well because there is a loop in the hardline that is nearly as tall as the master reservoir. I had to help it out with a hand vacuum pump, but once I got rid of the air in the lines, it set up a good siphon, and the gravity bleed worked nicely.
Since I was also working in the front compartment, I took a few minutes to (hopefully) repair a leak in the A/C system at the fitting that holds the orifice tube. Also took a minute to check the blower fan. Strangely enough, it was completely clear. After seeing some of the others on the forum, I expected a rat nest.
I haven't tweaked the chip for the manual tranny / dual O2s yet. Had a file error to come up with Tunercat. Have to fix that.
If anyone wants any pics of anything before I screw it all back together, please let me know.
It's very quick. Changes the entire flavor of the car. (Yes, it does blow through 1st gear very quickly. No prob. It's not going to be in 1st for very much of its life. .) Almost doubled the speed limit on the adjacent road, within half a block.
FWIW... It's as I guessed. The reluctor VSS is completely compatible with the Caddy PCM. Worked "right out of the box". I haven't compared it to my GPS, but it looks to be correct.
Still have to put the decklid back on, get the AC charged, and have the crossover fabricated.
Raydar, looking good. Glad you like it. I have the same trans (from Jeff too) with the EP LSD sitting behind my LS376. What final gear do you have , mine is the 3.94, and everyone told me not to do it with the LS3, but I love it. LIke you, im not in 1st gear that much anyway.
Awesome news! I bet it's much "faster" then before because of the higher final, the quicker shifting (you), and no automatic sucking the HP away. Do you happen to know what the Final drive was for your 4T60e? I'm running 2.73, and it seems like it could be much faster then it is, and it's already quite fast.
My 4T60E worked out to around 2.97. I forget what combination of gear ratio and sprocket ratio I had, but it was one that was not easily upgradeable without switching sprockets. Mine was quick for what it was, but I always wanted more. If I was doing it over again, I would insist on the Eldo ratio (3.33).
My Getrag is the 3.61(?). I specifically didn't want the 3.94 in combination with the tractor motor.
[This message has been edited by Raydar (edited 06-16-2011).]
My 4T60E worked out to around 2.97. I forget what combination of gear ratio and sprocket ratio I had, but it was one that was not easily upgradeable without switching sprockets. Mine was quick for what it was, but I always wanted more. If I was doing it over again, I would insist on the Eldo ratio (3.33).
My Getrag is the 3.61(?). I specifically didn't want the 3.94 in combination with the tractor motor.
2.97 is sounds correct, its the 37/33 chain with the 3.33 diff. I have the 37/33 chain with the 3.06 diff. And yes there was no way to upgrade yours unless you changed to 35/35 sprockets, like I want to.
[This message has been edited by mattwa (edited 06-17-2011).]
FWIW... I believe that Racer JT had 3.42s in his 4T60E. I believe the only 4T60E (not really sure about the "E") that came with 3.42s was the Z34 and other 3.4 DOHC cars. I'm not sure if that's what he had, or it it was cobbled together using a Caddy tranny. There is also the possibility of 3.73s with the correct combination of parts. I'm not sure if it's ever been done with the 4T60E, but I believe the parts are out there. It definitely has been done with a regular 4T60. I was considering doing that with my 3.4 before I swapped in the Getrag.
Fieroseverywhere has a Getrag in his 4.9 and has a novel solution for the crossover pipe dilemma. He cobbled it together from 2 Caddy crossover pipes... Maybe PM him about it?
Matt... No worries. It's stuff that someone may be able to use. I was going to post a link to a similar chart, but didn't have time.
quote
Originally posted by jtsordel: Fieroseverywhere has a Getrag in his 4.9 and has a novel solution for the crossover pipe dilemma. He cobbled it together from 2 Caddy crossover pipes... Maybe PM him about it? Thanks!!!
Josh
Thanks Josh. It's pretty much covered, though. As soon as I can get it to whodeanie. He's done some really nice headers. A crossover pipe ought to be easy for him.
First order of business is getting the A/C vacuumed down and charged. It's supposed to be 93 here, today.
[This message has been edited by Raydar (edited 06-17-2011).]
Fieroseverywhere has a Getrag in his 4.9 and has a novel solution for the crossover pipe dilemma. He cobbled it together from 2 Caddy crossover pipes... Maybe PM him about it?
Thanks!!!
Josh
I don't know if its "cobbled together" so much. As you said, I used 2 caddy cross over pipes. I cut the flanges off both. One I cut right at the flange, the other right before the first bend after the flanges. Then weld the longer flanges to the longer pipe. Its perfect for getrag shift cable clearance and you get to keep the factory heat shield.
I don't know if its "cobbled together" so much. As you said, I used 2 caddy cross over pipes. I cut the flanges off both. One I cut right at the flange, the other right before the first bend after the flanges. Then weld the longer flanges to the longer pipe. Its perfect for getrag shift cable clearance and you get to keep the factory heat shield.
Thanks for the tip. Unfortunately, I don't even have one Caddy crossover, since this was a custom Y-pipe, made to bolt up to a stock Fiero system. But it's all good. I talked to Dean just a while ago. Going to take it up there tomorrow.
Having said all that... This stupid Y-pipe issue was the only really ugly issue that came up, during the entire swap. And that's only because I can't bend or weld pipe. Everything else went pretty much as I would have expected.
Update... I updated the original post with a couple of things I learned, after doing this install.
Reader's Digest version: If you are using the HTOB Getrag (aka T550) you will need the clutch designed for the Cavalier with the 3.1 and the T550 trans. The Fiero clutch is "too tall", and places the release fingers too close to the release bearing.
Also, the "dish" in the flywheel is not wide enough for some clutches. Will work fine with others. I alerted Tom at LSC about it, and he assured me that the situation would be resolved with subsequent products.


.JPG)
.JPG)
.JPG)
.JPG)
 or to bend the coolant pipe down a bit in the front.
.JPG)
.JPG)
.JPG)
.JPG)
.JPG)
.JPG)
.JPG)
.JPG)
.JPG)
.JPG)
.JPG)
.JPG)
.JPG)

.JPG)
.JPG)
.JPG)
.JPG)
.JPG)
.JPG)


 Which is the standard Deville ratio.

 )
).JPG)
.JPG)
.JPG)
.JPG)
 )
)

 As you said, I used 2 caddy cross over pipes. I cut the flanges off both. One I cut right at the flange, the other right before the first bend after the flanges. Then weld the longer flanges to the longer pipe. Its perfect for getrag shift cable clearance and you get to keep the factory heat shield.


