I decided to start a project thread... since this car is definitely going to be a project to get it going as a daily driver first, but also taking it beyond that to what ever my imagination decides to do with this amazing car.
So here we go, I have recently purchased a good looking and fairly clean 1986 Fiero GT with ~143,000 miles. The only mods right now are some cool looking sails and an attempt at gold paint. It is a 10 foot paint job for sure, but not a hack job or rattle can. It needs a clay bar and polishing to bring out the intended gold. The original color was silver (I think). In this thread I will be posting my progress as I work through the car to get her into shape, with pictures of anything of value... which others may find useful if they are working on the same issues. This thread will be pic heavy with descriptions for each one, because I am a visual person but it will help if I have questions about a specific issue to "show you" what I am talking about. This car sat for several months before I got her, but was a 2 owner car and both people were related. I am owner # 3, and trust this car was well maintained based on what I have seen so far and what I know of the previous owners.
My goals:
1. To Make her a daily driver, I need to fix the electrical gremlins keeping the car from functioning as intended. These issues will be addressed and documented here.
a. I was able to get the headlights and motors back on line and actuating up/down. When I got the car only one side would intermittently work and I had to manually raise and lower them. I cleaned up the wiring in the dash area and front clip, reset the grounds etc...
b. The power windows are sloooow to roll up/down. They both work but I don't count on them working properly for long without some intervention.
c. The radiator fan switch needs replaced, I am using the A/C to run the fan when needed now (not ideal) but that rules out the relay.
d. The ECM is throwing 2 codes- 21 (TPS high volt) and 32 (EGR). I have replaced the vacuum lines in the EGR circuit so I hope that helps. I need to order the TPS. No other engine codes or engine mechanical issues I am aware of.
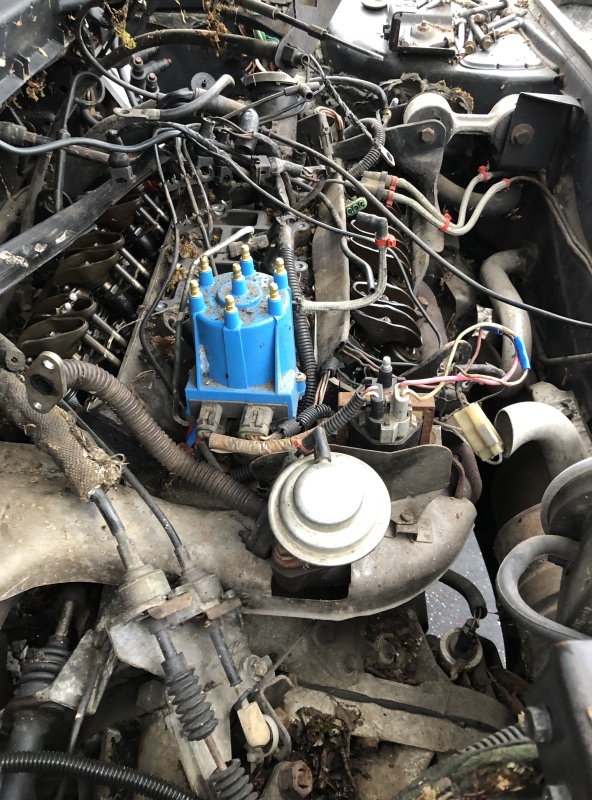
e. Last week my car stopped running (no spark). I ran through the recommended tests for the electrical connections and signals but I am not that great at reading my multi-meter but I narrowed it down to the pick-up coil or ignition control module...or both. The distributor is a lot of rust on the coil pick-up tabs. I just purchased a new distributor, plug wires and ICM just the be thorough. those should be in my hands by next week, then I'll start sharing that process.
2. Look at possible body kit options. I am not going to do anything crazy, but maybe find some tasteful side scoops and possibly a front bumper. But who knows!? It depends on what is available and when I am ready to tackle that. It will be down the road a bit. I really like the chopped look.
3. Look at potential engine upgrades- The 3.4 is my first choice, but again... this is down the road and who knows what will come along.
Here are pictures of the car as it sits now..... More to come when I get the distributor and other goodies! Sit back and enjoy.... Thank you for the support on this forum. There are some good peeps here.
------------------ Aaron H 1986 Fiero GT 2.8- A dream car of mine since childhood- Stock now, but looking for creative options to upgrade this wonderful car 2000 Caddy Deville- Has the Northstar- possible donor engine
[This message has been edited by Phlebmaster (edited 12-05-2018).]
My Fiero died on me at an intersection a couple years ago. It had no spark, and it was because of the pickup coil. I got it a whole new distributor; the upgraded type.
Unfortunately yesterday my Cadillac decided that it was done for life. Which means that I am going to start project cannibal Cadillac for the Fiero. I guess when life hands you a pile of crap it’s time to plant a garden. lol The sad part is that leaves me with no running driving vehicle at the moment until I get my distributor on the Fiero. Keeps life interesting for sure.... let’s see what we can do with this opportunity.
It looks like my Fiero is going to get heated seats at some point and a self dimming rear view mirror. And anything else that I can salvage off of the Cadillac. Unfortunately I do not have a place or the means to store the Northstar so that’s going to go to the wrecker. But I am going to pull as many things off of it as I possibly can in an attempt to set myself up later if I decide to go that route. Things like the wiring harness, the computer etc are coming out.
Both front and rear seats in the Cadillac are heated so I’m going to pull the foam off and re-purpose those inside the Fiero later. The winters here pretty cold lately and it would be an added feature to the car that wasn’t there before. Pics to follow when I pull the goodies out of my caddy.
Copperhens..... do you have any special requests? I know you’re building up a Northstar for your Fiero. Let me know if you need anything soon. the HOA in my neighborhood is not mechanic friendly so I’ll have to get what I can in a day.
------------------ Aaron H 1986 Fiero GT 2.8- A dream car of mine since childhood- Stock now, but looking for creative options to upgrade this wonderful car 2000 Caddy Deville- Has the Northstar- possible donor engine
Unfortunately yesterday my Cadillac decided that it was done for life. Which means that I am going to start project cannibal Cadillac for the Fiero. I guess when life hands you a pile of crap it’s time to plant a garden. lol The sad part is that leaves me with no running driving vehicle at the moment until I get my distributor on the Fiero. Keeps life interesting for sure.... let’s see what we can do with this opportunity.
It looks like my Fiero is going to get heated seats at some point and a self dimming rear view mirror. And anything else that I can salvage off of the Cadillac. Unfortunately I do not have a place or the means to store the Northstar so that’s going to go to the wrecker. But I am going to pull as many things off of it as I possibly can in an attempt to set myself up later if I decide to go that route. Things like the wiring harness, the computer etc are coming out.
Both front and rear seats in the Cadillac are heated so I’m going to pull the foam off and re-purpose those inside the Fiero later. The winters here pretty cold lately and it would be an added feature to the car that wasn’t there before. Pics to follow when I pull the goodies out of my caddy.
Copperhens..... do you have any special requests? I know you’re building up a Northstar for your Fiero. Let me know if you need anything soon. the HOA in my neighborhood is not mechanic friendly so I’ll have to get what I can in a day.
That sucks about your Northstar! Did the head gasket take a crap?
I like the plan for those heated seats. Makes me tempted to do something like that in mine lol.
That's a nice offer, but I don't think there is anything I need right now, thanks. You may want to check out the Fiero Facebook page and post about that Caddy. There could be someone interested, and maybe they'll give you something for it? Ay least if you take the engine harness and computer from your car, you could always sell it to someone in the future if you don't go the Northstar route.
You guessed it.... oil in the coolant tank was my clue. Really does kind of suck at the moment but in the end the Fiero is going to benefit from it... so I’m OK with that.
Thank you for the suggestion about posting it up on the Facebook page. I might just do that.
Maybe I’ll just do this with the caddy.... this bike belongs to a friend of mine. Quite inspirational haha but not practical
------------------ Aaron H 1986 Fiero GT 2.8- A dream car of mine since childhood- Stock now, but looking for creative options to upgrade this wonderful car 2000 Caddy Deville- Has the Northstar- possible donor engine
[This message has been edited by Phlebmaster (edited 12-07-2018).]
She is back up and running again!! The new distributor was an upgraded version and it came with the new ICM and cap/rotor. No need to post pics of what everyone else has done here, but I want to send out a special THANK YOU to Buddycraigg for his post here https://www.fiero.nl/forum/Forum2/HTML/045528.html and Youtube videos on the distributor replacement and timing. I had some high end thermo paste so I gobbed that under the ICM and used dielectric grease on all the connections
I also replaced the TPS while I was in there...
The only code left is the 32- so I will follow Buddycraigg's information when fixing that next.
The distributor went in with very little fuss....except the oil pump drive got moved a bit when taking out the old distributor. :-( So that added a little fun last night when it was monsooning. The deck lid got blown down on my head more than once. LOL time for tylenol . I got soaked and a headache, BUT the car runs and drives now and that makes it worth the effort. I still need to set the timing however. My timing light gave up the ghost and I have not been able to borrow one for this project... time to buy another one now that I have a car that will be needing it.
Next thing- I have started pulling (cherry picking) parts off the Northstar Caddy that died last week. Here is my list that will likely be assimilated into the Fiero at some point.
1. Heated seats! and maybe add a little more foam in the buttox area. I will re-purpose the foam from the Caddy seats with the heating elements in the Fiero. I will also pull any relays needed for this to work. 2. Self dimming rear view mirror- specifically the Onstar with digital compass so I don't get lost. haha 3. switches- lighted power window, headed seats, and anything else that I can easily pull as spares. I know I can make some of these work if needed. 4. ECM wiring harness, intake, with injectors/fuel rail, coil packs and as many sensors as I can get from the Northstar- I may use this later but if anyone here needs these for a swap I will have it. 5. bulbs- inside and out- these are cheap to buy but when you need a spare...and they don't take up much space.
Then the Caddy goes off to the wrecker to help another person needing anything left. The head gasket and starter failed and I have limited space which is why I am not pulling the motor and tranny out myself.
------------------ Aaron H 1986 Fiero GT 2.8- A dream car of mine since childhood- Stock now, but looking for creative options to upgrade this wonderful car 2000 Caddy Deville- Has the Northstar- possible donor engine
[This message has been edited by Phlebmaster (edited 12-12-2018).]
The Caddy is gone... but it went to a friend who wanted to try and fix it, so I left it mostly intact. I still got the rear view mirror and rear heated seats. :P Glad it went to help someone out.
On a good note- I discovered a fairly complete 85 SE at the local pick-n-pull so I'll be a regular there while I get parts off that.
Anyway, I have been working on the Fiero and trying to sort out a vac leak. It's running super rich right now and the EGR code comes on when I step on the brake hard. There's a vac leak somewhere, so as I work that out I'll share what I find.... if I find it. It will get all new lines soon and hope that cures it.
I also took a hole saw to the inside section of the air intake vent where it gets restricted access- I read that was a thing to do somewhere here- and it has helped with throttle response and it sounds amazing! I am sure I'll pay for that later somehow. LOL
------------------ Aaron H 1986 Fiero GT 2.8- A dream car of mine since childhood- Stock now, but looking for creative options to upgrade this wonderful car 2000 Caddy Deville- Has the Northstar- possible donor engine
[This message has been edited by Phlebmaster (edited 12-19-2018).]
When I said this thread was going to be full of pics and win...I was not intending to mean from fixing things in desperate situations. LOL Tonight on my way home from work the thermostat housing sprung a leak and I was on the side of the road trying to sort out where the leak was. Apparently it's "a thing" for these cars to rust in the thermostat housing. I didn't have many tools with me in the car other than a screwdriver and a knife, but I had what I needed to get this bandaged enough to get back to my shop and fix the problem tonight.
It was the metal hose piece leading to the heater core return line. I wasn't sure how I was going to get out of this one without leaving the car overnight, but then I remembered I had a spare spark plug and guess what!? It just barely fit inside the heater core return hose enough to block it and just fit inside the thermostat nipple enough to seal and stop the leak long enough to get me back to work where I could fix it. I pulled the thermostat too as a precaution and to reduce pressure in the system. It was not a fun drive....But I made it with no problems.
This was the culprit.... the small lower hose was metal version of swiss cheese
Glad I had this spark plug with me, it was so random too!
Oh my! a good wine with this cheese would be great! it was toast!
So I went to work on it to see what I could do... I mean I still have to get home after all. I bead blasted it to see the extent of the damage and it was pretty grim. I had to use my resources and noggen to find a solution.
Most of the holes were pretty small, but some parts were in bad shape so I needed to fill in the metal where I could. I had solder..... so here we go!
Obviously solder was not the best solution and was not going to last so I got out the goop... the solder will help reduce the pressure on the JB Weld and work with it to strengthen the repair long enough for me to get a replacement.
I filled it in in layers so I could build it up enough to allow for sanding it into the right size/shape for the hose later...
After several layers and some set time I filed the pipe level and sanded the tip round to ensure the hose seals...
Lastly.... some paint. I mean, what the heck, it is out and the paint will protect it even more as a temp fix. It looks almost new! Chances are this would last for quite a while now but I'll be looking for a new one as insurance regardless. Thanks for reading... It has been a fun evening! Time to go to bed.
------------------ Aaron H 1986 Fiero GT 2.8- A dream car of mine since childhood- Stock now, but looking for creative options to upgrade this wonderful car
Still feel that way? Kind of looks like battery acid has been used as coolant in that car!
I like your sense of humor... Yes I still do. To quote myself and add context
quote
This car sat for several months before I got her,
They don't make 30 year old vacuum lines or old metal parts like they used to, but this specific issue was caused by cavitation related to sitting for a long period in a wet environment. Oregon is very wet and the car was not running for months until I went to pick it up. The owner let me know about the issues she knew about and from what I have seen they took care of the car up to that point.
Besides, this wouldn't be much of a project thread if the car was perfect and would reduce your entertainment level by 0.0000001% and that would be a tragedy! ------------------ Aaron H 1986 Fiero GT 2.8- A dream car of mine since childhood- Stock now, but looking for creative options to upgrade this wonderful car
[This message has been edited by Phlebmaster (edited 12-20-2018).]
...this specific issue was caused by cavitation related to sitting for a long period in a wet environment. Oregon is very wet and the car was not running for months until I went to pick it up.
I know all about a "wet environment". I'm on the coast here in BC.
I've had Fieros which had been sitting for almost ten years... and I've never seen that type and/or level of corrosion. Must be an Oregon thing.
I know all about a "wet environment". I'm on the coast here in BC.
I've had Fieros which had been sitting for almost ten years... and I've never seen that type and/or level of corrosion. Must be an Oregon thing.
Well...We do have slugs larger than your common house cat...so yeah. LOL
I was a bit surprised at the level of decay, but it makes sense IF she didn't have coolant and only used water in the car for a while. I have experience with this type of thing with Datsuns... those are rust buckets from the factory but I loved my 240Z.
------------------ Aaron H 1986 Fiero GT 2.8- A dream car of mine since childhood- Stock now, but looking for creative options to upgrade this wonderful car
I didn't know those housings were so expensive. I see why you're trying to fix yours up.
Yeah, $70 for a used one was what I found. I was desperate too otherwise I’d been stranded. But I am making a trip to the local pick n pull tomorrow to scavenge the only fiero they have. I’ll have spares for anything I need. I’ll also see what engine options they have because I saw a 95 camaro sitting there and I think it had the 3.4. My wife will be unhappy with me if I come home with another engine... lol but I’ll take the beating
------------------ Aaron H 1986 Fiero GT 2.8- A dream car of mine since childhood- Stock now, but looking for creative options to upgrade this wonderful car
The irony is overwhelming- I still have a little bit of an issue after replacing all the lines that were bad. The only things left are the EGR and tube, AIC and the hard lines under the intake that I couldn't get to without removing the plenum. It does seem to run better but still runs very rich and lobes at idle a bit. It IS getting better... so that is encouraging.
Spent a whole day at the pick n pull and came home with some loot! I pulled every sensor I could get, most of them looked new and I even found a box or two inside the car from some of those...so I have spares now.
Here is the parts list: Throttle body assy- including the TPS and AIC valve..with all hoses and pigtails Thermostat housing...with new thermostat. Fan switch with pigtail Brake booster lines Temp sensor with pigtail Oil pressure sender and pigtail MAP sensor- new EGR valve assy with new tube Vac lines- all hard lines I could salvage to replace mine if needed Both ECM chips from 1226869- just as an insurance policy. Reman starter New plug wires EGR valve sensor unit with pigtail and lines That rear blower motor for cooling the alt and dist- I am not sure if mine works so I grabbed it as a back up I even got a cool collapsible cup holder from a Ford... I need one. :-) Any relays left- mainly the headlights but I grabbed a few more
Yesterday I took the car to the shop and replaced all the vac lines I could without removing the intake and lifted the car to examine the underside. It is good to have a way to lift the car when needed... Yes I was careful not to damage the cooling lines.
There wasn't much on the bone here... but I got what I needed...
Here's the loot!!- The pic won't load so click on the image placeholder to see the loot...sorry
I fixed the rear hatch key lock mechanism... I ran into a pinch when my battery died and couldn't open the trunk...yikes! Problem solved now
I took care of the important stuff.... new sound system. Sounds great!
Special hard lines replaced the old and cracked rubber vac lines...
Yes! I love having this available. Will come in handy if I swap the engine...
Assistance requested for these next items.....please.
I discovered these damn things when trying to pull the wheel and work on the rear brakes, stupid locking lugnuts.... I need to get a key. I read there's a place where I can get these from the manufacturer but if anyone here has one I'd much rather buy it from a PFF member. If you have this key as a spare please let me know asap
Lastly, I discovered this random connector tied in with the speed sending unit pigtail... does anyone know what this goes to? I looked everywhere and did not see any connections this could go to.... help?
------------------ Aaron H 1986 Fiero GT 2.8- A dream car of mine since childhood- Stock now, but looking for creative options to upgrade this wonderful car
[This message has been edited by Phlebmaster (edited 12-24-2018).]
A couple of things; 1) Get to that JY and get the Thermostat housing off of that 85! 2) It is very smart to gather spare parts; Like that Thermo housing, which is thin metal and CAN be exposed to a very corrosive environment. 3) Those locking lug nuts can be removed by using the right-size CHEAP socket and hammering it on. 4) Be very careful about lifting your Fiero; The coolant tubes run along the rockers....They are very nicely made stainless pipes....But they can easily be damaged/crushed.
A couple of things; 1) Get to that JY and get the Thermostat housing off of that 85! 2) It is very smart to gather spare parts; Like that Thermo housing, which is thin metal and CAN be exposed to a very corrosive environment. 3) Those locking lug nuts can be removed by using the right-size CHEAP socket and hammering it on. 4) Be very careful about lifting your Fiero; The coolant tubes run along the rockers....They are very nicely made stainless pipes....But they can easily be damaged/crushed.
Thank you for the input and pointers... Yes, I definitely grabbed that housing. $4.99 was all!
The socket- I tried using a 13/16th socket but it started to strip the nut- but I'll try a different socket since I was using an old one that was pretty worn...if I was going to ruin one that was the one I would prefer to do it to. :-) . If nothing else I can try the gator socket- that was something I read about too. Or plan C option D I can get a nut out tool from HF that will work. I was trying to save the lug nuts, but probably better to get rid of them anyway.
And the coolant lines were out of danger this time, I set the car up with the forks resting on the rear chassis rather than the body but good advice nonetheless for anyone seeing my shenanigans and getting a bright idea. LOL
------------------ Aaron H 1986 Fiero GT 2.8- A dream car of mine since childhood- Stock now, but looking for creative options to upgrade this wonderful car
That's a "new" tube? Do you have an asbestos jacket for it? If not, you'll need to buy some header wrap (discussed Here). Otherwise, exhaust heat from the EGR tube will help to cook the ICM in the base of your distributor.
That's a "new" tube? Do you have an asbestos jacket for it? If not, you'll need to buy some header wrap (discussed Here). Otherwise, exhaust heat from the EGR tube will help to cook the ICM in the base of your distributor.
Good eye Patrick! Yes, I have that too. I pulled it off to see the condition underneath before pulling it. But I plan to make sure those items are well protected when I pull; the plenum off to replace the rest of the lines. I will also add a heat sink under the distributor to reduce the heat on the ICM and coil pack... I have some spare computer parts and I think I have something small enough to fit under the distributor.
Thank you for the link! I like the look better than that space suit wrap on there now.
------------------ Aaron H 1986 Fiero GT 2.8- A dream car of mine since childhood- Stock now, but looking for creative options to upgrade this wonderful car
I will also add a heat sink under the distributor to reduce the heat on the ICM and coil pack...
A heat sink under the base of the distributor certainly extends the life of an ICM. I did that mod ten years ago and my already old and used ICM (in 2008) is still working fine.
[This message has been edited by Patrick (edited 12-24-2018).]
A heat sink under the base of the distributor certainly extends the life of an ICM. I did that mod ten years ago and my already old ICM (in 2008) is still working fine.
Perfect!! I have something in my box of computer goodies that kind of looks like that. Awesome! Great minds think alike... Thank you again
------------------ Aaron H 1986 Fiero GT 2.8- A dream car of mine since childhood- Stock now, but looking for creative options to upgrade this wonderful car
Merry Christmas! Did you get anything for the Fiero?
Thank you! I got all those goodies from the pick n pull, and been diligently working on her to get the bugs sorted. At least she's a daily driver now- mostly. LOL I still have moments where I feel unsure if the car is going to start- time to look at my grounds.
How about your project? It looks like you are moving along nicely! Can't wait to see the install steps you take. It's inspirational!
------------------ Aaron H 1986 Fiero GT 2.8- A dream car of mine since childhood- Stock now, but looking for creative options to upgrade this wonderful car
[This message has been edited by Phlebmaster (edited 12-25-2018).]
The spare connector coming off the VSS harness is for the backup lights. It goes to the reverse light switch which is somewhat hidden under the transmission levers.
Careful with bending that EGR tube around. They break easily, especially when used. Be sure you get the restrictor disk that goes between the tube and intake, or be sure to retain the one from your engine.
Well, I closed my trunk and a huge chunk fell off the tail light so I finished the job. Grrrrr
I’ll probably go with some custom lights anyway later so not a huge deal except these are impossible to find.
------------------ Aaron H 1986 Fiero GT 2.8- A dream car of mine since childhood- Stock now, but looking for creative options to upgrade this wonderful car
[This message has been edited by Phlebmaster (edited 12-26-2018).]
Hey Phlebmaster, keep an eye on Kieth Goodyear for the tail-light stuff. Soon, all shall be revealed. Great work on your car man and keep at it, she will be beautiful!
Hey Phlebmaster, keep an eye on Kieth Goodyear for the tail-light stuff. Soon, all shall be revealed. Great work on your car man and keep at it, she will be beautiful!
Thank you! I love a good challenge so this car is right up my ally....
I have the new (to me) thermostat housing from that 85 at the JY. It was in better shape than mine but still needed some rework.... I decided to test my theory about solder and try and fix the bad parts. I have a hot pot with some harder solder so here we go.... I will powder coat this when I have time. I am thinking bright blue! Black is just bleh.... and over done in this engine compartment
Here is the part after bead blasting... see the bad connection is missing a critical point. I had some spare metal so I went to reshaping it to fit inside the tube.
I would have preferred it fit tighter but this is what I had. Let's see if I can make it work... Tin alloy is more resistant to corrosion and the powder coating will seal the deal...so to speak. haha
Hot pot ready.... I had to adjust the temp just right to get this to stick to the housing, but it worked out... Yes, it looks ugly, but this is where the art of metal work comes in...
Not bad..but not perfect yet.
I bridged the gap to add structural support...
Next will be smoothing out the rough spots, then powder coating!! Pics soon to follow!~
------------------ Aaron H 1986 Fiero GT 2.8- A dream car of mine since childhood- Stock now, but looking for creative options to upgrade this wonderful car
[This message has been edited by Phlebmaster (edited 12-27-2018).]
I finished up a set of parts and then went to work on my project....
I went heavy on the powder so this was meant for function, not beauty. I would have done it differently if this was intended for looks... but I am happy with the outcome. I had to run the oven temp lower than usual, but the interlacing of the polymers was completed so it worked.
These are fiber optic distribution rack units, we brought powder coating in house about 6 months ago and I've been powder coating everything I can get my hands on. So far I have done wheels, motorcycle and bike frames, plus other odds and ends of parts.
Here is the set up... just finished the white
I cleaned the thermostat housing with acetone, then blew it dry.
First coat-
Final product! Nice and heavy inside and out. The solder held up well!
------------------ Aaron H 1986 Fiero GT 2.8- A dream car of mine since childhood- Stock now, but looking for creative options to upgrade this wonderful car
[This message has been edited by Phlebmaster (edited 12-27-2018).]
I am deciding what color I want to do my wheels and upper intake/valve covers. I wanted to try out the blue anyway to see how it makes me feel. I will be getting the gasket kit to pull off the plenum and EGR so I can replace the rest of the lines and EGR/tube...and add the heat sink under the distributor.
I do have a question..... when is that dist/alt cooling fan supposed to come on??? I have no idea if it is working or even when it is supposed to come on.
------------------ Aaron H 1986 Fiero GT 2.8- A dream car of mine since childhood- Stock now, but looking for creative options to upgrade this wonderful car
You might want to dress out your thermostat cap and gasket area to remove the powder coating. They need to be pretty smooth in order to seal correctly. The coating and color look good, though.
You might want to dress out your thermostat cap and gasket area to remove the powder coating. They need to be pretty smooth in order to seal correctly. The coating and color look good, though.
Good point... I have the coating heavy enough that I can flat sand it and still keep the coverage.
Any thoughts on that cooling fan in the engine compartment?
------------------ Aaron H 1986 Fiero GT 2.8- A dream car of mine since childhood- Stock now, but looking for creative options to upgrade this wonderful car
I do have a question..... when is that dist/alt cooling fan supposed to come on??? I have no idea if it is working or even when it is supposed to come on.
It's supposed to come on whenever the rad fan comes on.
It's supposed to come on whenever the rad fan comes on.
Many thanks good sir... Yes it works! that is a good thing.
I got my cruise control to work! That is also encouraging in regards to the vac leaks and electrical stuff getting sorted out.
Question- I replaced the clutch master cylinder and I am having a hell of a time getting it to work right. I bench bled (primed) the new MC before installing, then opened the bleeder on the slave in the engine compartment. It looks like I get all the air out and the clutch works perfectly...then after driving it a few miles it gets air in the system again. Am I missing something with the bleeding procedure? I used a bleeder tool first time, then manually open/closed the bleeder with help after it failed the first time. There is no fluid visible on the ground, so it is a mystery right now. I suspect the MC cup is too loose and sucking air with use...which I can exchange it. But I wanted to make sure I wasn't missing something...
Next! More powder coating done. The engine vents were pretty ugly so I pulled them and worked some magic.
I pulled the back plates off by drilling out the rivets. I wanted these blue and the top vents gloss black.
After a good scrubbing and then wipe down with Acetone they were ready.. I had to do a bike frame anyway so it worked out...
These go under the top vents and the color should add contrast to the engine bay
Next was the gloss black for the top vents... they look great! Now I need to reassemble everything with rivets and see how they look together
Happy Reading!
------------------ Aaron H 1986 Fiero GT 2.8- A dream car of mine since childhood- Stock now, but looking for creative options to upgrade this wonderful car
One man clutch bleeding procedure. It's always worked for me.
Lift the left front wheel with a floor jack just enough that it clears the ground. This raises the MC higher than the slave and also tilts the slave bleeder valve end upward. Remove the MC cap and fill the reservoir to the top. Leave the cap off the MC and fluid bottle. Go to the rear and open the slave bleeder valve. With a heavy tool, strike the side of the slave several times. This will dislodge any air stuck to the cylinder walls near the pushrod. Keep an eye on the MC and refill it before it goes empty. Return to the slave and strike the slave some more. Repeat the process one more time and when the fluid drops to the FULL level in the MC, close the slave bleeder valve and replace the MC cap. You should have a full clutch at this point and it should retain a good pedal if all parts of the system are working properly.
Due to the close proximity of the fluid line to the exhaust and coolant hose just below the slave, I use a length of the ribbed plastic wire harness cover to cover the fluid line from the flexible joint all the way down to the frame. This insulates the fluid line and acts as a heat sink to prevent the fluid from boiling.
Phlebmaster, your thermostat housing looked just like mine did on my 87 that I am rebuilding. The car had a coolant leak according to the previous owner and I am sure he was just putting water in it. The housing itself was full of pin holes from rust. I just replaced it with a much better shape one. I did not feel like putting in the effort like you did to fix mine. ha Awesome job on it!
One man clutch bleeding procedure. It's always worked for me.
Lift the left front wheel with a floor jack just enough that it clears the ground. This raises the MC higher than the slave and also tilts the slave bleeder valve end upward. Remove the MC cap and fill the reservoir to the top. Leave the cap off the MC and fluid bottle. Go to the rear and open the slave bleeder valve. With a heavy tool, strike the side of the slave several times. This will dislodge any air stuck to the cylinder walls near the pushrod. Keep an eye on the MC and refill it before it goes empty. Return to the slave and strike the slave some more. Repeat the process one more time and when the fluid drops to the FULL level in the MC, close the slave bleeder valve and replace the MC cap. You should have a full clutch at this point and it should retain a good pedal if all parts of the system are working properly.
Due to the close proximity of the fluid line to the exhaust and coolant hose just below the slave, I use a length of the ribbed plastic wire harness cover to cover the fluid line from the flexible joint all the way down to the frame. This insulates the fluid line and acts as a heat sink to prevent the fluid from boiling.
This is the easiest procedure to follow and works flawlessly! Thank you....
I still have air getting into the system somehow, so I will exchange the MC as a precaution. There is one other possibility- the bleeder valve on the slave was pretty corroded but I cleaned it up well and it looks like it is sealing. No fluid leaking at any of the connections and they are all tight. At least I can get her back on the road when it buggers up on me. LOL
Next! As you may have the experience- my gas gauge is not exact so I ran out of gas. BOO! But I now know where empty is. One other fact to know- I was experiencing a lot of bucking at low RPM. This was very annoying in heavy traffic. This was caused (not by a vac leak as I suspected) but the fuel filter was full-o-crap and clogged. New filter is on now and she idles smooth! No more bucking and low speed or idle hunt!~ So be sure to check this if you have the same issues- and especially if your tank has run dry and sucked 30 year old junk from the tank into the filter like mine did.
Ever Onward!
------------------ Aaron H 1986 Fiero GT 2.8- A dream car of mine since childhood- Stock now, but looking for creative options to upgrade this wonderful car
Phlebmaster, your thermostat housing looked just like mine did on my 87 that I am rebuilding. The car had a coolant leak according to the previous owner and I am sure he was just putting water in it. The housing itself was full of pin holes from rust. I just replaced it with a much better shape one. I did not feel like putting in the effort like you did to fix mine. ha Awesome job on it!
Thank you! The good thing is I now have a spare but don't expect to see anything like this happen again with the solder, JB Weld and paint. The Powder coated option will get installed if I need it. Or if someone else has a need.
------------------ Aaron H 1986 Fiero GT 2.8- A dream car of mine since childhood- Stock now, but looking for creative options to upgrade this wonderful car


 You may want to check out the Fiero Facebook page and post about that Caddy. There could be someone interested, and maybe they'll give you something for it? Ay least if you take the engine harness and computer from your car, you could always sell it to someone in the future if you don't go the Northstar route.