Pennock's Fiero Forum
  General Fiero Chat
  My plasti dip anthracite gray '85 notchback

Post New Topic  Post A Reply
Email This Page to Someone! | Printable Version


next newest topic | next oldest topic
My plasti dip anthracite gray '85 notchback by Charlie1963
Started on: 07-14-2015 08:34 PM
Replies: 22 (1076 views)
Last post by: no2pencil on 07-21-2015 10:50 PM
Charlie1963
Member
Posts: 100
From: Eaton Rapids, MI, USA
Registered: May 2013


Feedback score: (2)
Leave feedback

Rate this member

Report this Post07-14-2015 08:34 PM Click Here to See the Profile for Charlie1963Send a Private Message to Charlie1963Edit/Delete MessageReply w/QuoteDirect Link to This Post
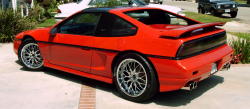
As typical with most Fieros the paint on mine was in bad shape and I debated between paint and plasti dip. I was quoted around $3k for a complete paint job while the plasti dip for the car and wheels cost about $500. Needless to say I went with the plasti dip. I bought the pro kit with 3 gallons plus 1 extra gallon from dip your car.

I wanted the dip job to look as much like a paint job as possible, which included dipping the door jambs, fenders under the trunk and hood lids and behind the wheel well liners. I removed the tail lights, marker lights, luggage rack, mirrors, sunroof gasket (needed new one anyway) any trim that was easy to remove, wheels, wheel well liners, intake grill, radiator grill, trunk gasket and engine vents (plus the plastic brackets). After all the items were removed I fixed cracks in the pillars and stone chips in the hood. The car had been repainted at some time and there was a lot of little stuff under the paint which I could feel running my hand over the paint. I sanded the entire car with 600 grit to smooth everything down. After sanding I cleaned everything with the pre dip cleaner. I then taped off everything I didn't want dipped. I followed this with another cleaning using the pre dip cleaner. At this point it was time to start dipping. The prep work took me about a week since I was in no rush and wanted it to look good when done.

The dip process took about 6 hours for the 5 coats allowing about 30 minutes or so between coats. It's recommended to remove any tape that touches the dip while the final coat is still wet. This is to avoid pulling up the dip when pulling off the tape. With one person this was impossible because the area dipped first for the final coat was almost completely dry by the time I finished up the final coat, maybe I'm just slow I ended up using a razor to cut the dip as I pulled the tape to remove it.

I'm very pleased with how it turned out.


[This message has been edited by Charlie1963 (edited 07-14-2015).]

IP: Logged
PFF
System Bot
Quad Raider
Member
Posts: 865
From: Oologah, Oklahoma
Registered: Dec 2010


Feedback score: (3)
Leave feedback

Rate this member

Report this Post07-14-2015 09:21 PM Click Here to See the Profile for Quad RaiderSend a Private Message to Quad RaiderEdit/Delete MessageReply w/QuoteDirect Link to This Post
That looks great!
IP: Logged
TheDigitalAlchemist
Member
Posts: 12447
From: Long Island, NY
Registered: Jan 2012


Feedback score: (5)
Leave feedback


Total ratings: 94
Rate this member

Report this Post07-14-2015 10:39 PM Click Here to See the Profile for TheDigitalAlchemistClick Here to visit TheDigitalAlchemist's HomePageSend a Private Message to TheDigitalAlchemistEdit/Delete MessageReply w/QuoteDirect Link to This Post
 
quote
Originally posted by Quad Raider:

That looks great!


What he said, wow!
IP: Logged
zmcdonal
Member
Posts: 1676
From: NW, Indiana
Registered: Oct 2005


Feedback score:    (9)
Leave feedback

Rate this member

Report this Post07-14-2015 11:51 PM Click Here to See the Profile for zmcdonalSend a Private Message to zmcdonalEdit/Delete MessageReply w/QuoteDirect Link to This Post
That looks great! Love the color.
IP: Logged
Patrick
Member
Posts: 36367
From: Vancouver, British Columbia, Canada
Registered: Apr 99


Feedback score: (1)
Leave feedback


Total ratings: 458
Rate this member

Report this Post07-15-2015 02:15 AM Click Here to See the Profile for PatrickSend a Private Message to PatrickEdit/Delete MessageReply w/QuoteDirect Link to This Post

I like the fact that you took the time to remove or tape all the black trim, including the belt line. I just hate the look of EVERYTHING being painted the same color!

Looks great!
IP: Logged
Csjag
Member
Posts: 3170
From: Ocklawaha,Fl, USA
Registered: Dec 2013


Feedback score: N/A
Leave feedback

Rate this member

Report this Post07-15-2015 07:52 AM Click Here to See the Profile for CsjagSend a Private Message to CsjagEdit/Delete MessageReply w/QuoteDirect Link to This Post
Excellent job! Not to my taste but everyone has different tastes.
IP: Logged
2.5
Member
Posts: 43224
From: Southern MN
Registered: May 2007


Feedback score: (1)
Leave feedback


Total ratings: 184
Rate this member

Report this Post07-15-2015 09:33 AM Click Here to See the Profile for 2.5Send a Private Message to 2.5Edit/Delete MessageReply w/QuoteDirect Link to This Post
Looks great
IP: Logged
Jason88Notchie
Member
Posts: 1695
From: Elyria, Ohio, USA
Registered: Oct 2009


Feedback score: N/A
Leave feedback

Rate this member

Report this Post07-15-2015 10:49 AM Click Here to See the Profile for Jason88NotchieSend a Private Message to Jason88NotchieEdit/Delete MessageReply w/QuoteDirect Link to This Post
Looks absolutely gorgeous!! Very good workman ship. And I really like the color. You know, a set of chromed wheels would really make that car pop!
IP: Logged
Charlie1963
Member
Posts: 100
From: Eaton Rapids, MI, USA
Registered: May 2013


Feedback score: (2)
Leave feedback

Rate this member

Report this Post07-15-2015 11:28 AM Click Here to See the Profile for Charlie1963Send a Private Message to Charlie1963Edit/Delete MessageReply w/QuoteDirect Link to This Post
 
quote
Originally posted by Jason88Notchie:

Looks absolutely gorgeous!! Very good workman ship. And I really like the color. You know, a set of chromed wheels would really make that car pop!


The wheels are chrome under the dip but they were starting to look bad with oxidation.
IP: Logged
JohnWPB
Member
Posts: 5182
From: West Palm Beach, Florida
Registered: May 2009


Feedback score:    (21)
Leave feedback


Total ratings: 144
Rate this member

Report this Post07-15-2015 11:47 AM Click Here to See the Profile for JohnWPBClick Here to visit JohnWPB's HomePageSend a Private Message to JohnWPBEdit/Delete MessageReply w/QuoteDirect Link to This Post
 
quote
Originally posted by Patrick:


I like the fact that you took the time to remove or tape all the black trim, including the belt line. I just hate the look of EVERYTHING being painted the same color!

Looks great!


Couldn't agree more! When the belt line is painted, it looks like an economy paint job that they just didn't feel like taking the time or effort to remove it or tape it off

Great choice on the color, it really looks great!


IP: Logged
Quad Raider
Member
Posts: 865
From: Oologah, Oklahoma
Registered: Dec 2010


Feedback score: (3)
Leave feedback

Rate this member

Report this Post07-15-2015 02:04 PM Click Here to See the Profile for Quad RaiderSend a Private Message to Quad RaiderEdit/Delete MessageReply w/QuoteDirect Link to This Post
How did you fill the small chips and dings?
IP: Logged
PFF
System Bot
Charlie1963
Member
Posts: 100
From: Eaton Rapids, MI, USA
Registered: May 2013


Feedback score: (2)
Leave feedback

Rate this member

Report this Post07-15-2015 02:30 PM Click Here to See the Profile for Charlie1963Send a Private Message to Charlie1963Edit/Delete MessageReply w/QuoteDirect Link to This Post
 
quote
Originally posted by Quad Raider:

How did you fill the small chips and dings?


I sanded thru the paint to the base material then used filler specific for SMC plastic. This filler was sanded smooth prior to spraying the dip.
IP: Logged
Quad Raider
Member
Posts: 865
From: Oologah, Oklahoma
Registered: Dec 2010


Feedback score: (3)
Leave feedback

Rate this member

Report this Post07-17-2015 10:22 PM Click Here to See the Profile for Quad RaiderSend a Private Message to Quad RaiderEdit/Delete MessageReply w/QuoteDirect Link to This Post
Well, the results are spectacular.
IP: Logged
davylong86
Member
Posts: 915
From: waterloo,il
Registered: Mar 2014


Feedback score: (1)
Leave feedback

Rate this member

Report this Post07-17-2015 10:52 PM Click Here to See the Profile for davylong86Send a Private Message to davylong86Edit/Delete MessageReply w/QuoteDirect Link to This Post
You just sold me on plasti dip for my 84. That looks great!
IP: Logged
Charlie1963
Member
Posts: 100
From: Eaton Rapids, MI, USA
Registered: May 2013


Feedback score: (2)
Leave feedback

Rate this member

Report this Post07-18-2015 06:53 AM Click Here to See the Profile for Charlie1963Send a Private Message to Charlie1963Edit/Delete MessageReply w/QuoteDirect Link to This Post
Thanks everybody for the compliments.

Since those pictures were taken I've since peeled the hood and dipped it again. I did this because a bubble about the size of a quarter formed under the dip on the hood and there was some banding from over spray on the hood that was visible from certain angles. Both of these really bugged me the more I looked at them so I decided to peel and dip the hood again.

I don't know why the bubble formed but from what I've read online it was likely some moisture on the surface before dipping. The banding was my inexperience with spraying and lack of good lighting in the garage when I sprayed it.

I was surprised how well the dip peeled off since there was no clear coat on the paint. I was a bit worried before I dipped the car that the lack of clear coat would cause the dip to adhere too good and be a real mess to remove if I ever wanted to get the car painted.

On another note one of the issues I've noticed after dipping is the formation of water spots on the car after it rains. I've been using the DYC Dip Coat on the car to keep it looking good and this is suppose to prevent staining and water spots. I had read about using Turtle wax Ice spray wax on dipped cars so I decided to use the Turtle wax on the redipped hood and not the Dip Coat. The Dip Coat makes the dip a slightly darker hue while the Turtle wax does not. After the first rain after applying the Turtle wax there wasn't a single water spot on the hood while the rest of the car was covered with spots. After seeing this I went over the entire car first with the PreDip spray then with Turtle wax Ice. The PreDip Spray is the cleaner used to prep the surface before dipping. It removes dirt, oil, waxes, cleaners and other films. I'm happy to say that after doing this there wasn't a single water spot on the entire car after it recently rained.

Time for some pictures.

Hood before redipping. The bubble is in the red circle and the banding is pretty easy to see with the hood up and the right lighting and angle.


Peeling the hood.


Hood after redipping.


Water spots on the fender and no water spots on the hood.


No water spots on fender or hood.

[This message has been edited by Charlie1963 (edited 07-18-2015).]

IP: Logged
NCTyphoonKid
Member
Posts: 1277
From: Trinity, NC USA
Registered: Jun 2008


Feedback score: (5)
Leave feedback

Rate this member

Report this Post07-18-2015 05:05 PM Click Here to See the Profile for NCTyphoonKidSend a Private Message to NCTyphoonKidEdit/Delete MessageReply w/QuoteDirect Link to This Post
Where did you get the dip I need to do something with my car I was quoted 5k for a paint job and that is not happening.
IP: Logged
Charlie1963
Member
Posts: 100
From: Eaton Rapids, MI, USA
Registered: May 2013


Feedback score: (2)
Leave feedback

Rate this member

Report this Post07-18-2015 05:58 PM Click Here to See the Profile for Charlie1963Send a Private Message to Charlie1963Edit/Delete MessageReply w/QuoteDirect Link to This Post
 
quote
Originally posted by NCTyphoonKid:

Where did you get the dip I need to do something with my car I was quoted 5k for a paint job and that is not happening.


www.dipyourcar.com
IP: Logged
NCTyphoonKid
Member
Posts: 1277
From: Trinity, NC USA
Registered: Jun 2008


Feedback score: (5)
Leave feedback

Rate this member

Report this Post07-20-2015 09:39 PM Click Here to See the Profile for NCTyphoonKidSend a Private Message to NCTyphoonKidEdit/Delete MessageReply w/QuoteDirect Link to This Post
 
quote
Originally posted by Charlie1963:


www.dipyourcar.com


Is it difficult to do and how long is the dip suppose to last?
IP: Logged
Charlie1963
Member
Posts: 100
From: Eaton Rapids, MI, USA
Registered: May 2013


Feedback score: (2)
Leave feedback

Rate this member

Report this Post07-21-2015 01:30 PM Click Here to See the Profile for Charlie1963Send a Private Message to Charlie1963Edit/Delete MessageReply w/QuoteDirect Link to This Post
 
quote
Originally posted by NCTyphoonKid:


Is it difficult to do and how long is the dip suppose to last?


It's not difficult to do, just time consuming if you want to do it right so it looks good. As with a regular paint job it's all about the prep work. A poor paint job can look good from a distance but to look good up close you need to put the extra time and effort into it.

How long the dip will last depends on a lot of variables. Dip color, how much sun it gets, how much you drive it, the list goes on. From what I've seen on the Internet it could last 1 to 3 years.

Just keep in mind it's not meant to be permanent.
IP: Logged
KaijuSenso
Member
Posts: 911
From: Westland, MI
Registered: Jan 2007


Feedback score: (1)
Leave feedback

Rate this member

Report this Post07-21-2015 03:55 PM Click Here to See the Profile for KaijuSensoSend a Private Message to KaijuSensoEdit/Delete MessageReply w/QuoteDirect Link to This Post
Look good! Almost kept my car in Gunmetal Gray but decided it looked too much like primer. The Anthrcite looks better.
IP: Logged
Charlie1963
Member
Posts: 100
From: Eaton Rapids, MI, USA
Registered: May 2013


Feedback score: (2)
Leave feedback

Rate this member

Report this Post07-21-2015 08:05 PM Click Here to See the Profile for Charlie1963Send a Private Message to Charlie1963Edit/Delete MessageReply w/QuoteDirect Link to This Post
 
quote
Originally posted by KaijuSenso:

Look good! Almost kept my car in Gunmetal Gray but decided it looked too much like primer. The Anthrcite looks better.


I almost went with gunmetal grey with pearlizer added. Then i saw the anthracite grey was metallic and decided that was the one.
IP: Logged
PFF
System Bot
kooljess
Member
Posts: 1135
From: FIEROS WEST USA
Registered: Jul 2004


Feedback score: N/A
Leave feedback

Rate this member

Report this Post07-21-2015 10:36 PM Click Here to See the Profile for kooljessSend a Private Message to kooljessEdit/Delete MessageReply w/QuoteDirect Link to This Post
Nicely done.

------------------

IP: Logged
no2pencil
Member
Posts: 1523
From: Fort Lauderdale, FL
Registered: Oct 2009


Feedback score: (3)
Leave feedback

Rate this member

Report this Post07-21-2015 10:50 PM Click Here to See the Profile for no2pencilSend a Private Message to no2pencilEdit/Delete MessageReply w/QuoteDirect Link to This Post
 
quote
Originally posted by Patrick:


I like the fact that you took the time to remove or tape all the black trim, including the belt line. I just hate the look of EVERYTHING being painted the same color!

I agree!!! Looks amazing. Jealous.
IP: Logged

next newest topic | next oldest topic

All times are ET (US)

Post New Topic  Post A Reply
Hop to:

Contact Us | Back To Main Page

Advertizing on PFF | Fiero Parts Vendors
PFF Merchandise | Fiero Gallery | Ogre's Cave
Real-Time Chat | Fiero Related Auctions on eBay


Copyright (c) 1999, C. Pennock