Thread Closed  Topic Closed
  Pennock's Fiero Forum
  General Fiero Chat
  Ferrari 288GTO build (Page 6)

Post New Topic  

Printable Version

This topic is 7 pages long:  1   2   3   4   5   6   7 
Previous Page | Next Page
next newest topic | next oldest topic
This thread has been moved here: The Construction Zone.
Ferrari 288GTO build by dobie1
Started on: 08-31-2014 11:18 PM
Replies: 274 (12976 views)
Last post by: dobie1 on 12-30-2019 10:35 PM
Patrick
Member
Posts: 36251
From: Vancouver, British Columbia, Canada
Registered: Apr 99


Feedback score: (1)
Leave feedback


Total ratings: 458
Rate this member

Report this Post05-02-2019 01:55 AM Click Here to See the Profile for PatrickSend a Private Message to PatrickEdit/Delete MessageReply w/QuoteDirect Link to This Post
 
quote
Originally posted by dobie1:

I my have to use my old phone much lower res.


Don't.

It's very simple to re-size and/or re-compress images once you settle on a method and do it a few times. And the advantage as mentioned is that you still have the hi-res original shots to archive.

 
quote
Originally posted by fieroguru:

Am I the only one who changes the resolution of the photos in the camera settings so the pictures are the proper size and don't need resizing...


Yes.

[This message has been edited by Patrick (edited 05-02-2019).]

IP: Logged
dobie1
Member
Posts: 450
From: BC, Canada
Registered: Jun 2005


Feedback score: N/A
Leave feedback

Rate this member

Report this Post05-02-2019 09:25 PM Click Here to See the Profile for dobie1Send a Private Message to dobie1Edit/Delete MessageReply w/QuoteDirect Link to This Post
pulled the Ferrari dash pod from the mold today and cleaned it up. Next I'll mold the new instrument pod and install into the dash.


Wayne

[This message has been edited by dobie1 (edited 05-03-2019).]

IP: Logged
Patrick
Member
Posts: 36251
From: Vancouver, British Columbia, Canada
Registered: Apr 99


Feedback score: (1)
Leave feedback


Total ratings: 458
Rate this member

Report this Post05-02-2019 11:21 PM Click Here to See the Profile for PatrickSend a Private Message to PatrickEdit/Delete MessageReply w/QuoteDirect Link to This Post
 
quote
Originally posted by dobie1:

[img]C:\Users\Wayne Gillis\Pictures\288 build photos\20190503-011432-20190502_122518_resized.jpg[img]


That would be a fail.

Did you forget to upload to PIP?
IP: Logged
dobie1
Member
Posts: 450
From: BC, Canada
Registered: Jun 2005


Feedback score: N/A
Leave feedback

Rate this member

Report this Post05-03-2019 12:06 AM Click Here to See the Profile for dobie1Send a Private Message to dobie1Edit/Delete MessageReply w/QuoteDirect Link to This Post
Thanks Patrick
this is starting to irk me
IP: Logged
motoracer838
Member
Posts: 3751
From: Edgewater Co. USofA
Registered: Jan 2006


Feedback score: (2)
Leave feedback


Total ratings: 83
Rate this member

Report this Post05-04-2019 11:21 AM Click Here to See the Profile for motoracer838Send a Private Message to motoracer838Edit/Delete MessageReply w/QuoteDirect Link to This Post
I've been using Filker since photosuckit tried to ransome my pics. Easy to use, (if I can do it, anyone can) and provides options for size, no clunky resizing.

Joe
IP: Logged
dobie1
Member
Posts: 450
From: BC, Canada
Registered: Jun 2005


Feedback score: N/A
Leave feedback

Rate this member

Report this Post05-08-2019 11:18 PM Click Here to See the Profile for dobie1Send a Private Message to dobie1Edit/Delete MessageReply w/QuoteDirect Link to This Post
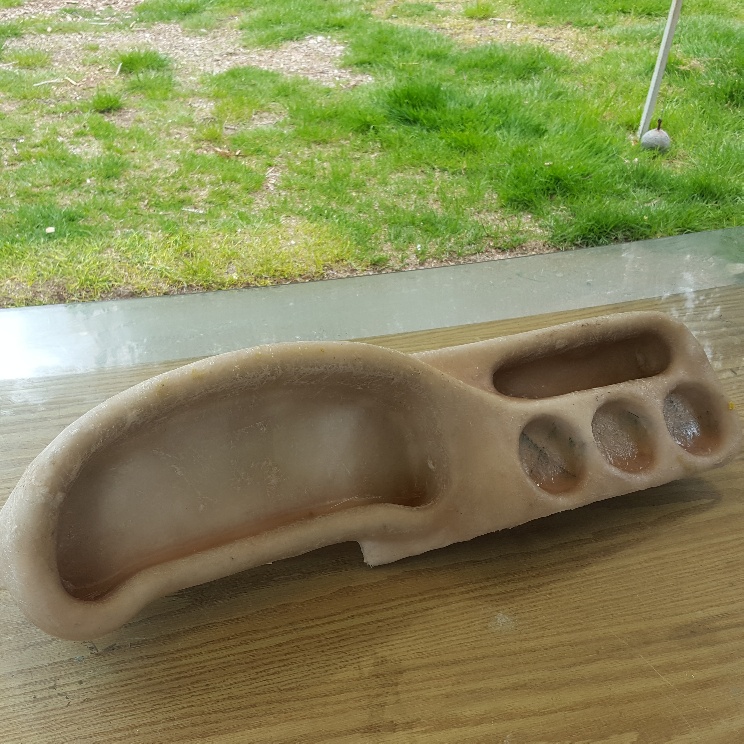
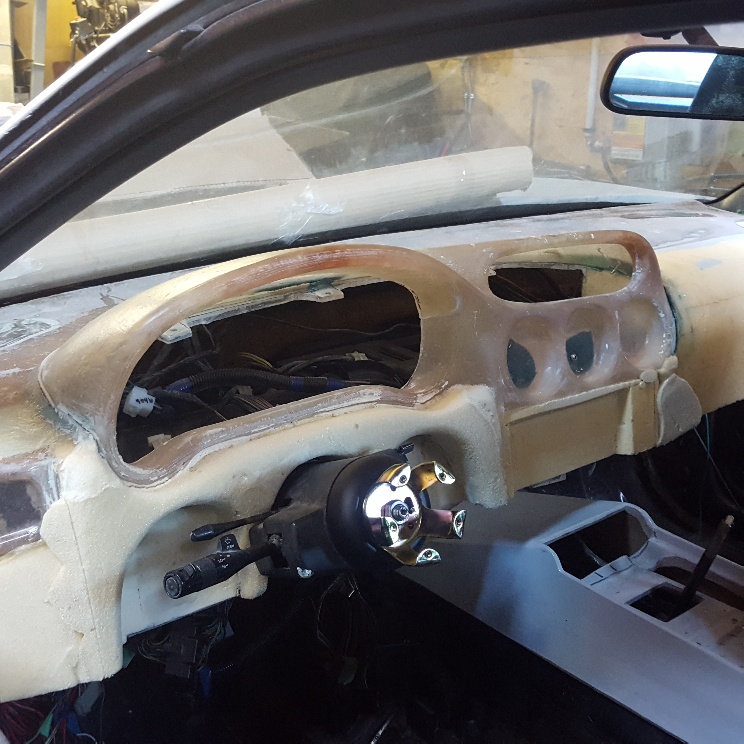
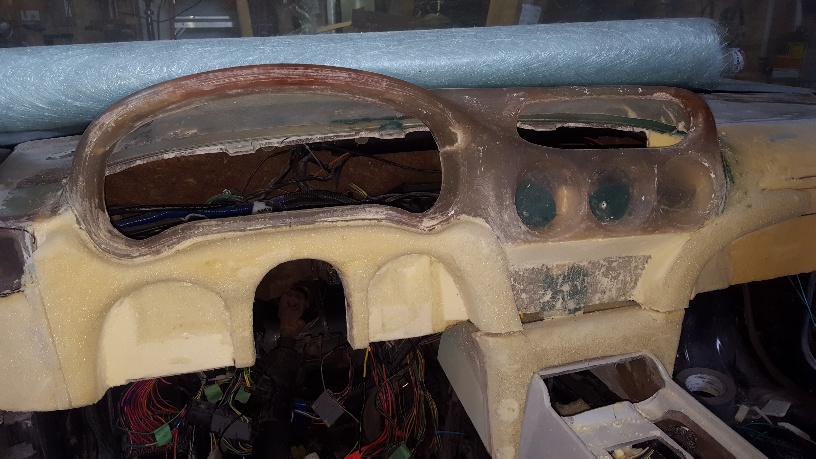
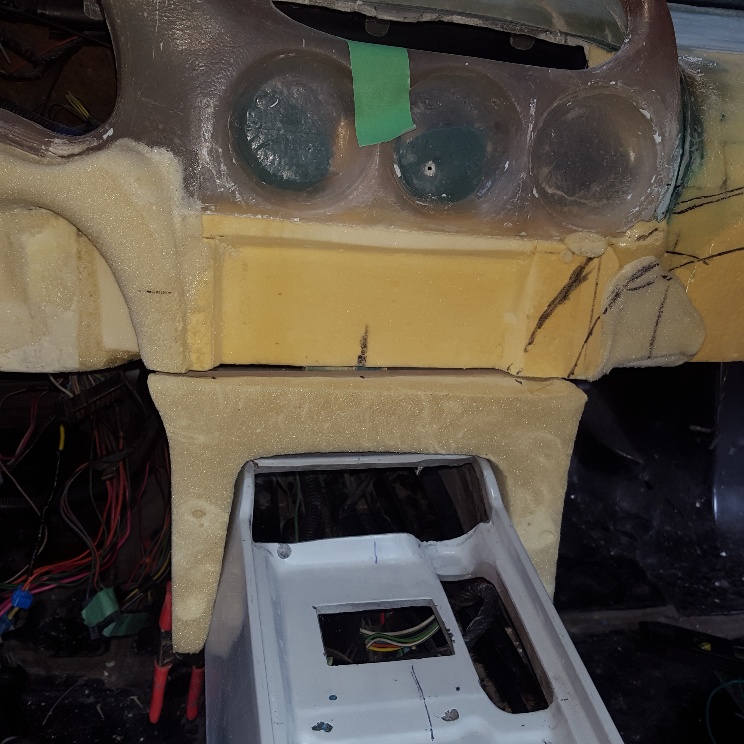
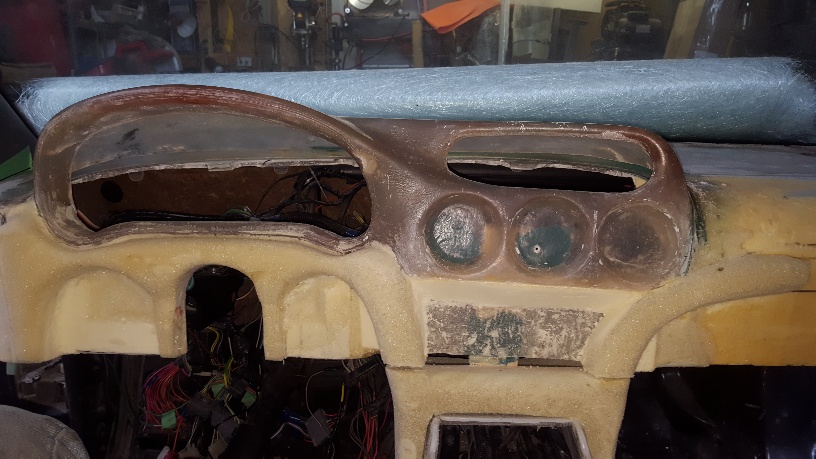
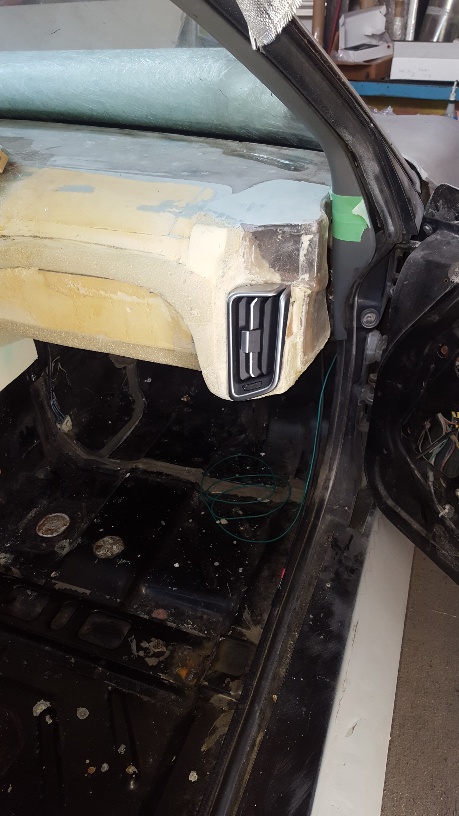
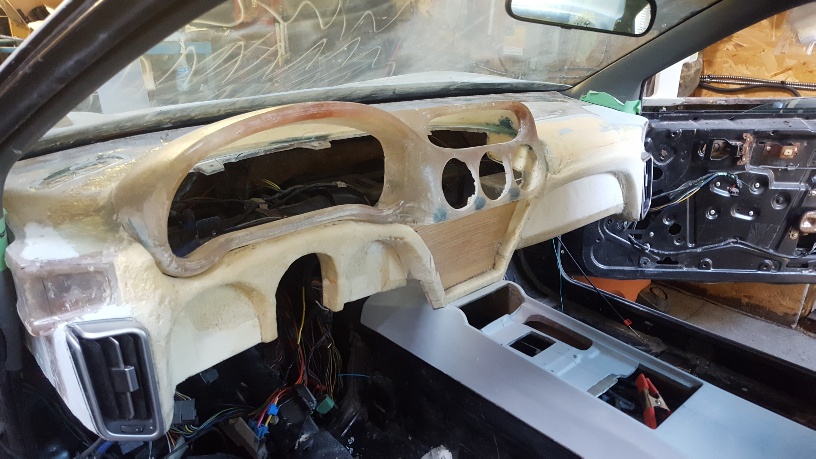
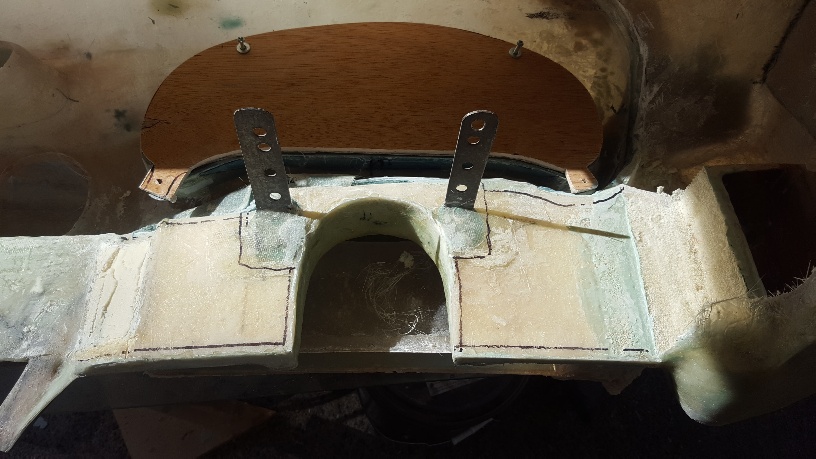
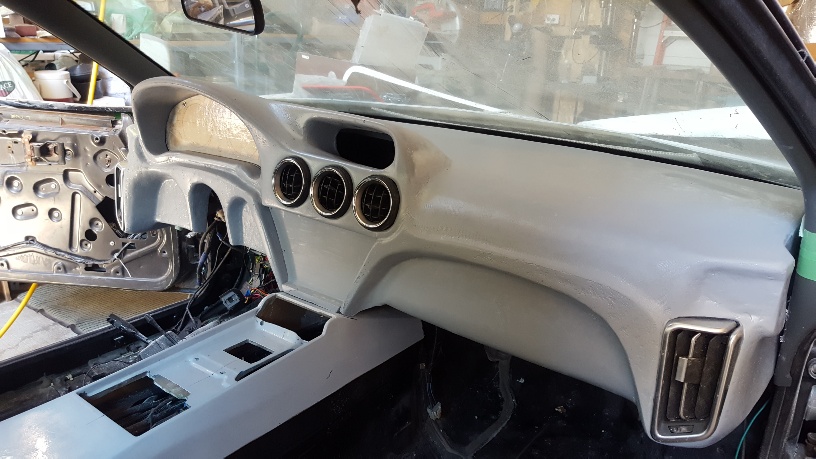
I've have been busy. I completed the mold and produced the first Ferrari 550 instrument pod to use in the dash build. I temporarily attached it to the dash and have through trial and error come up with a design I think I may go with. Still lots to do ,both side vents still need to be selected and built in, as well as the dash glove box area needs to get a lot of work. But it is coming. I have a used Ferrari inner dash HVAC plumbing coming that I hope I will modify to work.

Once I am certain of the location of everything I'll permanently attach and hide the joint seam


As I said the design Its not finished, I'll do some more web searching to get some ideas on the rest of the design.
I plan on filling in between the dash and console.


Wayne

[This message has been edited by dobie1 (edited 05-08-2019).]

IP: Logged
RCR
Member
Posts: 4397
From: Shelby Twp Mi
Registered: Sep 2002


Feedback score:    (7)
Leave feedback


Total ratings: 102
Rate this member

Report this Post05-09-2019 06:44 AM Click Here to See the Profile for RCRSend a Private Message to RCREdit/Delete MessageReply w/QuoteDirect Link to This Post
Nice job, Wayne.

What console are you using? Is that a 308 piece or 355?

Bob
IP: Logged
dobie1
Member
Posts: 450
From: BC, Canada
Registered: Jun 2005


Feedback score: N/A
Leave feedback

Rate this member

Report this Post05-09-2019 09:36 AM Click Here to See the Profile for dobie1Send a Private Message to dobie1Edit/Delete MessageReply w/QuoteDirect Link to This Post
 
quote
Originally posted by RCR:

Nice job, Wayne.

What console are you using? Is that a 308 piece or 355?

Bob


Thanks Bob
It’s a 355 console!
I’m going to make a mold of it as I want do make a few mods to it and don’t want to destroy a perfectly good OEM style dash.
I’m planning on making a Carbon fibre replacement.

Wayne
IP: Logged
Sage
Member
Posts: 2901
From: USA
Registered: Nov 1999


Feedback score:    (14)
Leave feedback


Total ratings: 69
Rate this member

Report this Post05-09-2019 10:37 AM Click Here to See the Profile for SageSend a Private Message to SageEdit/Delete MessageReply w/QuoteDirect Link to This Post
That looks killer!

Always great seeing your progress...please keep the updates coming as they are available.

HAGO!
IP: Logged
dobie1
Member
Posts: 450
From: BC, Canada
Registered: Jun 2005


Feedback score: N/A
Leave feedback

Rate this member

Report this Post05-09-2019 12:35 PM Click Here to See the Profile for dobie1Send a Private Message to dobie1Edit/Delete MessageReply w/QuoteDirect Link to This Post
 
quote
Originally posted by Sage:

That looks killer!

Always great seeing your progress...please keep the updates coming as they are available.

HAGO!


Thanks Sage
much appreciated!!
Wayne
IP: Logged
dobie1
Member
Posts: 450
From: BC, Canada
Registered: Jun 2005


Feedback score: N/A
Leave feedback

Rate this member

Report this Post05-11-2019 10:44 PM Click Here to See the Profile for dobie1Send a Private Message to dobie1Edit/Delete MessageReply w/QuoteDirect Link to This Post
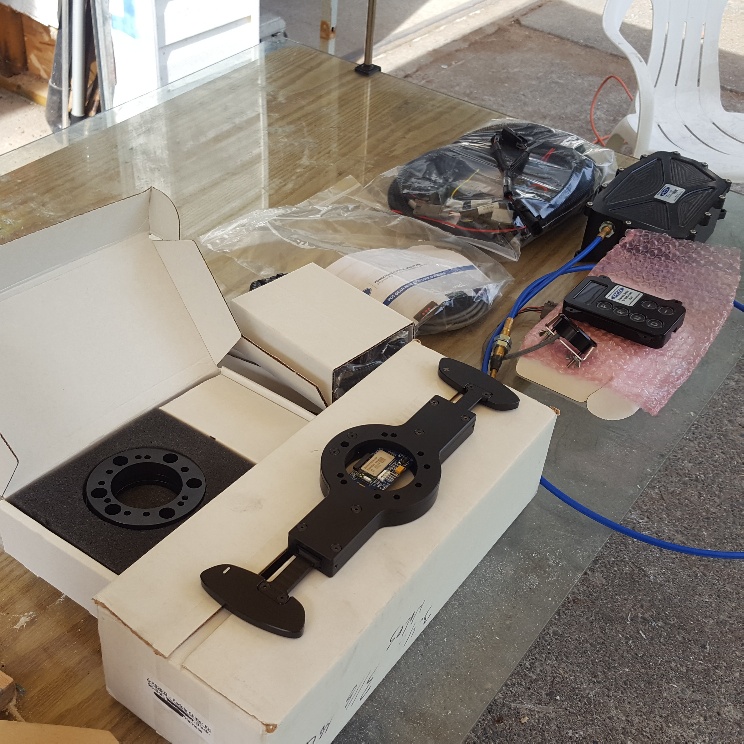
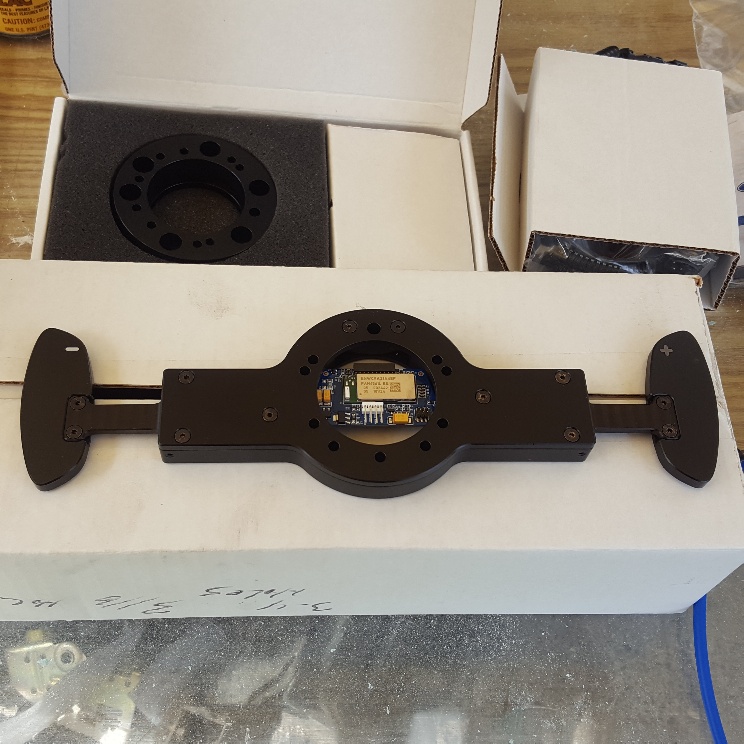
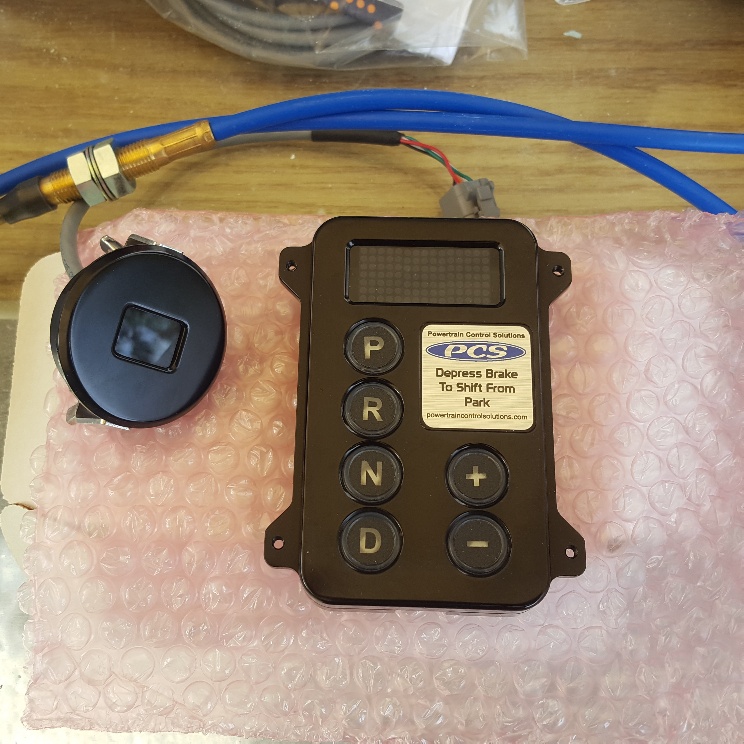
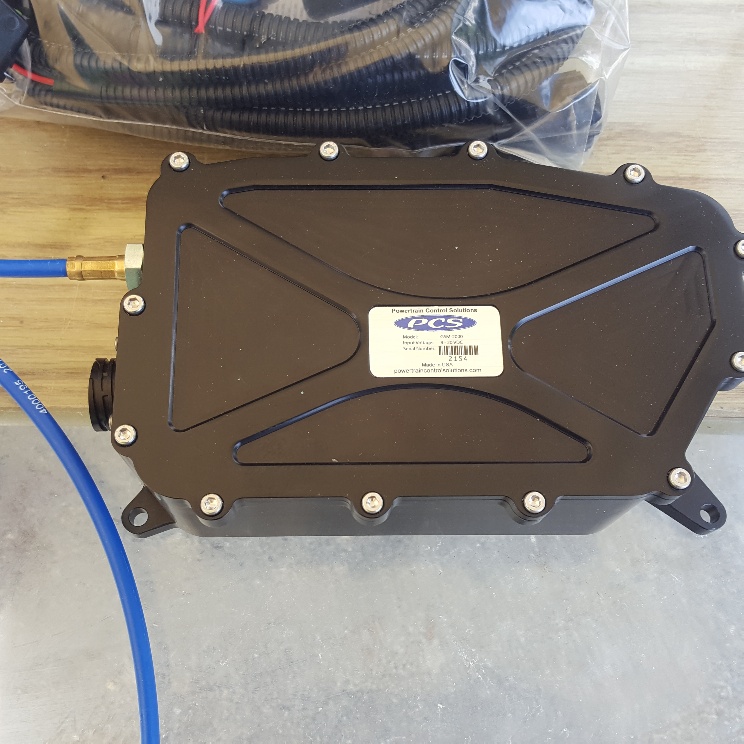
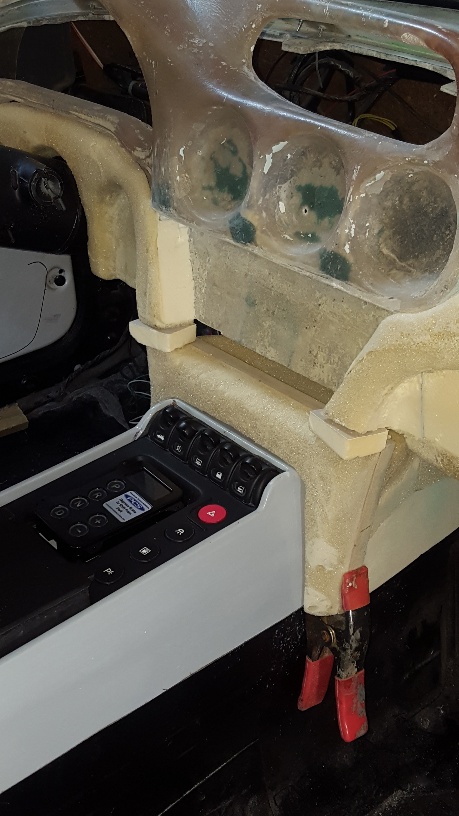
Well I had a really exciting day today, the Post lady delivered a package I’ve been waiting for on Friday.
I Unpacked it today, the system was a bit expensive with the exchange US to Canadian at 40% and 12.5% taxes.
It turned out to be a big hit!! But I'm very excited to have it and look forward to installing it.


The paddle shifter comes in two options , one with a digital gear indicator on the paddle shifter. The second, the option I took
where I'll mount the digital display in the dash . The paddle shifter only changes the forward gears.


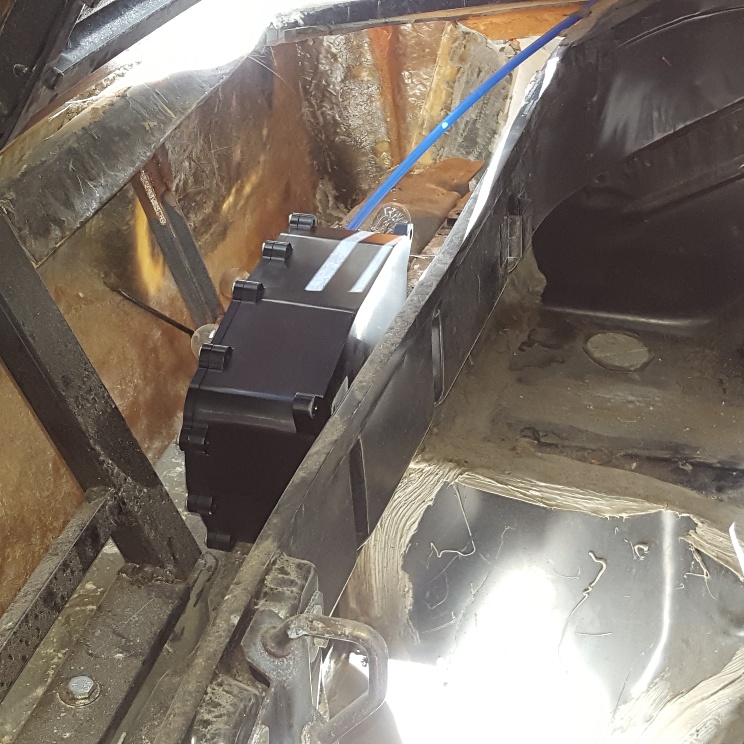
the main electronic shift controller will be mounted in the console where the OEM shifter is currently located. I’ll be removing the manual auto shifter mount which will clear up some valuable real estate under the console.


the actual shift mechanism , I'll have to figure out a location as there is only 6 feet of shift cable.
I’ll more than likely go with the OEM run.


Wayne

[This message has been edited by dobie1 (edited 05-12-2019).]

IP: Logged
PFF
System Bot
Sage
Member
Posts: 2901
From: USA
Registered: Nov 1999


Feedback score:    (14)
Leave feedback


Total ratings: 69
Rate this member

Report this Post05-12-2019 09:05 AM Click Here to See the Profile for SageSend a Private Message to SageEdit/Delete MessageReply w/QuoteDirect Link to This Post


WOW!
IP: Logged
dobie1
Member
Posts: 450
From: BC, Canada
Registered: Jun 2005


Feedback score: N/A
Leave feedback

Rate this member

Report this Post05-12-2019 09:39 PM Click Here to See the Profile for dobie1Send a Private Message to dobie1Edit/Delete MessageReply w/QuoteDirect Link to This Post
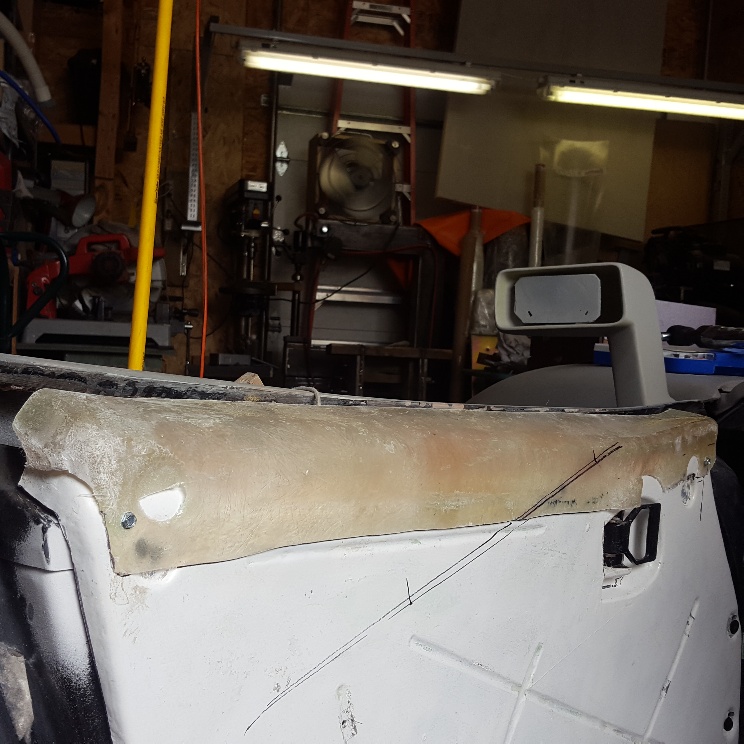
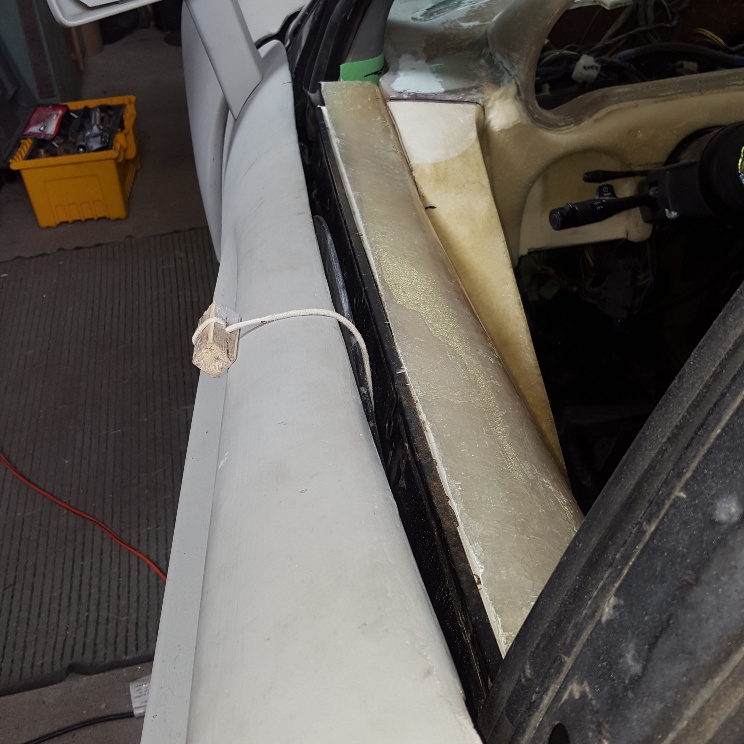
another busy day working on the interior.
One of the problems with the Pisa style kits is the fit of the door panels. When installed as per the OEM locations the top of the door panel leaves a 2" gap between the top of the outside door panel and the top o f the interior door card. This leaves an unsightly unfinished look.
A buddy of mine Don (Lindor) on Pennock's suggested that I build a fill and raise the inside to hide this. so I took the door cards and made a quick molds and made a cap that I secured temporarily. I'll need to glass it in permanently but I think it will work. I also secured the door arm for fitment to the dash and to check on the design flow.


Wayne
IP: Logged
RCR
Member
Posts: 4397
From: Shelby Twp Mi
Registered: Sep 2002


Feedback score:    (7)
Leave feedback


Total ratings: 102
Rate this member

Report this Post05-13-2019 06:51 AM Click Here to See the Profile for RCRSend a Private Message to RCREdit/Delete MessageReply w/QuoteDirect Link to This Post
Cruising right along, Wayne.


Bob
IP: Logged
dobie1
Member
Posts: 450
From: BC, Canada
Registered: Jun 2005


Feedback score: N/A
Leave feedback

Rate this member

Report this Post05-13-2019 10:39 PM Click Here to See the Profile for dobie1Send a Private Message to dobie1Edit/Delete MessageReply w/QuoteDirect Link to This Post
Thanks Sage and Bob for taking the time to follow ,you two know how much it takes to move the project along.

I find some days that I’m in the shop all day and there isn’t a lot to show. Today I pulled the center console to finish the fill between the top part of the dash and the console.
Also started to prepare the console to mold it so I can produce the carbon fiber console .
I am building a mold to do a vacuum infusion with the carbon fibre . I hope to take lots of pics of the process for those that might be interested.

Wayne
IP: Logged
shemdogg
Member
Posts: 1742
From: The Ghetto CA USA
Registered: Apr 2017


Feedback score: N/A
Leave feedback

Rate this member

Report this Post05-14-2019 12:03 AM Click Here to See the Profile for shemdoggSend a Private Message to shemdoggEdit/Delete MessageReply w/QuoteDirect Link to This Post
Thats a pretty sweet build you got there! Good call on the door panels, when I get to fabbing mine ill have to do the same. I had to fb my doors to bring them closer to the window also. Fb sucks man I know, lotsa time for little results but its gotta get done

shem
IP: Logged
dobie1
Member
Posts: 450
From: BC, Canada
Registered: Jun 2005


Feedback score: N/A
Leave feedback

Rate this member

Report this Post05-14-2019 10:24 AM Click Here to See the Profile for dobie1Send a Private Message to dobie1Edit/Delete MessageReply w/QuoteDirect Link to This Post
 
quote
Originally posted by shemdogg:

Thats a pretty sweet build you got there! Good call on the door panels, when I get to fabbing mine ill have to do the same. I had to fb my doors to bring them closer to the window also. Fb sucks man I know, lotsa time for little results but its gotta get done

shem


Thanks Shem,

One thing to consider when moving the door card height up is the metal bracket along the top we’re the panel lip slides into will also need to be raised. As well as an extension to the lip where the inside dew strip attaches to needs to come up, but that’s a week or so away from tackling that.

[This message has been edited by dobie1 (edited 05-14-2019).]

IP: Logged
dobie1
Member
Posts: 450
From: BC, Canada
Registered: Jun 2005


Feedback score: N/A
Leave feedback

Rate this member

Report this Post05-15-2019 10:49 PM Click Here to See the Profile for dobie1Send a Private Message to dobie1Edit/Delete MessageReply w/QuoteDirect Link to This Post
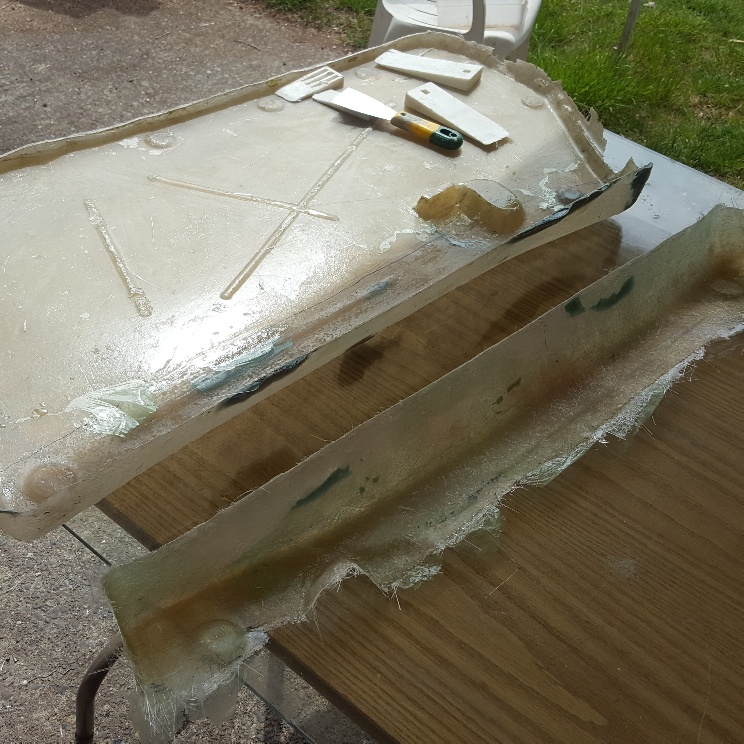
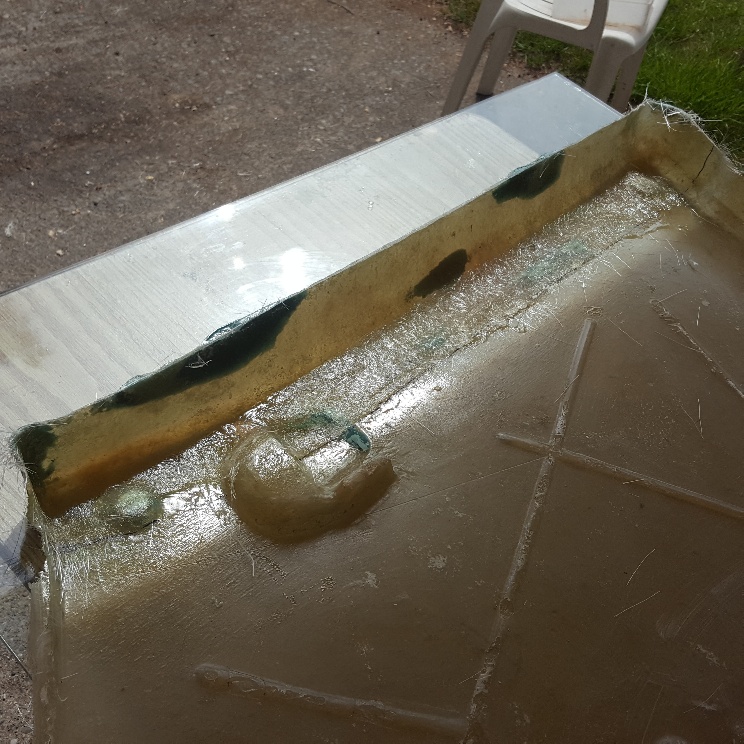
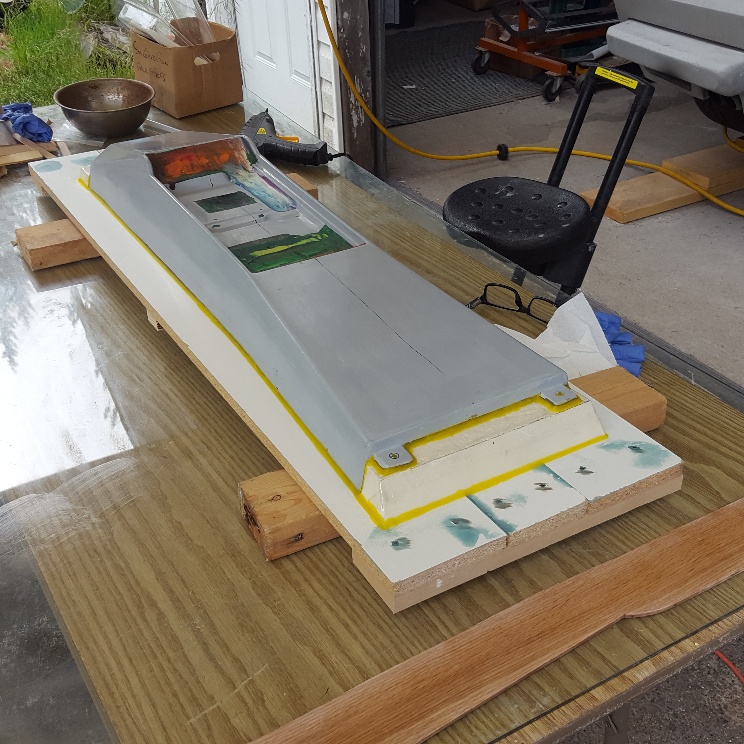
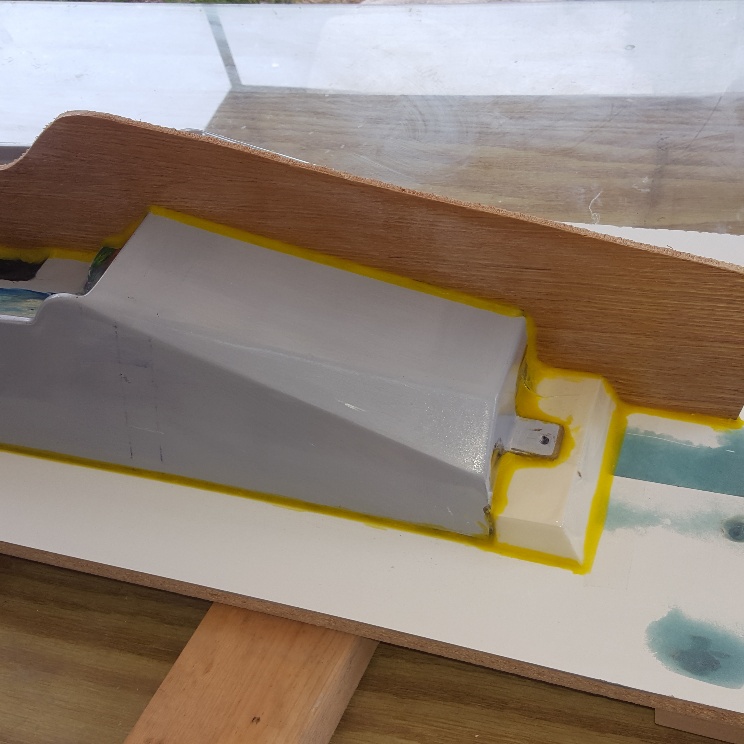
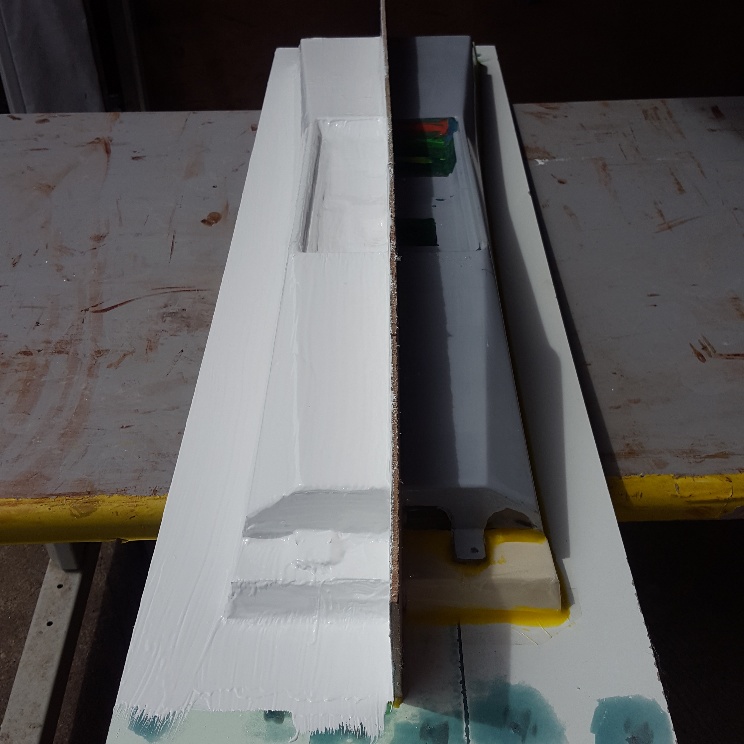
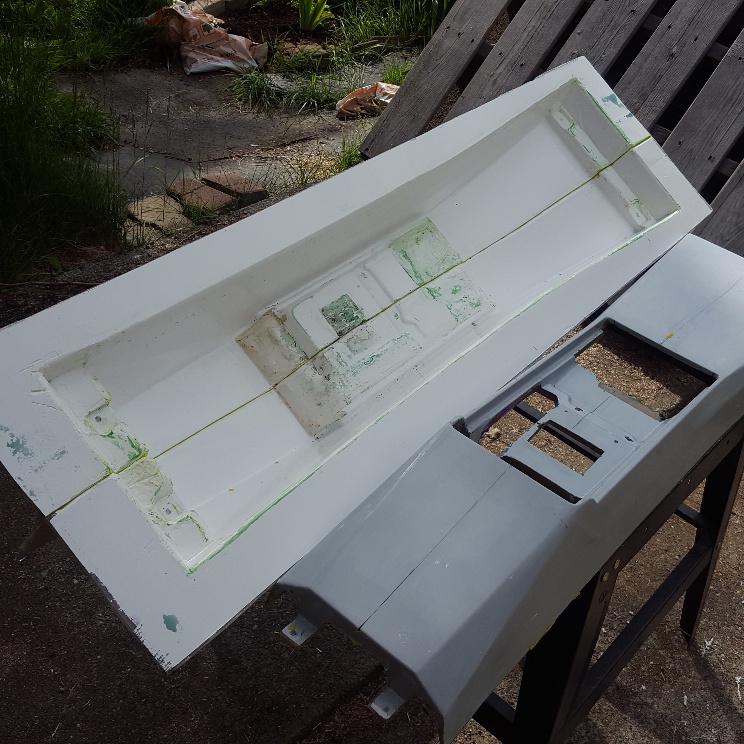
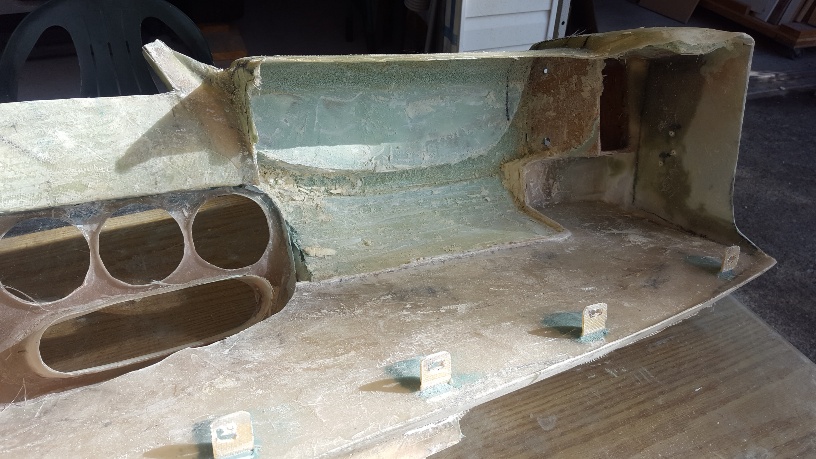
I'm not sure but I thought it might be of interest to show the building of a two part mold of the centre console, the mold I plan on using to produce the carbon fibre replacement. I'm by no means an expert and I'm still learning but showing the process might help others. I have been very fortunate to have been mentored by Don O.(Lindor).

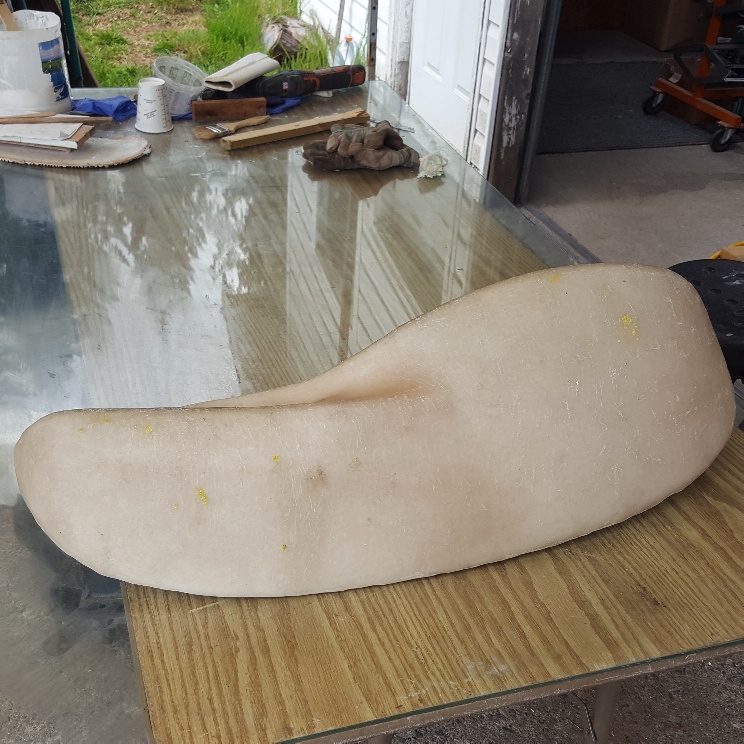
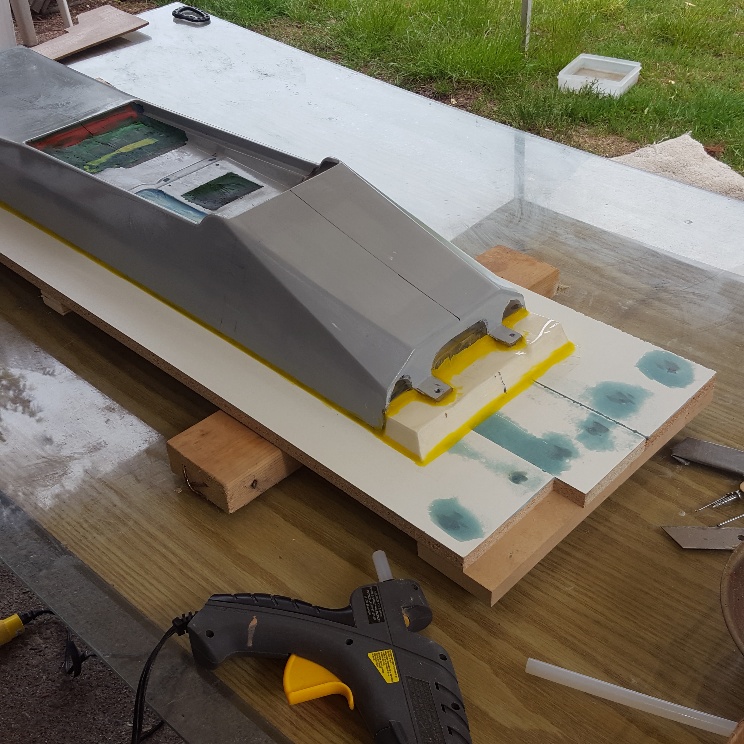
The first pictures show the console that is secured from beneath ,then using parting wax along edge to ensure the finish edge , and ensuring the fibreglass transition to the flat board has a good finish.


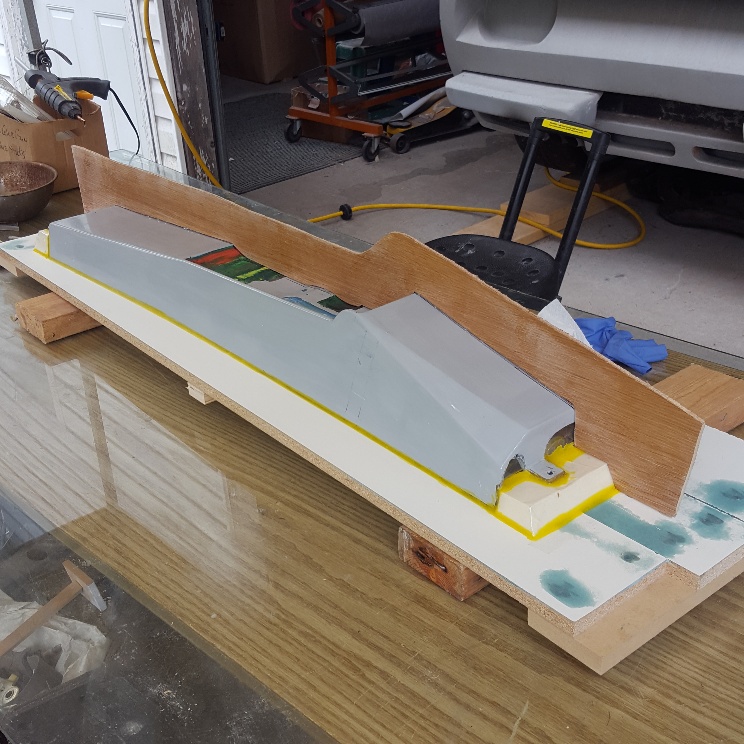
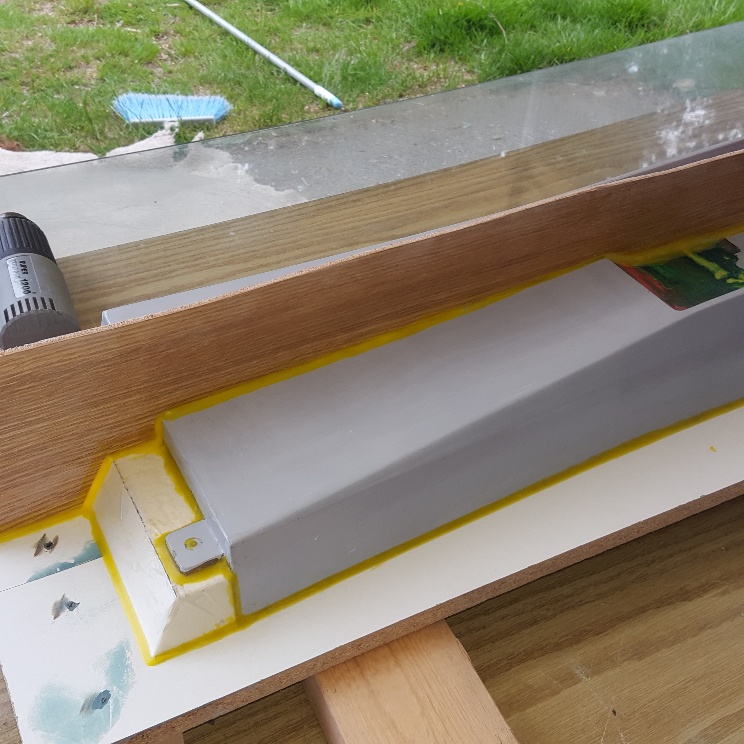
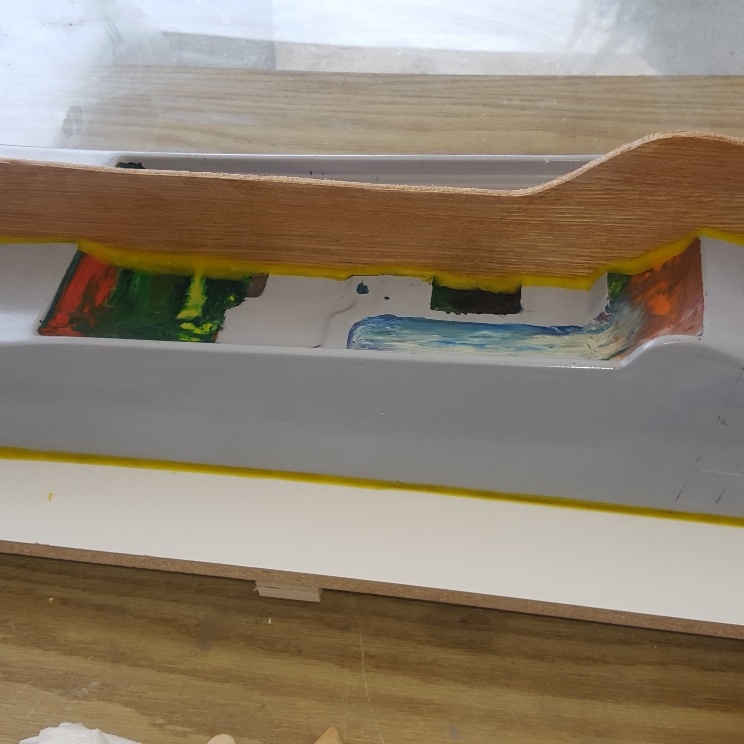
The next set are with the part down the centre creating the two part mold.


You'll notice parting wax along the base of the centre board to ensure a good parting line.
tomorrow I'll wax the one side and then spray with PVA. I plan on gell coat tomorrow.

Wayne
IP: Logged
dobie1
Member
Posts: 450
From: BC, Canada
Registered: Jun 2005


Feedback score: N/A
Leave feedback

Rate this member

Report this Post05-16-2019 11:33 PM Click Here to See the Profile for dobie1Send a Private Message to dobie1Edit/Delete MessageReply w/QuoteDirect Link to This Post
I was back at it again today , 5 coats of parting wax, and 3 layers of PVA 1 light coat and 2 heavier then a heavy coat of gelcoat.


I'm going away for the long weekend so I'll be back at it on Monday.
Wayne
IP: Logged
RCR
Member
Posts: 4397
From: Shelby Twp Mi
Registered: Sep 2002


Feedback score:    (7)
Leave feedback


Total ratings: 102
Rate this member

Report this Post05-17-2019 07:06 AM Click Here to See the Profile for RCRSend a Private Message to RCREdit/Delete MessageReply w/QuoteDirect Link to This Post
Great stuff, Wayne. Please keep us updated.

Have a great weekend.

Bob

PS, now I have a question.... Are you spraying the PVA and gel coat?

[This message has been edited by RCR (edited 05-17-2019).]

IP: Logged
dobie1
Member
Posts: 450
From: BC, Canada
Registered: Jun 2005


Feedback score: N/A
Leave feedback

Rate this member

Report this Post05-17-2019 09:07 AM Click Here to See the Profile for dobie1Send a Private Message to dobie1Edit/Delete MessageReply w/QuoteDirect Link to This Post
Good morning Bob!
answer to your question is I’m spraying the PVA easier to lay down a light coat on the first coat, I have a dedicated gun that
I just leave with PVA in.

Currently I’m using a brush to lay down the gel coat, I will be looking to get a gelcoat spray gun in a few months once I start to build the molds for the body.
Any updates on your build?
Wayne
IP: Logged
PFF
System Bot
shemdogg
Member
Posts: 1742
From: The Ghetto CA USA
Registered: Apr 2017


Feedback score: N/A
Leave feedback

Rate this member

Report this Post05-18-2019 12:13 AM Click Here to See the Profile for shemdoggSend a Private Message to shemdoggEdit/Delete MessageReply w/QuoteDirect Link to This Post
I got a cheapo gun from harbor freight to shoot gelcoat on my jetskis skiis. It needs to be thinned a bit but sprays fine. I use pam as a release or hvac tape.

shem
IP: Logged
dobie1
Member
Posts: 450
From: BC, Canada
Registered: Jun 2005


Feedback score: N/A
Leave feedback

Rate this member

Report this Post05-18-2019 11:52 AM Click Here to See the Profile for dobie1Send a Private Message to dobie1Edit/Delete MessageReply w/QuoteDirect Link to This Post
 
quote
Originally posted by shemdogg:

I got a cheapo gun from harbor freight to shoot gelcoat on my jetskis skiis. It needs to be thinned a bit but sprays fine. I use pam as a release or hvac tape.

shem


Hea Shem
Yea I was going to use a cheap gun, actually bought one 2.1 tip but way more clean up of the gun and a waste of expensive Acetone.
Using the cup system seams like a good way to go but the gun is expensive, the cups are cheap and disposable. Pam for a release interesting!
Wayne
IP: Logged
shemdogg
Member
Posts: 1742
From: The Ghetto CA USA
Registered: Apr 2017


Feedback score: N/A
Leave feedback

Rate this member

Report this Post05-19-2019 05:52 PM Click Here to See the Profile for shemdoggSend a Private Message to shemdoggEdit/Delete MessageReply w/QuoteDirect Link to This Post
Ive tried wax and pva and would always find a few areas that wouldnt release without motivation. The pam by far has worked the best for me but leaves that area tacky. The havc tape is perfect but is sometimes a biotch to get off. Unless you lay it w the adhesive side up, then it comes out great but you have to be careful of the tape moving.

Love the dash!

shem
IP: Logged
dobie1
Member
Posts: 450
From: BC, Canada
Registered: Jun 2005


Feedback score: N/A
Leave feedback

Rate this member

Report this Post05-20-2019 10:37 AM Click Here to See the Profile for dobie1Send a Private Message to dobie1Edit/Delete MessageReply w/QuoteDirect Link to This Post
Hi Shem
Yes I’ve used the HVAC tape before when I was using the Fiero engine vents as a buck for the vents I made that go under the rear fenders. It works ok but as you say very finicky to remove.
I just found your build and am reading up on your journey, nice find and good job.

Wayne
IP: Logged
dobie1
Member
Posts: 450
From: BC, Canada
Registered: Jun 2005


Feedback score: N/A
Leave feedback

Rate this member

Report this Post05-20-2019 10:26 PM Click Here to See the Profile for dobie1Send a Private Message to dobie1Edit/Delete MessageReply w/QuoteDirect Link to This Post

dobie1

450 posts
Member since Jun 2005
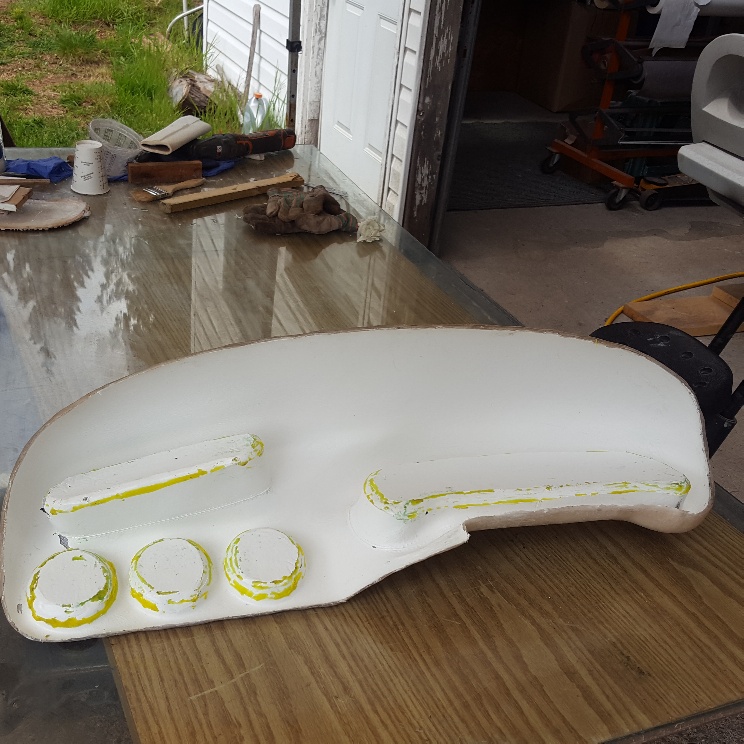
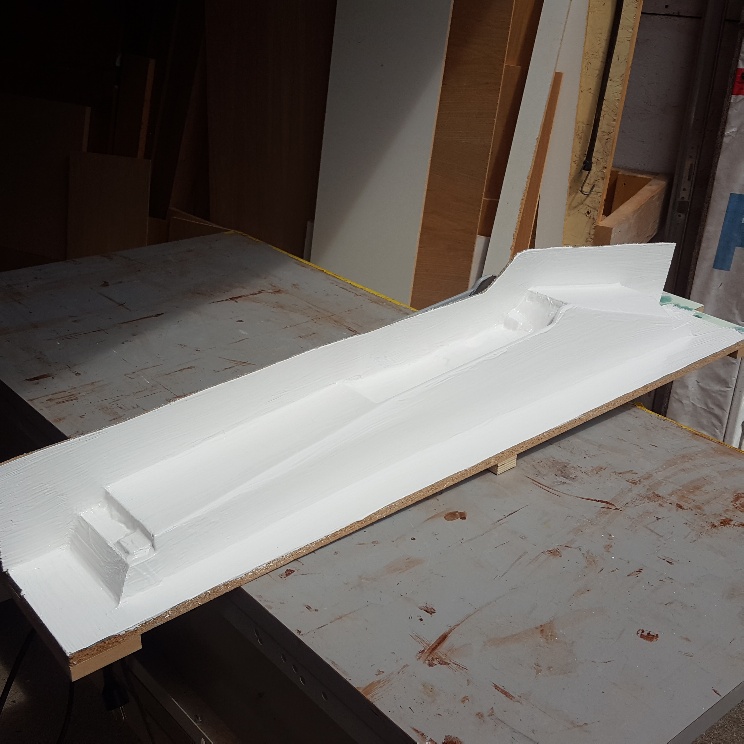
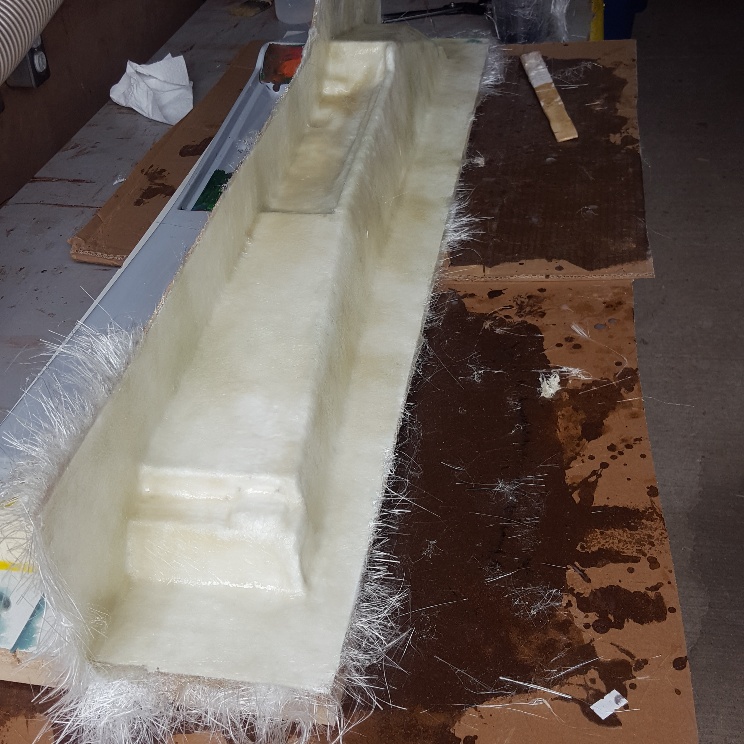
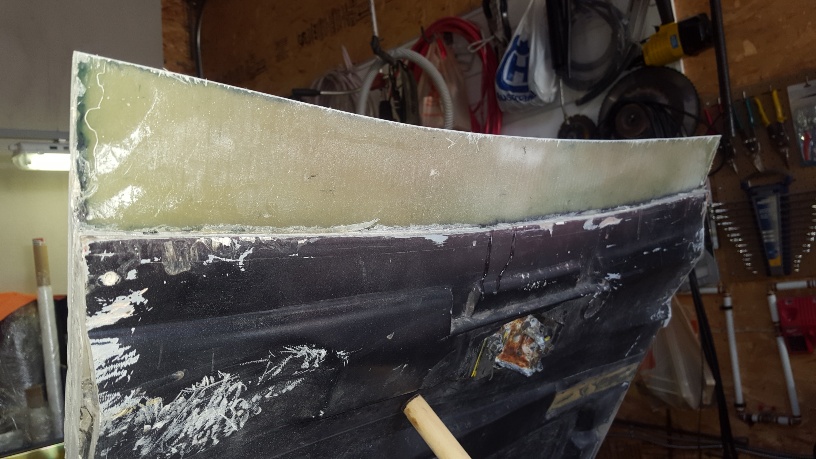
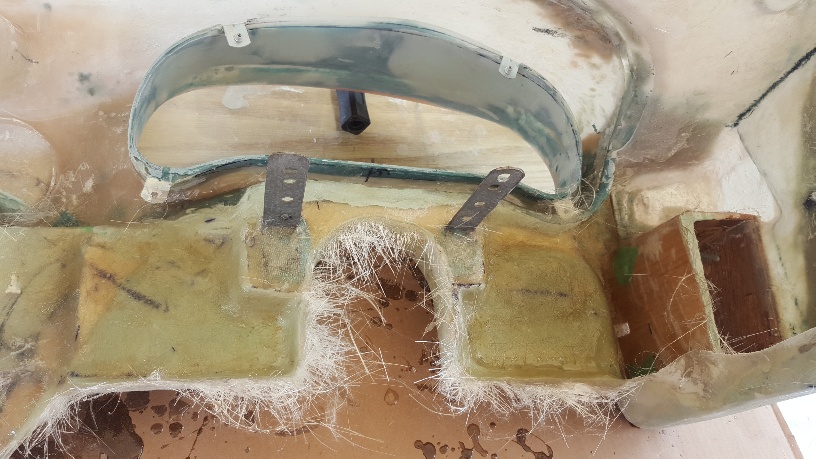
I spent a couple hours today Fibreglassing.
The first picture is with only 1 layer of 1 oz mat. I used the lighter weight glass as there are a couple areas that I needed to ensure the glass was laid and adhered to capture the tight edge. It didn't really lay correctly until the resin started to kick. and having a nice 1/4" roller really helped to keep everything bonding without any voids.

Wayne


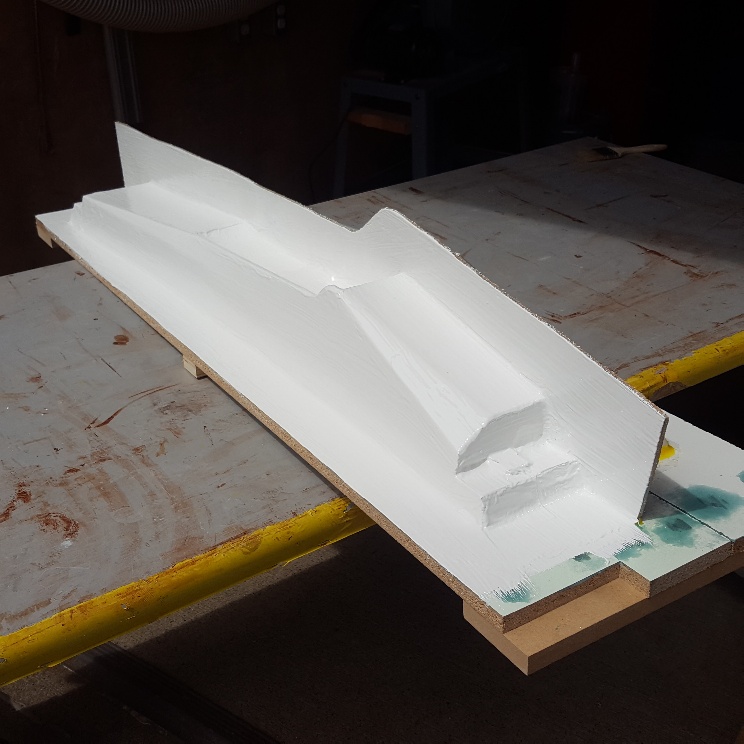
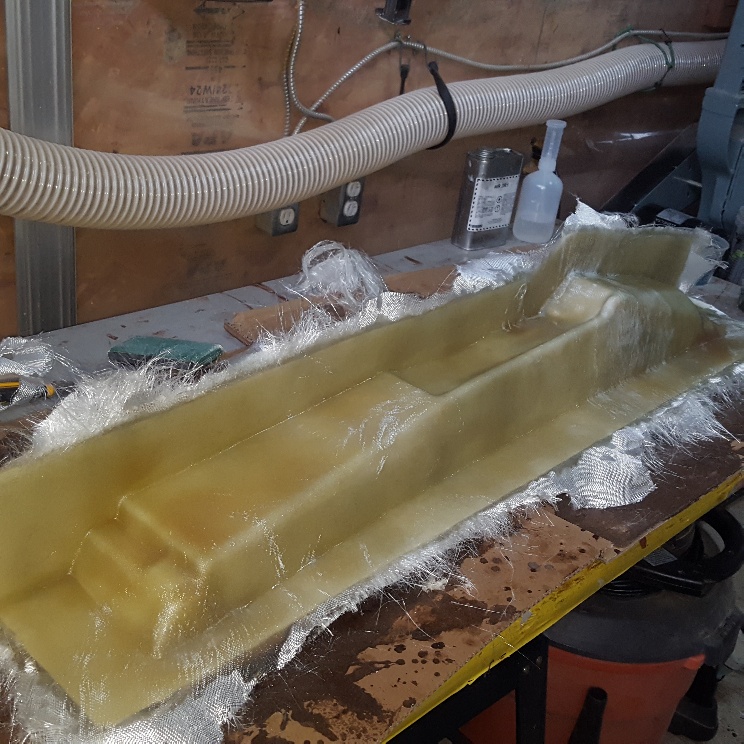
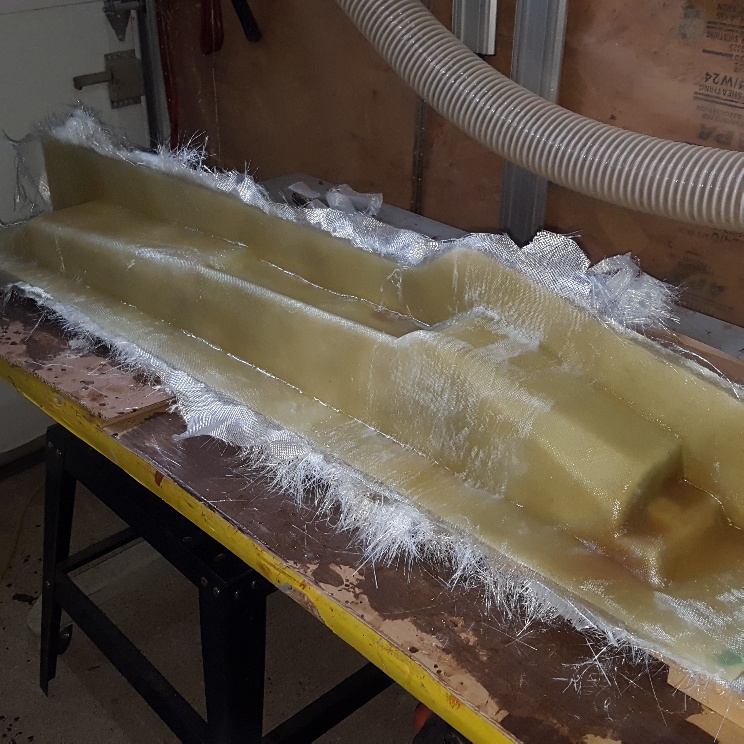
The next two pics are with 4 more layers of 1 1/2oz mat, then 1 layer of 6oz E glass, the E Glass will give me a bit more strength and finish. I'll leave it for a day then clean up the edges and also to make sure it is cured before I do the other side.


IP: Logged
dobie1
Member
Posts: 450
From: BC, Canada
Registered: Jun 2005


Feedback score: N/A
Leave feedback

Rate this member

Report this Post05-24-2019 11:30 PM Click Here to See the Profile for dobie1Send a Private Message to dobie1Edit/Delete MessageReply w/QuoteDirect Link to This Post
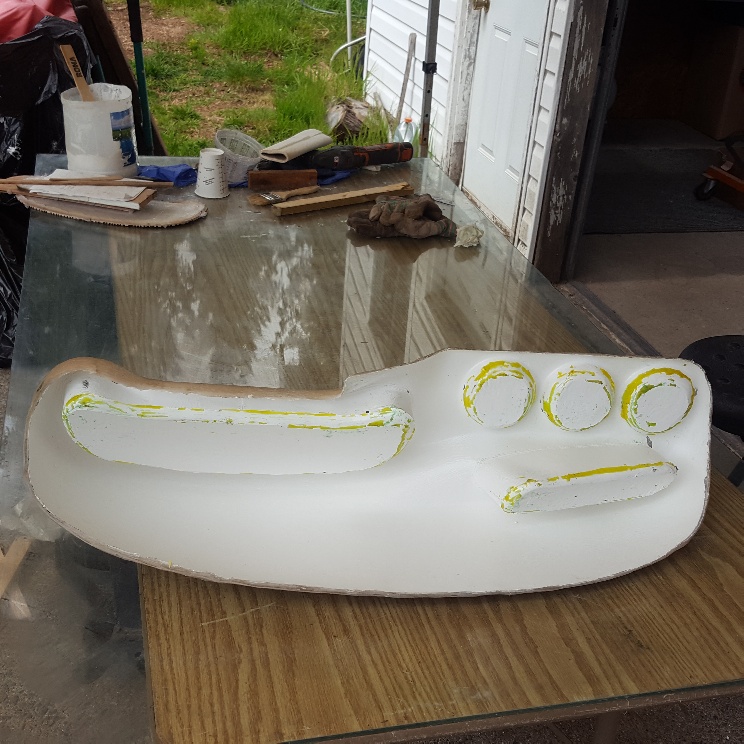
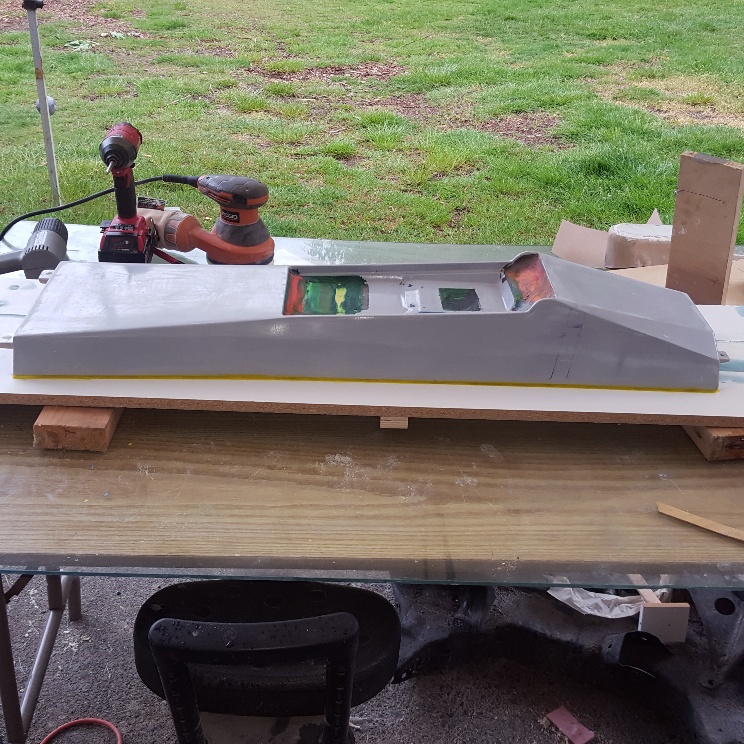
I have been busy the last few days but was able to finish the mold ,I plan on leaving it to cure for a week before proceeding to do the vacuum bagging of the carbon fibre console .
The mold came out pretty good need to clean it up and prep it . One thing that I want to mention when building a multi part mold is to ensure that before you remove the mold from the buck ensure you drill holes along the the parting wall to ensure alignment of the two halves.


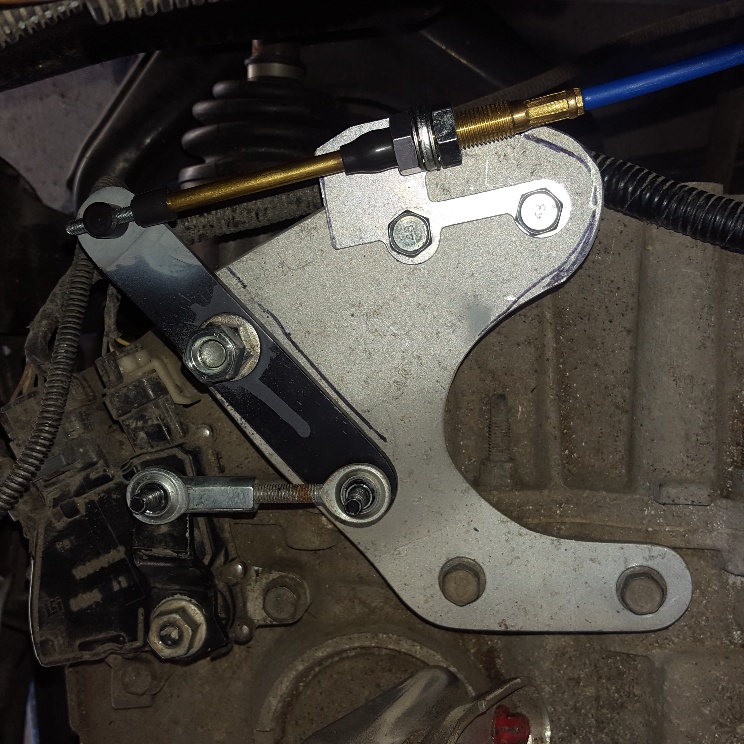
While I was waiting for everything to dry I started to install the new push button shifter, I removed all the OEM automatic shifting cables and shifter.
and modified the shift plate that I had gotten for the 3800 SC with a 4T65E install.
I haven't decided entirely where I"m putting the GSM (Gear Shift Module).


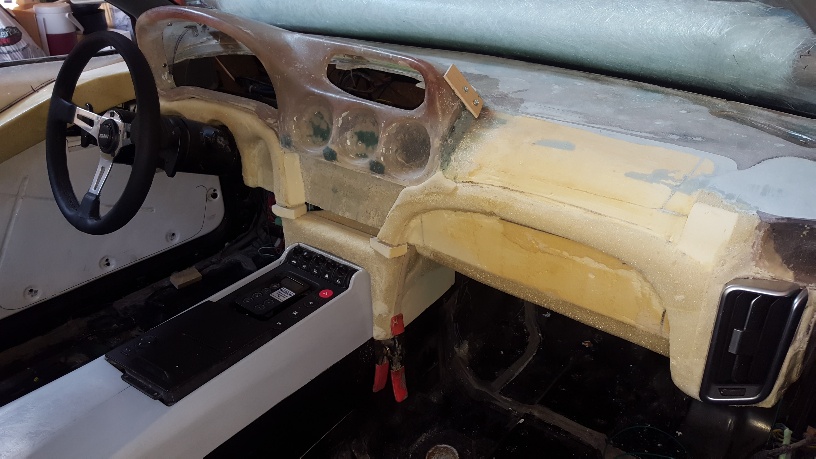
I was playing with the dash today, lots to do but starting to come together. Let me know what you think ?
Always looking for constructive ideas or critiques.


Wayne

[This message has been edited by dobie1 (edited 05-24-2019).]

IP: Logged
dobie1
Member
Posts: 450
From: BC, Canada
Registered: Jun 2005


Feedback score: N/A
Leave feedback

Rate this member

Report this Post05-30-2019 11:05 PM Click Here to See the Profile for dobie1Send a Private Message to dobie1Edit/Delete MessageReply w/QuoteDirect Link to This Post
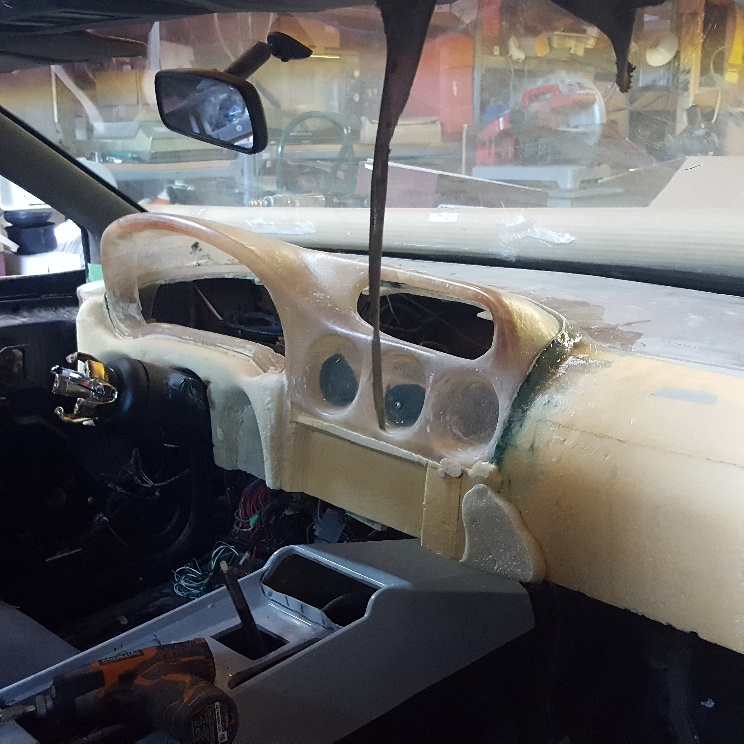
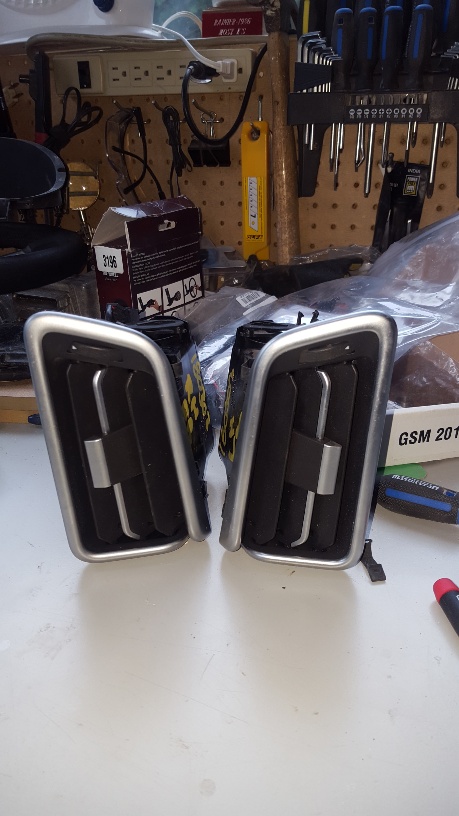
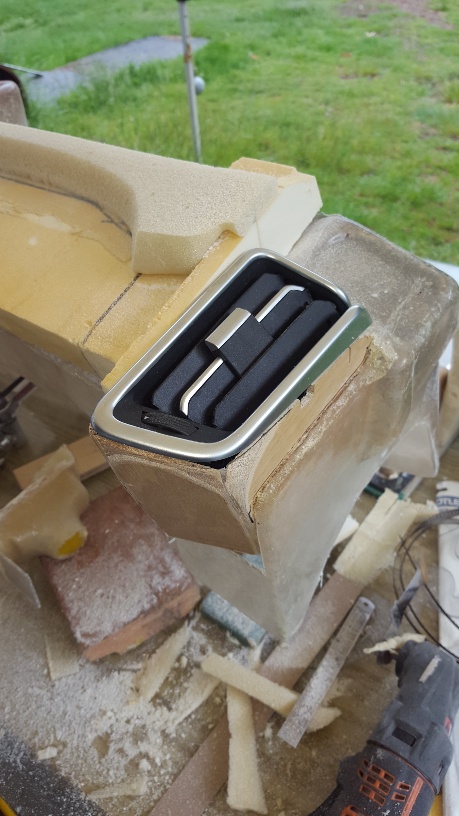
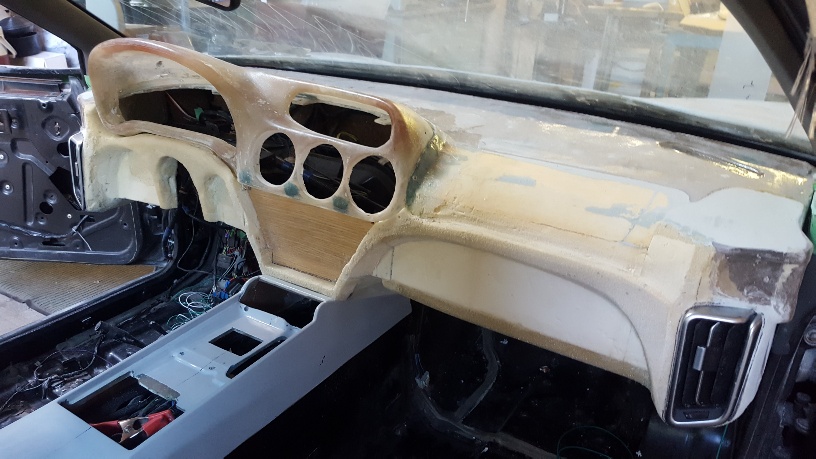
Here is a bit of a update on the dash build.
I've been working on the dash side vents over the last week , i had found a set of Maserati vents that I liked and was able to pick them up a a really good price. I built light ply containment boxes that house the vents , the boxes are buried in the dash foam.


I continued working on the dash design its getting closer to completion ,the glove box i'll cut out after I fibreglass the dash.
I hope to Rondo the foam next week to firm up the surface use some light bondo for final shaping before I fibreglass the whole dash.


Wayne

[This message has been edited by dobie1 (edited 05-30-2019).]

IP: Logged
RCR
Member
Posts: 4397
From: Shelby Twp Mi
Registered: Sep 2002


Feedback score:    (7)
Leave feedback


Total ratings: 102
Rate this member

Report this Post05-31-2019 06:58 AM Click Here to See the Profile for RCRSend a Private Message to RCREdit/Delete MessageReply w/QuoteDirect Link to This Post


Bob
IP: Logged
shemdogg
Member
Posts: 1742
From: The Ghetto CA USA
Registered: Apr 2017


Feedback score: N/A
Leave feedback

Rate this member

Report this Post06-01-2019 09:03 AM Click Here to See the Profile for shemdoggSend a Private Message to shemdoggEdit/Delete MessageReply w/QuoteDirect Link to This Post
Looking good sir!

shem
IP: Logged
dobie1
Member
Posts: 450
From: BC, Canada
Registered: Jun 2005


Feedback score: N/A
Leave feedback

Rate this member

Report this Post06-14-2019 12:09 AM Click Here to See the Profile for dobie1Send a Private Message to dobie1Edit/Delete MessageReply w/QuoteDirect Link to This Post
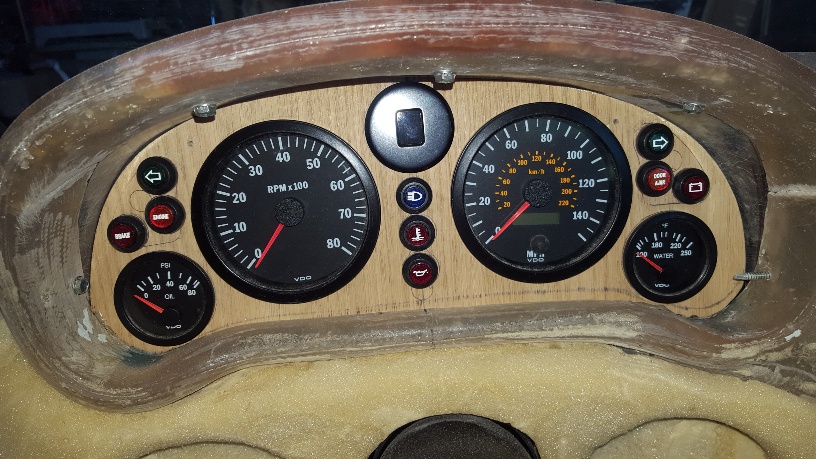
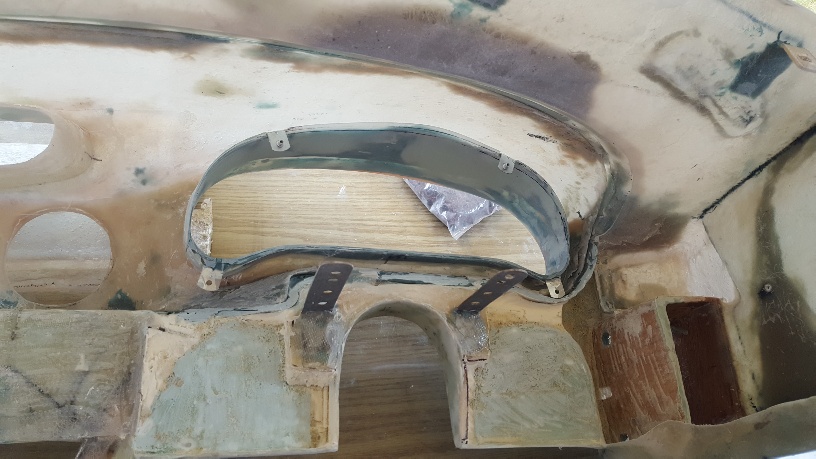
A bit of a update, I have been working on the build in-between family obligations.
I'm taking a bit of a break on the dash build ,letting my brain do some thinking on the design.
I did a mockup of the proposed instrument gauge placement before I build one of carbon fibre.


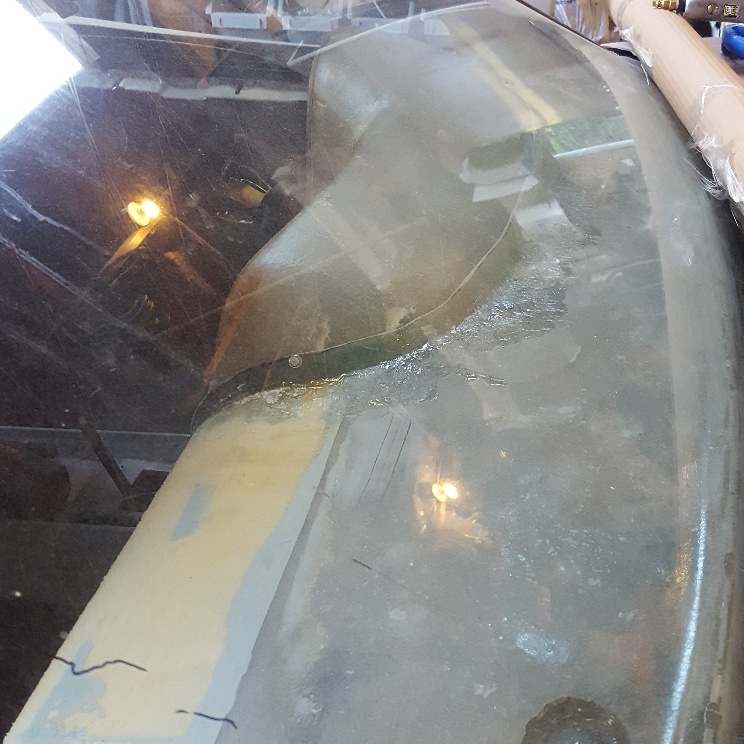
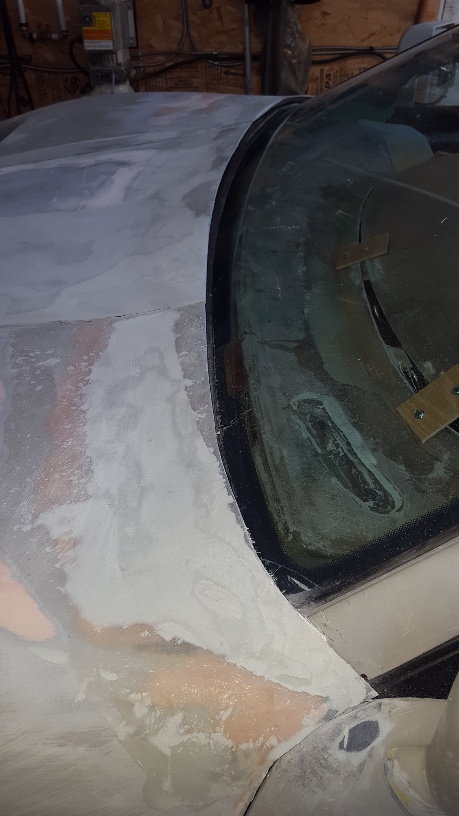
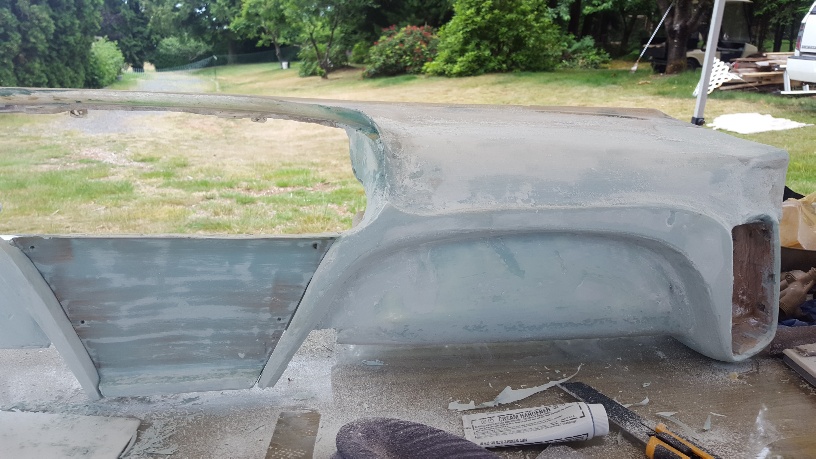
I was never happy with the fitment of the fender and hood from the original 308 kit ,I never thought it covered the front compartment toward the windscreen far enough. It worked for the fiero and the original 308 kit’s hood was glued onto the fiero hood ,but I thought it should have covered the rubber seal at the base of the windshield. During my break I decided to work on extending the fenders and hood to cover that area. I added 3"s to all three panels and at the same time adjusted and leveled (added bondo ) to the overall fit .I’ll get the gaps cleaned up before I prime. And get the front end panels ready for producing the molds, and ultimately producing new light weight ones.


I'm happy with the fit and length ,and they all lineup!!!


I will take the Dash out again and get to the wiring to get all the runs completed and bundled and try to clean up the rats nest.

Wayne

[This message has been edited by dobie1 (edited 06-14-2019).]

IP: Logged
PFF
System Bot
RCR
Member
Posts: 4397
From: Shelby Twp Mi
Registered: Sep 2002


Feedback score:    (7)
Leave feedback


Total ratings: 102
Rate this member

Report this Post06-14-2019 07:51 PM Click Here to See the Profile for RCRSend a Private Message to RCREdit/Delete MessageReply w/QuoteDirect Link to This Post
Wipers??

Bob
IP: Logged
dobie1
Member
Posts: 450
From: BC, Canada
Registered: Jun 2005


Feedback score: N/A
Leave feedback

Rate this member

Report this Post06-14-2019 10:11 PM Click Here to See the Profile for dobie1Send a Private Message to dobie1Edit/Delete MessageReply w/QuoteDirect Link to This Post
Hi Bob
Yes , I’ll modify if It needs similar to to cuts in the real Ferrari hood.
Thanks for the feedback though, much appreciated.
Wayne
IP: Logged
RCR
Member
Posts: 4397
From: Shelby Twp Mi
Registered: Sep 2002


Feedback score:    (7)
Leave feedback


Total ratings: 102
Rate this member

Report this Post06-15-2019 07:07 AM Click Here to See the Profile for RCRSend a Private Message to RCREdit/Delete MessageReply w/QuoteDirect Link to This Post

Do you have a before picture? I'm curious if your fenders/hood were that much different than mine.
My hood sets back like the original Fiero hood, but the fenders go up to the A-pillars.

Bob

PS: what ever happened to that other 308 t-top you bought? I was looking back at your posts and noticed it.

[This message has been edited by RCR (edited 06-15-2019).]

IP: Logged
dobie1
Member
Posts: 450
From: BC, Canada
Registered: Jun 2005


Feedback score: N/A
Leave feedback

Rate this member

Report this Post06-15-2019 10:57 AM Click Here to See the Profile for dobie1Send a Private Message to dobie1Edit/Delete MessageReply w/QuoteDirect Link to This Post
Hi Bob
I sould have taken a pic , I’ve looked through my pics and I never really took one of that area??? If you go to page 2 there is one shot when I’m doing the fender vertical trunk supports that sort of shows the where the fender ends at the beginning of the big rubber moulding. I’ve just covered it to the end more like OEM, which I may have to do the OEM cutouts if there is.a problem.

As for the T-roof 308, a supposed friend Frank Dunlop that had been working on my car, was going to install the T-roof in my car in return for rescuing a bunch of Lamborghini parts for him in North Carolina on top of that I paid a lot of money to him seems to have ripped me off. Keeping the Troof 308 and equipment and has gone dark!! Enough said

Wayne

IP: Logged
dobie1
Member
Posts: 450
From: BC, Canada
Registered: Jun 2005


Feedback score: N/A
Leave feedback

Rate this member

Report this Post06-19-2019 10:46 PM Click Here to See the Profile for dobie1Send a Private Message to dobie1Edit/Delete MessageReply w/QuoteDirect Link to This Post
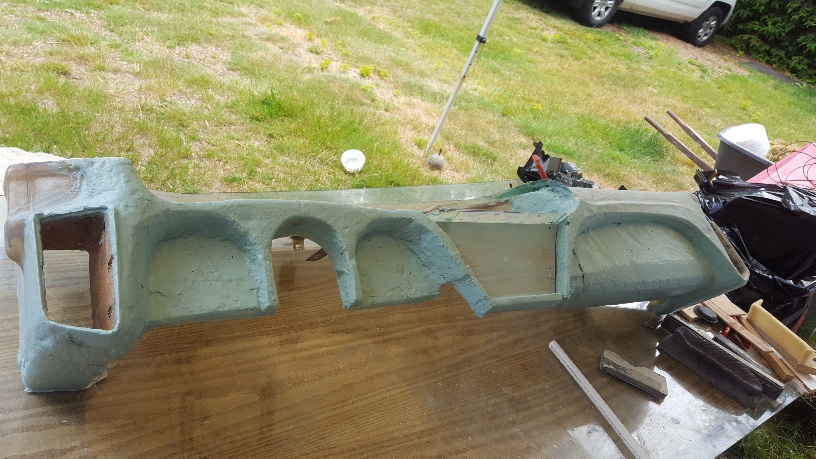
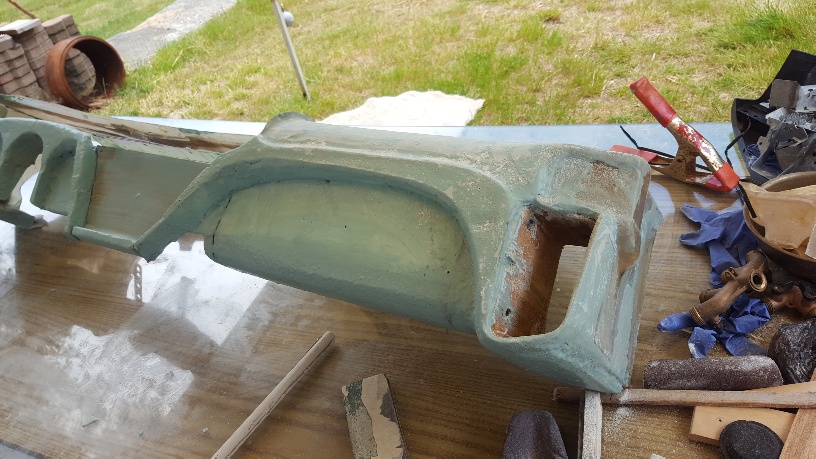
I have been back at work on the dash and after a lot of head scratching and a couple drinks come to the final design. Don O has gave me his input on the design and I think I'm happy with the final rendition.


the next series is after a couple changes to the centre consul area, once the design was finished I
tried a procedure that I've seen on Youtube called Rondel ( Resin and Bondo ) mixed together
into a milkshake consistency and painted onto the foam . It is great way to protect the substrate that I then
applied light weight body filler to come up with a great even finish, to which I will next add a layer of fibreglass to .


Wayne

[This message has been edited by dobie1 (edited 06-19-2019).]

IP: Logged
dobie1
Member
Posts: 450
From: BC, Canada
Registered: Jun 2005


Feedback score: N/A
Leave feedback

Rate this member

Report this Post06-28-2019 11:33 PM Click Here to See the Profile for dobie1Send a Private Message to dobie1Edit/Delete MessageReply w/QuoteDirect Link to This Post
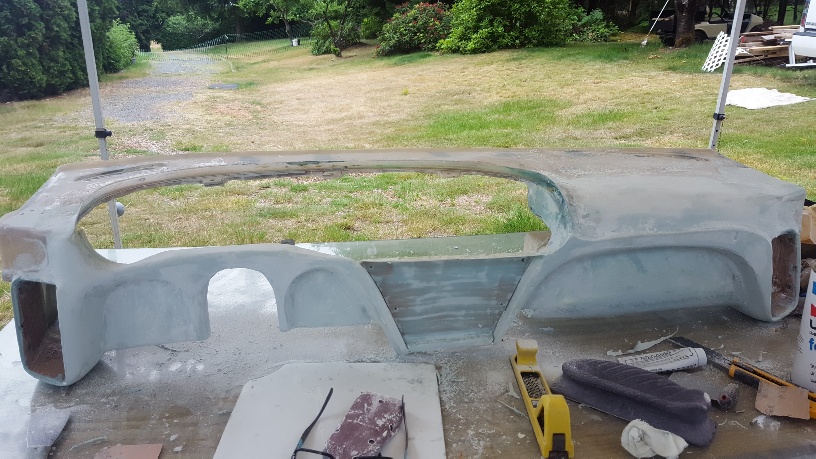
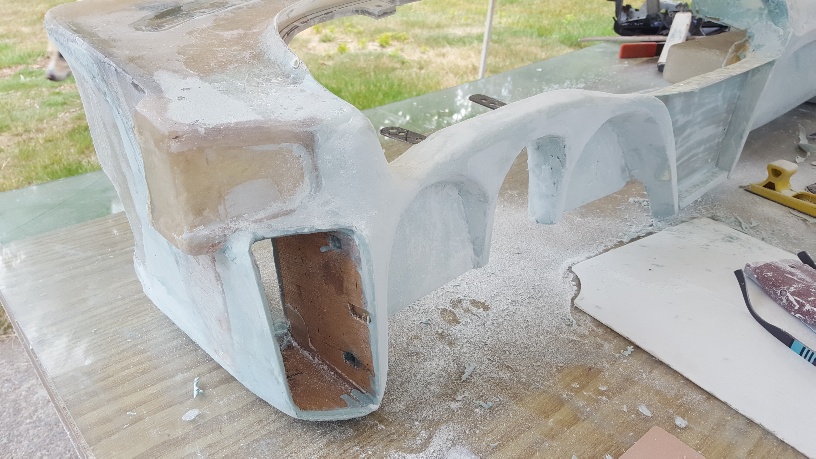
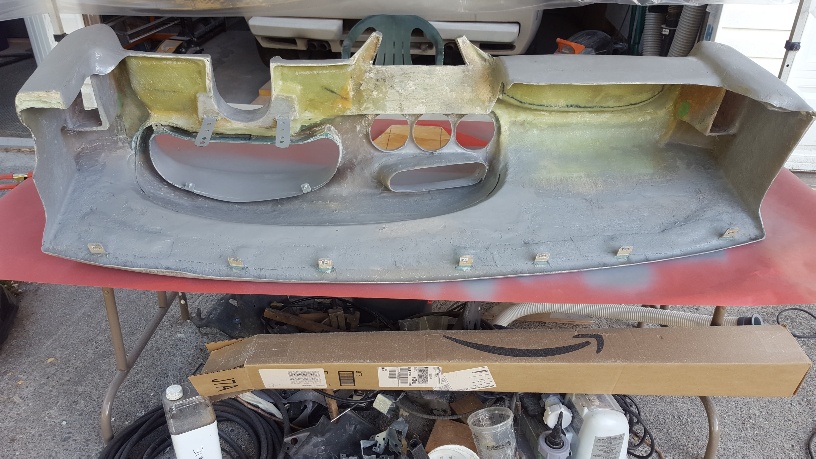
The build on the dash is going well, the actual construction is now completed . I have taken out all the foam and cleaned up all the lines and fibreglassed two layers of glass making everything one unit.
I added 4 layer in the glove box door area to give me some thickness .


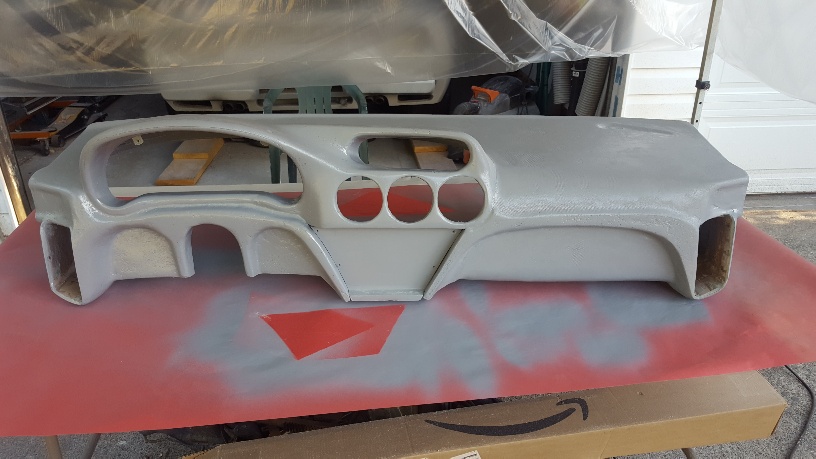
I sanded the whole dash today and will be spaying the dash with a epoxy primer which will give me a good base for the final finish.

I'll post some pics soon of the primer dash.
Wayne
IP: Logged
dobie1
Member
Posts: 450
From: BC, Canada
Registered: Jun 2005


Feedback score: N/A
Leave feedback

Rate this member

Report this Post06-30-2019 11:46 PM Click Here to See the Profile for dobie1Send a Private Message to dobie1Edit/Delete MessageReply w/QuoteDirect Link to This Post
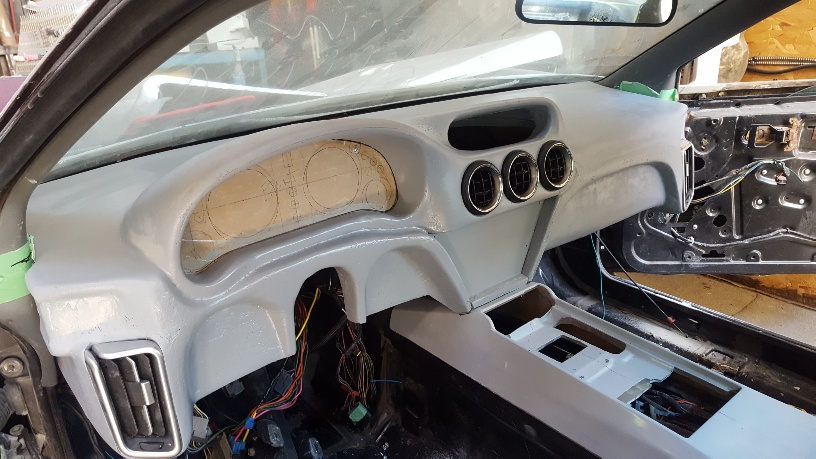
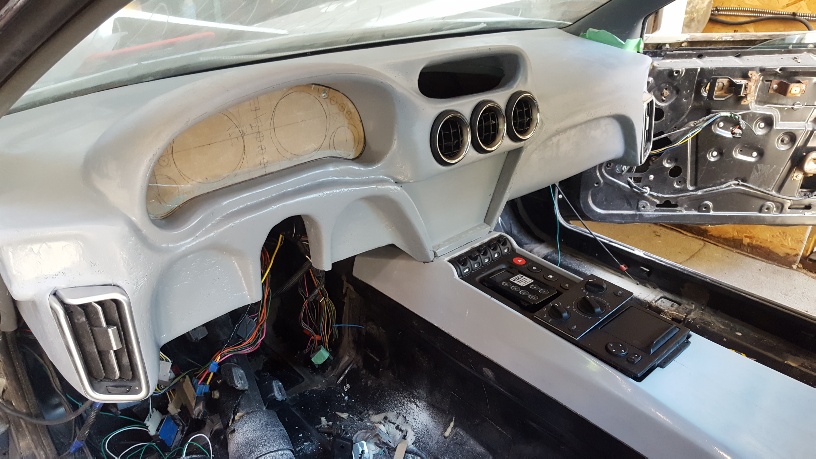
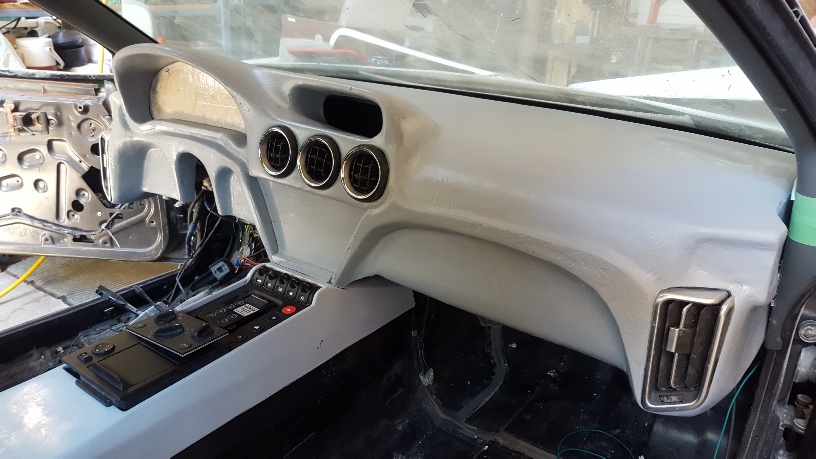
Priming the dash sure gives it a completed look, I'm quite happy with the look!!
I started today doing a final fitment check of the dash in the car, everything fits as it is supposed to so on to installing the HVAC system into the dash.


I'll post more pics of the HVAC install in a couple days
Wayne
IP: Logged
MinnGreenGT
Member
Posts: 11545
From: Lakeville, MN 55044
Registered: Jul 2001


Feedback score: (1)
Leave feedback


Total ratings: 274
Rate this member

Report this Post07-01-2019 08:19 AM Click Here to See the Profile for MinnGreenGTClick Here to visit MinnGreenGT's HomePageSend a Private Message to MinnGreenGTEdit/Delete MessageReply w/QuoteDirect Link to This Post
Wow! Yeah... that primer really pulled it all together!
IP: Logged
shemdogg
Member
Posts: 1742
From: The Ghetto CA USA
Registered: Apr 2017


Feedback score: N/A
Leave feedback

Rate this member

Report this Post07-01-2019 09:57 PM Click Here to See the Profile for shemdoggSend a Private Message to shemdoggEdit/Delete MessageReply w/QuoteDirect Link to This Post
Bro that looks awesome!

shem
IP: Logged
This thread has been moved here: The Construction Zone.
Previous Page | Next Page

This topic is 7 pages long:  1   2   3   4   5   6   7 
next newest topic | next oldest topic

All times are ET (US)

Post New Topic  
Hop to:

Contact Us | Back To Main Page

Advertizing on PFF | Fiero Parts Vendors
PFF Merchandise | Fiero Gallery | Ogre's Cave
Real-Time Chat | Fiero Related Auctions on eBay


Copyright (c) 1999, C. Pennock