Thread Closed  Topic Closed
  Pennock's Fiero Forum
  General Fiero Chat
  Ferrari 288GTO build (Page 5)

Post New Topic  

Printable Version

This topic is 7 pages long:  1   2   3   4   5   6   7 
Previous Page | Next Page
next newest topic | next oldest topic
This thread has been moved here: The Construction Zone.
Ferrari 288GTO build by dobie1
Started on: 08-31-2014 11:18 PM
Replies: 274 (12977 views)
Last post by: dobie1 on 12-30-2019 10:35 PM
dobie1
Member
Posts: 451
From: BC, Canada
Registered: Jun 2005


Feedback score: N/A
Leave feedback

Rate this member

Report this Post05-24-2017 10:54 AM Click Here to See the Profile for dobie1Send a Private Message to dobie1Edit/Delete MessageReply w/QuoteDirect Link to This Post
http://i36.photobucket.com/...ized_zpshv28jpog.jpg

Wow a new page.
Bob the wheels are 19x8 on the front and 19x10 on the rear. I agree with getting a front wide track suspension for all kinds of reasons.
The back has already been widened 3" on both sides with no spacers. The rear rotors are from a Ferrari 550 with 550 Brembo brakes
The rotor design has a fairly deep wheel hub so adding 1" spacer wouldn't look to differant. This would leave the wheel about 1/2" away from the wheel well lip at the top Which I think is perfect. At the front of the rear wheel well due to the lower scoop there would be more space.

[This message has been edited by dobie1 (edited 05-24-2017).]

IP: Logged
Fieromaineac
Member
Posts: 234
From: Kittery, Maine USA
Registered: Jun 2003


Feedback score: N/A
Leave feedback

Rate this member

Report this Post05-26-2017 03:03 PM Click Here to See the Profile for FieromaineacSend a Private Message to FieromaineacEdit/Delete MessageReply w/QuoteDirect Link to This Post
dobie1
Where did you find those louvers on your rear deck?
Dana
IP: Logged
dobie1
Member
Posts: 451
From: BC, Canada
Registered: Jun 2005


Feedback score: N/A
Leave feedback

Rate this member

Report this Post05-27-2017 10:22 AM Click Here to See the Profile for dobie1Send a Private Message to dobie1Edit/Delete MessageReply w/QuoteDirect Link to This Post
The rear deck louvers are made by a buddy of mine.

IP: Logged
Fieromaineac
Member
Posts: 234
From: Kittery, Maine USA
Registered: Jun 2003


Feedback score: N/A
Leave feedback

Rate this member

Report this Post05-29-2017 11:16 AM Click Here to See the Profile for FieromaineacSend a Private Message to FieromaineacEdit/Delete MessageReply w/QuoteDirect Link to This Post
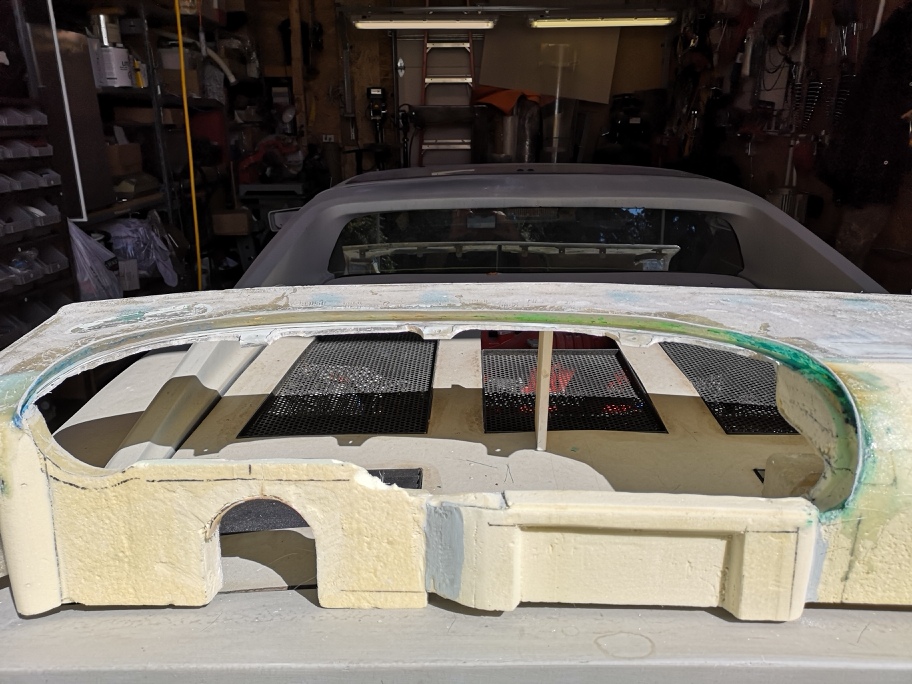
Dobie1,
I see the other rear deck openings are covered with a mesh. Will your buddy be building louvers for those openings? Just my opinion, I think louvers look more OME . . . . .
Dana
IP: Logged
dobie1
Member
Posts: 451
From: BC, Canada
Registered: Jun 2005


Feedback score: N/A
Leave feedback

Rate this member

Report this Post05-29-2017 11:00 PM Click Here to See the Profile for dobie1Send a Private Message to dobie1Edit/Delete MessageReply w/QuoteDirect Link to This Post
Yes there will be lovers covering over the mess below for the final production! good eye your the first person to have noticed that.

Wayne
IP: Logged
dobie1
Member
Posts: 451
From: BC, Canada
Registered: Jun 2005


Feedback score: N/A
Leave feedback

Rate this member

Report this Post08-21-2017 10:34 AM Click Here to See the Profile for dobie1Send a Private Message to dobie1Edit/Delete MessageReply w/QuoteDirect Link to This Post
In the interest of giving credit where credit is due I want to say that the changes and current finish to the design of the car where completed entirely buy Frank Dunlop. We brainstormed back and forth on the design but he did all the work. I think he did a fantastic job. Thank you Frank!
,
I plan on finishing the car as soon as time allows.

[This message has been edited by dobie1 (edited 08-24-2017).]

IP: Logged
dobie1
Member
Posts: 451
From: BC, Canada
Registered: Jun 2005


Feedback score: N/A
Leave feedback

Rate this member

Report this Post09-30-2018 07:48 PM Click Here to See the Profile for dobie1Send a Private Message to dobie1Edit/Delete MessageReply w/QuoteDirect Link to This Post
Well its been awhile but I've finally completed all the reno's I need on the house.
So on with the build, I've had the car down having an inspection done on it so it will be road safe once its finished.
My first order of business is the interior getting the dash modified and hopefully using the 550 dash pod I got from Riceburner.
Ill update as soon as I have something.

Wayne
IP: Logged
RCR
Member
Posts: 4397
From: Shelby Twp Mi
Registered: Sep 2002


Feedback score:    (7)
Leave feedback


Total ratings: 102
Rate this member

Report this Post09-30-2018 08:23 PM Click Here to See the Profile for RCRSend a Private Message to RCREdit/Delete MessageReply w/QuoteDirect Link to This Post
Welcome back, Wayne.


Bob
IP: Logged
dobie1
Member
Posts: 451
From: BC, Canada
Registered: Jun 2005


Feedback score: N/A
Leave feedback

Rate this member

Report this Post10-10-2018 05:25 PM Click Here to See the Profile for dobie1Send a Private Message to dobie1Edit/Delete MessageReply w/QuoteDirect Link to This Post
Thanks Bob
looking forward to getting back on the project, its been too long.
wayne
IP: Logged
cvxjet
Member
Posts: 3643
From: ca, usa
Registered: May 2010


Feedback score: (1)
Leave feedback

Rate this member

Report this Post10-11-2018 12:27 PM Click Here to See the Profile for cvxjetSend a Private Message to cvxjetEdit/Delete MessageReply w/QuoteDirect Link to This Post
First off, that kit has very good proportions....Looking carefully, someone who knows the real GTO will notice differences, but it still looks good and cohesive.

Second, on your front wheels, don't get wheels with more negative offset- That will increase your scrub radius. Instead, have custom A-arms made that move the spindle (And wheel) out. Arraut used to make them but they have gone under apparently....There are other custom operations that can make them to your specs.
IP: Logged
dobie1
Member
Posts: 451
From: BC, Canada
Registered: Jun 2005


Feedback score: N/A
Leave feedback

Rate this member

Report this Post10-11-2018 08:10 PM Click Here to See the Profile for dobie1Send a Private Message to dobie1Edit/Delete MessageReply w/QuoteDirect Link to This Post
 
quote
Originally posted by cvxjet:

First off, that kit has very good proportions....Looking carefully, someone who knows the real GTO will notice differences, but it still looks good and cohesive.

Second, on your front wheels, don't get wheels with more negative offset- That will increase your scrub radius. Instead, have custom A-arms made that move the spindle (And wheel) out. Arraut used to make them but they have gone under apparently....There are other custom operations that can make them to your specs.


Thanks cvxjet for the positive comment, as for having custom "A"arms yes that is the direction I've decided to move in Ive been in discussions with Chris from West Coast Fiero and hope to order up the fronts once I get the final measurements.

wayne
IP: Logged
PFF
System Bot
dobie1
Member
Posts: 451
From: BC, Canada
Registered: Jun 2005


Feedback score: N/A
Leave feedback

Rate this member

Report this Post04-23-2019 12:59 AM Click Here to See the Profile for dobie1Send a Private Message to dobie1Edit/Delete MessageReply w/QuoteDirect Link to This Post
Well I’ve finally finished all the home and yard projects that have be holding up my build since we moved, and am back to work.
i picked up a lift for my shop which will makes working on the bottom and sides of the car much easier and perhaps even save my back!!!
I am working on my interior the ultimate goal to make a more modern updated interior. Starting with the dash endeavouring to incorporate the 550 instrument pod I picked up from Riceburrer a couple years ago into a modified 308 “Pisa” dash. I didn’t want to destroy a perfectly good dash so I molded the dash and layer up one to cut up to add the pod.

For the centre console I’m using one I picked up from Don that is for a 355 I picked up all the switchers from him as well. I’m running a 4T65e auto I wanted to eliminate the shifter ” takes up to much real estate” replacing it with a PCS paddle shifter and controller.
The seats I’m replacing with some APR racing seats , much more support and allows for a 4 point harness install.
ill post some pics as I go need to figure out how to post them , it’s been awhile.


Wayne
IP: Logged
dobie1
Member
Posts: 451
From: BC, Canada
Registered: Jun 2005


Feedback score: N/A
Leave feedback

Rate this member

LEEEZARD
Member
Posts: 610
From:
Registered: May 2011


Feedback score: N/A
Leave feedback

Rate this member

Report this Post04-23-2019 02:27 AM Click Here to See the Profile for LEEEZARDSend a Private Message to LEEEZARDEdit/Delete MessageReply w/QuoteDirect Link to This Post
are you going to sell a kit?
IP: Logged
dobie1
Member
Posts: 451
From: BC, Canada
Registered: Jun 2005


Feedback score: N/A
Leave feedback

Rate this member

Report this Post04-23-2019 10:35 AM Click Here to See the Profile for dobie1Send a Private Message to dobie1Edit/Delete MessageReply w/QuoteDirect Link to This Post

 
quote
Originally posted by LEEEZARD:

are you going to sell a kit?


Hi LEEEZARD
I am going to be making a mold of the car so that If God forbid I have a accident I can replace panels. I was considering building a limited run of 10 bodies lots of PM’s but no one willing to commit. And pay the price for one. So I’m going a different direction and am probably going to be building turn key complete cars. Something for me to do in my retirement.

Nice wheels by the way!!

Wayne
IP: Logged
LEEEZARD
Member
Posts: 610
From:
Registered: May 2011


Feedback score: N/A
Leave feedback

Rate this member

Report this Post04-23-2019 12:36 PM Click Here to See the Profile for LEEEZARDSend a Private Message to LEEEZARDEdit/Delete MessageReply w/QuoteDirect Link to This Post
glad you like the wheels.
IP: Logged
dobie1
Member
Posts: 451
From: BC, Canada
Registered: Jun 2005


Feedback score: N/A
Leave feedback

Rate this member

Report this Post04-23-2019 07:24 PM Click Here to See the Profile for dobie1Send a Private Message to dobie1Edit/Delete MessageReply w/QuoteDirect Link to This Post
Added the foam board to the dash to give me the median to carve a shape to accentuate the lines of the 550 dash into the dash design. Once the changes are complete I’ll prepare the dash as a plug to have a new dash laid up on it.
https://imgshare.io/image/IYNO
https://imgshare.io/image/IPRZ

[This message has been edited by dobie1 (edited 04-23-2019).]

IP: Logged
LEEEZARD
Member
Posts: 610
From:
Registered: May 2011


Feedback score: N/A
Leave feedback

Rate this member

Report this Post04-23-2019 08:15 PM Click Here to See the Profile for LEEEZARDSend a Private Message to LEEEZARDEdit/Delete MessageReply w/QuoteDirect Link to This Post
i am interested in a kit or roller. let me know when you are finished. car looks amazing
IP: Logged
RCR
Member
Posts: 4397
From: Shelby Twp Mi
Registered: Sep 2002


Feedback score:    (7)
Leave feedback


Total ratings: 102
Rate this member

Report this Post04-23-2019 08:46 PM Click Here to See the Profile for RCRSend a Private Message to RCREdit/Delete MessageReply w/QuoteDirect Link to This Post

Bob
IP: Logged
dobie1
Member
Posts: 451
From: BC, Canada
Registered: Jun 2005


Feedback score: N/A
Leave feedback

Rate this member

Report this Post04-23-2019 10:02 PM Click Here to See the Profile for dobie1Send a Private Message to dobie1Edit/Delete MessageReply w/QuoteDirect Link to This Post
Thanks Bob it’s good to get back to work on the project.
IP: Logged
dobie1
Member
Posts: 451
From: BC, Canada
Registered: Jun 2005


Feedback score: N/A
Leave feedback

Rate this member

Report this Post04-23-2019 10:04 PM Click Here to See the Profile for dobie1Send a Private Message to dobie1Edit/Delete MessageReply w/QuoteDirect Link to This Post

dobie1

451 posts
Member since Jun 2005
 
quote
Originally posted by LEEEZARD:

i am interested in a kit or roller. let me know when you are finished. car looks amazing


PM me and we can talk
IP: Logged
PFF
System Bot
LEEEZARD
Member
Posts: 610
From:
Registered: May 2011


Feedback score: N/A
Leave feedback

Rate this member

Report this Post04-24-2019 12:19 AM Click Here to See the Profile for LEEEZARDSend a Private Message to LEEEZARDEdit/Delete MessageReply w/QuoteDirect Link to This Post
 
quote
Originally posted by dobie1:


PM me and we can talk


pm sent
IP: Logged
dobie1
Member
Posts: 451
From: BC, Canada
Registered: Jun 2005


Feedback score: N/A
Leave feedback

Rate this member

Report this Post04-24-2019 11:40 PM Click Here to See the Profile for dobie1Send a Private Message to dobie1Edit/Delete MessageReply w/QuoteDirect Link to This Post
Got the new seats in and they will fit ,there a bit more metal work and welding as I had to make a couple metal modifications due the the increased track width.
I plan on reupholstering them along with the new dash , using Alcantera for most surfaces on the interior with carbon fiber accents. Perhaps a seat center panel a accent colour .
Sure wish I could figure out why I can’t post pics directly, still working on it sorry for the links.
https://imgshare.io/image/j4Uq
https://imgshare.io/image/jBF7

[This message has been edited by dobie1 (edited 04-24-2019).]

IP: Logged
RCR
Member
Posts: 4397
From: Shelby Twp Mi
Registered: Sep 2002


Feedback score:    (7)
Leave feedback


Total ratings: 102
Rate this member

Report this Post04-27-2019 02:04 PM Click Here to See the Profile for RCRSend a Private Message to RCREdit/Delete MessageReply w/QuoteDirect Link to This Post
well, that didn't work...hmmm?

Cool, Wayne.

Bob

[This message has been edited by RCR (edited 04-27-2019).]

IP: Logged
LEEEZARD
Member
Posts: 610
From:
Registered: May 2011


Feedback score: N/A
Leave feedback

Rate this member

Report this Post04-27-2019 02:52 PM Click Here to See the Profile for LEEEZARDSend a Private Message to LEEEZARDEdit/Delete MessageReply w/QuoteDirect Link to This Post
looking good
IP: Logged
Easy8
Member
Posts: 366
From: Jacksonville, Fl
Registered: Feb 2009


Feedback score: (1)
Leave feedback

Rate this member

Report this Post04-27-2019 03:03 PM Click Here to See the Profile for Easy8Send a Private Message to Easy8Edit/Delete MessageReply w/QuoteDirect Link to This Post


And as payment for the web page work you need to explain how you go about putting alcantera an carbon fiber in the car.. I want to replace some cheap carpet on the inside of Red Devil..
IP: Logged
dobie1
Member
Posts: 451
From: BC, Canada
Registered: Jun 2005


Feedback score: N/A
Leave feedback

Rate this member

Report this Post04-27-2019 11:14 PM Click Here to See the Profile for dobie1Send a Private Message to dobie1Edit/Delete MessageReply w/QuoteDirect Link to This Post
Thanks for reposting the pics!!
Follow the build, over the next 3 months (the time I figure it will be to totally do the interior) I’ll be posting the interior build.
Including the build of the custom dash , carbon fibre skimming of the center consul and the “A “ pillar ,window and sill mouldings.
The Alcantera will be used to cover the dash ,door panels, roof panel and the seats.
I have to find another hosting site for my pics , any recommendations?

Wayne
IP: Logged
dobie1
Member
Posts: 451
From: BC, Canada
Registered: Jun 2005


Feedback score: N/A
Leave feedback

Rate this member

Report this Post04-27-2019 11:20 PM Click Here to See the Profile for dobie1Send a Private Message to dobie1Edit/Delete MessageReply w/QuoteDirect Link to This Post

dobie1

451 posts
Member since Jun 2005
Thanks Bob I’m waiting for some more posts from you!!
Thanks LEEEZARD, and Easy8 for the bumps
Wayne
IP: Logged
dobie1
Member
Posts: 451
From: BC, Canada
Registered: Jun 2005


Feedback score: N/A
Leave feedback

Rate this member

Report this Post04-30-2019 01:39 PM Click Here to See the Profile for dobie1Send a Private Message to dobie1Edit/Delete MessageReply w/QuoteDirect Link to This Post
So what is everyone using to post pics.
I appreciate any help here, have a couple updates.
Thanks in advance
Wayne
IP: Logged
PatrickTRoof
Member
Posts: 605
From: Baltimore, MD, USA
Registered: May 2013


Feedback score: N/A
Leave feedback

Rate this member

Report this Post04-30-2019 01:49 PM Click Here to See the Profile for PatrickTRoofSend a Private Message to PatrickTRoofEdit/Delete MessageReply w/QuoteDirect Link to This Post
I'm so glad to see updates from you again!
IP: Logged
dobie1
Member
Posts: 451
From: BC, Canada
Registered: Jun 2005


Feedback score: N/A
Leave feedback

Rate this member

Report this Post04-30-2019 05:05 PM Click Here to See the Profile for dobie1Send a Private Message to dobie1Edit/Delete MessageReply w/QuoteDirect Link to This Post
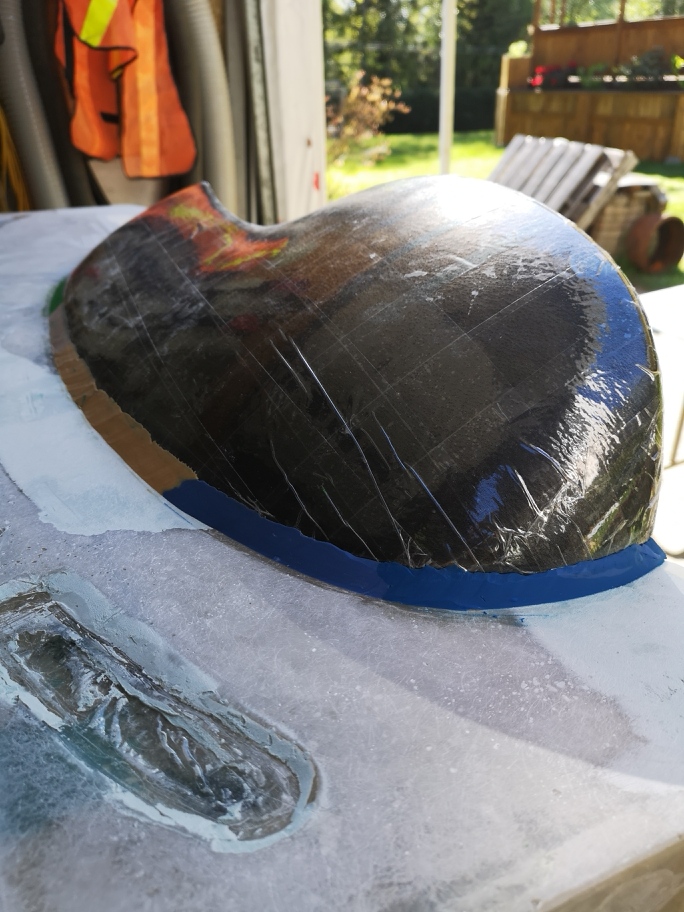
So I’ll try this again
So I was wanted to creat a one piece dash incorporating the dash pod into the dash as fibreglass rather than the stock leather as I want to upholsterer the dash in Alcantera . So this requires making a mold of the dash pod but first having a transition I needed a lip on the dash to the pod.
The first pics I used packing tap to protect the dash from the process. Glassing a 3” strip over the fairing I made using plaser scene as it isn’t affected by the resize.

[This message has been edited by dobie1 (edited 04-30-2019).]

IP: Logged
PFF
System Bot
Easy8
Member
Posts: 366
From: Jacksonville, Fl
Registered: Feb 2009


Feedback score: (1)
Leave feedback

Rate this member

Report this Post04-30-2019 07:06 PM Click Here to See the Profile for Easy8Send a Private Message to Easy8Edit/Delete MessageReply w/QuoteDirect Link to This Post
IP: Logged
RCR
Member
Posts: 4397
From: Shelby Twp Mi
Registered: Sep 2002


Feedback score:    (7)
Leave feedback


Total ratings: 102
Rate this member

Report this Post04-30-2019 07:23 PM Click Here to See the Profile for RCRSend a Private Message to RCREdit/Delete MessageReply w/QuoteDirect Link to This Post
 
quote
Originally posted by dobie1:

So what is everyone using to post pics.
I appreciate any help here, have a couple updates.
Thanks in advance
Wayne


Still using PIP.

Bob

[This message has been edited by RCR (edited 04-30-2019).]

IP: Logged
dobie1
Member
Posts: 451
From: BC, Canada
Registered: Jun 2005


Feedback score: N/A
Leave feedback

Rate this member

Report this Post05-01-2019 12:13 AM Click Here to See the Profile for dobie1Send a Private Message to dobie1Edit/Delete MessageReply w/QuoteDirect Link to This Post
Once the glass was set up I trimmed down to a 1" lip
I wanted to get the pod completely fitted before I finished the rest of the dash. I can then carve and shape the foam to the look that works with the rest of the centre consule and I'll fibreglass the rest of the dash and mold it.


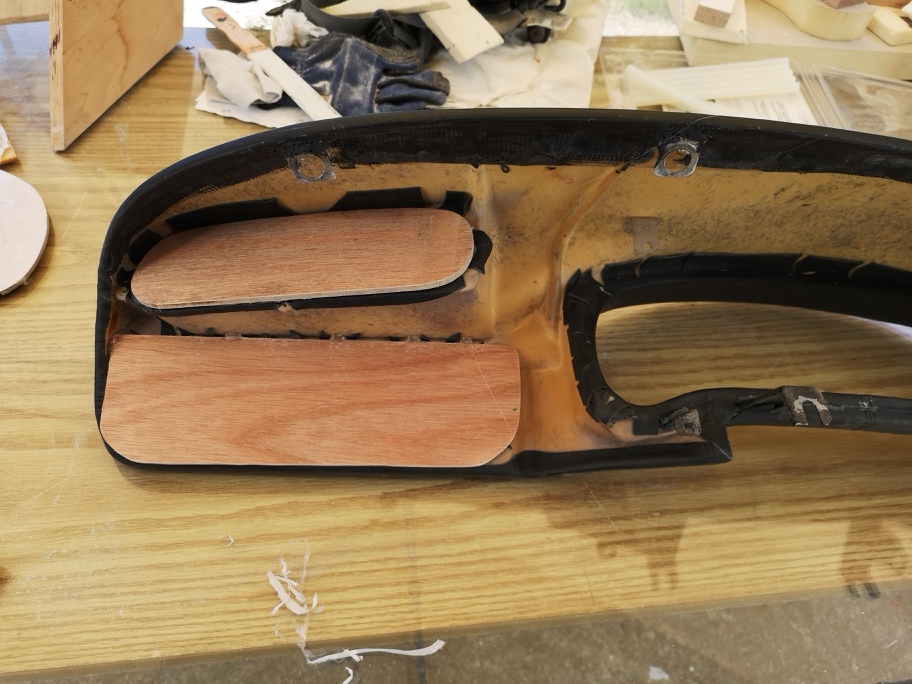
When I was preparing the dash pod I needed some blanks to block off the openings using hot glue to keep in place. Once they were secure I used fairing wax to build up a filet for the fibreglass to transition.


there are a bunch more pics but the files are too big, I need to reduce the resolution of the pics.
But I finally figured out how to get the pics in. Thanks Bob!!!
Wayne

[This message has been edited by dobie1 (edited 05-01-2019).]

IP: Logged
RCR
Member
Posts: 4397
From: Shelby Twp Mi
Registered: Sep 2002


Feedback score:    (7)
Leave feedback


Total ratings: 102
Rate this member

Report this Post05-01-2019 12:18 PM Click Here to See the Profile for RCRSend a Private Message to RCREdit/Delete MessageReply w/QuoteDirect Link to This Post
 
quote
Originally posted by dobie1:
there are a bunch more pics but the files are too big, I need to reduce the resolution of the pics.
But I finally figured out how to get the pics in. Thanks Bob!!!
Wayne


No problem. I wish I could do more. The way I resize images is a PITA, so I won't suggest it unless it's a last resort. Someday I may look into something easier.

Bob
IP: Logged
Neils88
Member
Posts: 4045
From: Jeddore,Nova Scotia
Registered: Aug 2013


Feedback score: N/A
Leave feedback


Total ratings: 56
Rate this member

Report this Post05-01-2019 07:47 PM Click Here to See the Profile for Neils88Send a Private Message to Neils88Edit/Delete MessageReply w/QuoteDirect Link to This Post
I always open the pics in Microsoft Paint and use the resize function. It's really quick and easy... but you do have to do it to each pic one at a time. Unfortunately there isn't a batch edit function.
IP: Logged
Patrick
Member
Posts: 36353
From: Vancouver, British Columbia, Canada
Registered: Apr 99


Feedback score: (1)
Leave feedback


Total ratings: 458
Rate this member

Report this Post05-01-2019 08:05 PM Click Here to See the Profile for PatrickSend a Private Message to PatrickEdit/Delete MessageReply w/QuoteDirect Link to This Post
 
quote
Originally posted by dobie1:

there are a bunch more pics but the files are too big, I need to reduce the resolution of the pics.


PIP requirements/restrictions are... Maximum width - 1024 pixels. Maximum file size - 300 kb.

I use IrfanView for image resizing, It's free. It's great. One feature of IrfanView that I really like is that you can set the maximum file size of the JPG image before you save it. The program itself then works out the compression required, and implements it. Takes all the guesswork out, makes the process so easy.

And if that's not enough... it does batch editing/resizing. Do a whole folder of images with one click.

[This message has been edited by Patrick (edited 05-01-2019).]

IP: Logged
fieroguru
Member
Posts: 12127
From: Champaign, IL
Registered: Aug 2003


Feedback score:    (45)
Leave feedback


Total ratings: 258
Rate this member

Report this Post05-01-2019 10:06 PM Click Here to See the Profile for fieroguruSend a Private Message to fieroguruEdit/Delete MessageReply w/QuoteDirect Link to This Post
Am I the only one who changes the resolution of the photos in the camera settings so the pictures are the proper size and don't need resizing... just upload and go.
IP: Logged
pmbrunelle
Member
Posts: 4376
From: Grand-Mère, Québec
Registered: Sep 2008


Feedback score: N/A
Leave feedback


Total ratings: 62
Rate this member

Report this Post05-01-2019 10:11 PM Click Here to See the Profile for pmbrunelleSend a Private Message to pmbrunelleEdit/Delete MessageReply w/QuoteDirect Link to This Post
I have used this tool:
http://www.rw-designer.com/picture-resize

Dirt simple!

I don't snap my pics at low resolution; I want my personal archives to be high quality.

What ends up on the site here are low-quality exports.
IP: Logged
dobie1
Member
Posts: 451
From: BC, Canada
Registered: Jun 2005


Feedback score: N/A
Leave feedback

Rate this member

Report this Post05-01-2019 10:15 PM Click Here to See the Profile for dobie1Send a Private Message to dobie1Edit/Delete MessageReply w/QuoteDirect Link to This Post
I’m already at my lowest resolution, my Huawei P20 pro lowest is 7MP 2736x2736. But thanks to everyone that has helped I’ll look at Patrick’s recommendation. I my have to use my old phone much lower res.
Wayne
IP: Logged
This thread has been moved here: The Construction Zone.
Previous Page | Next Page

This topic is 7 pages long:  1   2   3   4   5   6   7 
next newest topic | next oldest topic

All times are ET (US)

Post New Topic  
Hop to:

Contact Us | Back To Main Page

Advertizing on PFF | Fiero Parts Vendors
PFF Merchandise | Fiero Gallery | Ogre's Cave
Real-Time Chat | Fiero Related Auctions on eBay


Copyright (c) 1999, C. Pennock