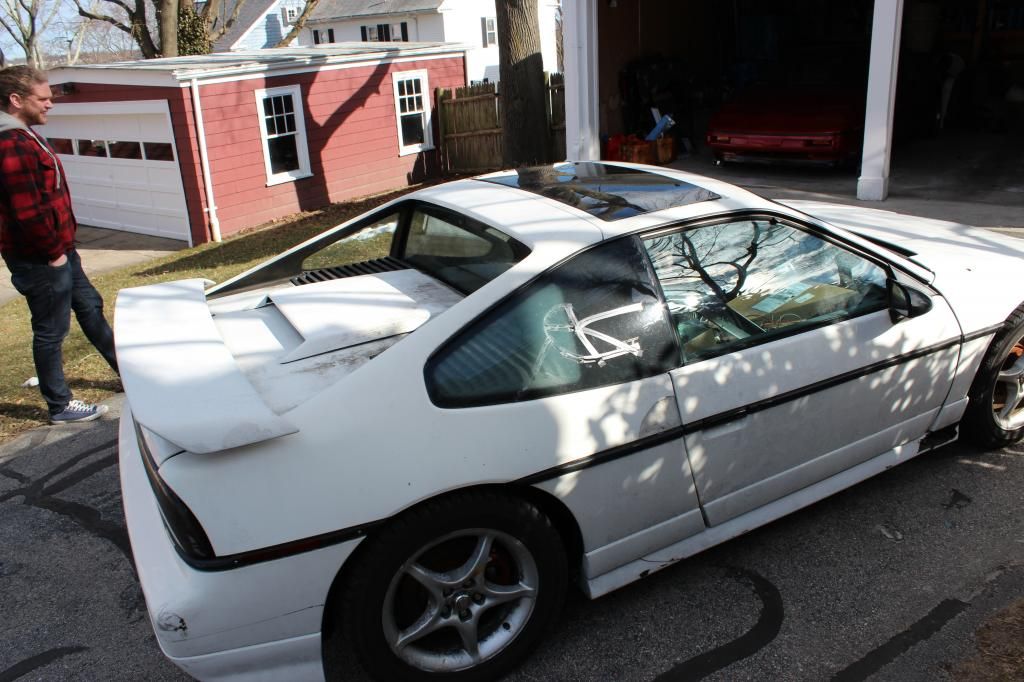
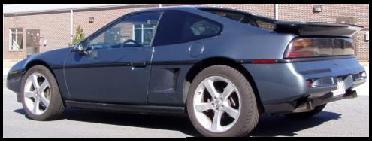
Well it has been two years of some driving but mostly sitting for my formula. It has been plagued with overheating issues for 5 or so years and I have had enough! It is now time to remove the bad and replace it with awesomeness. It is sitting on a brand new suspension (I did a full rebuild about 3 years ago) that has hardly been used, and I repainted it two years ago myself (turned out ok). This will be my first time dropping an engine and definitely swapping (it is more like a transfer really). Here is what I am starting with:
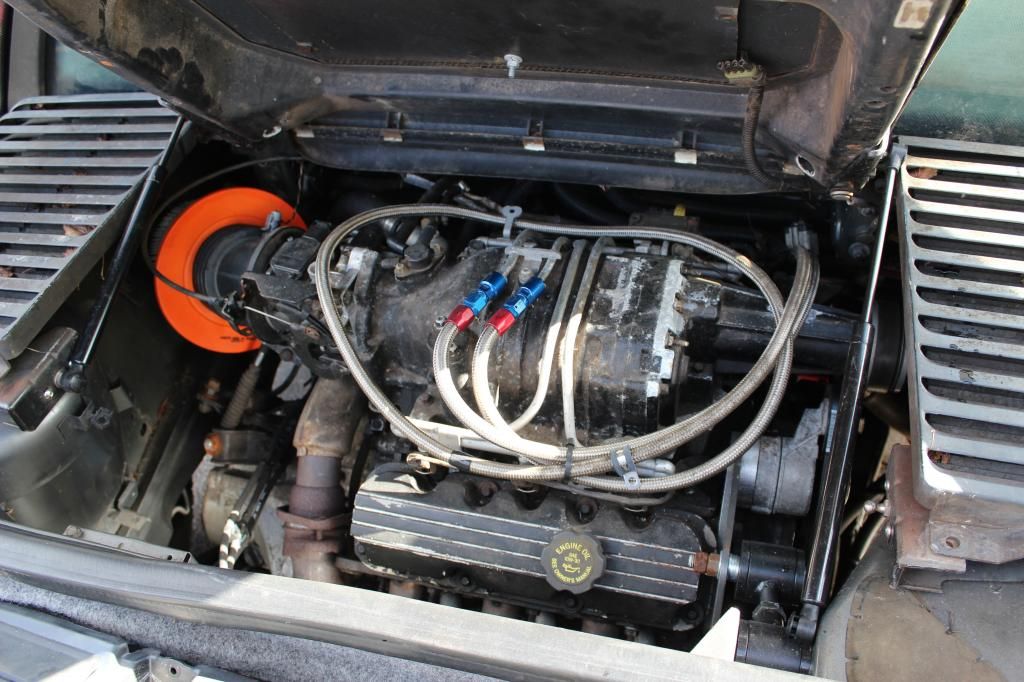
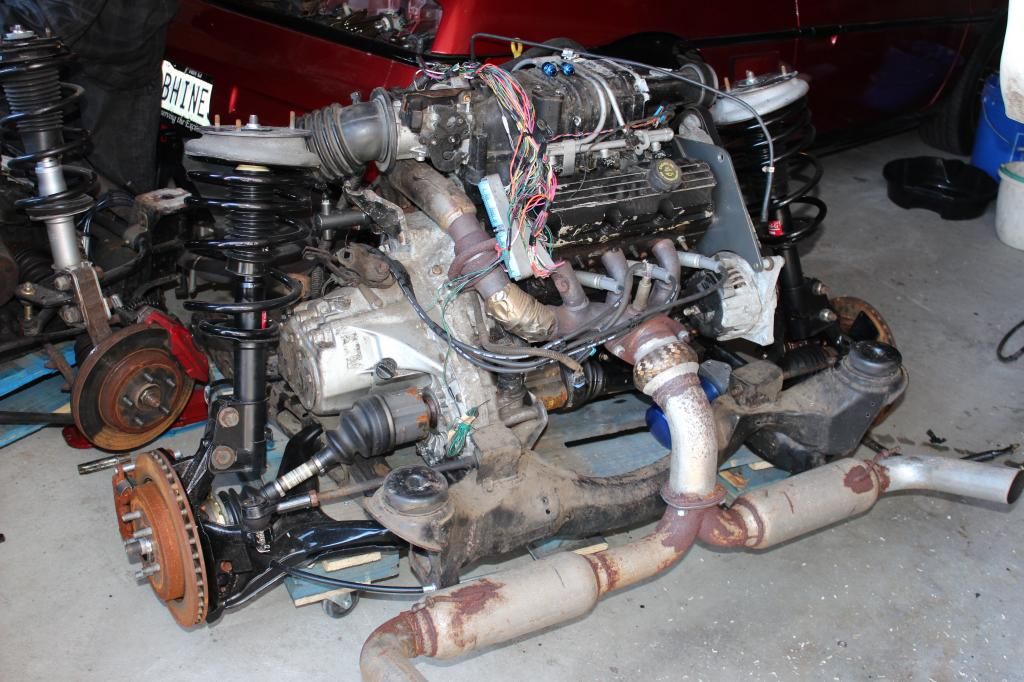
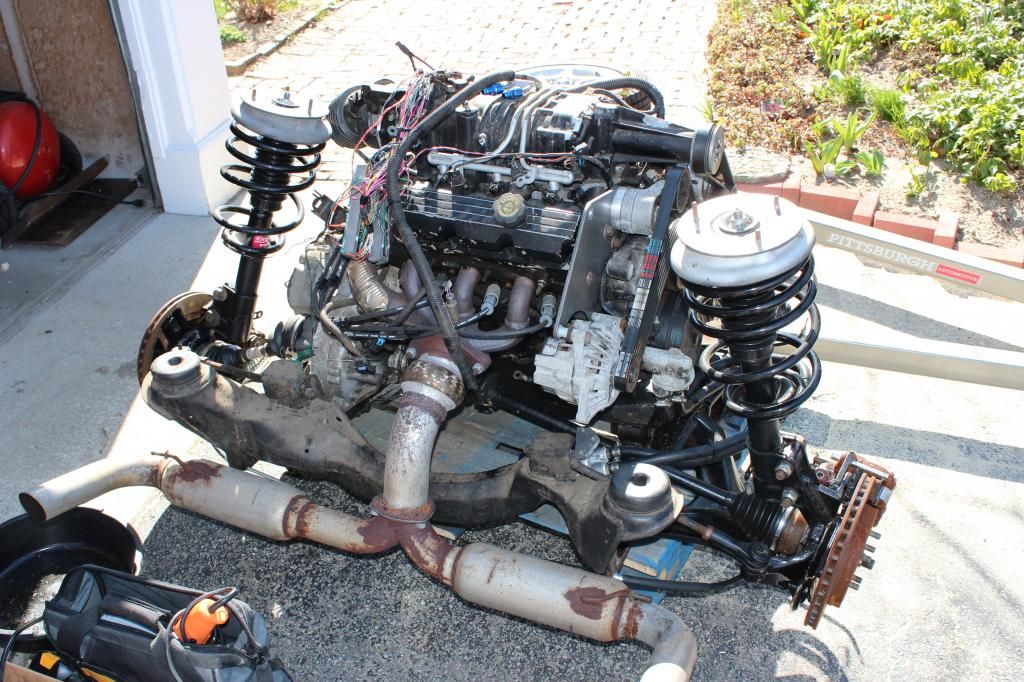
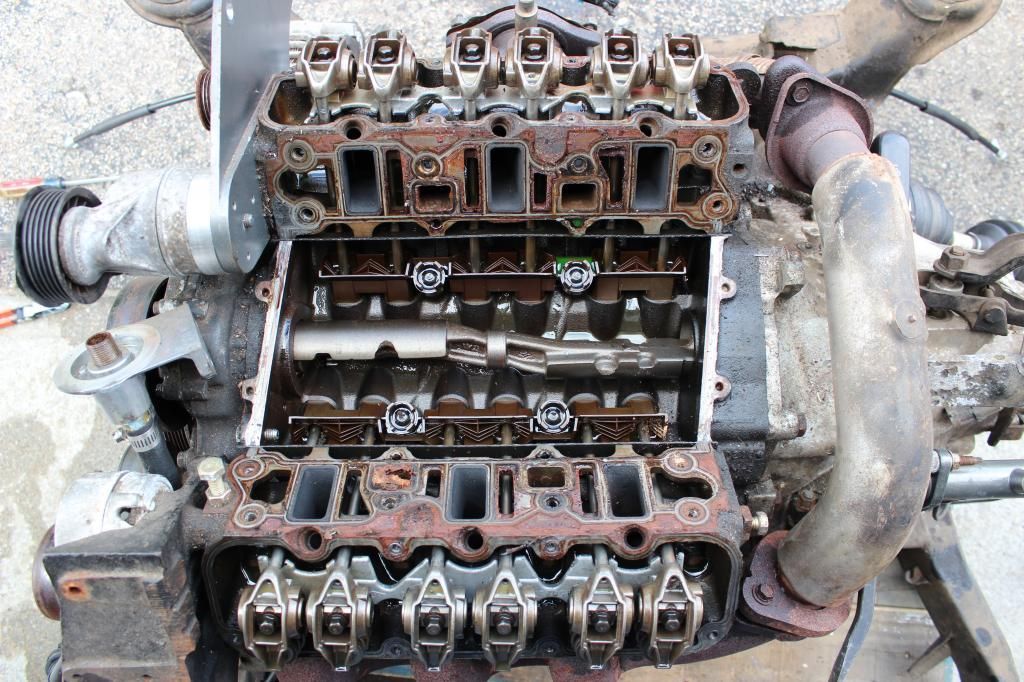
I picked up a 1986 gt this weekend from another member here Bob Williams, it has a 3800 swap about 90% done. It still needs the exhaust to be finished, has a few other loose ends, and needs to be cleaned up. The engine is out of a 98 Park Ave Ultra and is mated to a 5 speed Getrag with a Spec 3 clutch. The clutch also needs to be repaired/replaced as it has popped a spring. Here is the engine as it sits today.
Here is my car waiting for its new engine
I will be putting some new pics up as I go, and will be listing lots of parts in the mall. From what I understand it should be a pretty straight direct swap. I am wondering if I will need new engine/transmission mounts though and if they will transfer onto the 88 cradle?
The engine mount bracket will need work to allow the 87 and older design to work on a 88 cradle as the mounting holes in the cradle are in a different spot. Dan
The engine mount bracket will need work to allow the 87 and older design to work on a 88 cradle as the mounting holes in the cradle are in a different spot. Dan
Is it just a matter of drilling some holes or would you recommend I just get a proper 88 set?
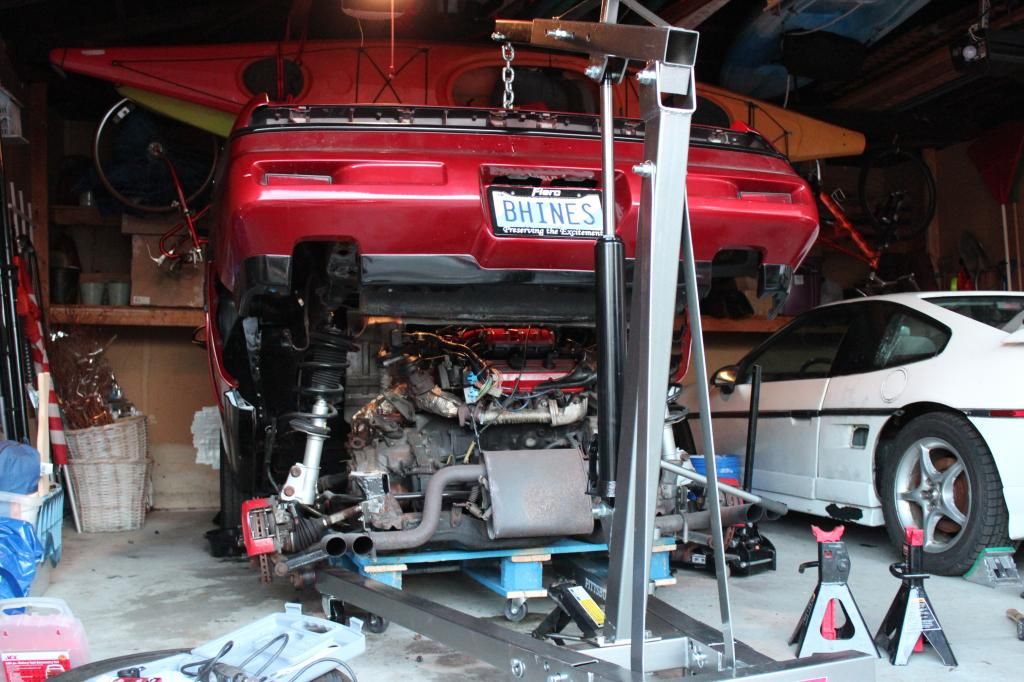
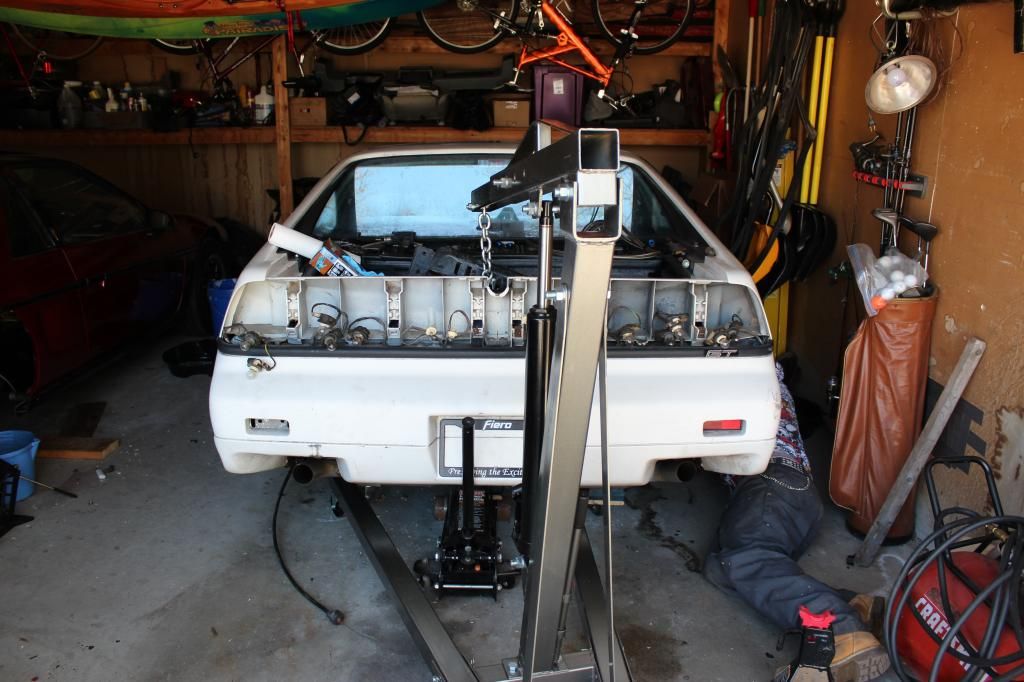
It was definitely a successful day, my first time dropping an engine and I definitely wouldn't have gotten nearly as far as I did without Steve's help! Here's how the day started out
And then the real fun began...
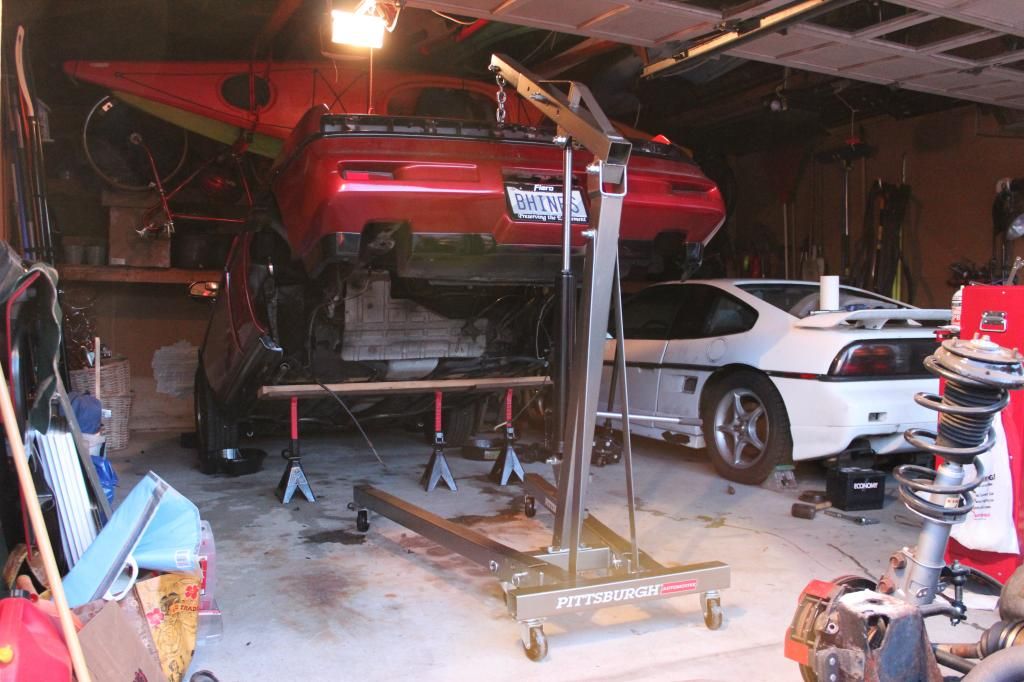
5 Hours later...
We still have the 3800 engine to drop, that is looking like a project for next weekend so expect more updates then! I think we've got a good system down so we should be able to do it in less time
I think we can get the 3800 out in less time, now that we know exactly where we can keep the car jacked up and get it on the dolly easily. I can't wait to start on that one!
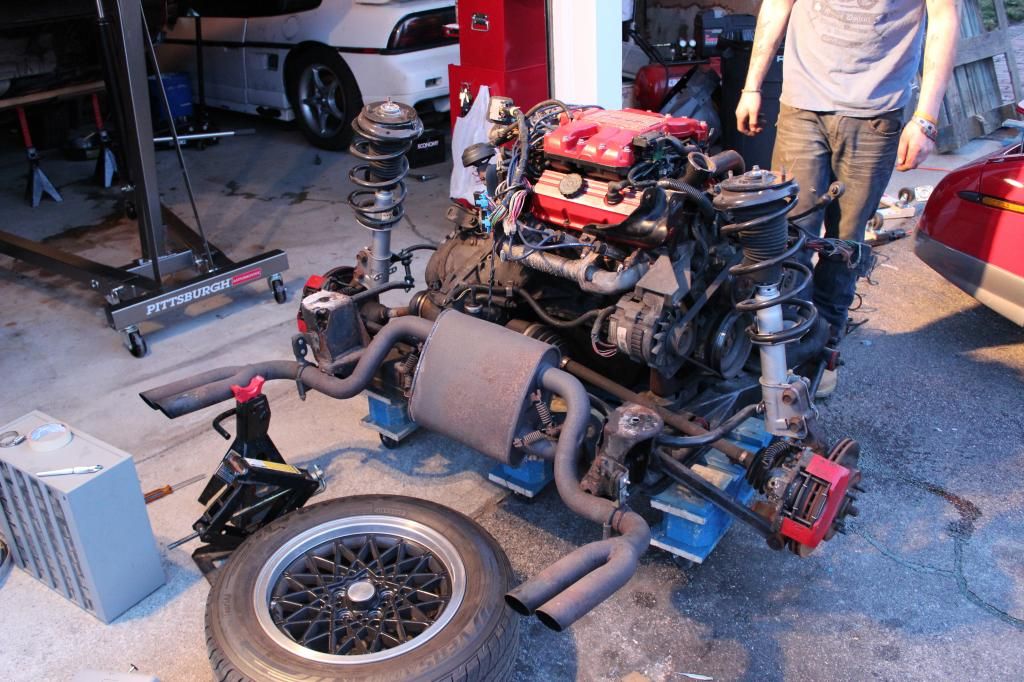
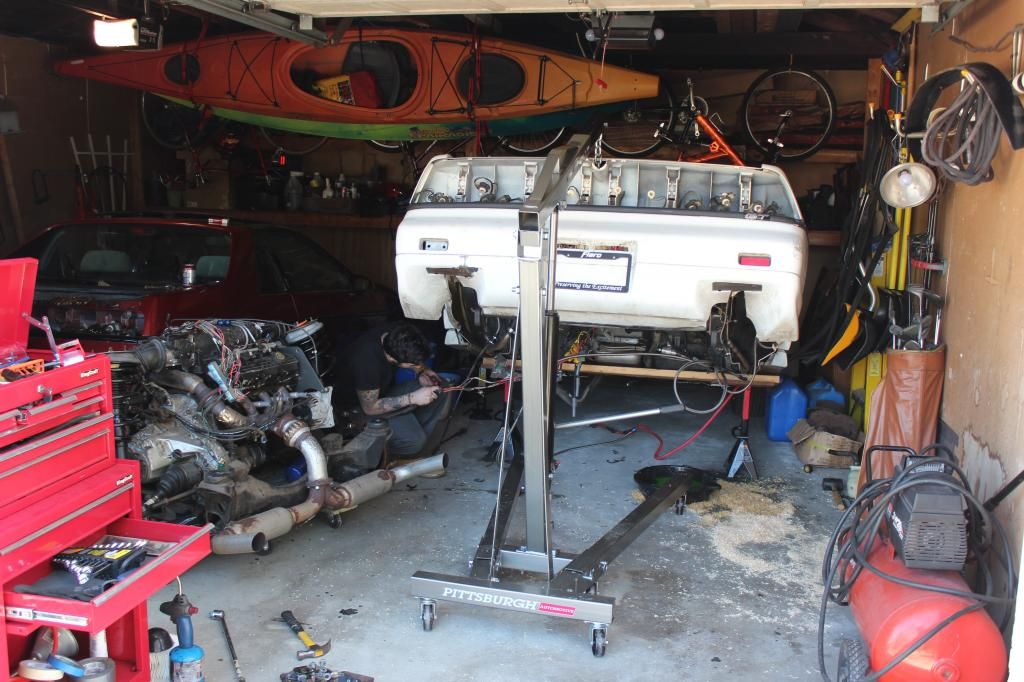
Here is the latest progress update from saturdays work. Things went pretty smooth dropping the 3800, the cradle bolts practically unbolted themselves
2304 zip ties later the engine was out and Steve got his own engine bay shot, I suppose he earned it!
He didn't even know this one was happening
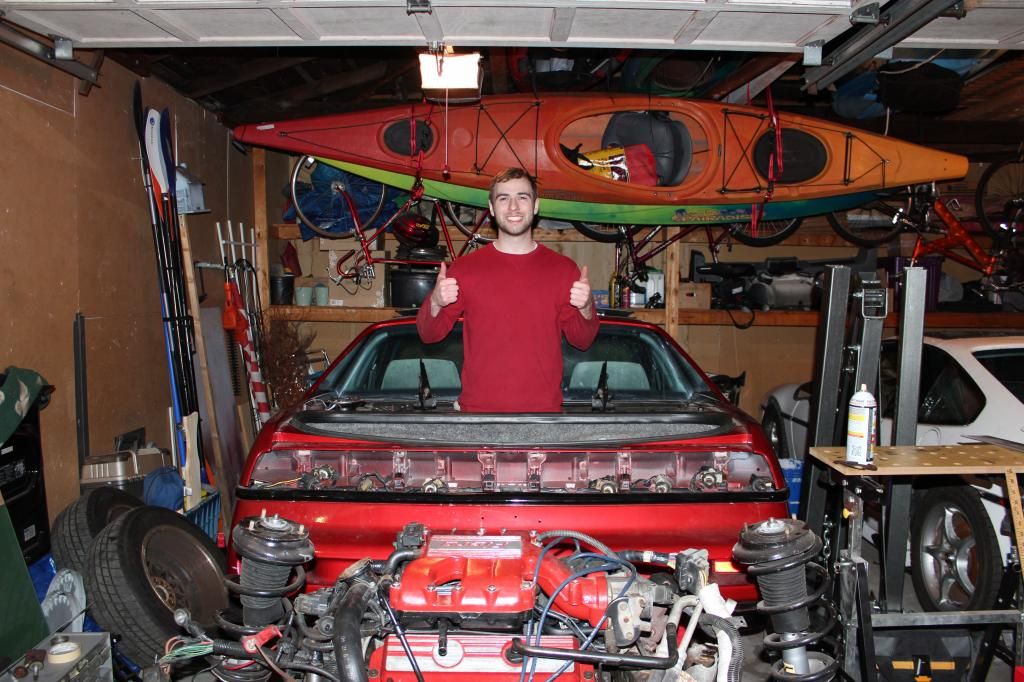
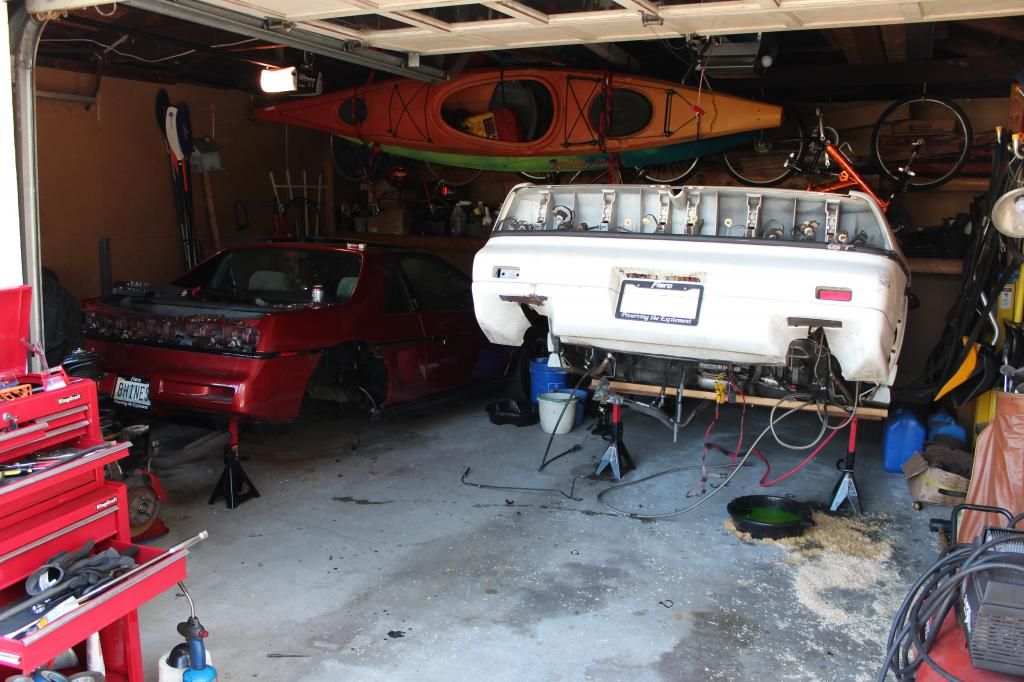
And at the end of the day I was left with two engineless fieros!
Next weekend the journey will continue and get a little more interesting as we start to swap cradles and clean things up. The 3800 will get new gaskets, cleaned and painted, and we will check out the clutch to see what is going on with it. Stay tuned!
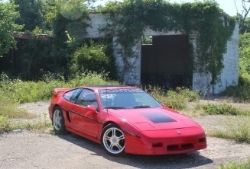
Don't see many medium reds (probably my favorite Fiero color) - especially Formulas. Yours looks really good.
Thanks! I actually repainted it two summers ago in my garage but it was originally medium red as well. I think I will throw up some pictures of other projects I have done on the car to get it where it is now.
I removed the tail lights because I like to sit there when working on the engine (when its in the car) and I don't want to risk cracking them
Week 3 Update: Today I made some interesting discoveries as I began to tear down the 3800. First thing to come off was the wiring harness, exhaust, and suspension...
And then I decided to drain the oil because some oil that I saw looked rather suspect and I was a bit surprised to see this
Not too happy there so I decided to keep tearing things down to see if there was any visible issues
Finally got the heads off and all the cylinder walls looked ok except for one which appears to have some pitting on it though I could not feel any bumps with my finger
So now I am wondering if this should be a concern for me or what other concerns I should have. Will the engine be fine or will I have some long term issues?
I also started to clean some of the parts up because they were pretty nasty
And my collection of new parts is growing!
That's all for now, I will continue to be cleaning things up and painting.... I would love to hear some feedback in regards to my concerns
And then I decided to drain the oil because some oil that I saw looked rather suspect and I was a bit surprised to see this
I would love to hear some feedback in regards to my concerns
Head or Intake gasket? If it still had the stock Intake gaskets then that was a recall from GM. If it was a head gasket then I'd be worried. Did you pull the oil pan and have a look?
That orange gunk looks like the common problem with Dextron coolant. Search Dextron problems on the web to see what I am talking about. The pitting on the cylinder wall is very similar to what I encountered with an engine I am rebuilding for my 88 Notch. It came from a wrecked 2006 Yukon. based on what I found - I believe it must have gone over on its side in the accident. That caused coolant to leak up into the manifold and when it was righted, this spilled down into the heads and onto the pistons. Sitting at the salvage yard for a couple of months, the coolant pooled along the lowest point on the rings and gradually etched the cylinder walls. Most of the cylinders weren't too bad but on one cylinder the ring opening was towards the outside of the engine and the coolant leaked past and sat on the second ring. Net result - I have to send the engine out to have it overbored.
There may have been a leak in the gasket that has caused the coolant to pool on the top of the piston while it has been sitting and that has caused the pitting. That is also probably coolant mixed in with the oil.
Thanks for the responses, I am not sure which gasket was the issue but it looks like I will be pulling the oil pan next to see the extent of the issue. The PO replaced the oil pan gasket and I am sure he would have noticed an issue at the time but we will see...
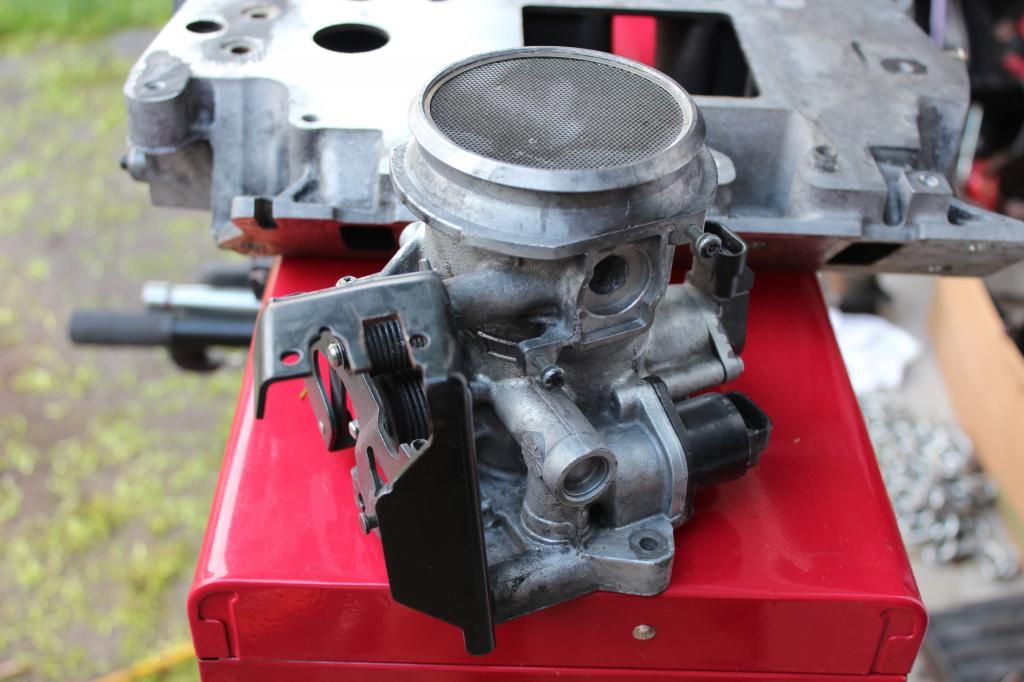
Also I forgot to post this picture from the clutch slave cylinder, I don't really understand what they did since it is a brand new rodney part
LOL I forgot about the socket "spacer"... That was done at the bottom of a hill after I got stuck on the first trip out of the driveway when the clutch went.. We were "hoping" it was just a slave throw issue and the clutch fork just needed a little "extra" travel, but no such luck. I meant to pull that out of there but was so frustrated I seem to have forgotten.. Now I know why I'm missing that socket!
The "oil" or whatever that is now scares me.. When I replaced the oil pan the oil was somewhat dirty, but overall was fine. I had driven the car a total of 60 miles since I had finished it in the previous car, to get it to my buddy's place on the Cape. Then a run or two around the block once the engine was in the new car, before the pan was dropped. Of course the oil was drained and replaced when we did the oil pan gasket, and had seen "maybe" 5 miles of driving since, never saw any white smoke out the exhaust. Is there any chance that happened while sitting for a few years, or could all that happen from 5 miles of driving? It definitely wasn't much more than that, just around the block a couple of times and down to the gas station to fill up. It was green coolant when I got the original car, so I continued with the green stuff after hearing all the bad stories about Dexcool. I hadn't torn down the engine at all, so I have no idea if the cylinder wall issue was there when I got it, or happened while I had it. If I had opened the engine while I had it and had seen that, I'd have been (more?) pissed at the P.O... If that cylinder was at TDC and had filled with coolant from a leaking gasket and sat for a year, would that do it?
Here's the original 'build' thread that I dug up: //www.fiero.nl/forum/A...060811-1-051739.html I have the saved Mall posting on my computer, but not sure how to post it. Doesn't have much more info anyway, just stuff like "runs and drives". Does say "reprom by Loyde @ FastFieros" which I'd forgotten about..
On the second page there's a shot of the top of the motor without the valve covers, but hard to see much detail. He was pretty excited about it being a 40k mile motor, but of course it doesn't say if the engine had been sitting upside-down in the car or anything.. He also hadn't driven it more than "around the block" supposedly, which I believe as the wiring was sitting on the exhaust and melting when he got it started for me... I wish I could go back in time and not buy that car...
If you end up having to have work done to it or worse-case replacing the block or something, I'll refund you some $$.. I feel like an arse now. I should have parted it out and scrapped the thing when I got fed up with it last fall..
Another day and more work done... I removed the engine from the cradle and began the process of stripping it down to the block
The car was having issues shifting and we thought it was a clutch issue (maybe a popped spring) but when I took it apart it looked fine to me, but maybe I am missing something?
Coolant passages are caked with dexcool nastiness
Marking the pistons pre-removal
And here is everything I have been pulling off
So that was it for today, I still need to remove the crankshaft bolt and I'm not sure how I am going to do that yet. I may need to just give in and buy an impact wrench. I plan to strip the block all the way down to have a machine shop fix the pitted cylinders and hopefully I can get it there soon. Stay tuned!
More update from the weekend! I finally got to strip the block all the way down... I didn't take many pictures while it was going on because of the oily factor but heres a small sample of what went on:
So there it is! It was my first time doing it and fortunately I found a step by step guide with pictures on another forum so I didn't have to guess anything. Right now the block is ready to head over to the machine shop to get a cleaning and have the cylinders checked out. While that is gone I will be able to work on some other things like getting my 88 cradle ready. I will also be doing some brake upgrades while everything is out including SS lines and hoses and a master cylinder upgrade. Now is also the time to drop my tank to clean it out and install the new fuel pump. So lots more to do still!
Here's the latest update of what has been going on, I don't have any pictures but here is where I am at:
- My 88' cradle is stripped down and I am working on cleaning it up to get ready for some POR-15 - The 3800 engine block is at the machine shop for the next three weeks getting cylinder 5 sleeved and hot tanked - A new harness is on its way to remove some headache and time down the road trying to sort out the one I have
This upcoming weekend I plan to clean and paint as many engine parts as I can, I also am going to be working on some brake upgrades. I will take some pictures of my progress then too!
Weekend update... More cleaning while I wait for my engine block. This time I have some pictures but not much
Lots of wire brushing! [URL=http://s852.photobucket.com/user/hinesb1890/me dia/Engine%20Swap/IMG_1978_zps88812f18.jpg.html][/URL]
Cradle is ready for some POR-15 but I still have a lot more cleaning of parts to do. Anyone have a good method for cleaning gasket surfaces (as on the LIM) where there is tough residue still?
Hey cuz...hope things are going well was looking for another update figured you were working on it over the long weekend.
also sent you an FB message on some parts you might have..let me know.
I actually took a small vacation to Vermont this weekend but I will be back at it this upcoming one. I'll check out those parts for you this weekend and see if they are any good, I can't remember off the top of my head
Finally have some more progress happening... I got to POR-15 my cradle so I can start the process of putting everything back together. Here is my custom painting jig I came up with:
Two coats, many hours, and lots of sweat later it looked like this (it was about 90 today)
In the mean time I worked on stripping all the old paint and grime off the supercharger...
Everything got packed away and I left the cradle to dry overnight
Hopefully this upcoming week my block should be all set and ready for reassembly. I still have lots of parts to clean and paint so that is also in the plans. Stay tuned!
Looks like the center hub on the clutch disk was installed backwards. How does the throw out bearing look?
I believe it was installed correctly, the side labeled "FW SIDE" was facing the flywheel... It looked fine when I first looked at it but I also don't know exactly what to look for, I would appreciate some guidance on that
It was installed correctly however the center hub usually extends into the crankshaft, yours extends into the throw out bearing. It's a conversion so maybe it's fine but if that is a stock fiero replacement clutch it is not.
Hmm... There was a time when Spec clutches had center hub issues, namely being made backwards IIRC.. From the pictures in the original owner / builder's build thread I'd thought it was right.. But perhaps not..? Doing some PFF searching, it looks like Joshua would be better informed of the issue than I am! One of the old threads: //www.fiero.nl/forum/A...0811-1-057878-2.html
If the hub is installed into the plate wrong, that could explain why it's presenting like "not enough travel" on the slave or a throwout bearing issue..
After looking through some threads I think you guys are right about the center hub being installed backwards. I will contact them and see what they say about it... I also double checked the throwout bearing today and it is spinning fine so it looks like this may be my issue.
I called Spec and emailed them the pictures but no response yet, I also called the machine shop to check on my block and it looks like it will take another week to get done While there is still no news there I finally started to paint some parts (using POR15 engine enamel)...
and the color is...
White!! I am going with a white and black theme, the car has enough color so I figured I would keep it clean for the engine. I only got on one coat and I will put a finishing coat on tomorrow, can says 24 hours between coats... I also got started on cleaning up my heads
That's it for now! I have more gaskets and such coming this week in the mail so hopefully in a week or so I can start putting my engine back together!
[This message has been edited by hinesb1890 (edited 06-08-2013).]


 When I replaced the oil pan the oil was somewhat dirty, but overall was fine. I had driven the car a total of 60 miles since I had finished it in the previous car, to get it to my buddy's place on the Cape. Then a run or two around the block once the engine was in the new car, before the pan was dropped. Of course the oil was drained and replaced when we did the oil pan gasket, and had seen "maybe" 5 miles of driving since, never saw any white smoke out the exhaust. Is there any chance that happened while sitting for a few years, or could all that happen from 5 miles of driving? It definitely wasn't much more than that, just around the block a couple of times and down to the gas station to fill up. It was green coolant when I got the original car, so I continued with the green stuff after hearing all the bad stories about Dexcool. I hadn't torn down the engine at all, so I have no idea if the cylinder wall issue was there when I got it, or happened while I had it. If I had opened the engine while I had it and had seen that, I'd have been (more?) pissed at the P.O... If that cylinder was at TDC and had filled with coolant from a leaking gasket and sat for a year, would that do it?


 [/URL]


 One of the old threads:


