Pennock's Fiero Forum
  General Fiero Chat
  mini wide body (Page 3)

Post New Topic  Post A Reply
Email This Page to Someone! | Printable Version

This topic is 5 pages long:  1   2   3   4   5 
Previous Page | Next Page
next newest topic | next oldest topic
mini wide body by bjc 350
Started on: 01-12-2013 02:59 PM
Replies: 191 (11144 views)
Last post by: shemdogg on 06-11-2023 09:35 AM
exoticse
Member
Posts: 8650
From: Orlando, Fl
Registered: Jun 2003


Feedback score: N/A
Leave feedback


Total ratings: 108
Rate this member

Report this Post07-12-2017 09:15 AM Click Here to See the Profile for exoticseSend a Private Message to exoticseEdit/Delete MessageReply w/QuoteDirect Link to This Post
That is hot !
IP: Logged
Imnuts
Member
Posts: 605
From: Dayton, Ohio, USA
Registered: Jun 2013


Feedback score: N/A
Leave feedback

Rate this member

Report this Post07-12-2017 12:45 PM Click Here to See the Profile for ImnutsSend a Private Message to ImnutsEdit/Delete MessageReply w/QuoteDirect Link to This Post
Very impressive body work. I have a spare hood I am getting to put a vent in hopefully just like yours. Not sure about the lights but the look is something different and could look out of this world when done.
Keep up the great work and postings.
Thank!

------------------
∇PONTIAC∇
“The difference between a Fiero owner
and a genius is that genius has its limits.”

IP: Logged
bjc 350
Member
Posts: 952
From: Astoria
Registered: Oct 2005


Feedback score: (1)
Leave feedback

Rate this member

Report this Post07-20-2018 05:45 PM Click Here to See the Profile for bjc 350Send a Private Message to bjc 350Edit/Delete MessageReply w/QuoteDirect Link to This Post
I actually applied two layers of fiberglass to the foam nose! Likely will sand out and apply one more. My auto body friend is in California for about three weeks, but hope to have him start body prep for paint once he returns from vacation. May get this car finished yet.
IP: Logged
bjc 350
Member
Posts: 952
From: Astoria
Registered: Oct 2005


Feedback score: (1)
Leave feedback

Rate this member

Report this Post01-19-2019 12:34 PM Click Here to See the Profile for bjc 350Send a Private Message to bjc 350Edit/Delete MessageReply w/QuoteDirect Link to This Post
No pictures, but finished up the fiberglass on the nose last evening. Now will use epoxy resin and micro ballons to make a sandable filler to get final contour and hide the glass cloth weave that will otherwise show through with time. Painter stopped by last week and is ready for my word to start final finish and paint. Maybe done by summer. Think I said that at least three years ago. Now to install a new heater core since it has started leaking. Think I bought this car in 2010, didn't leak then!. Where does the time go? Turning 75 in March, better get this done.
IP: Logged
bjc 350
Member
Posts: 952
From: Astoria
Registered: Oct 2005


Feedback score: (1)
Leave feedback

Rate this member

Report this Post01-26-2019 05:05 PM Click Here to See the Profile for bjc 350Send a Private Message to bjc 350Edit/Delete MessageReply w/QuoteDirect Link to This Post
Adding a few pictures of near final facia concept.

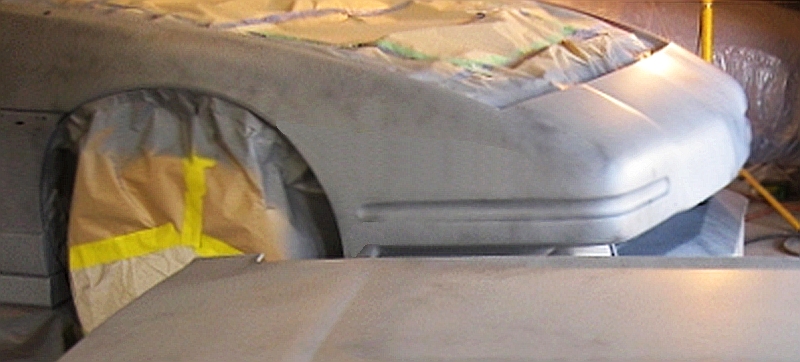
Overall view. Three layers of cloth with epoxy fiberglass, One coating, on much of it, of epoxy resin/micro balloons mix to make a sandable filler.


It all looks much better down on the ground, but too low to work on effectively.


Had to extend the upper molding, so used 3/4" pvc pipe to get correct length.


The cove area has not had any filler yet, thus the wavy, irregular look. The LED lights are white daytime running lights as well as amber turn signals. I really would like to find a similar LED that has a more production looking flexible clear covering over it. These work fine, but pretty cheap looking. Guess they were pretty cheap! And of course the Caddy parking lights.


Driver side a bit too tacky to sand yet. Shop gets pretty cold at night so the epoxy has not fully cured.


IP: Logged
bjc 350
Member
Posts: 952
From: Astoria
Registered: Oct 2005


Feedback score: (1)
Leave feedback

Rate this member

Report this Post01-26-2019 05:08 PM Click Here to See the Profile for bjc 350Send a Private Message to bjc 350Edit/Delete MessageReply w/QuoteDirect Link to This Post

bjc 350

952 posts
Member since Oct 2005
double post.

[This message has been edited by bjc 350 (edited 04-26-2019).]

IP: Logged
bjc 350
Member
Posts: 952
From: Astoria
Registered: Oct 2005


Feedback score: (1)
Leave feedback

Rate this member

Report this Post01-26-2019 05:43 PM Click Here to See the Profile for bjc 350Send a Private Message to bjc 350Edit/Delete MessageReply w/QuoteDirect Link to This Post

bjc 350

952 posts
Member since Oct 2005
OOPS! Double post. Guess I can't delete one of them either. Funny, thought the first one disappeared. Obviously wrong.
IP: Logged
shemdogg
Member
Posts: 1750
From: The Ghetto CA USA
Registered: Apr 2017


Feedback score: N/A
Leave feedback

Rate this member

Report this Post01-26-2019 11:48 PM Click Here to See the Profile for shemdoggSend a Private Message to shemdoggEdit/Delete MessageReply w/QuoteDirect Link to This Post
Ive been having trouble getting the glass to dry too. Ive been adding extra hardener to make it go off quicker. Nice mods Im diggin the look!

shem
IP: Logged
bjc 350
Member
Posts: 952
From: Astoria
Registered: Oct 2005


Feedback score: (1)
Leave feedback

Rate this member

Report this Post01-27-2019 01:43 PM Click Here to See the Profile for bjc 350Send a Private Message to bjc 350Edit/Delete MessageReply w/QuoteDirect Link to This Post
Shem, I've been watching your amazing transformation on your car. You attack things with a lot more adventure than I do. And you get great results. The epoxy I am using has to be mixed 50/50. It can't be varied to get quicker drying. Sometimes I think my ratio is off just a bit which adds to the slow drying problem. Supposed to be 60 degrees or warmer for the epoxy. Shop has been dropping to 50 at night.
IP: Logged
shemdogg
Member
Posts: 1750
From: The Ghetto CA USA
Registered: Apr 2017


Feedback score: N/A
Leave feedback

Rate this member

Report this Post02-01-2019 09:10 PM Click Here to See the Profile for shemdoggSend a Private Message to shemdoggEdit/Delete MessageReply w/QuoteDirect Link to This Post
Im getting it to go off in 40-50 weather in a few hours w little sunlight. Poly resin is poly resin, Im using the bondo brand gallons from home depot. Try a little bit w more hardener than you would normally use n see how it goes off. Im sure itll work. I use much less hardener than it calls for because here it dries too fast. I use way less than called for in the summer and maybe triple what I use in the winter.

Anywho- sweet ride man!

shem
IP: Logged
bjc 350
Member
Posts: 952
From: Astoria
Registered: Oct 2005


Feedback score: (1)
Leave feedback

Rate this member

Report this Post02-09-2019 12:26 PM Click Here to See the Profile for bjc 350Send a Private Message to bjc 350Edit/Delete MessageReply w/QuoteDirect Link to This Post
My friend, Richard has been by several times to get some final detail work on the facia. Just a few small areas to finish before we put some primer on the facia area to get the lines/details correct. Because of some health issues, he only works a few hours a day. He has helped me with several Fiero projects and does nice paint. I can get body work close, but he gets it right. Big difference. Anyway, attached are a few pictures. May be hard to see progress because of multiple colors on the nose, but believe me, it is very near final shape.


Passenger front fender trued up along with some filler not yet shaped, to get correct trailing edge of the coved area near front fender well opening.


Still some final mud shaping on seam between facia and fender and a bit of work required where drivers front fender meets door.
IP: Logged
PFF
System Bot
bjc 350
Member
Posts: 952
From: Astoria
Registered: Oct 2005


Feedback score: (1)
Leave feedback

Rate this member

Report this Post02-09-2019 12:35 PM Click Here to See the Profile for bjc 350Send a Private Message to bjc 350Edit/Delete MessageReply w/QuoteDirect Link to This Post

bjc 350

952 posts
Member since Oct 2005
Oh, and when it is finished, these small grillworks will cover the fake air duct opening.
IP: Logged
bjc 350
Member
Posts: 952
From: Astoria
Registered: Oct 2005


Feedback score: (1)
Leave feedback

Rate this member

Report this Post02-22-2019 09:49 PM Click Here to See the Profile for bjc 350Send a Private Message to bjc 350Edit/Delete MessageReply w/QuoteDirect Link to This Post
Richard and I have both been suffering from a hella cold/flu for about two weeks. Slowed progress to near stand still. I did get the filler he had applied, sanded to profile and replaced the leaky heater core. I was dreading the heater core job, but wasn't too hard, just time consuming to get at the fasteners. No real surprises there, though that was the first air conditioned Fiero I have replaced the heater core in. Also reworked some areas on rear tail light panel. It had been several years since I did that work, and it needed some reinforcing for longevity! I think the car will get finished within a few months, finally. I have said that before a couple times, however.
IP: Logged
liv4God
Member
Posts: 733
From: CA
Registered: Feb 2011


Feedback score:    (6)
Leave feedback

Rate this member

Report this Post03-09-2019 01:54 PM Click Here to See the Profile for liv4GodSend a Private Message to liv4GodEdit/Delete MessageReply w/QuoteDirect Link to This Post
Looking good! Looking forward to seeing the next progress and hope your health stays up! On an unrelated note, check your pms next time you get a chance, I sent you one about another topic.
IP: Logged
bjc 350
Member
Posts: 952
From: Astoria
Registered: Oct 2005


Feedback score: (1)
Leave feedback

Rate this member

Report this Post04-12-2019 01:36 PM Click Here to See the Profile for bjc 350Send a Private Message to bjc 350Edit/Delete MessageReply w/QuoteDirect Link to This Post
I know pictures are best. But, work is being done, all be it, slowly. Prepped the lower aero rockers for painting. Installed wheel well liners, and of course they had to be extended since the wheel well openings are now wider. Removed dew wipes and lubed the window mechanicals and now windows move much better. Made the grill for hood vent, and installed the side rear quarter scoop grills. One off front facia is ready for primer as well as the roof, rear deck lid and spoiler, both sides, except one quarter panel yet to finalize. Prepped rear bumper for primer. Just a little work to be done on rear tail light insert and prepping the side moldings for paint (body color). Richard was going to prime just front clip and then move on to balance. But, he decided we best prep whole car and then do primer all at once. Been lots of sanding and niggly chip and gouge repair. Very time consuming. This car was not a garage queen! But what could I expect for an $800-88 GT. Still lots of sanding, blocking once primer gets applied. Looking forward to the Inferno Red finish coat.
IP: Logged
bjc 350
Member
Posts: 952
From: Astoria
Registered: Oct 2005


Feedback score: (1)
Leave feedback

Rate this member

Report this Post04-12-2019 01:37 PM Click Here to See the Profile for bjc 350Send a Private Message to bjc 350Edit/Delete MessageReply w/QuoteDirect Link to This Post

bjc 350

952 posts
Member since Oct 2005
Removed double post.

[This message has been edited by bjc 350 (edited 04-26-2019).]

IP: Logged
bjc 350
Member
Posts: 952
From: Astoria
Registered: Oct 2005


Feedback score: (1)
Leave feedback

Rate this member

Report this Post04-12-2019 01:41 PM Click Here to See the Profile for bjc 350Send a Private Message to bjc 350Edit/Delete MessageReply w/QuoteDirect Link to This Post

bjc 350

952 posts
Member since Oct 2005
Not sure how these double posts occur, but have had two in the last month or so and none prior in the near decade I have been posting on Pennock's. Sorry.
IP: Logged
anaverin
Member
Posts: 435
From: VANCOUVER WASHINGTON USA
Registered: Aug 2002


Feedback score: N/A
Leave feedback

Rate this member

Report this Post04-15-2019 11:20 AM Click Here to See the Profile for anaverinSend a Private Message to anaverinEdit/Delete MessageReply w/QuoteDirect Link to This Post
Ben enjoying watching your progress! Was great meeting you at damian's this year, can't wait to see this car!! Hope tosee it at some events.


------------------
86 SE FASTBACK T-TOPS
88 FORMULA 4.9
87 GT MEDIUM RED METALLIC stockish


EMAIL : Anaverin@gmail.com

IP: Logged
bjc 350
Member
Posts: 952
From: Astoria
Registered: Oct 2005


Feedback score: (1)
Leave feedback

Rate this member

Report this Post04-20-2019 02:01 AM Click Here to See the Profile for bjc 350Send a Private Message to bjc 350Edit/Delete MessageReply w/QuoteDirect Link to This Post
Richard has been here the last few days getting more accomplished. We hope to have primer on by end of coming week. The more he works on the car, the more little defects he finds to fix before priming/painting. We may have made that priming statement prematurely before. Life gets in the way. We are looking forward to the end of bondo dust.


IP: Logged
bjc 350
Member
Posts: 952
From: Astoria
Registered: Oct 2005


Feedback score: (1)
Leave feedback

Rate this member

Report this Post04-20-2019 02:03 AM Click Here to See the Profile for bjc 350Send a Private Message to bjc 350Edit/Delete MessageReply w/QuoteDirect Link to This Post

bjc 350

952 posts
Member since Oct 2005
Fixing double post.

[This message has been edited by bjc 350 (edited 04-26-2019).]

IP: Logged
bjc 350
Member
Posts: 952
From: Astoria
Registered: Oct 2005


Feedback score: (1)
Leave feedback

Rate this member

Report this Post04-20-2019 03:11 PM Click Here to See the Profile for bjc 350Send a Private Message to bjc 350Edit/Delete MessageReply w/QuoteDirect Link to This Post

bjc 350

952 posts
Member since Oct 2005
I'm really confused why I get these double posts after years of posting without it happening. Any ideas? Old age and arthritic fingers?
IP: Logged
PFF
System Bot
cvxjet
Member
Posts: 3649
From: ca, usa
Registered: May 2010


Feedback score: (1)
Leave feedback

Rate this member

Report this Post04-20-2019 07:27 PM Click Here to See the Profile for cvxjetSend a Private Message to cvxjetEdit/Delete MessageReply w/QuoteDirect Link to This Post
I have found that if you use the "Back" button at the top left, it will back-up and then try to re-post(Double-post). Now what I always do is go to the top right of the Pennock's site and click on "Pennock's Fiero Forum" and then continue from there. If you do hit the back button by accident and it starts to re-post, just kill the whole page immediately and that will stop it from re-posting. (And why doesn't it have a safety "Are you sure you want to post again?"......I mean, does it expect me to KNOW what I am doing?!)
IP: Logged
shemdogg
Member
Posts: 1750
From: The Ghetto CA USA
Registered: Apr 2017


Feedback score: N/A
Leave feedback

Rate this member

Report this Post04-21-2019 05:34 PM Click Here to See the Profile for shemdoggSend a Private Message to shemdoggEdit/Delete MessageReply w/QuoteDirect Link to This Post
Looking very very good! I like the pics of the whole car it looks great. How did you attach the grilles to the scoops?

shem
IP: Logged
bjc 350
Member
Posts: 952
From: Astoria
Registered: Oct 2005


Feedback score: (1)
Leave feedback

Rate this member

Report this Post04-22-2019 12:51 AM Click Here to See the Profile for bjc 350Send a Private Message to bjc 350Edit/Delete MessageReply w/QuoteDirect Link to This Post
Those grills are attached via a very sophisticated method. Actually they are glued on with some strategically located GOOP RV adhesive. I have used it for many things including holding the tubular grill work in my V8 Fiero for nearly 10 years. It looks a lot like silicone, but is much more adhesive in nature. We should have it in primer and ready for final block sanding by the end of coming week. Then have to clean the bondo dust out of the shop so we don't blow it into the new paint job.
IP: Logged
bjc 350
Member
Posts: 952
From: Astoria
Registered: Oct 2005


Feedback score: (1)
Leave feedback

Rate this member

Report this Post04-22-2019 12:54 AM Click Here to See the Profile for bjc 350Send a Private Message to bjc 350Edit/Delete MessageReply w/QuoteDirect Link to This Post

bjc 350

952 posts
Member since Oct 2005
Another double post, but now I think I know what I have been doing wrong!

[This message has been edited by bjc 350 (edited 04-22-2019).]

IP: Logged
bjc 350
Member
Posts: 952
From: Astoria
Registered: Oct 2005


Feedback score: (1)
Leave feedback

Rate this member

Report this Post04-26-2019 03:30 PM Click Here to See the Profile for bjc 350Send a Private Message to bjc 350Edit/Delete MessageReply w/QuoteDirect Link to This Post
Closer to primer, but likely be tomorrow, Can't wait.


IP: Logged
Patrick
Member
Posts: 36401
From: Vancouver, British Columbia, Canada
Registered: Apr 99


Feedback score: (1)
Leave feedback


Total ratings: 458
Rate this member

Report this Post04-26-2019 05:37 PM Click Here to See the Profile for PatrickSend a Private Message to PatrickEdit/Delete MessageReply w/QuoteDirect Link to This Post
 
quote
Originally posted by bjc 350:

OOPS! Double post. Guess I can't delete one of them either. Funny, thought the first one disappeared. Obviously wrong.


quote
Originally posted by bjc 350:

Another double post, but now I think I know what I have been doing wrong!


You can't delete a post... but you can certainly edit and delete the entire contents of the multiple double posts in this thread. Doing so would help clean up this thread nicely and make it much easier to see all the great work you've done!
IP: Logged
bjc 350
Member
Posts: 952
From: Astoria
Registered: Oct 2005


Feedback score: (1)
Leave feedback

Rate this member

Report this Post04-26-2019 10:45 PM Click Here to See the Profile for bjc 350Send a Private Message to bjc 350Edit/Delete MessageReply w/QuoteDirect Link to This Post
Thanks Patrick. I will give it a shot.

You are right. Cleaned things up a bit.

[This message has been edited by bjc 350 (edited 04-26-2019).]

IP: Logged
bjc 350
Member
Posts: 952
From: Astoria
Registered: Oct 2005


Feedback score: (1)
Leave feedback

Rate this member

Report this Post04-28-2019 12:54 AM Click Here to See the Profile for bjc 350Send a Private Message to bjc 350Edit/Delete MessageReply w/QuoteDirect Link to This Post
Finally, lots of primer. Then sanding and fixing the fiddley things, more primer. And just maybe some color soon.


Guide coat applied.


Guide coat applied here, too.


IP: Logged
DotTC
Member
Posts: 2345
From: Hamlet, North Carolina
Registered: Nov 2003


Feedback score: N/A
Leave feedback


Total ratings: 154
Rate this member

Report this Post04-30-2019 01:16 AM Click Here to See the Profile for DotTCClick Here to visit DotTC's HomePageSend a Private Message to DotTCEdit/Delete MessageReply w/QuoteDirect Link to This Post
Bravo! Looking through this gives me some ideas, although not everyone's idea of what looks good is the same.. I love seeing unique and interesting cars. I like most of the front bumper, just can't for the life of me figure out what looks off to me. Overall tho, love it.
IP: Logged
bjc 350
Member
Posts: 952
From: Astoria
Registered: Oct 2005


Feedback score: (1)
Leave feedback

Rate this member

Report this Post04-30-2019 02:04 AM Click Here to See the Profile for bjc 350Send a Private Message to bjc 350Edit/Delete MessageReply w/QuoteDirect Link to This Post
I've done a few custom facias, and each time I find something I don't like. This one will look pretty good once the grill and lights are installed. But, I would never again try to design a facia around a Prius grill that I took a liking to! What I see, now that it is nearly finish, is the wrap around indent on each side does not flow correctly with the stance of the car. It points downward as it flows along the side toward the rear of the facia. I did not realize that until after we got primer on the car. But thanks for looking and I know it's not everyone's cup of tea as I have said before.
IP: Logged
PFF
System Bot
Patrick
Member
Posts: 36401
From: Vancouver, British Columbia, Canada
Registered: Apr 99


Feedback score: (1)
Leave feedback


Total ratings: 458
Rate this member

Report this Post04-30-2019 03:28 AM Click Here to See the Profile for PatrickSend a Private Message to PatrickEdit/Delete MessageReply w/QuoteDirect Link to This Post
 
quote
Originally posted by bjc 350:

What I see, now that it is nearly finish, is the wrap around indent on each side does not flow correctly with the stance of the car.


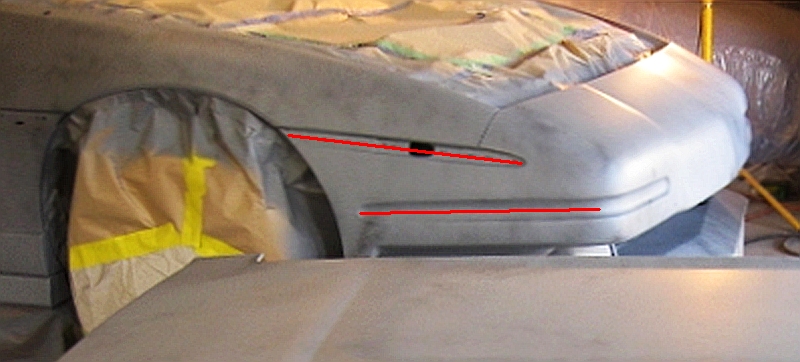
It's interesting that you should say that, as there was something about this which caught my attention as well. Is it possible that it's these two angles that are conflicting with each other?


If so, how would it look to delete the upper one?


Heck, you could even relocate the front side reflector/light within the new lower channel.

I am in no way trying to diminish what you've done with the car. It's impressive!

IP: Logged
bjc 350
Member
Posts: 952
From: Astoria
Registered: Oct 2005


Feedback score: (1)
Leave feedback

Rate this member

Report this Post04-30-2019 09:26 PM Click Here to See the Profile for bjc 350Send a Private Message to bjc 350Edit/Delete MessageReply w/QuoteDirect Link to This Post
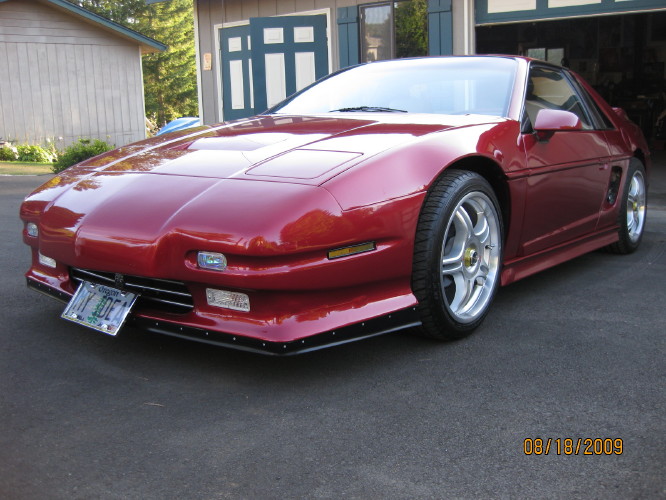
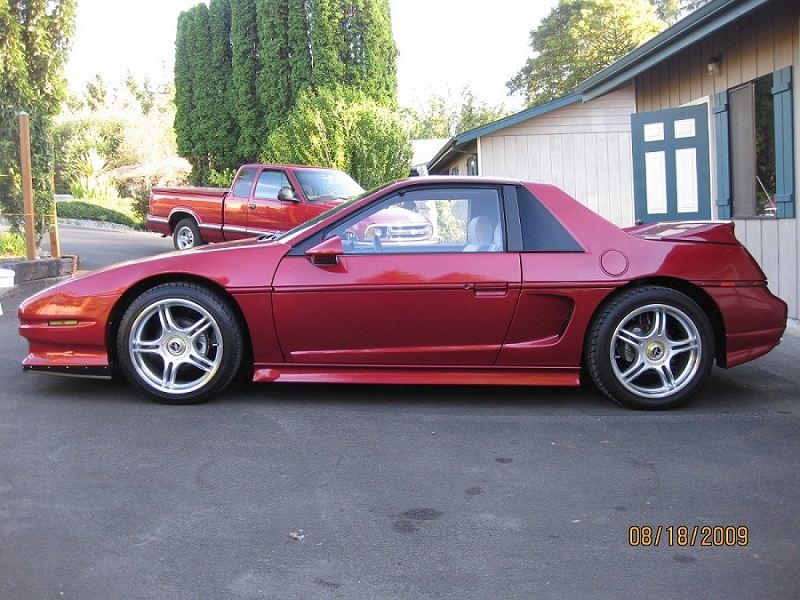
Patrick , I think it is two factors. Trying to keep the factory style facia moldings accentuated the top seam. And, by my error, the lower groove points slightly downward as it trails toward the rear of the facia. Creates a bit of incongruity that, at this point, I will likely live with. When the moldings are installed, It may help. My V8 car looks better from the side profile, because we did not use the factory molding, like you are suggesting. The V8 car has a problem with the bottom platform/base angling upward at a different angle than the rake of the car. I was able to mask it to some extent by adding the lower aero valance in black "rubber base" molding! That is why real automotive designers get paid the big bucks.


IP: Logged
Patrick
Member
Posts: 36401
From: Vancouver, British Columbia, Canada
Registered: Apr 99


Feedback score: (1)
Leave feedback


Total ratings: 458
Rate this member

Report this Post04-30-2019 10:06 PM Click Here to See the Profile for PatrickSend a Private Message to PatrickEdit/Delete MessageReply w/QuoteDirect Link to This Post
 
quote
Originally posted by bjc 350:

My V8 car looks better from the side profile, because we did not use the factory molding, like you are suggesting.


Cool... I don't think I've ever seen a picture of this Fiero before. Interesting that the front side reflector/light has also been re-located to where I thought it might be able to go. Great minds think alike!
IP: Logged
bjc 350
Member
Posts: 952
From: Astoria
Registered: Oct 2005


Feedback score: (1)
Leave feedback

Rate this member

Report this Post04-30-2019 10:50 PM Click Here to See the Profile for bjc 350Send a Private Message to bjc 350Edit/Delete MessageReply w/QuoteDirect Link to This Post
I'm hoping to install LED lights in the groove. I have purchased two different 24" sets, but neither gives a very finished look. They work as day time running lights and orange turn signal lights. Hope to find just the right ones, but so far not very good luck. They would wrap all the way around showing both from the front and the side as shown in a previous mock up.
IP: Logged
DotTC
Member
Posts: 2345
From: Hamlet, North Carolina
Registered: Nov 2003


Feedback score: N/A
Leave feedback


Total ratings: 154
Rate this member

Report this Post05-01-2019 02:04 PM Click Here to See the Profile for DotTCClick Here to visit DotTC's HomePageSend a Private Message to DotTCEdit/Delete MessageReply w/QuoteDirect Link to This Post
 
quote
Originally posted by bjc 350:

I've done a few custom facias, and each time I find something I don't like. This one will look pretty good once the grill and lights are installed. But, I would never again try to design a facia around a Prius grill that I took a liking to! What I see, now that it is nearly finish, is the wrap around indent on each side does not flow correctly with the stance of the car. It points downward as it flows along the side toward the rear of the facia. I did not realize that until after we got primer on the car. But thanks for looking and I know it's not everyone's cup of tea as I have said before.


I think it is what Patrick is talking about. The two different angles don't match. Overall tho, I like it.
IP: Logged
Yorgle
Member
Posts: 39
From: Berlin, Wisconsin, USA
Registered: Nov 2018


Feedback score: N/A
Leave feedback

Rate this member

Report this Post05-01-2019 03:50 PM Click Here to See the Profile for YorgleSend a Private Message to YorgleEdit/Delete MessageReply w/QuoteDirect Link to This Post
I like it! Here's a suggestion, though- when you're making the grill, do something to visually carry the lines of the hood bulge down into the lower area.
IP: Logged
bjc 350
Member
Posts: 952
From: Astoria
Registered: Oct 2005


Feedback score: (1)
Leave feedback

Rate this member

Report this Post05-09-2019 08:21 PM Click Here to See the Profile for bjc 350Send a Private Message to bjc 350Edit/Delete MessageReply w/QuoteDirect Link to This Post
Yorgle, I had never thought of accenting the upper hood into the lower valance area. If I ever do another one, I may try that idea. I think it would work well. Been in Vegas for a week so not a lot to report. Richard spent two partial days block sanding everything while we were gone. Today he came by and finished blocking the rear deck/spoiler area. Then he added a bit of glazing filler to some problem areas and will be back tomorrow to smooth them out. We have several areas along the front and rear moldings that need to have the lines finalized where they transition to the regular body surface. Also, the front groove in the facia needs to have the lines defined where they transition from the concave groove to the facia surface. Been hard for me to get them straight and defined. Richard will get it. Then, spot prime, sand again, and finally move on to sealer/base coat and clear. It is happening, just slower than we would like.
IP: Logged
bjc 350
Member
Posts: 952
From: Astoria
Registered: Oct 2005


Feedback score: (1)
Leave feedback

Rate this member

Report this Post06-02-2019 03:08 PM Click Here to See the Profile for bjc 350Send a Private Message to bjc 350Edit/Delete MessageReply w/QuoteDirect Link to This Post
Been a while since the last post. Work has been slowed because Richard is dealing with his health issues a bit and visits from his family. Likely will see him this coming week. We have a few lines to finish up, spot prime them and finally get some color on this thing. We finalized the front molding lines on both sides. But we still have a few other lines to get right.

Passenger side looks good, but concave area just below the front point of molding needs to be straightened a bit.


Driver side good to go except for spot priming.


Both rear quarter side marker moldings need the upper fender extended slightly downward to close the excess gap


This molding line behind driver door needs to be straightened. Slight rise just past halfway.


Couple pictures of infamous rear lighting panel with recessed LED backup lights added. Very close to final here, just need to add those six Caddy tail lights!


IP: Logged
bjc 350
Member
Posts: 952
From: Astoria
Registered: Oct 2005


Feedback score: (1)
Leave feedback

Rate this member

Report this Post06-20-2019 02:03 PM Click Here to See the Profile for bjc 350Send a Private Message to bjc 350Edit/Delete MessageReply w/QuoteDirect Link to This Post
Finally finished the rear lighting panel to our liking. That is the good news. Not so good, is that Richard who has really been doing the final detail work before paint, has had to head back to California to see his medical specialist. His health is more important than getting the car finished, by far! Not sure how long he will be gone. I may try to clean up the final lines and spot prime while he is away. Not real confident about the base coat clear coat painting though. I've only really done single stage paints before, with just OK results.
Anyway, pictures of finished lighting panel: 1 1/2" lights in center are LED backup lighting.


IP: Logged
Previous Page | Next Page

This topic is 5 pages long:  1   2   3   4   5 
next newest topic | next oldest topic

All times are ET (US)

Post New Topic  Post A Reply
Hop to:

Contact Us | Back To Main Page

Advertizing on PFF | Fiero Parts Vendors
PFF Merchandise | Fiero Gallery | Ogre's Cave
Real-Time Chat | Fiero Related Auctions on eBay


Copyright (c) 1999, C. Pennock