In early 2011, my team drove this '78 Mustang II in a 24 Hours of LeMons race in Reno, Nevada. We were being lapped by the leaders ever 3.5 laps with the exception of the 2:30 a.m. snow event when we were in the top half for speed.
I was hooked on racing (again) and decided to form a new team and build a new car. After a few minutes of research I found a website with the following quote. "The Pontiac Fiero may be one of the most perfect 24 Hours Of LeMons racers that very little money can buy"
Cool! Let's get a Fiero. Never mind that I'm 6'2" 240 lbs and my partner's 6'4" and neither of us had ever even sat in a Fiero, we were convinced. What could go wrong? Of course that quote was the first sentence of the article, and we didn't read the rest. You can do so here if you want. http://jalopnik.com/5056010...the-gray-ladys-pages
Because I use a digital camera and do not have to process film, I took a ton of photos. So I'm planning to document our efforts in turning this into a Lemons racer.
In July of 2011 we were searching Craigslist for a suitable Fiero for our LeMons endeavors. At that time we were aware that the '88 was the most desirable from a suspension stand point, but didn't really know why. We actually found two over the hill in Sacramento, CA. The first was this '88 coupe with a broken 4-cylinder.
We purchased it while on the way to the car we were most interested in, an '88 Formula (whatever that meant) with a v-6. A younger guy named Lance had this yellow Formula from his Uncle, the original owner. It had 98K miles and had obviously be run hard. Just a tip, if you are going to sell a car, at least make sure the oil registers on the dipstick. Just saying, it makes a better impression. Anyway, two weeks later we made the trip back over the hill and bought the car at a price we were willing to pay. To our advantage, Lance was hot to buy a new bike and had incentive to sell.
We had under three months until our first race, October 22nd. at Infineon Raceway.
[This message has been edited by DonP (edited 07-04-2017).]
Our first step was to scale the car. As it was unloaded off the trailer, with approximately a 1/2 tank of gas. That works out to 42% front weight, 58% rear
After cleaning out the trunk and removing the jack and spare, same split 42% front, 58% rear weight. The interior was intact and nothing really taken off the car.
I will jump ahead and say that our final, as raced weight was 2450, 57.4% rear and 42.6% front. With the heaviest driver in the car, (me) the total was 2688, 57.1% rear, 52.9% left side. That's fully built out with cage and everything.
[This message has been edited by DonP (edited 07-04-2017).]
So, where do you start when stripping a car down to make it a track car? Right, the interior. At this point we're not sure how to deal with the body, but seats are easy to rip out. Neither Rich or Robert were available on the first weekend that we had to start the project, so I was the one to jump in and start on the interior.
.
I gotta say, this was probably the last day that, when it was time to go home, it looked as though you had accomplished a lot. If it went this fast, surely we could build the whole car in just a couple strong weekends.... It's also the first time we started to get a real appreciation for how the car was constructed. In essence you have a space frame with a body attached.
Our car was exactly what people mean when they say they have a California car. Rust was virtually non-existent.
.
[This message has been edited by DonP (edited 07-04-2017).]
It's at this point that we could see the reason for some of the updates people are recommending for these cars.
, We followed suggestions we had picked up here on the forum and ordered a rebuild kit for the shifter as well as bushings for the transmission levers from Rodney Dickman. At the same time we added pedal bushings for the brake and clutch pedals.
I don't think we ever even considered new door hinge pins. They were stripped much further than this and weight wasn't a concern.
.
All the a/c and air controller stuff had to go. It wasn't until much later that we missed having a defrost, but that's much later in this story. Removing all of that structure meant that we had a much cleaner firewall...once we built a sheet metal plate to cover the hole.
.
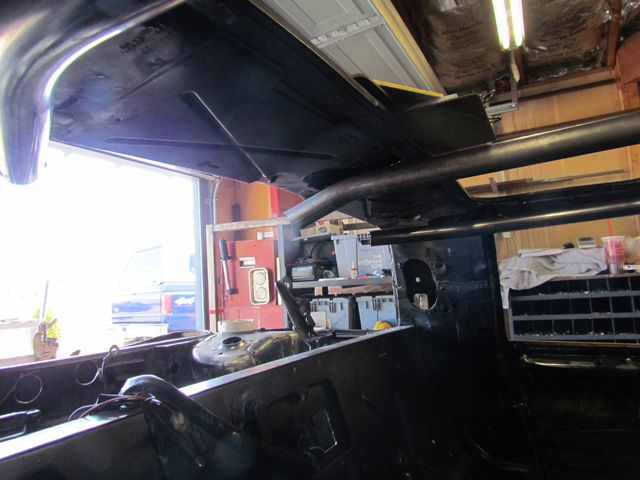
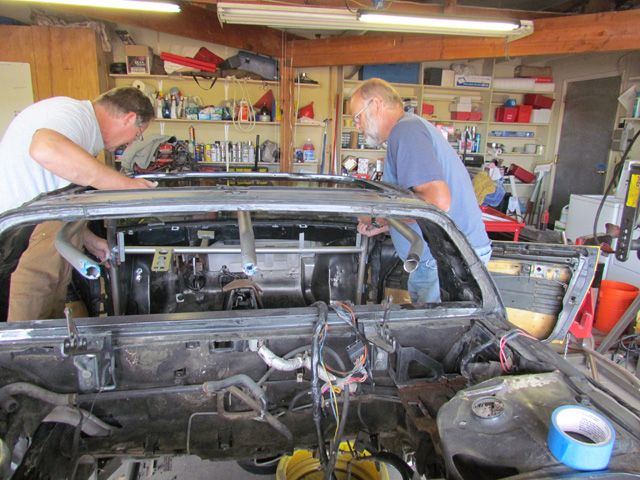
If you have never had to remove the dash from your Fiero, this is what you can expect to find. I have to say that I am always amazed at the amount of engineering that goes into designing a car. Just the packaging is fascinating. The engineer has to place dimples or tabs to attach parts and pieces that have nothing at all to do with the part being designed. The level of integration is awe inspiring. .
See that tube or cross piece that supports the steering column in the picture above and below? In addition to supporting the steering column and dash, it's actually part of the ventilation system! . Air travels inside the boxed structure. .
Didn't matter too much, because we ultimately cut it out flush with the top of the central console. We made some effort to label wires in order to help in deciding which could be removed later. Rich is a certified electrician and that can be a real PITA when you want to just rip everything out indiscriminately. But it paid dividends later when we had to put stuff back in.
.
[This message has been edited by DonP (edited 07-04-2017).]
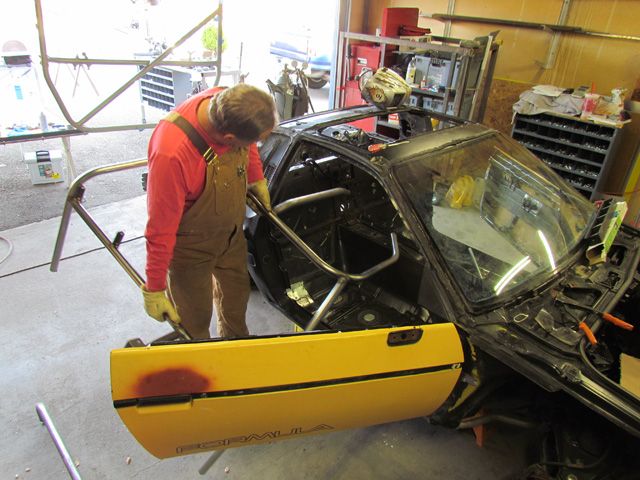
Next job was to strip down the body in our efforts to "add lightness" Once the body was removed we could evaluate what needed to be changed or eliminated. A couple of the postings here on PFF were invaluable. A lot of the body stuff isn't readily apparent.
Robert gets after the front end .
And Rich tackled the rear bumper cover. .
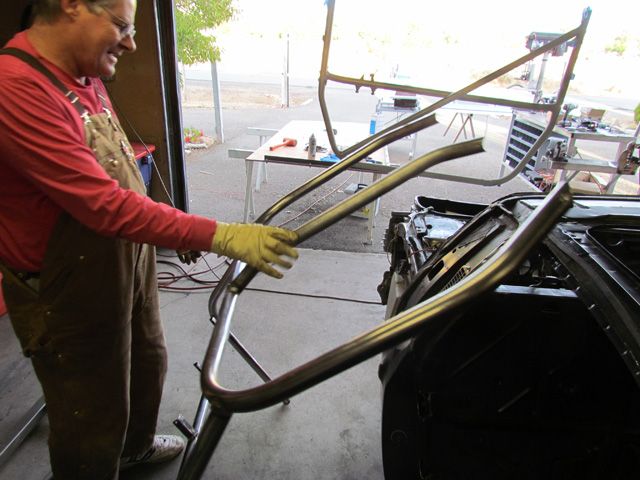
If you have ever had to remove the roof structure, you know what a pain that is. And yes, there are studs bolted through the roof! .
.
Pulled the rear cradle. Thanks for the write-ups we found on the forum! .
[This message has been edited by DonP (edited 07-05-2017).]
Our plan was to stay with the 2.8 and the Getrag. Once we got the car home, we had the opportunity to romp on it a bit since we are in an open rural part of the community. The neighbors are used to seeing, uh... different things going down the road. We did have some concerns about the engine. See the comment about no oil showing on the dipstick. So we picked up a second set of front and rear cradles. And shortly after we started, Pick-n-pull had their 50% off sale. So we picked up a second engine and tranny combination. The great thing was that the engine came with a 90 day warranty! That meant that we were going to be running our first race on a warrantied engine.
Having said that, we were reading all the posts here and a 3800SC seemed to be a very good option. We picked up a running driving '93 Park Avenue Ultra with a 3800SC. It was a series 1. Picked it up for $450, pulled the engine and wiring, sold the 1,200 mile tires for $200 and scrapped the rest for $203.45. So for less than $50 we had a SC. That figured into future plans, but we were in a serious time crunch, so it was a back burner project.
The original engine, as we picked up the car. Okay, it's just another engine bay......
.
At this point, we were able to break up the many tasks involved in creating a fire-breathing, flame belching race-car of a Fiero. Oops, let's delete the fire references.
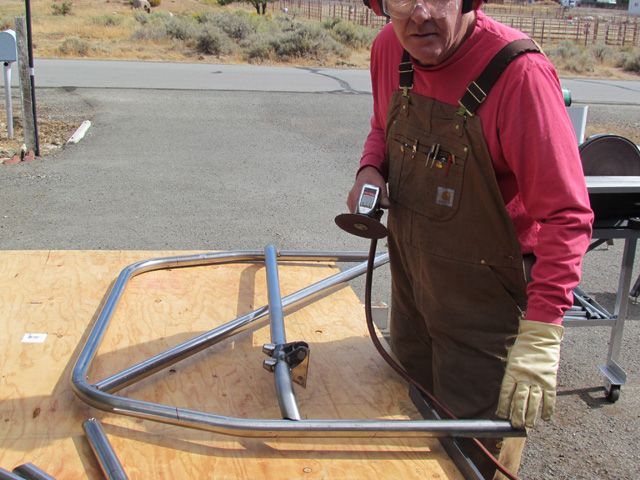
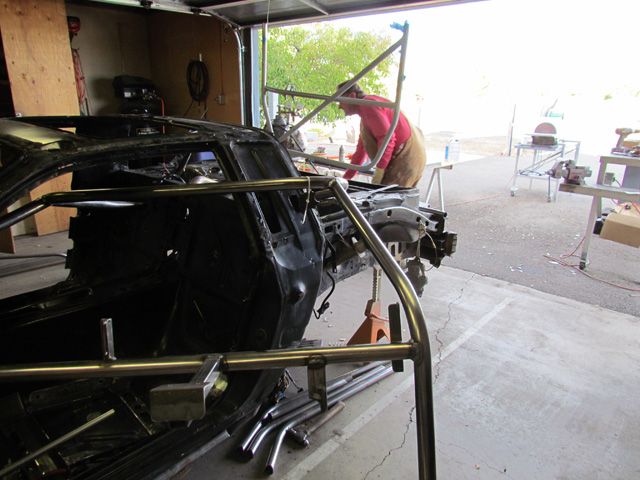
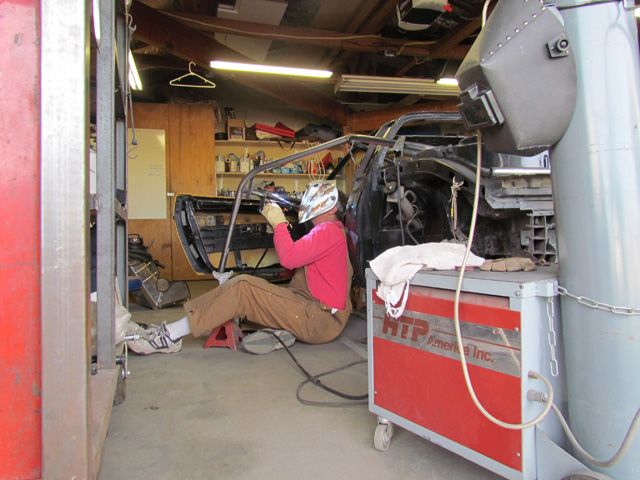
Rich has a tubing bender purchased early on in his race-car construction days. He has actually produced a couple instructional videos including building a stock-stub race car as well as the IMCA-modified race car under the C&K Motorsports title. Cage design and construction fell on his shoulders. .
. Robert and I tackled disassembly and clean-up of the suspension, brakes, bodywork and, well, the general clean-up that's necessary for building a track car. .
As I mentioned above, we found another '88 4-cylinder car in the local pick-n-pull. I spent a day dropping the front and rear cradles to have as spares. We also picked up a spare engine and transmission combination out of an '86 GT. Knowing that we were not going to be rebuilding an engine for the series, we wanted to carry a spare in case of catastrophic failure on-track. What better way than to have a complete loaded and ready to go spare cradle. If we had to swap an engine, it's far faster and easier to drop an cradle and replace it. Same goes for the front cradle with a complete suspension. Why not rebuild the engine? Remember, it's a LeMons race. So essentially the car should have a value under $500 less all the safety stuff such as wheels, brakes, cage, seat and like items. Some teams have reportedly rolled in "better" but still used main bearings. But a full rebuild is not within the spirit of the competition.
We did intake and exhaust gaskets and one modification I'll talk about later.
[This message has been edited by DonP (edited 07-05-2017).]
there is one small problem with you plans :your car is an 88 , and the 84-87 cradles dont fit that easily .you can adapt an 88 to early cars with a top of strut relocator kit , but nothing is available to go the other way .i am sure you guys could make something up though....but the 88's have the best suspension and brakes .great writeup , keep it coming .
Good catch WFTB. The front and rear cradles were out of an '88. The engine and transmission were out of an '86 GT. What did catch us out was the change in oil pans between the years. It was interesting to go through the wrecking yards and identifying the difference between the '88 suspension and earlier years. Visually seeing what people here were talking about.
So now we have to come up with a "Plan of Attack" (v1.0) I would suggest that anyone trying to build something like this (with so many tasks all of which seem to change almost at random,) find a team member who is painfully organized. I won't say names, but our guy was/is compulsive about lists. We had ever evolving lists of tasks to complete, parts to purchase, stuff to research (most often right here on the forum.) It's really the only way to make it all work, particularly with a very short window to work it all out. Here's a portion of one of the early "to purchase" lists.
You'll notice none of the early stuff was really Fiero specific, but mostly construction related. Stuff like Rodney Dickman's shifter rebuild kits, clutch slave cylinder and ball joints came later in the process. And trust me, there was a ton more to purchase.
Is it really Christmas if you have to pay for it?
.
[This message has been edited by DonP (edited 07-05-2017).]
We decided to remove the fuel tank fairly early in the process. The biggest reason being a safety concern . We knew that we would have a lot of sparks flying both during the disassembly process as well as the build-up.
Also, the fuel pump, water pump and oil pump are all "must replace" items for a track car.
What a pain! That's the first time we realized that in addition to a heat shield, there's a double bulkhead arrangement. The filler neck comes from the filler (in the now removed rear quarter) behind a wall and to the tank. Of course you cannot see a thing when removing the tube or replacing it. We took the opportunity to replace every rubber hose. Should you be in the same situation, make sure you use fuel rated hoses. Ordinary rubber hoses will deteriorate.
You can see the filler neck at the top of this photo. That smaller tube is the vent tube which also goes down to the tank .
Even today we are still discussing the possibility of using a racing style fuel cell. I think that our preferred option would be to mount one in the front trunk. Remember that 57% rear weight? In front would probably be advantageous.
We have already decided to mount the battery in the front. We elected to mount as shown in these photos instead of further forward just for protection. In addition we didn't want to mount it in the plastic tub as some guys are doing because of how it might hamper our plans to re-work the airflow through the radiator. I believe we bought the battery box through Speedway Motors, but several racing vendors carry a similar product. No plastic box and straps for us! .
You can also, see how we placed a piece of sheet metal over the opening created by removal of the AC system. The plastic tub was replaced once we were done with our work in this area. You can also see the steering rack stub. We will deal with that shortly.
[This message has been edited by DonP (edited 07-06-2017).]
Specifically, we had the option of using 1.50" x .120 (wall thickness) OR 1.75" x .095 tubing given that our car was under 3000 Lbs. We elected to use 1.50" x .120 tubing.
We also elected to go with ERW tubing instead of the more costly DOM tubing. If we had a local supplier for DOM, we might have gone that way, but having to make the trip over the hill into Sacramento just didn't seem reasonable. In addition, most cars we've been involved with in other series such as IMCA are fine with ERW.
We knew the basic design that we wanted to follow. We would also exceed the requirements when it came to the door bars. In addition, there's no way we would build a track car without a dash bar. We have debated this last point with a couple drivers who feel a dash bar is a way to get trapped in the case of a severe accident. I'm always left to wonder how they mounted their seats and submarine straps if they are going to be trapped. In addition a dash bar can help prevent the uprights from diamonding in the case of a side impact on the front down-tubes.
SPOILER ALERT!! I'm editing this in 4 1/2 years after the original posting. Check out the last couple images (that I anticipate adding) of this entire thread on page 8. The dash bars were put to the extreme test of a drivers side door impact. Without the dash bars, the young lady driving would likely have had a life changing incident. Instead she just had big time bruising. Use a dash bar if you are building a cage!
Rich headed down to the local steel supplier and picked up the material, three 20 foot sticks of 1.5"x .120" wall tubing . And I dragged out his Mitler Bros. air over hydraulic tubing bender.
Cost for the tubing was $272.31
[This message has been edited by DonP (edited 07-07-2017).]
Picking the seat was another task that had to be completed early on. The Main hoop of the roll cage is supposed to have 2" of clearance to the top of the drivers helmet. In a stock seat, I doubt I have 2" of clearance to the headliner even without a helmet.
This is one of those times it's so convenient to have Summit Racing just a mile down the street. We had the chance to do a direct comparison and experience the difference between a 15" wide seat and a 17" wide seat. We chose the 17". Our choice was a Kirkey aluminum seat with a 20 degree layback. It was a 36 series or what Kirkey calls an intermediate seat.
We also chose to add the padding, something we have not done with the IMCA Modified. The Modified races for maybe 10-15 minutes at a time. We are planning on up to 2-hour stints.
One of the first uses of the new racing seat. It may not have been mounted in the final position. There might have been a bit of snoring.
Checking out the steering position
[This message has been edited by DonP (edited 07-06-2017).]
Cool, another racer! Glad you found some entertainment from my thread. While we did end up completing the car and competing last year (great story that hopefully I'll finish someday), unfortunately I've had to move several hours east and now the car sits, waiting for someone to breathe new life into it and get it racing again. If you know anyone out east that might be interested in a chumpcar (or maybe someone near you who doesn't mind a long drive?), let me know.
Yeah, I saw how your thread just stopped. I watched for more. Have you brought the car up in the mall? Yes I realize how much is really put into these $500 cars.
I haven't put it in the mall yet, going to do that this weekend when I will be back in my hometown to take pics. I had all the rest of the pics and info to finish the thread but got discouraged with the amount of time it was taking to do and the lack of audience participation (for lack of a better term). Plus getting married, moving, and starting a new job took its toll on my free time. I'll see if I can finish it up just for the sake of completeness
Edit: And just to add to your statement, I think if I totaled up all the receipts just for the purchase of the car and the parts to get it ready for chumpcar (with free tools and labor) it came to around $6k. We did do a lot of things that weren't necessary but made for a better car. Then of course you have the fees for entering a race, for the car and each participant, then there's fuel, tires, any repaired parts during the race, etc. Don't get me wrong, I'm totally happy I did it and that racing weekend was one of the most fun I've ever had. It's just a little deceiving hearing "Racing for $500!"
[This message has been edited by kwagner (edited 12-18-2012).]
I just took a quick peek at the spreadsheet I was keeping on our build expenses. I actually gave up on keeping accurate records (but all receipts are kept in case I feel the need to exercise my masochistic side) in January of 2012. The build started in August 2011. At that time, our $500 car had cost $6,200. That included tires, but no actual race specific items such as entry fees, towing, lodging..........
Still, we are continuing on. It;'s still worth the expense. And I know what it costs to run a competitive IMCA modified car. We are still far below those expenses.
It's definitely on the cheaper side of racing. My comment was more for people in general reading through. I assumed from your previous experience you knew what the costs were
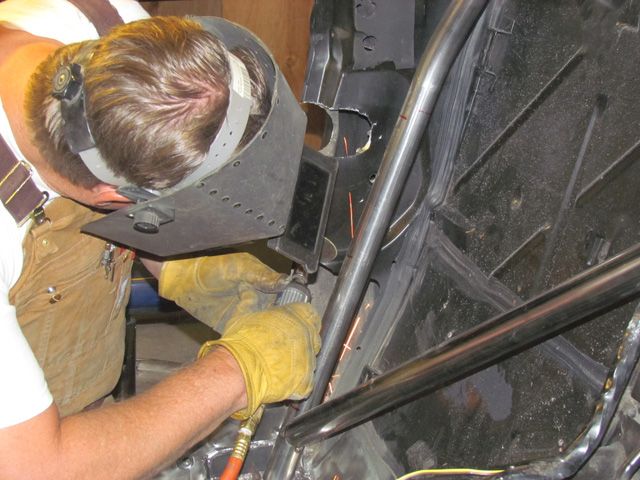
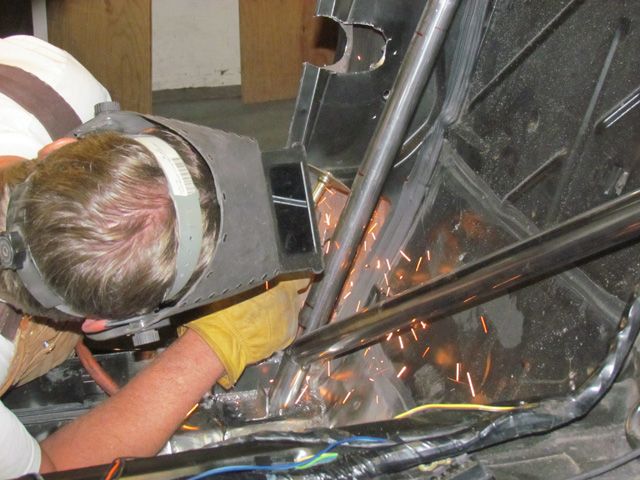
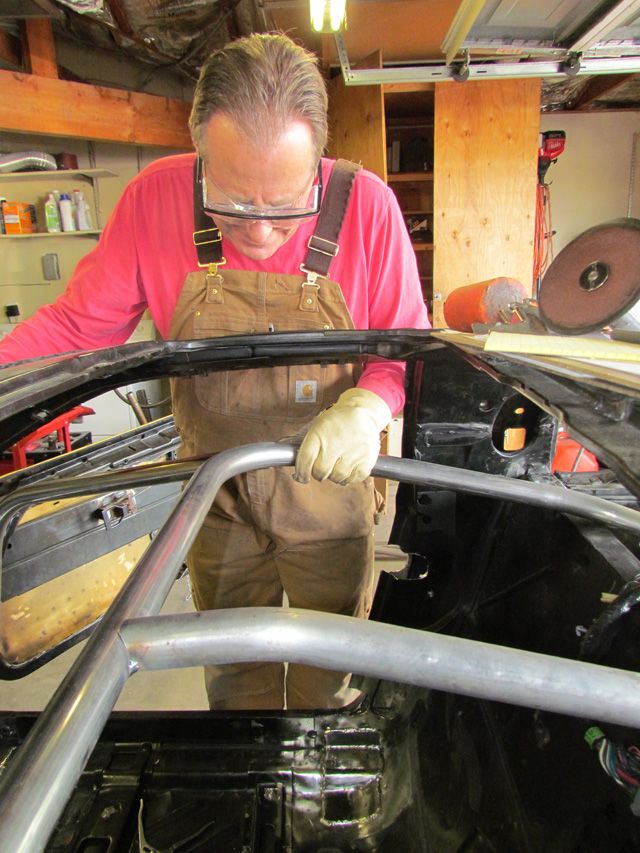
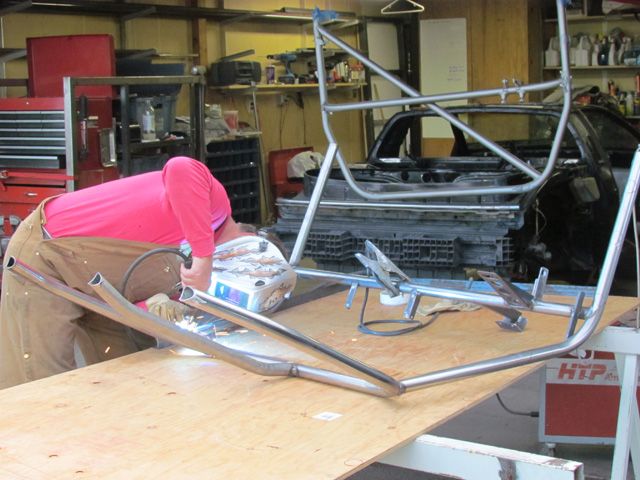
One of the biggest tasks in creating this track car has been the design and construction of the cage. The rules require a full cage, but still allows for some choices. For example, the door bars can be either parallel bars (think NASCAR) or an "X" design. We are not allowed to use a single bar coming down from the main hoop past the drivers door to the floor.
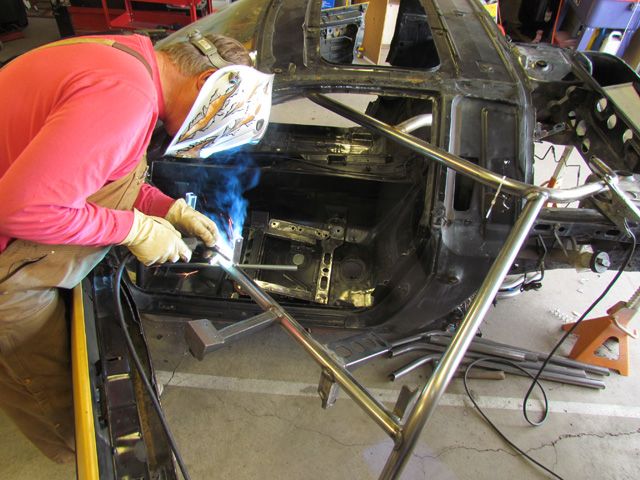
We started by cleaning out the cabin as much as possible. You can see that we left the main harness intact as it passes through the bulkhead. Having it in place made sure that we never forgot to make allowances for it. BUT we absolutely removed the ECU. We NEVER weld on the car with the computer in place. I know it's isolated, but why take the chance?
We know that we have to add a base plate at all points that the cage connects to the body. This helps spread the load in case the cage is actually called upon to work. We went through half a dozen wire wheels during the build. The chemicals they treat the base metal with really does penetrate the surface and makes it difficult to get good welds.
Smoothing out the base material .
[This message has been edited by DonP (edited 07-06-2017).]
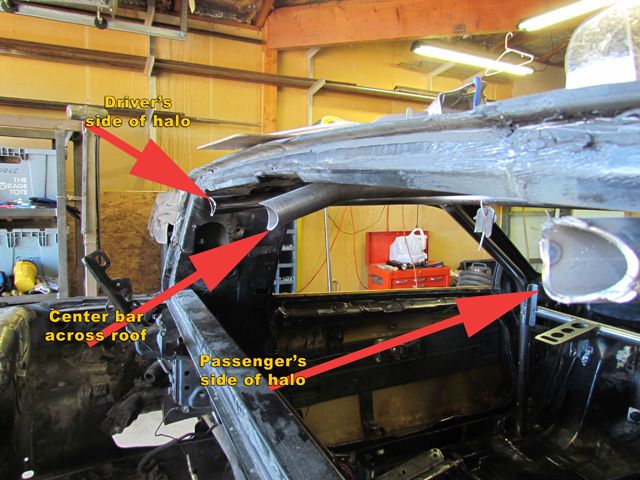
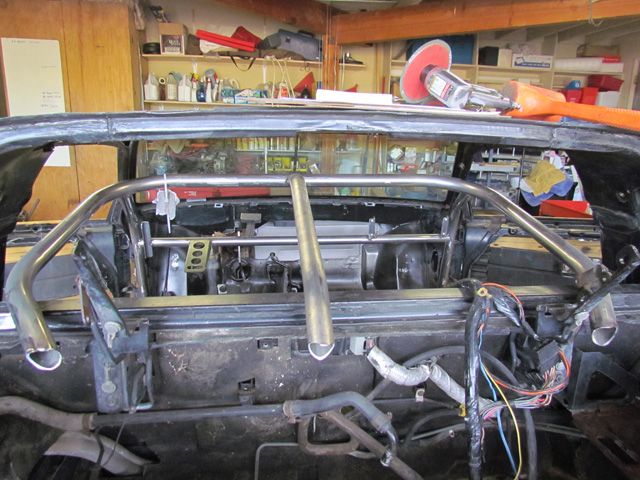
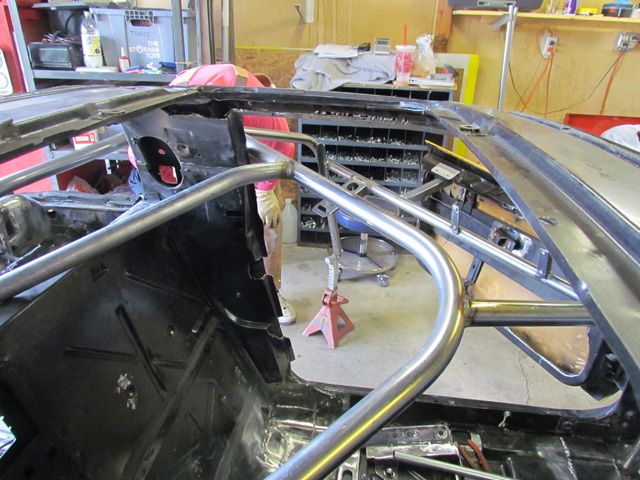
I did not get any shots of the tubing actually being bent, but this is an early initial fit of the main hoop. I added arrows at two points of interest. The A arrow shows some flat plate braces we welded to the top of the rear bulkhead. These helped to assure we always had couple reference points as we tweaked the hoop. Ultimately they were also welded solid. The "B" arrow shows some relieving we did to the roof structure. We made sure the hoop was as far towards the driver's side as possible in order to assure clearance for the driver's helmet. In addition, we kicked the "halo" out to the left as far as possible. So we actually cut into the first layer of the roof structure at that point. The cage should more than compensate for cutting into the structural pieces.
You can see the clearance in the left roof structure. That's just a piece of EMT temporarily holding the halo in place. It's not a permanent brace. Rich used a lot of EMT as an aid in designing the cage, and transferred finished measurements to the actual cage tubing. I have no idea how, I think it might have involved math. Maybe some geometry, but probably no calculus. I just washed parts.
A real common sight for those neighbor folks driving by. .
[This message has been edited by DonP (edited 07-06-2017).]
The base plates for the front down-tubes was significantly easier than those for the main hoop. The floorboard structure was a little more straightforward. These are the plates we made to fit the floor.
A little trimming, It's dark out there!
The front down-tubes are tacked in place
And it looks as though we have enough head-room.
[This message has been edited by DonP (edited 07-06-2017).]
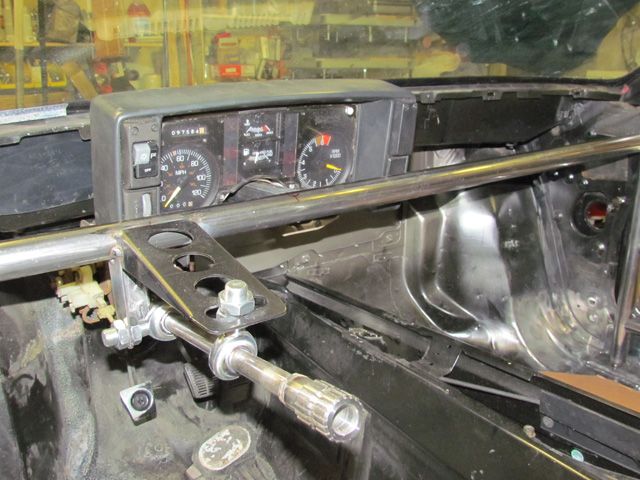
I gave our reason to add a dash bar to the cage. It just creates a much stronger and safer structure. We had not yet decided what we would do about gauges. But it was assumed that we could make everything work with the dash bar. The dash bar also provided a point to mount a steering column.
We purchased a new steering shaft from Speedway motors. http://www.speedwaymotors.c...ing-Shaft,15270.html It' a thick walled (.120") 3/4 O.D. DOM shaft. This is commonly used in track cars. It's much lighter than the stock column and removes the possibility of problems with tilt or locking mechanisms. We are definitely not using any of the electrical system related to the stock column, so it also helped clean everything up. We used the steering shaft mounting bracket from Coleman racing products http://www.colemanracing.co...t-Weld-On-P3963.aspx and connecting the bracket to the shaft is a pair of over-sized heim joints designed to work with the 3/4" steering shaft.
Here you can see how we actually built the steering column.
If you look closer, at the driver end of the shaft you can see a splined shaft. Those splines connect to the quick-disconnect steering wheel hub/connector.
That's followed by the two heims. We used two in order to help with supporting the shaft as you can see in the top image. We then used a u-joint from Speedway motors to alter the angle of the shaft towards the rack. From there, Rich cut another section of the 3/4" steering shaft and ended up sliding it INSIDE a portion of the original Fiero steering shaft . That allowed for the final connection back onto the rack and pinion. The fact that the two shafts overlapped was fortuitous as we would never want to just butt weld the two together. We were careful to make sure that the new shaft did not interfere with any of the pedals throughout their range of motion.
[This message has been edited by DonP (edited 07-07-2017).]
Great work guys!! I drive a Civic chump car in certain races here in the south east. It is not my car, I pay my share to race. It is between $800 to $1000 depending on the venue. That covers the entry fee, the gas and the car per driver. If you need a driver for a couple of endurance races you can count with me. I have a track day Fiero and I would love the opportunity to drive one in a race.
Rei Moloon
[This message has been edited by La fiera (edited 12-23-2012).]
Great work guys!! I drive a Civic chump car in certain races here in the south east. It is not my car, I pay my share to race. It is between $800 to $1000 depending on the venue.
Yup, this cheap racing isn't all that cheap. Until you compare it against other series and venues. Both Chumpcar and Lemons do have a fairly high entry fee. But you have to factor in the fact that there is no front gate to cover the overhead.
But another option that you are talking about is the option of buying a ride. The Lemons guys require a minimum of 4 drivers per car. That sounds weird until you think about the fact that the shortest (and most common) races run right around 7 hours. Most drivers will be in the car 1.5 - 2 hours at a time. As you know La Fiera, that's a LONG time to be in a race car. Anyway, often times a team may lose a driver for a given race for whatever reason and may elect to offer a seat for sale to spread out the costs. I talked with a guy at Sears Point last year that was participating in his third "arrive and drive" event that year. He flew in with his safety gear and a check and had a great weekend. The risk here is that the first driver can total the car in the first turn and nobody gets a refund. There's a specific area of the 24 hours of Lemons forum where many folks offer seat time. http://forums.24hoursoflemo.../viewforum.php?id=11
Being based in Reno, we race at the northern California events. I'm lobbying to make the trip to Portland, OR as I consider that my home track when I first started racing. Don't think the lobbying will work, however.
Have fun in the Civic!
Don
[This message has been edited by DonP (edited 12-24-2012).]
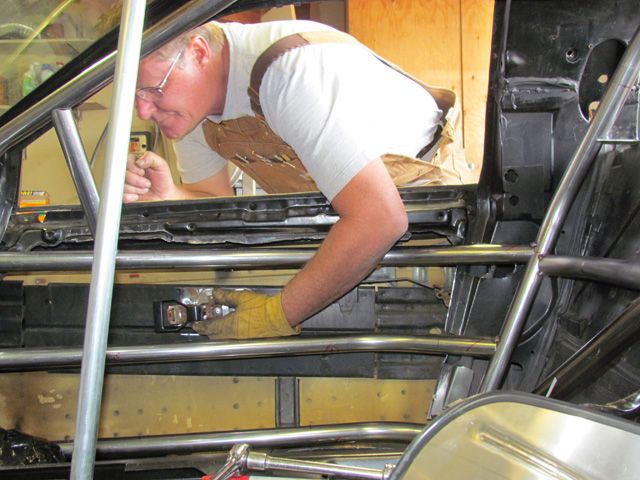
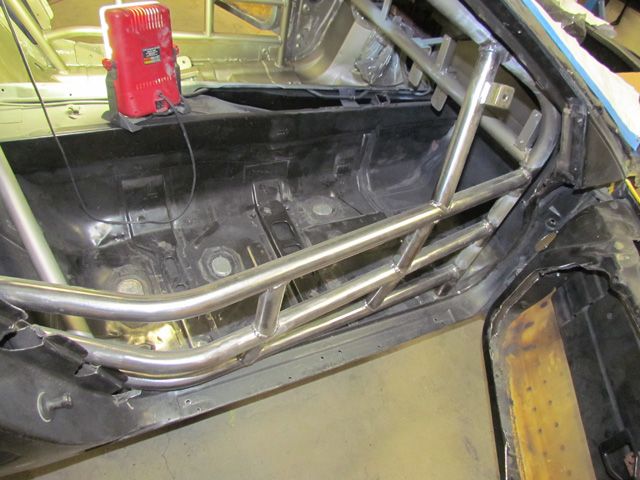
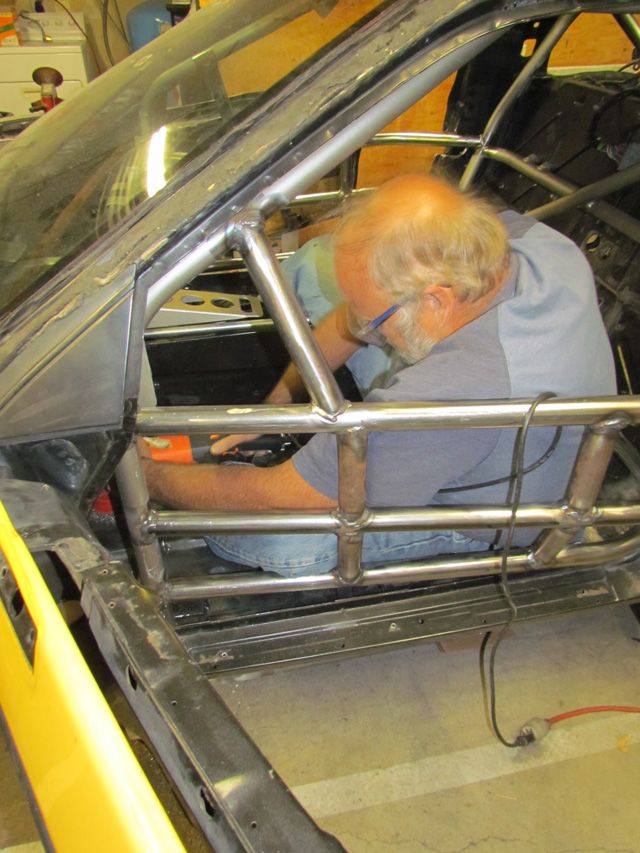
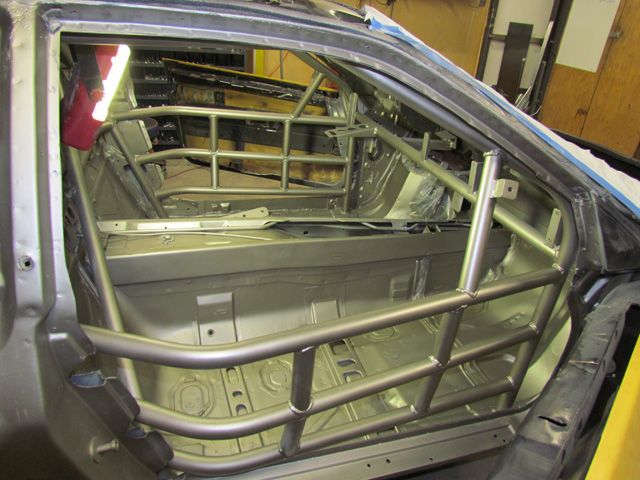
Now that the main structure was finalized, we set about adding door bars. Because we have raced and been hit before, there was no discussion about doing anything less than the full NASCAR style door bars. We chose to have three parallel bars joined by small stand-offs. In addition, there is just no way we would have the bars inside the normal cockpit area. First of all, if I am going get hit, I want some room for the bars to give before getting to the driver. But more importantly (and honestly) I'm too big to fit with the bars that close.
If you are going to use full door bars, a quick disconnect steering wheel is required. Trust me.
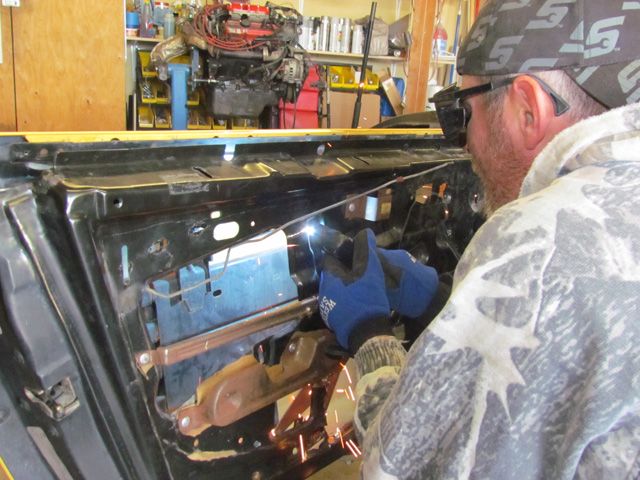
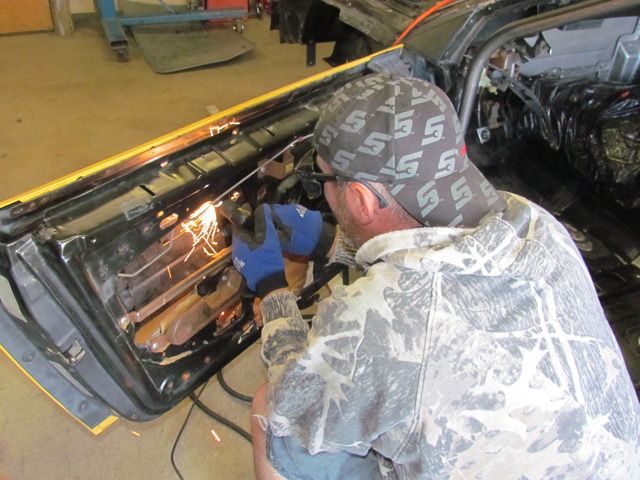
Robert took the first guess at where we needed to cut the doors inner panels. That would be modified on a regular basis as we went on. Plasma cutters are just too cool!
There is a commonly seen practice to build door bars with a compound bend such as seen in this photo. I found this post on the 24 Hours of Lemons Forum, so want to give them credit.
And we have problems with the design. In a significant impact, I feel that this type of s bend is more likely to bend into the passenger compartment. For that reason we chose to limit bends in a way to direct the energy from a significant impact. In order to do that, it was necessary to notch the door jambs. Again, I think this is a reasonable trade-off.
We moved the interior door release to the side impact panel. Yes, we tried to keep the door skins operational as doors. It's a bear to climb out the window. The top door bar is lower and stronger. We need all the help we can get. Yes, that is the passenger side. We are building the car with the possibility of having a passenger riding along and screaming from the right seat. We planned for ride-along instructors at SCCA and NASA events.
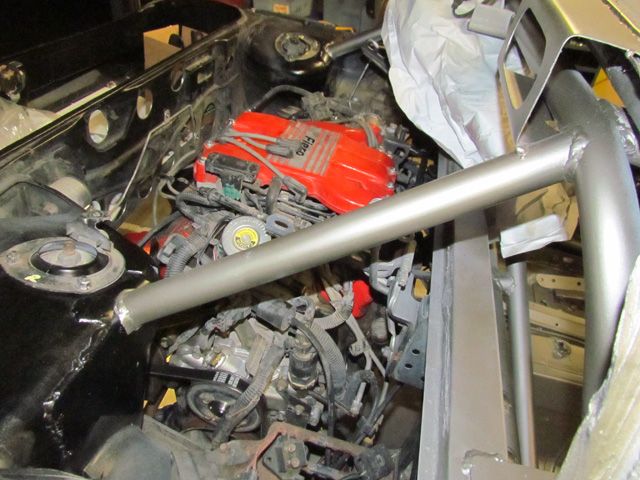
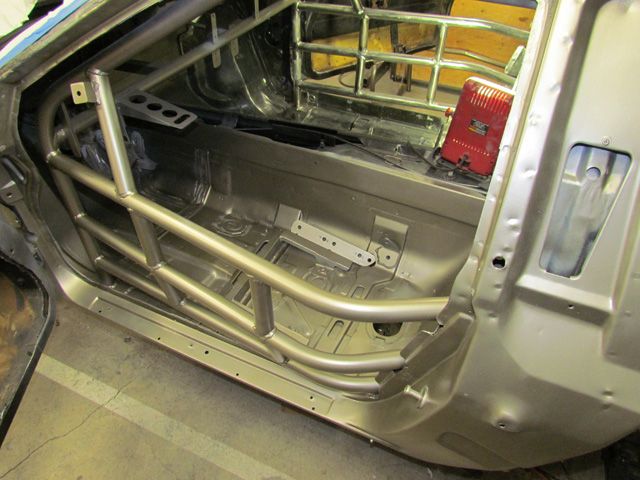
The rules require a pair of down tubes at the back of the cage. These are supposed to connect to the top of the main hoop and extend down and back at as close to a 45 degree angle as possible. In our case, this allowed for the braces to terminate at the rear strut towers. We made spreader plates that wrapped around the top and front sides of the strut towers.
The rules do not specifically prohibit forward running tubes from the dash bar to the front frame. But we couldn't think of a way to make them work.
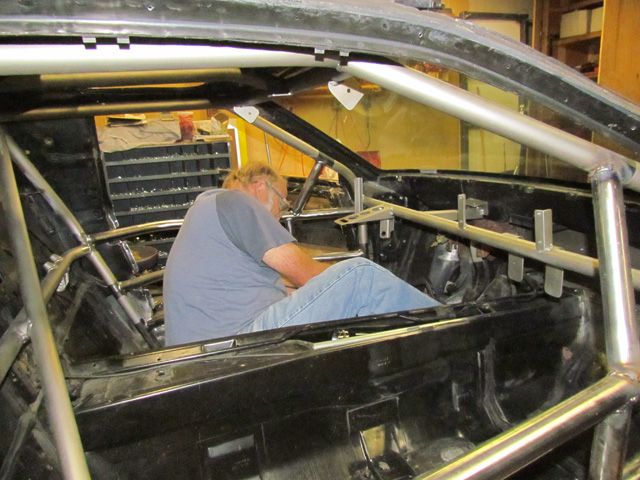
The biggest piece still missing from our build is the cross bar going across the main hoop. This is an important strengthening bar as well as one that provides a mounting point for the seat belts. Because of the shape of the rear structure and where the rear glass fits within it, the main hoop cannot fit flush to the rear bulkhead. And because we needed to allow the seat to be as far back as possible, we elected to modify the conventional design for this brace. Typically the cross bar and angled brace intersect on the same plane. The cross bar is cut and fish-mouthed to fit the angled bar, and everything is welded solid. We decided to take advantage of the space between the angled bar and bulkhead. So Rich bent a tight radius kick-back to run the cross bar behind the rest of the main hoop. You can see how that looked out of the car here.
In the following picture, you can see the bar offset. You can also see some fixtures that we have added to the bar. The squared off piece is a bracket to hold the seat back bracing. It's adjustable for two different seat positions. What's more interesting is the two conical looking fixtures. These are tapered "bungs" produced by UB Machine. Ub makes a ton of race related hardware pieces. These bungs have internal 1/2" threads for bolting a race harness to the cage. The wider base has a radius to match the cage and are welded on in whatever position you need. The bosses are here http://ubmachine.com/bosses.html
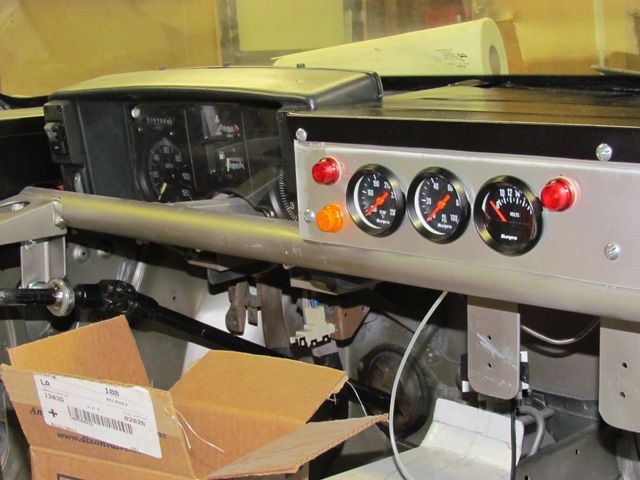
It was time to start mocking up the dash. Initially we planned on building something like the "Chariot of Fire" build https://www.fiero.nl/forum/Forum1/HTML/085472.html. That's a pretty standard way to deal with the whole issue. But I think our concerns about looking like we had done too much modification to the car kicked in. That and we found that the stock instrument pod could fit (and it was already paid for.)
But we needed some additional gauges. So we extended across the dash towards the right. Ultimately our finished dash looked like this. The two tabs below the add-on gauges are to hold the fire extinguisher.
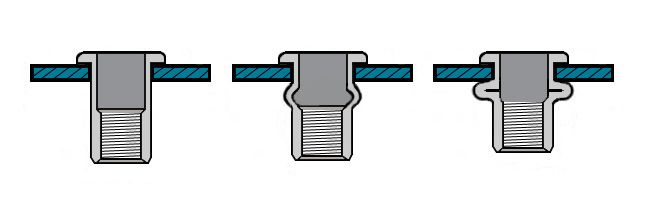
That meant we had to plan ahead and add some sort of mounting structure. Here are a couple pictures of the simple mounting braces. In the second photo, just at Rich's left elbow, you can see the brace we installed to hold the dash pod. We used nutserts to bolt the sheet metal to the braces. Nutserts are cool. They are in essence threaded pop rivets. Great for blind holes that need to be threaded, particularly in material too thin to accept a tap.
Very nice! I know this won't help you guys since you did this work already, but in case it wasn't mentioned in the other threads, Doug Chase told me he would drill holes into the floor and drop the cage down into it. Then he could weld 360 around all pieces, lift the completed cage into place, and then weld plates on the floor to cover the holes and mount the cage to the floor.
Yeah, that's a common approach. I've seen several "Street Stock" type cars use that trick. But we tried hard to maintain as much integrity on the shell as possible. But we thought of it! Chase does some nice work, we really scoped out his pictures before the actual build.
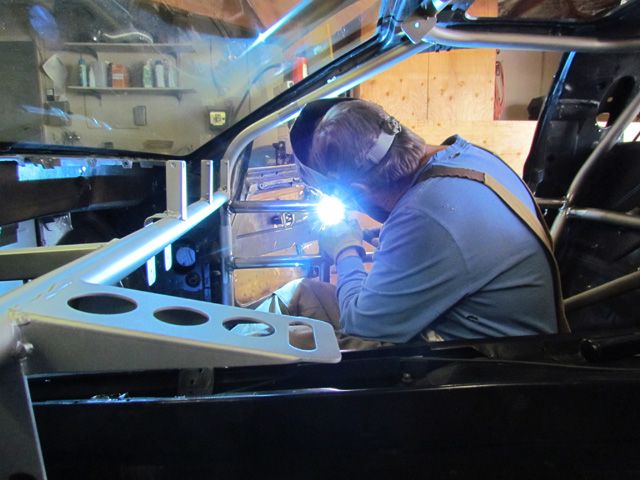
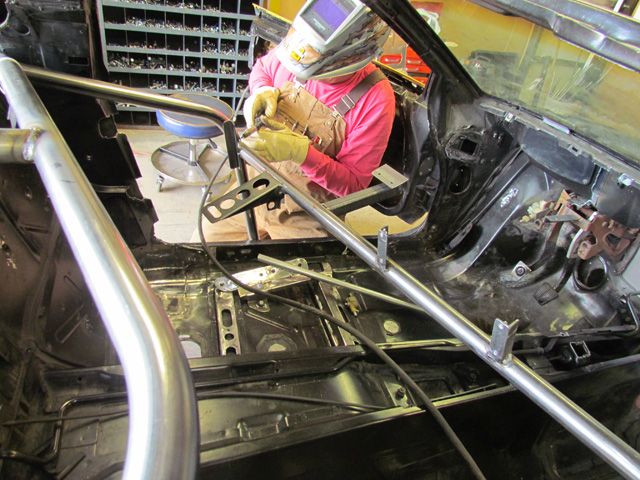
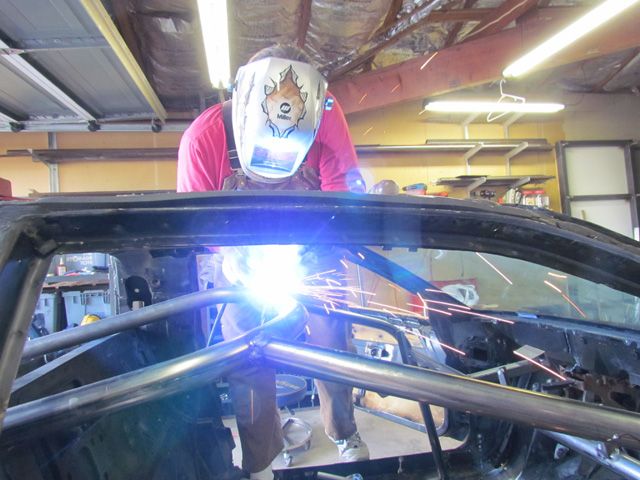
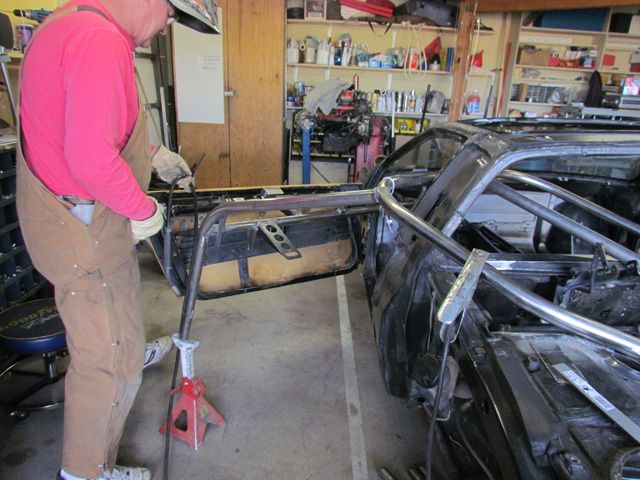
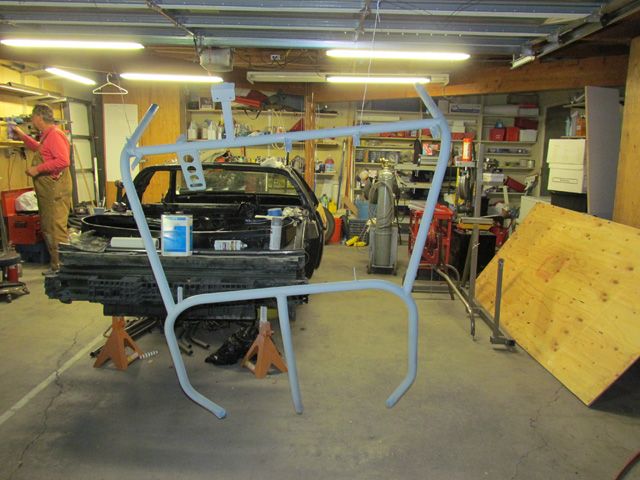
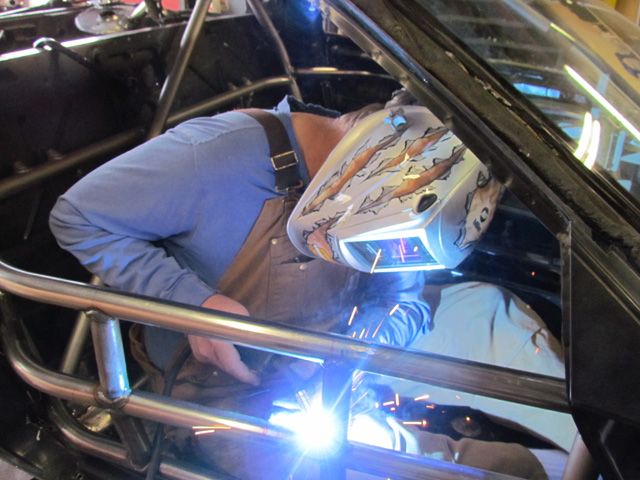
Now here's where it got interesting. To this point, the cage is mostly just tacked together. The intent is to get everything in-place and fitting before doing the final full weld. Anybody that has finish welded a cage inside the car can testify to how much a pain the process is. It is mandatory that all welds completely circumnavigate each joint. And the quality has to be good to fulfill the requirements of a race cage. Did you know that you can remove the cage from inside a Fiero, weld everything together out in the open, reinsert it back into the car leaving just a handful of welds to complete. Well, we gave it a shot.
First step was to break the tack welds where the main hoop joined the halo and the floor plates. That allowed us to snake the main hoop out. Okay, we removed the door bars before even attempting this. The only way (I think) that it can work is with the back glass out of the car.
Okay, to be honest, we had not yet thought of trying to remove the front half and top of the cage. Our intent of removing the main rear hoop was to allow us to pivot the rest of the structure back to gain access to all joints. You can clearly see that the joints were just tacked together.
But we started snaking portions out of the cabin to gain easier access.
Finally came the realization that we had more of the cage outside the car than in. Again, we had earlier tacked the door bars in place, and removed them. Had we not done that, I don't believe we would have even thought that removing the main structure would be possible. Oddly enough, we could get it out of the passenger side, but not the driver's side. I think that was because we had fudged the halo towards the driver's side for greater head clearance.
Welding became an easier proposition. That's the main hoop hanging in the back. It's been fully welded, cleaned, primered and painted.
The rest of the cage painted and ready to reinstall. If you look closely, you can see where the paint stopped in preparation for final welding once back in the car. Our choice of paint is the Rust-Oleum "stainless steel" paint we pick up at Lowes. It gives a nice clean look to the bars. Just our choice. The picture below is still in primer.
[This message has been edited by DonP (edited 12-26-2012).]
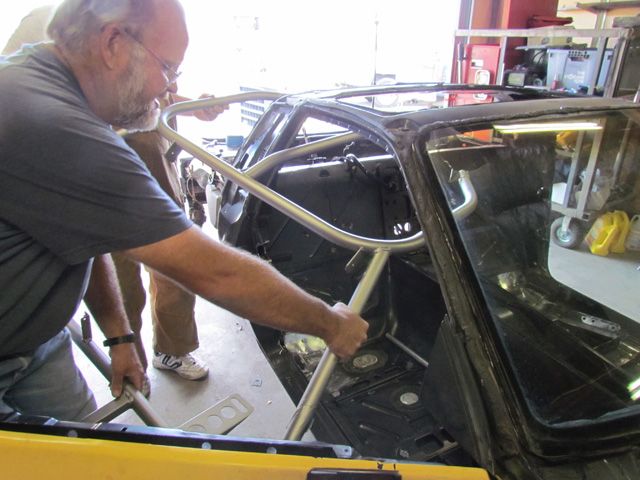
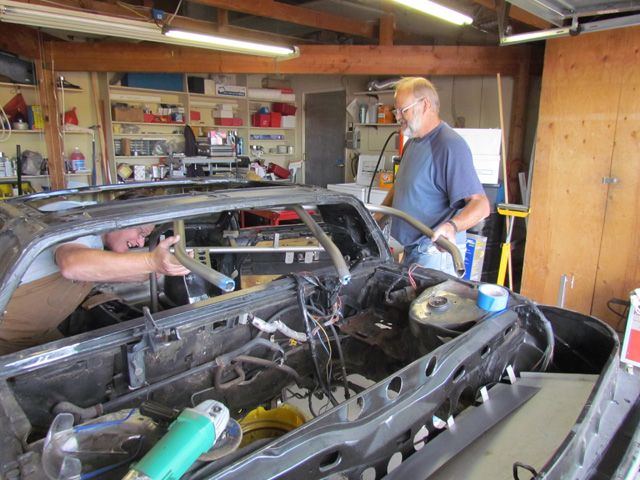
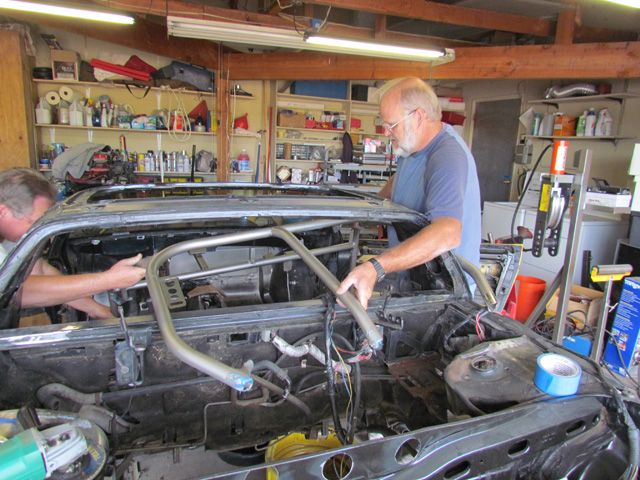
Once the cage was welded and painted, we had to snake it back into the car.
From there, we basically set everything in place, with the main hoop being the keystone for the whole thing. We fit and tacked the main hoop to the floor plates which were solidly mounted, and then tacked the already welded halo/downtubes/dash bar structure to the main hoop. And then, without welding the front downtubes to their corresponding base plates, we tacked in in the door bars. We actually had to use a ratcheting tie-down strap to pull the front tubes back towards the rear hoop and make the door bars fit tightly. We then broke the main hoop tacks which allowed us to shift the entire structure inside the passenger compartment. Moving the structure gave us access to weld fully around the door bars. Once we had the door bars fully welded, we moved everything back to the final position and welded the main hoop and front down tubes to their respective floor plates/spreaders. We were lucky to have someone who has been building race cars since the '70s as Rich was able to plan out each step in the process.
Note to self, wire brush the floor pan, rear bulkhead and sills BEFORE welding in the cage. I spent quite a bit of time with the wire brush cleaning all the surfaces. I cannot weld, but I can clean. It was definitely cramped with the cage installed.
But we did finally get it cleaned, primed and painted. Again we elected to use the Rust-Oleum "stainless steel" paint for the complete interior. With all the sheetmetal exposed, black would be too dark. And we like the clean and bright look of the stainless steel.
Notice that we masked off stuff that we wanted to keep from being painted. Here we had plastic bags over the pedals to keep the pivots clean. We also masked off the windshield inside and out before painting.
On the picture above and below, you can see side mirror mounts we installed prior to painting. We didn't want to rely on the stock side mirrors as they are too exposed in the case of impact.
[This message has been edited by DonP (edited 12-27-2012).]
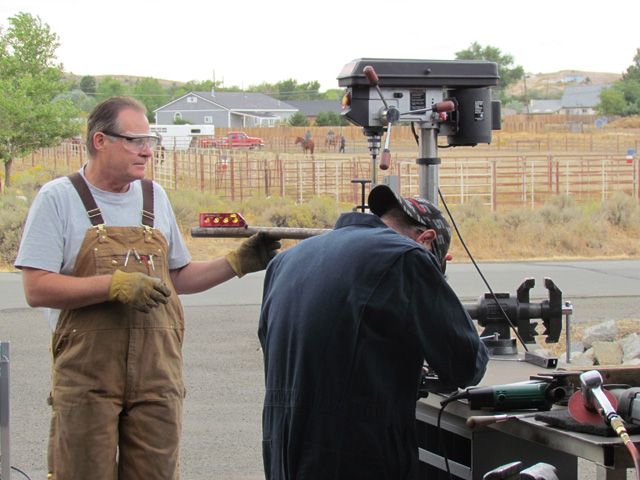
Prior to starting the build on our cage, we took a trip to both summit racing and Harbor freight to check out their tubing notchers. They looked to be very similar and we picked up the slightly cheaper unit at Harbor Freight. It's neat to have these guys both right here in town. The first thing Rich always buys before starting a new car build is a new file. He gets a new 14" 1/2 round file to deburr all tubes joints. If you were to watch the build, it would be surprising how much work is accomplished with a new sharp file.
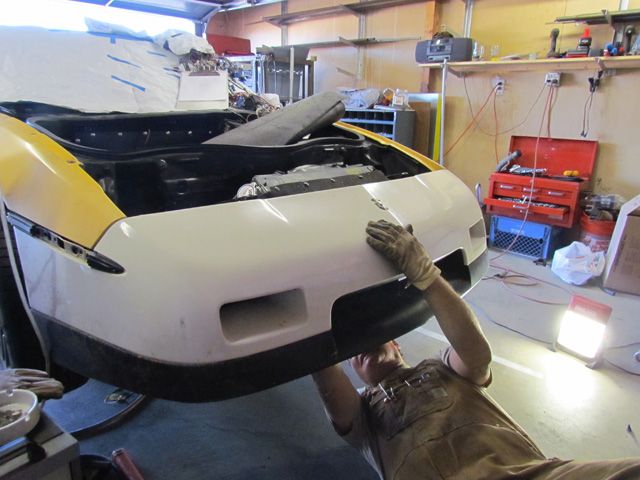
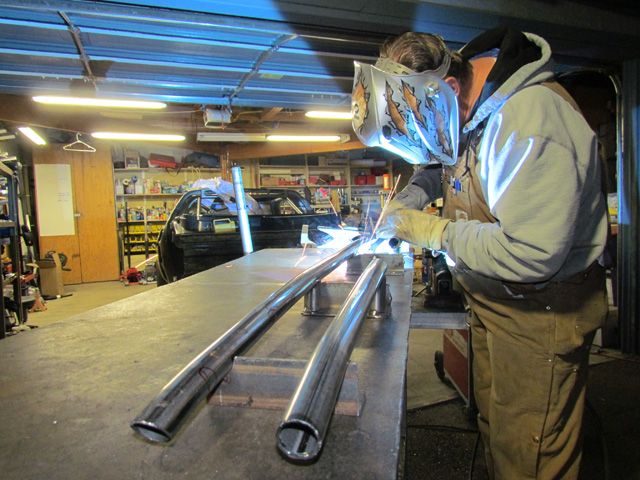
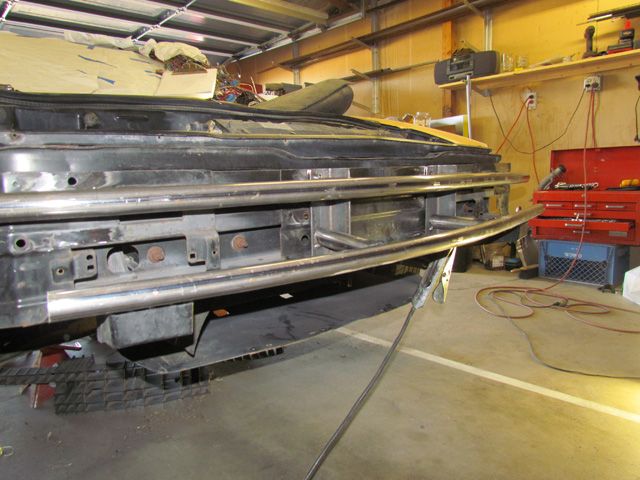
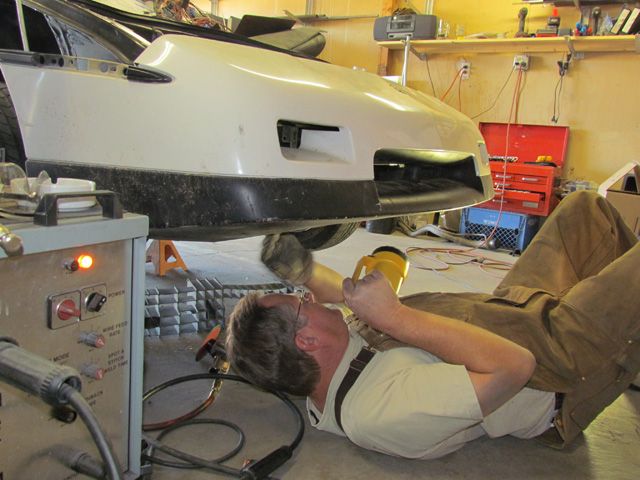
Before putting the tubing bender away, Rich tackled the front and rear bumpers. We knew that we couldn't slap a cattle guard on the front and back and call it good. It just wouldn't fly with this type of racing. At the same time, it just doesn't work to leave the bumpers ignored. That's when we found some inspiration in the "Team Pontiaxed" build here on the forum. I cannot find a link, but they removed the egg-crate behind the nose and welded what appeared to be a race-inspired tube bumper with two parallel bars and stand-offs. With the nose reinstalled, all was hidden behind the plastic. But they used an aero nose which looked to allow more room and better air flow. so we found an aero nose.
We have a big debate on the team about the aesthetics of the standard Formula nose versus the aero nose. I come down on the side of the standard nose. Rich on the side of the aero nose. Robert wisely wants nothing to do with the discussion. In any case, the aero nose wins out for the on-track application.
Rich made a template out of light EMT tubing and then started bending the full-size tubing to match Behind the plastic egg-crate is what we believe to be spring steel. No way to easily drill through this material. But we could weld to it. So he got to work on making the bumpers. The final bumpers was made of 1.25" tubing at .081" wall thickness. Didn't have any .093 on hand or we would have used that.
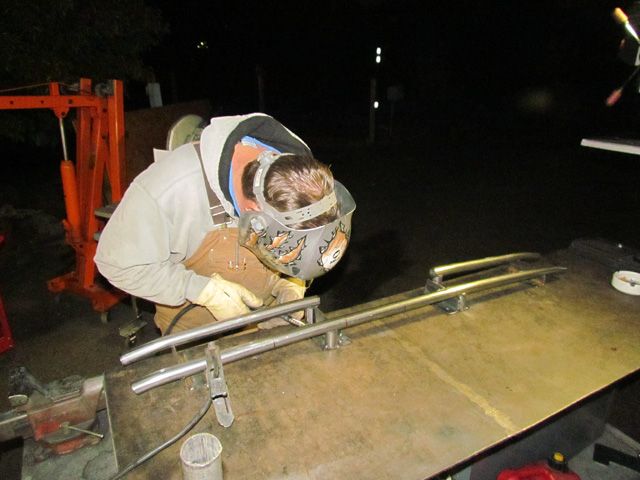
This is the rear bumper. You can see the cut out in the center of what is the lower bar. That cut-out accommodates the license plate pocket in the rear cover.
He used two pieces of angle iron that welded to the original steel structure. From there, he made a couple of standoffs to kick the bars forward to the point that they are just in contact with the back side of the plastic nose. He bent two bars that follow the contour of the nose and are welded to the standoffs.
Checking the fit
[This message has been edited by DonP (edited 12-30-2012).]


 Glad you found some entertainment from my thread. While we did end up completing the car and competing last year (great story that hopefully I'll finish someday), unfortunately I've had to move several hours east and now the car sits, waiting for someone to breathe new life into it and get it racing again. If you know anyone out east that might be interested in a chumpcar (or maybe someone near you who doesn't mind a long drive?), let me know.