So, I’m finally getting around to doing the drive train swap on my Fiero. I have had the donor parts in my possession for a few years now, but no time to really get into the job. Now that I’m starting the swap, I knew I had to do a build thread on PFF. Thanks to all of you who have taken the time to post excellent information on your own builds and to help others. Reading those posts helped convince me to do the swap that I have chosen.
The car: A red 1985 Fiero GT, 2.8l automatic, with 116,000 miles on the car. I was going to rebuild the stock motor, but figured if I’m going to go through all of the work and cost required, why not put that effort towards installing a more potent power producer. After doing much research and finding all kinds of help on PFF, I decided the 3800 Series 2 supercharged motor with the 4T65E-HD transaxle was the way to go!
The donor car was a wrecked 1998 Pontiac Grand Prix GTP with 83,000 miles on it. I was able to get the complete front clip with the motor, transaxle, PCM and wiring harness. All of the parts were in good shape, but very dirty and some aluminum oxidation was evident on the supercharger, intake, transaxle and alternator.
Here is a shot of the motor and transaxle out of the donor car awaiting disassembly, cleaning and painting.
I separated the motor from the transaxle and I cleaned all of the dirt and greasy mess from both using wire brushes, Castrol Superclean, and varsol. For better cleaning, I removed the valve covers, oil pan, supercharger and intake manifold. I checked the bottom end while the oil pan was off – no problems found. All of the aluminum parts were quite difficult to clean, being so porous, so I bought a bag of walnut shell blasting grit and shell blasted them. That method worked very well and got the parts clean and looking good (ready for paint!). I removed the transaxle oil pan, looked for signs of trouble and replaced the oil filter. The torque converter seal and axle seals were also replaced. It sure looks a lot better cleaned up and painted!
I gave the valve covers a thorough cleaning and then thought about doing something more than just painting them. I have seen some nice work with the 3800 valve covers here on PFF and other places, so I wanted to do something unique as well. When opening the trunk lid, I wanted the valve cover to stand out and catch the eye. Using high temperature epoxy, I ended up filling in the grooves on the valve cover closest to the back of the car. After sanding, this leaves a smooth surface, which I painted flat black. The rest of the valve cover was painted Chevy orange.
I found a “3800 Series ll” emblem and also a chromed metal “Supercharged” emblem on ebay and affixed them to the valve cover with epoxy glue. I drilled holes for the Supercharged emblem’s 3 pins. The final result looked like this.
The alternator got a complete overhaul. I took it apart, shell blasted the casing and installed new bearings and a new diode pack. The casing and pulley got a coat of paint and everything was re-assembled. The supercharger was disassembled and cleaned out. The needle bearings were re- greased and the gear oil changed. Everything seemed tight and no signs of rubbing. With all of the cleaning, walnut shell blasting and painting done, this was the end result.
Looks really nice! Wont it be difficult to access your oil fill though?
Thanks. Yes, I realize the PITA factor was going to go way up for adding oil to the motor, but I decided to give in and do it anyway. Call me shallow, but I think the girl looks better dressed up this way,LOL. I've seen a few 3800sc swaps on the forum with the oil filler on the firewall side, although the majority are on the trunk side. I would imagine the oil could be added on the firewall side with a funnel / hose setup?? Not sure what the other guys do. I'll see how it goes when I get to that stage. If too painfull, I might have to re-think the setup.
TheRealShadowX Keep it up! Lookin awesome! Loooove the Flat black and orange.
------------------
Thanks! Hey , 85GT with a 3800SC, 4t65e-HD! You've done what I'm doing! I love this forum.It's such a great source of information for Fiero know how .All comments are welcome in this build thread. If you guys see some place to throw in some constructive criticism, I would be happy to hear from you!
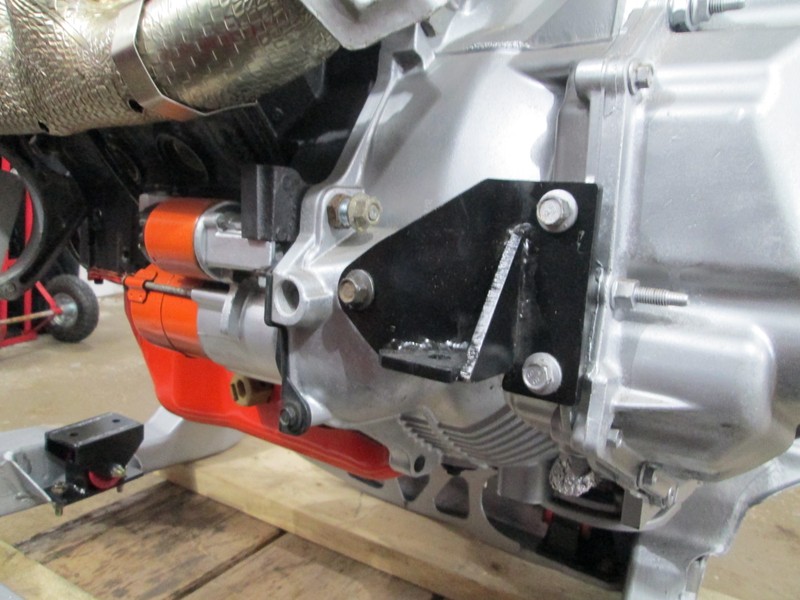
I made up a low-mount alternator bracket from ¼” plate. It also holds the accessory tensioner pulley and serves as the dogbone mounting point. The tensioner pulley is from a 1995 Ford Windstar (with a 3800 engine). I used this one because it had the tallest body I could find and even with that, I had to make up a 3/8” spacer to bring it in line with the rest of the pulleys. For the dogbone mount, I first mounted a stock GTP bracket and took measurements of exactly how my homemade bracket should be built. With the alternator mounted on a single stud (with a few washers to space the alternator out to proper pulley alignment), I measured to determine where the other alternator support mounting should be placed on the bracket. Armed with these measurements, some ¼” steel plate and a welder, I put the bracket together with frequent stops for test fitting to be sure it all would line up. Here is the finished bracket.
This pic shows how the setup looks with the drive belts installed.The supercharger belt is stock length (Goodyear 4060660), but the accessory belt had to be quite a bit shorter than stock (4060835). The local parts store (Part Source) was great when I told them what I was doing and allowed me to try a couple of belts to determine the exact one I needed. Even with measuring beforehand, I still needed a belt 2” shorter than I thought to bring the tensioner to mid-travel.
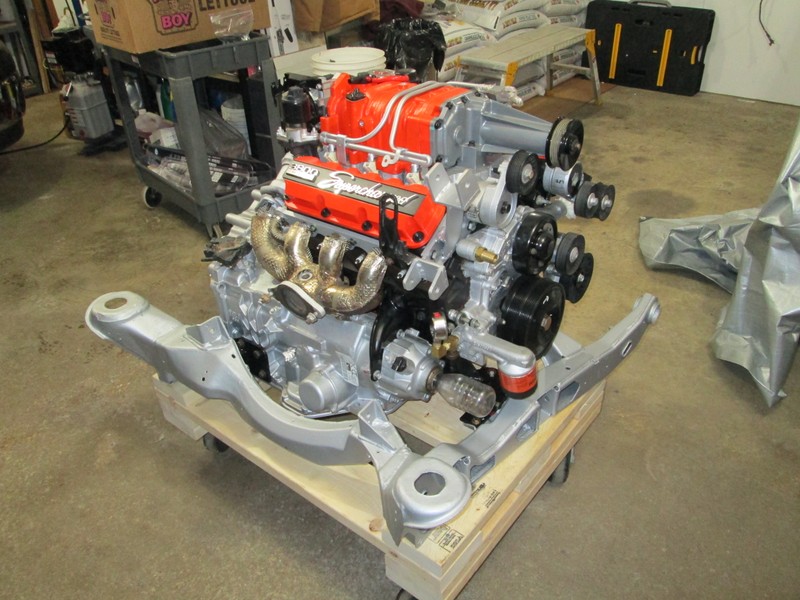
FUEL RAILS I have seen several methods of handling the fuel rails on the forum, ranging from leaving them stock to replacing them with billet fuel logs. I went with modifying the stock rails to eliminate the need for fuel lines wrapping around the engine. I cut, swaged, bent, added line and brazed the stock rails to place the fuel connections close to where the stock Fiero lines are. The whole job is just a variation of what some guys were doing with bending the stock lines back to face them toward the same general area.
Here are some shots of the fuel rails installed on the engine (before I did the valve cover art).
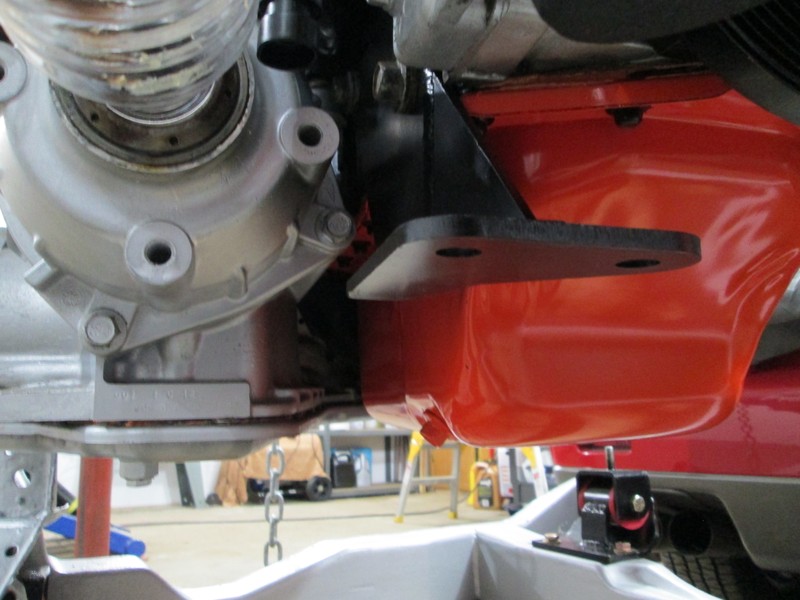
HEATER CORE SUPPLY/RETURN For the heater core supply, I opted for using a modified Fiero thermostat housing. This seems like the easiest way to fill the cooling system and access the thermostat too. I had to modify the mounting bracket for the boost bypass valve so the valve could be rotated counter clockwise, and allow room for the thermostat housing. For the return, I installed a 7/8” freeze plug in the intake manifold port and threaded a barbed fitting into the coolant return passage. I may change that fitting to a 90° to keep the hose tighter to the engine and not routed through the belt.
Looking good and clean. Very nice work on the tensioner, alternator mount, dog bone bracket and water outlet. Looks to be sturdy.
------------------ " THE BLACK PARALYZER" -87GT 3800SC Series III engine, custom ZZP /Frozen Boost Intercooler setup, 3.4" Pulley, Powerlog manifold, Northstar TB, LS1 MAF, 3" Flotech Afterburner Exhaust, Autolite 104's, MSD wires, Custom CAI, 4T65eHD w. custom axles, HP Tuners VCM Suite. "THE COLUSSUS" 87GT - ALL OUT 3.4L Turbocharged engine, Garrett Hybrid Turbo, MSD ign., modified TH125H " ON THE LOOSE WITHOUT THE JUICE "
I noticed the starter was also in need of some attention. It worked alright, but looked as bad as the motor did before it was cleaned up. So I took the starter apart, cleaned it up, relubricated the gear set and gave it a fresh coat of paint.
Now it's looking good and ready to be put back on the engine!
MOTOR AND TRANS GOING BACK TOGETHER The motor and trans went back together without any problems.
I got some ARP flexplate bolts and torque converter bolts from Summit to replace the originals.
I gasket matched the firewall side exhaust manifold and smoothed it out The other manifold is already pretty well matched.Once the exhaust manifolds were back on the engine, I covered them with DEI exhaust wrap
Looking good and clean. Very nice work on the tensioner, alternator mount, dog bone bracket and water outlet. Looks to be sturdy.
Thanks Dennis. I was going to go with a modified all aluminum GTP dogbone bracket as others have done, but decided to try my own welded steel model (I can kinda weld steel,but not so sure about aluminum).It should be at least as strong as the aluminum type. We'll see how it works out.
WOW what a sexy looking motor! Wanna clean one up for me lol What part of Thunder Bay you from? I grew up on Pine Street before moving down to Toronto
I would, but I know how much we all enjoy cleaning and working on our cars. It just wouldn't be fair to take that away from you.lol I live on the south side of town, near Arthur Street.
quote
Rare87GT Looks really good man!
quote
Fierochic88 What a clean and beautiful engine. Hope it runs as good as it looks!!
~ Jen
I appreciate the kind words. I can hardly wait to get this motor in! It is basically stock with the only addition being a 3.5" SC pulley from SLP. Once the engine is in and running for a while, I will be adding more performance mods in stages.My garage is not heated, so my progress will be slowed down a bit during the winter months - just too cold to be out there!
REAR COILOVERS The idea of an adjustable rear coilover setup appeals to me. The stock springs and struts are tired and the upgrade seems to be an effective, good looking way to improve the ride. For the coilover build, I got KYB GR2 struts, 12” 300 lb springs from Summit , 7” coil over kits and poly bushings from Jegs.
As covered in other forum posts, I cut the spring perches off the struts.
Then filed smooth and painted the area.
Gooped up the strut body with silicone and placed the 7” sleeve on the strut.
Here is where I noticed a problem. The sleeves do not sit square on the strut bracket. The bracket is raised on the open side (see pic) , causing the sleeve to rest **** -eyed on the bracket.
I don't know if this has caused any problems on other members cars. I haven't read any posts that say so, but in my mind, the sleeve should be resting as flatly as possible on that bracket.So I trimmed the sleeve just enough to clear the bracket. This allowed most of the sleeve to be flush with the bracket and as an added bonus, the notched sleeve along with the silicone will stop the sleeve from turning when adjusting the springs
Silicone sealant was slathered onto the strut bodies, then the notched sleeves were put on and the excess silicone was wiped away.
I made up custom top hats using 1/4” plate, 2” pipe and poly bushings.
I cut pieces from the 2" pipe and welded them to both sides of the top plates. They will retain the poly strut and spring bushings.
I painted the springs yellow (what can I say? I like yellow springs!) After threading the adjusting rings down the sleeves, the springs went on along with a washer.
Then a poly bushing.
Then the top hat, with spring seat bushing under it.
The top bushing.
Top washer.
And a locknut .
And the final product, awaiting installation at a future date!
FUEL RAILS I have seen several methods of handling the fuel rails on the forum, ranging from leaving them stock to replacing them with billet fuel logs. I went with modifying the stock rails to eliminate the need for fuel lines wrapping around the engine. I cut, swaged, bent, added line and brazed the stock rails to place the fuel connections close to where the stock Fiero lines are. The whole job is just a variation of what some guys were doing with bending the stock lines back to face them toward the same general area. Here are some shots of the fuel rails installed on the engine (before I did the valve cover art).
]
Nice work!! I wish I could create something like that!!
Nice work!! I wish I could create something like that!!
Thanks Cruiser. I have to say, a lot of the things I've done are the result of seeing what other PFF members have done with their rides, sometimes with slight variations. This forum ROCKS!
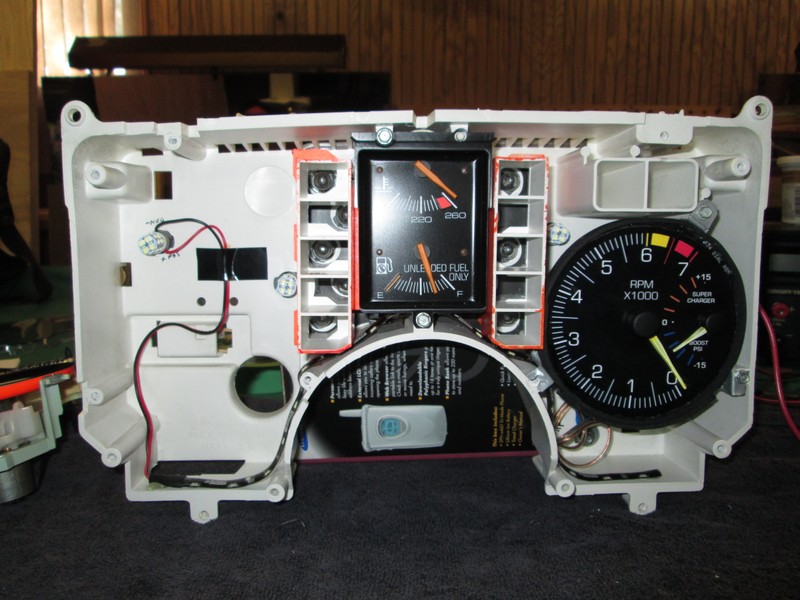
As soon as I saw posts about people putting the Turbo Sunbird tach into the 3800SC Fieros, I thought oh ya, I have got to do that mod on my install. I took a trip to a local wrecking yard and there sat a beat up old 93 Sunbird. I thought... what are the chances it’s a turbo? The motor was gone and the doors wouldn’t move very easily, but as I stuck my head inside the car, a big smile came over my face. The turbo tach was there! I removed and bought the whole instrument cluster for $20. To prepare the tach for my needs, I followed instructions already existing on the forum to recalibrate the sunbird tach for a 6 cylinder motor. One problem I had to deal with was the tach face mismatch. My 85 Fiero speedometer is not backlit like the Sunbird’s tach. Also the shade of black, number font and hash mark spacing was off as well. My solution was to create my own tach face overlay using a high resolution graphics program on my computer and glue the overlay onto the Sunbird tach. While I was at it, I changed the wording to “SUPERCHARGER BOOST PSI” instead of “TURBO BOOST”. The tach needle center piece was also different, so I made an impression of the tach center piece in modeling clay and forged an identical one for the speedo using epoxy glue. Some dremel work and paint made the new center piece usable. The results are below.
The Turbo Sunbird Tach! This is someone elses pic, but identical to mine- I forgot to take my “before” pic on this one.The hashmarks and numbering did not match the 85GT speedo.
This was one step before the final draft of the tach overlay I made. I decided to add the solid coloring between 6 and 7 grand. It seemed to look better.
The modified Turbo Sunbird tach installed in my car. It matches the speedo design pretty good. The car still has the 2.8 motor in it at this point, but the tach works perfectly. I left a generous amount of wire coiled up under the dash for the boost gauge/MAP sensor hookup on the 3800.
I wish I could have finished it by now,but winter is long up here,I have no heat in my garage and the snow is still on the back yard! I hope to be getting to it shortly though.
Love the look of that instrument cluster. That boost gauge looks like it belongs there. Clean looking swap as well. Keep at it, and keep updating the thread. Can't wait to hear this thing fired up for the first time!
------------------ Take a corner at 130, and you'll understand the term "dirty."
Sorry for showing up late for this build thread but I love love love it! Nice alt/ dog bone/ tensioner bracket!! Good work on the fuel rails. I'm not a fan of ARP bolts on the flex nor your heater hose setup, but......... AWESOME VALVE COVER!!! Keep up the good work and great pics! I will be watching..... Marshal
johnyrottin: "Just out of curiosity, why wrap he header?"
I was hoping to reduce the amount of heat in the engine compartment by wrapping the exhaust manifolds.It seems to work for some people, but I have also read about headers cracking from being wrapped.Hopefully, the stock exhaust manifolds will be able to stand the extra heat!
Thanks for the comments guys.It seems the winter is the only time of year that I actually have lots of time to work on this project but I have never had a heated garage.I am taking care of that problem by insulating and installing a furnace in the garage right now, so maybe I can spend some serious time on the car soon.
It's been a while, but I finally got heat in the garage (pellet stove) and have been busy on the fiero again! It's so nice to have a heated garage with the extreme cold we have around here during the winter.
I'm happy this thread didn't archive on me! More updates and pics coming soon!
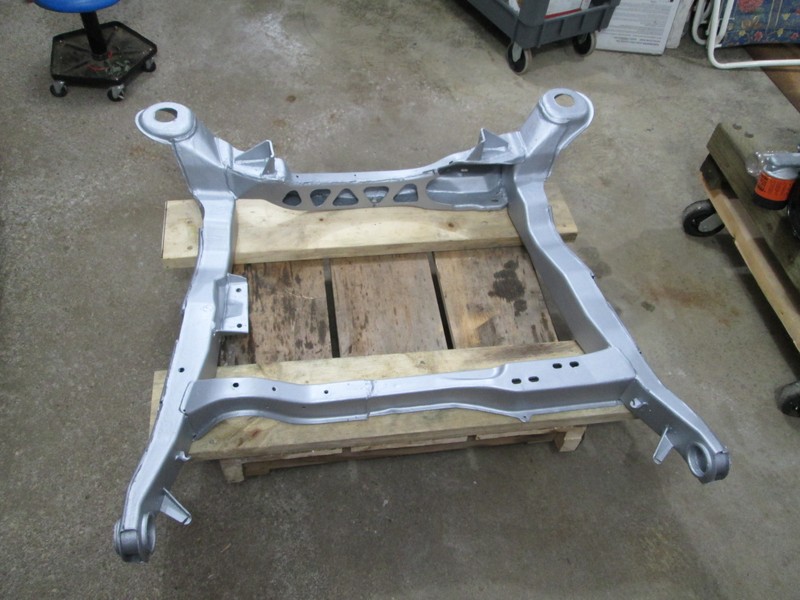
Last year, I picked up another 85 fiero for a parts car.I removed all the parts that were salvagable including the engine cradle. I wanted the cradle in particular to get my new engine/trans mounted on. The plan being to get it all setup and wired, ready for the swap. I sandblasted the cradle,welded a couple of patches in, welded a cradle stiffener in (from a fellow forum member) and then gave the cradle a few coats of Rust Bullet paint.
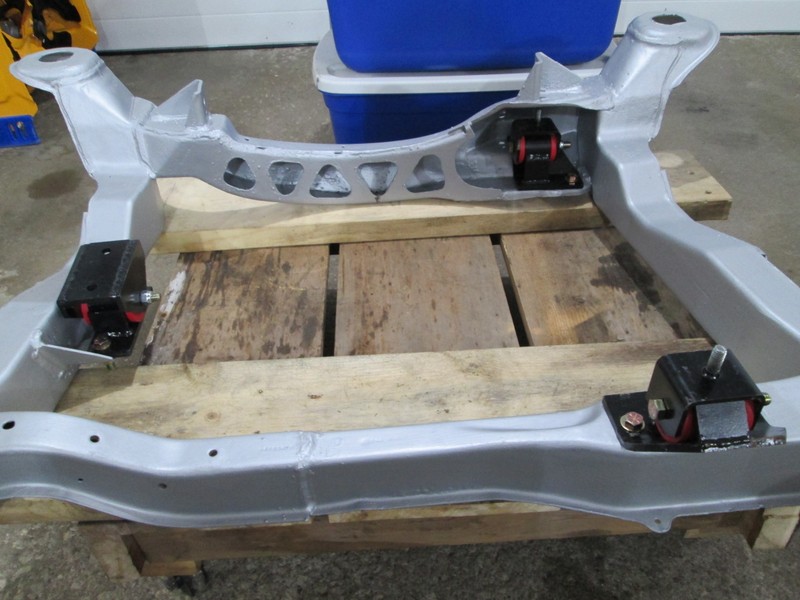
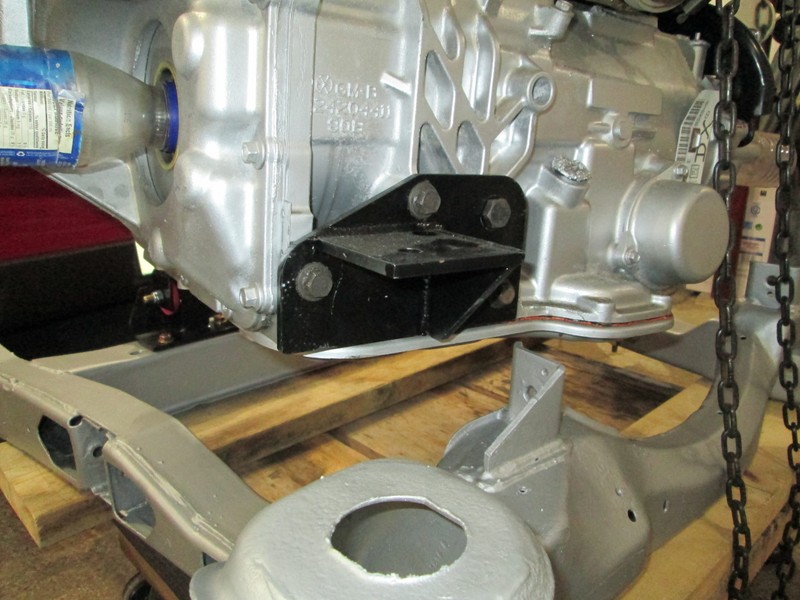
I got a set of 3800sc swap mounts from Purple Reign, here on the forum quite a few years ago. I had to egg out a couple of holes and grind a little bit on one mount, but overall the mounts are built solid and I am very happy with them. Below are some pics of the mounts.
Frame half of mounts installed on cradle.
Motor/trans half of mounts installed on motor/trans.
HAHA! Yes, it's been a long time since posting much here.But you know, sometimes life throws you a few curve balls and things keep getting put on the back burner.Before you know it, years have gone by!Anyway, hopefully I can keep making progress on my build because I really,really want to get it done.
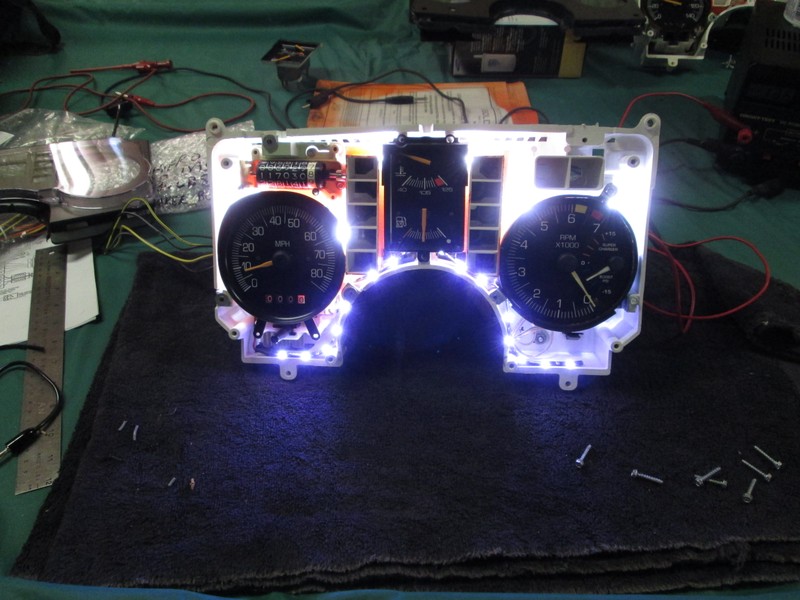
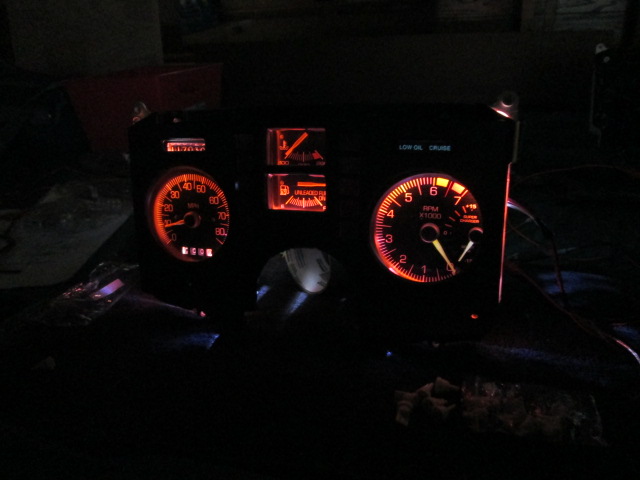
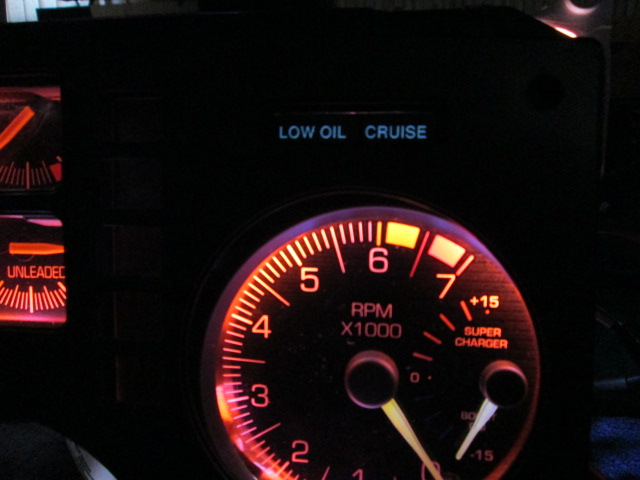
I did manage to do some work on the fiero dash lighting.Even with the dimmer bypassed, my dash lights were still too dim for my liking.I have heard about higher wattage standard bulbs,but opted to go for high output led replacements. A lot cooler and a lot brighter. I replaced all of the incandescent dash lights with led and also added an led strip along the bottom. Here's what it looks like.
I also trimmed the metal just a bit around the edge of the gauge plate to let more light through to the gauge faces.
Here is a pic of the instrument panel test lit in my basement.The gauges are much easier to read now.
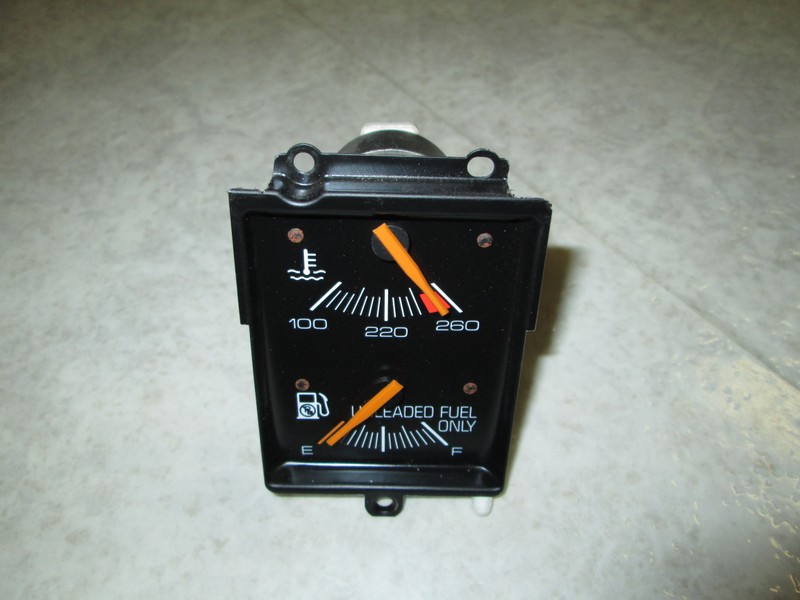
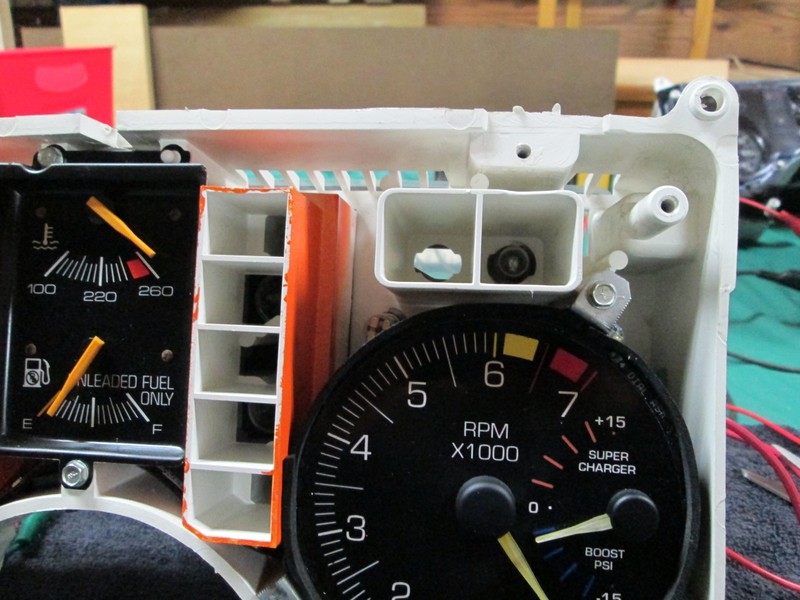
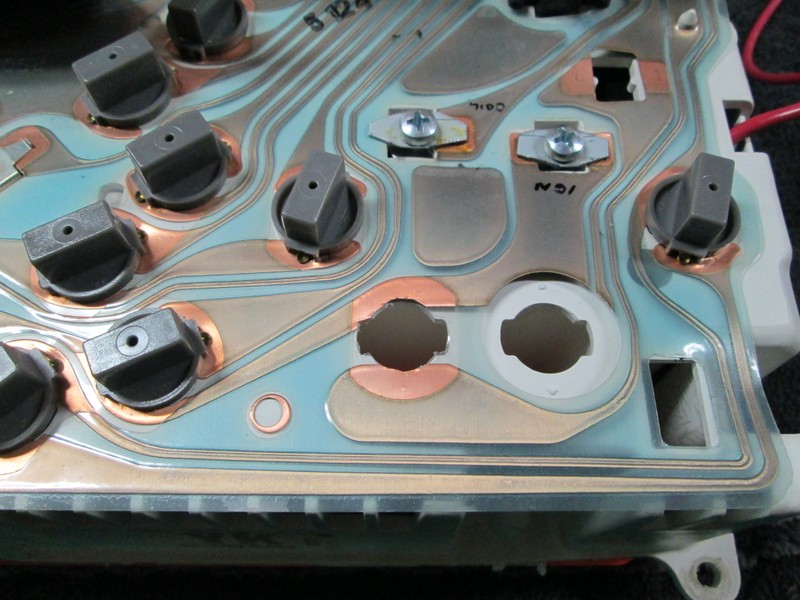
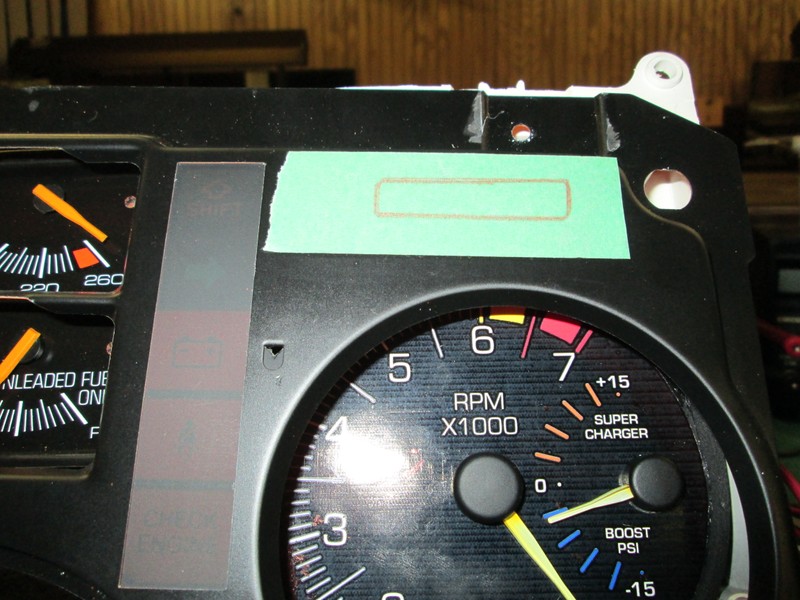
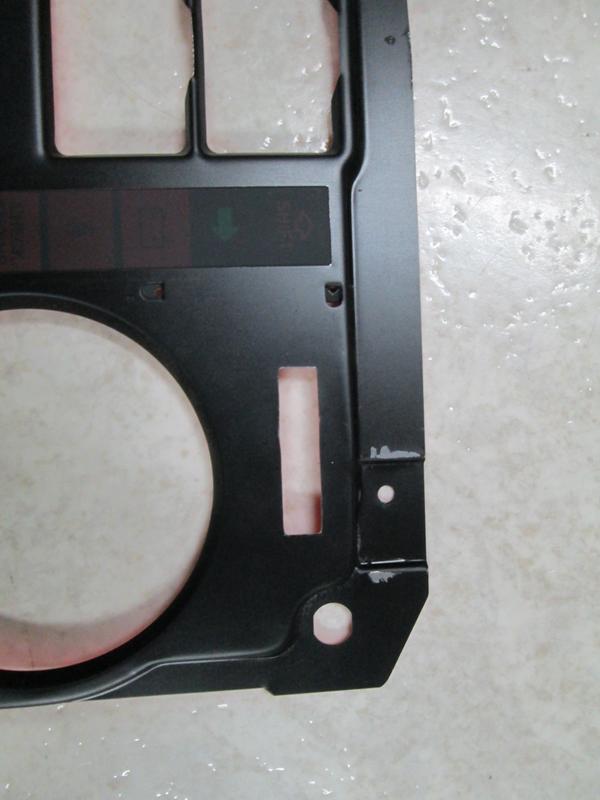
With the 3800SC going in soon, I decided to add a low oil and cruise light to the dash (both are GTP features - will be putting digital cruise in from donor car). There were 2 empty bulb locations available.I just had to cut an access hole in the dash plate and make up the needed windows for the 2 status lights.
I have to keep reading threads like this to keep me motivated as my car has set for years also. Thanks for posting your mods, I will have to copy this dash.
[This message has been edited by LornesGT (edited 03-18-2018).]


 just don't tell the insurance company! doh!