Pennock's Fiero Forum
  General Fiero Chat
  Yet another build thread (Page 3)

Post New Topic  Post A Reply
Email This Page to Someone! | Printable Version

This topic is 4 pages long:  1   2   3   4 
Previous Page | Next Page
next newest topic | next oldest topic
Yet another build thread by JPH87
Started on: 02-04-2010 10:28 PM
Replies: 128 (7560 views)
Last post by: exoticse on 08-13-2015 08:38 PM
JPH87
Member
Posts: 292
From: Post Falls ID
Registered: Sep 2008


Feedback score:    (10)
Leave feedback

Rate this member

Report this Post02-18-2011 01:15 AM Click Here to See the Profile for JPH87Send a Private Message to JPH87Edit/Delete MessageReply w/QuoteDirect Link to This Post
Not Much new to post been working on the kid's car front end problems but this did come in today


Champion 3 core
IP: Logged
madcurl
Member
Posts: 21401
From: In a Van down by the Kern River
Registered: Jul 2003


Feedback score: N/A
Leave feedback


Total ratings: 314
Rate this member

Report this Post02-21-2011 06:07 PM Click Here to See the Profile for madcurlSend a Private Message to madcurlEdit/Delete MessageReply w/QuoteDirect Link to This Post
 
quote
Originally posted by fourpoint9:


It's Modders Mesh http://www.mnpctech.com/moddersmesh.html

And here's one idea


Yeah, that's the best design. If I may add. Round up the outside corner vent at the bottom to match the 350Z window. You could also wait and pull-in the C-pillers thus a allowing for some "hips" play. You could then purchase Whodeannie's hips that are going to be produced this year.

The end result should look similar like the PPG hips, but in your case using a glass deck.

[This message has been edited by madcurl (edited 02-21-2011).]

IP: Logged
JPH87
Member
Posts: 292
From: Post Falls ID
Registered: Sep 2008


Feedback score:    (10)
Leave feedback

Rate this member

Report this Post02-22-2011 04:13 AM Click Here to See the Profile for JPH87Send a Private Message to JPH87Edit/Delete MessageReply w/QuoteDirect Link to This Post
I have been watching Dean's thread I like the hips but those will probaby have to wait for the next build. I like what fourpoint9 did with the vents. I think I will lay something like that out this week.
IP: Logged
madcurl
Member
Posts: 21401
From: In a Van down by the Kern River
Registered: Jul 2003


Feedback score: N/A
Leave feedback


Total ratings: 314
Rate this member

Report this Post03-03-2011 12:11 AM Click Here to See the Profile for madcurlSend a Private Message to madcurlEdit/Delete MessageReply w/QuoteDirect Link to This Post
You have a pm.
IP: Logged
JPH87
Member
Posts: 292
From: Post Falls ID
Registered: Sep 2008


Feedback score:    (10)
Leave feedback

Rate this member

Report this Post04-25-2011 03:48 AM Click Here to See the Profile for JPH87Send a Private Message to JPH87Edit/Delete MessageReply w/QuoteDirect Link to This Post
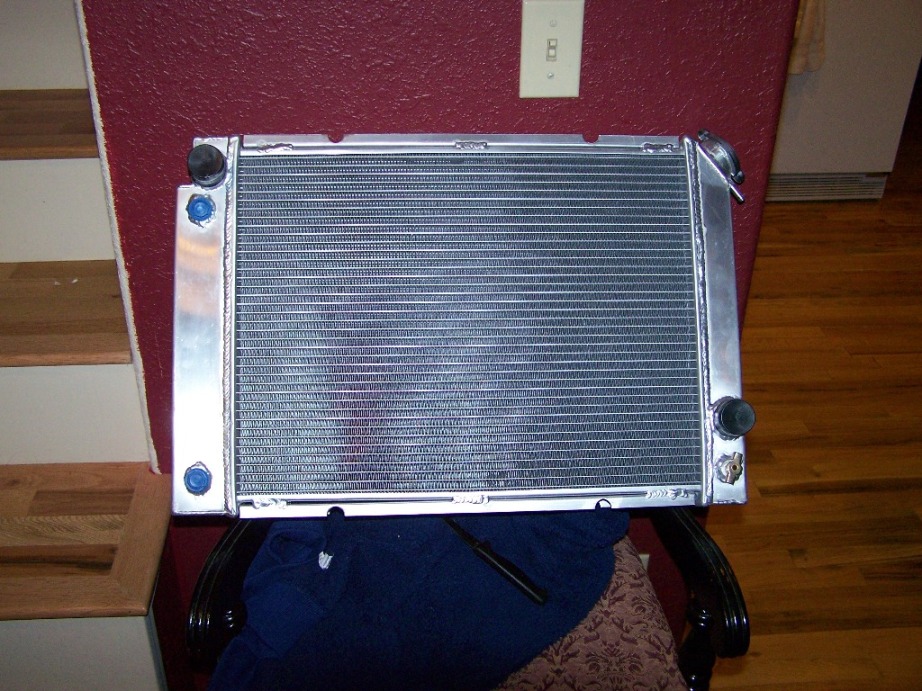
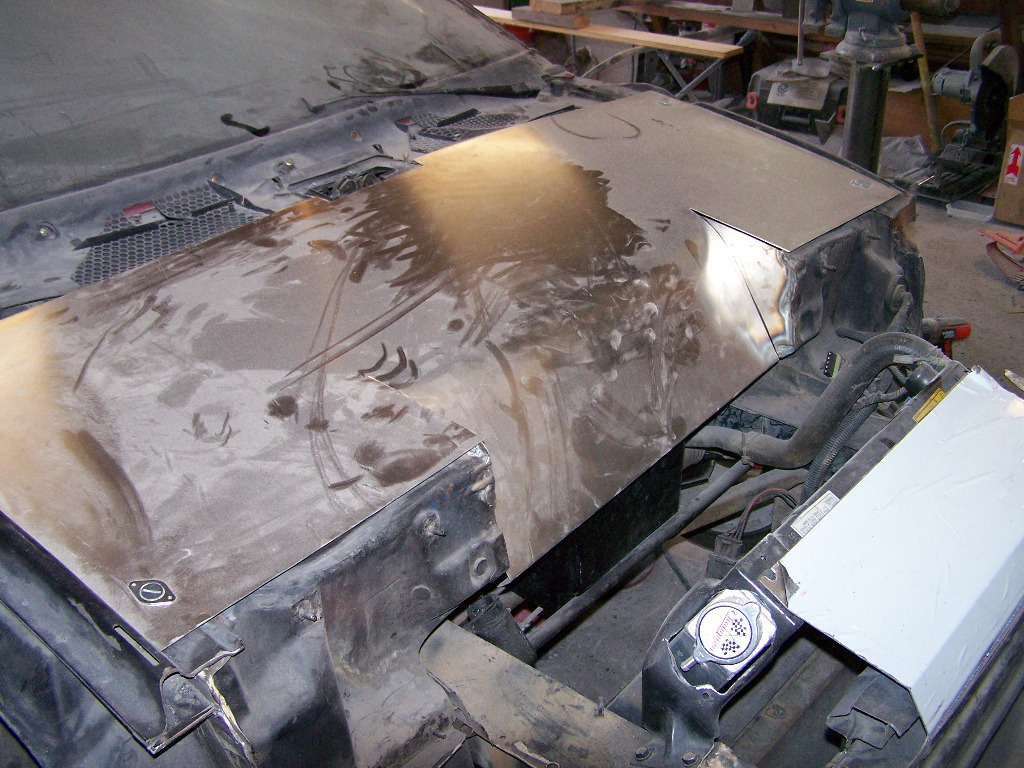
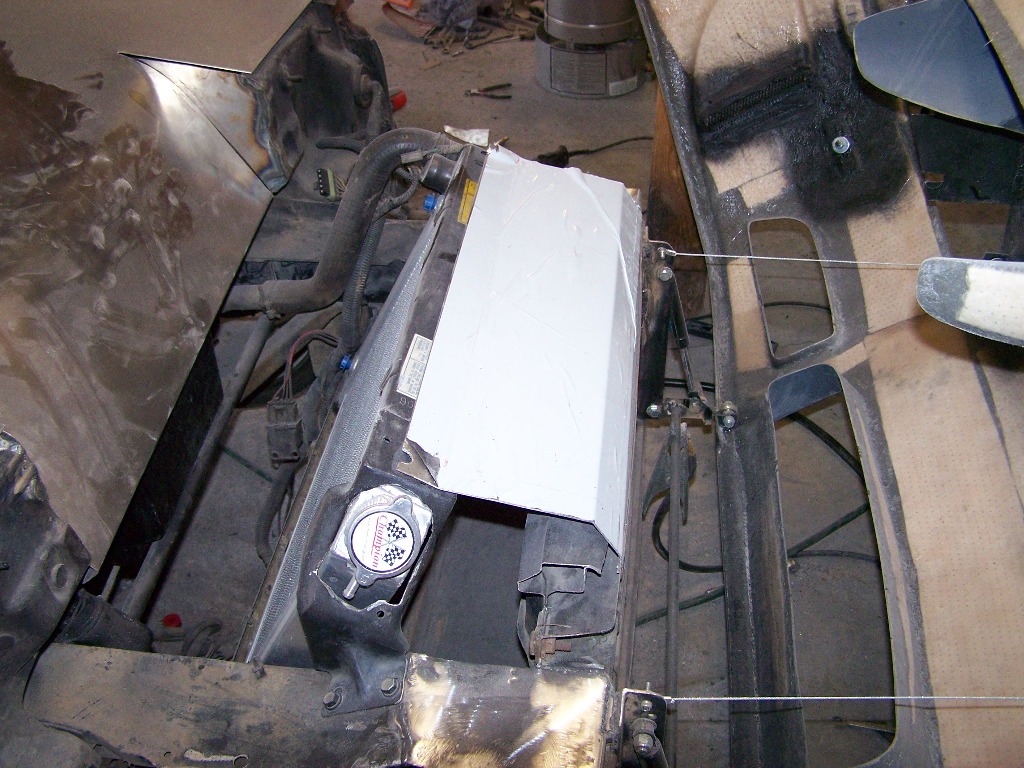
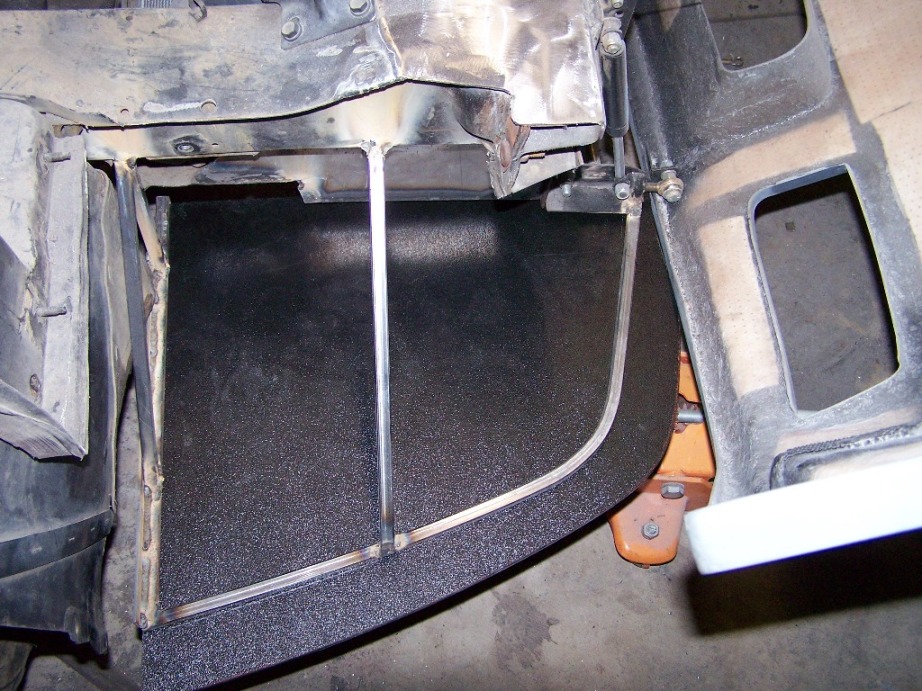
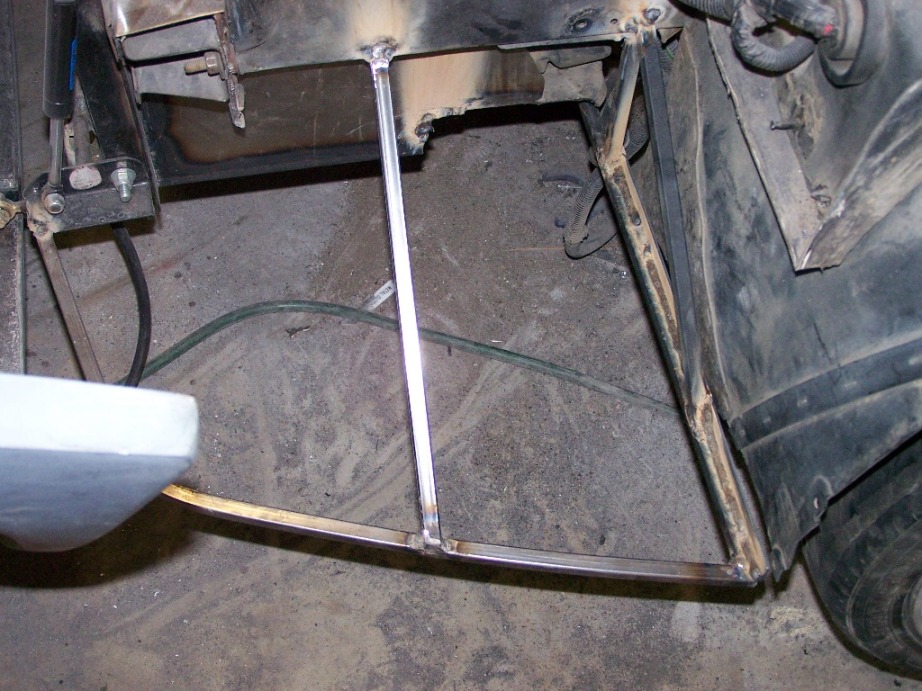
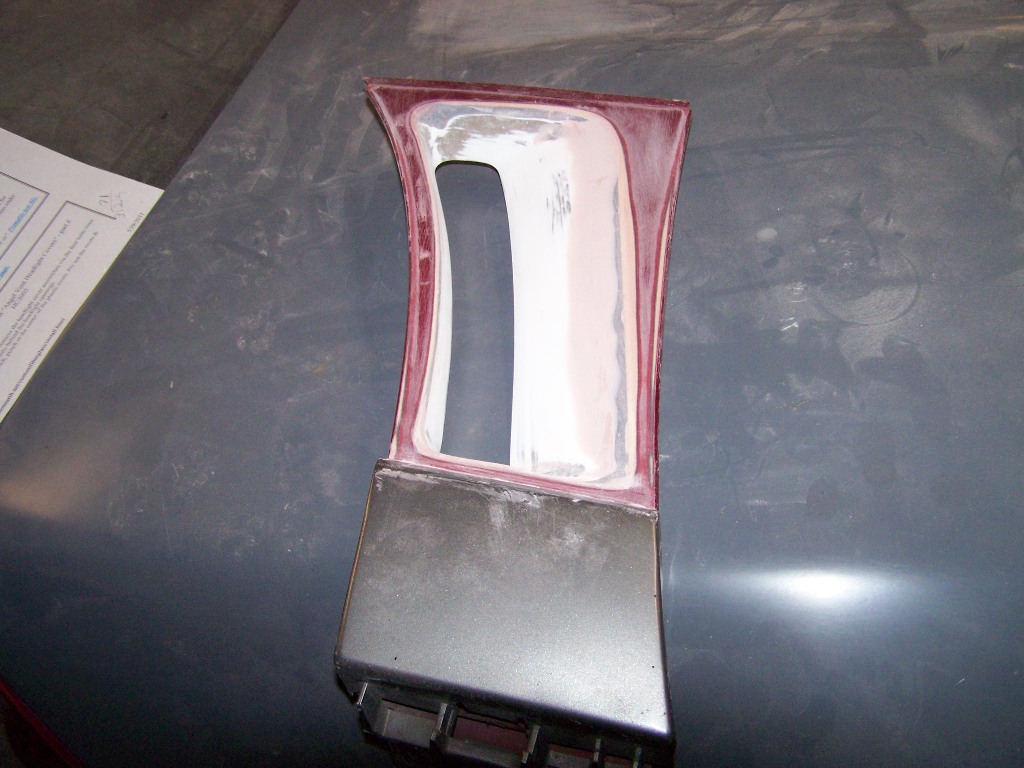
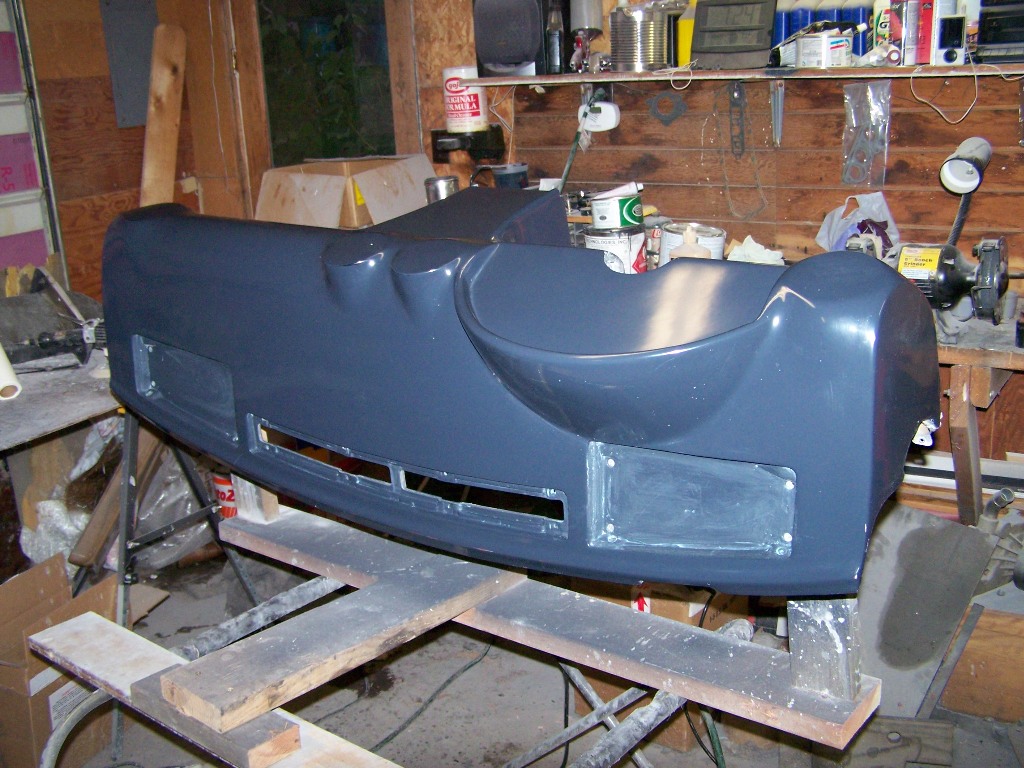
Not a lot to show but I have gotten a few things done.

I didn't like the way you have to cut the front of the front trunk up for the hood so I made this cover.

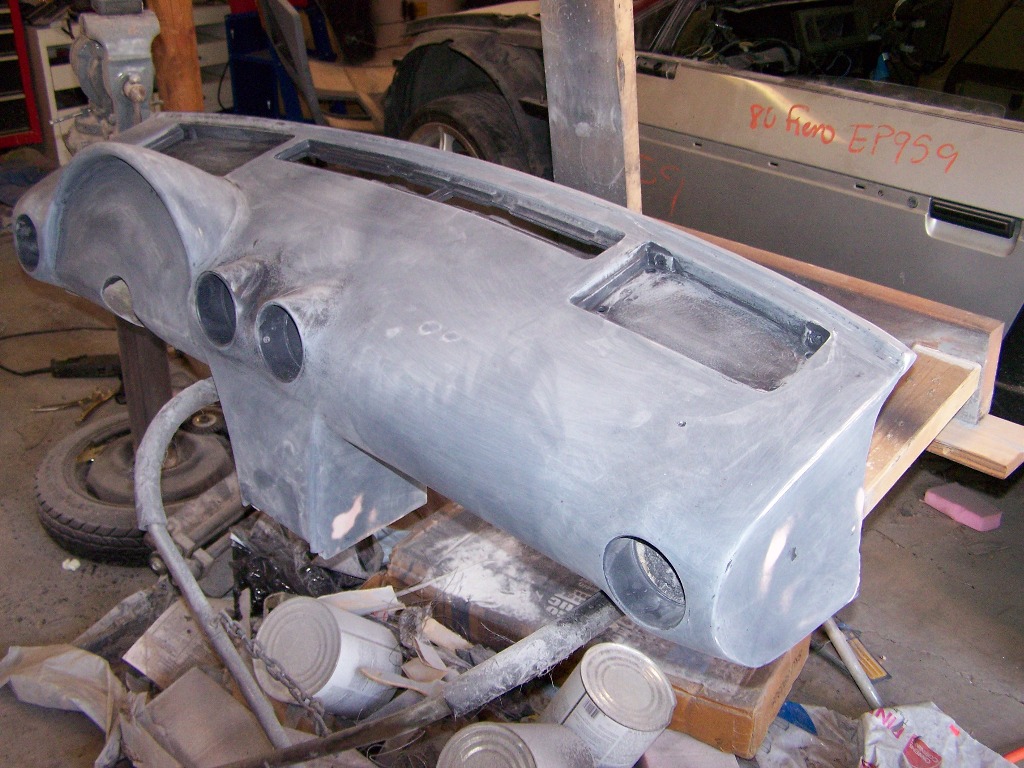
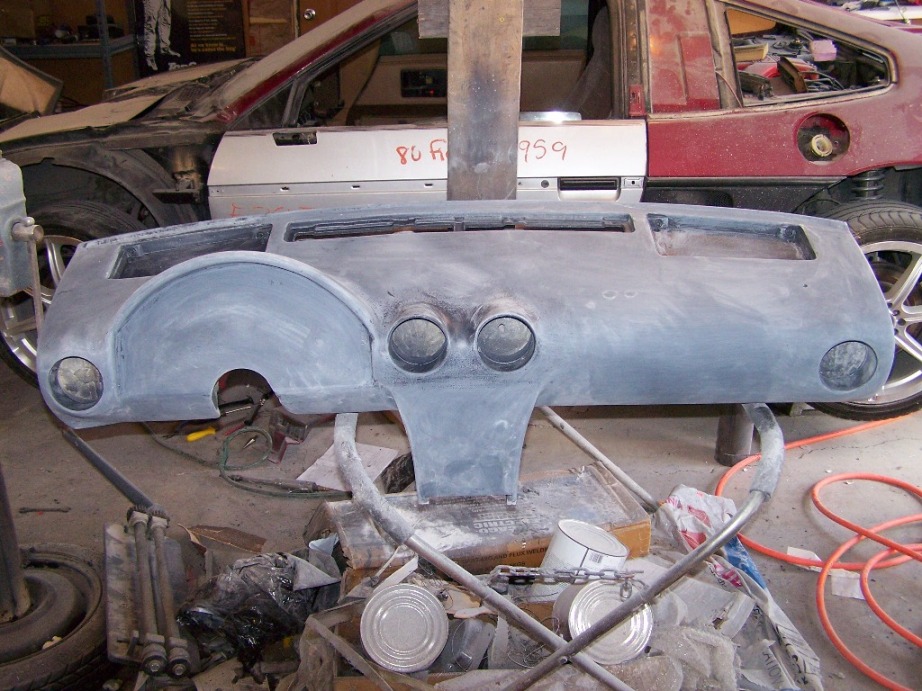
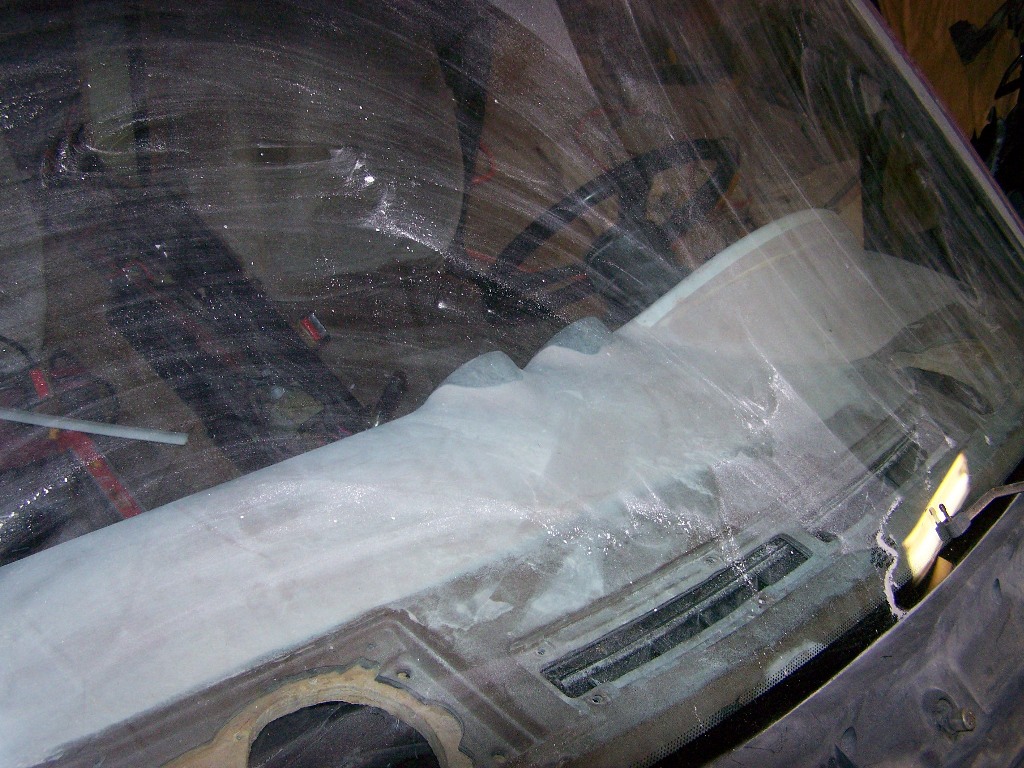
This cover is just to keep air going thru the radiator and not around

I also made a frame work to hold this 1/4" abs to keep air out and protect the bottom of the hood.


The dash is almost ready to make the mold


lots left but its coming
IP: Logged
JPH87
Member
Posts: 292
From: Post Falls ID
Registered: Sep 2008


Feedback score:    (10)
Leave feedback

Rate this member

Report this Post08-20-2011 12:23 PM Click Here to See the Profile for JPH87Send a Private Message to JPH87Edit/Delete MessageReply w/QuoteDirect Link to This Post
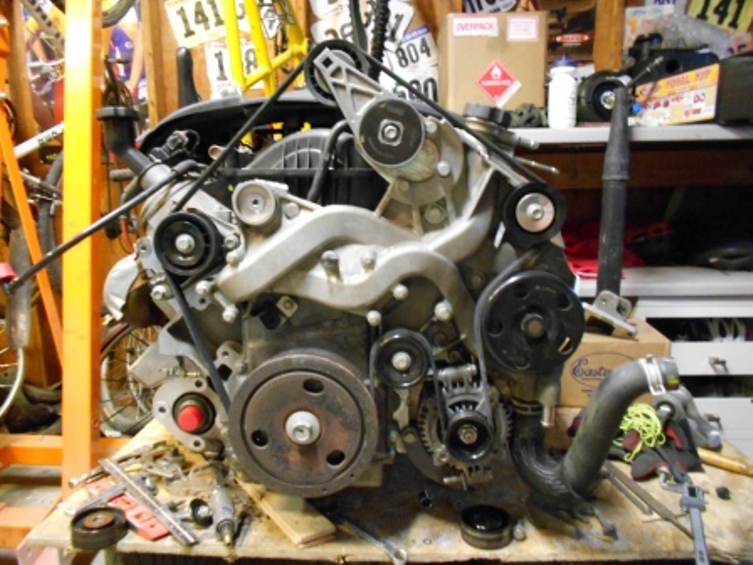
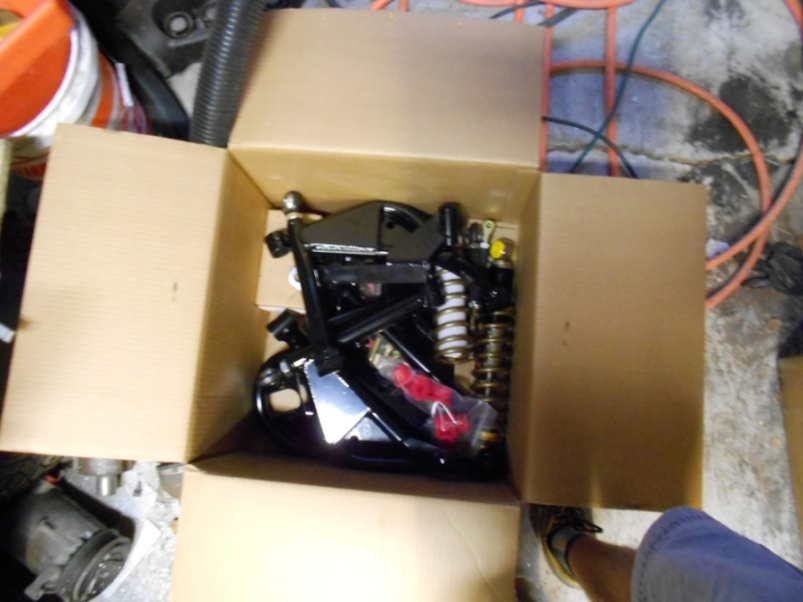
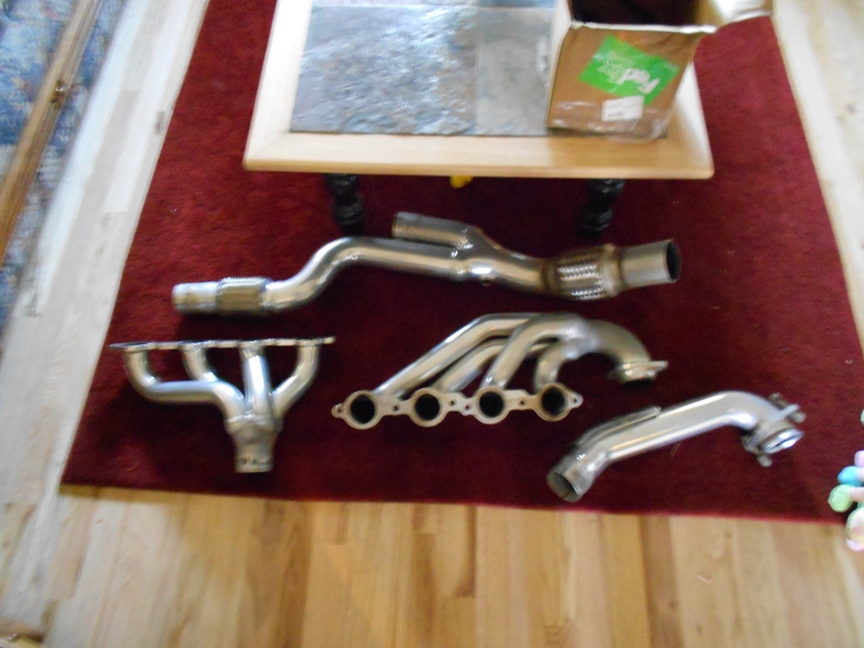
Not much done on the car lately but I did work out the belt route and made the alternater bracket

I also picked up rear bump stop eliminator kit and front tubular arms and coilovers from westshore nice stuff. This also means that my original arms that have been powder coated and have brand new poly bushings and ball joints will be in the mall soon

Picked up some front side vents from The Driver they look real good

I also picked up some Doug Thurly headers for the LS4 off another forum They are very nice very thick primary tubes

I also picked up some solid cradle bushings from Rodney and other odds and ends. Now I need to get to work.
IP: Logged
JPH87
Member
Posts: 292
From: Post Falls ID
Registered: Sep 2008


Feedback score:    (10)
Leave feedback

Rate this member

Report this Post10-20-2011 01:36 AM Click Here to See the Profile for JPH87Send a Private Message to JPH87Edit/Delete MessageReply w/QuoteDirect Link to This Post
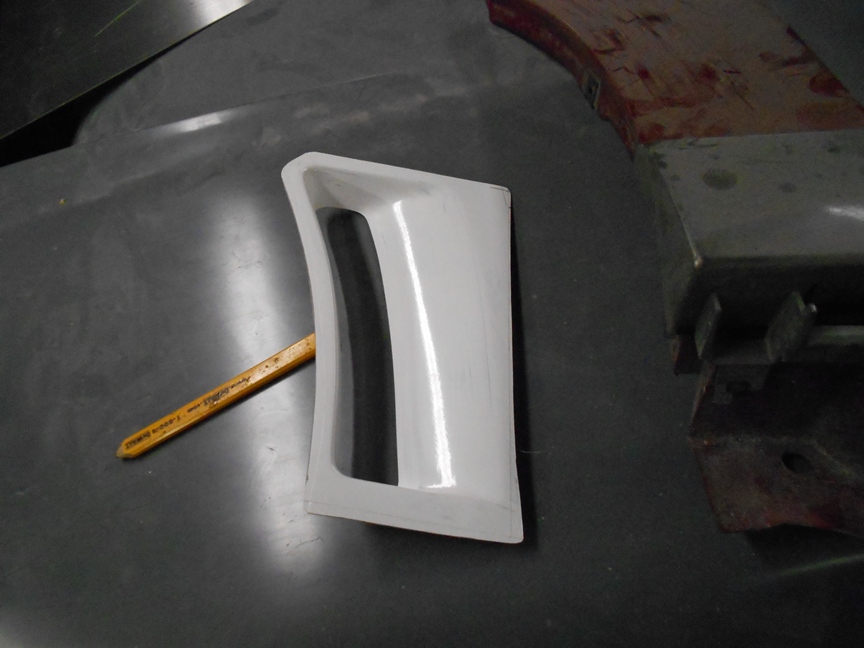
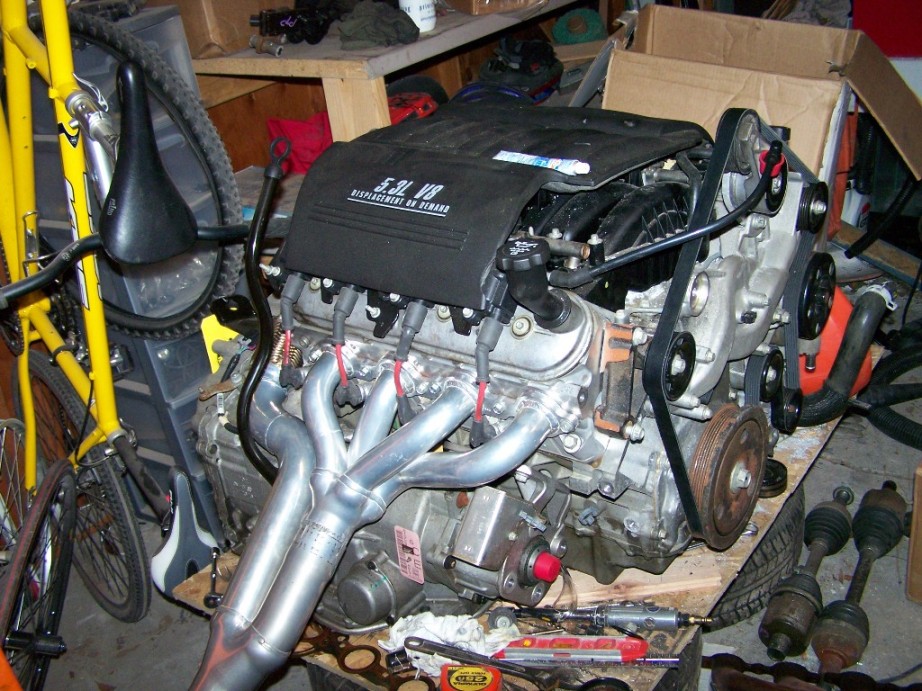
OK over due update. The engine is at Fieroking's mounted on the cradle and Joe is finishing up the wireing harness. I have been working on the dash mold slowly but should be down this weekend. Here are some pics of the engine with the headers on and some other stuff.

The drivers side vent


IP: Logged
Shill
Member
Posts: 2166
From: Spokane, WA
Registered: Apr 2009


Feedback score: N/A
Leave feedback

Rate this member

Report this Post10-20-2011 03:26 AM Click Here to See the Profile for ShillSend a Private Message to ShillEdit/Delete MessageReply w/QuoteDirect Link to This Post
Looking good!
IP: Logged
85SEnochie
Member
Posts: 2081
From: Tri-cities, WA
Registered: Oct 2007


Feedback score: N/A
Leave feedback


Total ratings: 58
Rate this member

Report this Post10-20-2011 01:08 PM Click Here to See the Profile for 85SEnochieSend a Private Message to 85SEnochieEdit/Delete MessageReply w/QuoteDirect Link to This Post
Nice work! You inspire me to learn how to glass! I have to many ideas though, will not work on one Fiero May have to buy about ten
Keep up the great work

Terry

------------------

Love The Excitement! https://www.fiero.nl/forum/Forum1/HTML/068738.html

[This message has been edited by 85SEnochie (edited 10-20-2011).]

IP: Logged
JPH87
Member
Posts: 292
From: Post Falls ID
Registered: Sep 2008


Feedback score:    (10)
Leave feedback

Rate this member

Report this Post10-26-2011 01:36 AM Click Here to See the Profile for JPH87Send a Private Message to JPH87Edit/Delete MessageReply w/QuoteDirect Link to This Post
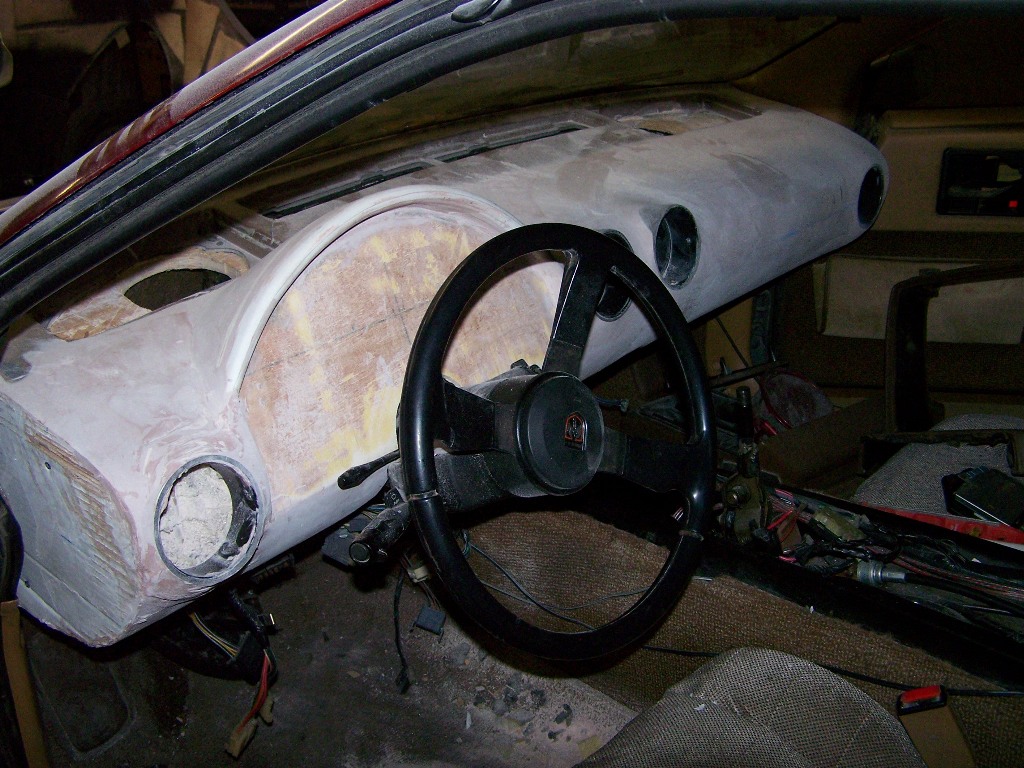
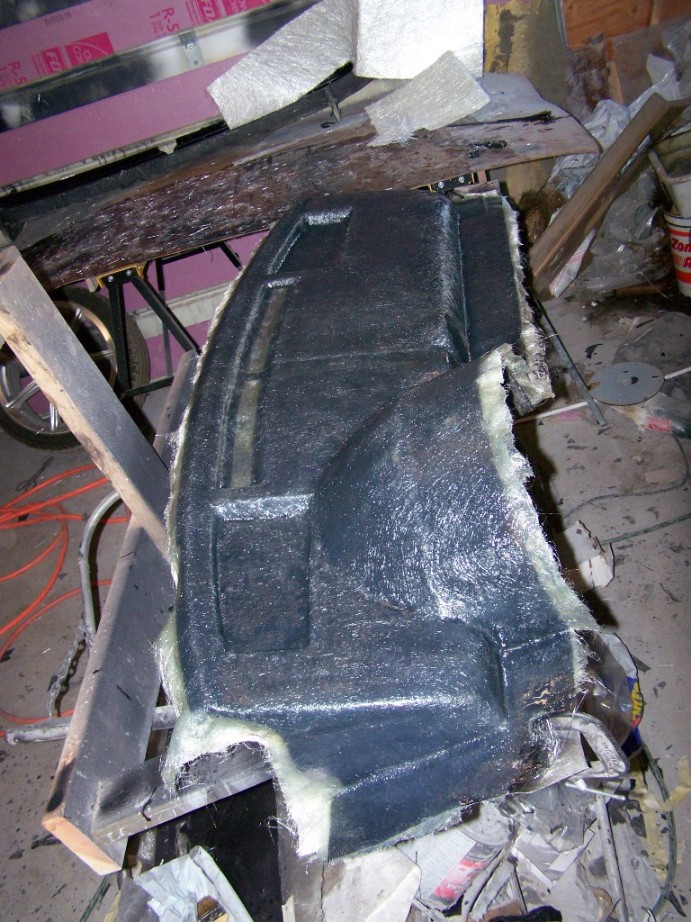
I finally have a new dash now I have to make a new center console. It should be alot quicker than it took me to make the dash. I think the dash was definately worth it. question for you all paint it or upolster in leather?

In the 2 part mold

Here it is

The 2 halves of the mold in front


I'm very pleased with the way it came out but what a pain in the butt to lay up
IP: Logged
JPH87
Member
Posts: 292
From: Post Falls ID
Registered: Sep 2008


Feedback score:    (10)
Leave feedback

Rate this member

Report this Post10-28-2011 10:23 PM Click Here to See the Profile for JPH87Send a Private Message to JPH87Edit/Delete MessageReply w/QuoteDirect Link to This Post
Got the vents cut in and the start button in what do you guys think


[This message has been edited by JPH87 (edited 10-28-2011).]

IP: Logged
PFF
System Bot
85SEnochie
Member
Posts: 2081
From: Tri-cities, WA
Registered: Oct 2007


Feedback score: N/A
Leave feedback


Total ratings: 58
Rate this member

Report this Post10-31-2011 12:34 PM Click Here to See the Profile for 85SEnochieSend a Private Message to 85SEnochieEdit/Delete MessageReply w/QuoteDirect Link to This Post
 
quote
Originally posted by JPH87:

Got the vents cut in and the start button in what do you guys think


Well done they look GREAT! Push button start nice tweek

------------------

Love The Excitement! https://www.fiero.nl/forum/Forum1/HTML/068738.html

IP: Logged
JPH87
Member
Posts: 292
From: Post Falls ID
Registered: Sep 2008


Feedback score:    (10)
Leave feedback

Rate this member

Report this Post10-31-2011 03:02 PM Click Here to See the Profile for JPH87Send a Private Message to JPH87Edit/Delete MessageReply w/QuoteDirect Link to This Post

Well done they look GREAT! Push button start nice tweek

Thanks the push button start is by StarDrive so it will have keyless entry also
IP: Logged
85SEnochie
Member
Posts: 2081
From: Tri-cities, WA
Registered: Oct 2007


Feedback score: N/A
Leave feedback


Total ratings: 58
Rate this member

Report this Post11-01-2011 01:25 PM Click Here to See the Profile for 85SEnochieSend a Private Message to 85SEnochieEdit/Delete MessageReply w/QuoteDirect Link to This Post
 
quote
Originally posted by JPH87:


Well done they look GREAT! Push button start nice tweek

Thanks the push button start is by StarDrive so it will have keyless entry also


Yah keyless entry is a must have I think !

------------------

Love The Excitement! https://www.fiero.nl/forum/Forum1/HTML/068738.html

IP: Logged
JPH87
Member
Posts: 292
From: Post Falls ID
Registered: Sep 2008


Feedback score:    (10)
Leave feedback

Rate this member

Report this Post11-03-2011 11:54 PM Click Here to See the Profile for JPH87Send a Private Message to JPH87Edit/Delete MessageReply w/QuoteDirect Link to This Post
little more done plus some new parts came in

Got the speaker grills mounted they need to be recovered in UV black speaker clothand the defrost vent has been fitted and powder coated gloss black

Speed hut guages


FieroKing saw these seats and gave me a call went over to our local junkyard 09 solstice GXP seats in perfect shape will look great in the car


Finally I started modding the Grand prix GXP steering column to go in the car. I'm using the GXP column and wheel to retain the tapshift and for the multi switches

When done it will bring the steering wheel about 1 1/2 inches closer to the driver not bad and as i'm 6 foot I always have the seat most of the way back anyway.

[This message has been edited by JPH87 (edited 11-03-2011).]

IP: Logged
JPH87
Member
Posts: 292
From: Post Falls ID
Registered: Sep 2008


Feedback score:    (10)
Leave feedback

Rate this member

Report this Post02-18-2012 01:37 PM Click Here to See the Profile for JPH87Send a Private Message to JPH87Edit/Delete MessageReply w/QuoteDirect Link to This Post
Okay it's been awhile since I did an update so here it goes car is coming along slow but sure here are some pics
Engine cradle modded by Joe aka Fieroking ready for the LS4 powder coated with Rodney's solid bushings


I thought I had taken more pics of the seat process but I guess not. Getting the Solctice GXP seat to fit correctly was alot more work than I anticipated as always. Used the fiero rails and had to dissassemble the GXP seat completely modded the bottom and welded to the fiero rails, got the seat bottom with 1/2 inch of factory hight comfortable fit.


The Grand prix GXP steering column is in that was a pretty easy mod and haveing the tap shift is going to be cool.


The engine bay has been completely stripped down and painted with pur 15


HVAC controls have been mounted in the dash


Joe built my AXLES yay


I have trimmed out the new aluminum fire wall and sound and heat pad will go between it and the factory firewall


I also dropped the fuel tank and put in an Aeromotive 340 lph stealth pump and plummed the new fuel system Jegs and summit are always handy -6an braided hose and fittings

[This message has been edited by JPH87 (edited 06-23-2012).]

IP: Logged
Sourmug
Member
Posts: 4538
From: Calgary, Alberta, Canada
Registered: Sep 2002


Feedback score:    (29)
Leave feedback


Total ratings: 144
Rate this member

Report this Post02-18-2012 01:55 PM Click Here to See the Profile for SourmugSend a Private Message to SourmugEdit/Delete MessageReply w/QuoteDirect Link to This Post
JPH87

Great thread.

I would love to see some more pictures of the process you used to build the dash pig if you have them.

Nolan
IP: Logged
JPH87
Member
Posts: 292
From: Post Falls ID
Registered: Sep 2008


Feedback score:    (10)
Leave feedback

Rate this member

Report this Post02-21-2012 03:20 PM Click Here to See the Profile for JPH87Send a Private Message to JPH87Edit/Delete MessageReply w/QuoteDirect Link to This Post
I had a harbor frieght powder coat gun that was not working very well took alot of powder to get coverage was not seeming to charge the particals very well. So I bought a Eastwood gun and the difference is huge good coverage little waste compared to the Harbor gun so if your in the market I would say deffinetly worth the extra money for the eastwood gun and you will save the money back in less powder loss.
IP: Logged
JPH87
Member
Posts: 292
From: Post Falls ID
Registered: Sep 2008


Feedback score:    (10)
Leave feedback

Rate this member

Report this Post02-21-2012 03:24 PM Click Here to See the Profile for JPH87Send a Private Message to JPH87Edit/Delete MessageReply w/QuoteDirect Link to This Post

JPH87

292 posts
Member since Sep 2008
 
quote
Originally posted by Sourmug:

JPH87

Great thread.

I would love to see some more pictures of the process you used to build the dash pig if you have them.

Nolan


I will check to see if I have anymore pics but I think I posted what I took. I took the original dash and trimmed some of it then added AB foam wood and lots of bondo till I got the shapes I wanted then painted with duratech and pulled a mold. If your interested in making something drop me a line and I will walk you through it the best I can.
IP: Logged
JPH87
Member
Posts: 292
From: Post Falls ID
Registered: Sep 2008


Feedback score:    (10)
Leave feedback

Rate this member

Report this Post06-23-2012 02:15 AM Click Here to See the Profile for JPH87Send a Private Message to JPH87Edit/Delete MessageReply w/QuoteDirect Link to This Post
Been a while since I posted anything so this will be a big post. Been a little distracted with my new car and work but progress is being made.

Engine bay ready

expansion tank powder coated and ready to go back in

Joe AKA Fieroking hooked me up with an aluminum transmission pan got it installed

Here is the transmission cooler it will go on the passanger side quarter scoop


Engine bolted up to the cradle

First attempt at putting it in had to make some adjustments to the shock tower and front fire wall

Ready for another attempt I think everything was adjusted wiring harness is on

It fits it is in its new home the headers clear idler pullies clear I think she can stay in now.

Computers are Isolated and mounted. Have some more wiring and coolant lines to run but she is getting close.
Did find that I will probably loose the bottom 5 inches of the trunk to make room for the exhust with the bumper I made and were I relocated the tips I don't think there is much choice trunks to deep anyway LOL
IP: Logged
BlackThunderGT
Member
Posts: 2048
From: The Rock
Registered: Apr 2009


Feedback score: (5)
Leave feedback

Rate this member

Report this Post06-23-2012 02:38 PM Click Here to See the Profile for BlackThunderGTSend a Private Message to BlackThunderGTEdit/Delete MessageReply w/QuoteDirect Link to This Post
Looking good!
IP: Logged
PFF
System Bot
JPH87
Member
Posts: 292
From: Post Falls ID
Registered: Sep 2008


Feedback score:    (10)
Leave feedback

Rate this member

Report this Post11-18-2012 02:19 PM Click Here to See the Profile for JPH87Send a Private Message to JPH87Edit/Delete MessageReply w/QuoteDirect Link to This Post
I have discovered I'm horrible at this and taking pictures but here are some updates. Got all the HT motorsports suspention installed bumpsteer kit tubular A arms and coil overs all the way around. Completely rebuilt the rack with Dickman bushing and instructions. Put the car on the ground and rolled it out to step back and look at the overall pretty happy and I like the ride height. Lots to do after going to sema I'm a little more motivated.


Don't mind the dorks

IP: Logged
Stubby79
Member
Posts: 7064
From: GFY county, FY.
Registered: Aug 2008


Feedback score: N/A
Leave feedback


Total ratings: 58
Rate this member

Report this Post11-18-2012 02:22 PM Click Here to See the Profile for Stubby79Send a Private Message to Stubby79Edit/Delete MessageReply w/QuoteDirect Link to This Post
 
quote
Originally posted by JPH87:

Not much done on the car lately but I did work out the belt route and made the alternater bracket


That tensioner not causing you trouble closing the decklid?
IP: Logged
JPH87
Member
Posts: 292
From: Post Falls ID
Registered: Sep 2008


Feedback score:    (10)
Leave feedback

Rate this member

Report this Post11-18-2012 09:15 PM Click Here to See the Profile for JPH87Send a Private Message to JPH87Edit/Delete MessageReply w/QuoteDirect Link to This Post
running an Archie hatch lots of room. Future whipple supercharger will replace the tensioner
IP: Logged
exoticse
Member
Posts: 8650
From: Orlando, Fl
Registered: Jun 2003


Feedback score: N/A
Leave feedback


Total ratings: 108
Rate this member

Report this Post11-19-2012 04:03 AM Click Here to See the Profile for exoticseSend a Private Message to exoticseEdit/Delete MessageReply w/QuoteDirect Link to This Post


Really coming together nicely !!

Loving it.
IP: Logged
JPH87
Member
Posts: 292
From: Post Falls ID
Registered: Sep 2008


Feedback score:    (10)
Leave feedback

Rate this member

Report this Post11-19-2012 11:12 PM Click Here to See the Profile for JPH87Send a Private Message to JPH87Edit/Delete MessageReply w/QuoteDirect Link to This Post
Thanks, lots to do and ideas from SEMA to workin but hope to have her on the road by late summer or not haha
IP: Logged
1988holleyformula
Member
Posts: 4109
From: SE MN
Registered: Jul 2009


Feedback score: (3)
Leave feedback


Total ratings: 68
Rate this member

Report this Post11-20-2012 03:46 AM Click Here to See the Profile for 1988holleyformulaSend a Private Message to 1988holleyformulaEdit/Delete MessageReply w/QuoteDirect Link to This Post
Thanks for the updates!
IP: Logged
JPH87
Member
Posts: 292
From: Post Falls ID
Registered: Sep 2008


Feedback score:    (10)
Leave feedback

Rate this member

Report this Post12-13-2012 12:07 AM Click Here to See the Profile for JPH87Send a Private Message to JPH87Edit/Delete MessageReply w/QuoteDirect Link to This Post
One of the things I saw at SEMA that I like that I could use on my car were called Aero catch latches so I ordered a pair and here they are


I really like how they are turning out they are frenched in from the back and will lock down the sides of the front end nicely.

Joe aka fiero King came by he had built the mount for the linear acuator and the black control box 4 momentary push buttons will shift the car from park to reverse drive and manual very cool I think

the control box/ little computer

I also built a heat shield for the actuator


I also got the tappered gound effects from fiero fiberglass mounted
IP: Logged
IanT720
Member
Posts: 1703
From: Whitmore Lake, MI
Registered: Sep 2010


Feedback score:    (9)
Leave feedback

Rate this member

Report this Post12-13-2012 12:57 AM Click Here to See the Profile for IanT720Send a Private Message to IanT720Edit/Delete MessageReply w/QuoteDirect Link to This Post
Wow looks killer!

------------------
86 Fiero GTX project now tearing up the street, My build thread! 3800sc, interior, wheels, suspension and more! https://www.fiero.nl/forum/Forum1/HTML/089483.html

IP: Logged
exoticse
Member
Posts: 8650
From: Orlando, Fl
Registered: Jun 2003


Feedback score: N/A
Leave feedback


Total ratings: 108
Rate this member

Report this Post12-13-2012 12:58 AM Click Here to See the Profile for exoticseSend a Private Message to exoticseEdit/Delete MessageReply w/QuoteDirect Link to This Post


Gonna be one sick ride. Spotted the new vents behind the front wheel wells, nice !

keep tweekin it !
IP: Logged
JPH87
Member
Posts: 292
From: Post Falls ID
Registered: Sep 2008


Feedback score:    (10)
Leave feedback

Rate this member

Report this Post12-14-2012 12:34 AM Click Here to See the Profile for JPH87Send a Private Message to JPH87Edit/Delete MessageReply w/QuoteDirect Link to This Post
Thanks Guys, well motivation is running high so I have gotten out in the shop every night after work this week. Got the auto brake pedal assembly in and modified the GXP brake booster and mounted it.

Still need to make the shaft longer but this was really pretty easy to mount. I also got the power distribution fuse holder mounted

Little by little I would like to see this thing hit pavement this summer.
IP: Logged
PFF
System Bot
exoticse
Member
Posts: 8650
From: Orlando, Fl
Registered: Jun 2003


Feedback score: N/A
Leave feedback


Total ratings: 108
Rate this member

Report this Post01-17-2013 02:55 AM Click Here to See the Profile for exoticseSend a Private Message to exoticseEdit/Delete MessageReply w/QuoteDirect Link to This Post

Bump.
IP: Logged
madcurl
Member
Posts: 21401
From: In a Van down by the Kern River
Registered: Jul 2003


Feedback score: N/A
Leave feedback


Total ratings: 314
Rate this member

Report this Post01-24-2013 12:34 PM Click Here to See the Profile for madcurlSend a Private Message to madcurlEdit/Delete MessageReply w/QuoteDirect Link to This Post

------------------


"Friends don't let their friends drive stock."

IP: Logged
JPH87
Member
Posts: 292
From: Post Falls ID
Registered: Sep 2008


Feedback score:    (10)
Leave feedback

Rate this member

Report this Post01-28-2013 09:40 PM Click Here to See the Profile for JPH87Send a Private Message to JPH87Edit/Delete MessageReply w/QuoteDirect Link to This Post
Ok got side tracked a bit with other vehicle issues back to the fiero. With the Doug Thurley Headers came a small problem space for the exhaust. The crossover conects to the backside collecter in a 2 into 1 design using a 3" single pipe but all of this is done 3-4 inches lower and further back than stock. So with not wanting a bunch of 90's and no need for cats I made my muffler. 3" in 2 2.5 out. Still have to finish up but you will get the Idea. I did cut the bottom of the trunk out but I'm only loosing about 5 inches of the it.I had to rework the Thuley crossover and shorten it up about 3 inches.


Here it is the car before I put the top on.

Steel wool in the main divider and on the ends to try and quiet it down abit and hopefully tone down resonance.


after locating all the baffles I drilled small holes in the top to spot weld the baffles to the top.


Hoping for a nice low tone loud but not too loud.
IP: Logged
exoticse
Member
Posts: 8650
From: Orlando, Fl
Registered: Jun 2003


Feedback score: N/A
Leave feedback


Total ratings: 108
Rate this member

Report this Post03-02-2013 11:28 AM Click Here to See the Profile for exoticseSend a Private Message to exoticseEdit/Delete MessageReply w/QuoteDirect Link to This Post


Bump for one of my favorite threads !

loving this project.
IP: Logged
Tony Kania
Member
Posts: 20794
From: The Inland Northwest
Registered: Dec 2008


Feedback score:    (7)
Leave feedback


Total ratings: 305
User Banned

Report this Post03-02-2013 12:17 PM Click Here to See the Profile for Tony KaniaSend a Private Message to Tony KaniaEdit/Delete MessageReply w/QuoteDirect Link to This Post
I have heard good things as of late. Let me know if you need any help Justin. I know that you have been busy with a new venture, and I just want to extend my hand.
IP: Logged
JPH87
Member
Posts: 292
From: Post Falls ID
Registered: Sep 2008


Feedback score:    (10)
Leave feedback

Rate this member

Report this Post03-03-2013 11:51 AM Click Here to See the Profile for JPH87Send a Private Message to JPH87Edit/Delete MessageReply w/QuoteDirect Link to This Post
Thanks guys work has me out of town alot at the moment but in a couple weeks that should calm down. I will get a small up date posted later today
IP: Logged
troyboy
Member
Posts: 2075
From:
Registered: Sep 2005


Feedback score: N/A
Leave feedback


Total ratings: 154
Rate this member

Report this Post03-03-2013 12:34 PM Click Here to See the Profile for troyboySend a Private Message to troyboyEdit/Delete MessageReply w/QuoteDirect Link to This Post
How on Earth did I miss this thread!! Looking good!

IP: Logged
JPH87
Member
Posts: 292
From: Post Falls ID
Registered: Sep 2008


Feedback score:    (10)
Leave feedback

Rate this member

Report this Post03-04-2013 11:28 PM Click Here to See the Profile for JPH87Send a Private Message to JPH87Edit/Delete MessageReply w/QuoteDirect Link to This Post
[QUOTE]Originally posted by troyboy:

How on Earth did I miss this thread!! Looking good!
I'm flying under the radar
Here's a quick up date exhaust is basically done just need to clean up some weld and get it ceramic coated


New tranny cooler little bigger than the last one

I got C6 side mirrors
IP: Logged
thismanyfieros
Member
Posts: 3468
From: Red Deer, alberta,canada
Registered: Dec 2002


Feedback score:    (15)
Leave feedback


Total ratings: 120
Rate this member

Report this Post03-04-2013 11:38 PM Click Here to See the Profile for thismanyfierosSend a Private Message to thismanyfierosEdit/Delete MessageReply w/QuoteDirect Link to This Post
Not sure if you have thought of changing your sock rear wing out and do the camaro lip spoiler...It will make your car look really really bad ass with that front end.. I think it will complete the rear body lines off sweet as well..
IP: Logged
Previous Page | Next Page

This topic is 4 pages long:  1   2   3   4 
next newest topic | next oldest topic

All times are ET (US)

Post New Topic  Post A Reply
Hop to:

Contact Us | Back To Main Page

Advertizing on PFF | Fiero Parts Vendors
PFF Merchandise | Fiero Gallery | Ogre's Cave
Real-Time Chat | Fiero Related Auctions on eBay


Copyright (c) 1999, C. Pennock