Pennock's Fiero Forum
  General Fiero Chat
  RCR's body mods... (Page 14)

Post New Topic  Post A Reply
Email This Page to Someone! | Printable Version

This topic is 17 pages long:  1   2   3   4   5   6   7   8   9   10   11   12   13   14   15   16   17 
Previous Page | Next Page
next newest topic | next oldest topic
RCR's body mods... by RCR
Started on: 06-15-2009 07:28 PM
Replies: 657 (38263 views)
Last post by: RCR on 11-17-2023 07:56 AM
dobie1
Member
Posts: 453
From: BC, Canada
Registered: Jun 2005


Feedback score: N/A
Leave feedback

Rate this member

Report this Post05-20-2019 10:37 PM Click Here to See the Profile for dobie1Send a Private Message to dobie1Edit/Delete MessageReply w/QuoteDirect Link to This Post
Keep it coming Bob looking really good!!
IP: Logged
dobie1
Member
Posts: 453
From: BC, Canada
Registered: Jun 2005


Feedback score: N/A
Leave feedback

Rate this member

Report this Post05-20-2019 10:39 PM Click Here to See the Profile for dobie1Send a Private Message to dobie1Edit/Delete MessageReply w/QuoteDirect Link to This Post

dobie1

453 posts
Member since Jun 2005
What are you doing for the interior any thoughts Yet?
Wayne

[This message has been edited by dobie1 (edited 05-20-2019).]

IP: Logged
RCR
Member
Posts: 4397
From: Shelby Twp Mi
Registered: Sep 2002


Feedback score:    (7)
Leave feedback


Total ratings: 102
Rate this member

Report this Post05-21-2019 06:44 AM Click Here to See the Profile for RCRSend a Private Message to RCREdit/Delete MessageReply w/QuoteDirect Link to This Post
 
quote
Originally posted by dobie1:

What are you doing for the interior any thoughts Yet?
Wayne


HI Wayne.

Yes, I have some ideas rolling around. I actually started the interior before the rebody started.
Currently I have a 2001 Grand am dash with custom gauge pod.

I was also working on custom door panels and console. (And seat covers at one time)

Lately, I've also been trying to install Cadillac ATS seats.

Who knows how it will turn out in the end.

Thanx for dropping in.

Bob
IP: Logged
RCR
Member
Posts: 4397
From: Shelby Twp Mi
Registered: Sep 2002


Feedback score:    (7)
Leave feedback


Total ratings: 102
Rate this member

Report this Post06-03-2019 08:16 PM Click Here to See the Profile for RCRSend a Private Message to RCREdit/Delete MessageReply w/QuoteDirect Link to This Post
 
quote
Originally posted by shemdogg:

That hoods looking really good man! I spent lotsa time thinking about how to do all the things I wanted to do to my car, and what I needed to do. Then tried to find a middle ground. Kit cars are a lotta work, both on and off the car. Ive spent waaaay too much time online looking for parts too. Keep it up man youre getting close!

shem


Thanx Shem. Missed your post at the bottom there.

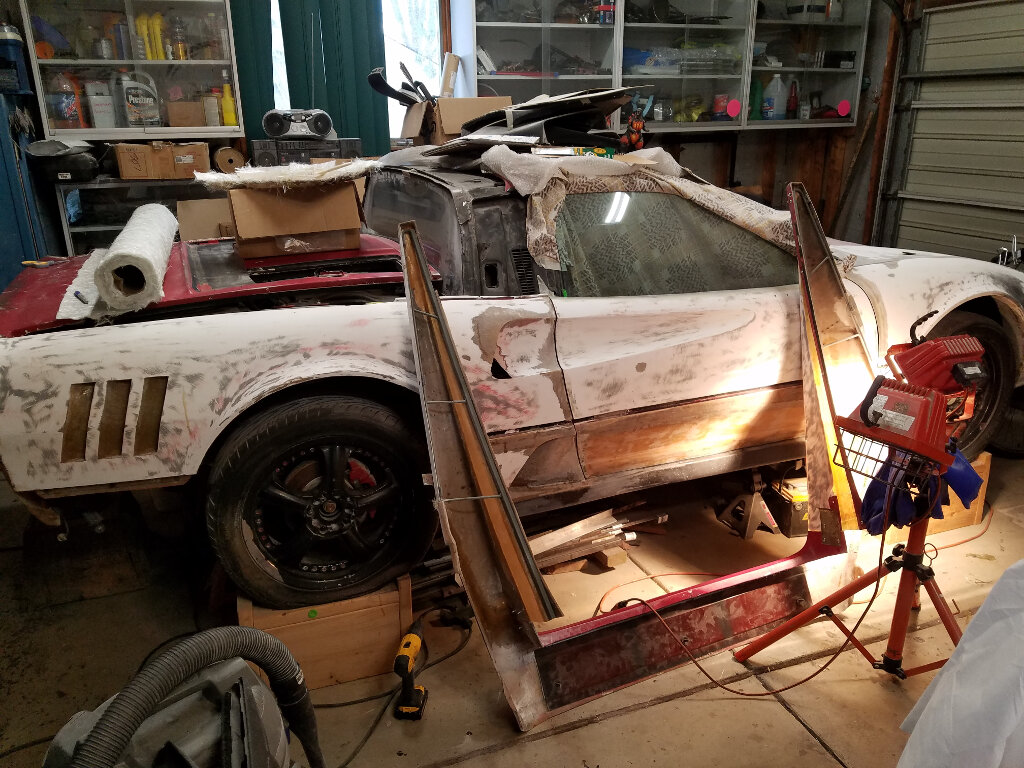
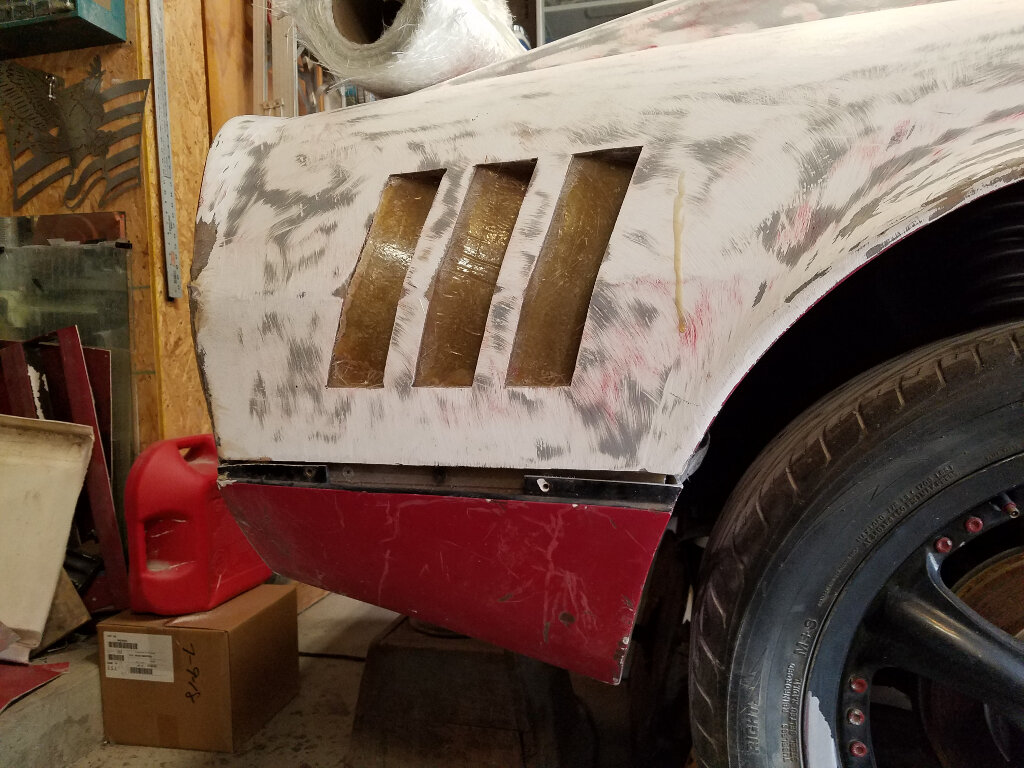
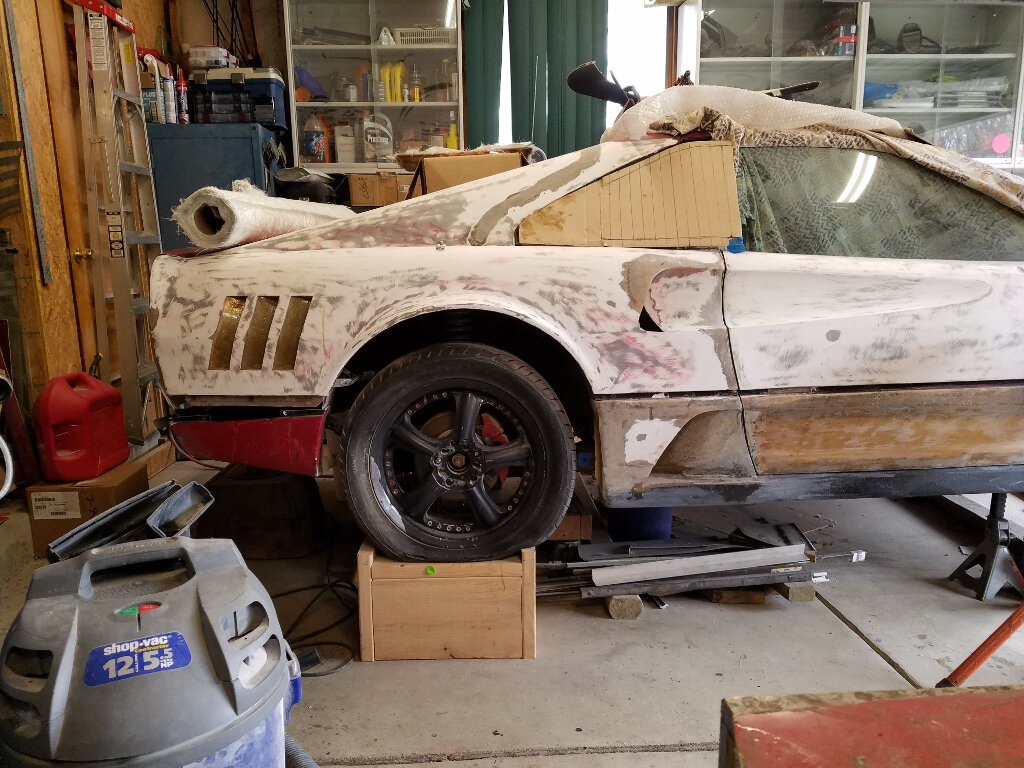
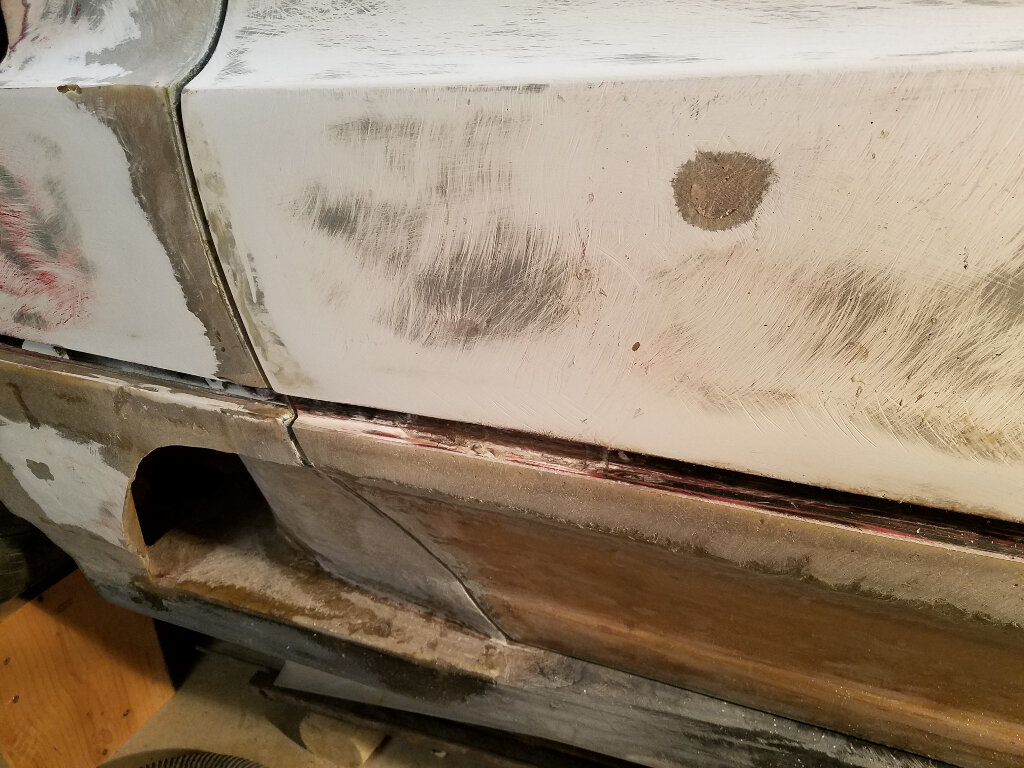
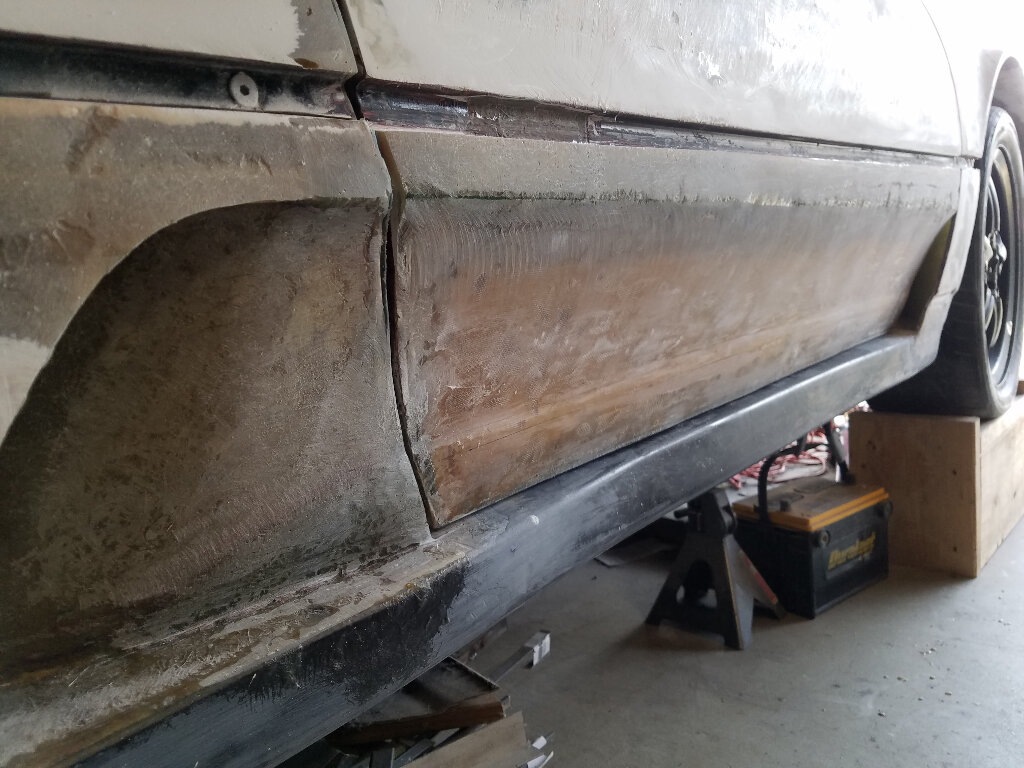
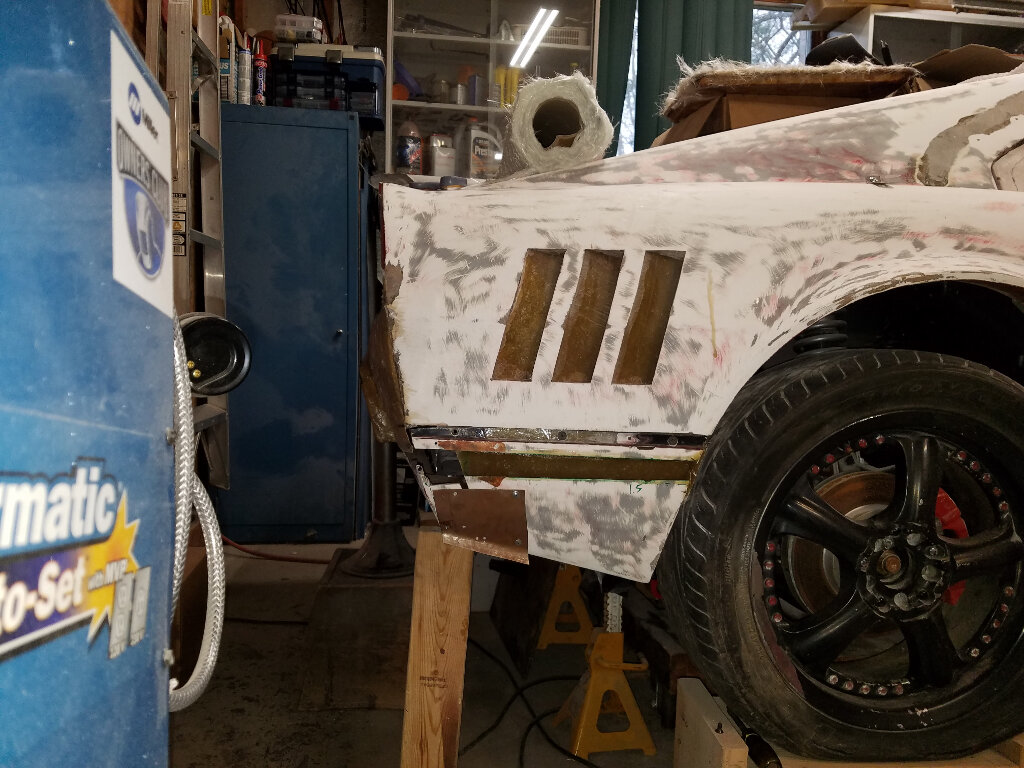
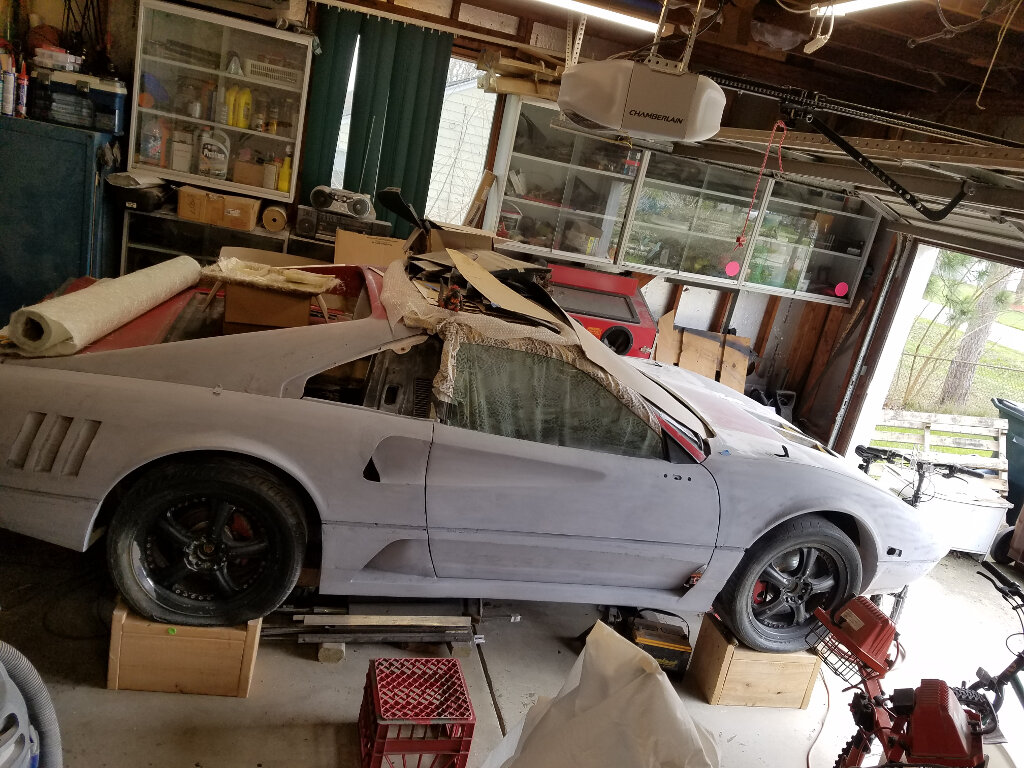
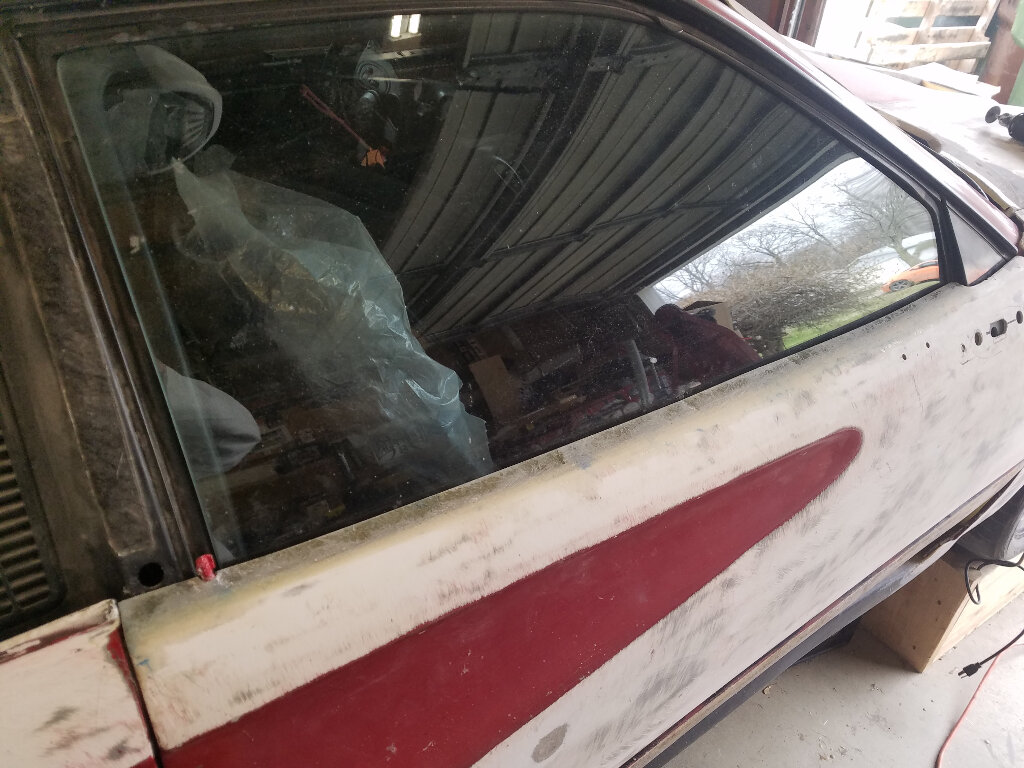
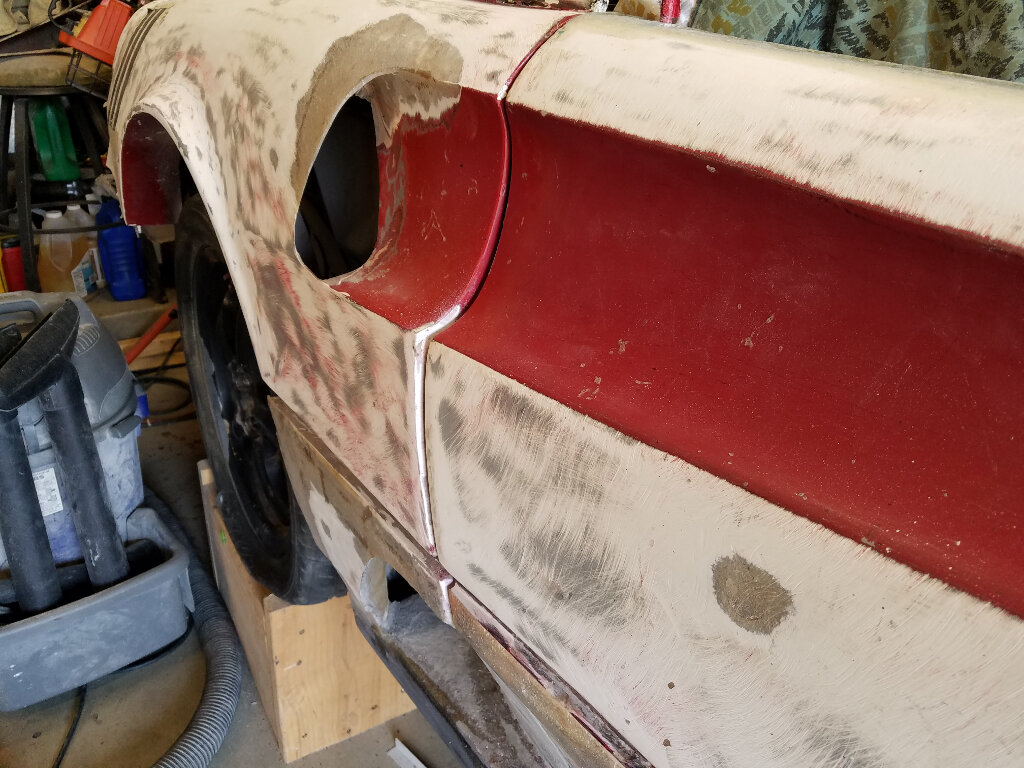
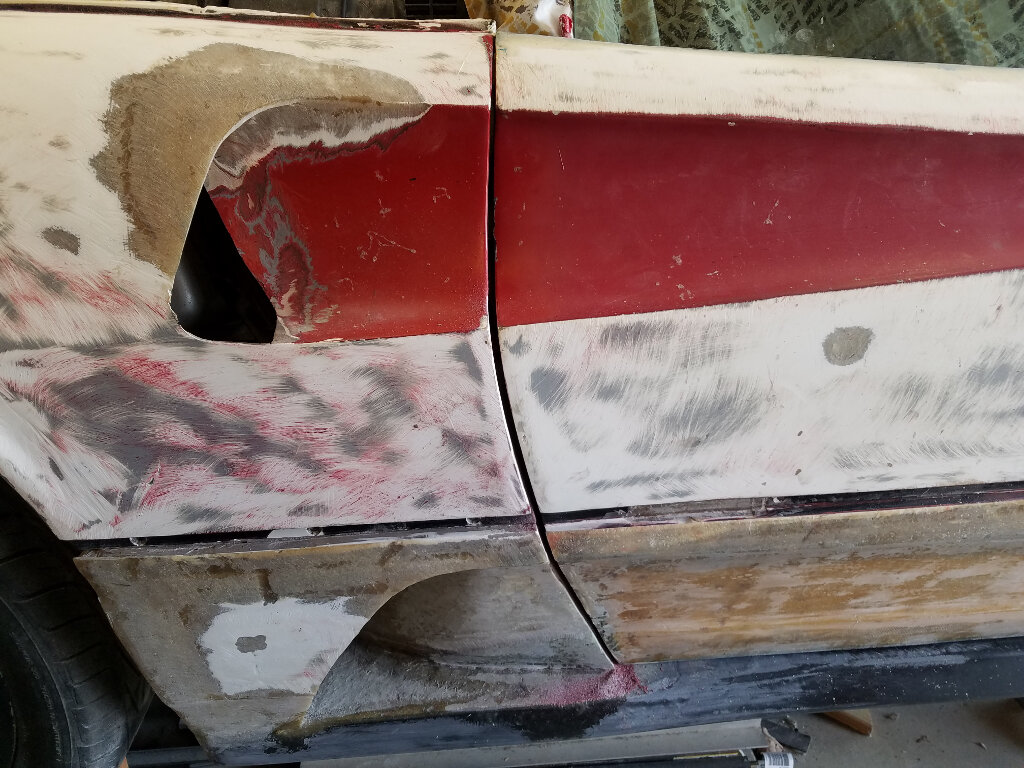
No real updates. Slow going. I did more work on the gaps on the pass side. Pretty much looks like the last picture.

Hope to get more done soon.

TTYL

Bob
IP: Logged
Dennis LaGrua
Member
Posts: 15144
From: Hillsborough, NJ U.S.A.
Registered: May 2000


Feedback score:    (13)
Leave feedback


Total ratings: 328
Rate this member

Report this Post06-15-2019 11:58 AM Click Here to See the Profile for Dennis LaGruaSend a Private Message to Dennis LaGruaEdit/Delete MessageReply w/QuoteDirect Link to This Post
Ten years in the making and must applaud your sense of dedication to this project. Will the car be road worthy this year?

------------------
" THE BLACK PARALYZER" -87GT 3800SC Series III engine, custom ZZP /Frozen Boost Intercooler setup, 3.4" Pulley, Northstar TB, LS1 MAF, 3" Spintech/Hedman Exhaust, P-log Manifold, Autolite 104's, MSD wires, Custom CAI, 4T65eHD w. custom axles, Champion Radiator, S10 Brake Booster, HP Tuners VCM Suite.
"THE COLUSSUS"
87GT - ALL OUT 3.4L Turbocharged engine, Garrett Hybrid Turbo, MSD ign., modified TH125H
" ON THE LOOSE WITHOUT THE JUICE "

IP: Logged
RCR
Member
Posts: 4397
From: Shelby Twp Mi
Registered: Sep 2002


Feedback score:    (7)
Leave feedback


Total ratings: 102
Rate this member

Report this Post06-17-2019 07:11 AM Click Here to See the Profile for RCRSend a Private Message to RCREdit/Delete MessageReply w/QuoteDirect Link to This Post
 
quote
Originally posted by Dennis LaGrua:

Ten years in the making and must applaud your sense of dedication to this project. Will the car be road worthy this year?


Hey Dennis,
Thanx for viewing my adventure. As I closed out the last build season, I really thought I'd have it ready to roll this year. But alas, this year has not been kind to me. There just isn't the funding to get a lot done, so I've been left to tinkering with the supplies I have left. We'll get it turned around and I'll get back at it.

Bob
IP: Logged
RCR
Member
Posts: 4397
From: Shelby Twp Mi
Registered: Sep 2002


Feedback score:    (7)
Leave feedback


Total ratings: 102
Rate this member

Report this Post06-25-2019 09:37 PM Click Here to See the Profile for RCRSend a Private Message to RCREdit/Delete MessageReply w/QuoteDirect Link to This Post
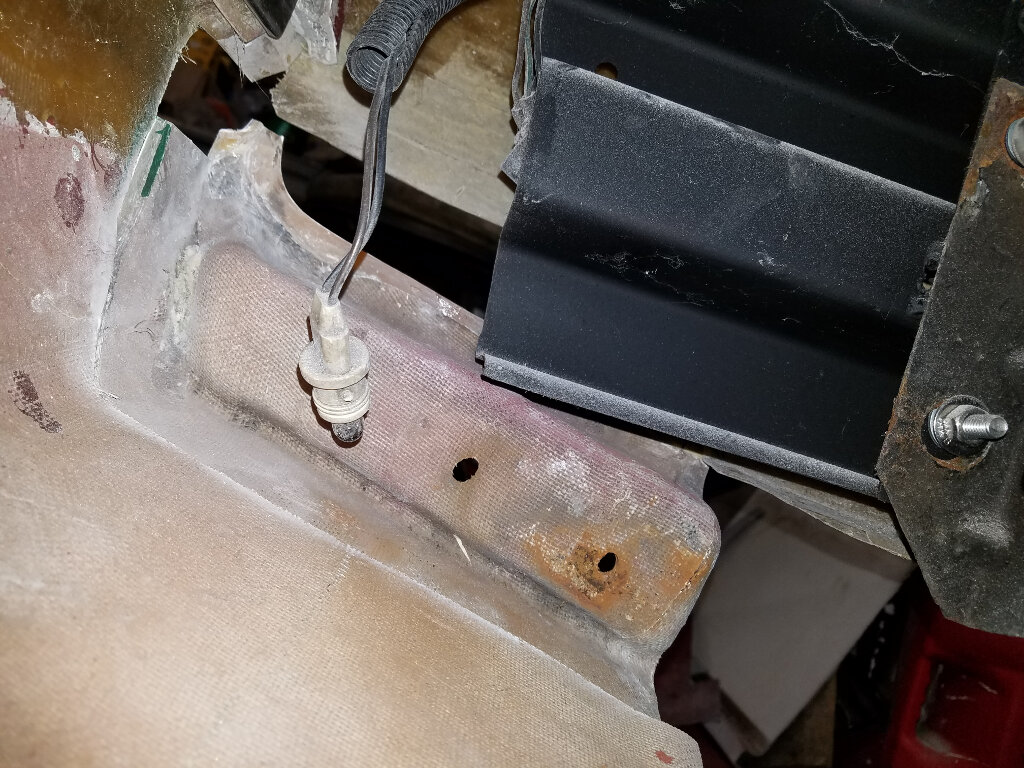
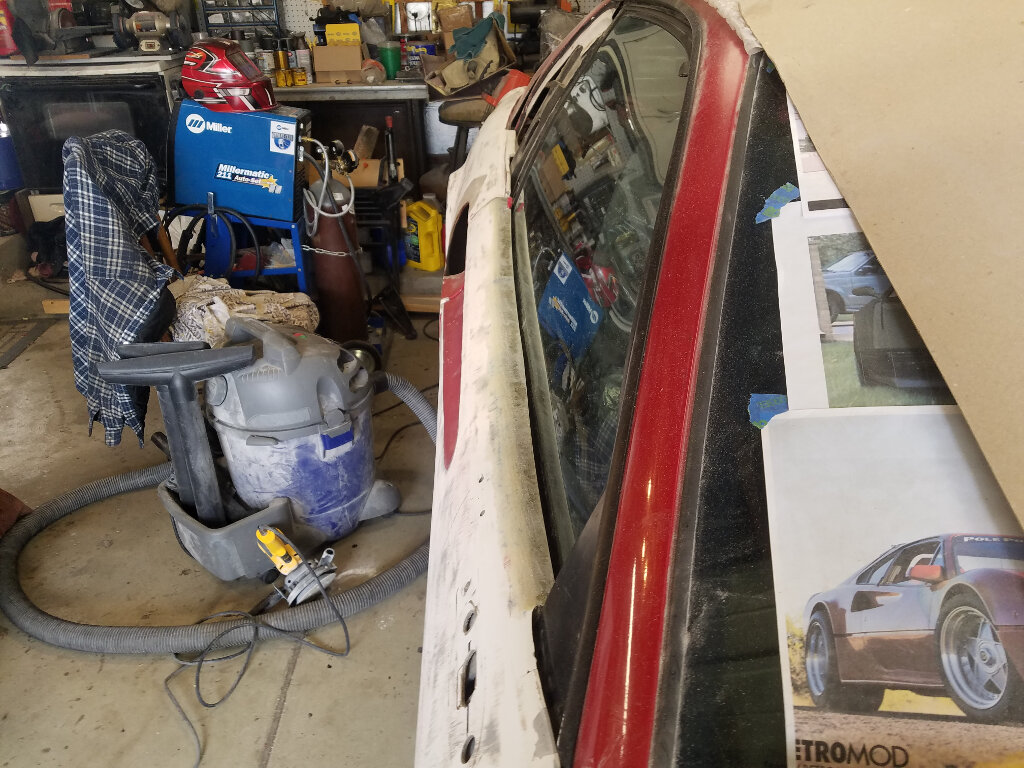
Worked on gaps more over the weekend. Also finished the pass side mount for the front fender. It's in a fixed location now. Pics are on my phone, but it's 20ft away and I don't feel like getting up.
I'll post em later.

Thanx for viewing.

Bob
IP: Logged
RCR
Member
Posts: 4397
From: Shelby Twp Mi
Registered: Sep 2002


Feedback score:    (7)
Leave feedback


Total ratings: 102
Rate this member

Report this Post09-13-2019 07:54 AM Click Here to See the Profile for RCRSend a Private Message to RCREdit/Delete MessageReply w/QuoteDirect Link to This Post
Long over due non-update.

It's been a sucky year so far, with no end in sight. But, we're hanging in there.

It kills me to see her sitting there, but I haven't done squat in months, so much so, that's it's even hard to lurk here at PFF.
Anyway, just wanted to let my peeps know I'm still going to be at it, just real slow due to circumstances.

Thanks for peeping.

Bob
IP: Logged
Sage
Member
Posts: 2902
From: USA
Registered: Nov 1999


Feedback score:    (14)
Leave feedback


Total ratings: 69
Rate this member

Report this Post09-13-2019 08:31 AM Click Here to See the Profile for SageSend a Private Message to SageEdit/Delete MessageReply w/QuoteDirect Link to This Post
I know the feeling Bob.

It just makes it that much sweeter when you DO actually get a spare moment here or there to "fuss" with it..and if you actually get to take a small step forward...well....that's cause for major celebration!

Thanks for sticking with it and letting us all know what's up.

More than some of us seem to be able to manage!

HAGO!
IP: Logged
RCR
Member
Posts: 4397
From: Shelby Twp Mi
Registered: Sep 2002


Feedback score:    (7)
Leave feedback


Total ratings: 102
Rate this member

Report this Post09-13-2019 04:47 PM Click Here to See the Profile for RCRSend a Private Message to RCREdit/Delete MessageReply w/QuoteDirect Link to This Post
 
quote
Originally posted by Sage:

I know the feeling Bob.

It just makes it that much sweeter when you DO actually get a spare moment here or there to "fuss" with it..and if you actually get to take a small step forward...well....that's cause for major celebration!

Thanks for sticking with it and letting us all know what's up.

More than some of us seem to be able to manage!

HAGO!


Thanx for the kind words, Ted. That's what makes you guys awesome and this forum so great.


Bob

[This message has been edited by RCR (edited 09-13-2019).]

IP: Logged
DotTC
Member
Posts: 2345
From: Hamlet, North Carolina
Registered: Nov 2003


Feedback score: N/A
Leave feedback


Total ratings: 154
Rate this member

Report this Post09-13-2019 05:31 PM Click Here to See the Profile for DotTCClick Here to visit DotTC's HomePageSend a Private Message to DotTCEdit/Delete MessageReply w/QuoteDirect Link to This Post
Just went through this entire thread... I remember watching it back when it started. Gives me hope for my build.
IP: Logged
PFF
System Bot
dobie1
Member
Posts: 453
From: BC, Canada
Registered: Jun 2005


Feedback score: N/A
Leave feedback

Rate this member

Report this Post09-13-2019 10:49 PM Click Here to See the Profile for dobie1Send a Private Message to dobie1Edit/Delete MessageReply w/QuoteDirect Link to This Post
 
quote
Originally posted by RCR:

Long over due non-update.

It's been a sucky year so far, with no end in sight. But, we're hanging in there.

It kills me to see her sitting there, but I haven't done squat in months, so much so, that's it's even hard to lurk here at PFF.
Anyway, just wanted to let my peeps know I'm still going to be at it, just real slow due to circumstances.

Thanks for peeping.

Bob


Bob Life does have these suckie times and when you exit out the other side in time and you will !!! completing the car will be that much more special..

Wayne🤙
IP: Logged
shemdogg
Member
Posts: 1749
From: The Ghetto CA USA
Registered: Apr 2017


Feedback score: N/A
Leave feedback

Rate this member

Report this Post09-15-2019 03:26 PM Click Here to See the Profile for shemdoggSend a Private Message to shemdoggEdit/Delete MessageReply w/QuoteDirect Link to This Post
No worries man, bad times pass eventually! When you need a break from the bs of life you have a sweet car to take your mind off of it. Maybe make a punch list and attack some smaller jobs on the car. Keep that chin up!

shem
IP: Logged
Neils88
Member
Posts: 4045
From: Jeddore,Nova Scotia
Registered: Aug 2013


Feedback score: N/A
Leave feedback


Total ratings: 56
Rate this member

Report this Post09-16-2019 09:08 PM Click Here to See the Profile for Neils88Send a Private Message to Neils88Edit/Delete MessageReply w/QuoteDirect Link to This Post
Hey Bob! Great to see you posting again. I took a long break over the summer as well... in fact I just made my first post on my build thread since May!!! It's never a bad idea to take a little break to recharge your batteries... Keep at it!

IP: Logged
RCR
Member
Posts: 4397
From: Shelby Twp Mi
Registered: Sep 2002


Feedback score:    (7)
Leave feedback


Total ratings: 102
Rate this member

Report this Post12-25-2019 11:33 AM Click Here to See the Profile for RCRSend a Private Message to RCREdit/Delete MessageReply w/QuoteDirect Link to This Post
Merry Christmas everyone.

The car still starts right up. Looking forward to a good build year.

Take care everyone.

Bob


(trying the new image loader) - Thanx Cliff
IP: Logged
RCR
Member
Posts: 4397
From: Shelby Twp Mi
Registered: Sep 2002


Feedback score:    (7)
Leave feedback


Total ratings: 102
Rate this member

Report this Post04-04-2020 03:24 PM Click Here to See the Profile for RCRSend a Private Message to RCREdit/Delete MessageReply w/QuoteDirect Link to This Post
Hey folks. Hope everyone is hanging tight and staying healthy.

For all of the home time, still not a bunch of time to work, and supplies are low (damned gloves), but I've been tinkering and have a few pictures.

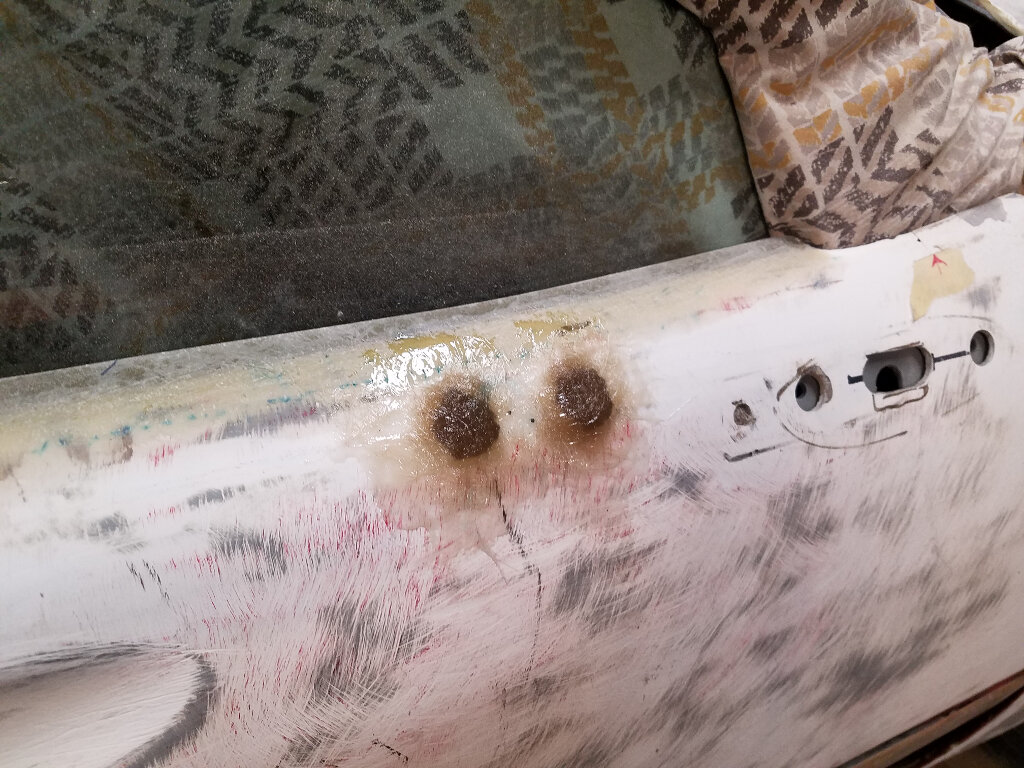
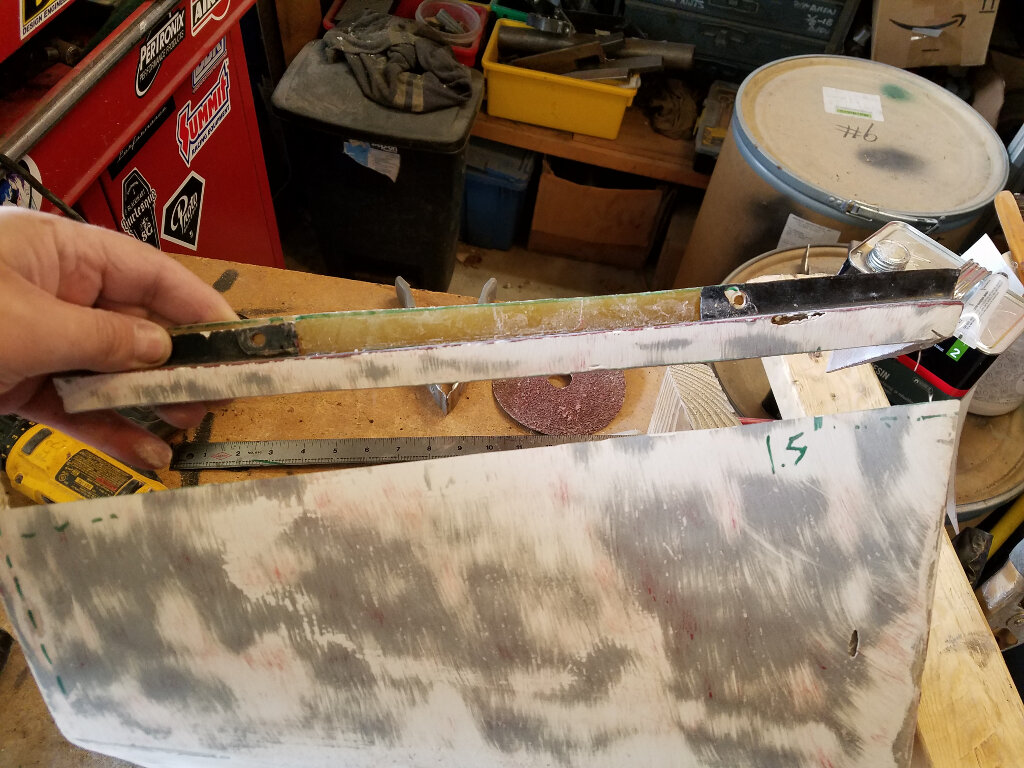
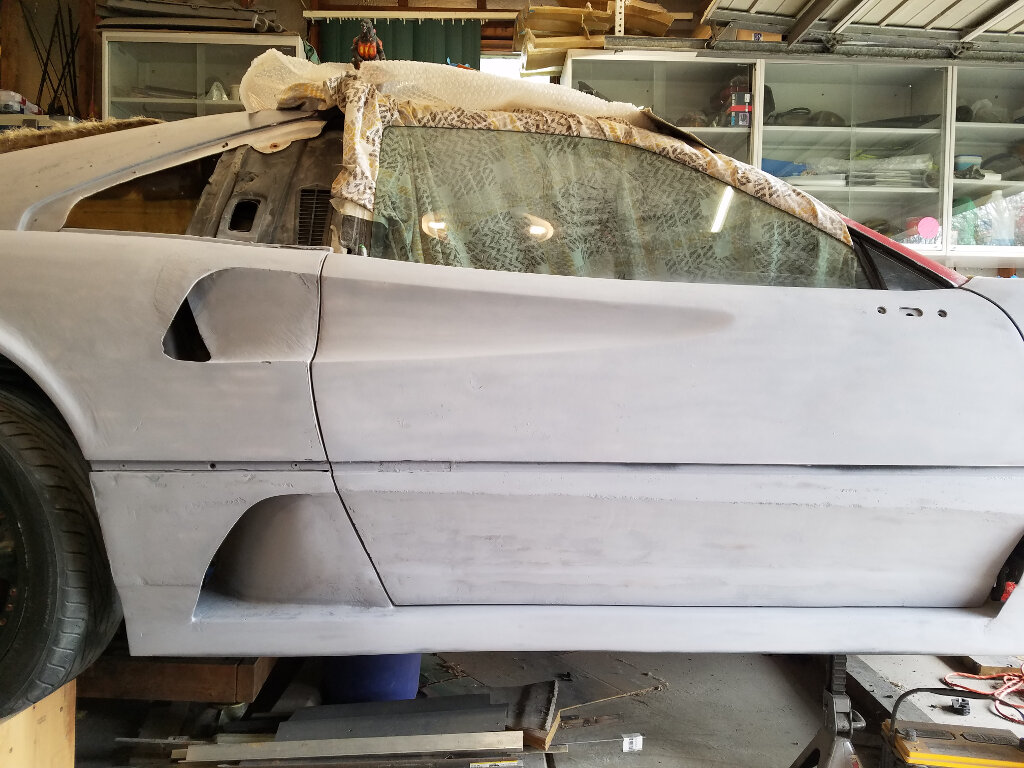
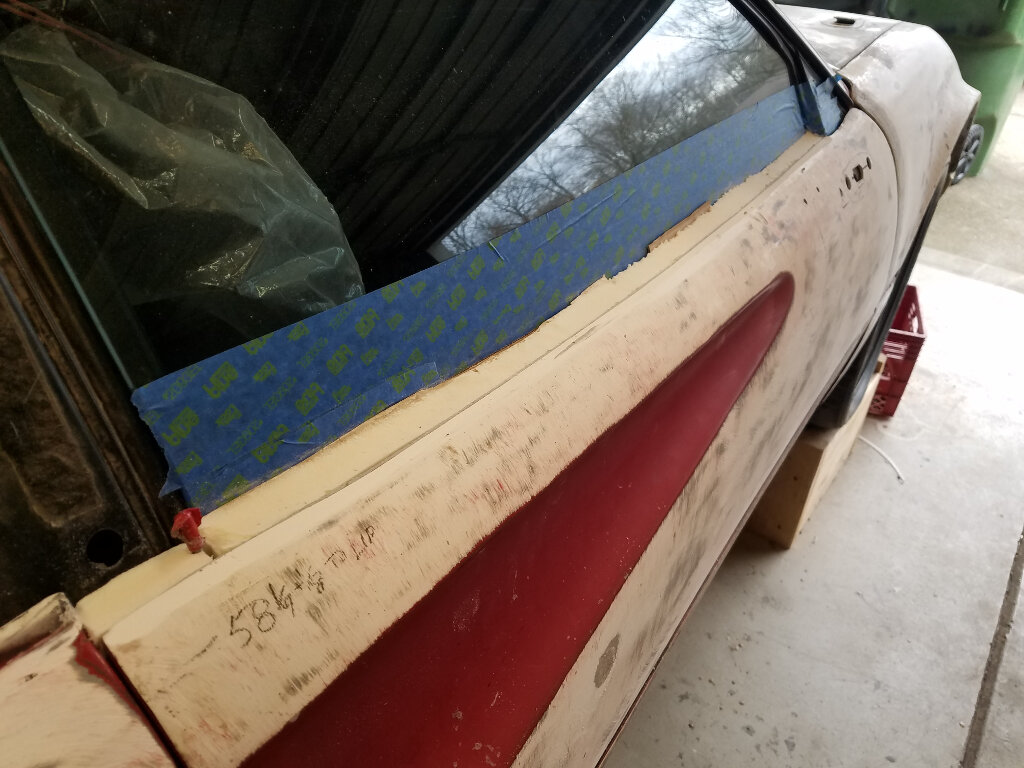
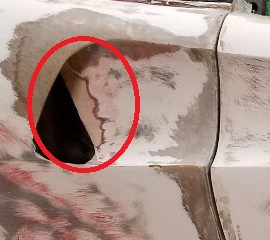
First off, the door skins have a big gap on top near the window. Really makes it look like a kit, especially on the passenger side where the gap was nearing 1".

Here's how I corrected that.


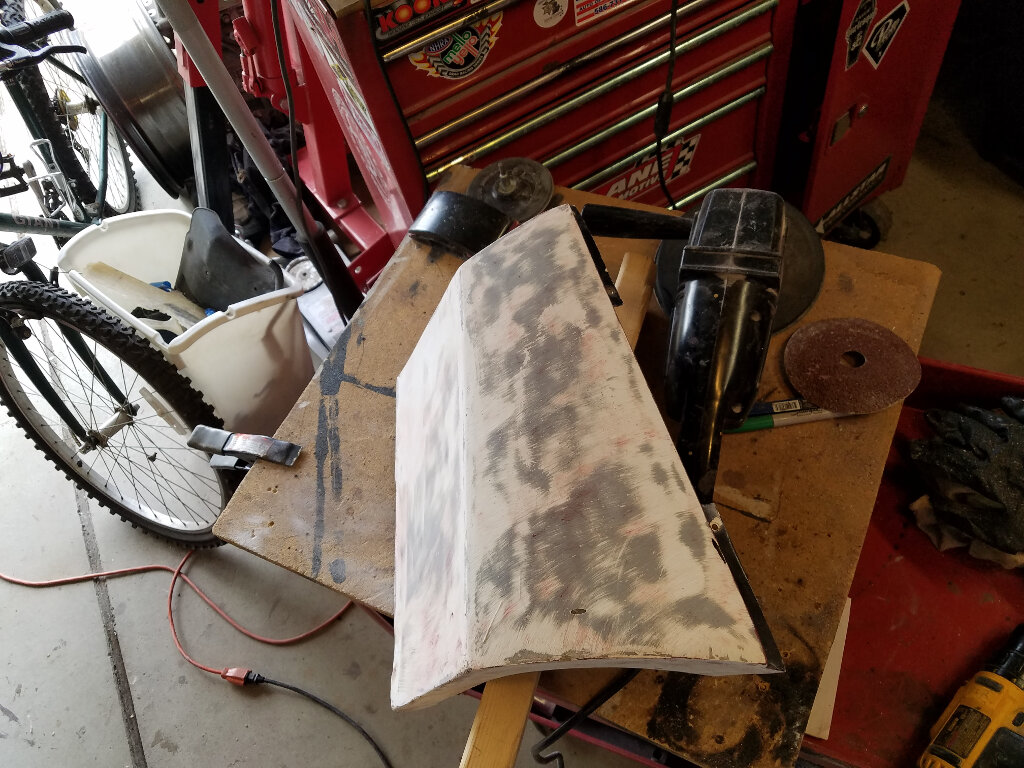
I began by taping up the window, then filled the gap with foam strips. The sanded to shape.


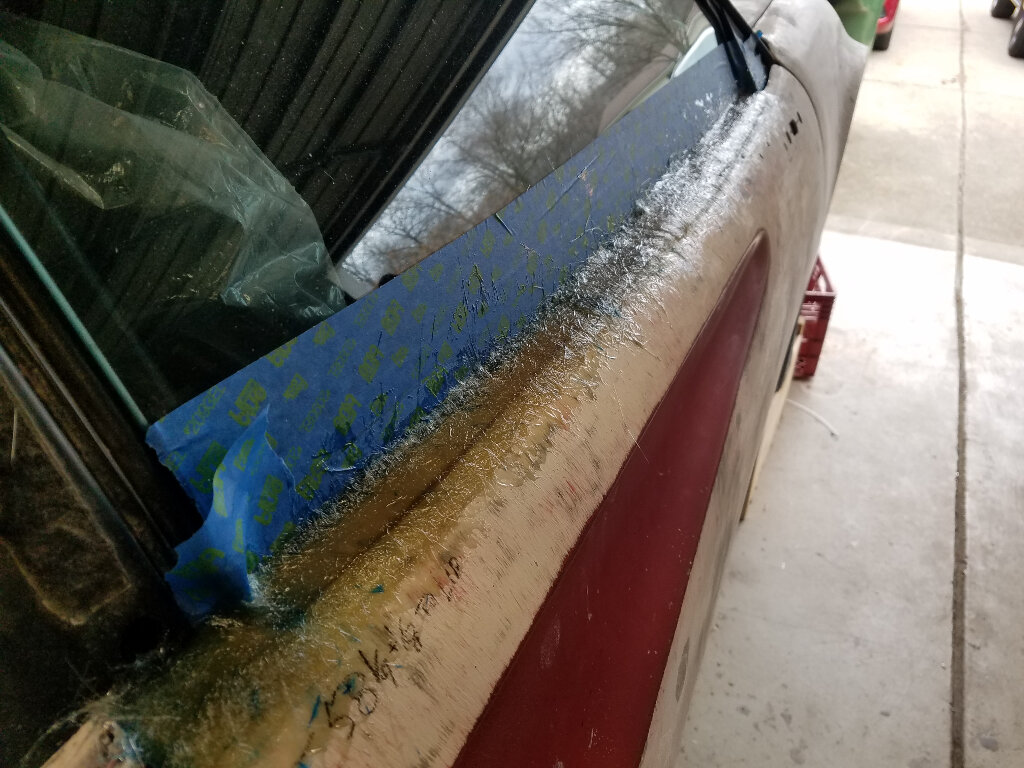
Time to get itchy. Couple layers of glass on top. Took the panel off and applied several layers below.


A little trimming and sanding, and voila, Small gap. I think it looks soooo much better. Now the other side needs to get done,


While I was at it, I started messing with the gaps a bit. I filled this door gap once, and it looked pretty good, but with all the finagling over the last few years, the gap grew. So, I guess it's time to fix.
Just started, but here's acouple pics.


Stay healthy, friends.

Bob

[This message has been edited by RCR (edited 04-04-2020).]

IP: Logged
dobie1
Member
Posts: 453
From: BC, Canada
Registered: Jun 2005


Feedback score: N/A
Leave feedback

Rate this member

Report this Post04-04-2020 08:56 PM Click Here to See the Profile for dobie1Send a Private Message to dobie1Edit/Delete MessageReply w/QuoteDirect Link to This Post
Bob It’s good to see you back at it!
I’m surprised at the gap on the Top of the door panel did you modify the panel that much or was that The way it was molded?

I had to do a lot of work on the front door gap as well!


Keep at it and stay safe.
Wayne
IP: Logged
RCR
Member
Posts: 4397
From: Shelby Twp Mi
Registered: Sep 2002


Feedback score:    (7)
Leave feedback


Total ratings: 102
Rate this member

Report this Post04-05-2020 08:31 AM Click Here to See the Profile for RCRSend a Private Message to RCREdit/Delete MessageReply w/QuoteDirect Link to This Post
 
quote
Originally posted by dobie1:

Bob It’s good to see you back at it!
I’m surprised at the gap on the Top of the door panel did you modify the panel that much or was that The way it was molded?

I had to do a lot of work on the front door gap as well!


Keep at it and stay safe.
Wayne


Hi Wayne. Thanx for coming by.
Yes, it came that way. The passenger side was worse than the driver's side, probably by 3/8".

Bob
IP: Logged
engine man
Member
Posts: 5298
From: Lebanon NH
Registered: Mar 2006


Feedback score: (5)
Leave feedback

Rate this member

Report this Post04-06-2020 07:48 PM Click Here to See the Profile for engine manSend a Private Message to engine manEdit/Delete MessageReply w/QuoteDirect Link to This Post
it amazes me how you can make things from scratch and make them so uniform you are doing a great job
IP: Logged
Sage
Member
Posts: 2902
From: USA
Registered: Nov 1999


Feedback score:    (14)
Leave feedback


Total ratings: 69
Rate this member

Report this Post04-07-2020 08:04 AM Click Here to See the Profile for SageSend a Private Message to SageEdit/Delete MessageReply w/QuoteDirect Link to This Post
Looking good Bob.

Glad to see somebody actually working on their project....stay healthy and hopefully everybody you care about and are responsible for does too!

Your door gaps remind me of something the guy I learned from told me about how to get Vette doors to fit right....."You just glass em' shut, then cut the opening to what you want it to be."

Keep up the good work.....and the updates! Enjoy seeing the progress.

HAGO!
IP: Logged
RCR
Member
Posts: 4397
From: Shelby Twp Mi
Registered: Sep 2002


Feedback score:    (7)
Leave feedback


Total ratings: 102
Rate this member

Report this Post04-12-2020 02:01 PM Click Here to See the Profile for RCRSend a Private Message to RCREdit/Delete MessageReply w/QuoteDirect Link to This Post
Engineman, Sage,,,Thanx for dropping by and the kind words. Stay healthy guys.

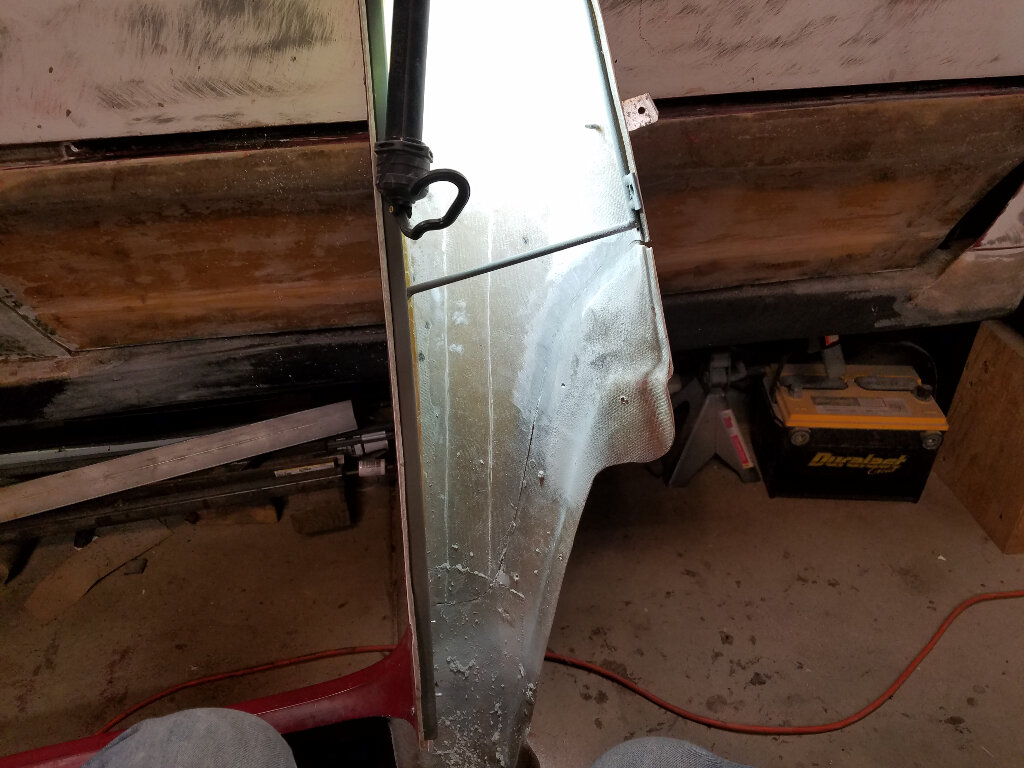
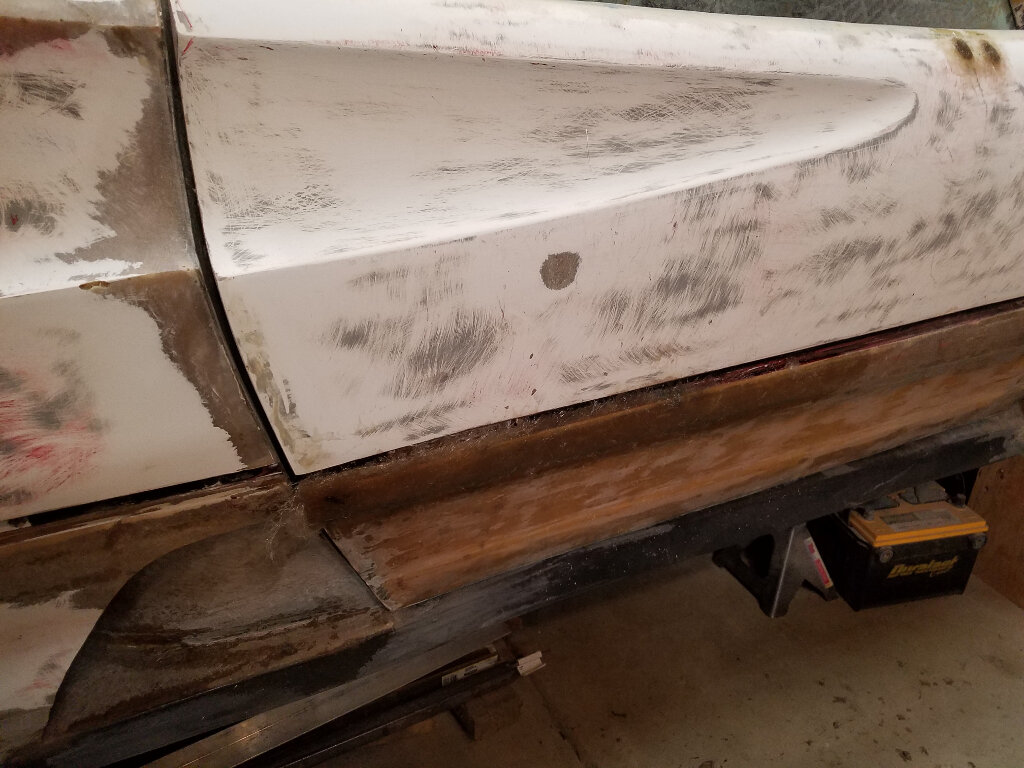
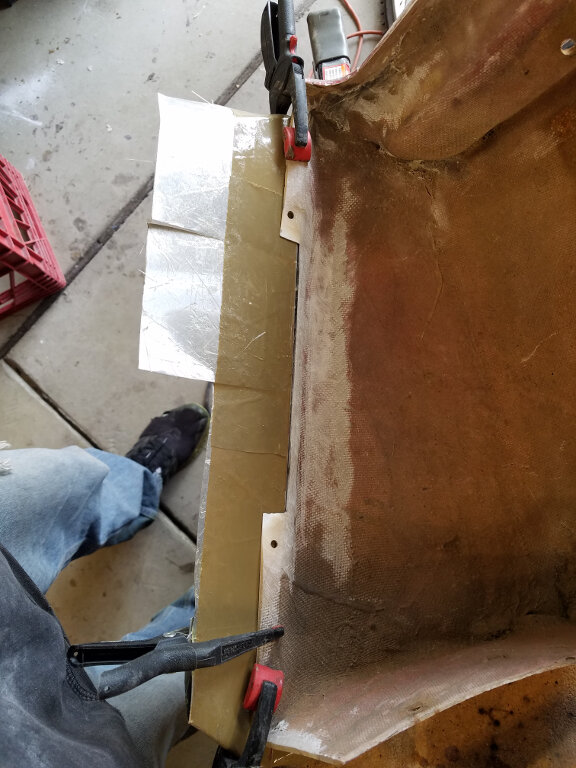
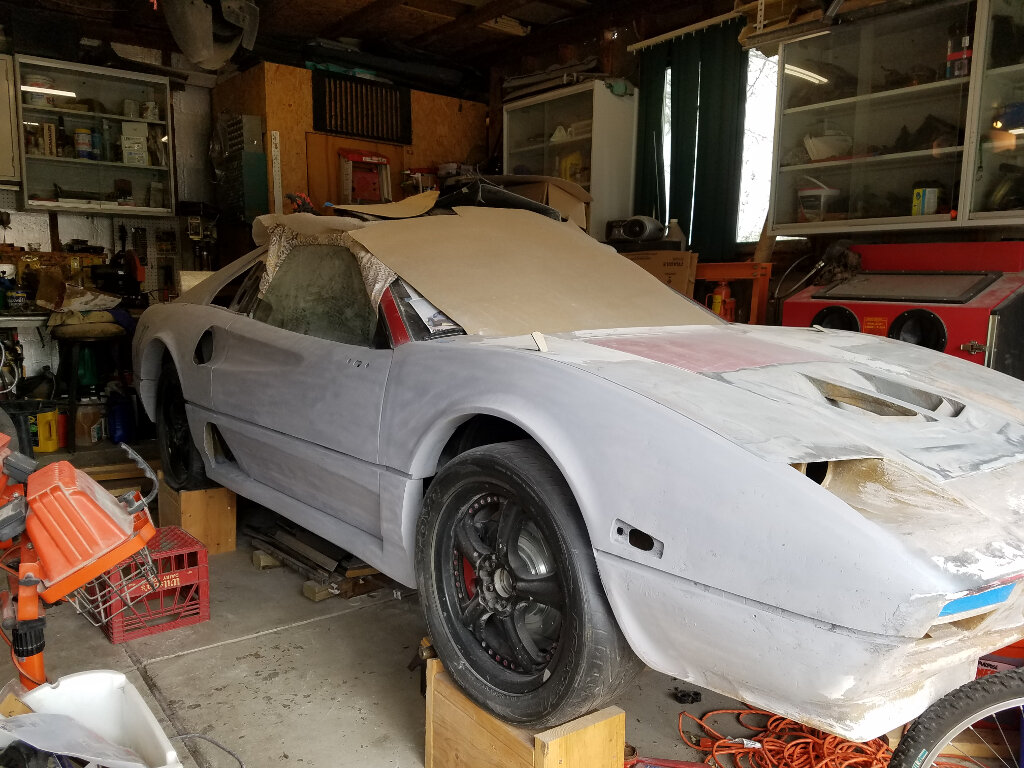
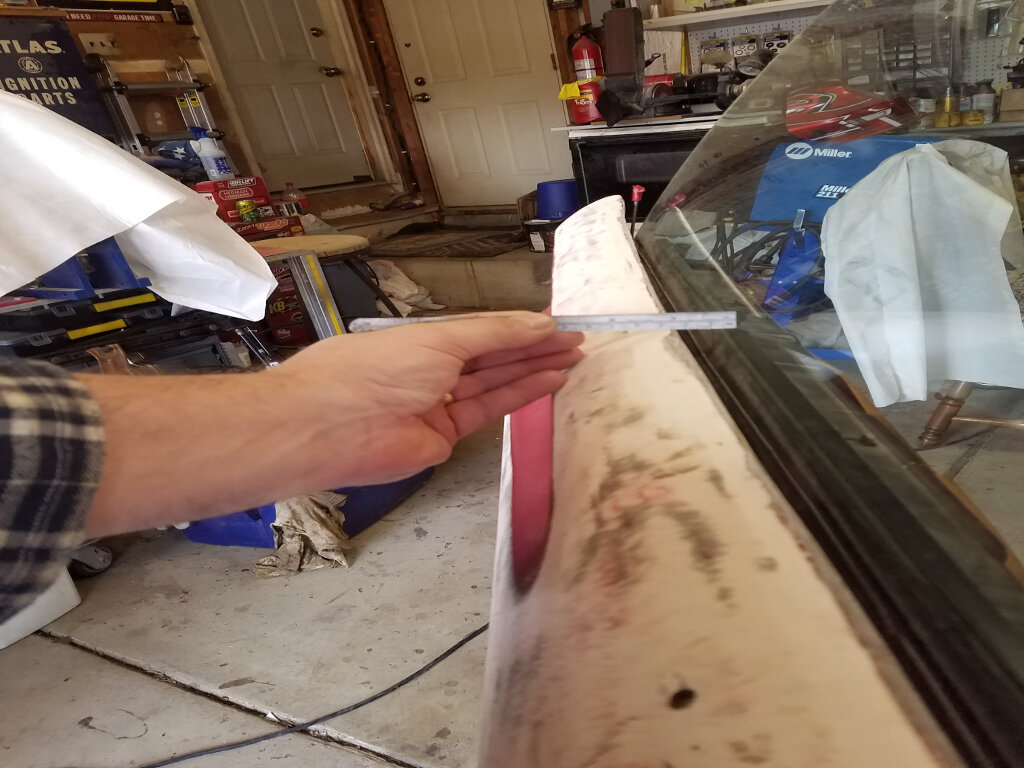
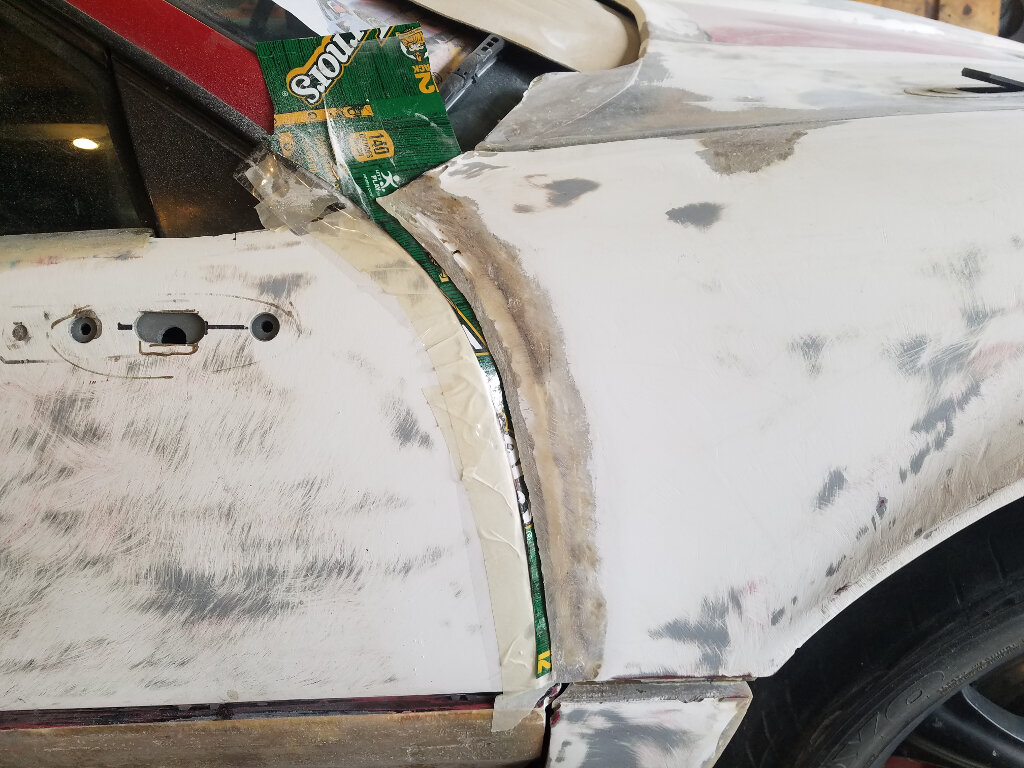
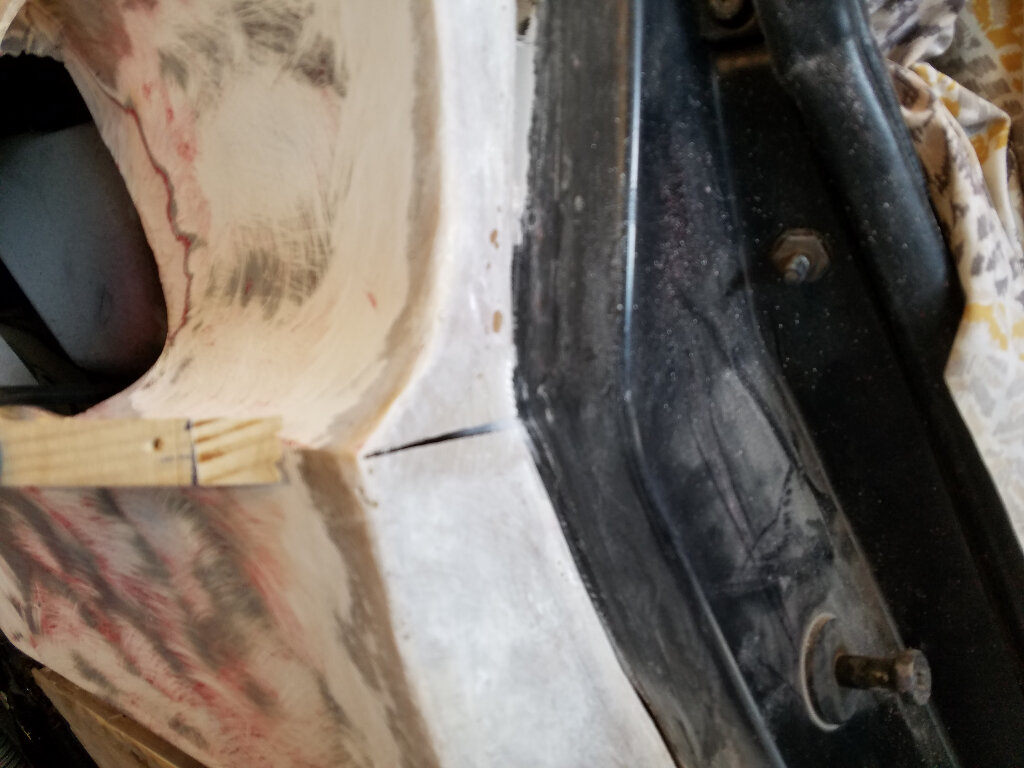
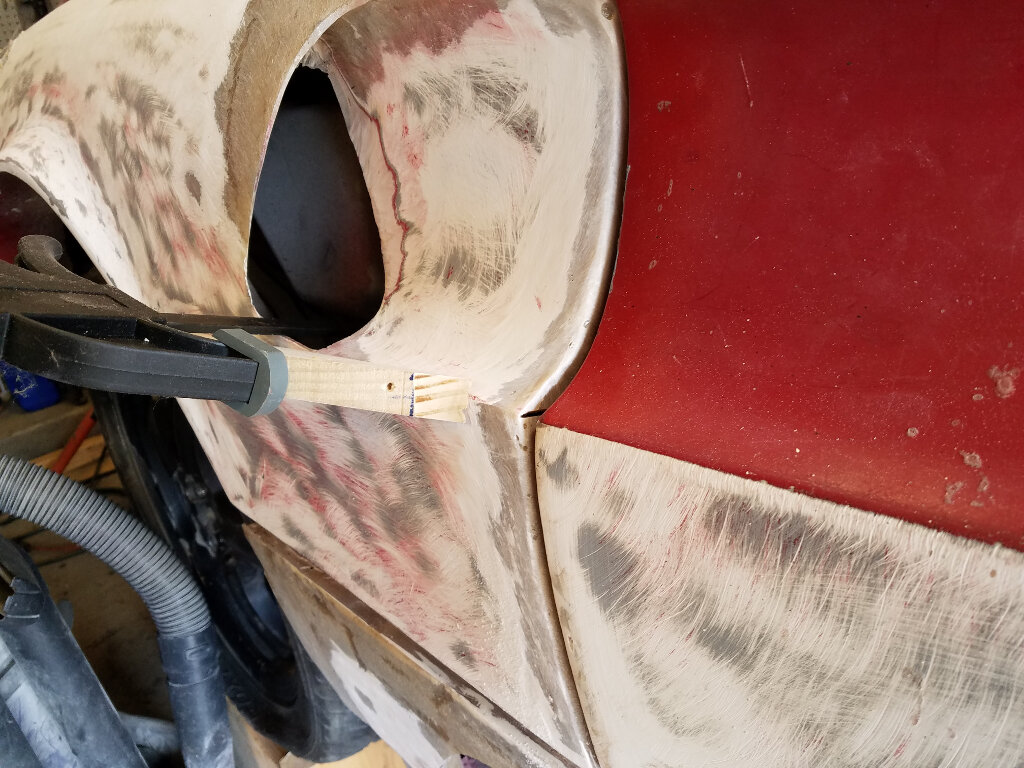
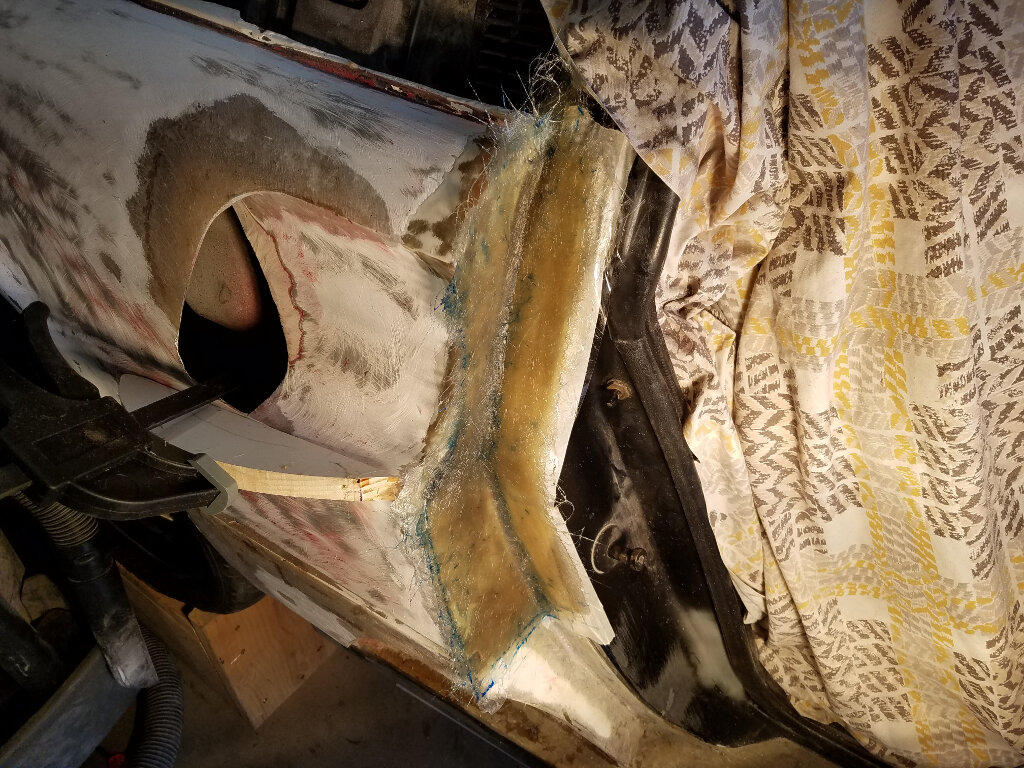
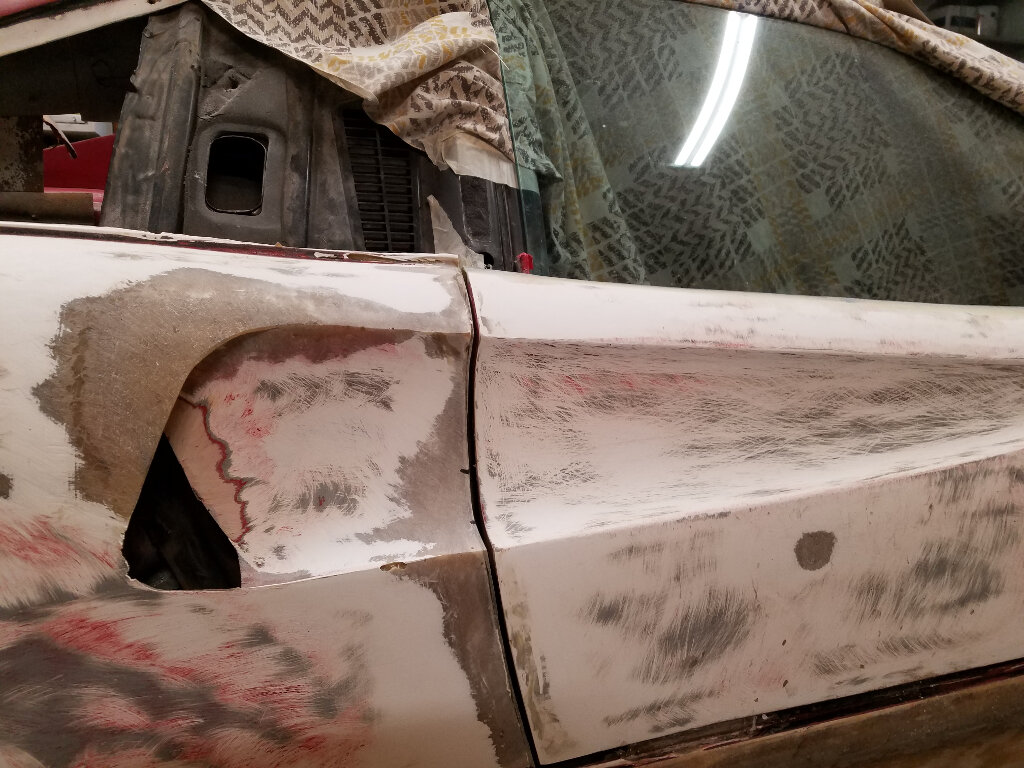
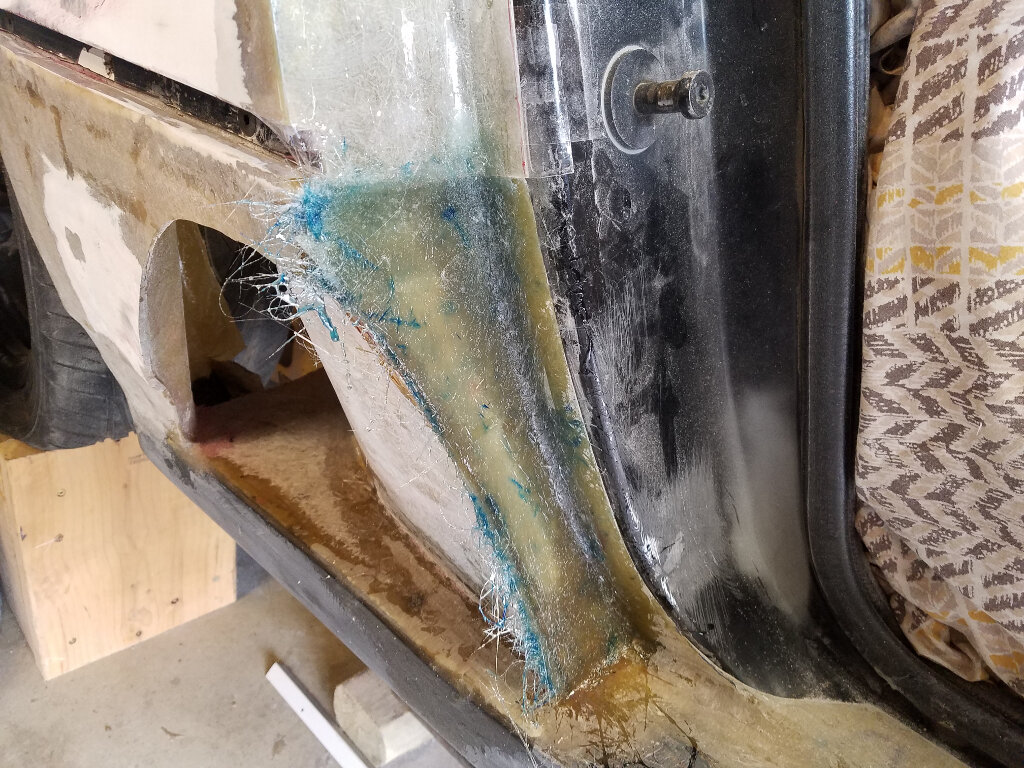
A couple days to play. Working on the door gaps and fender flange some more.
The first two pics show what I'm working with. Fixing both the gaps and the difference in z-height between the door and fender.


To deal with the z-difference, I cut a slot in the flange and clamped it down.


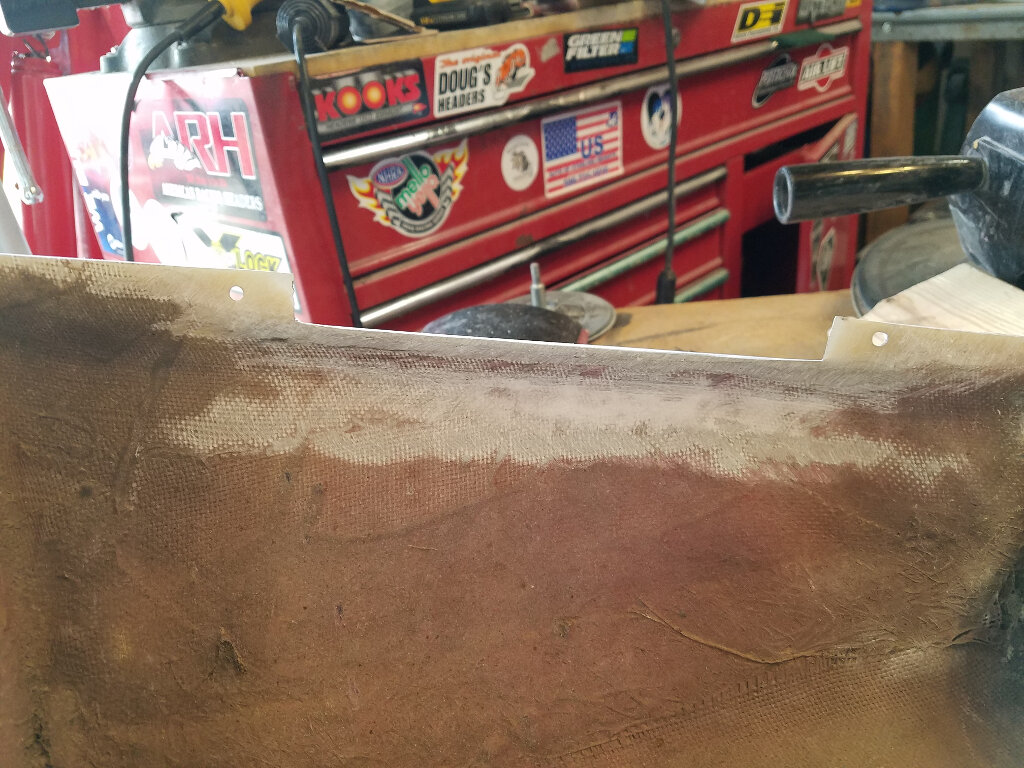
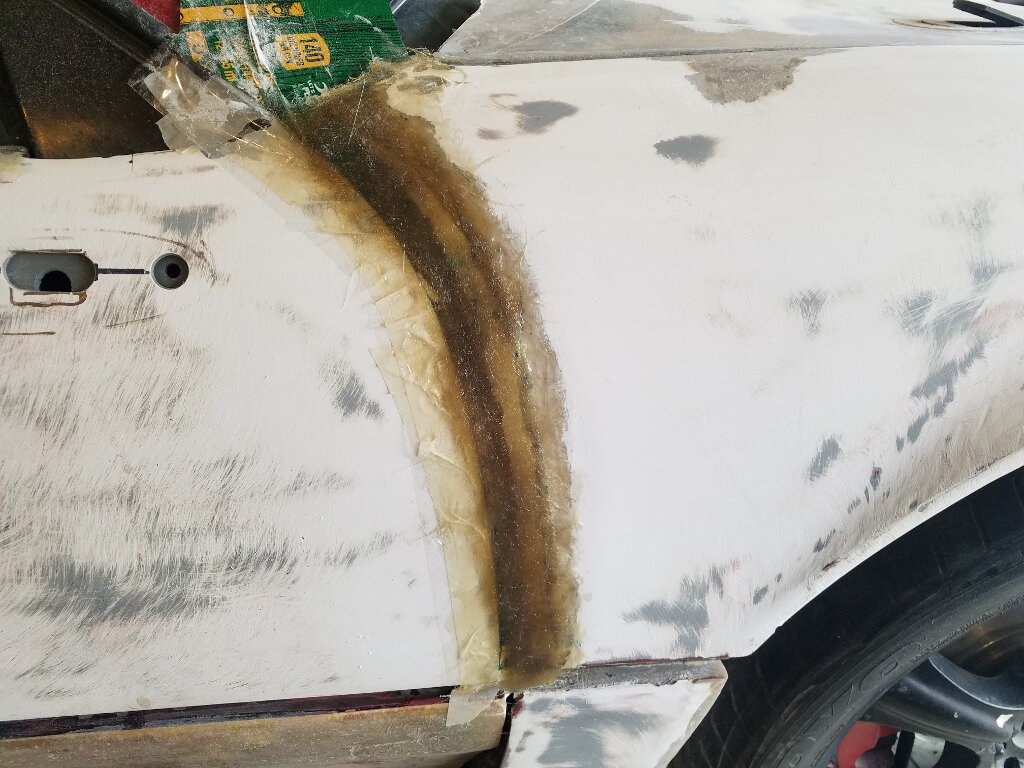
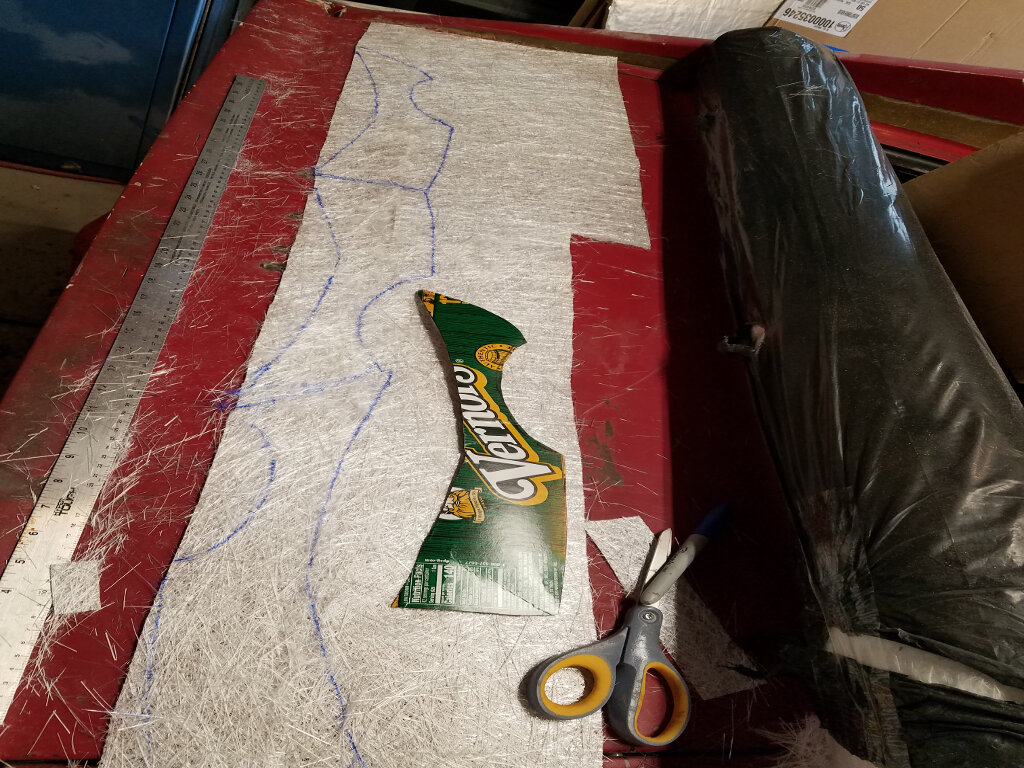
After some taping and rough sanding, it was time for the glass. I made a template of the shape and cut 3 layers from the matt.
(continue the post after a crash...)


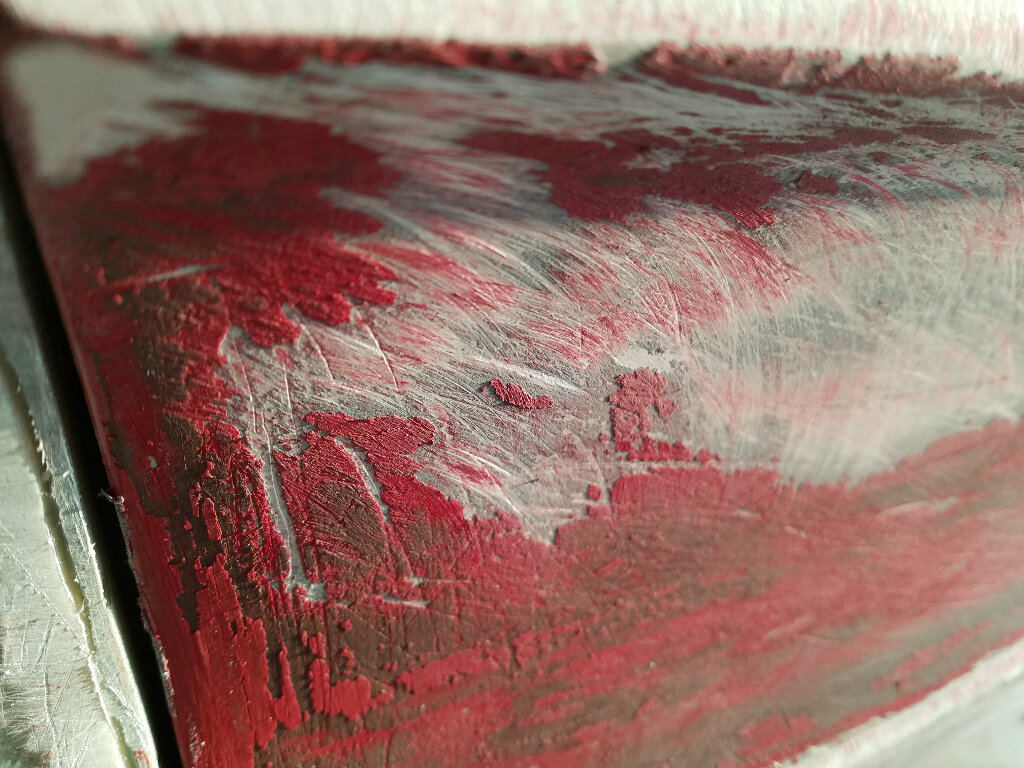
One of the many challenges with this body kit is thahe paint that's on it. It took me an hour to get this crap off and back to gel coat.


Back to glassing.


And onto the rocker portion.


Not perfect yet, but here's where I'm at now.


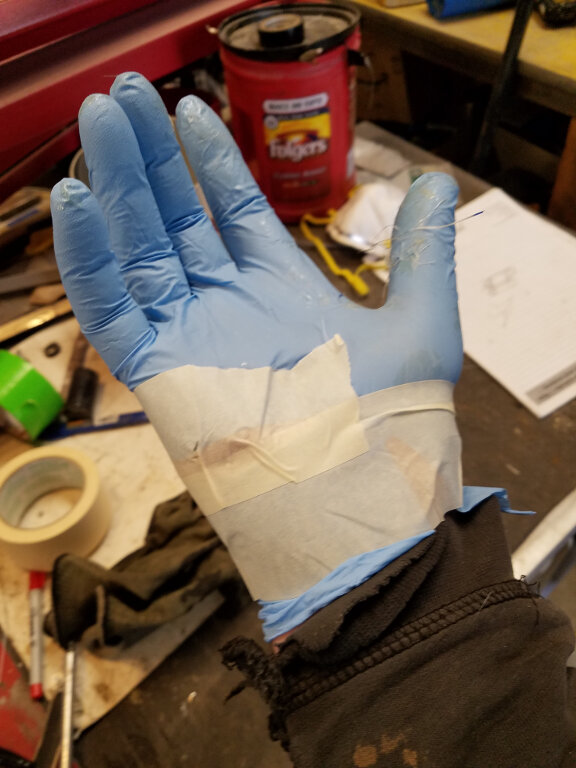
I should be able to keep banging out these little projects as long as the gloves hold out. Only have a few pairs. The current pair I've used 4 times now. Not bad for HF 5mil latex.

Happy Easter and stay safe.

Bob

[This message has been edited by RCR (edited 04-12-2020).]

IP: Logged
PFF
System Bot
dobie1
Member
Posts: 453
From: BC, Canada
Registered: Jun 2005


Feedback score: N/A
Leave feedback

Rate this member

Report this Post04-12-2020 03:27 PM Click Here to See the Profile for dobie1Send a Private Message to dobie1Edit/Delete MessageReply w/QuoteDirect Link to This Post
Looks really good Bob!
That’s has to be the nicest advantage of fiberglass being able to make modifications like you’ve done, and no one will ever Know once you have primer n it!!!!
I hadn’t noticed you had changed the shape of the upper intake! I like it.

Stay safe
Wayne
IP: Logged
RCR
Member
Posts: 4397
From: Shelby Twp Mi
Registered: Sep 2002


Feedback score:    (7)
Leave feedback


Total ratings: 102
Rate this member

Report this Post04-12-2020 06:05 PM Click Here to See the Profile for RCRSend a Private Message to RCREdit/Delete MessageReply w/QuoteDirect Link to This Post
 
quote
Originally posted by dobie1:

I hadn’t noticed you had changed the shape of the upper intake! I like it.


Thanx. I did that to match the bottom.

Fun part of removing paint is finding out what's underneath. The pink area at the edge is all bondo. More to replace.


Bob

[This message has been edited by RCR (edited 04-12-2020).]

IP: Logged
Neils88
Member
Posts: 4045
From: Jeddore,Nova Scotia
Registered: Aug 2013


Feedback score: N/A
Leave feedback


Total ratings: 56
Rate this member

Report this Post04-19-2020 10:02 AM Click Here to See the Profile for Neils88Send a Private Message to Neils88Edit/Delete MessageReply w/QuoteDirect Link to This Post
It's looking great, Bob! Glad to see you making good progress on it.
IP: Logged
RCR
Member
Posts: 4397
From: Shelby Twp Mi
Registered: Sep 2002


Feedback score:    (7)
Leave feedback


Total ratings: 102
Rate this member

Report this Post04-19-2020 07:03 PM Click Here to See the Profile for RCRSend a Private Message to RCREdit/Delete MessageReply w/QuoteDirect Link to This Post
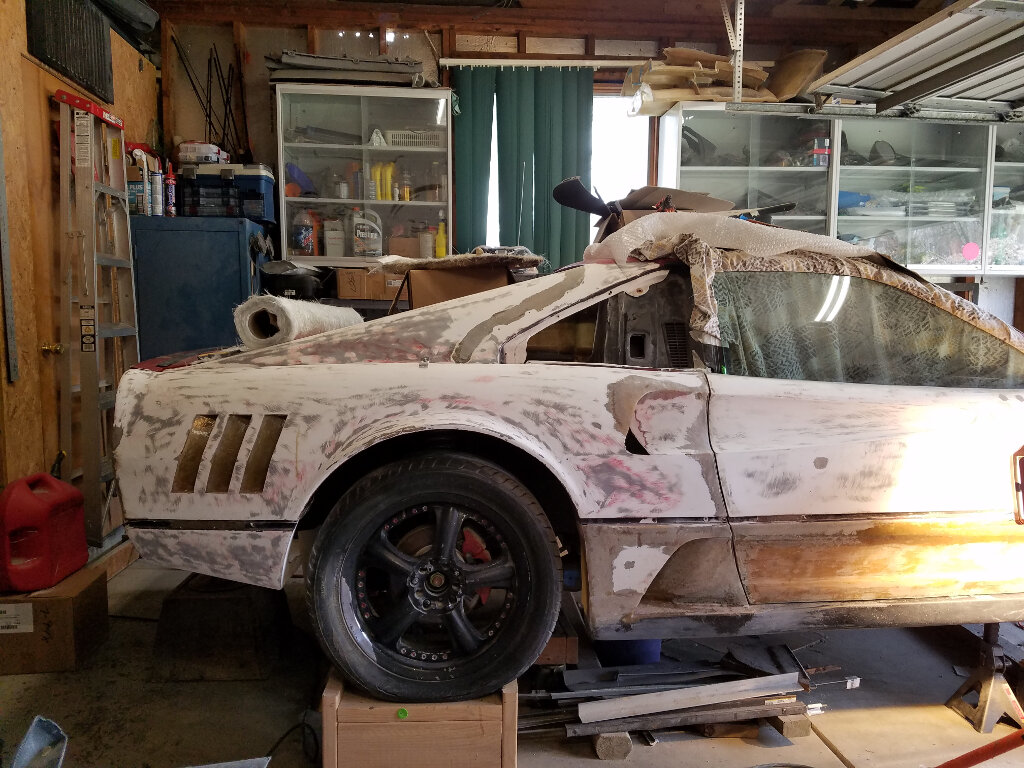
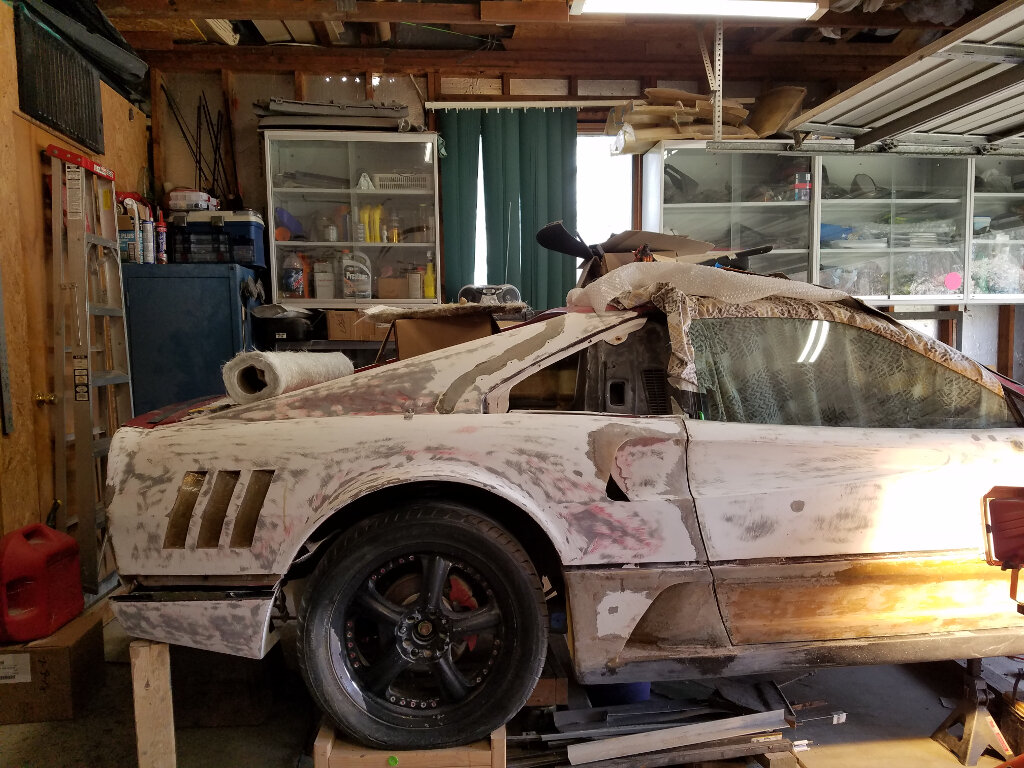
Well, concluding week 4 of stay at home (I think it's week 4 anyway)...

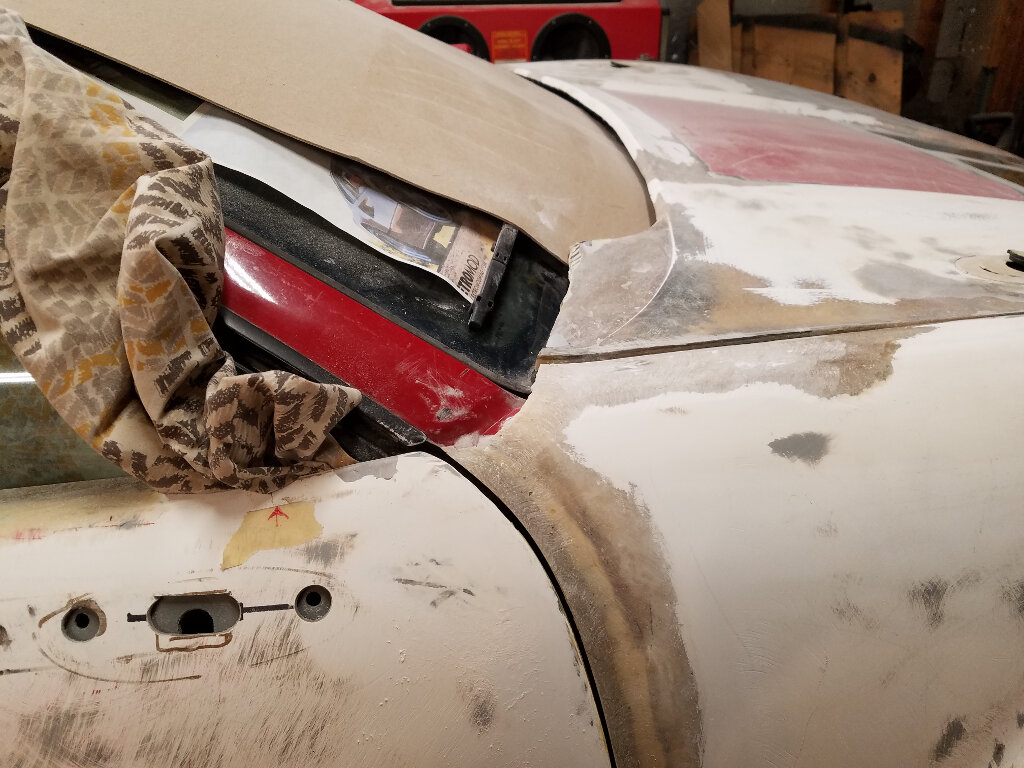
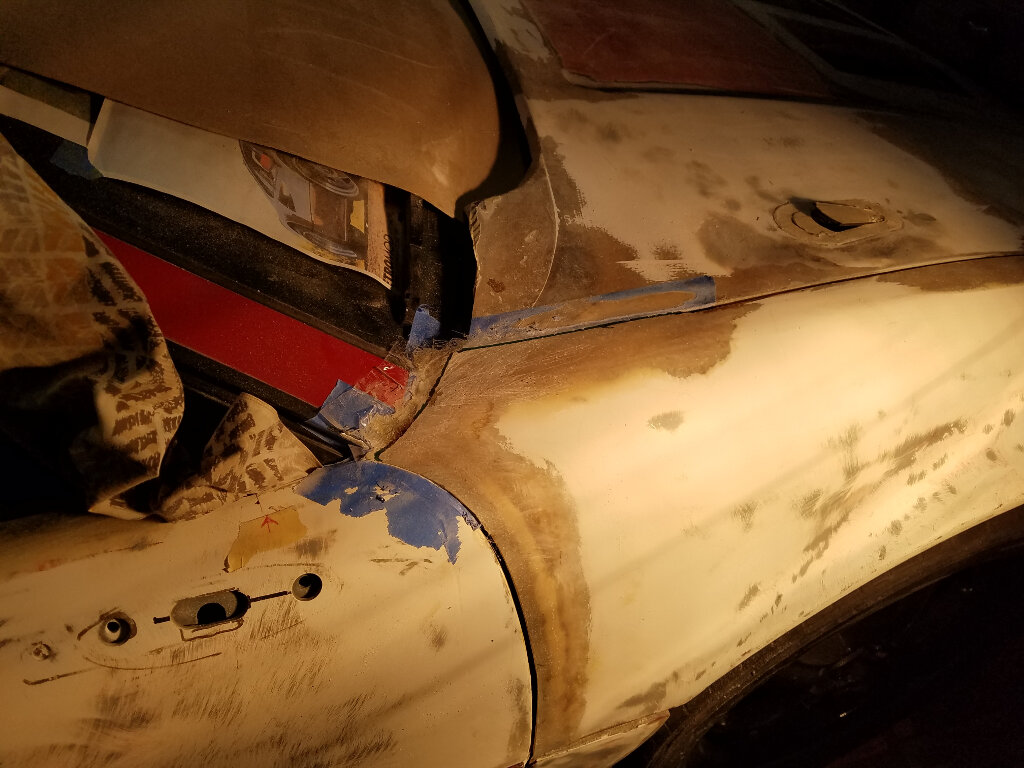
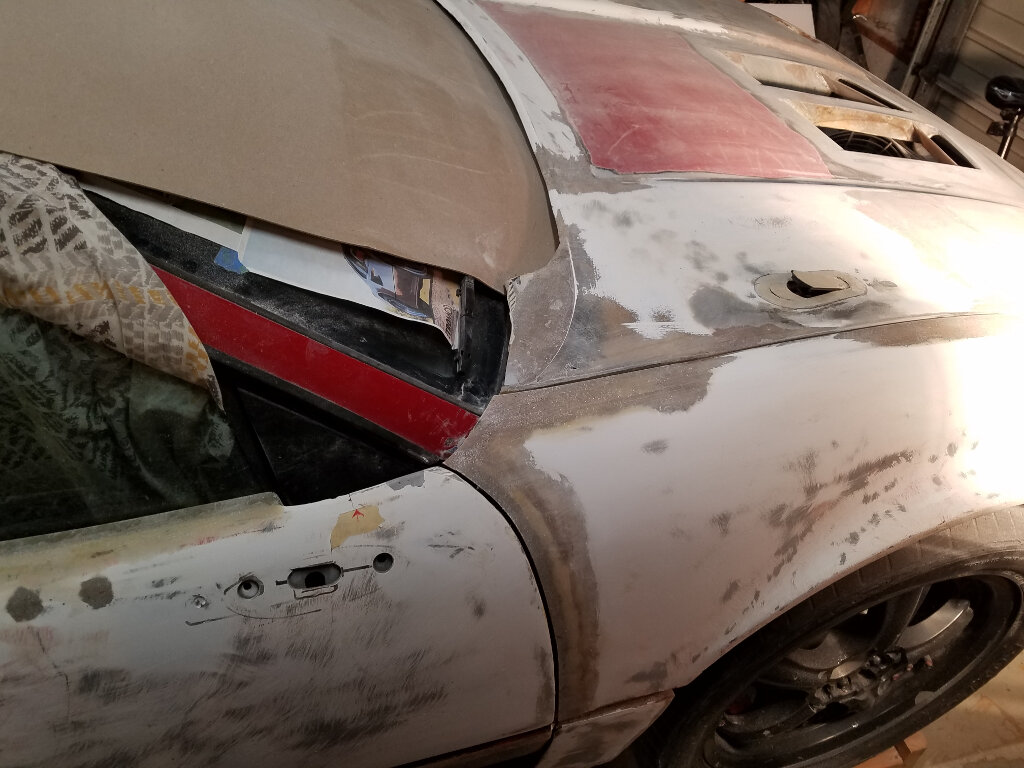
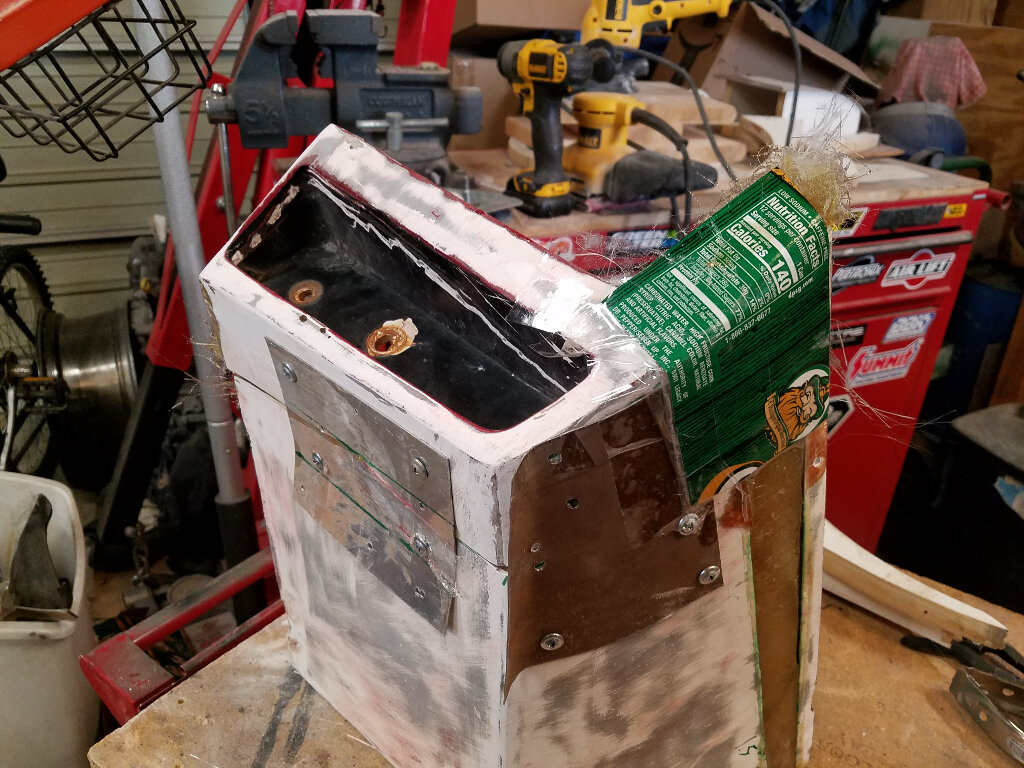
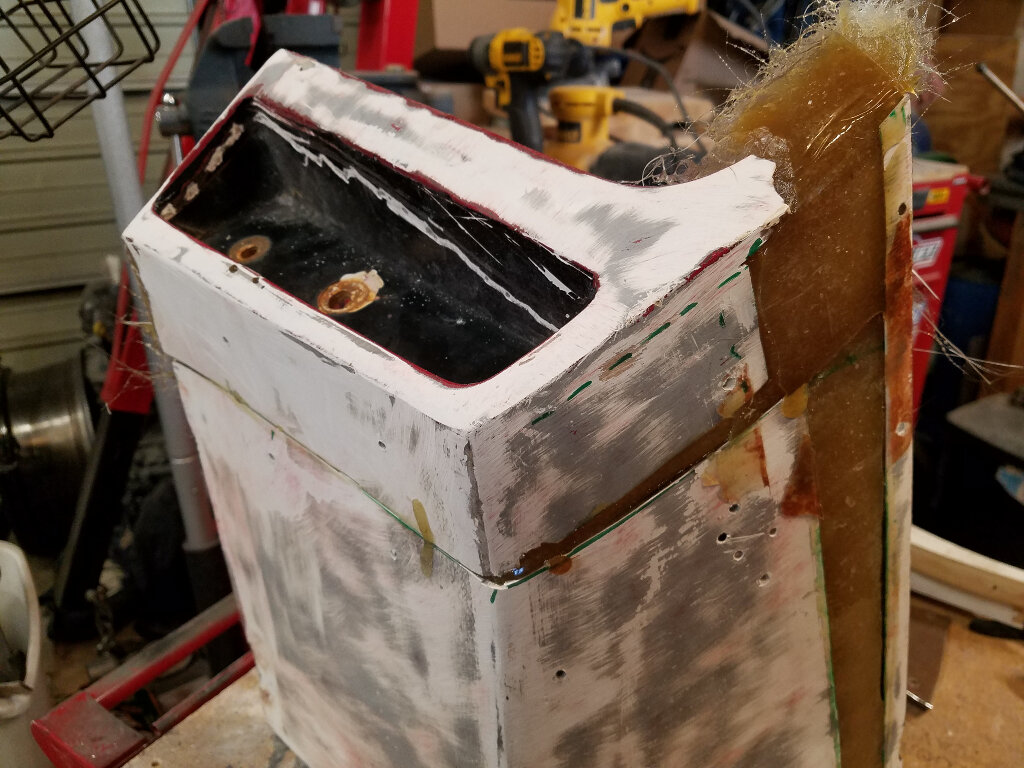
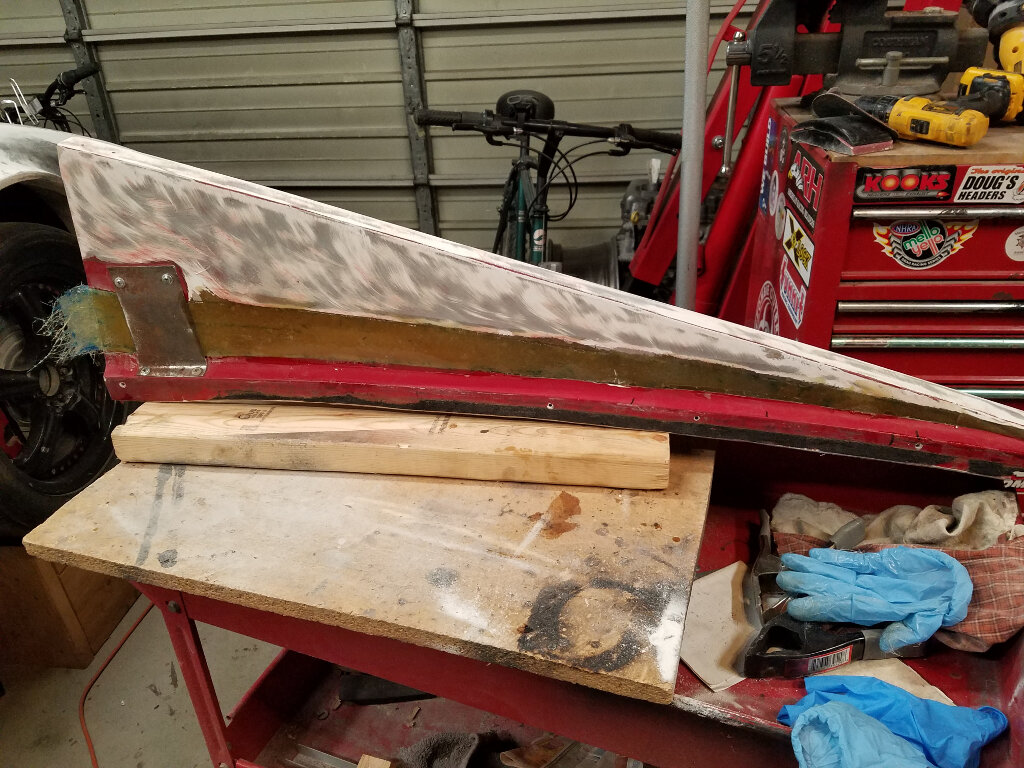
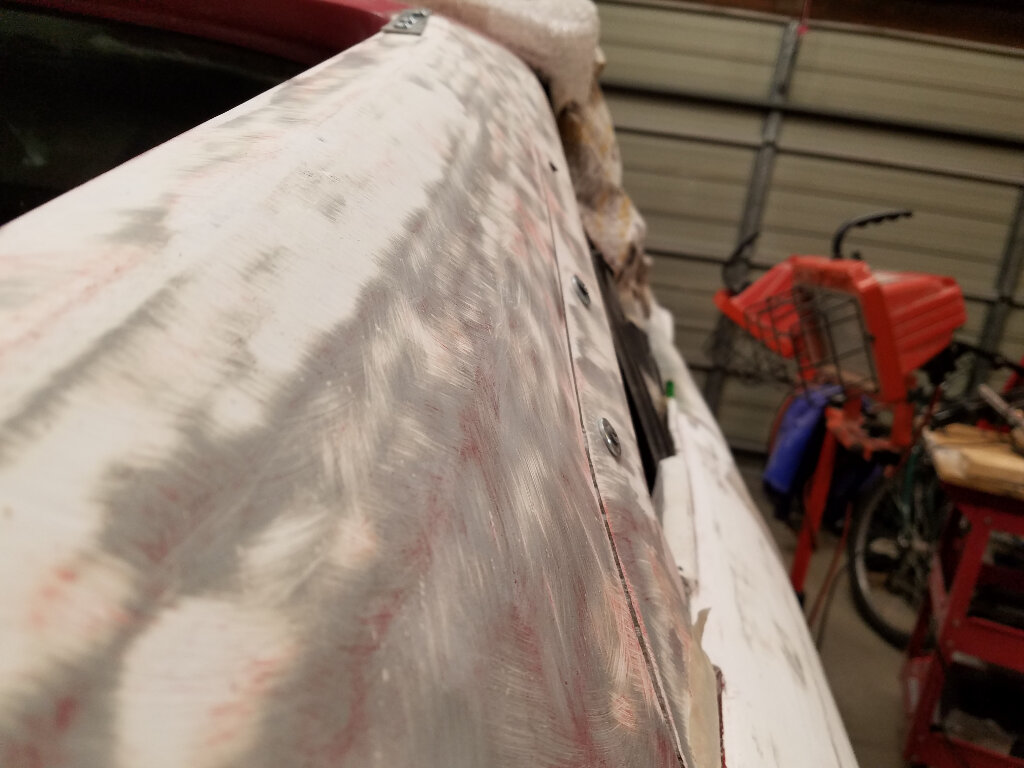
This weekend I worked to undo a mistake I made. Originally, I was going to have the rear decklid open like the 308, but changed it up to open like a 288. In doing so, that left me with the flying buttresses that I had cut off to integrate with the decklid. Lots of words to say I cut too much off, so I put it all back together (well almost).

First thing to do was to take off all of that red paint. Then I had to fill the gap created by lowering the hood. Here is the end result.


Once that was glassed back together, It was time to attach it back on the buttress. I had a bit of a gap to take up, so i screwed a board to the back and wedged it so everything lined up.


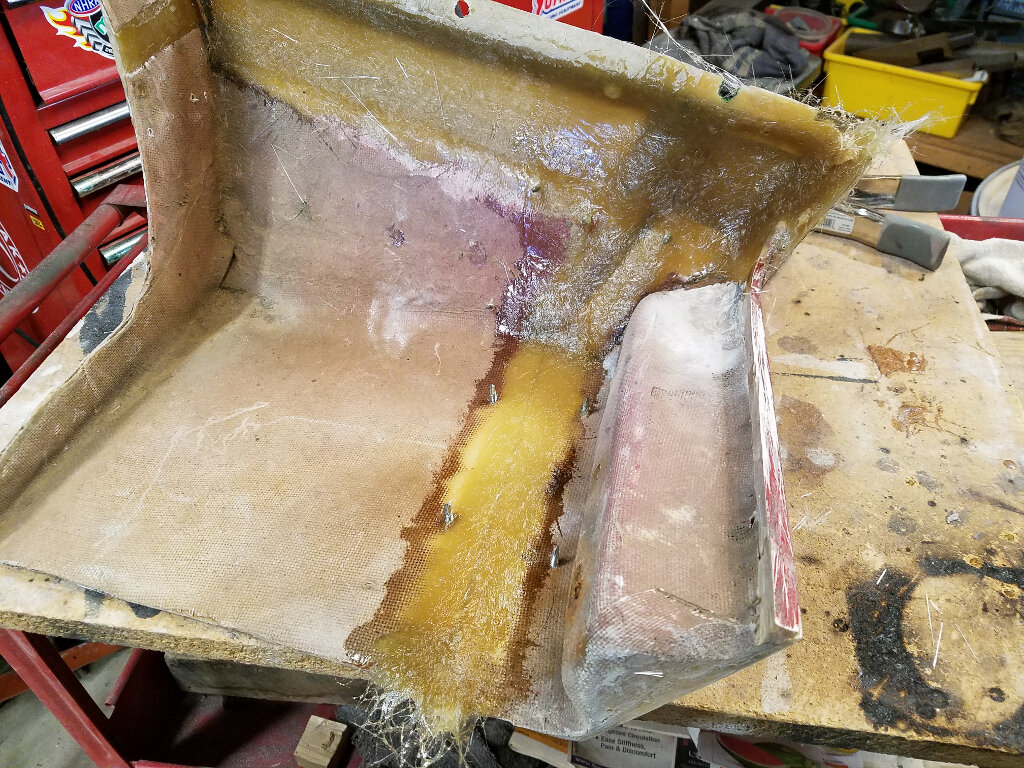
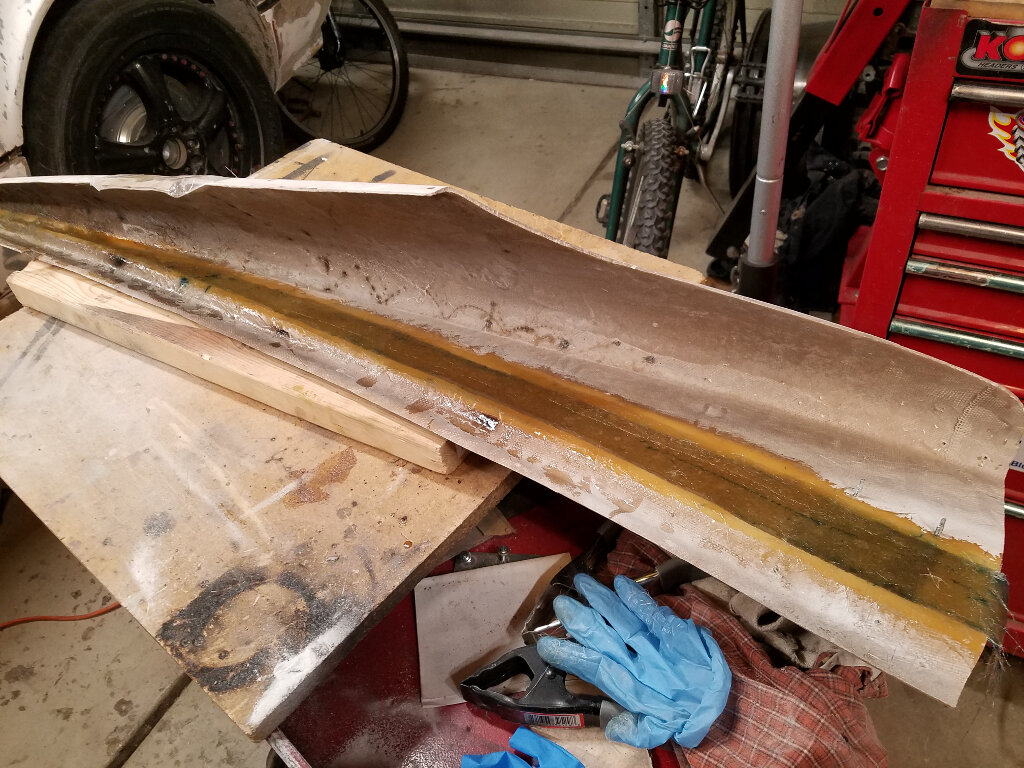
Apparently I didn't take a pic of it together On either side...
First off, I ground the joint down about 1/2 to 2/3 through, tapering it back about an inch. Then I applied 3 to 4 layers of glass. Then I repeated everything on the driver side.

Once everything cooled down, I pulled it off the car to glass up the back sides.


This requires grinding the joint back down the the fresh glass on the outside.


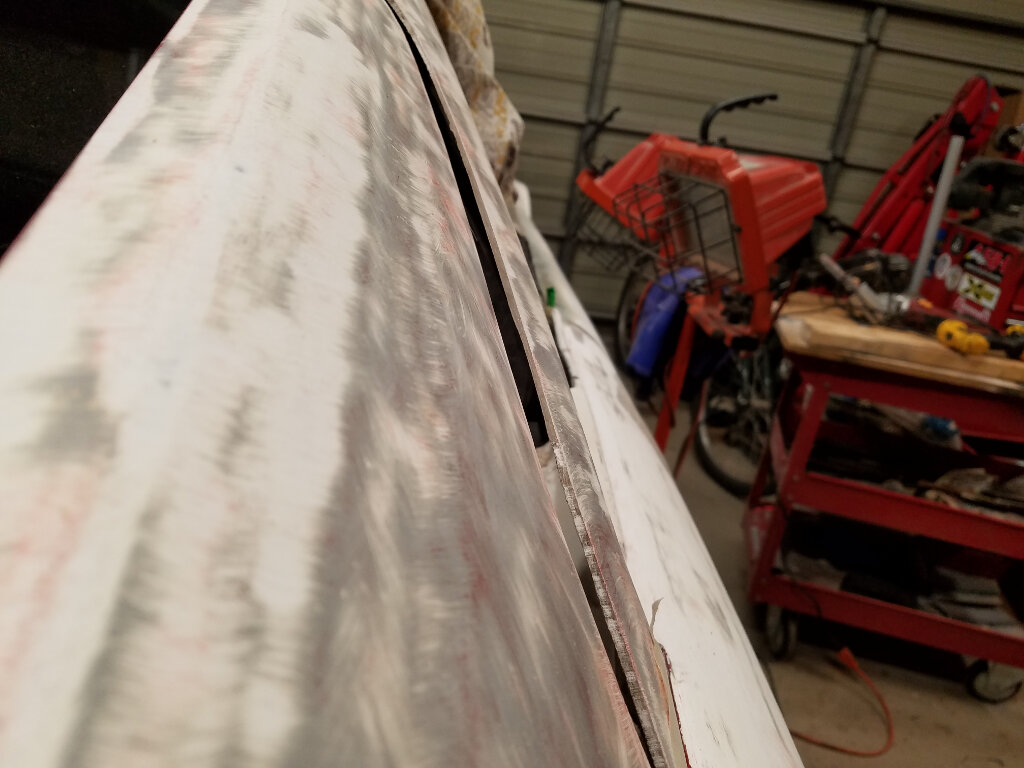
The verticle cuts above were made to releave some of the stress on the glass when I pulled the gap together. Im ground these out and applied a couple layers on it to restrengthen the part.
Rinse and repeat.

Lastly, in these trying times, when latex gloves are in short supply. Sometimes you have to do what you have to do to keep moving forward.


Right now I'm recycling gloves. Got 6 uses out of one...

Stay healthy friends...

Bob

[This message has been edited by RCR (edited 04-19-2020).]

IP: Logged
RCR
Member
Posts: 4397
From: Shelby Twp Mi
Registered: Sep 2002


Feedback score:    (7)
Leave feedback


Total ratings: 102
Rate this member

Report this Post04-19-2020 07:25 PM Click Here to See the Profile for RCRSend a Private Message to RCREdit/Delete MessageReply w/QuoteDirect Link to This Post

RCR

4397 posts
Member since Sep 2002
 
quote
Originally posted by Neils88:

It's looking great, Bob! Glad to see you making good progress on it.


I don't know about good progress, but it's good to be back at it.

Thanx for dropping by, Neil.

Stay safe...

Bob
IP: Logged
DrXtreme
Member
Posts: 54
From: St Johns, FL
Registered: Mar 2019


Feedback score: N/A
Leave feedback

Rate this member

Report this Post04-21-2020 12:11 PM Click Here to See the Profile for DrXtremeSend a Private Message to DrXtremeEdit/Delete MessageReply w/QuoteDirect Link to This Post
Nice to see a fellow fiberglass tech doing great crazy mods. You make me want to get back into the garage and change things on my MERA.

Dr Xtreme
IP: Logged
RCR
Member
Posts: 4397
From: Shelby Twp Mi
Registered: Sep 2002


Feedback score:    (7)
Leave feedback


Total ratings: 102
Rate this member

Report this Post04-21-2020 05:38 PM Click Here to See the Profile for RCRSend a Private Message to RCREdit/Delete MessageReply w/QuoteDirect Link to This Post
 
quote
Originally posted by DrXtreme:

Nice to see a fellow fiberglass tech doing great crazy mods. You make me want to get back into the garage and change things on my MERA.

Dr Xtreme


Thank you. I don't know about chopping up a Mera, though.

In other news: I'm out of gloves.

Bob
IP: Logged
RCR
Member
Posts: 4397
From: Shelby Twp Mi
Registered: Sep 2002


Feedback score:    (7)
Leave feedback


Total ratings: 102
Rate this member

Report this Post04-25-2020 08:06 PM Click Here to See the Profile for RCRSend a Private Message to RCREdit/Delete MessageReply w/QuoteDirect Link to This Post
How about some fun first...


Here is how one of my walls is decorated...


Just an asortment of stuff.

Bob
IP: Logged
RCR
Member
Posts: 4397
From: Shelby Twp Mi
Registered: Sep 2002


Feedback score:    (7)
Leave feedback


Total ratings: 102
Rate this member

Report this Post04-25-2020 08:21 PM Click Here to See the Profile for RCRSend a Private Message to RCREdit/Delete MessageReply w/QuoteDirect Link to This Post

RCR

4397 posts
Member since Sep 2002
OK, back to work...

Ran to work today. Grabbed some gloves (had permission). Back at it...

C-pillar back together.


Before grabbing the gloves, I started looking at the rear fender, Not sure what I like... This would be "stock":


Seems almost too "skinny", So I tried it lower:


Now it seems "fat". Not sure what I will do yet. Stare at it a bunch more, I guess.

So, I played elsewhere. Cleaning up gaps and fixing stuff I didn't like.
The back of the door was off in the Z-axis. Fill it with glass.


Had some mysterious holes to finish off. The backs had already been filled.


Then I worked on the hood, fender, door interface. Cleaned it up.


Next will probably be cleaning up the cove on the door.

Til next time...

Bob
IP: Logged
dobie1
Member
Posts: 453
From: BC, Canada
Registered: Jun 2005


Feedback score: N/A
Leave feedback

Rate this member

Report this Post04-25-2020 08:36 PM Click Here to See the Profile for dobie1Send a Private Message to dobie1Edit/Delete MessageReply w/QuoteDirect Link to This Post
Looking good Bob!
Just my thoughts for what it’s worth, I personally like the fatter look but you would have to elongate vertically the Gills to make it look proportionally right.
I dropped my rear lower valance on my car 3”s to come close to where the 288 needed to be.

Also on your hood,fender, door looks like your extending the hood toward the window?

I was lucky before all this Covid19 I had stocked up my supplies of gloves, glad to see you back to work though.

Stay safe
Wayne
IP: Logged
PFF
System Bot
RCR
Member
Posts: 4397
From: Shelby Twp Mi
Registered: Sep 2002


Feedback score:    (7)
Leave feedback


Total ratings: 102
Rate this member

Report this Post04-26-2020 05:27 PM Click Here to See the Profile for RCRSend a Private Message to RCREdit/Delete MessageReply w/QuoteDirect Link to This Post
 
quote
Originally posted by dobie1:

Looking good Bob!
Just my thoughts for what it’s worth, I personally like the fatter look but you would have to elongate vertically the Gills to make it look proportionally right.
I dropped my rear lower valance on my car 3”s to come close to where the 288 needed to be.

Also on your hood,fender, door looks like your extending the hood toward the window?

I was lucky before all this Covid19 I had stocked up my supplies of gloves, glad to see you back to work though.

Stay safe
Wayne


Hi Wayne,
I was probably going to move the slats up higher. Just not going to do it yet. I think I determined what I'm going to do, but that's in the next post.
I'm not moving the hood any higher than it is. Just need to clean up the edges.

Take care...
Bob

[This message has been edited by RCR (edited 04-26-2020).]

IP: Logged
RCR
Member
Posts: 4397
From: Shelby Twp Mi
Registered: Sep 2002


Feedback score:    (7)
Leave feedback


Total ratings: 102
Rate this member

Report this Post04-26-2020 05:41 PM Click Here to See the Profile for RCRSend a Private Message to RCREdit/Delete MessageReply w/QuoteDirect Link to This Post

RCR

4397 posts
Member since Sep 2002
Ok, more for today.

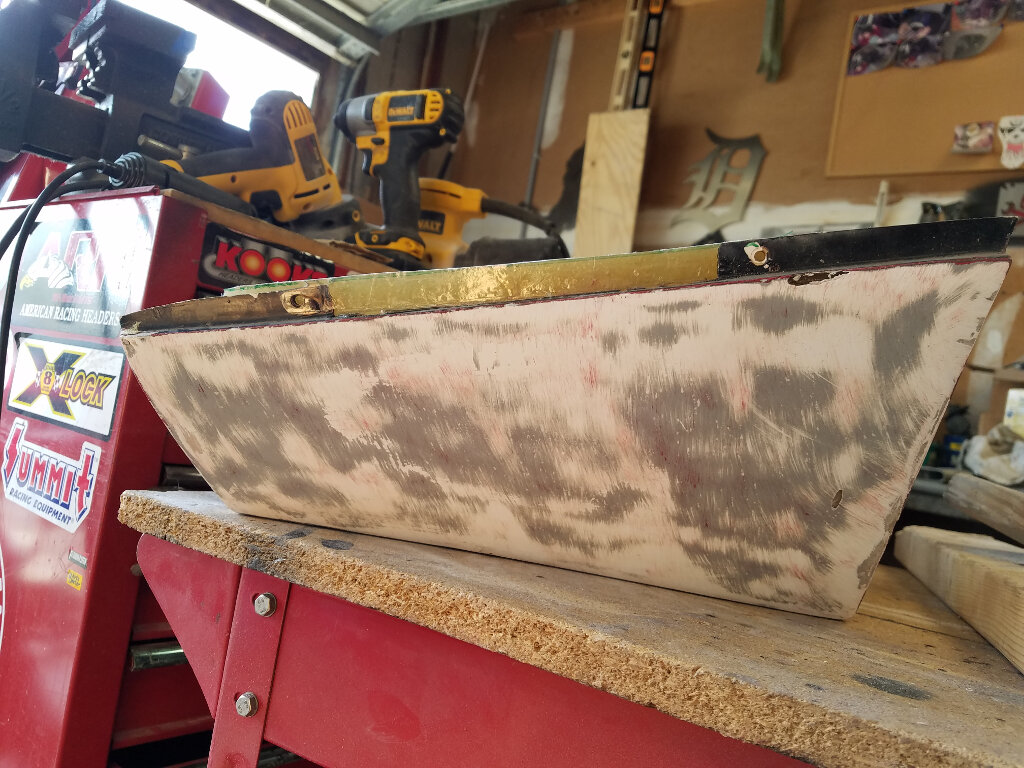
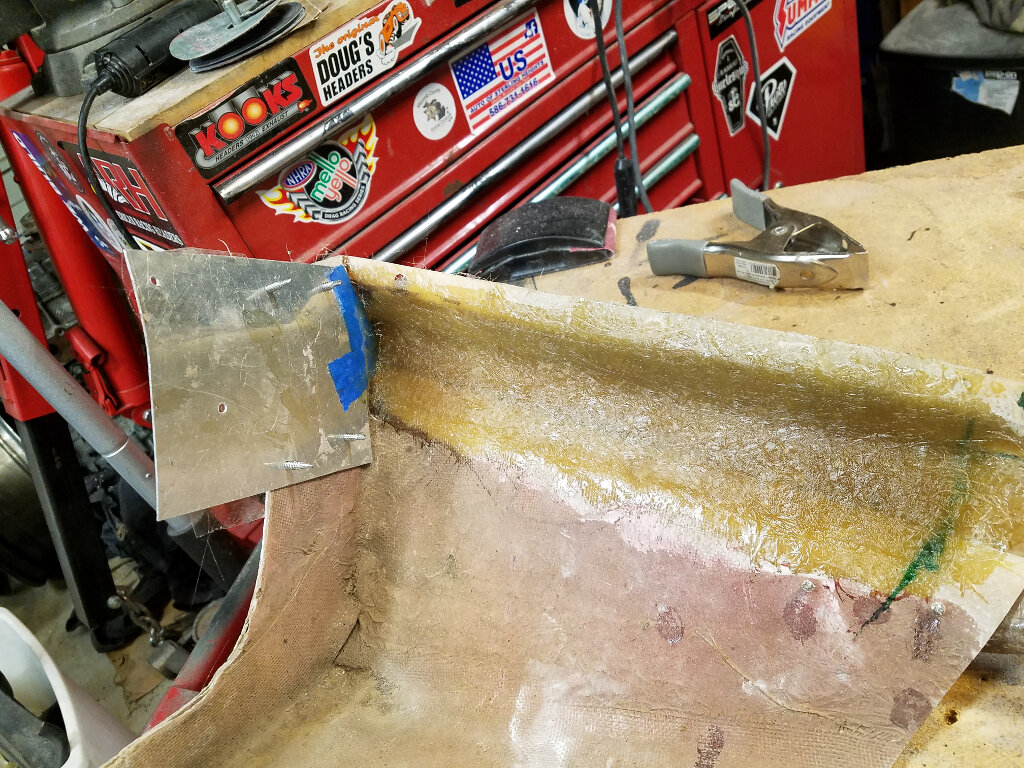
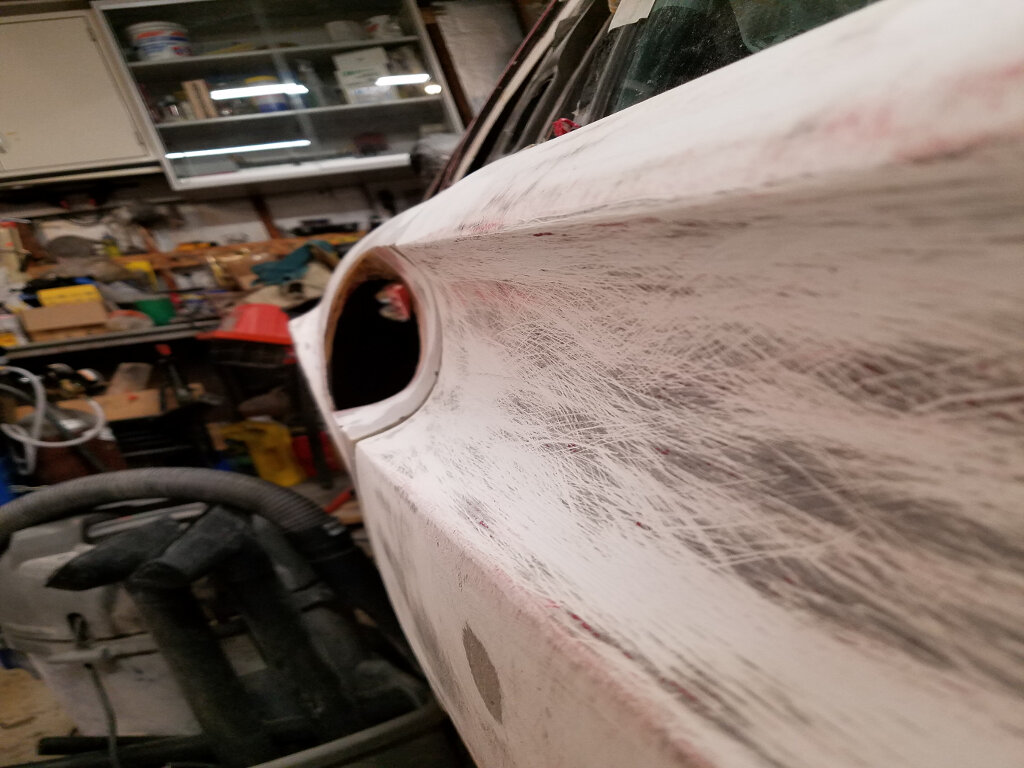
Cleaned up the cove a little bit. Still needs a little more glass, but it's close.


Also started working on the rear valence. First I knocked off that red paint, then I needed to fill the hole where the side marker light was.
That requires grinding the back down and adding 4 layers of glass. My template comes in handy for building the mounting flange.


A little trimming and voile.


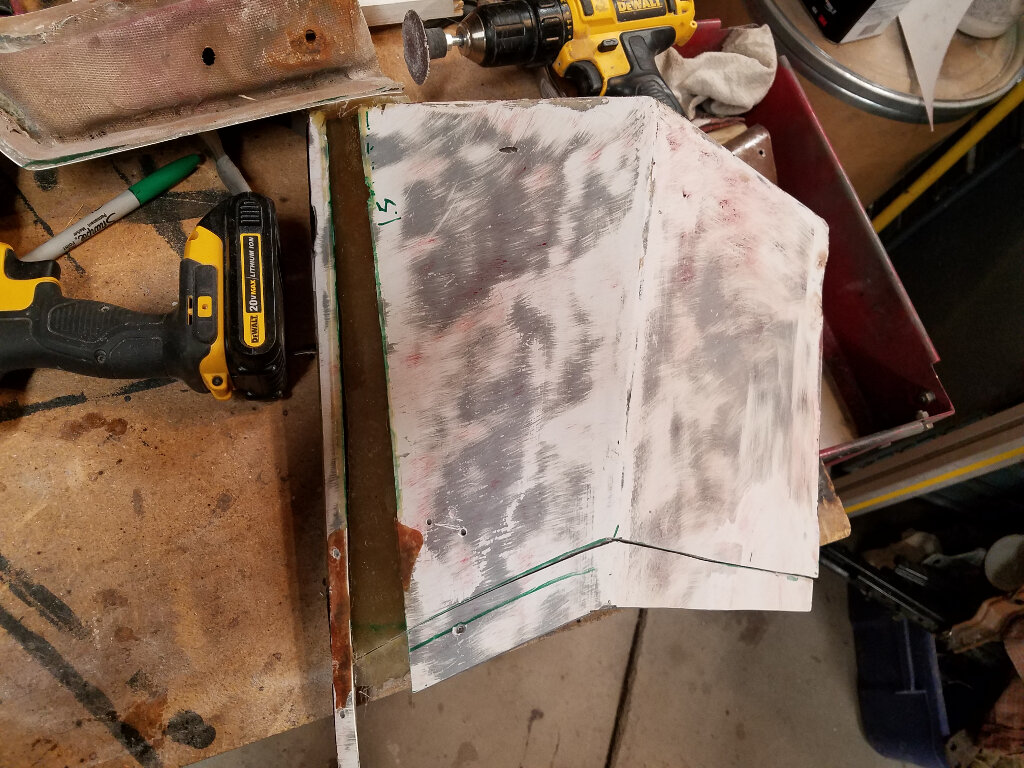
Now the fun starts. I decided the valence needed to be lower. To accomplish this, out came the Dremel and I cut the valence into three pieces.
The main thing was to use the existing mounts, so that gets mounted to the body. Then start positioning the lower part where it looks right.


Grabbed a couple more pics:


I was tired, so that was it for the day. More to follow.

stay healthy friends.

Bob

[This message has been edited by RCR (edited 04-26-2020).]

IP: Logged
RCR
Member
Posts: 4397
From: Shelby Twp Mi
Registered: Sep 2002


Feedback score:    (7)
Leave feedback


Total ratings: 102
Rate this member

Report this Post04-26-2020 06:55 PM Click Here to See the Profile for RCRSend a Private Message to RCREdit/Delete MessageReply w/QuoteDirect Link to This Post

RCR

4397 posts
Member since Sep 2002
I guess one other thing... I took 3'rd place in the WIP category for the Quaretine Car Show. Thanx to the folks at MAFOA for putting on a great show and all those that participated and voted for me.

Take care

Bob
IP: Logged
RCR
Member
Posts: 4397
From: Shelby Twp Mi
Registered: Sep 2002


Feedback score:    (7)
Leave feedback


Total ratings: 102
Rate this member

Report this Post05-01-2020 06:44 PM Click Here to See the Profile for RCRSend a Private Message to RCREdit/Delete MessageReply w/QuoteDirect Link to This Post
Rebuilt the corner valence this week. All pics...

Filling holes


Holes filled


Well, it kind of hits the bumper now.


Cut-off saw, problem solved.


Now to reattach the back piece.


attached


Starting to work on the rocker now.

stay safe

Bob
IP: Logged
RCR
Member
Posts: 4397
From: Shelby Twp Mi
Registered: Sep 2002


Feedback score:    (7)
Leave feedback


Total ratings: 102
Rate this member

Report this Post05-09-2020 01:39 PM Click Here to See the Profile for RCRSend a Private Message to RCREdit/Delete MessageReply w/QuoteDirect Link to This Post
Worked the rocker panel over a bit. Should have taken a pic or two.

Decided for good or bad that it was hard to see what needed to be done with all of the colors, so I rattle canned it one color.

Pretty stoked...


Decided I needed to finish up the front next (so I can turn the car around). Started adding glass to the back side and shaping the outside.

Pic of the inner works


Now, the temps are back in the 40's, so I'm online instead of working.

stay safe,

Bob

[This message has been edited by RCR (edited 05-09-2020).]

IP: Logged
dobie1
Member
Posts: 453
From: BC, Canada
Registered: Jun 2005


Feedback score: N/A
Leave feedback

Rate this member

Report this Post05-11-2020 12:23 AM Click Here to See the Profile for dobie1Send a Private Message to dobie1Edit/Delete MessageReply w/QuoteDirect Link to This Post
Looking really good Bob, cleaned up really nice.
Stay safe
Wayne
IP: Logged
RCR
Member
Posts: 4397
From: Shelby Twp Mi
Registered: Sep 2002


Feedback score:    (7)
Leave feedback


Total ratings: 102
Rate this member

Report this Post06-02-2020 07:27 PM Click Here to See the Profile for RCRSend a Private Message to RCREdit/Delete MessageReply w/QuoteDirect Link to This Post
forum is acting all wonky. skip this post

[This message has been edited by RCR (edited 06-02-2020).]

IP: Logged
RCR
Member
Posts: 4397
From: Shelby Twp Mi
Registered: Sep 2002


Feedback score:    (7)
Leave feedback


Total ratings: 102
Rate this member

Report this Post06-02-2020 07:29 PM Click Here to See the Profile for RCRSend a Private Message to RCREdit/Delete MessageReply w/QuoteDirect Link to This Post

RCR

4397 posts
Member since Sep 2002
 
quote
Originally posted by dobie1:

Looking really good Bob, cleaned up really nice.
Stay safe
Wayne


Thanx Wayne. Not a whole bunch going on. It got ridiculously warm all of a sudden, but I have been moving the ball forward ever so slowly.

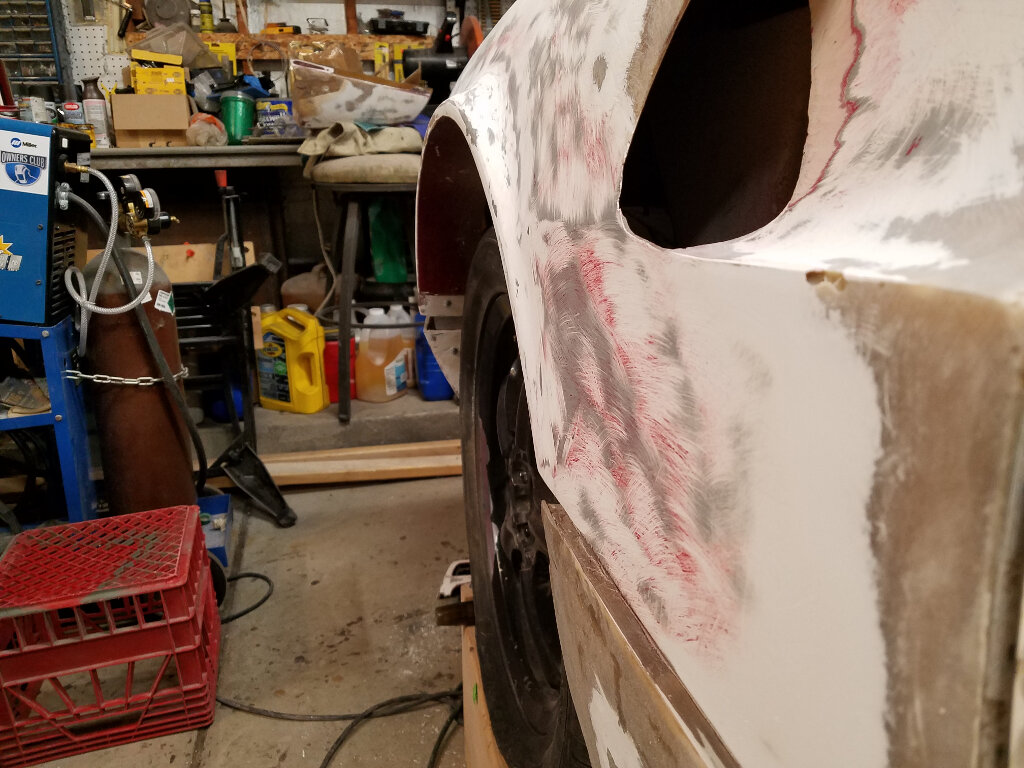
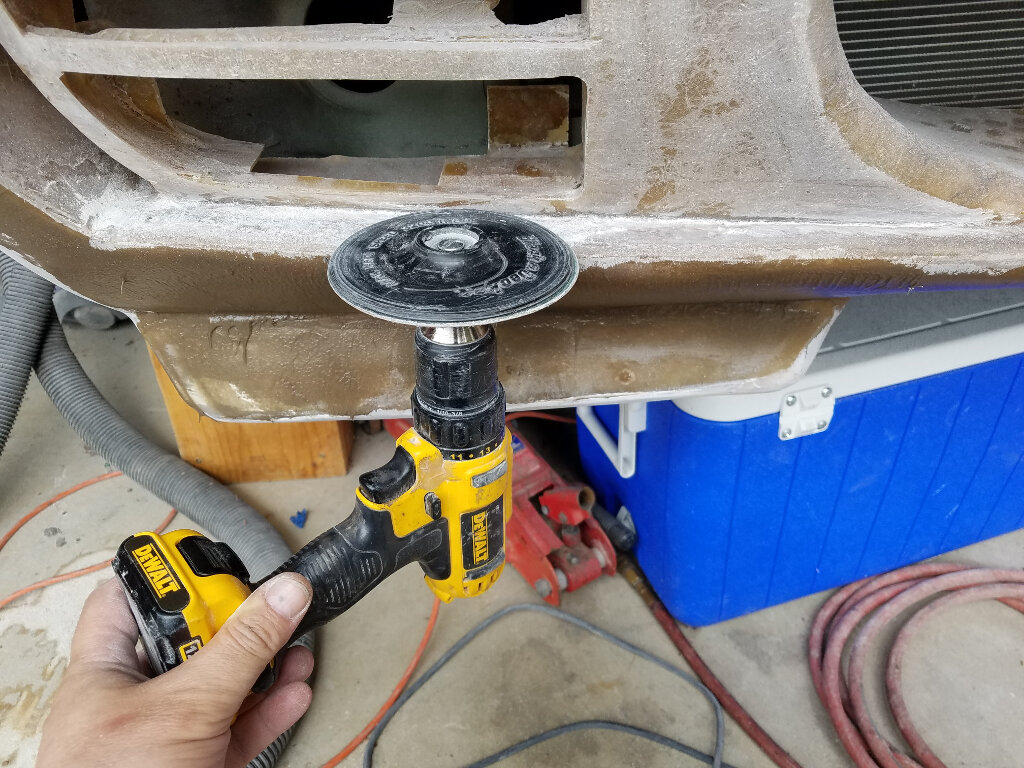
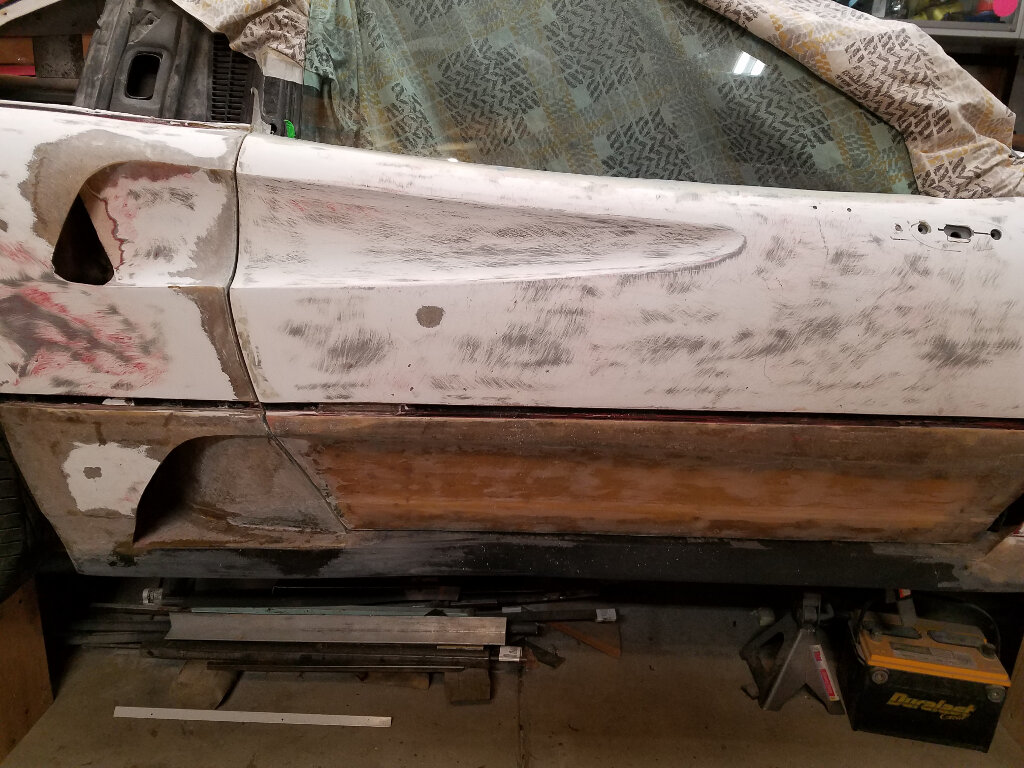
I've been concentrating on finish work on the glass, filling, smoothing, and sanding. I'm working on the front right now.

A few pics...

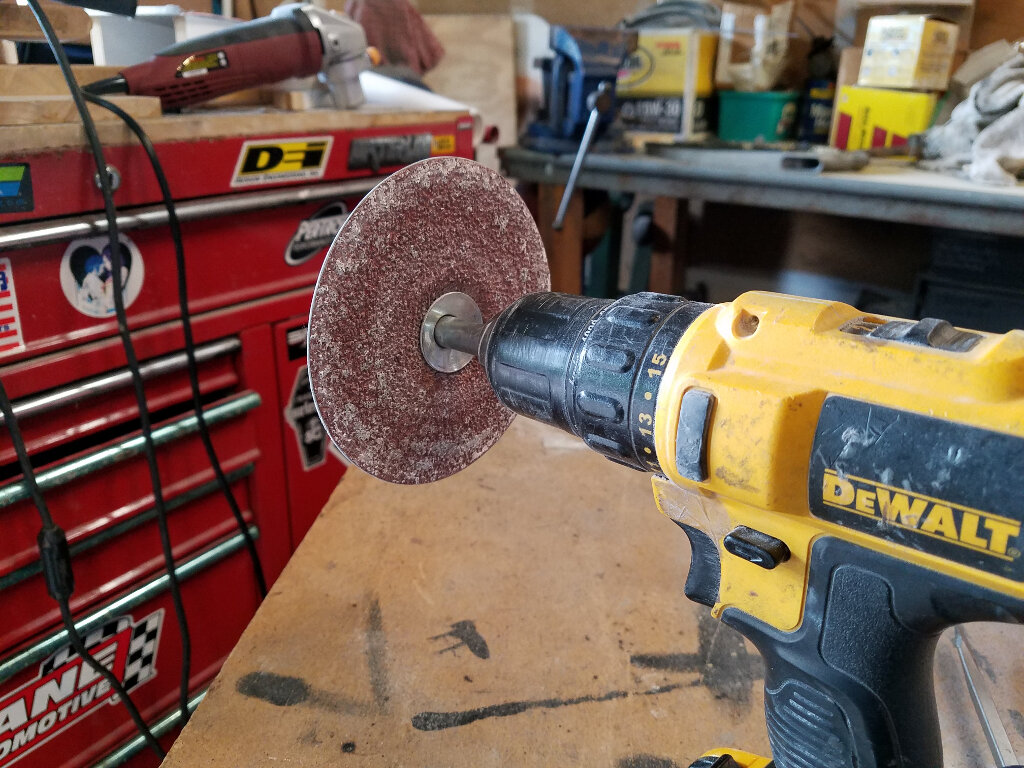
One issue i've struggled with is how to sand the sharp inner edges. necessity is the mother of invention.


Works like a champ.


Pretty much where I'm at right now (as I sit in the AC). I've finished shaping the nose to fender transition and have been filling the top panel and grill openings.


stay safe my friends.
Bob

IP: Logged
Neils88
Member
Posts: 4045
From: Jeddore,Nova Scotia
Registered: Aug 2013


Feedback score: N/A
Leave feedback


Total ratings: 56
Rate this member

Report this Post06-15-2020 01:16 PM Click Here to See the Profile for Neils88Send a Private Message to Neils88Edit/Delete MessageReply w/QuoteDirect Link to This Post
IP: Logged
Previous Page | Next Page

This topic is 17 pages long:  1   2   3   4   5   6   7   8   9   10   11   12   13   14   15   16   17 
next newest topic | next oldest topic

All times are ET (US)

Post New Topic  Post A Reply
Hop to:

Contact Us | Back To Main Page

Advertizing on PFF | Fiero Parts Vendors
PFF Merchandise | Fiero Gallery | Ogre's Cave
Real-Time Chat | Fiero Related Auctions on eBay


Copyright (c) 1999, C. Pennock