Hi some years ago I started a Fiero project which I planed to finish some weeks after. Unfortunately some other projects came in between and so I stored the Fiero somewhere in the back of my garage. When we cleaned up the garage recently we found it:-)
So my plan is to finish on the Fiero project in the next 12 Month and to document here what happend in the past and what is happening now. As i am travelling a lot for my job I only have some days a year to spent at home. Therefore the whole project will last some month instead of 3 weeks.
*********************************************************************************************************************** As my time is limited and I would like to give some details and “how to" comments,too I could offer you to post topics in several steps. Each should included technical hints and pictures. If i found out something did not work, i would post it here, too
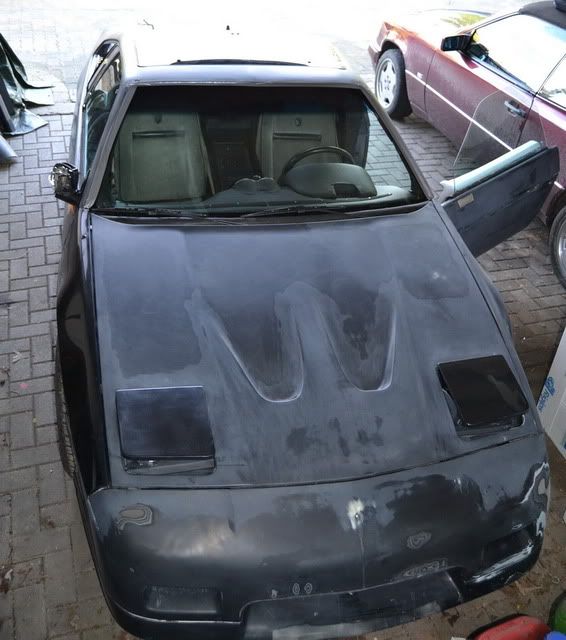
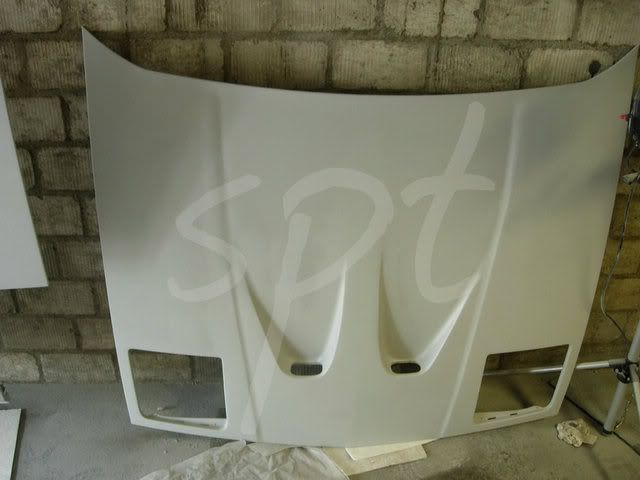
1) Brakes ->Porsche (front) /VW (rear) Brakes-> Making of. 2) hood scoops, outer Mirrors and the 3rd breaklight in the rearwing-> Some pictures 3) interior-> How to build a complete interior from nothing to fiberglas (lots of pictures available) 4) New wiring and electronic upgrades, example: - e- mirrors: heated, autodim, foldable -inner mirror with autodim -Led sidemarker lights -Hud Display -Key Less entry -Automatic modul for Headlight (headlights will automatic turn on at dark) -Comfort Control of Windows -> open an close with one touch -Heated seats (sorry to tell you but the electronic Porsche Seats do not fit -> removed them) Unfortunately I can only post you the things I used and where I installed them, as I did not make a wiring diagram. But still there would be some tips. 5) Rear trunk modification within 1.5 hours (it doesn’t get bigger but more organized and comfortable) 6) I think there a already a lot of threats about remanufacturing the stock V6 and Chassi so I won’t post any comments on that.
Anything i should not post here?
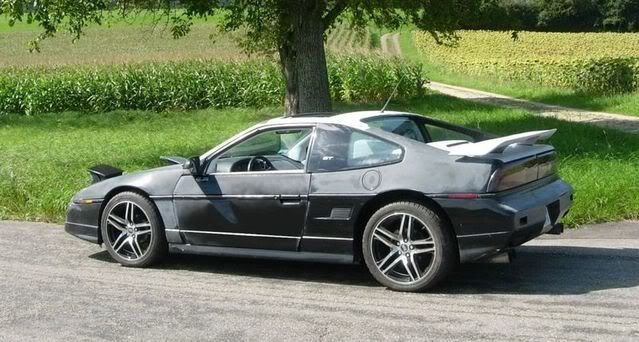
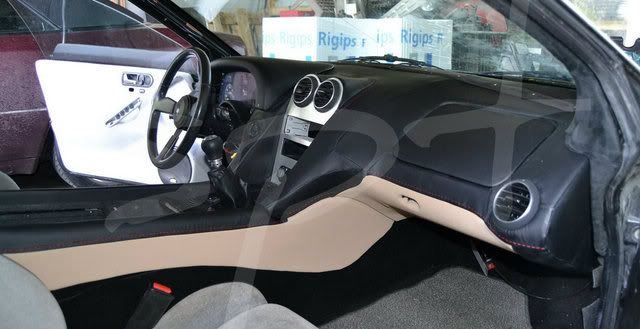
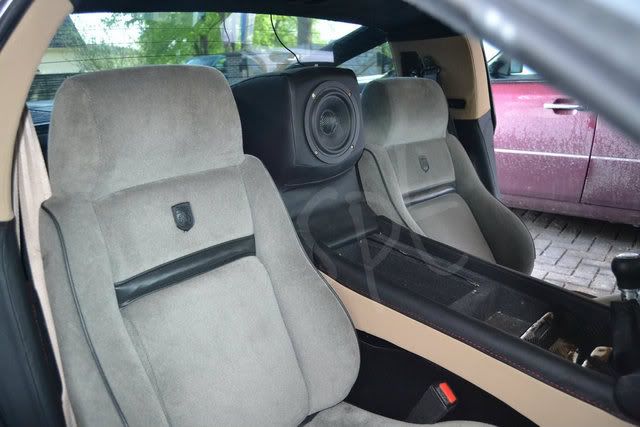
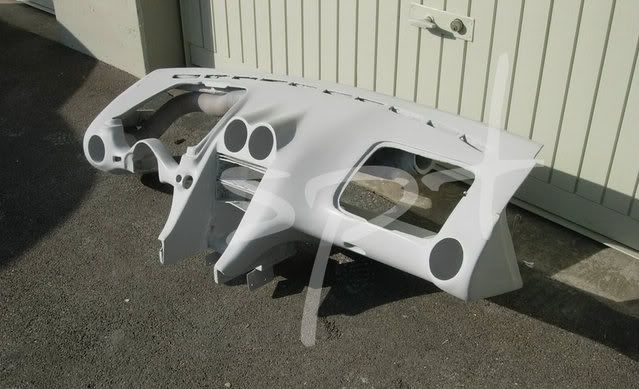
PS all interior parts a build 100% by my own plans, which means that there was not even a doorboard from another car. Advantage: it fits perfect and is easy to modify Disadvantage: it's 100% Fibreglass with 3 to 4 layers *********************************************************************************************************************** Here are some previews of the exterior /interior/ and Porsche Breaks:
[This message has been edited by custom made dreams (edited 07-16-2012).]
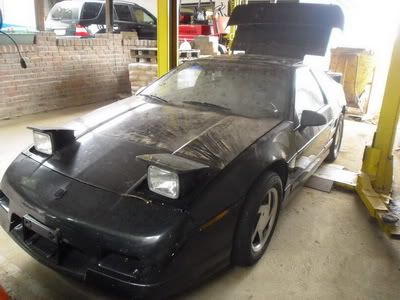
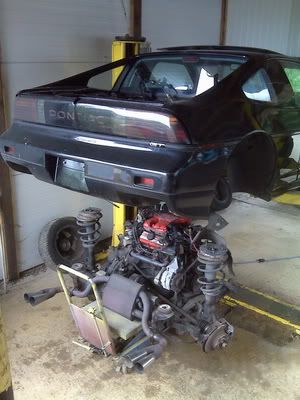
One reason to finish the projects is that the Fiero stood there some years, was full of dust and without a battery. I changed the battery and drove the car out of the garage ;-)
Very nice. I like how the center of the console flows quite well from the rear bulkhead to the dash. It's a nice setup, and the upholstry goes quite well with the design.
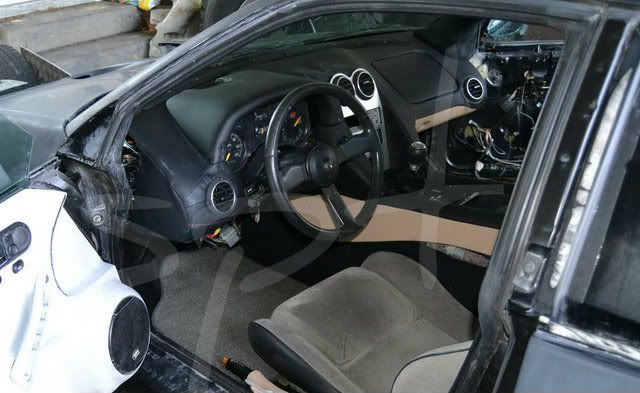
All parts are handmade, so nothing but the switches and the vents are from other cars. I made sure that no real modifications have to be made to the Fiero interior itself, so its kind of plug and play. I only had to drill new holes. Also the airsystem and the Dash fits from the Fiero.
[This message has been edited by custom made dreams (edited 07-08-2012).]
Well I am happy that some people found the my posting. I will try to post the topics after an other and update the first post like an agenda, so you can see with topics have already been posted.
[This message has been edited by custom made dreams (edited 07-15-2012).]
IP: Logged
09:38 AM
PFF
System Bot
NetCam Member
Posts: 1490 From: Milton, Ontario, Canada Registered: Mar 2012
Ok here is the beginning. I found that Fiero covered with dust standing close to a road. It was parked for 5 years due to a broken shifter cable. As i had already more than 15 Fieros in the last years I decided to buy this one and bring it back to live, too. The paint was original black but with a lot of damages to the surface. Several parts were rusty Engine (Stock V6) and transmission ( Manual) worked fine and thanks to the oilleaks hardly any rust was in the Engine Area. The interior was ok but it smelled like old socks. The car was complete, but all rubber and elastic things were hard and worthless. Also the weather strips.
So a good project to start restauration: , , , , ,
As always I started to bring the mechanical parts back to life. Than changed water and oil for the first time. Made a list of all parts that needed to be replaced. Made a list of all parts that I just want to replaced. All parts worked or were listed to be replaced and the Fierostore bill summed up to 2K.
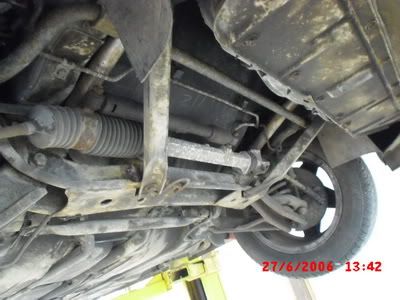
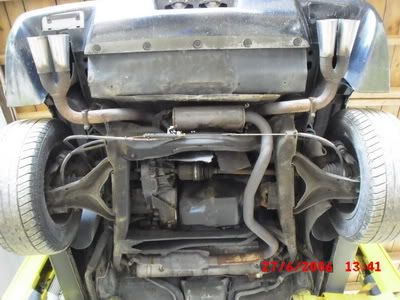
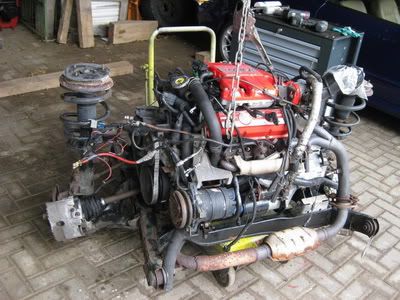
Afterwards I took out the engine with cradel which last about 2 Hours, thanks to my little sister. I totaly disassembeled the axels, brakes, and all rusty metal things. All those parts where "sandblasted" and a new kind of zinc was put on them before I painted them 2K in Ral black 9005.
Cost so far 800$ Fiero 2000$ The first list to Fierostore ended up in a 2K bill and covered several engine-, chassi-, and smaller parts. No tuning parts, just regular shocks and struts included. 300$ Sandblast and colour (3liter +3kg Primer)
[This message has been edited by custom made dreams (edited 07-10-2012).]
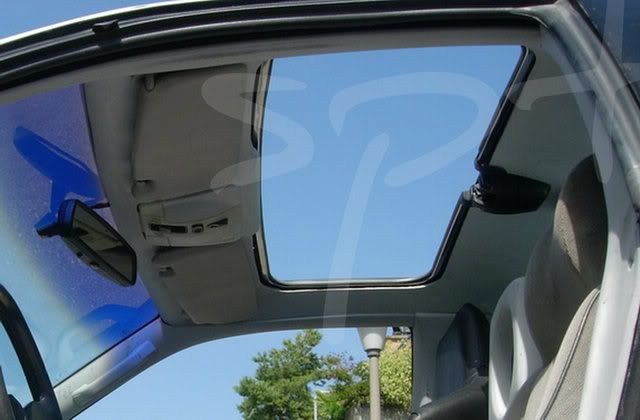
Painting all smaller and bigger parts after sandblasting. Painting Includes tubes, Breaklines, axels, rear cradle bolt washer, rear tie rods, several new parts like the shocks as they incline to rust within 12 month... Front metal, gastank,... You can also spot the new fiberglass headliner in one of the pictures. The painting takes only 2 days for all parts but its a lot of preparation work as you know. The Black is RAL 5000 and The Red is RAL 3000 which i think looks a bit like Ducati. For all parts which are close to hear i used special heatresistent colour. E.g. Exhaust head shilds, EGR Valve, and the Engine intself. I did not use high glossy colours in Engine area to reduce heatdistribution (just minor impact but it works)
, , , , , , , , , , , , Meanwhile I had time to order the parts for my performance brakes, which I will post soon ;-)
[This message has been edited by custom made dreams (edited 07-17-2012).]
I see above you made mention that no serious internal modifications to the Fiero interior structure regarding it's operation was performed when you created your custom dash. When you get the time, could you possibly detail the procedures that you followed in creation of the dash? One of the more interesting and pertinent modifications that many Fiero owners seek to perform is some sort of custom interior. Many of the dashes made for Fieros can be expensive, and many custom jobs are out of the ability of many individuals. It would be interesting to see and hear from you exactly what you had to do to create that dash and interior. I have to say that your dash and interior setup has to be one of the best Fiero interiors I have seen. My primary reasons being because not only is it quite striking in terms of visual appearance but it seems to accomplish this by using many OEM components such as the gauges and HVAC - something that is rather difficult for many dash customizers to pull off.
allof your pics are on photobucket but its listed as a private account and i cant zoom in on them can you fix please!!!!!!!!
--> Fixed!
quote
Originally posted by Fiero84Freak: I see above you made mention that (1) no serious internal modifications to the Fiero interior structure regarding it's operation was performed when you created your custom dash. When you get the time, could you possibly detail the (2) procedures that you followed in creation of the dash? One of the more interesting and pertinent modifications that many Fiero owners seek to perform is some sort of custom interior. Many of the dashes made for Fieros can be expensive, and many custom jobs are out of the ability of many individuals. It would be interesting to (3) see and hear from you exactly what you had to do to create that dash and interior. I have to say that your dash and interior setup has to be one of the best Fiero interiors I have seen. My primary reasons being because not only is it quite striking in terms of visual appearance but it seems to accomplish this by (4) using many OEM components such as the gauges and HVAC - something that is rather difficult for many dash customizers to pull off.
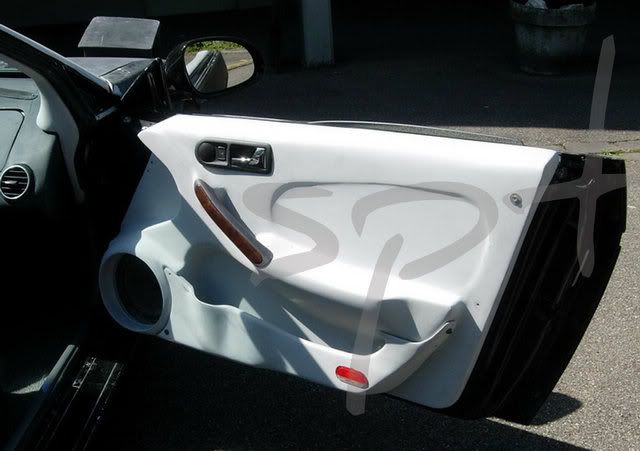
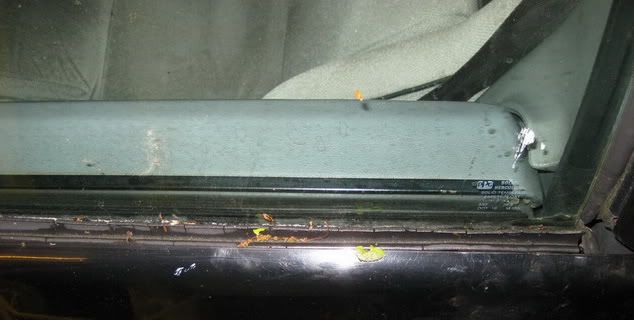
(1)-> That is correct, you do not have to weld in or take somthing out. I think there is a 20cm long an 2cm wide "strut" at the door, close to the armrest. That has to be removed ( 2 rivets). You can switch back to the original interior easily. (2/3)-> I can post a lot of pictures to show the growth of the interior, starting with a naked car, foam used, first GFK layers, until the painted parts inside the car. Actually the doors are not covered with leather yet. I will do so in the winter. (4)-> Yes using inexpensive OEM parts which can be found everywhere was an important part for me, too.
As i mentioned before, I had more than 1 Fiero in the past and so I have more tools and possibilities than most of you might have available. For Example the interior started in a Fiero Convertible without a windshield installed -> easy to work. The Headliner was made in a roof that I cut off while Building an Kitcar and placed on a nice table:-). The PU Foam used is delivered in two 200kg barrel. But nevertheless you won't need those circumstanced to build a nice custom interior yourself.
[This message has been edited by custom made dreams (edited 07-10-2012).]
IP: Logged
06:05 AM
PFF
System Bot
Australian Member
Posts: 4701 From: Sydney Australia Registered: Sep 2004
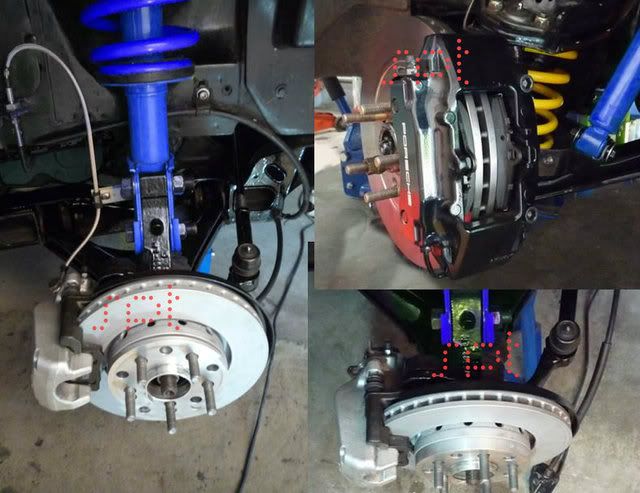
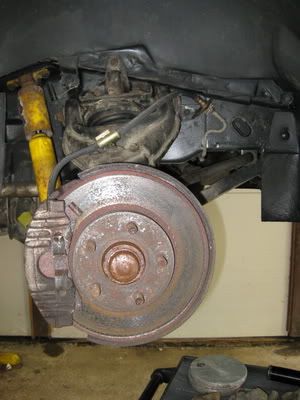
Here are details about the installed front Porsche brakes. All required things are listed below. The brakes can be found at ebay (400$ a good pair. Do not buy bad condition parts). The brakelines are custom made-> Goodrich or Spiegler (120$). The Master cylinder comes from 996 Porsche, too. (65$) Some Screws (12$) 2Disc (80$) Adapters are selfmade.
Overview with parts. You can zoom in for the yellow post its in pictures Nr1. They show comments like the size in MM: 1)
2) , , , , ,
3) , 4) , 5) , 6) , 7) , 8) , 9) ,
Comments 2) I use Porsche 996 Brakes and disc and heatshield from VW ( I have to look up which exact model) The Size can be seen in Pic. 1. I also had to drill 5 new holes (10mm 5X100). The center-hole of the disc was too big, therefore a metal ring was made to center the disc. The disc is put on a modified FIERO disc which was customized on a "engine lathe" (I hope that is the correct translation"). You can see details also in Pic 1.
A friend of mine made the : -adapter for the brake, -the stop for the Steering -the mount for the mastercylinder -the adapter to the pedal
All parts consist of a special metal which can be used for those parts. The are computer "cut/drilled". They use the original Fiero holes and the Porsche break is mounted with original Porsche screws. The area around the Fiero holes had to be prepared -> make it plane so that the new brakes caliper is 100% in line with the disc. The reduction is about 1mm.
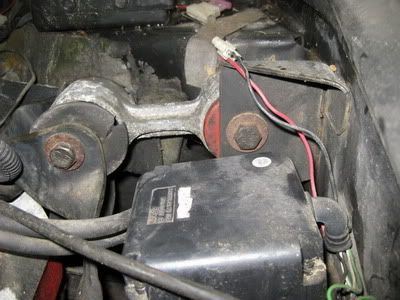
3) Porsche 996 unmodified 4) Adapter to mount #3 to Fiero Chassi 5) Adapter to the brakepedal 6) 3 to 5 7) the original hole has to be cut a bit to the passenger side as the mastercylinder wont fit in otherwise. The plate covers the orignal hole and stops air to come in. I use the original 4 bolts. 8) installed :-) 9) Will Follow -> picture of the installed Wilwood preassure regulator. I had to install it as the combination of VW and Porsche was not good enough before. Unfortunaltely I did not make a picture of that jet.
To Summarize my solved problems: -which disc can be mount to a modified Fiero disc and will fit between the Porsche brake pads? -> VW -which break can be mounted 90degrees to the disc-> all kind of Porsche. -how to center the disc? -> made a metal ring -too short brakelines -> custom made (one Email with connectors and length required) -Fiero Mastercylinder has too low preasure- > Porsche installed -Preasure distribution -> Wilwood regulator -the steering needs something to stop it-> self made part -the 15"wheels are too small-> bought 17" ;-)
[This message has been edited by custom made dreams (edited 07-26-2012).]
The next post will probably comment the rear breaks as those are installed as well. I' ll try to scan the "blueprints" for the adapters and add them in the future to this post..
IP: Logged
06:05 PM
KaijuSenso Member
Posts: 911 From: Westland, MI Registered: Jan 2007
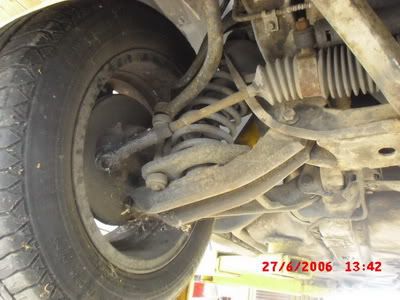
Comments I use Volkswagen VR32 Brakes and disc. Heat shield comes from VW, too ( I have to look up which exact model) You can see the brake pads do use the whole available area of the disc. I had to drill 5 new holes (10mm 5X100). A friend of mine made the adapter for the brake.
All parts consist of a special metal which can be used for those parts. The are computer "cut/drilled". They use the original Fiero holes and the VW brake is mounted with original VW screws. The area around the Fiero holes had to be prepared -> make it plane so that the new brakes caliper is 100% in line with the disc. The reduction is about 2 mm.
Pictures: 1) Fiero handbrake cable is used. 2) I had to make an Adapter to use the Fiero cable 3) The center-hole of the VW disc was too big, therefore a metal ring was made to center the disc perfectly 4) 5) VR Heatshield can be mounted immediately to fiero, after drilling 2 new holes 6) – 8) Adapter to mount the VR32 Brake to the Fiero -> #13) 9) 10) The handbrake arm was custom made 11)-14) as seen in the picture I modified the Fiero part in the marked area to fit in the adaptor. I am sure that the impact is not material to the strength of the part. 15) 16) bolt on the brake 17) 18) installed with modified Spiegler Brakelines. Those are 5 inch longer than the original. You can see that I have added a Wheelspacer in the picture -> those were required with my first set of rims as those had the wrong size and the brake was too big to get the rim on. -> New rims -> no spacer ;-)
[This message has been edited by custom made dreams (edited 07-27-2012).]
To Summarize my solved problems: -which disc can be mount to a will fit between the VR32 brake pads? -> VW -which brake can be used and will work with the fiero cable -how to center the disc? -> made a metal ring -too short brakelines -> custom made -Fiero Mastercylinder has too low preasure- > Porsche installed -Preasure distribution -> Wilwood regulator -the 15"wheels are too small-> bought 17" ;-)
...I would like to have a garage that I could lose a car in only to find at a later date.
Trust me that is not funny, because you recognise that you don't have enough time and too much to work on. The great thing is, i have placed some cars at my parents place so i dont see the work so often;-)
Hi, due to a special project on the job I was a bit busy in the last days..Here are the first pictures of the preparation: 1) I use PU Foam and wood to to build 3D models. Therefore you can buy the small 1L bottels, 5kg canister or 200kg barrels. The last is the most expensive (1-2k) but thanks to Ebay -> 300$ = 200kg :-)
2) The Foam consists of 2 components which have to be mixed fast. It growth after 10-20 seconds after mixing the components together, so be quick. I use a Drilling machine to mix it properly. The foam expands about 5 to 10 Times the orignal size. The final consistency is hard and it keeps the structure.
3) The foam stinks a lot and you must avaiod skin contact. If you get it on your clothes you wont get it of any more. It behaves like a glue with everythink. Futhermore never use it without a gasmask while using it. While forming and cutting you can use the 3M mask to avoid the dust.
,
4) As a preparation I make a box (*)which has the correct size of the part i want to build. I put wax and film on the box to be able to seperate the box from the foam afterwards. I mix the 2 components and pour it into the box as fast a I can. After 10 Minutes the foam should be cold and you can take it out of the mold. Now you can work on it with a saw, knife, drill holes in it... My favorite tool for bigger parts can be seen in the pictures: I reduce the rotation speed and then you can bring the foam into very nice shape. Afterwards i either use sandpaper or smaller tools like a DREMEL.
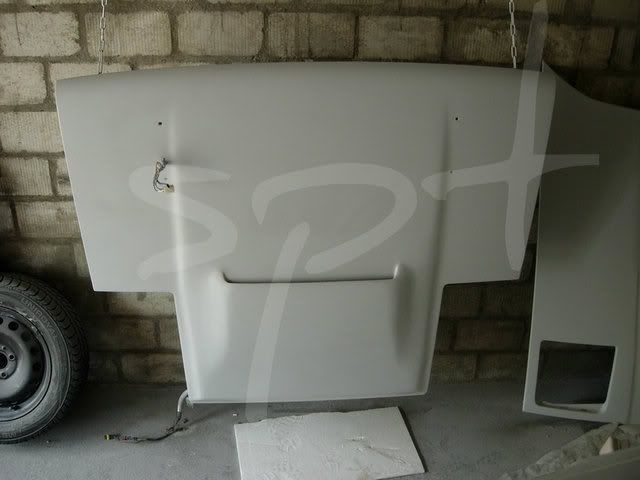
* -> To build the doorboars for example i used a fiero door which I prepared with wax ( the same we use with fibreglass projects to get the parts out of the molds)
So we can start. Either you build a box as discribed before and work your as of to get the backside cut and prepared to get all the foam into your car and then start to work on the frontsurface, or you take a Fiero and use it as the box ;-) I used a Fiero which should become a Convertible. ,
- The interior frame was waxed and i split it up into seveveral sections : Dash, Doors, firewall, middle area. - To reduce the necessary foam i filled up some areas with bags filled with paper. - As the foam spreads to everywhere I had to make sure that is doesn't get behind any parts and jam up. It will be a pain to get the foam out of the car if that happens. - I installed a bar as a subframe for the dash from the left area to the right. This will stay in the foam and give it more stiffness. - Then I poured in the first foam in the dash area.
- I looks like a vulcano or cloulds and takes some tries before you get a nice surface.
- Afterwards I hat to get it out of the car and smoothened the backside a bit to make sure it comes in and out easily.
-Now i could start to give it a shape on the front surface. ....-> next comment tomorrow...
[This message has been edited by custom made dreams (edited 08-04-2012).]


 ,
, 
 ,
, 
 ,
, 
 ,
, 
 ,
, 


 can you fix please!!!!!!!!


