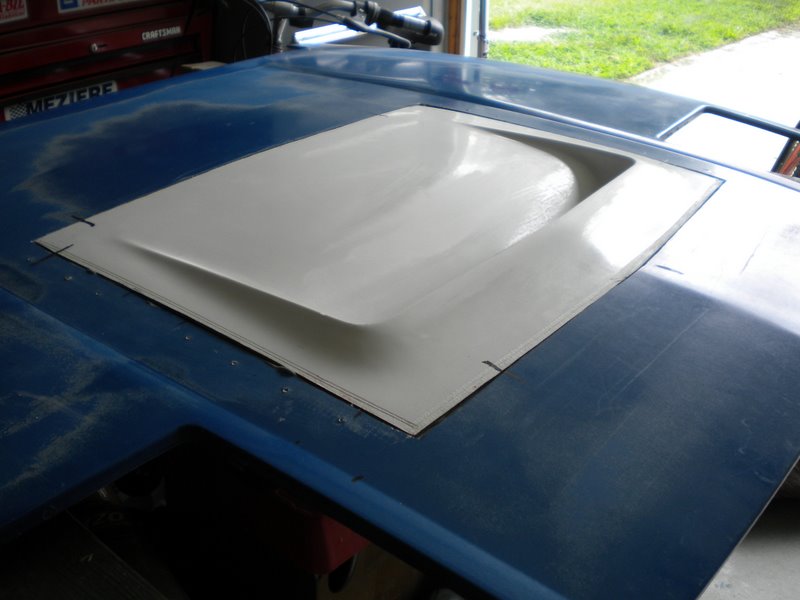
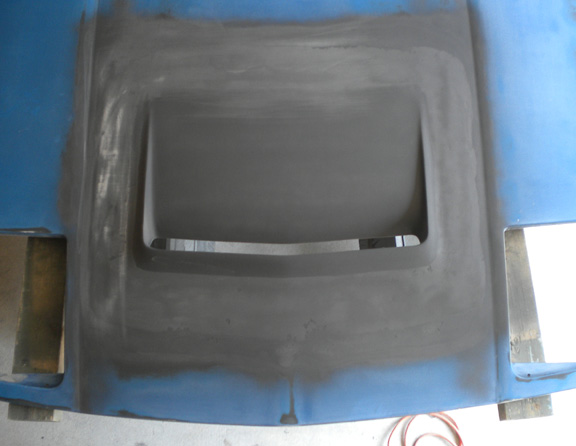
Paul got me one of his new Version 2 Angel hood vents this week, finally got around to it today. Pics attached.
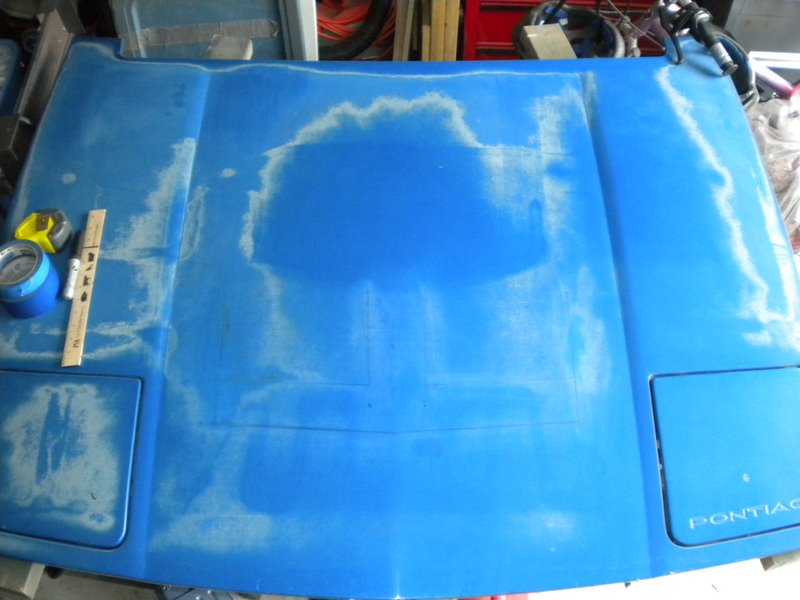
Stock 87 GT hood.
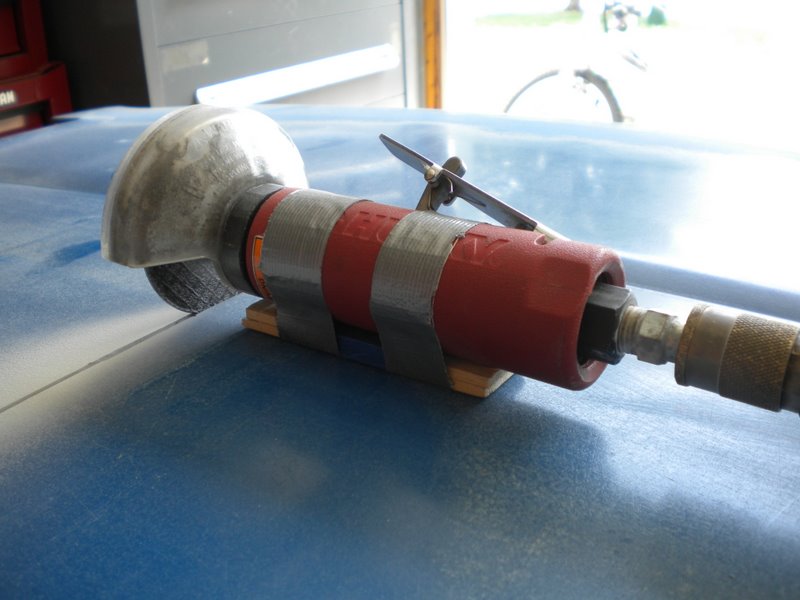
Cut off wheel
Cuts made
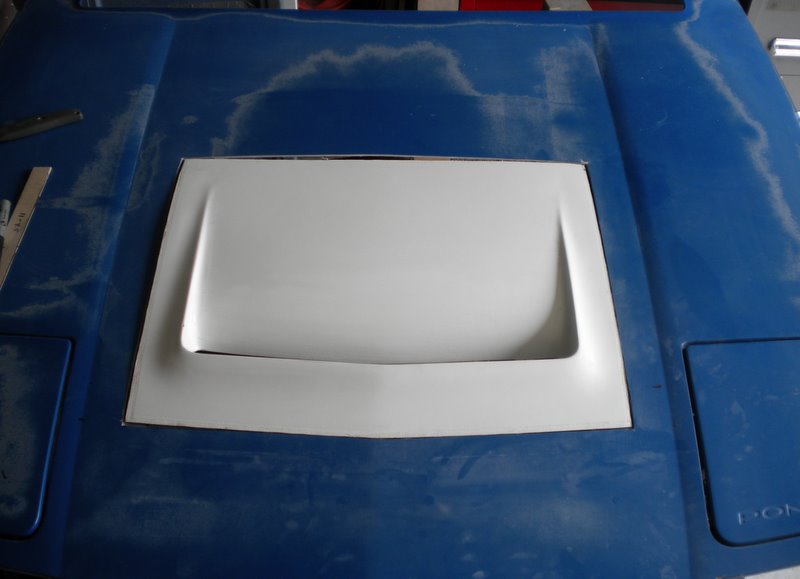
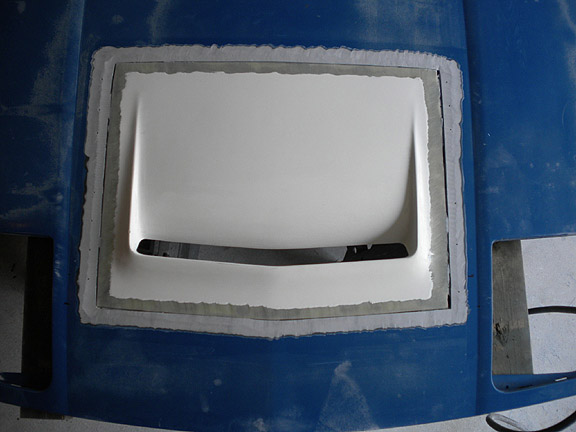
Top off, this was easier than I thought
Bottom cut to fit
IT FITS
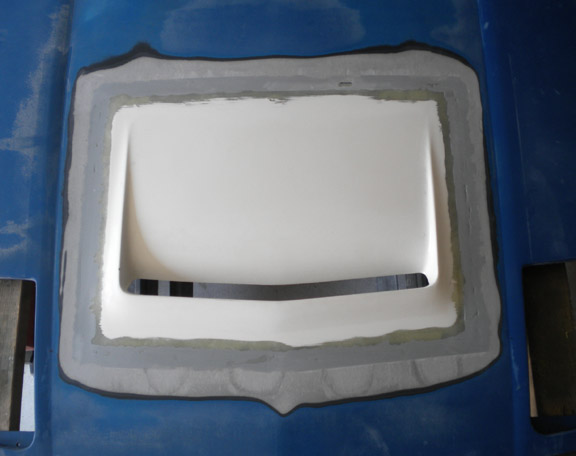
Spacers cut down and first set of holes drilled.
This is as far as I got today, I hope to get the "adhesive" tomorrow and bond the stips, then get the scoop bonded in. Then the fun begins, trying to blend it all in, primer, and paint.
Rob
[This message has been edited by qwikgta (edited 04-18-2012).]
Hey, that's a great idea using the wood spacers on the die grinder!
Looking good.
Nolan
yea, I think I spent about an hour looking at my tools to figure out how I was going to cut 1/8 inch deep. In the end, this was the best option, so I took a pic of it in case someone asked.
It cut through the top like a hot knife through butter. (made a lot of dust)
Rob
IP: Logged
12:59 AM
cptsnoopy Member
Posts: 2587 From: phoenix, AZ, USA Registered: Jul 2003
Great start Rob! I found bonding one strip at a time was better as the adhesive tended to dry too fast to do more than that. It was also tough to get the adhesive spread out along the whole perimeter and getting all the screws in and tight before it started to set. I was using screws with nuts though. Hopefully using the sheet-metal style screws will make it easier. good luck!
Charlie
IP: Logged
01:15 AM
highspeeddirt Member
Posts: 46 From: Norfolk, Virginia Registered: Jun 2010
Great start Rob! I found bonding one strip at a time was better as the adhesive tended to dry too fast to do more than that. It was also tough to get the adhesive spread out along the whole perimeter and getting all the screws in and tight before it started to set. I was using screws with nuts though. Hopefully using the sheet-metal style screws will make it easier. good luck!
Charlie
Thanks for the heads up. Yea, I'll be out in the garage in a few hours getting started on this. I also am doing something differant, don't like the idea of a bonding strip going across the middile of the hood, so I used a portion of the top to create a large "bonding slab" that will fill the entire middile of the hood. So when you look at it from underneth, it will not show the stripe in the middle. Pics will show what im talking about
Rob
IP: Logged
09:46 AM
qwikgta Member
Posts: 4671 From: Virginia Beach, VA Registered: Jan 2001
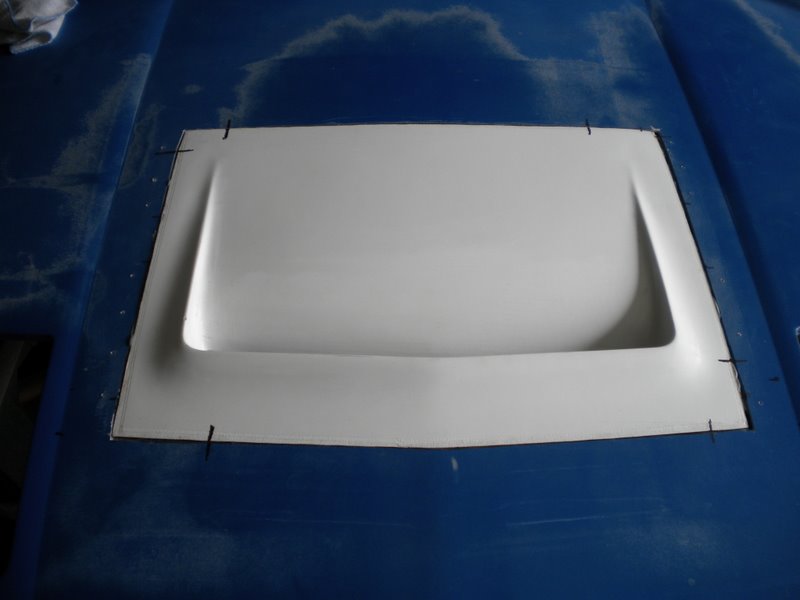
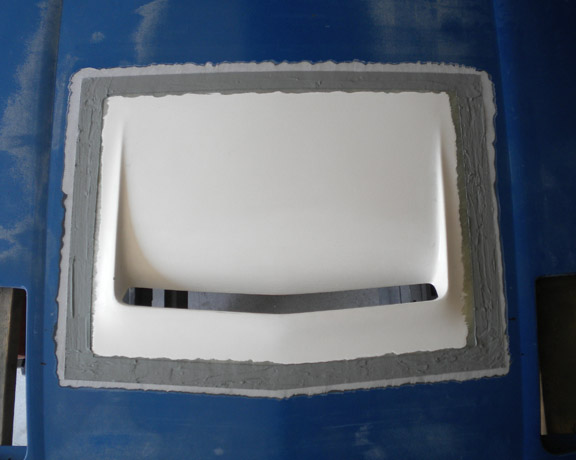
This A.M. i bonded / screwed the strip's on, and made spacers.
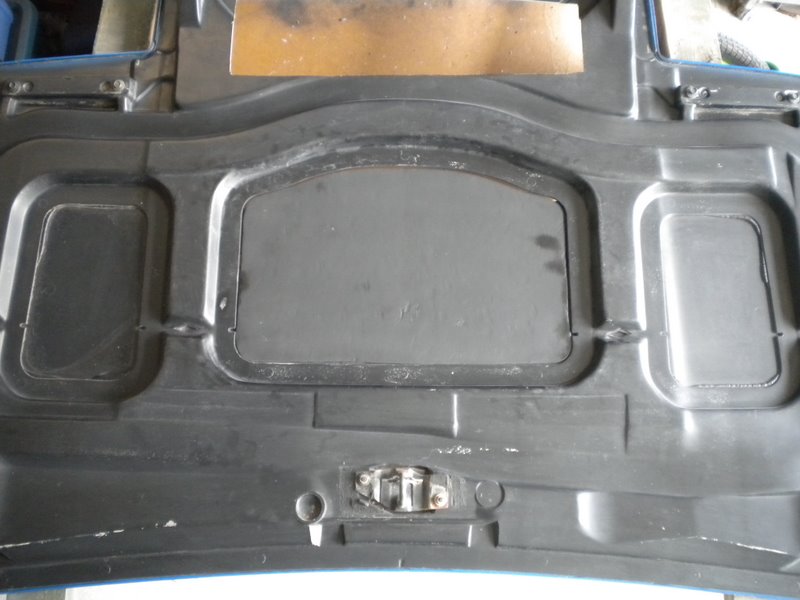
Then I bonded on the large panel that fits inside the middle opening. This is a step that is not required, but like I stated, I was not a fan of the strip that went across the back. I think it looks out of place when the hood is open. So I made a panel to fit that opening. Bonded it in, and then let it sit for approx 5 hours.
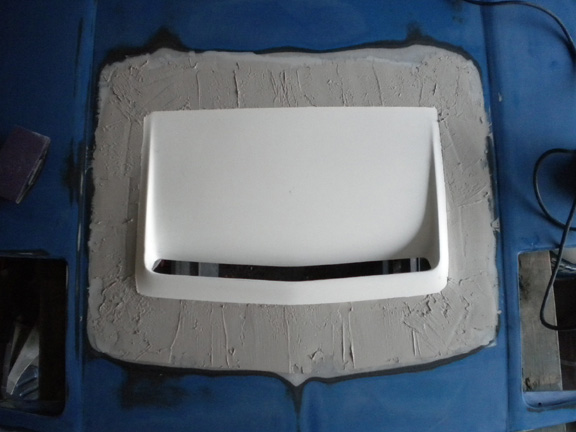
Then I could not wait, so I went and bonded in the scoop.
Overall, very easy, but I still have a long road ahead.
Rob
[This message has been edited by qwikgta (edited 06-27-2011).]
IP: Logged
06:55 PM
Jun 27th, 2011
qwikgta Member
Posts: 4671 From: Virginia Beach, VA Registered: Jan 2001
I am out of town, so I'll have to wait until the weekend to get back at it. I have to sand down the joined area, and then mix up a batch of Panel "Glue". Lots of sanding, filling, sanding and then primer/paint.
Quick tip for you. One thing I notice a LOT at car shows. if you dont want the dreaded mating line in the paint be sure to go over the bodywork around it far more than you think it needs. I see a lot of fieros that have the front "weber" scoop, what that is actually called, installed that you can see the mating seam all the way around in the paint when you look at it from different angels.
when you think you are done sanding, spray a light coat of the color or a different color of primer and sand until gone. if you dont see the line appear as you sand, then you got it completely.
Thanks for the info, I'm not a body man, so I will no doubt screw this up. I'll keep sanding till done, and then some more :-)
Rob
IP: Logged
08:06 AM
Daredevil05 Member
Posts: 2345 From: South Jersey 08077 Registered: Oct 2006
will this scoop... 1) create significant extra airflow over the radiator?
2) help keep the front end down (reduce lift) at higher speeds?
3) what happens when it rains... does the front trunk compartment get soaked?
4) how much does one of these cost, and where does one order it from?
I am also planning to add better side air scoops to channel air into the engine compartment - the little drivers side air scoop I currently have doesn't seem to be doing enough... I don't want to go with the all new lower molding that I see on the GTs... but for my notchy -just the back quarter panels on both sides.... any ideas of the best place to get some of these?
note: yesterday coming home from work, it was 100 degrees...and I got caught for 1.5 hours in major stop-and-go rush hour traffic. I noticed the temp gauge getting up to 260-270 degrees - last night I did an internet search and found out a 350 V8 should run at 190-220 max water temp.
so it appears I need to do something ...or wait until winter to drive it (which is only 2 months out of the year here in austin.)
IP: Logged
01:35 PM
rcp builders Member
Posts: 736 From: north port, Fl. Registered: Apr 2007
will this scoop... 1) create significant extra airflow over the radiator?
2) help keep the front end down (reduce lift) at higher speeds?
3) what happens when it rains... does the front trunk compartment get soaked?
4) how much does one of these cost, and where does one order it from?
I am also planning to add better side air scoops to channel air into the engine compartment - the little drivers side air scoop I currently have doesn't seem to be doing enough... I don't want to go with the all new lower molding that I see on the GTs... but for my notchy -just the back quarter panels on both sides.... any ideas of the best place to get some of these?
note: yesterday coming home from work, it was 100 degrees...and I got caught for 1.5 hours in major stop-and-go rush hour traffic. I noticed the temp gauge getting up to 260-270 degrees - last night I did an internet search and found out a 350 V8 should run at 190-220 max water temp.
so it appears I need to do something ...or wait until winter to drive it (which is only 2 months out of the year here in austin.)
You need to check your FAN! Ray
IP: Logged
02:59 PM
boomme Member
Posts: 197 From: austin texas Registered: Feb 2011
will this scoop... 1) create significant extra airflow over the radiator?
2) help keep the front end down (reduce lift) at higher speeds?
3) what happens when it rains... does the front trunk compartment get soaked?
4) how much does one of these cost, and where does one order it from?
I am also planning to add better side air scoops to channel air into the engine compartment - the little drivers side air scoop I currently have doesn't seem to be doing enough... I don't want to go with the all new lower molding that I see on the GTs... but for my notchy -just the back quarter panels on both sides.... any ideas of the best place to get some of these?
note: yesterday coming home from work, it was 100 degrees...and I got caught for 1.5 hours in major stop-and-go rush hour traffic. I noticed the temp gauge getting up to 260-270 degrees - last night I did an internet search and found out a 350 V8 should run at 190-220 max water temp.
so it appears I need to do something ...or wait until winter to drive it (which is only 2 months out of the year here in austin.)
1. yes, it should provide a path for the air coming through the radiator to exit from. also helps keep the headlight covers down at high speed. 2. Maybe because it helps lower the "bubble" of air that may build up in front of the radiator (if there is one) 3. This car does not see rain. But, this is a gen-2 scoop, and it does not require you to cut the spare-tire well, so if it did get wet, it would just fall to the ground, unless I was driving it, then it would hit the window. 4. $170 sent to your house (USA) Here is the link http://angelonearth.net/customfiberglass/
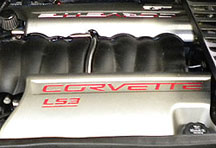
last weekend I was cough in 1.5 hour traffic at 95" and my LS3 got to 190 and I was very worried, it has only run about 180 prior to that. If I hit 220+ i'd be pulling over to the side of the road.
Originally posted by boomme: note: yesterday coming home from work, it was 100 degrees...and I got caught for 1.5 hours in major stop-and-go rush hour traffic. I noticed the temp gauge getting up to 260-270 degrees - last night I did an internet search and found out a 350 V8 should run at 190-220 max water temp.
so it appears I need to do something ...or wait until winter to drive it (which is only 2 months out of the year here in austin.)
Champion 3-core aluminum radiator swap if you're running with stock. Will probably help a fair bit.
IP: Logged
04:17 PM
Pete Matos Member
Posts: 2291 From: Port St. Lucie, Florida Registered: Jan 2010
That hood scoop is looking real nice man. I hope to be ordering one from Thadriver soon as I can scrape up the coinage. Wish he made some nice side scoops to match these... I suppose you are gonna just glass these in after that dries up? Does he give any sort of instructions for installation. That scoop looks sharp man...peace
Pete
IP: Logged
04:36 PM
A_Pegasi Member
Posts: 206 From: Virginia Beach, VA, USA Registered: Dec 2001
Paul got me one of his new Version 2 Angel hood vents this week, finally got around to it today. Pics attached.
Top off, this was easier than I thought
This is as far as I got today, I hope to get the "adhesive" tomorrow and bond the stips, then get the scoop bonded in. Then the fun begins, trying to blend it all in, primer, and paint.
Rob
LOOKING GOOD!!! Can't wait to see it when I get home from the "Frozen North". Question: What did you have to do to separate the factory glue from the top piece?
1. yes, it should provide a path for the air coming through the radiator to exit from. also helps keep the headlight covers down at high speed. 2. Maybe because it helps lower the "bubble" of air that may build up in front of the radiator (if there is one) 3. This car does not see rain. But, this is a gen-2 scoop, and it does not require you to cut the spare-tire well, so if it did get wet, it would just fall to the ground, unless I was driving it, then it would hit the window. 4. $170 sent to your house (USA) Here is the link http://angelonearth.net/customfiberglass/
last weekend I was cough in 1.5 hour traffic at 95" and my LS3 got to 190 and I was very worried, it has only run about 180 prior to that. If I hit 220+ i'd be pulling over to the side of the road.
They may help out.
Rob
thanks rob for the great info. definitely going to go with both the side scoops and the same angel scoop
(I'll be pointing the body shop guys to this thread... so please post lots of pics/explainations for them to follow)
also... FYI checked the fan and it's running fine... I don't think I was actually up to 260 gegrees... but was definitely a tad above 230 on the water temp.
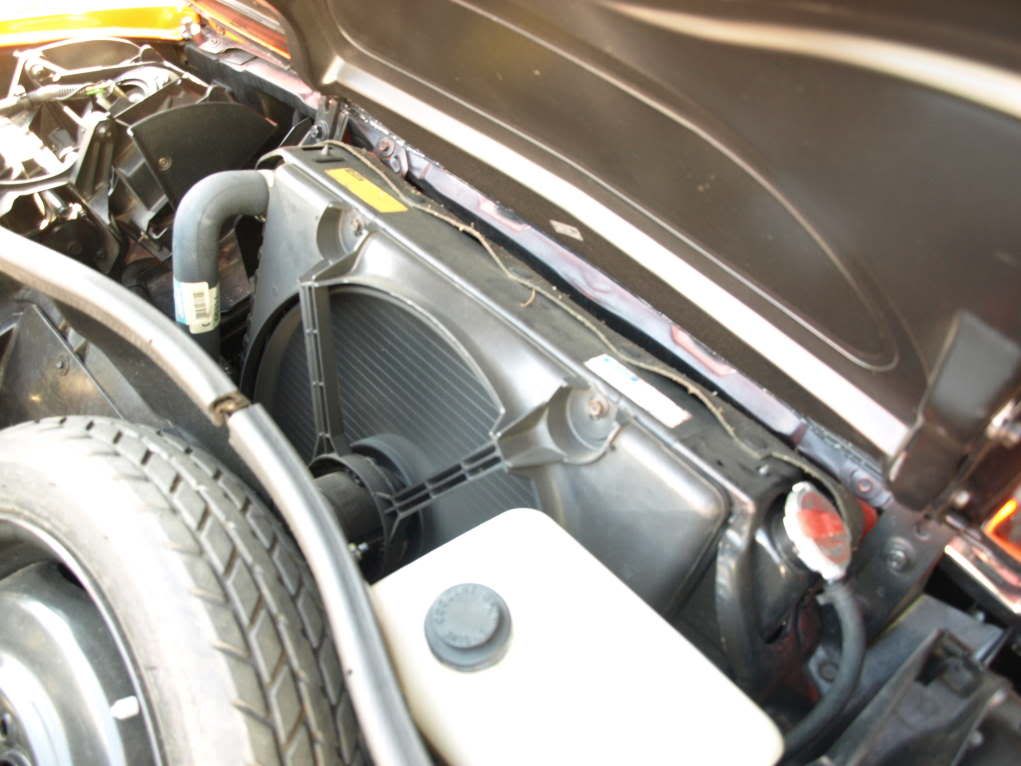
so... since I just bought the car... I can't tell what radiator it has... here's a pic if anyone can determine from it whether it's stock or not...
I personally saw one of Paul's deep hood vent on a club member's car in NJ and even though yours is the shallow version you will not be disappointed.
I was just told about this thread so I'll catch up a little. Just thought I'd note here, that even though this is the "shallow" version hood vent, it actually has a larger hole to vent the air. To accomplish this, I curved the bottom down a lot more aggressively & made the vent wider. ~ Paul aka "Tha Driver"
will this scoop... 1) create significant extra airflow over the radiator?
2) help keep the front end down (reduce lift) at higher speeds?
3) what happens when it rains... does the front trunk compartment get soaked?
4) how much does one of these cost, and where does one order it from?
I am also planning to add better side air scoops to channel air into the engine compartment - the little drivers side air scoop I currently have doesn't seem to be doing enough... I don't want to go with the all new lower molding that I see on the GTs... but for my notchy -just the back quarter panels on both sides.... any ideas of the best place to get some of these?
note: yesterday coming home from work, it was 100 degrees...and I got caught for 1.5 hours in major stop-and-go rush hour traffic. I noticed the temp gauge getting up to 260-270 degrees - last night I did an internet search and found out a 350 V8 should run at 190-220 max water temp.
so it appears I need to do something ...or wait until winter to drive it (which is only 2 months out of the year here in austin.)
1) I'm sure it will help increase the airflow through the radiator as it reduces the back pressure. What it really does, though, is 2) keep the frontend from lifting so much at speed (& helps keep the headlights from popping up). 3) The vent is open to the area behind the radiator. Water sprays through the radiator & gets that area wet every time it rains. The front compartment is not compromised. 4) $170 shipped in the continental U.S.: I make them, as well as several other parts (including fender vents that help vent even more air). (EDIT: I also make vented headlight covers now to even *further* increase the airflow.) I made a website to help folks check them out. I even gave everything part numbers to help keep track of it all. Custom Fiberglass Parts
Next time your car gets hot sitting in traffic, shift into neutral & idle it up a few hundred RPMs. That will increase the flow of water. Also, if it gets really hot & you want to avoid damage to the engine turn on your heater wide open. That will pull a lot of heat from the engine. It'll roast you, but it's much better than rebuilding an engine.
~ Paul aka "Tha Driver"
[This message has been edited by Tha Driver (edited 06-28-2011).]
That hood scoop is looking real nice man. I hope to be ordering one from Thadriver soon as I can scrape up the coinage. Wish he made some nice side scoops to match these... I suppose you are gonna just glass these in after that dries up? Does he give any sort of instructions for installation. That scoop looks sharp man...peace
Pete
I have instructions for the hood scoops, fender vents, & headlight covers on the website. Plan to add more when I get time. ~ Paul aka "Tha Driver"
Rob, I love the idea of making a solid plate for the forward bonding strip. One thing concerns me, though: Did you not make solid bonding strips that go all the way around the hole? You really need bonding strips under the edge all the way around. ~ Paul aka "Tha Driver"
LOOKING GOOD!!! Can't wait to see it when I get home from the "Frozen North". Question: What did you have to do to separate the factory glue from the top piece?
Bob
A flat chisel or scraper (tapped a few times with a small hammer) will separate the two pieces a lot easier than you would expect. I'll put it this way. No way you'll be able to separate my parts like that! ~ Paul aka "Tha Driver"
hey Paul, I plan on getting one of these hood scoops - plus some of the side scoops. I won't be doing the install myself...but rather having a body shop do it so it gets done right.
question - what is the difference between the part nds6001 - 170.00 and the full skin NDS6002 - 240.00?
I'm Guessing the 495.00 "soon to come" decklid is the entire hood with scoop installed?
will the body shop I get this done at need any extra parts other than the scoop to do this install? and... same question for those side vents... -terry
I'm guessing nobody can tell from my picture if that is a stock radiator I have on my car...?
[This message has been edited by boomme (edited 06-29-2011).]
hey Paul, I plan on getting one of these hood scoops - plus some of the side scoops. I won't be doing the install myself...but rather having a body shop do it so it gets done right.
question - what is the difference between the part nds6001 - 170.00 and the full skin NDS6002 - 240.00?
I'm Guessing the 495.00 "soon to come" decklid is the entire hood with scoop installed?
will the body shop I get this done at need any extra parts other than the scoop to do this install? and... same question for those side vents... -terry
I'm guessing nobody can tell from my picture if that is a stock radiator I have on my car...?
NDS6001 Is just the scoop with the forward section of the skin. NDS6002 is the full skin: no bodywork just separate the inner & outer of your decklid & bond your inner to the new skin. (well you'll probably want to cut out the one cross piece under the scoop) NDS6003 will be a bolt-on new decklid: nothing to do but the usual prep & paint & bolt it on. If you get just the scoop the shop will need SMC adhesive/filler to install it & blend it in. The fender vents require a special adhesive made for RRIM. (nothing is ever easy on a Fiero.) It's hard to tell from a photo if the radiator is stock, since all the brackets & such cover it up. But I have read a lot of threads that folks have said they're using the stock radiator with a SBC & it cools just fine. Might check on the water flow (make sure nothing's clogged, water pump is working well, etc.). ~ Paul aka "Tha Driver"
Rob, I love the idea of making a solid plate for the forward bonding strip. One thing concerns me, though: Did you not make solid bonding strips that go all the way around the hole? You really need bonding strips under the edge all the way around. ~ Paul aka "Tha Driver"
yea, that is just one picture. I had bonding strips around both sides, and in the front I had enough lip left, but noticed that the scoop sat lower, so I made a small set of "spacers" and bonded them in to. I also figured that if you bonded the scoop flat to the spacers and lips real tight, you'd squeeze out all the bonding agent, so I left room for the agent to be sandwiched between both scoop and strips. Also, I used the bonding agent across the middle and put it on real thick so that it would attach to both top and bottom and get squeezed flatter. Kind of hard to put in words but I believe its strong enough, I also still have to sand down the edge were the two meet on the top, and lay the bonding stuff on the top. When done im not worried about it coming off. More worried about sanding it all "glass smooth" for the paint.
More pics to follow when I get back in town this weekend.
Rob
IP: Logged
08:03 AM
qwikgta Member
Posts: 4671 From: Virginia Beach, VA Registered: Jan 2001
LOOKING GOOD!!! Can't wait to see it when I get home from the "Frozen North". Question: What did you have to do to separate the factory glue from the top piece?
Bob
Bob it was so easy. I was worried about this step, and it was easier than making the cuts. See that piece of 1/4 MDF, I used a screw driver to lift up the loose end, put that MDF under it and hit it with a rubber mallet. The glue under the hood may be real sticky when new, but now its just soft rubber and it separated with ease. It took me less than 2 minutes to get the top off, and most of that time was me making sure I did'nt screw something up, going slow and double checking as I went along.
It should be all done when you get back.
Rob
IP: Logged
08:07 AM
Jul 4th, 2011
qwikgta Member
Posts: 4671 From: Virginia Beach, VA Registered: Jan 2001
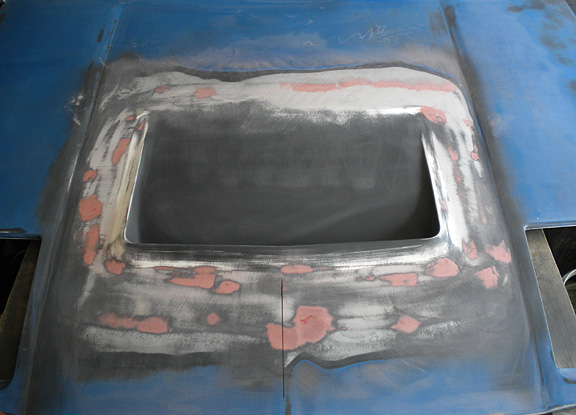
Looks great. Just be very careful of the hood body line where you have your sharpie line in the last picture. It is easy to overlook when you are sanding and sand it down too much and end up with an uneven curve. I'm just seeing a lot more of the original black surface as the pictures progress. Even if you sand too much, just sand down the rest of the hood all the way to the tip where it meets the bumper to even it out. Came out very nice though. Paul makes a very good product.
[This message has been edited by IMSA GT (edited 07-04-2011).]
IP: Logged
08:11 PM
Jul 5th, 2011
qwikgta Member
Posts: 4671 From: Virginia Beach, VA Registered: Jan 2001
Understood. I do plan to sand the hood out about 6" or so in all directions attempting to "feather" the sanding out as I go.
The line was just put there becasuse as I get close to the middle, I wanted to "see" where the two half's were. I was using my hand (and a straight edge) but I wanted to see it too.
Question. In a few places on the hood, I sanded all the way down to the "fiberglass". (I know its not fiberglass but thats what it looks like). When I sprayed the guidecoat in those areas, fibers were standing up. Do I need to cover that area of the hood with something before I primer/paint? The primer in those areas looked very 'rough' compared to all the rest of the hood.
Thanks
Rob
[This message has been edited by qwikgta (edited 07-05-2011).]
Understood. I do plan to sand the hood out about 6" or so in all directions attempting to "feather" the sanding out as I go.
Question. In a few places on the hood, I sanded all the way down to the "fiberglass". (I know its not fiberglass but thats what it looks like). When I sprayed the guidecoat in those areas, fibers were standing up. Do I need to cover that area of the hood with something before I primer/paint? The primer in those areas looked very 'rough' compared to all the rest of the hood.
Thanks
Rob
Actually it IS fiberglass, just not binded with polyester resin like most aftermarket parts (& boats & such). To answer the question above, you should not put "guidecoat" over any bare fiberglass (or bondo for that matter). You should prime any bare material before guidecoating. What I usually do is prime with PPG epoxy for maximum adhesion, & if there are any spots where I've done body work or that are wavy I prime with a 2K type hi-build primer. THEN you guidecoat. I'm also concerned that you used bondo. It will stick fine to my scoop & the SMC filler, but it will not stick as well to the SMC. You should always use the SMC adhesive/filler to finish it out to primer. In addition,: What kind of spot putty is that? I hope it's not air-dried lacquer putty. If it is then sand it ALL off immediately. You should only use a catalyst-hardened putty. In short, you need to sand off at least all of the guide coat down to the bondo, if not cut out all of the bondo & fill it out smooth with the SMC shtuff. ~ Paul aka "Tha Driver"
NDS6001 Is just the scoop with the forward section of the skin. NDS6002 is the full skin: no bodywork just separate the inner & outer of your decklid & bond your inner to the new skin. (well you'll probably want to cut out the one cross piece under the scoop) NDS6003 will be a bolt-on new decklid: nothing to do but the usual prep & paint & bolt it on. If you get just the scoop the shop will need SMC adhesive/filler to install it & blend it in. The fender vents require a special adhesive made for RRIM. (nothing is ever easy on a Fiero.) It's hard to tell from a photo if the radiator is stock, since all the brackets & such cover it up. But I have read a lot of threads that folks have said they're using the stock radiator with a SBC & it cools just fine. Might check on the water flow (make sure nothing's clogged, water pump is working well, etc.). ~ Paul aka "Tha Driver"
thanks paul, after getting a quote from the shop on what they'd charge to put in the scoop, I'm thinking if I go with a scoop, it's be more economical just to buy the entire decklid from you and have it painted. plus, that'd allow me to keep my stock lid in case I ever wanted it. I'm assuming the deck lids you sale line up pretty well (mine is a n 87 notchie)?
I'm probably going to go with a larger radiator regardless.... last thing I want to do is burn up this V8 engine... to much money invested to quibble over the price of installing a larger radiator .
Paul, Thanks for the reply. I used Evercoat “SMC Panel Adhesive” for the bonding of the scoop to the hood. I covered the SMC with Evercoat “Lite Weight” non clog filler. The putty on top is just the stuff you get at the local auto parts store, so I don’t know what type it is. I used this same process when I grafted the T/A scoops in the front fenders and it worked great, but they are also a lot smaller and are not affected by the heat of the sun. What are the issues when putting the “Lite Weight” on the “SMC”? Also the putty on top of the “Lite Weight”? Are you saying I should purchase some of the Evercoat “Vette Panel Adhesive/Filler” and put that on top of the SMC panel adhesive vs. the "Lite Weight"? If it matters, the thickness of the "Lite Weight" is very thin in most areas. It was more of a filler over the SMC that had bumps/grooves from applying.
Also, the guide coat was primer, not the carbon based stuff. I know because it clogged up the sand paper, and kicked my *** the whole time I was sanding. I also should have put on a lot less of it, but as I started to apply it, I wanted to see what the hood looked like all one color.
I’m more concerned with the areas of the hood that I sanded down into the bare hood. I tried to sand down to just the black coat and not go into the hood, but in a few spots it just didn’t work out. IF I was to order up a quart of the Vette Panel Adhesive/Filler can I work that out into the paint and then sand down as needed (not going back into the hoods surface)? I’m thinking that if I get the filler, I can apply a good coat to the top and work it out 5-6 inches from the scoop, and feather it smooth. (make sence). If I go this route, are you telling me I have to get all the "Lite Weight" off first?
I was going to cover it all with a good coat of primer, and sand it, repeating as often as needed to get a good foundation for the top paint. I guess I just figured that I could primer; spot putty and repeat as needed until I got a good surface to paint. Are the issues I may face all related to the product not sticking, lifting or being affected by the sun or vibration?