Ok, so I am about 90% done with the infamous $50 Rustoleum paint job and I wanted to share it all with you. My primary inspiration (and guidance) for doing this can be found in this thread. I also want to thank BoostDreamer for providing some encouragement and tips.
I ended up doing only five coats total (2 coats, sand with 220 grit, 2 more coats, sand with 440 grit, final coat). I think I will end up going for the full 7 coats as there are still some sanding scratches faintly visible upon close inspection. Overall I am very happy with the results and it was a lot of fun to do although as others have noted it is very time consuming but who cares if I'm having fun in the process?
My technique was to do one part of the car at a time. First the front, then the roof, then the driver door, then trunk, then rear clip, then passenger door. Doing one panel at a time was really a great move. It let me work in very small doses with measurable results in each stint.
And yes, I know that a real DIY spray job can be had for <$300 and I can appreciate that, but there were several reasons I went with the roller approach. Firstly, I have very little free time. The roller approach allowed me to work in 30 minute to one hour stints. Second, I don't have access to a 30+ gallon compressor. Third, with spray you only get one shot and I know I'd screw it up since I'd never done that before. With the roller, I could play with different methods to figure out the best results. Fourth, I'd end up junking a bunch of cheap equipment when i was done (such as harbor freight HPLV gun, etc). The roller approach had very low waste. Fifth, you can drive it between coats. Just wash and wipe down with mineral spirits before resuming. Lastly, it was only about $70 total.
And here are my tips to those of you who may be thinking about trying this yourselves: - Roll with one hand, hold a shop light with the other (flourescent tube is best). That way you can really see if you missed a spot - Go back 30 mins to 1 hour after you do a coat, look for runs and roll them out. - If your paint is too thin, it will run like crazy. Too thick and it takes ages to dry - Dust and hair were my biggest problem (Boostdreamer warned me about this). I tried setting up plastic sheeting but there is still a lot of dust/hair in the paint. - I bet that any color other than black would be more forgiving. It shows every imperfection!
So without further ado, here are the pics!
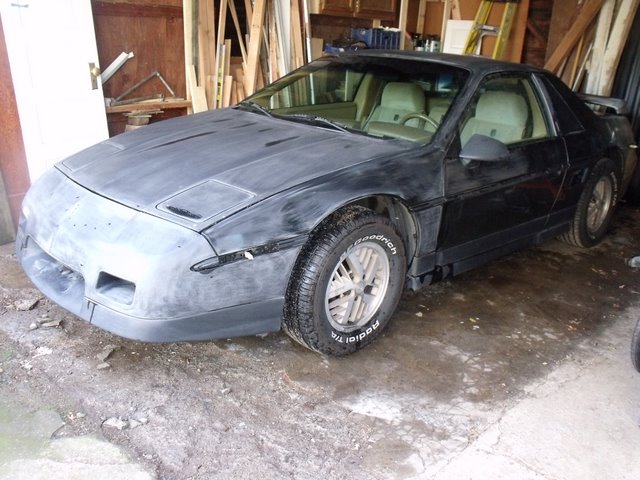
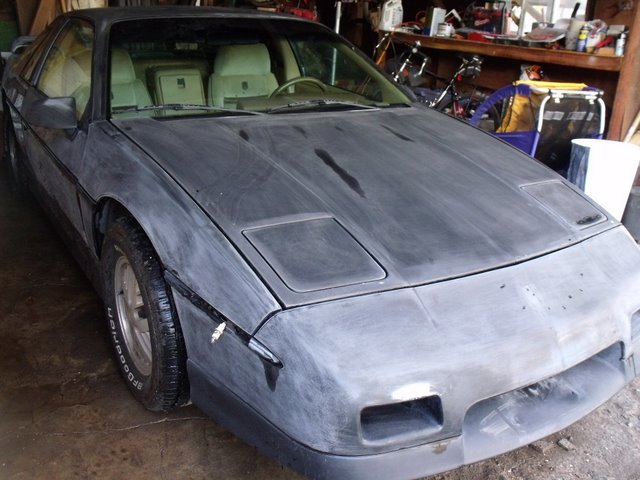
This is what I started with. As you can see, anything would be an improvement! This is a $1300 car with 300,000 miles but the PO was a mechanic and it is very reliable, just looked terrible:
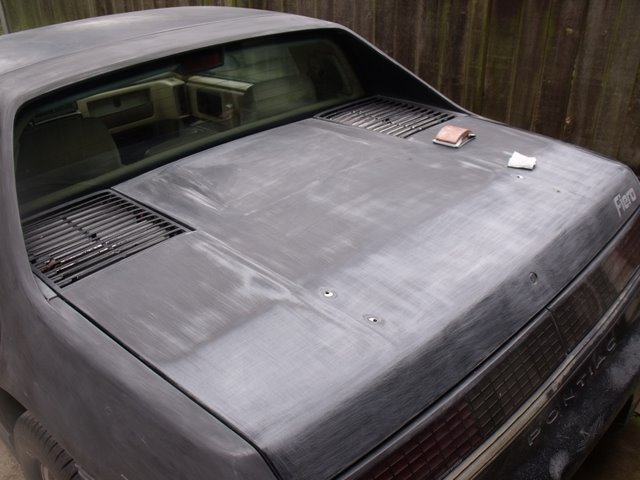
Check out the fade on the hood, fenders, and trunk:
And here is what it looked like wet. Now if I only kept it wet all the time, I wouldn't have to paint it! This actually gave me inspiration to what it would look like when I was done.
Sanding:
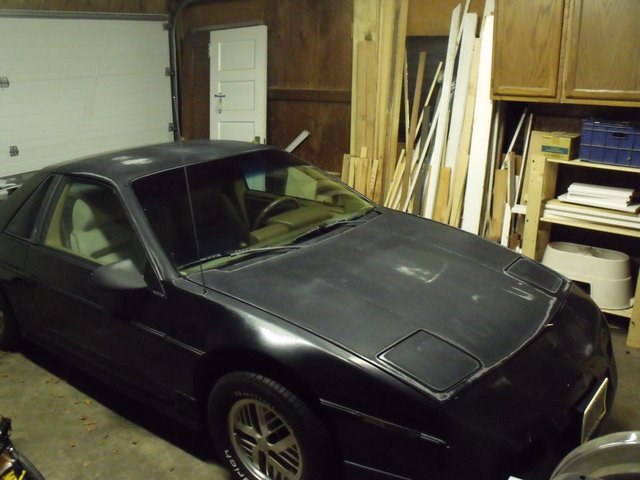
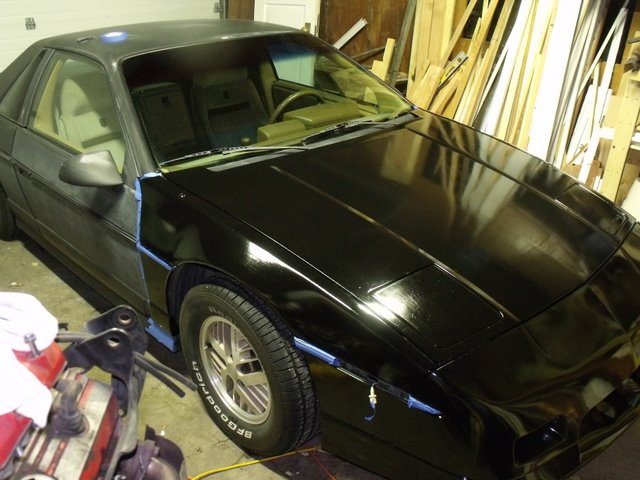
And here it is with the front painted:
Next, I moved on to the roof:
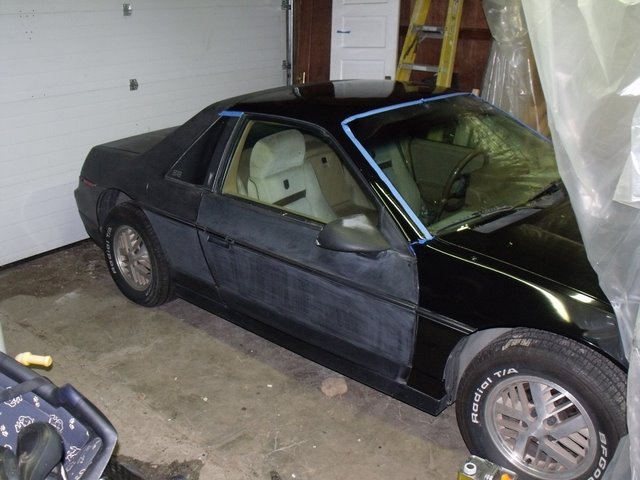
Then the doors, trunk and rear clip:
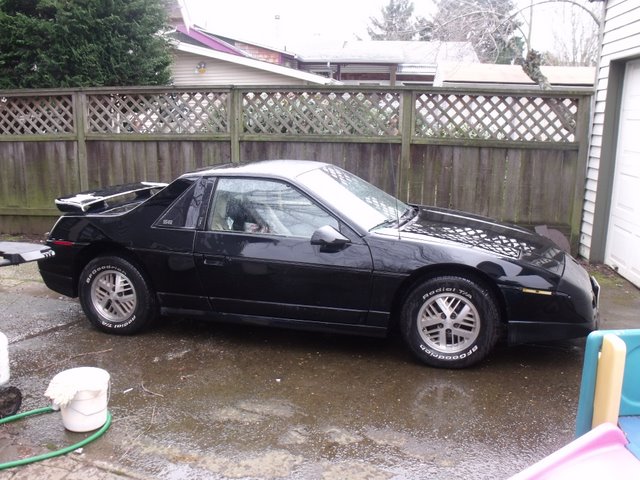
I still need to do the spoiler and passenger door, but you get the drift. I will post a few more outside when it is all done. I also want to polish it to see if I can get a bit more shine out of it but even if I can't, I am very impressed with how it turned out.
Hope you all enjoy the pics and I hope this provides the encouragement for others to consider this method -Bill in PDX.
IP: Logged
12:47 AM
PFF
System Bot
87antuzzi Member
Posts: 11151 From: Surrounded by corn. Registered: Feb 2009
don't let anyone tell you that you're cheap, its resourceful! Gives me some inspiration for a geo metro hatchback that me and 3 friends each threw in $50 for...
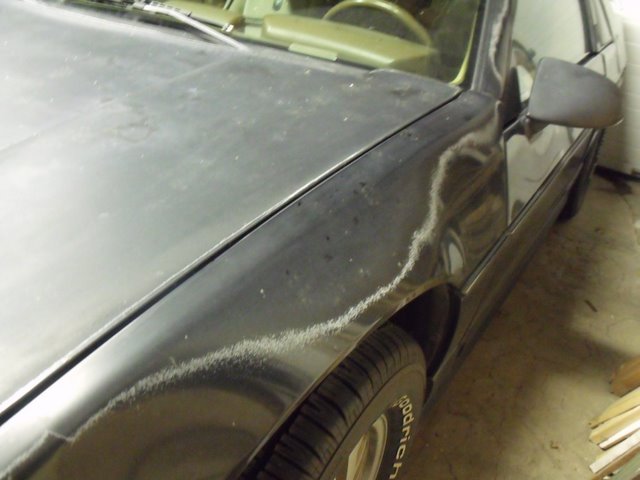
I was wondering about the spiderwebbing on the front fascia, do you foresee the rustoleum doing the same in the event of some flexing?
IP: Logged
12:53 AM
nitroheadz28 Member
Posts: 4774 From: Brooklyn, NY Registered: Mar 2010
don't let anyone tell you that you're cheap, its resourceful! Gives me some inspiration for a geo metro hatchback that me and 3 friends each threw in $50 for...
I was wondering about the spiderwebbing on the front fascia, do you foresee the rustoleum doing the same in the event of some flexing?
People can go ahead and call me cheap, doesn't bother me!
Yeah, I wondered the same thing about the spiderwebbing. It is completely hidden now and looks great today. I guess time will tell if it will reappear. I wouldn't be too surprised if it resurfaced eventually.
BTW, you can still see scratches on the headlight cover in the one pic. I think I took that after the third coat. There are no scratches visible on the front anymore.
IP: Logged
01:04 AM
CaravanBill Member
Posts: 277 From: Portland, OR Registered: Aug 2009
looks great Bill! I will be starting to build my cousins GT clone in a little over a week, hopefully after that is done we will have time for some serious polishing. Both my car and his. If you want to get in on the fun you could swing by! Well be in touch. I have a nice buffer.
I repainted my Buick a couple of summers ago in Black and the paint is still holding up just fine. I need to put on a few more coats, but I've been waiting to replace a few body panels first. I think I only ended up with about 5 coats before I called it good enough, which was just enough to hide the fact that it used to be 5 colors
My Fiero is getting painted white in a couple of weeks with the same method too though
If I remember correctly, I did about 50/50 paint/mineral spirits (to the consistency of whole milk) and then added about an ounce of Penetrol, an agent that helps smooth paint as it dries. Worked great!
IP: Logged
02:38 AM
grkboy707 Member
Posts: 3019 From: Kingsville, MD Registered: May 2009
Hey man, let me first congratulate you on being daring enough to try this. Secondly for doing what looks like a very good job of it. I am sure once you get it all finished and especially when you hit it with some high speed buffer and then wax it nice and clean it will just shine like a new diamond. I NEED to paint my car and when I first heard about this method I balked as I am sure many others have. Then after seeing many many different videos and pictures of peoples cars and even several fieros on this forum that have taken the plunge. I was actually curious about it myself and bought some red rustoleum paint and some mineral spirits and actually sprayed my GT's wing with it to see how it went. I was actually quite surprised to see that it flowed nicely and the red color is really beautiful.... not orange and not too red... just right. I sprayed it this past weekend over the memorial day break and it has been drying in the shop ever since. I thought I would let it dry for a week or so and then wetsand it and hit it with the buffer. I gotta say tho that right out of the gun it is VERY SHINY and smooth. I am sure I could have sprayed the whole car and left it alone but I am gonna try to make it look as good as possible and that includes a cut and buff even on the best paint jobs.... I gotta say that if the rest of my car can look anything like the wing does now I would be very pleased. The long term pictures and feedback from others who have done this is also inspiring. I think the best part of it all is that you can keep this paint in the can for a LONG time and if you manage to damage your paint or get road chips or whatever, it is just a quick touch up and wetsand and your back to beautiful... I may try to post some pictures of the wing right out of the gun and then some after the cut and buff.... I basically hit the couple little dings and scratches with some very light bondo and scuff sanded the whole wing with 320 grit and then shot it.... The paint on the car is not coming off just faded real bad so I am thinking a scuff would do it.... It sure does look nice tho!! peace
Pete
IP: Logged
07:53 PM
Jun 3rd, 2010
CaravanBill Member
Posts: 277 From: Portland, OR Registered: Aug 2009
Looks fantastic! What do you use to sand it? I have never sanded a Fiero to prep her for paint.
Thanks 88GTV! I started with (gulp) 80 grit. This was a big mistake. Start with 120 or maybe even a shade finer. Also another tip: sand in straight back and forth motion, not circles! For some reason, those swirls were the last to disappear under the later coats. Also, I used a sanding block for the initial rough up but just used my hands after that. Really important so your hand conforms to the curves in the body as you sand.
I did not go past 600 grit. You can't find anything finer than 600 except at an automotive paint store which is fine if you have one local. The thread I referenced in my first post recommends 1000 and then 1500 grit. Honestly, the 600 feels only slightly rougher than standard printer paper!
IP: Logged
12:34 AM
CaravanBill Member
Posts: 277 From: Portland, OR Registered: Aug 2009
Originally posted by Pete Matos: Hey man, let me first congratulate you on being daring enough to try this. Secondly for doing what looks like a very good job of it.
Thanks Pete...I appreciate the kind words. I am guessing that you might also have good results if you thin it out a bit. Then again I have never used a spray gun so I don't really know what I am talking about. Speaking of which, can you explain "cut and buff"? I would very much like to do some finish work when done but am unclear on the procedure and technique. Maybe I should just do some googling?
Another nice thing with the Rustoleum is you can always play with it. If you don't like the way something turned out, scuff it up and try again.
Nice job, Im actually getting ready to experiment first on my daily driver, a green civic, then gonna probably start on Fieros. Can you get custom colors of Rustoleum?
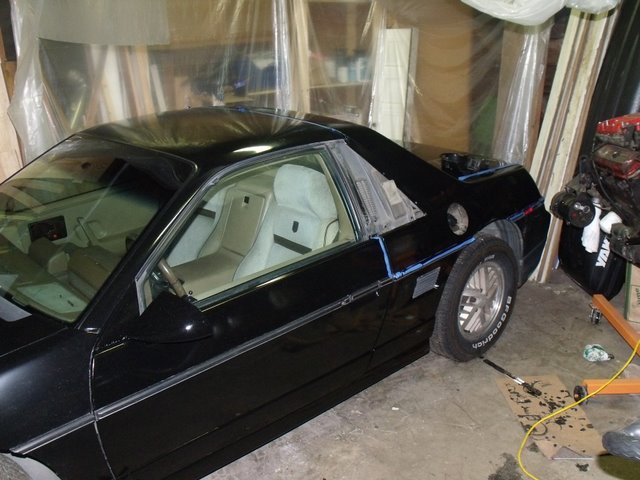
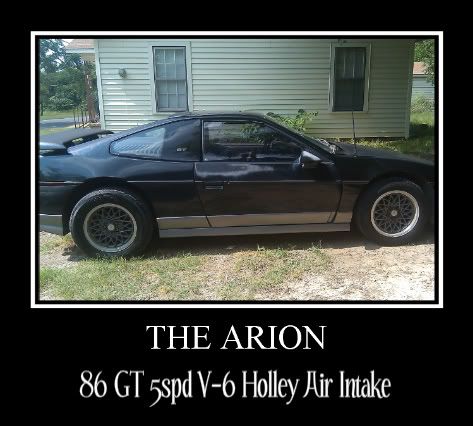
I've been doing this same type of paint for my 86 GT. Difference is I have been using the Spray Rattle Can path. So far, I have had only a few draw backs. The hood gave me a run for my money trying to paint it. A lot of Wrinkling. Eventually, I went the roll on way with the hood and eventually got it all correct and ready for buffing and polishing. The Fender, Deck Lid and HEadlight covers have turned out GREAT with the Rattle can. Here are my pics so far.
The pics don't do it justice. There is a little trash in the Deck Lid but it should wet sand out. Not much at all really. But not perfection like I want. Overall, the rattle can way works great too, just have to sand properly and CLEAN GREASE off, especially. I am still on the look out for a extra good degreaser. I have been using Dawn Dishwashing soap with the best results cause the Denatured Alcohol didn't do a good job.
Wow, this goes to show the difference between the Z community and the Fiero community.... Every now and then we have a Z owner post up their rattlecan paintjob.... All I'll say, the threads never end well for the OP.... LOL...
I have to admit, the one done in the checkerboard floored garage looks pretty darn good!
------------------
[This message has been edited by FairladyZ (edited 01-20-2012).]
It all depends on quality of material and prep time, although prep time can't make up for a less then average material. If its a good quality paint it will last. both paint jobs look way better then the 1980 era custom peel jobs.
IP: Logged
10:05 PM
Khw Member
Posts: 11139 From: South Weber, UT. U.S.A. Registered: Jun 2008
I would def go for one of these painjobs on my dd if someone can provide a clear that wouldnt react with the oil based paint.... If i can clear it, i will paint it.
IP: Logged
11:07 PM
Stubby79 Member
Posts: 7064 From: GFY county, FY. Registered: Aug 2008
Rustoleum or permatex or one of those(can't remember which) makes a clear spray in a rattle can that goes over rustoleum and such without a problem. Dunno about longevity, mind you...
IP: Logged
11:14 PM
GT86FASTBACK Member
Posts: 757 From: Monroeville, PA Registered: Jul 2009
Tried that... As with any spray can, you cant deliver enough volume to cover a whole large panel to a wet finish before it starts to dry and turn into overspray.... Need something that either brushes on, or comes in a larger can that can be sprayed with a gun.
IP: Logged
11:25 PM
Jan 24th, 2012
Stubby79 Member
Posts: 7064 From: GFY county, FY. Registered: Aug 2008
Does the Duplicolor Paint Shop line of clear eat/mess up rustoleum? Probably...considering the price of the Paint Shop line of paint, why not go with that from the start? Then you can do your clear coat.
IP: Logged
12:57 PM
GADJet Member
Posts: 1466 From: Star City, AR, USA Registered: Sep 2010
Well my birthday is in 2 days and I think I will treat myself to a rusto paint job. Well atleast I will get the mineral spirits and paint and sand paper.
And for those of you that need some inspiration.... Watch this.
Does the Duplicolor Paint Shop line of clear eat/mess up rustoleum? Probably...considering the price of the Paint Shop line of paint, why not go with that from the start? Then you can do your clear coat.
Duplicolor is lacquer based. RustO is enamel. Ever have the cheese slide off your pizza? Same thing will happen. All of the solvent will leach into the enamel soften it. The lacquer will skin over and shrink. Since the enamel is liquid again the shrinking lacquer will split and crack and give you crazing. So if you want that antique cracked paint look go for it. I never understood the RustO paint job with www.paintforcars.com out there. However, it's your car and your budget so if that is what you wanna do and you are happy with it have at it.
I have to agree with curlup though the panel in the video was amazing, you are limited to colors with the rustolem and no metallics, but hey it beats the hell out of a crappy paint job.
[This message has been edited by Macs86GT (edited 01-24-2012).]
IP: Logged
06:38 PM
DANGERUS Member
Posts: 268 From: Bancroft, Ontario, Canada Registered: Mar 2011
Oh, man! That looks awesome! I wish I could get a rattle can finish as nice as that even once!!! I've painted tons of stuff with spray bombs and I've never been able to do that no matter how much prep or buffing.
IP: Logged
10:18 PM
Khw Member
Posts: 11139 From: South Weber, UT. U.S.A. Registered: Jun 2008