Thought I'd use this thread again for a couple things. Bump it back to the first page, in case somebody that wanted to, didn't see it, keep it out of the archives for the time being and to add a new part to the mold inventory.
Have been working on and off in spare time on a fastback decklid "lip spoiler", similar to the 1st generation Camaro ducktail. Finally got around to finishing up the mold and thought I'd post a few of the steps here. Let's anybody looking see some of the process of making a mold, and announces the availability of a new part from Fierowarehouse.
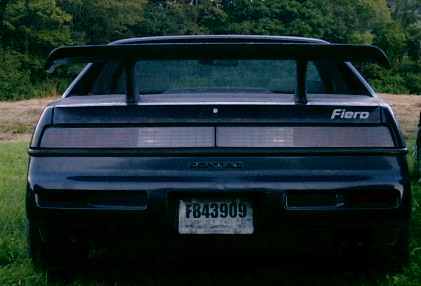
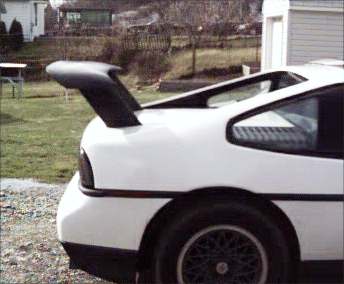
This is a shot of the plug stuck on my 86GT with double sided tape, just for the picture:
As I said, this was the plug that the mold was made from.
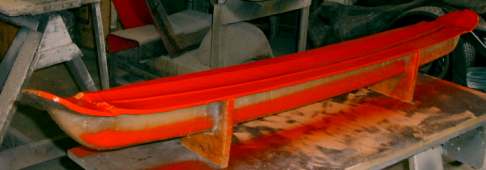
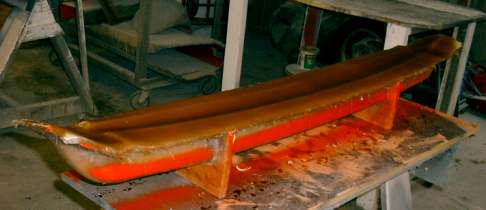
Here is the bottom half of the mold, (top of the spoiler), with the plug inside and first coat of tooling gel to create the top of the mold, (bottom of the spoiler), applied.
A second coat of the orange tooling gel is applied, and finally, a white tracer coat before the reinforcement:
The little dots you see are merely reflections of light.
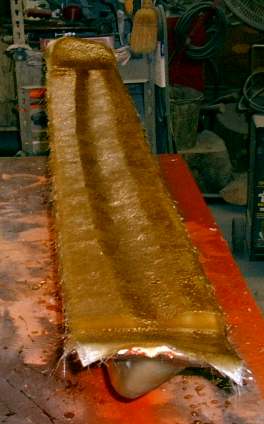
After the tracer coat kicks, the laminate starts going on:
Three and a half layers at a time. That's one layer of three quarter ounce, and three layers of ounce and half matte. If you put it on thicker than that, you take a chance of "cooking" something, as it will heat up during the curing process. Since it cures in the absence of air, the more concentrated the mixture, ( the more there is in spot) the hotter it's going to get, so three and half layers is generally all I'll put on at a time. I trim the edges after each layup session, after it starts to kick, of course! As mentioned above, if you catch it at just the right time, it can be trimmed with a utility knife very efficiently without effecting the part. Saves a ton of work later on, cause if you don't get it with the knife, you'll have to use a grinder or saw, or both, later.
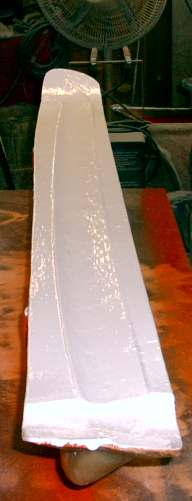
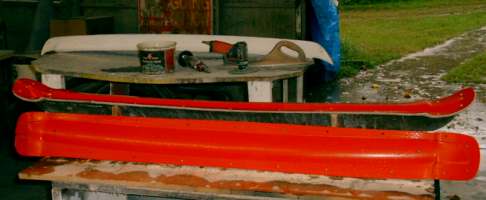
So, here it is after nine layers have been applied, waiting to be trimmed for the last time, then to be pulled apart and hopefully, separated from the plug, leaving the mold to be finished in preparation for pulling parts.
The preparation and finishing of the mold, consists of wet sanding with #400 then #800 then #1000 and finally #1200 wet or dry paper and a soap solution, till the entire pulling surface is slippery smooth all over. Then it is buffed with three stages of buffing compound and the last step, waxed 10 times with mold release wax, and ideally, let set for at least 10 days before the first part is put in it. Seems like the long way around, I know, but that's how I learned to do it, and it does seem to always work for me. Shortcuts have always produced results that seem to fall short of what you wanted, so I don't use them very often, unless they've been tested and proven to give the results you were after.
This is after trimming and pulling the plug, but before sanding buffing and waxing. You can see the plug on the bench behind the mold. It was gel coated white and prepped with the above mentioned process, after the top pic was taken.
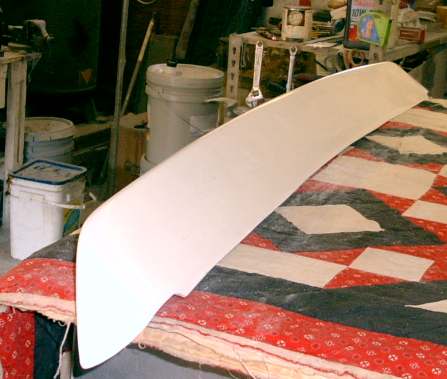
Here is the first part taken out of the mold.
This piece only used the bottom half of the mold, as the customer wants to graft the spoiler onto his decklid after cutting the corners off and grafting them onto the tops of the rear fenders, in the early Camaro style. For this, he only needed the top section of the spoiler, with no bottom anywhere. I can make three different versions of the spoiler. The one just mentioned, (no bottom), one with bottoms only on the ends, so the center section can be molded onto the decklid and the whole thing will move with the deck, the ends "hovering" over the fenders, and one with the entire bottom on the spoiler with mounting studs for which two holes would have to be drilled in the deck but provides a completely "bolt on" part.
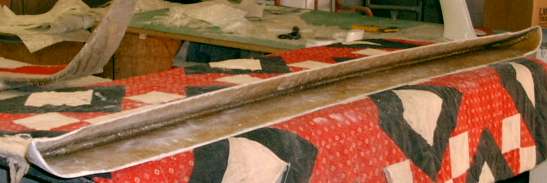
Here is the bottom of this first part, which btw went to Whadeduck so he can have a "ducktail" on his GT! Hopefully, he'll post some pics of his project either while in progress, or after it's all done. The second version mentioned will have bottoms on just the corners, the third will be filled in completely.
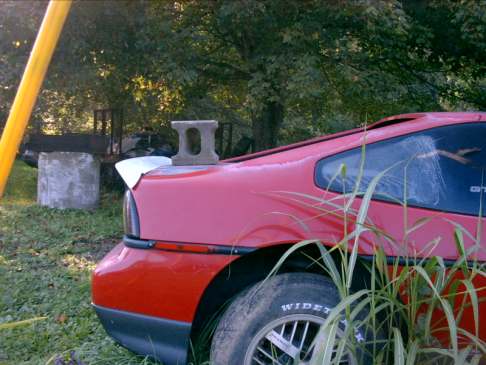
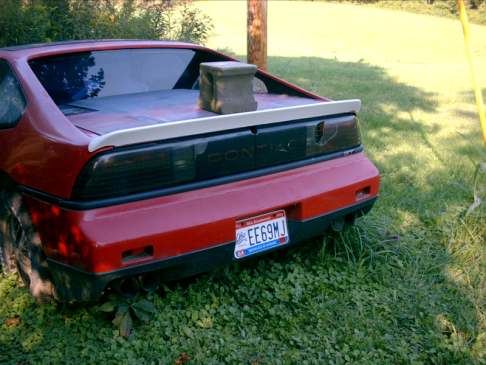
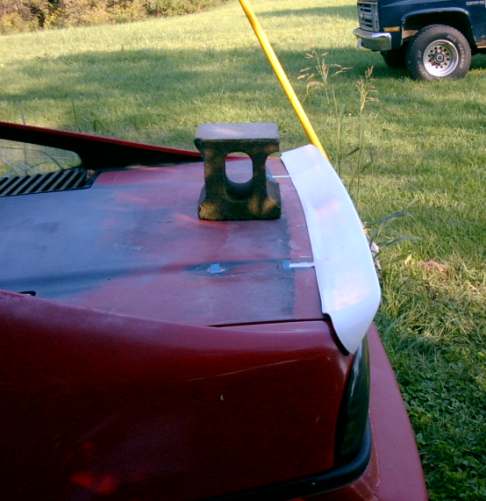
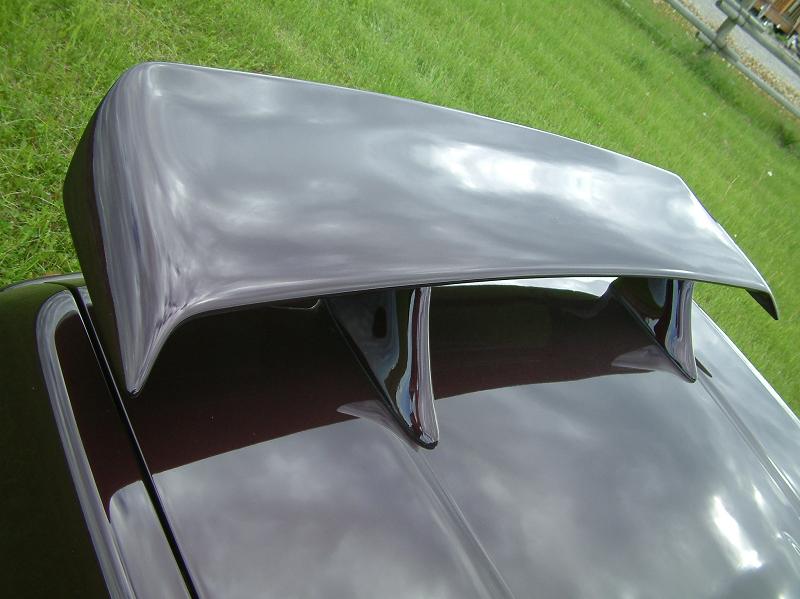
Here is one of the new part taped onto a parts car. The block is there to keep the deck closed, as I took the latch out for easy access (no battery or lock assembly on car).
Another angle:
One last pic:
This plug was made by laying up the last 5" in a mold from IRM that makes a fiberglass replacement wing for the Fiero, then molding it onto a GT decklid and finishing as described above. A little more involved than what that sounds like, but that's the gist of it.
So hope you enjoyed looking and maybe after seeing a little more of "how it's done", some of you won't be afraid to try a mold of your own.
Thanks for the space and for taking the time to look.
HAGO!
IP: Logged
07:33 AM
exoticse Member
Posts: 8650 From: Orlando, Fl Registered: Jun 2003
I am curious, how do you make the mold? How do you make the pieces so that they come apart and you even have some that are bolted together. I find all this stuff very interesting and I like to play around with it. thanks dustin
Thanks exoticse. None of it that difficult IF you're willing to put in the time and effort for little return other than the satisfaction of having done it.
Thanks madcurl. Not sure of the weight difference, but I'm relatively certain the glass unit will weigh less.
fierodustin_86: There are numerous books on the subject of plug and mold making and fiberglass production techniques. I've done a brief outline on the making of the wingstands in this thread. Your library will have books that'll explain the basics, and maybe a few that will go into more advanced proceedures. Go to fiberglast.com and look at their downloadable "how to" brochures, they are very informative and directed at specific levels of expertise, including novice. There are many websites that have the same info available, but fiberglast.com is just one that I'm familar with.
Forbes Airde (sp?) has a couple books out which I think are also available from fiberglast.com. He seems to have a very practical way of explaining things.
Look at the custom widebody build thread, right here on the forum, that'll give you an idea of some of what's involved.
The molds that you see bolted together are multiple piece molds that make one piece parts. The bolts and flanges are used to section the mold, so it will come off the plug, and the parts. Look at the site I mentioned, it explains it better than I can. Do some reading, get some materials and have at it. Get an idea of what you have to do, a concept of what you want to do, then do it! Allot of variables involved, but none that can't be controlled or overcome, at least enough to make your project work. Good luck!
Nolan, thanks, and I'm figuring it should be about 1/57th of a G.
Thanks everyone for looking and HAGO!
IP: Logged
09:39 PM
exoticse Member
Posts: 8650 From: Orlando, Fl Registered: Jun 2003
What are you guys using to hold the wingstands to the wings? Would have to be some type of anchor, similar to a wall anchor?
From the factory, the wing already has a metal "anchor" in it. Most of the time you can simply unscrew the old stands - and screw on the new ones. But I have had a couple of instances where the anchor has come loose from the wing itself - then you're pretty much on your own when it comes to removing it without breaking something...
IP: Logged
11:59 AM
madcurl Member
Posts: 21401 From: In a Van down by the Kern River Registered: Jul 2003
Yes, the anchors came loose. I managed to get them all out with a pair of pliers. The holes they fit into reamed out a tiny bit. I believe the anchors had either rubber or soft plastic. So was looking for some anchors that had a similar material to hold them secure. I know you can get the metal type wall anchors or rivets, but worry about the metal on the plastic/fiberglass wing.
Tony: If you were up here, I'd show you everything I know, should take about an hour
Fierofreak00: Yes these will be for sale. 3 versions will be available. 1) $80 No bottom, as pictured above, for molding onto the decklid and splitting it into 3 sections, with the ends being molded onto the top of the fenders. This is what Whadeduck plans to do with his, and hopefully, he'll post pics of his project. 2) $100 No bottom in the middle, ends totally enclosed, for molding onto the decklid as one piece, the ends "hovering" over the top of the fenders when deck is closed. 3) $160 Totally enclosed with studs mounted in the bottom for a "bolt on" peice, will require two holes drilled in the deck, but no molding in required.
Prices stated do not include shipping. You'd have to check with Doug at Fierowarehouse for shipping costs, and I'm sure it will vary with destination.
vallen11: The wingstands I make use the factory mounting system, which are molley nuts, or jack nuts, or mushroom nuts, depends on who you talk to as to what they are called. When I order them, they are listed as molley nuts. You can also use the rubber style "mushroom nuts" available at most auto paint supply houses. They have a threaded brass insert and "mushroom" inside the wing when the screw is tightened into it. I order the molley nuts from ACE hardware, but they don't carry them in house, they always have to be ordered, at least that's how it is here. Doug at Fierowarehouse offers a "molley kit" that includes molley nuts and matching screws, that for all practical purposes, is an exact replacement for what the factory used. Ken "partfiero" in Phoenix, (I think), also used to offer the rubber deal kits. Both are about $15 if I remember correctly.
Madcurl: Yea, I can think of a couple, but cost isn't one of them. As you well know, you can probably pick up a first generation Camaro lip spoiler in the j/y for CHEAP! Sooner or later, they are going to get hard to find though. I can make quite a few, for some time to come, with the new mold! As you said, they are "other" reasons as well.
Thanks for looking!
HAGO!
IP: Logged
07:35 PM
madcurl Member
Posts: 21401 From: In a Van down by the Kern River Registered: Jul 2003
Madcurl: Yea, I can think of a couple, but cost isn't one of them. As you well know, you can probably pick up a first generation Camaro lip spoiler in the j/y for CHEAP! Sooner or later, they are going to get hard to find though. I can make quite a few, for some time to come, with the new mold! As you said, they are "other" reasons as well.
Thanks for looking!
HAGO!
Ahh, I should have used "caps" on the word, "GREAT," hehe. You have a pm.
Garbage: All orders have to be directed to Doug Kinney at fierowarehouse.com as I'm not set up to retail. I believe there is a link to email him from the site. I make the stuff for the Fierowarehouse, but basically only sell to him, he retails everything.
Nolan: The "open" style is available now, but it would still take me a few days to get one made, as I'm working on other orders, and I STILL haven't figured out how to do more than 3 things at once. Am still in the waxing stage on the "new" part of the mold, (the "top"of the mold (or bottom of the part)), but it should be ready to go in another couple days.
Cool thread, thanks for supporting our hobbie. I am going to need some of the taller wingstands because I had seen V8 Archies Purple Pavement Eater and loved the rear decklid with the vent and wing. My vote for the sexiest Fiero ever. Anyone know the baest place to get that scoop/cowl that is used?
Real important one here...can you throw some pics up for back-to-back comparison of the wing stands completely installed on cars? This is so we can compare the finished look on a vehicle. Of course, the other products you make would be nice!!! I have never done body work as I don't have any artistic apptitude what so ever, more mech inclined, so I can appreciate all the effort you put in. Thanks!!
Sage, I have missed this until now. All I can say is..EXCELLENT! What a great idea, write-up, and illustrations. My hat is off to an exceptional Craftsman Nick
Went through some of my pics, and I don't really have a good one of each different size/style to do a side by side comparison. Here's a couple I did find below. Maybe some of the folks who have them on their cars will see this and post some of their own pics here.
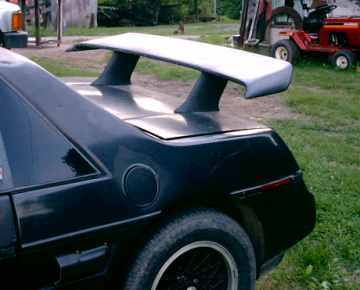
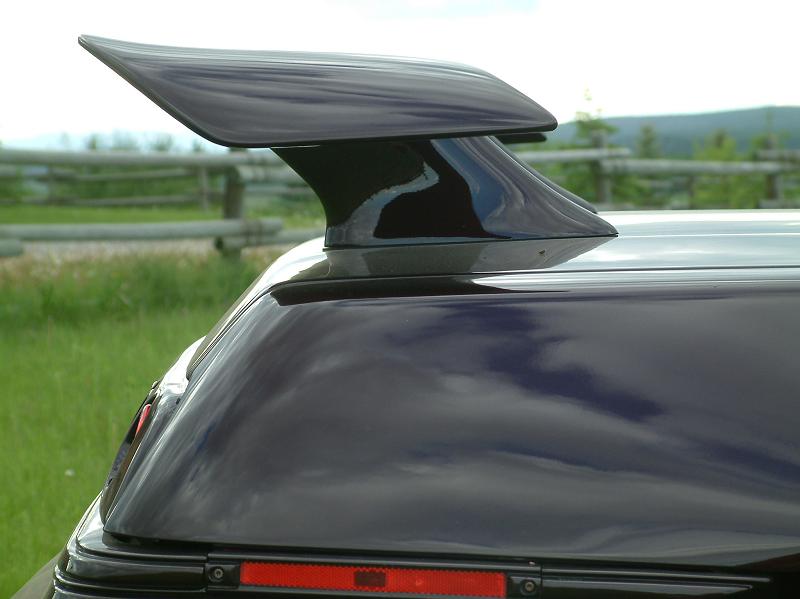
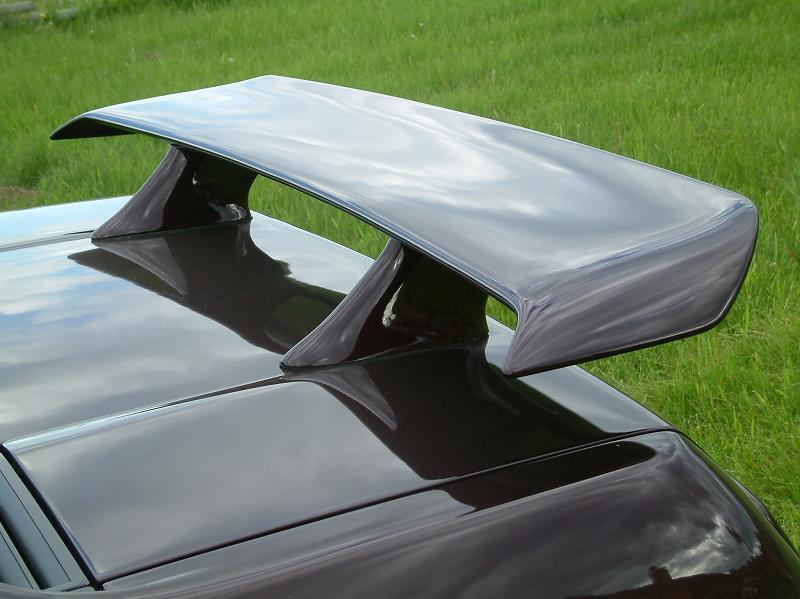
These are straight style 5" on a fastback:
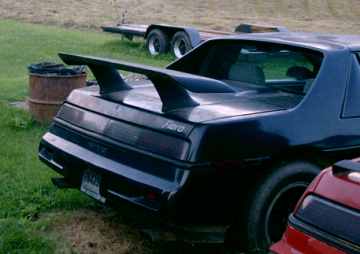
7" flared bottom on a notchie:
another angle:
and from the other side:
Kameo Kid posted pics of his which are the 5" kicked back style earlier in this thread.
That's about all I have at the moment.
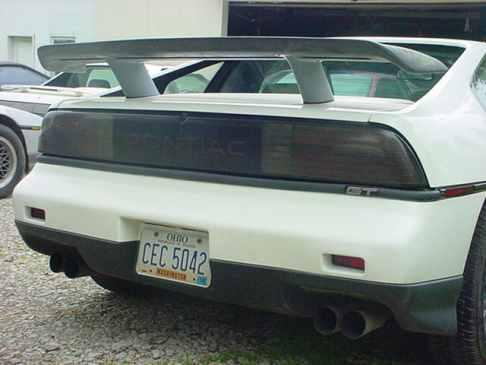
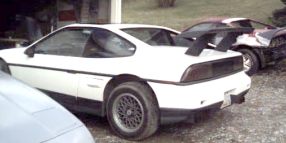
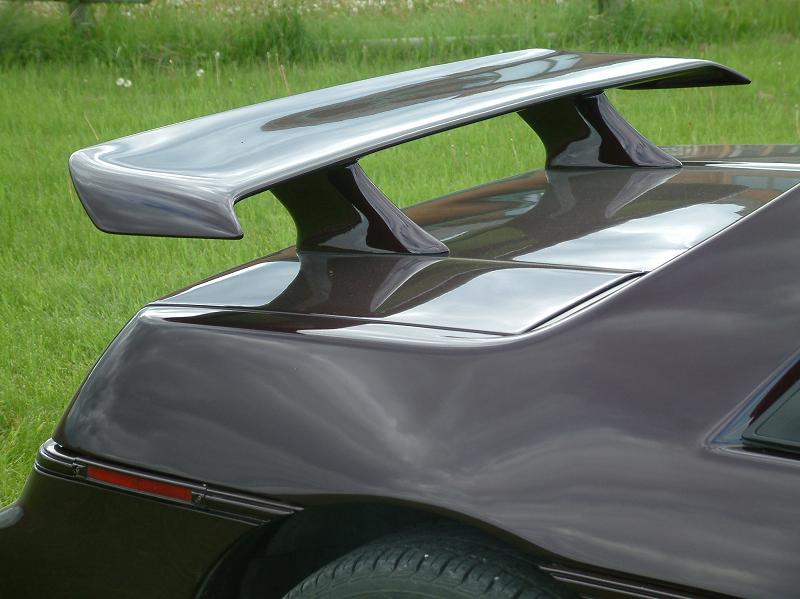
Here's why I don't make the 10"anymore
Just toooooo much! There a few cars out there that had these on them. They are just not practical, although putting the wing up that far might just put it more in line with the air flow at the back of the car, but I'm no aeronautics engineer. Anyway, I don't make anything over 8" anymore and 7" is pushing it IMHO.
Nick: Thanks for looking and for your compliment, I've seen your work in several different mediums, and coming from you, it means allot.
HAGO!
IP: Logged
07:00 PM
Dec 24th, 2007
Wii Bird Member
Posts: 264 From: Dartmouth, Nova Scotia, Canada Registered: Oct 2007
All the wingstands we offer retail for $200, which includes shipping within the U.S.. Shipping to Canada will be more, but I can't tell you how much more, you'll have to check with Doug at the Fierowarehouse for that, he handles the shipping.
I don't have molds for 6"flared bottom stands. The molds I have for flared bottom stands will make 7" flared bottom, or 5" flared bottom. The 5" are like the ones Kameo Kid posted pics of, i.e., they set the wing back farther on the deck than an extended 5" straight stand would.
Hope this answers your question.
Thanks for looking.
HAGO!
IP: Logged
11:55 AM
Jun 19th, 2008
BlackCherryGT Member
Posts: 51 From: Minneapolis, MN, US Registered: Aug 2004
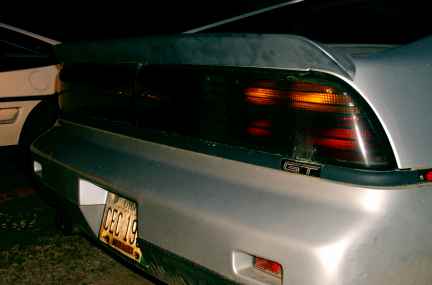
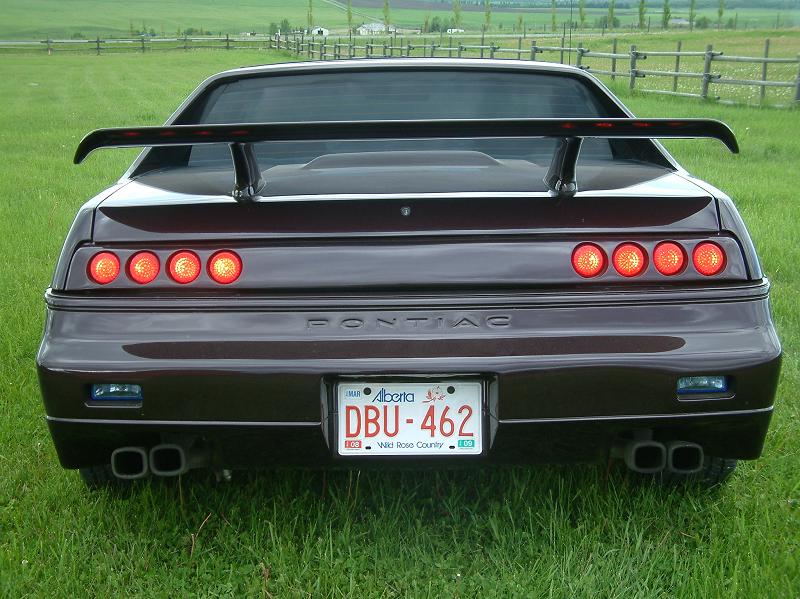
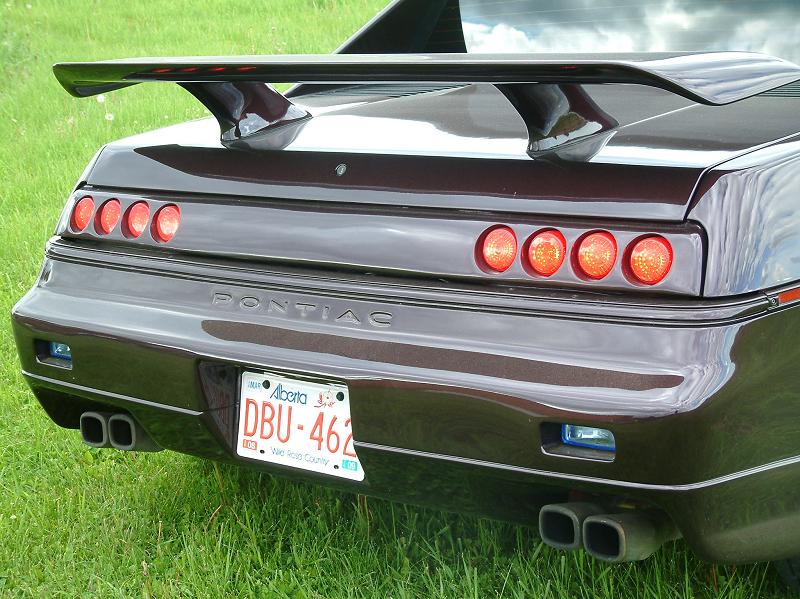
Ken, you did a nice job of converting the fastback bottoms to a notchback!
Looks great IMHO. That sure is nice paint on your ride, wouldn't be "BlackCherry" perchance, would it?
How'd you go about putting the lights in your wing, that's really a nice touch. Also, where did your taillight setup come from? Did you do it yourself?
Thanks for posting the pics, and to Troy and Archie for helping to get these stands to you.
HAGO!
IP: Logged
10:38 PM
Curlrup Member
Posts: 2590 From: Havre De Grace, MD Registered: Apr 2007
Sage, awesome work. I will be doing some mold pulling myself for a work project I have to ask. On your molds the inner layer is red. What is that coating? I was thinking baout using just a white gel coat on my molds. Is there someting else that is better?? Thanks
The orange is tooling gel coat. It will withstand more heat than regular gel coat. You can use the regular if you don't plan to pull many parts, but if you want a longer lasting mold, you just about have to use tooling gel. It's available in other colors, I sometimes use black. The reason for the color, is most parts use white or gray gel coat for thier finish, so the orange or black shows the seperation between mold and part better.
fiberglast.com has allot of info on making molds and fiberlgass parts in general. They also carry supplies. We get our stuff from Composite One now, closer and better price.
Ken, just figured out, those "lights" in your wing are the reflection of your tails! LOL More credit to your great paint job, and I guess moving the wing back far enough to reflect the lights. Looks great anyway!
HAGO!
IP: Logged
11:09 PM
Jun 20th, 2008
BlackCherryGT Member
Posts: 51 From: Minneapolis, MN, US Registered: Aug 2004
Sage, thanks for the note. The taillights fiberglass panel is from PISA, however, I changed the lights to basic red trailer marker light bodies. I then stripped the inners from the marker lights and used LED clusters (24 LED per cluster) that are used for motorcycle lights inside the marker light bodies. The clusters I found are dual brightness so the low end is used for my parks and the high is used for my brakes.
Not much, thanks for asking Tony. I stay fairly occupied with helping take care of my wife, and just keeping up with what orders that do come in. It is both surprising and gratifying when somebody orders parts. I'm glad that I'm still able to turn them out, even if it is at a much slower pace than I used to. I've still got lots of plans and ideas, but never know when I'll "get around to it", if you know what I mean. I've got a new front and rear bumper planned out in my head, among several other projects I'd really like to do, but.......................good intentions never did anything. I did get a new closed mouth chin spoiler mold made and am in the process of refurbing the original from DGP. Also wanted to ravamp the Twin Lakes 355 nose, but there's so many others making them now and it's been around for such a long time, I think the time and effort would be better spent on something entirely new and different, but again.........not sure if/when I'll get the time to pursue the idea. Maybe one of these days........also have ideas for an entire new body kit........but I don't see that coming together anytime soon either. So I've rambled on enough now, the simple answer to your question is "not much". I do appreciate your thinking of me and taking the time to ask.......thanks for that.
When we gonna see your car finished?........the teaser pics look great!
HAGO!
IP: Logged
11:03 PM
Jul 8th, 2009
motoracer838 Member
Posts: 3751 From: Edgewater Co. USofA Registered: Jan 2006
I don't need spoiler stands but Sage gets a '+' from me just because he does such nice work. I'm following this thread just to see what he dreams up next.
I admire the "can-do" attitude. "No boundaries". Making something where nothing was before - that's what I live for...
IP: Logged
02:14 PM
McNasty Member
Posts: 122 From: Philadelphia Registered: May 2007
I just recently purchased one of Sage's 5" raked stands and I am very happy with the results....
Thanks to Troy, Sage and Archie for helping me get the stands quickly.
Ken
Anymore Pictures of this car but from a few steps back, so the whole car is in the picture? I wanna see the wing stands and the car in the shot. Looks like the perfect height just wanna make sure before i commit. thanks, Shawn


 LOL More credit to your great paint job, and I guess moving the wing back far enough to reflect the lights. Looks great anyway!


