How about a full fiberglass front clip, mounted "normally", and Coke bottle it (Corvette style) over the front wheels. Easy enough to pull molds off the factory fenders and hood, foam it up, carve the humps and glass em in. You could also do a one-piece wrap-around front clip, with your shortened nose, and a lift-off or hinged hood. I had some outline drawings around here somewhere with a body channeled like you have yours and a humped front clip. I'll see if I can find it tomorrow.
------------------ toddshotrods.com - wanna ride? crazy projects, features, articles, art & more
IP: Logged
04:34 AM
Erik Member
Posts: 5625 From: Des Moines, Iowa Registered: Jul 2002
Started mocking up the body. Because of the channel, the front end will have to raised about two inches. The side molding is going away. I will fill in the notch at the rear of hood. The front end will also be shortened six inches. I am thinking about widening the top of the fenders and adding vents to the fender tops. If I widen the fenders I can mount them a little lower as the inside mounting point will not be over the tire anymore.
What wheels are those?
IP: Logged
10:44 AM
gushotrod Member
Posts: 40 From: Eugene, OR, USA Registered: May 2004
Started mocking up the body. Because of the channel, the front end will have to raised about two inches. The side molding is going away. I will fill in the notch at the rear of hood. The front end will also be shortened six inches. I am thinking about widening the top of the fenders and adding vents to the fender tops. If I widen the fenders I can mount them a little lower as the inside mounting point will not be over the tire anymore.
www.fierowarehouse.com has some wide front fenders. Those might be a better place to start that completely reworking stock pieces.
IP: Logged
02:43 PM
Sep 17th, 2005
aaronrus Member
Posts: 870 From: bradenton, FL USA Registered: Nov 2003
Got the engine in. I will post more pics later this weekend. The engine is a .040 350. 4 bolt/forged crank/Carrilo rods/fluid dampner/Weaver dry sump/World Products heads, Inglese manifold with 48 mm Webers, Comp roller, etc.
you man, SCREW the fieor body.. get a laborghinin diablo kit made for a fiero.. the killer kit car deserves nthing but the best
IP: Logged
02:28 AM
Sep 26th, 2005
pavo_roddy Member
Posts: 4351 From: State with a city named Gotham Registered: Apr 2004
you man, SCREW the fieor body.. get a laborghinin diablo kit made for a fiero.. the killer kit car deserves nthing but the best
And somehow a fake fiberglass lambo body is somehow better than a customized Fiero-based body? Really... anyone can go out and buy a tube-frame Diablo (if they have deep enough pockets) - but this will be the best one-of-a-kind ever!
Originally posted by MinnGreenGT: And somehow a fake fiberglass lambo body is somehow better than a customized Fiero-based body? Really... anyone can go out and buy a tube-frame Diablo (if they have deep enough pockets) - but this will be the best one-of-a-kind ever!
If it was mine I wouldnt put any body panels on it
The seats are from Ultra. The harness mounts are in, will use rally-type belts as the full competion belts are a pain to live with every day. Decided to put in a full dash after all, had to redo the steering column because the heim on the old column would have been in the way of the gauges. The new column is adjustable for height and plunge. Built the nitrous bottle mount and got that in, also radiator fans. The ignition box is located behind the passenger seat as it is near the pattery and the engine and I can access the rev limiter easily. The fire bottle is located in the passenger side foot well. I made a new bracket for the bottle as the one that came with was just not trick enough. Getting anxious to start on the body, I at least have the remaining chassis items down to a list. Received the lower body side pieces from Aus. This is the second set he shipped as the first set seems to be on a world tour.
Hey guss i've got a question for ya. Are you planing on having the frame powdercoated once your done fabbing everything up? It would seem to be a waste (to me if that matters) to just have it painted . Well anyway keep up the awsome work bro !
Oh yeah....you are getting sleeeepyyyyy @ 85 IMSA body @ ........hint hint
------------------ HARDCORE SBC FAN AND PROUD OF IT ! GOT TQ ?
Frame will be epoxy primed, painted and clear coat on the external bits. This held up very well on the race cars. The clear really helps with impact damage.
IP: Logged
08:25 PM
Oct 6th, 2005
stalen88GT Member
Posts: 472 From: Southern, California Registered: Oct 2004
The seats are from Ultra. The harness mounts are in, will use rally-type belts as the full competion belts are a pain to live with every day. Decided to put in a full dash after all, had to redo the steering column because the heim on the old column would have been in the way of the gauges. The new column is adjustable for height and plunge. Built the nitrous bottle mount and got that in, also radiator fans. The ignition box is located behind the passenger seat as it is near the pattery and the engine and I can access the rev limiter easily. The fire bottle is located in the passenger side foot well. I made a new bracket for the bottle as the one that came with was just not trick enough. Getting anxious to start on the body, I at least have the remaining chassis items down to a list. Received the lower body side pieces from Aus. This is the second set he shipped as the first set seems to be on a world tour. QUOTE]
I lived over seas for 18 years as a missionary kid and stuff shipped globally litterally takes forever. You think snail mail is slow, you are finally experiencing surface mail. Sux, I know, but good luck on the build and looks great so far.
Looks great. With the power to weight ratio that you'll have, you may want to consider 2006 C6 Z06 brakes and rotors(6-piston calip. on 14" rotors in front and 4 piston calip. on 13" rotors out back). They bolt right up to C5 uprights. However, they do require the larger C5 or C6 wheels (18" minimum). Here's a link to a guy that did it: http://forums.corvetteforum.com/showthread.php?t=1189347&forum_id=103
The wipers are almost finished. The motor is fiero, the parts that hold the wipers are from a ford ranger, the washer tank is an overflow from a dodge colt, with the top from a saab (did I leave anybody out?). The linkage is chorme moly with 5/16" heims. I made a tank for race gas for the nitrous system, holds about a gallon. It mounts over the no2 bottle. Bought a stainless recovery tank on Ebay. I don't know what they were thinking when they made this as the line from the radiator is three inches up in the tank, with the overflow tube about three inches down, making the effective length of the tank about six inches. I removed the line going to the radiator and welded in a fitting. This thing is way pretty but heavy, wish I would have bought an aluminum unit The brakes are C5 ZO6, 13 x 1 1/4 inch directional vane front and rear. I am using the front rotors and calipers all the way around. I don't anticipate any braking problems. I have some fiberglass door skins coming, when they get here I can get going on the body.
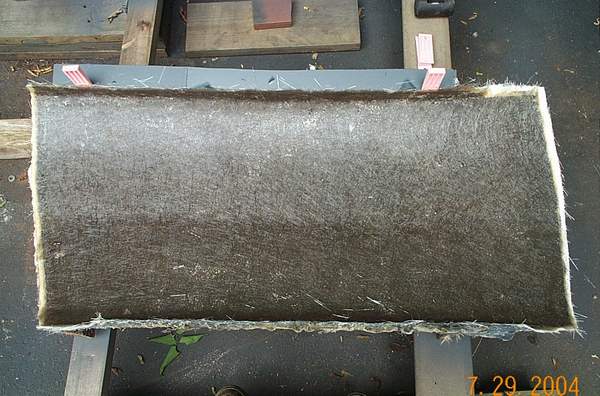
I received the door skins. I had some doubts when I ordered these. These things are pretty thin, looks like two layers of mat. Edges are delaminated in spots. Fiberglass was not fully wetted near some edges. Gonna take a lot of work.
I can't get over how incredible your project is... I've always dreamed of building a supercar from the ground up... How are you going to get smooth lines with the front fender raised up so much?
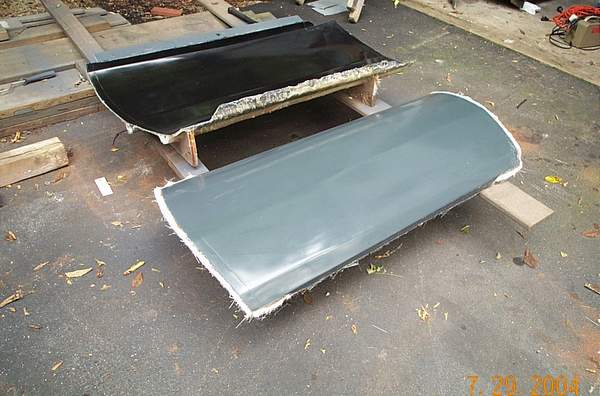
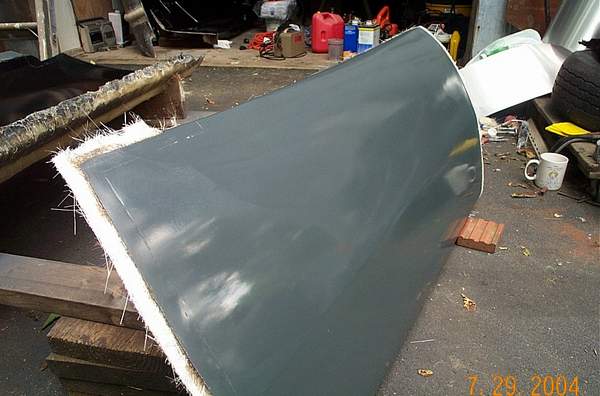
These parts only required starting the wedges, and the whole part almost popped out of the mold.
This is a door skin. The white edges will be trimmed off to the imprinted edge of the mold with a die grinder cutoff blade. Then the PVA coating will be rinsed off with warm soapy water. Now you have a part, ready to install.
Indeed they would but you would then need to have the rest of the Pantero to match up the body lines properly or do a bunch of fiberglassing to get the lines to match.
You are going to have to do that with your existing doors as well so might as well do that on the ones you have now. Throw a couple more layers of glass on the inside first and then you will have more material to work with. Shouldn't warp or bend if you lay them flat and put one layer at a time so it doesn't get too hot when curing.
Looking great. I think putting the pantero body on this frame would a great idea though. The height is stock Pantera and the rear clip on the pantero could be modified to lower it the two inch difference and make the roof line way cool as well.
Either way you go, I am sure you will create a great work of art with the body the same as you did with the frame.
Keep pluggin' at it.
Cheers Don
IP: Logged
01:22 AM
Zreon Member
Posts: 169 From: Orlando, Fl, USA Registered: Apr 2005
Looks like most people I have asked think the fenders should be mounted in the stock position with bubbles on the fender tops to clear the tires. I can't do this without making a tilt front end. If I leave the upper fender mount where it is it will be on top of the tire, and the hood will have to carry part of the bulge. I can't make the top of the fenders wider because the wiper will be under the fender. I priced some fiberglass fenders to use as a starting point and it just seemed too much for as much of the fender as I am going to use. So I am making them. Total cost $30 each, 3 hours start to finish. These are just splashed off the original fenders. I was going to use these as molds but they came out smooth enough to use as the actual fenders. No chicken wire was harmed during the fabrication of these fenders
Can't wait for an update. Just out of curiosity gus, how did you go about getting the necessary dimensions for the car? Did you take them off of a stock Fiero? I've always thought about making one myself. Only using some stock stuff and having the engine and transmission mounted sideways like stock. The passenger compartment would be the main piece of course. But the front and rear would be removable substructures for maintenance and repairs. On the outside, it would appear stock. But underneath it would be all race.
------------------ Whade' "The Duck Formerly Known As Wade" Duck
Dimensions taken from the fiero were front axle centerline to edge of door, front axle centerline to front of seatback, width between rockers (ID), and width between tires (OD). Measurements from the engine/trans were front of engine to CL of axles (which determined the five inch stretch), and CL of crank to lower edge of transaxle, which determined engine height. The cage dimensions were taken from the body center section after it was mounted to the frame. Inner pivot points for the lower a-arms are determined from the width of the steering rack eyes. Inner pivot points for the upper a-arms were calculated from the spindle height to give desired instant center length and roll center height. Anti-dive was just a guess. Mounting points for sway bars and spring/shocks located to fit in the available area. Rear inner pivot points were determined by the width of the frame, with the uppers again calculated based on desired IC and RC heights. Also taken into the mix was tire diameter and ride height. Original component locations were determined to give desired weight distribution first and low MOI second. Component locations were modified somewhat later to simply everything.
This is the original photoshop of the body design. The lower rocker panels need to be sectioned a couple of inches and the body lowered, with some kind of bubbles over the front fenders. Anybody?
IP: Logged
06:43 PM
bubbajoexxx Member
Posts: 1630 From: Ontario Canada Registered: Aug 2003
Looks like most people I have asked think the fenders should be mounted in the stock position with bubbles on the fender tops to clear the tires. I can't do this without making a tilt front end. If I leave the upper fender mount where it is it will be on top of the tire, and the hood will have to carry part of the bulge. I can't make the top of the fenders wider because the wiper will be under the fender. I priced some fiberglass fenders to use as a starting point and it just seemed too much for as much of the fender as I am going to use. So I am making them. Total cost $30 each, 3 hours start to finish. These are just splashed off the original fenders. I was going to use these as molds but they came out smooth enough to use as the actual fenders. No chicken wire was harmed during the fabrication of these fenders
good job on the fenders just raise the wheel lip to the top of the fender as they do with the GTS BMW cars then fill in the area with new glass to smooth them out
The top of the hood and fender is even with the top of the tire at ride height because the car is channeled. I need a three inch bubble over the tires
bond the fenders to the outer hood layer the raise the wheel lip the height you need then cut out the ofending material on the fender and hood the using a plastic bag over the tire put expanding foam in the area to be raised then using sand paper smooth the foam to the desiered shape and glass over it for the final finish then remove the foam from the inside
be sure to remove the inner layer of the hood before glassing the fenders on . When you are finished reinforce the inside of the tilt with aluminum tube glassed to the under side
PS: dont make it full tilt make it cam shelled as on a vette so only the hood and top of the fenders lift keep it light
[This message has been edited by bubbajoexxx (edited 10-16-2005).]


 Really... anyone can go out and buy a tube-frame Diablo (if they have deep enough pockets) - but this will be the best one-of-a-kind ever!