Wasn't sure where to post this... I have a quick question. Has anybody installed a better blower / fan to get more air from the stock A/C? It would seem to me that would be a project "somebody" has tried to tackle?
Thanks!
IP: Logged
05:11 PM
PFF
System Bot
Alex4mula Member
Posts: 7410 From: Canton, MI US Registered: Dec 1999
That would be interesting. What I would like is less gap in speed between #3 and Hi settings. Sometimes Hi is too noisy and #3 not enough blow. So I'm stuck with noisy.
Wasn't sure where to post this... I have a quick question. Has anybody installed a better blower / fan to get more air from the stock A/C? It would seem to me that would be a project "somebody" has tried to tackle?
Thanks!
Great idea, get to work!
IP: Logged
05:32 PM
DIY_Stu Member
Posts: 2337 From: Republic of TX Registered: Jun 2007
Alex the speed control is nothing more than resistors in the air box. you could use an alligator clip jumper to shorten the #3 speed resistor. the thickest and shortest one. The clip will allow you to experiment with it until you find your final length. But I am also looking for a more powerful fan as well.
IP: Logged
07:06 PM
kevin Member
Posts: 2722 From: Elk Grove, CA USA Registered: Jan 2000
When the blower fan died in my S 15 GMC I used a spare one out of my old 85 2M4. Fit good, work good, except for where the rubber hose connected to the motor casing part. It has been like that for one year now.
IP: Logged
07:52 PM
jscott1 Member
Posts: 21676 From: Houston, TX , USA Registered: Dec 2001
The real root cause is the fact that there is no filter on the evaporator and it has 20+ years of lint from the interior and leaves and dust from the exterior. Although an evaporator cleaning is nearly impossible to accomplish and replacing it a pain in the you know what.
Those resistors glow red hot with current. I would be careful about jumpering them with any ole wire. But I too am frustrated by the huge jump from full on to #3.
IP: Logged
08:34 PM
jscott1 Member
Posts: 21676 From: Houston, TX , USA Registered: Dec 2001
The real root cause is the fact that there is no filter on the evaporator and it has 20+ years of lint from the interior and leaves and dust from the exterior. Although an evaporator cleaning is nearly impossible to accomplish and replacing it a pain in the you know what.
Those resistors glow red hot with current. I would be careful about jumpering them with any ole wire. But I too am frustrated by the huge jump from full on to #3.
So I'm glad I am not the only one who doesn't like the speed thing. The evaporator is actually very (relatively) easy to take out and clean. Depending on your environment you may be able to clean a lot of debris. When I took out the one on my yellow car it wasn't that dirty. Of course it needs to be done at re-charge time.
Two different things being asked here. I believe speeds between fan switch settings are controlled by the resistor pack (maybe use a different one?), and speed at HI is full 12 volts, bypassing resistors completely. Only way to get "more air" on HI is with a blower motor with a higher RPM at a full 12 volts. It's possible that because of age, some of these blower motors are starting to slow down, so a NEW motor would help in those situations.
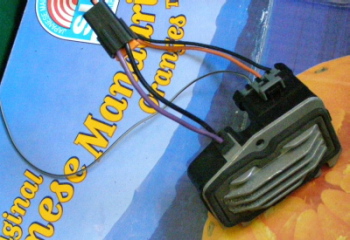
I found that the same blower motor is used in Fiero with or without A/C, but no details on motor RPM. It also list vehicles that use the same CCW rotation motor as Fiero (others are CW).
We'd need to find a site that gives us specs on the resistor packs and blower RPM to find an "upgrade".
I did some research on the electrical side of things when I was prototyping a PWM fan control replacement board for the resistor pack.
I bypassed the Blower Motor relay and went straight to the battery post (around 14 inches) from the positive terminal on the blower motor. There are no difference between high speed on the control knob and direct power from the battery. This eliminates a poor power flow caused by old wiring/dirty relay terminals. As stated,k there is a big jump between "medium high" and "High" on the fan knob. This was one of the things I hoped to fix with the PWM control circuit.
Someone above mentioned the Evaporator being dirty. This is my conclusion as well. There is 20+ years of crap sitting in the evaporator. Cleaning this out or replacing it with new would open up a LOT of air flow. Getting to it is a whole new issue entirely.
I also did some blower motor research to see what else would fit. There aren't a whole lot that will bolt into the same location easily. The Fiero air box does not allow a deep squirrel cage blower. Many other vehicles use a larger (read, deeper) wheel inside than the Fiero has room for, and this alone will cause a huge reduction in air flow.
You could make an adapter that would allow the deeper cage, but I am unsure whether it would affect airflow or not.
IP: Logged
01:56 PM
fierosound Member
Posts: 15258 From: Calgary, Canada Registered: Nov 1999
Has anybody installed a better blower / fan to get more air from the stock A/C? It would seem to me that would be a project "somebody" has tried to tackle?
Using this same reasoning, that newer/larger vehicles used faster motors (or different fans), I re-checked the eCatalog at 4 seasons http://www.4s.com
PN 35002 is a CCW blower motor from newer GM vehicles. Specs seems about the same, but NO listing as to whether it's higher RPM/output or same squirrel cage fan (should be able to swap Fiero one to motor). It also has a 2-wire connector, so not sure how to wire that up. But the cross-reference to GM vehicles would be a way to get one from a wrecker for anyone who wants to experiment.
[This message has been edited by fierosound (edited 09-02-2010).]
IP: Logged
02:29 PM
Synthesis Member
Posts: 12213 From: Jordan, MN Registered: Feb 2002
When I was doing my A/C tune up... Just before the Ole Compressor blew. I found several things. I was loosing a lot of air through the old sealant for the Heater core and the A/C lines going into and out of the air box. 2 The A/C Evaporator was filthy. You can get to the Evap by removing the cover in the front compartment.
Need new sealant? Oreilly AutoParts carries it. Murry Climate Control P/N 59010 UPC 096361590106
This stuff sticks to you bad. wet your fingers or it won't let go of you.
Perhaps a small brushless DC motor might be the trick. They are high RPM and should be relatively easy to adapt to the existing squirrel cage fan. One drawback is that, I believe, most of them require a motor controller which would make the HVAC fan switch obsolete. I may just poke around a bit on this and see what's available....
------------------
[This message has been edited by randye (edited 09-03-2010).]
IP: Logged
01:00 AM
Hockaday Member
Posts: 2165 From: Clifton Park, New York, The States. Registered: Sep 2009
could always replace a dimmer style switch for the motor. we use them on some electric locomotives for 7 1/4" scale. They run from 6-24 volts.
------------------ Cliff's 610th Positive Feedback Giver. #12 NYFOC Member In recent times, the custom aftermarket car/automobile roadwheel has become a status symbol. These wheels are often incorrectly referred to as "rims". The term "rim" is incorrect because the rim is only the outer portion of a wheel (where the tire is mounted )
It looks like there is a squirrel cage and fan that can fit the Fiero air box from a later model Chevy van. It has "deeper" fan blades with a bit more curve to them than the stock Fiero blades, which would result in a higher volume of air and a higher speed of air flow. I need to pull my fan and compare it with the one at the parts place. The good news is, the new fan motor and squirrel cage is only 30 dollars, and as far as I can tell, is a direct bolt in. The only difference that may prevent this swap would be the clocking of the fan cooling port.
IP: Logged
02:11 PM
jscott1 Member
Posts: 21676 From: Houston, TX , USA Registered: Dec 2001
The evaporator is actually very (relatively) easy to take out and clean.
I would be interested to hear more about this... I never removed the evaporator on a good car but it looks fairly well covered up with other junk. I removed the entire HVAC off a parts car and that was a real pain and took what seemed like forever.
Looks like you would have to remove the heater hoses...which can be a pain. And of course you would have to drain the refrigerant out first, and what else is involved?
IP: Logged
03:36 PM
PFF
System Bot
Sep 4th, 2010
Synthesis Member
Posts: 12213 From: Jordan, MN Registered: Feb 2002
I installed a new blower motor, and that made a big difference. I then decided to check out my airflow passages by opening the front AC ducting up.
I discovered a few things. The black seal around the evaporator tubes that come out the top and bottom of the duct cover was hard and loose. The foam plug that goes around the heater core tubes where they enter the front compartment was missing. And the plastic part that the Accumulator bracket screws to was broken on the front. Which means that someone had pried against it in the past. It had actually cracked a large section, so there is air leaking around the cracked area. I could probably epoxy this in place without an issue, but may look for a new one and install it instead.
I pulled the Evaporator out of the car, and discovered some mouse nest material on the end closest to the front of the car. About 1/3rd of the evaporator was covered. I dumped all of this out, and then took the evaporator upstairs to the shower. I have a spray nozzle for washing the dog attached to the shower, and my water pressure is phenomenal here. I put the nozzle against the evaporator core, and proceeded to backwash (against the flow of air) through the fins.
Well, I don't believe this has ever been removed from the car. The water was BLACK coming out of the fins. There were small particles all over the place being washed out as well.
Before, I could see light through the fins, now, if I look just right, I could almost read through them.
I believe that this alone is a major contributing factor to poor fan performance. The duct work is fairly open inside, albeit several 90 degree turns, etc that will obstruct the flow of air.
With the panel removed, and the fan out of the way, I can look clearly down into the driver's foot well where the "Max AC" air recirculation is.
Again, the new fan made a noticeable difference. I will report back with a clean evaporator and everything sealed up. I'd be willing to bet the system will flow plenty of air now.
IP: Logged
07:27 PM
Synthesis Member
Posts: 12213 From: Jordan, MN Registered: Feb 2002
I would be interested to hear more about this... I never removed the evaporator on a good car but it looks fairly well covered up with other junk. I removed the entire HVAC off a parts car and that was a real pain and took what seemed like forever.
Looks like you would have to remove the heater hoses...which can be a pain. And of course you would have to drain the refrigerant out first, and what else is involved?
To remove the evaporator, you have to pull a small handful of 7MM screws, two 10MM bolts, the heater core hoses (and plug them if you don't want to deal with a lot of coolant loss).
Disconnect the accumulator, both fittings. Unplug. Remove the 10MM bolt holding the accumulator, and remove.
Remove washer jug.
Disconnect both heater core hoses. Plug hoses, and bend out of the way.
Remove the metal brackets on the front of the AC Duct work. (Relay mount, 2 screws, and accumulator mount, 1 screw)
Unclip the wiring harness from across the top of the duct work, and lay across the brake booster.
Disconnect the bottom Evaporator fitting.
Remove the fan. Remove the 7MM screws around the fan mount (3 I believe).
Remove the remaining 7MM screws around the housing.
Remove the 10MM bolt above the heater core opening. Remove the 10MM bolt between the fender and the heater core opening (just below).
Remove front cover, and remove AC Evaporator.
This is the first time I have ever torn into the AC system this far in preparation for repairing it. I was able to have the evaporator out in under 20 minutes.
[This message has been edited by Synthesis (edited 09-04-2010).]
IP: Logged
07:33 PM
jscott1 Member
Posts: 21676 From: Houston, TX , USA Registered: Dec 2001
This is the first time I have ever torn into the AC system this far in preparation for repairing it. I was able to have the evaporator out in under 20 minutes.
THANKS! I would give you a "+" but I already had in the past. I don't know why I thought it was a harder job than that. Maybe because I paid to have it done (on another car not a FIero) and I was charged out the wazoo. I guess this is one of those things that's actually easier on a Fiero, like the heater core.
IP: Logged
09:28 PM
Sep 5th, 2010
Daniel Member
Posts: 282 From: Calgary, Alberta, Canada Registered: Jun 2003
This controller can be a continuous variable fan speed controller by using a variable resistor, and a set resistor to ensure max speed is set at no resistance from the first resistor. (I am in the process of mounting one in the rear to a set of fans to cool the engine bay when it gets hot using intake air temperature sensors, may be done by next year as I am in no rush but I can adjust the speed with a variable resistor using a similar controller from a bonneville, The boneville controller was easier to remove, but has larger fins, probabaly would not fit up front )
7 speed fan controller (found in front of the heater fan, under the dash in the grand prix, in front of the glovebox)
7 speed fan controller installed
------------------ 1988 Fiero GT
IP: Logged
11:11 AM
fierosound Member
Posts: 15258 From: Calgary, Canada Registered: Nov 1999
It looks like there is a squirrel cage and fan that can fit the Fiero air box from a later model Chevy van. It has "deeper" fan blades with a bit more curve to them than the stock Fiero blades, which would result in a higher volume of air and a higher speed of air flow.
What year/model of Chevy van was this? The 4-Seasons website showed the 97-00 Chevy Venture van had a CCW fan. Was that it?
IP: Logged
12:01 PM
Synthesis Member
Posts: 12213 From: Jordan, MN Registered: Feb 2002
What year/model of Chevy van was this? The 4-Seasons website showed the 97-00 Chevy Venture van had a CCW fan. Was that it?
There are a couple that do. I would have to look up the part number again. The box is in the garage.
The fan cooling port is on the wrong side, so either the fan will have to be clocked around to the correct orientation (not difficult to do at all) or you have to plug the cooling port, which isn't really an option in hot climates.
Also, the squirrel cage, when viewed in person would not have been a CCW squirrel cage. The photo of it online was reversed, which meant that it was a Clockwise rotation. I did test a clockwise fan, knowing it most likely would not work do to the style of air box. It made a lot of noise, but moved no air.
[This message has been edited by Synthesis (edited 09-05-2010).]
IP: Logged
12:07 PM
Synthesis Member
Posts: 12213 From: Jordan, MN Registered: Feb 2002
To add to my AC experimentation while I look for a faster fan:
The duct was cracked, seals were missing... And the heater core with the limited lifetime warranty that was installed 5 years ago or so is bad. Yay!
Anyway, I took the AC evaporator to the local self serve car wash, sprayed it heavily with brake cleaner, let it sit for about 2 minutes and then proceeded to wash from the backside with high pressure and soap. The evaporator looks a lot cleaner, and I can see even better than I could yesterday...
My honest opinion is not that we need a better/faster fan, it is that we need to properly service the AC system, including duct and evaporator cleaning. A new fan will resolve slow issues. I am also looking into a module, like what was listed above to provide a better solution than resistor wires that get hot.
IP: Logged
03:57 PM
Synthesis Member
Posts: 12213 From: Jordan, MN Registered: Feb 2002
Just finished reassembling my front air box. Heater core is currently bypassed using a 5/8" to 3/4" dual ended barb splice.
I am not 100% sealed up front now, but it is better than it was. I used a rubberized foam tape around the evaporator tubes where they come out of the cover until I can get the "official" sealant, which is not in stock at any of the local parts places, including O'Reilly.
I got into the car, turned the AC to full off, then started the car.
On the four position switch, there is a big jump between three and four.
With everything cleaned, and still not sealed 100%, position three is comparable to the position four prior to my cleaning rampage.
Position four, while not as strong as today's modern vehicles with better designed duct work, etc, is still strong enough to be noticeably improved over the previous flow.
When I get the heater core replaced and replace the foam seal there, and finish sealing the evaporator ports, I should see a nearly 250% improvement over the previous air flow.
It is very difficult to explain how much of a difference is both heard and felt when the air flow is on full with everything cleaned out when compared to the "before".
If your AC is in need of service, then don't hesitate to tear into this, and clean the evaporator. I removed the "water guard" from the back of the evaporator, as I have never had an issue with water splash anyway.
Thanks for starting this thread. It gave me the motivation to tear into my system.
A little over a month ago, Randye came down here to my place to help me get my AC working. It has never worked since I bought the car in Jan. 2001. After the 3800 swap, I never bothered to try to get it to work. Randye and I pulled the evaporator. It was filthy to say the least. I soaked it down with brake cleaner and then blew it out with the air compressor. I repeated that 3 or 4 times. Once it was all put back together and working, I have AC that will freeze you out of the car on Max AC. The air flow is great now that there is nothing restricting it.
While having a faster motor would help, you still need to remove the evaporator and give it a thorough cleaning. It makes a world of difference.
I can say unequivocally, I agree with Jimmy. After cleaning the evaporator, and sealing the rest of the holes/gaps in the AC duct housing, my system is pushing a LOT of air.
Before, my outer vents by the doors did not push anything noticeable.
After the work I did cleaning the ducts and the evaporator, the outer vents are strong enough to push a 4 inch piece of yarn straight out when taped to the vent.
What a HUGE improvement! And my vents smell a lot better too.
[This message has been edited by Synthesis (edited 09-05-2010).]
IP: Logged
07:25 PM
PFF
System Bot
jscott1 Member
Posts: 21676 From: Houston, TX , USA Registered: Dec 2001
Okay you have convinced me that I need to remove my evaporator for cleaning, but that is one of those jobs that I dread doing for some reason.
It's really not as bad as you think it will be. It's a job you can do in 2-3 hours by yourself. A little trick for you. That hard black sealant around the pipe that runs into the plastic cover, will soften and get plyable if you hit it with a heat gun.
PM sent to you jscott1
[This message has been edited by JimmyS (edited 09-06-2010).]
IP: Logged
12:07 AM
DIY_Stu Member
Posts: 2337 From: Republic of TX Registered: Jun 2007
Alex it's not really a tape... Looks like it when it's in the box... but It's just a very sticky asphalt/Butyl that's flat on a release paper. You peel it off the paper then stick it.
IP: Logged
04:36 AM
DIY_Stu Member
Posts: 2337 From: Republic of TX Registered: Jun 2007
JScott if your A/C is charged, just clean it in the car. Use cleaners, Foaming Cleaners will help suspend the dirt then blow it out and use a Vac to catch it. Sure it'll make a mess, but once the box is open you can get to the back side of it to push the dirt back out and it'll be outside of the interior.
IP: Logged
04:40 AM
Australian Member
Posts: 4701 From: Sydney Australia Registered: Sep 2004
Go to tandy and get a different pod to control the speed. I would think that the fan isn't the problem but the airconditioning as the heat is sure to work. If your in need of a new fan i like that you think outside the square or the rectangle.
I dropped my car off at the Fiero Factory last night to address a few concerns but I am having Jeremy look at and clean the fan. I'll let you guys know what I find.
IP: Logged
08:34 AM
Synthesis Member
Posts: 12213 From: Jordan, MN Registered: Feb 2002
WOW! I asked a question and you guys really answered it!!! You guys didn't happen to take pics while you were cleaning everything?
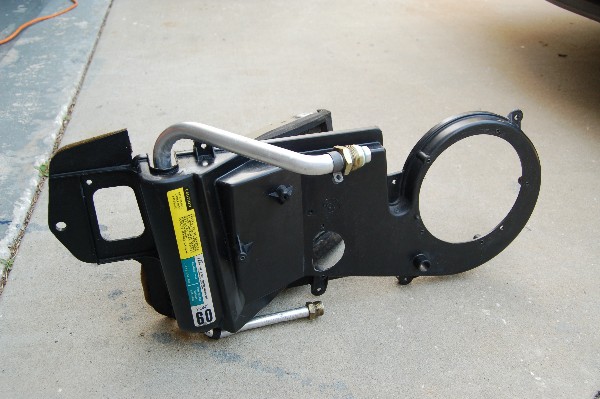
Blower housing and evaporator core removed from the car:
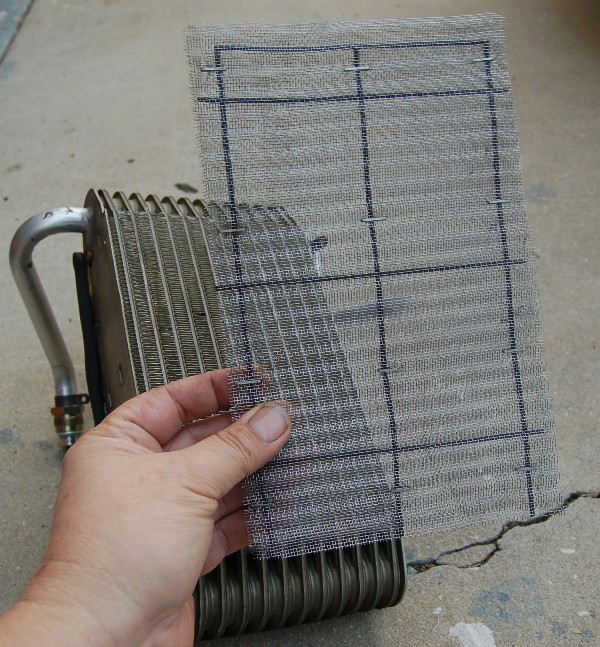
Water separator screen. It's actually *glued* to one side of the evap. Throw it away, it's not needed:
Evaporator core by itself. Flush out the fins with brake cleaner and blow out with compressed air, then wash it with hot soapy water, then rinse and blow dry. An amazing amount of crap will come out of the fins, and, *yes*, you do need the brake clean solvent to get all the built up "goo" out of the fins that is restricting air flow. Flush out the inside of the evap. with denatured alcohol and blow it out with compressed air. Keep the black rubber seals on the core intact, (they are needed to seal the core inside the housing to prevent airflow from passing around it and to keep it from moving and rattling inside the housing.)
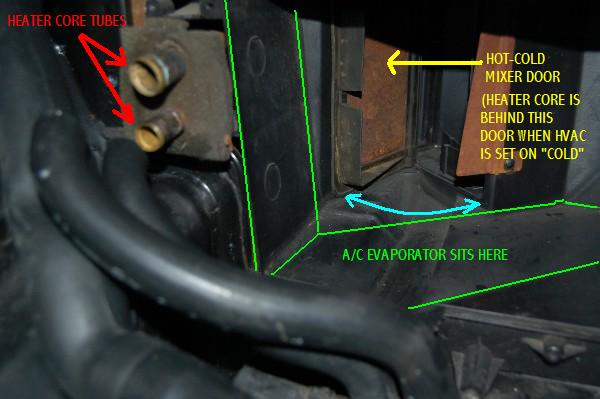
Where the evaporator core "lives":
------------------
[This message has been edited by randye (edited 09-08-2010).]


 No stores near me.