I have decided to start a new "thread format" for the forum. I encourage all of PFF's members to contribute their own suggestions and ideas, along with a how-to for "Repairs under 20 dollars." I think this will be a great way to showcase potential repairs/functional upgrades that keep our cars running smooth, if not better than they did.
Over the last several weeks I have been encountering shift issues on my Isuzu 5 speed with my V6.
Today, I decided to remedy the issue.
FieroSTS had a spare slave cylinder tucked away, and was kind enough to toss it my way.
I don't have any photos of the process, but I can provide a step by step.
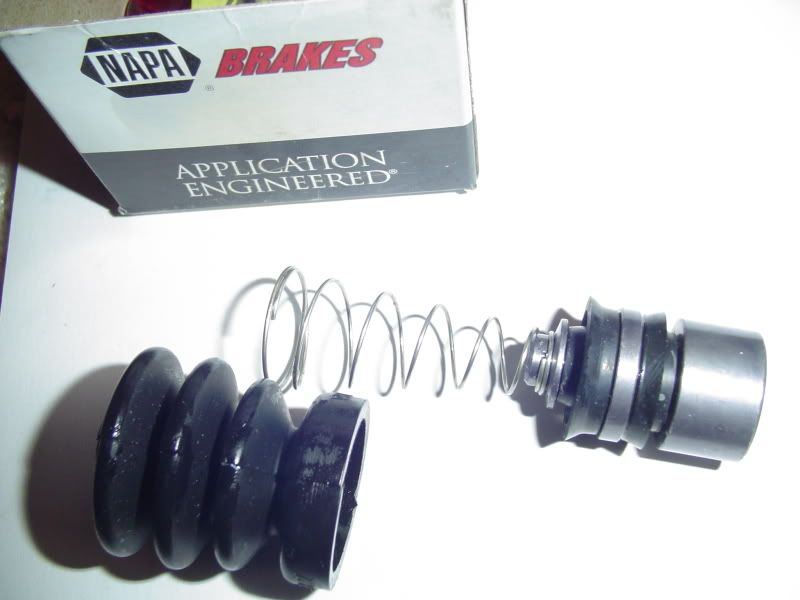
The 1985/86 Toyota MR2 features a slave cylinder with the same bore size as the steel Isuzu slave cylinder. The MR2 uses a dual seal piston, vs the single seal on the Fiero. The part number for the MR2 piston is CHK351359. The photo below shows the MR2 Piston, boot and spring. To complete this upgrade, you use just the MR2 piston, with the Fiero Isuzu spring.
Start by removing the slave cylinder from the car. This does involve opening the clutch system up, so bleeding the system is required.
If you have trouble breaking the clutch line or bleed screw loose, use a torch to heat the threaded sleeves that the fittings screw into. This will pop them loose fairly easy. Do not heat the line fitting or the bleed screw.
Once the slave is out of the car, carefully pull the boot off the slave cylinder along with the push rod. Use a pair of snap ring pliers to pull the retainer ring out. Set this to the side, as you will need it again.
If the Fiero piston does not push out on it's own, put the bleeder screw back in and snug it down, then, while aiming the slave cylinder down, or against a table, apply a small amount of air pressure to the feed port. This will push the piston out of the cylinder bore, along with the spring. BE CAREFUL, as air pressure will fire the piston like a cannonball. ALWAYS use caution.
Clean the cylinder up if you plan to repaint it, otherwise, continue on to the next step.
Check the bore using a flash light and verify that the bore is smooth. Any grooves or rough spots will result in a failed seal on the new piston. You can buy a cheap cylinder hone for brake/clutch cylinders for less than 10 bucks if you do need one. Most do not.
Apply a small amount of brake fluid to the outer seals on the MR2 piston. Put the Fiero spring back into the Isuzu slave cylinder, and gently insert the piston in on top. You want the "pocket" in the end of the piston to face out when you slide it into the bore. It will be firm to push in, but it will go in. Once it is in the bore, use a screwdriver to push it down, the spring should return it to the top position.
Reinstall the snap ring. Replace the boot and push rod, and reinstall in the car.
Get a friend to help you bleed the clutch. Enjoy a great feeling clutch and smooth shifting!
Total cost of repairs: 8.95 for the MR2 Piston kit 4.95 for brake fluid 5 bucks for beer for the helping friend.
Shifting smoothly, priceless.
[This message has been edited by Synthesis (edited 08-23-2009).]
Make sure the bore is smooth..if you have to hone,, make sure hone has fine stones(use drum brake, wheel cylinder hone) after cylinder hone,,use rough cloth like denim to finish hone..this removes some of the roughness and the piston will last longer.. A hone cuts the walls with grit on the stones .. even a bad polish/finish job will cause the piston seals to last longer just place denim cloth in drill and spin,, you will figure it out !! when use air pressure to blow a part out,, shoot part into a box with cloth placed in it.. If the piston has a groove or score in it..there is a flaw in the cylinder you may not see.. eyeball cylinder in sunlight,,direct sunlight into walls .. the 2 seal system is tighter and can save a slave that would not work with the stock single seal piston..it just fits tighter ..I love a tight slave !!
IP: Logged
05:43 PM
ltlfrari Member
Posts: 5356 From: Wake Forest,NC,USA Registered: Jan 2002
I just replaced my slave with one from rock auto and did this mr2 piston swap. Went from creek creek to dead smooth and nice and quiet. In fact I can now hear the foot pedal squeak that I need to fix!
While I was doing it I also got a speed bleeder kit and adapter and installed that in place of the stock bleeder so that I could bleed it by myself, worked great.
OK, so I probably bust the $20 fix limit but it was worth it, especially since my old slave cylinder is was pretty much toasted. ------------------ Dave
At first I didn't know what the problem was. Well, I'm still not absolutely sure. However, I do notice something interesting.
Here's the slave piston from the top of this thread...
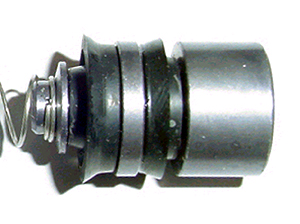
And here's the second piston...
Notice the outer (right hand) seal? It's pointed in different directions on these two pistons. I checked my yet to be installed Beck/Arnley slave kit and my piston is the same as the second piston pictured above.
So, I wonder if one style is superior to the other?
[This message has been edited by Patrick (edited 11-21-2009).]
IP: Logged
02:47 PM
TopNotch Member
Posts: 3537 From: Lawrenceville, GA USA Registered: Feb 2009
Well, if the purpose of the 2nd seal is to keep air out, maybe the 2nd design is better. But, on the other hand, mine was like the first design, and was from a Toyota parts supplier, so maybe the 2nd one was just put together backwards.
IP: Logged
03:03 PM
Patrick Member
Posts: 39414 From: Vancouver, British Columbia, Canada Registered: Apr 99
Well, if the purpose of the 2nd seal is to keep air out, maybe the 2nd design is better. But, on the other hand, mine was like the first design, and was from a Toyota parts supplier, so maybe the 2nd one was just put together backwards.
Perhaps it's the "Toyota parts supplier" piston that was "put together backwards".
The problem that so many of us have had, is that air is drawn into the system as opposed to fluid leaking out. Because of that, I prefer the second design pictured above. It's also the one that I have (yet to be installed), so I'm sitting pretty.
[This message has been edited by Patrick (edited 11-21-2009).]
Well I liked the idea of having a double hydraulic seal, not a hydraulic seal one way and an air seal the other way. I flipped it around to match the "factory toyota" one and installed it. Works but not very well. I'll attribute this to a pretty trashed cylinder wall though. The clutch only disengages at the very very end of the pedal stroke. It's bled pretty well too. I'll try it again with a new slave cylinder and let ya know what happens.
IP: Logged
06:32 PM
Patrick Member
Posts: 39414 From: Vancouver, British Columbia, Canada Registered: Apr 99
Well I liked the idea of having a double hydraulic seal, not a hydraulic seal one way and an air seal the other way.
Why? Air in the hydraulics has always been the curse of the Fiero clutch system. Anything that stops air from being drawn into the hydraulic system is good in my books.
[This message has been edited by Patrick (edited 11-21-2009).]
Those are dual cup seals. Cup seals seal well in one direction, not so much in the other. Cup seals pointing the same way is pretty pointless. Having them point in opposite directions seals well in both directions.
I have the MR2 piston in my Isuzu slave; it has completely cured the problem of air getting into the slave.
To bleed the clutch, I simply park the car with the left side up (bleeder at the highest point). Then, I vacuum bleed with engine vacuum, using a catch can.
Well I guess I cannot answer that without more information. So these things are just cursed with air problems eh? I need to know WHY that is before I can answer why I would like an air seal more than an extra hydraulic seal in my hydraulic clutch. What makes this car more prone to air than other hydraulic setups? Also having a poor inner sealing surface (even after a slight hone and polish) would lead me to believe that the failure mechanism was fluid leaking past the seal, not air being introduced to the system. There was significant fluid loss at the slave and my thinking was that this double seal would help prevent the pressure loss if they worked in tandem by sharing the load if the first one leaked or by alternating the load if one passed an area it could not seal on. For air to enter the system there would need to be more pressure outside the system than inside as fluid flows from high pressure to low pressure correct? At what point does this occur in a normally operating hydraulic circuit? The only reason I could see this seal being installed this way was that it was acting as a wiper seal to keep debris away from the main seal and sealing wall. If this is the case, why didn't they use a wiper seal instead of one designed exactly like the hydraulic seal? All wiper seals I have dealt with in the past were for rods and not for bores but I would expect similar design characteristics. I dunno, maybe my books were just written by a different author.
IP: Logged
11:36 PM
PFF
System Bot
Nov 22nd, 2009
Patrick Member
Posts: 39414 From: Vancouver, British Columbia, Canada Registered: Apr 99
For air to enter the system there would need to be more pressure outside the system than inside as fluid flows from high pressure to low pressure correct? At what point does this occur in a normally operating hydraulic circuit?
Probably every time the clutch pedal is released.
There's more than ten years worth of posts here addressing this issue of air in the Fiero clutch hydraulic system. The search function for this forum works great.
To get you started, have a look at This thread I was involved with going way back to April 1999.
IP: Logged
12:36 AM
katatak Member
Posts: 7136 From: Omaha, NE USA Registered: Apr 2008
I have installed a few of the MR2 kits. Everyone I have seen has the seals going the same direction. Most "air" issues come from the slave bore being worn and pitted/rusted which in turn takes out the seal. The MR2 kit works good but works even better with a new slave. Better yet is to buy RD's new slave. The first 4 spd slave I rebuilt, I used the old slave and tried to clean up the bore. It worked but not great. Every one I have done since, I have used a new slave and have had zero problems. Now that RD has his new ones available, I will just buy his. The 2 seal piston not only spreads the sealing work out over the 2 seals, it also helps to keep the piston centered in the bore. Single seal pistons will "rock" in the bore creating hi and low pressure points on the seal. Any pits or corrsoin and in comes the air - usually on the disengage stroke. As the seal passes over the pitt, it traps air in the pitt. As the clutch is engaged (clutch pedal up), it pulls the air out of the pit into the slave. Multiply the pitts by a hundred and it does not take long to get an air bubble or two. How many threads have you read where the guy bleeds and bleeds and lbeeds his clutch. It works great but slowly get's worse to the point the car will creep with the clutch dsinegaged? He can't understand why - he is not leaking fluid anywhere? Best way I have found to bleed the clutch is to push the slave rod all the way into the slave and hold it there - use a block of wood a wedge. Bleed your master - do not "pump" the clutch pedal multiple times before cracking open the bleeder. Push to floor and hold, crack the bleeder. Repeat till no more air bubble's. Make sure the master is full and slowly let the slave rod extend - the internal spring will push the piston out and slowly will pull the fluid from the master into the slave. No need to "tilt" the car, put it up on ramps, stand on your head, etc. Do not let the master run dry while doing this. A speedbleeder is a great addition. I have done this many times on many Fieros. Works perfect everytime.
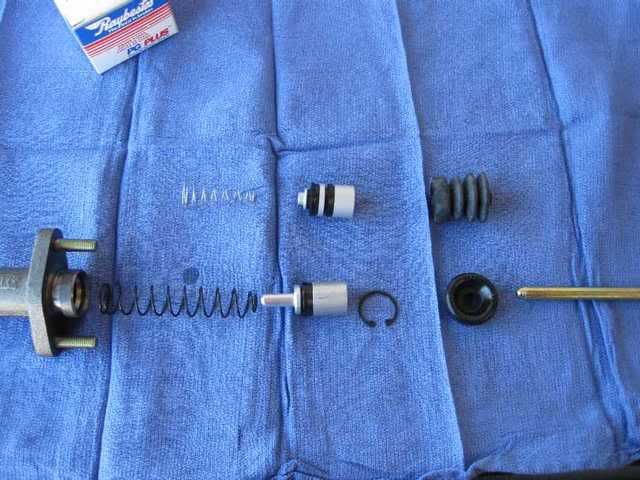
Here's the Raybestos MR2 Kit:
Pat
[This message has been edited by katatak (edited 11-22-2009).]
As quoted from the 1987 GM Pontiac Service Manual in regards to hydraulic clutch operation: "On the return stroke, the plunger moves back as a result of the return pressure of the clutch." Were you suggesting that somehow there is vacuum pulling the slave piston back to resting position? I will ask again, at what point is the pressure in a normally operating hydraulic clutch circuit lower than atmospheric pressure?
If we are using probabilities in our science then I would care to guess that the reason the Fiero is cursed with air problems is probably because the majority of them are owned by incompetent mechanics who think the car is neat and enjoy f*cking with it.
I'm sure the search function works great, that happens to be how I found this original topic. But believe it or not I have better things to do than read through ten years worth of posts and people's frustrations on the simplest of problems. What I was looking for was a thoughtful response like katatak's (thank you) which:
a) explains my thoughts on how a F'ed up cylinder wall is the actual culprit b) confirms that what I had was not like other peoples seals WHO HAVE THEM INSTALLED AND WORKING NICELY and c) tops it off by adding tips and tricks to make the bleeding easier
IP: Logged
02:57 AM
Patrick Member
Posts: 39414 From: Vancouver, British Columbia, Canada Registered: Apr 99
If we are using probabilities in our science then I would care to guess that the reason the Fiero is cursed with air problems is probably because the majority of them are owned by incompetent mechanics who think the car is neat and enjoy f*cking with it.
Originally posted by Cheeze_87: I will ask again, at what point is the pressure in a normally operating hydraulic clutch circuit lower than atmospheric pressure?
You can easily have a 10" height difference between the master and slave.
On my planet, brake fluid has a mass, which would cause a vacuum of 10" of brake fluid relative to the atmosphere in the slave, if the car was pointed downhill.
Edit: In case your competent self didn't know, at rest, the master cylinder is vented to the atmosphere.
[This message has been edited by pmbrunelle (edited 11-22-2009).]
IP: Logged
05:00 PM
Mar 11th, 2010
Fieroseverywhere Member
Posts: 4242 From: Gresham, Oregon USA Registered: Mar 2006
You can easily have a 10" height difference between the master and slave.
On my planet, brake fluid has a mass, which would cause a vacuum of 10" of brake fluid relative to the atmosphere in the slave, if the car was pointed downhill.
Edit: In case your competent self didn't know, at rest, the master cylinder is vented to the atmosphere.
A second part of the equation that nobody mentioned is from the factory the fieros come with a return spring on the clutch pedal itself. As per a serrvice buliton in 86 this spring should be removed to help avoid creating the vaccume that sucks air into the slave past the seal. So, its not just the mass of the brake fluid that effects this. The pedal return spring can create a return rate faster then the seal can handle and cause it to suck air. And that truely sucks!
I'm trying out this MR2 piston tonight. I'll post my "real world" results later. I have both OEM and new aftermarket slaves to play with but of course the OEM is preffered.
Once I installed the MR2 piston (well actually, I requested one for a 95 Camry at the parts store, so it wouldn't be like I was going to the dark side), I was even able to vacuum bleed the slave, with no bubbles entering. That was using engine manifold vacuum at idle.
IP: Logged
03:34 PM
Fieroseverywhere Member
Posts: 4242 From: Gresham, Oregon USA Registered: Mar 2006
Once I installed the MR2 piston (well actually, I requested one for a 95 Camry at the parts store, so it wouldn't be like I was going to the dark side), I was even able to vacuum bleed the slave, with no bubbles entering. That was using engine manifold vacuum at idle.
95 camry? Same bore size? Still double seal? Its still a toyota so still the darkside. I only found one MR2 piston in stock locally (autozone part #22426). Everywhere else lists them as being obsolete (even Napa which has 42 at their local warehouse ). My vacuum pump just broke so I may use your engine vacuum trick also.
The Camry piston is identical double seals and all, but the slave casting is different. Not that it matters, since I was cannibalizing it for the piston.
I couldn't get a piston by itself, so I just got the whole slave.
IP: Logged
04:22 PM
Rodney Member
Posts: 4715 From: Caledonia, WI USA Registered: Feb 2000
Soon I will be offering new dual seal pistons kits for those who want to do this.
------------------ Rodney Dickman
Fiero Parts And Acc's Web Page: All new web page!:www.rodneydickman.com Rodney Dickman's Fiero accessories 7604 Treeview Drive Caledonia, WI 53108 Phone/Fax (262) 835-9575
IP: Logged
04:28 PM
PFF
System Bot
Fieroseverywhere Member
Posts: 4242 From: Gresham, Oregon USA Registered: Mar 2006
My best <$20 fixes are hydraulic. Whenever my hydraulics act up, I take out the master cyl, clean it out, hone the cylinder, clean it out, reassemble and bleed. You're out about two hrs and $5 (for brake fluid).
Also, whenever mine starts acting up electrically, I disconnect all the associated connectors, apply dielectric grease, and connect/disconnect each connector about a dozen times. Usually works.


 However, I do notice something interesting.


 ). My vacuum pump just broke so I may use your engine vacuum trick also.
