Ok, this is only like the 4th car that I have ever painted and my first experience with basecoat - clear coat and a HVLP gun. Anyway, I thought that I would share some of the things that I have learned so far. Feel free to offer comments & critique.
First off, I really do enjoy painting but time & time again, my luck seems to prove that the more effort I put into painting prep, the more things go wrong and the more work I have to re-do. That being said, I�ll try not to whine or complain any more. Painting is a lot of work and the pro�s really do earn their money.
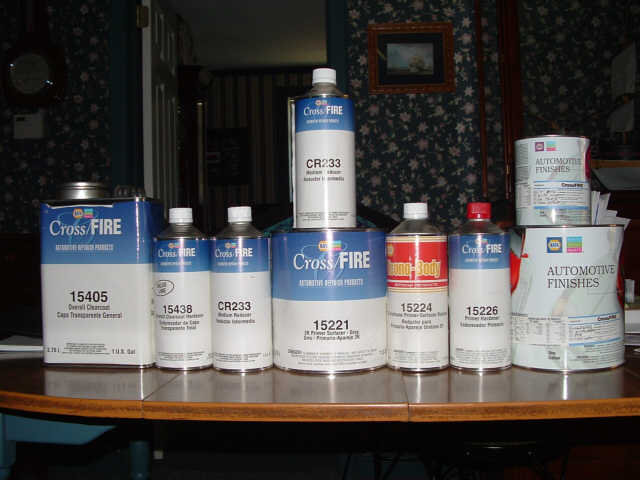
I used Martin Senour Cross-Fire auto paint. This is their �value line� of paints, custom mixed at my friendly neighborhood NAPA store. The color choice was 2002 Dodge Viper race yellow. Materials so far have totaled $360, soon to easily break $400.
Materials �
Primer: 1 gal 2k primer surfacer � 158221 1 qt primer surfacer reducer � 15224 1 qt primer hardener � 15226
Base coat � 3 qts Cross Fire Viper yellow 2 qts CR233 reducer
My paint gun is an Ingersol Rand model 270G, gravity feed HVLP
Here are a few gems of wisdom & other observations that I would like to pass on to you�
Equipment: 1.) Once again, my trusty old air compressor was easily up to the task. I found some desiccant air line filters to trap moisture so I bought a couple of them and hooked them in line up by the gun. They were a very good investment. I need at least three so you can change them out when they are full of moisture. 2.) I put an air tool hose-whip on the end of the paint gun. It worked out well & gave me a little bit more movement holding the hose away from the freshly painted surface. 3.) A gravity feed gun can dribble paint from the nozzle, even with the air line disconnected if you pull the trigger. Good to know and it makes sense. My old siphon feed guns didn�t do this. Note to self, don�t hold the gun over anything that you don�t intend to splatter paint on! 4.) Once you fill the paint cup, you can�t set the damn thing down so, prepare a hanger to hold it. It�s a little bit unnerving holding it between my knees while I pour paint into it. 5.) Once it is full of paint, don�t hang it from the hanger unless the air hose is attached. It�s top heavy (duh, close call on that one )
The primer is a two-part product with hardener. Once mixed, it has a pot life of four hours. Believe it! The left over will turn to jelly overnight in a sealed container.
Discovery # 6� The paint directions advised using 10 psi at the air cap. Since my paint gun has a built in regulator at the handle, I simply set the pressure to 10 psi and commenced painting. That was my first mistake. I had read about how HVLP guns can leave an orange peel finish and that is exactly what it did. My instinct told me that the paint needed more reducer or I should add more pressure at the gun but the instructions said�.
Oh well, so much for all my careful prep work. I spent the next entire day sanding out the primer filler until it was smooth again. (remember where I said that professionals really earn their money?) By the way, that two part primer with the hardener really cures over 24 hours. It was much harder to sand smooth as the day went on.
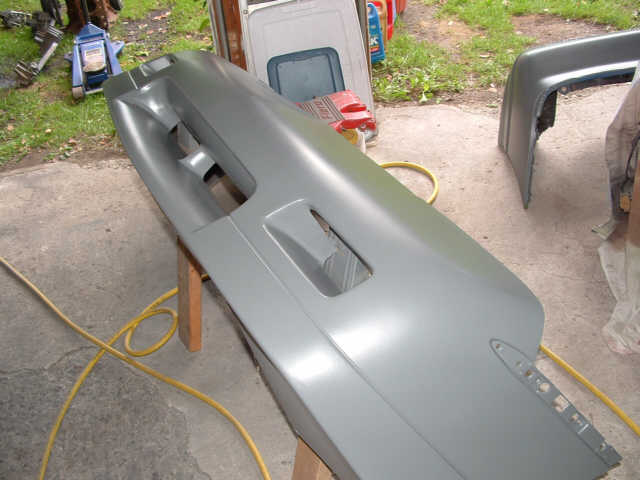
You can almost see the texture in the primer
I did a little bit of research on the internet & discovered that there are actually custom aircaps with pressure gages attached at the tip for setting the precise pressure for the gun. The line pressure isn�t necessarily the cap pressure. Big revelation! With this little gem in mind, I grabbed an old scrap door panel & headed back to the garage. I mixed another batch of primer, set the regulator at 25psi. and adjusted the air valve at the gun open all the way. Next, I adjusted the fan and the flow for desired pattern & adjusted the pressure regulator for good atomization. It made a whole world of difference.
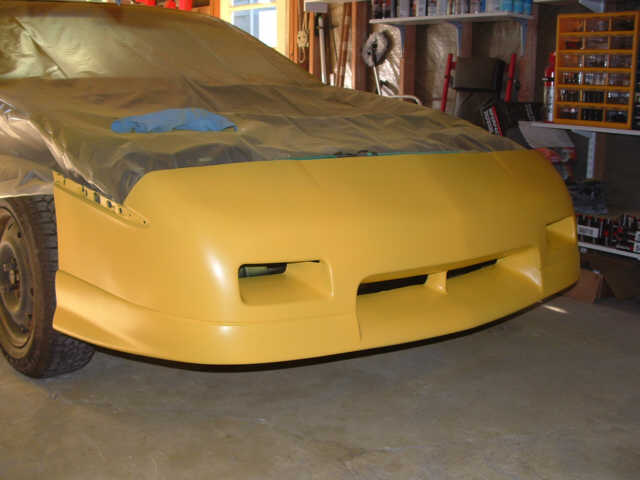
The color coat applies very well. I gave it one quick strike followed by 2 � 3 coats at 5 min intervals or when the paint begins to dull. That�s a difference with basecoat clearcoat that takes a little getting used to. The basecoat dries flat unlike single stage paints. I was really pleased with the base coat. It is very forgiving if applied in light coats. Does not tend to sag and settles into a nice smooth finish.
Discovery # 7 Yellow is a somewhat translucent base coat. It really takes three good coats in a cross pattern to build up an even consistent color base.
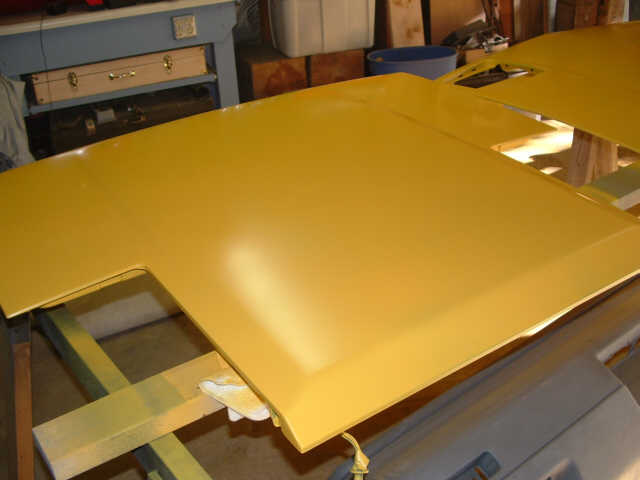
Discovery # 8 It takes a whole lot more paint to do a full body panel off paint job. Especially it you are using yellow and painting the underside of the hood & trunk. The guys at the store thought two quarts should be sufficient for a little Fiero but I picked up an extra quart and still ran out. So�. Tomorrow I will be back to the store for a couple more quarts. L
The clearcoat is also a two part coating & hardener. There is no reducer listed available in the specs. I sure hope that it performs as well as the basecoat. I also hope that one gallon will do. We will see and I�ll let you know.
Oh, just one last thing, A two car garage is much to small to stage all of the body panels for painting at the same time so don't even think about it. I made lots of hangers & suspended parts from the ceiling once they were tack dry.
All for now & happy painting, Gordo
[This message has been edited by Gordo (edited 09-05-2005).]
IP: Logged
08:25 PM
PFF
System Bot
Gordo Member
Posts: 2981 From: East Guilford, NY, USA Registered: Mar 2002
Make damn sure it's 100% clean! Kinda goes without saying... but....
Do a test sheet somewhere, on something that's standing up against a wall. Now stand back, and wait about 15-20 minutes. See if you applied it too heavily, and it's now starting to sag.... go ahead... ASK ME how I know.....
Big thing I found was resisting the urge to pull the fluid tip out too far when setting up. I was laying FAR too much product on in one pass. I'm using a true HVLP turbine setup now (wow it make nice work!), and I'm turning the knob out about 1/2 a turn from seated I think! Nothing like where you'd set a conventional.....
Good luck with it all - and make sure you have someone take some 'during' shots! Also make sure they're wearing an approved mask as well - the isocyanate's in any catalyzed paint are killers (literally).
IP: Logged
09:29 PM
Gordo Member
Posts: 2981 From: East Guilford, NY, USA Registered: Mar 2002
Make damn sure it's 100% clean! Kinda goes without saying... but....
Do a test sheet somewhere, on something that's standing up against a wall. Now stand back, and wait about 15-20 minutes. See if you applied it too heavily, and it's now starting to sag.... go ahead... ASK ME how I know.....
Big thing I found was resisting the urge to pull the fluid tip out too far when setting up. I was laying FAR too much product on in one pass. I'm using a true HVLP turbine setup now (wow it make nice work!), and I'm turning the knob out about 1/2 a turn from seated I think! Nothing like where you'd set a conventional.....
Good luck with it all - and make sure you have someone take some 'during' shots! Also make sure they're wearing an approved mask as well - the isocyanate's in any catalyzed paint are killers (literally).
Thanks for the tips. I use a Binks respirator (when I think of it) I helps to keep my head clear. I'll tell ya one thing, you won't get a good buzz off this stuff.
IP: Logged
09:36 PM
DrFunk234 Member
Posts: 467 From: Oxford, NY, USA Registered: May 2005
well its looking superb. whats the needle size your using for color and clear? 1.6-1.8? somewheres in that range should take car of the right size needle, have you sanded the paint to get al the orange peel out before you apply the clear? also once the clear is on you can still sand the clear to get rid of orange peel in the clear. will make your p/j look like a smoooth finish and not all wavyish in the light. 1500-2000 grit sandpaper would do the trick for that, but if you do decide to sand after you apply the clear you will need to buff. or were you planning on that? hmmm trying to think of more tips for yah, apply the clear like 3 times if you want it nice and shinny and so you dont sand through with your sand paper, not that you would with 2000 grit. make sure you have all edges sanded very well before paint or clear, chipping of the paint occurs usaully on the edges first, also make sure you prep sol real well to remove any dust/dirt particles.....i belive you are right shoulod be 10-12psi coming out of the air cap and like 35-45psi at the regulator, if the clear looks like it is coming out dry, then lower your pressure. if i think of anything else, ill tell yah.
IP: Logged
10:04 PM
DrFunk234 Member
Posts: 467 From: Oxford, NY, USA Registered: May 2005
oh and i was reading a lil bit of the above, but when your sprying dont bend the gun so its beyond parrell with the panel, because that lil hole on the top of the cup will let paint drizzle out and make sure that hole has nothing blocking its passage, thats where the air for the paint to "breath" come out, if its blocked, the cap to the cup will pop off and blow paint all over in your face well maybe it wont blow off, but it will build pressure. which isnt good.6-8inches from panel for spraying, always test the spray before you hit the panel, maybe on a peice of wood or something. filter the paint/clear coat/ primer before you toss it into the cup for spraying it. and usaully a well ventalaited area helps the paint job look better, but those can cost alot, last time i had a friend put primer on in his garage it seemed to blow up all the dust ooff the floor and onto the car....bad thing, lots more sanding...grrrr
Well good luck my friend from the other side of the hill
[This message has been edited by DrFunk234 (edited 09-05-2005).]
IP: Logged
10:08 PM
DPC Member
Posts: 88 From: Hot Springs, AR USA Registered: Aug 2002
Very nice work, Gordo! Thanks for sharing your experience with this. I am getting ready to give it a try too, with the same gun and everything. I think your discoveries will prove to be helpful. Thanks again and very nice work! David
IP: Logged
10:18 PM
Gordo Member
Posts: 2981 From: East Guilford, NY, USA Registered: Mar 2002
Yeah, that was my big problem, cranking up the line pressure. It felt a lot more like my old gun. As far as sanding, all of the primer was sanded back smooth again before the color coat was applied. I figure that it's a whole lot easier to sand the prmer with 320 than the clear coat with 1500.
I had two bugs and a couple specs of dirt. Other than that it's really smooth. I would like to give it one more coat to even out the color.
[This message has been edited by Gordo (edited 09-05-2005).]
IP: Logged
10:23 PM
Gordo Member
Posts: 2981 From: East Guilford, NY, USA Registered: Mar 2002
Very nice work, Gordo! Thanks for sharing your experience with this. I am getting ready to give it a try too, with the same gun and everything. I think your discoveries will prove to be helpful. Thanks again and very nice work! David
Are you changing the color, painting with the panels off?
IP: Logged
10:24 PM
DrFunk234 Member
Posts: 467 From: Oxford, NY, USA Registered: May 2005
Yeah, that was my big problem, cranking up the line pressure. It felt a lot more like my old gun. As far as sanding, all of the primer was sanded back smooth again before the color coat was applied. I figure that it's a whole lot easier to sand the prmer with 320 than the clear coat with 1500.
I had two bugs and a couple specs of dirt. Other than that it's really smooth. I would like to give it one more coat to even out the color.
good idea.
IP: Logged
10:36 PM
PFF
System Bot
DPC Member
Posts: 88 From: Hot Springs, AR USA Registered: Aug 2002
Yeah, it's red at the moment, but I am planning on painting it white after some bodywork and primer. I am planning on taking the body panels off as well, but I am a little nervous about that since I have never done it before. I appreciate your post. Thanks! David
IP: Logged
11:30 PM
Sep 6th, 2005
watts Member
Posts: 3256 From: Coaldale, AB, Canada Registered: Aug 2001
I was watching a buddy paint a car last night (he's a licensed guy)... he kept a tak cloth in his pocket, and as he was going around laying on the clear, he used the cloth to wipe off any bits of dust that had settled on the base coat (obviously BEFORE he shot that area with the clear!).
He recommended a couple other things: Start shooting at the bottom, and go up. IF something is going to go wrong, it'll probably be at the beginning. If it's down low, you won't see it as much as the top of the roof or something!
Always keep a wet edge. Mostly important on the hood and roof. eg: Start from the passenger door edge, shoot into the middle, go around the other side, start at the middle, and come towards yourself.
I'm sure you know most of this, but maybe some of the other readers wont.
Looks like you really know what you're doing! I guess its a little too late to suggest using paper instead of plastic. Plastic has a tendancy to hold static, which can make a mess if you're not careful. Either way, that color is looking awesome!
IP: Logged
12:43 AM
FieroMaster88 Member
Posts: 7680 From: Mattawan, MI Registered: Nov 2000
ABSOLUTELY BEAUTIFUL DAD! I can't wait to come home in a few weeks to see it in person! I'll try real hard to pay you back that $200.00 so you can put some tires on that beast!
P.S. Can I drive it pleeeaaaaaase?
IP: Logged
01:27 AM
rogergarrison Member
Posts: 49601 From: A Western Caribbean Island/ Columbus, Ohio Registered: Apr 99
I never use 2 part primer myself, but thats my choice.
As you found out, yellows are very transparent, ALWAYs spray them with a couple of coats of white first. This is even written down in Corvette tech service bulletin, and that bulletin is included with any body parts you buy, or stated in the directions for the paint mixer.
Yes, panel offs take lots more paint because of the loss off the edges. I have done a few motorcycle frames and they take as much paint as a van.
IF your experienced with HVLP, you can paint a Fiero with 1 quart. I paint Cadillacs with 2 quarts.
Orange peel in the basecoat color is no big deal, its getting the clear down without thats more important. If you do a metallic color, you cannot sand or even TOUCH the base untill the clear is down. If you get a mistake, you can wetsand that spot and respray that spot with base color.
Clear WILL RUN lot easier than the basecoat color.
Most Clears MUST be applied within a specified time, or you have to respray a coat of basecoat color. My brand must be clearcoated not later than the next day.
gordo, roger is right about the color of the underlying primer. i finished painting my fiero the same color as yours a couple months ago. i paint with dupont croma system base/ clear. with dupont there is a value shade on the paint can label for the correct color shade to use primer. #1 is white, #4 is medium gray and the last is a dark charcoal. the viper yellow requires a #1 white primer shade. this is mainly used for color matching when doing collision work. it's not a big deal that you used a gray primer i will just take a little more paint to cover over the gray primer and the end result color will be a little different than the factory color chip.
when painting yellow the most important thing to do is when painting seperate panels is to use exactly the same number of coats of paint for each panel, at least 3 or 4 if needed for uniform color. pay attention to the edges to make sure they have the same amount of coverage as the whole panel. otherwise you can get into trouble with the paint color matching between panels.
i myself prefer the 2 part urathane primer. the hardener in the primer helps prevent the primer from absorbing the reducer from the top coat. this helps prevent sand scratch swelling which shows up in the paint months later.
another thing, be very careful when using plastic as a masking surface. when going over with the top coat the air from the gun can blow the dry paint off the plastic and into the fresh surface.
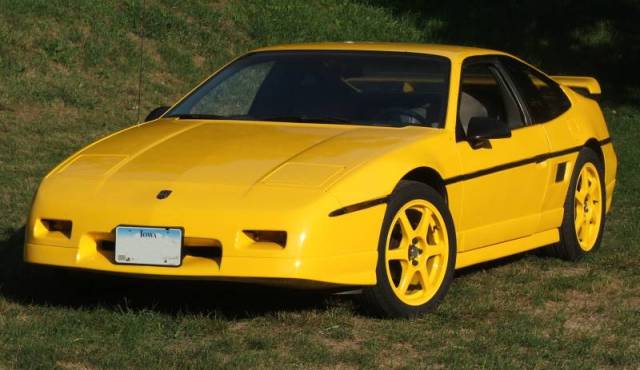
here is a pic of my viper yellow 88 gt. it took me 2 quarts of color with 3 coats for a panel off job.
IP: Logged
05:56 PM
Sep 8th, 2005
Gordo Member
Posts: 2981 From: East Guilford, NY, USA Registered: Mar 2002
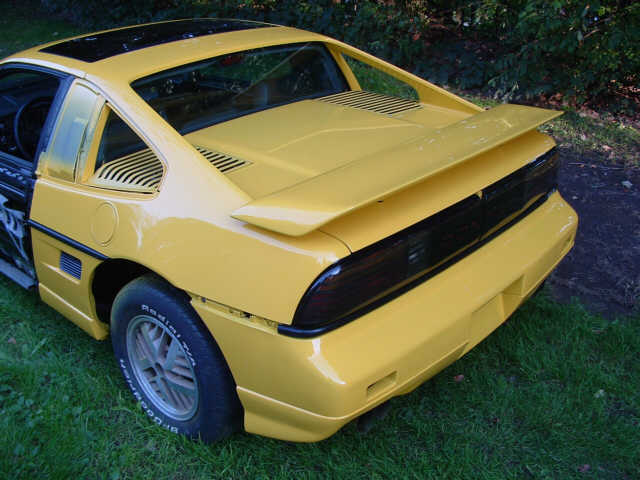
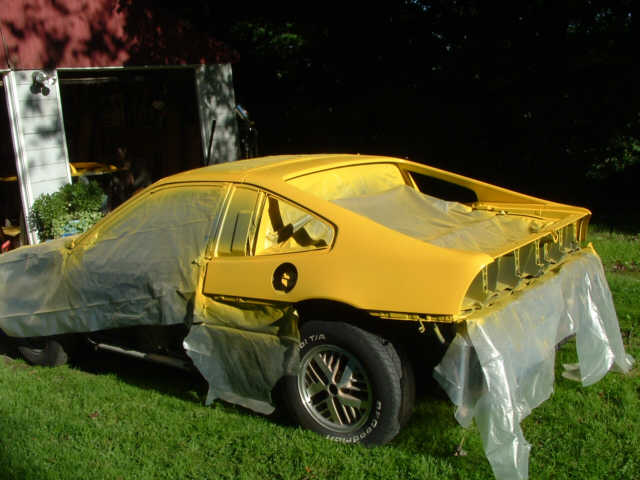
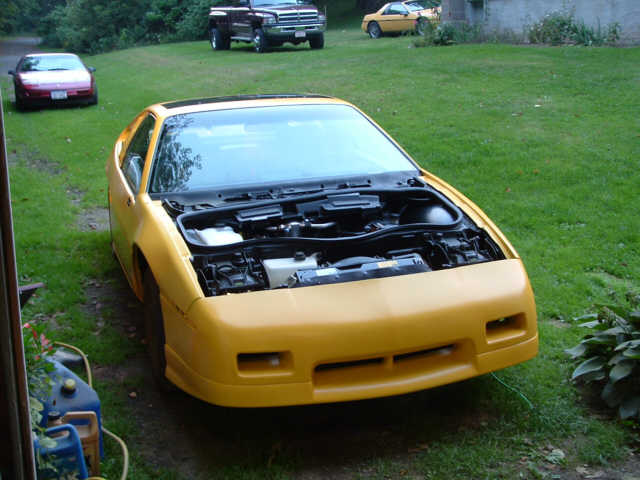
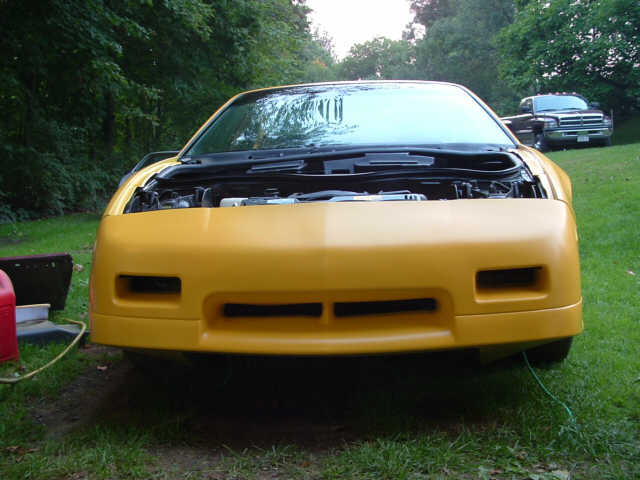
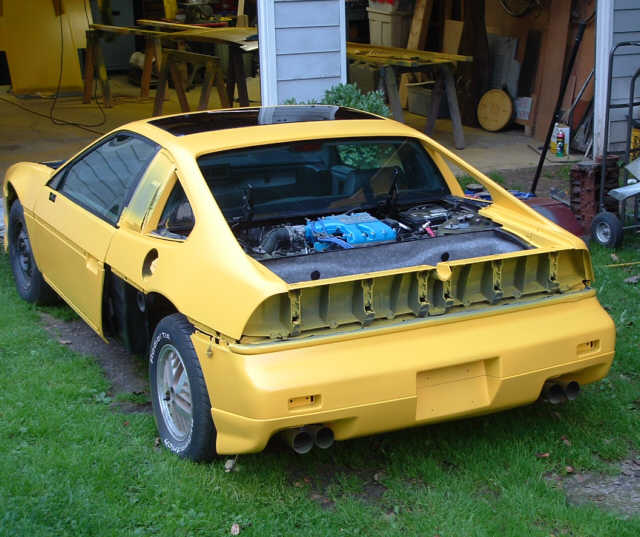
Finally got the rest of my paint today and so I finished the base coat. I basically had to re-shoot every panel to get it all the same shade. Took about four coats total. Next time I will shoot over a white base. (the Wife wants one in this color too ) Here you can see, I rolled it outside & test fit the panels to check for color match.
I am going to re mask for the clear coat.
IP: Logged
09:07 PM
DrFunk234 Member
Posts: 467 From: Oxford, NY, USA Registered: May 2005
........I am going to re mask for the clear coat......
You're spraying the clear after the color has set? It's looking great, but why didn't you spray the clear right away? With most paint formulas, you need to spray the clear within 24 hours of the color base or it won't adhere properly, and you cannot sand the base before you apply the clear. You might need to scuff the color base, spray another coat of color, then spray the clear for proper adhesion. If the color sets up too long, the clear won't stick properly and will begin to peel.
Good luck!
Mark
Just noticed that you are spraying clear one panel at a time. Check the paint and see if you might have an issue with the drying times. I don't spray anything Martin-Seynour so I'm not really familiar with the set-up times.
[This message has been edited by Firefox (edited 09-09-2005).]
IP: Logged
06:37 PM
Gordo Member
Posts: 2981 From: East Guilford, NY, USA Registered: Mar 2002
Martin Senour recommends clearcoat within 7 days or the base will need to be sanded & re-sprayed. The reason that I had to stop was I ran out of base & needed to get two more quarts mixed. The shop ran out of pigment & had to back order. I re-sprayed the entire car with base again before I clearcoated but it still has been only 4 days. Painting with the panels off is a pain but the bugs love it.
IP: Logged
06:56 PM
BigRed88 Member
Posts: 839 From: East Guilford, NY Registered: Apr 2003
......Martin Senour recommends clearcoat within 7 days or the base will need to be sanded & re-sprayed.........
Glad to hear that. I would have hated to hear that you need to respray the entire car again due to the drying time, but when I read that you hadn't sprayed the clear it worried me. Sorry if I caused any problems.
I do suggest using masking paper for the remask. You'll be better off with dust and overspray. Car looks good, though, and glad to see it's turning out.
You bringing it out to Fierorama in Chicago this weekend?
Mark
IP: Logged
08:56 PM
Fiero5 Member
Posts: 8882 From: Arecibo, PR Registered: Jun 2000
Originally posted by Gordo: Painting with the panels off is a pain but the bugs love it.
Wow! Very pretty! Yeah, painting outside is always an adventure huh? Paint a few panels... wet sand out bugs... touch up area and then paint some more...then wet sand out bugs..etc LOL Hey Firefox, you seem to have changed your tune a bit about people painting cars outside? Whats up with that? Seriously though, lookin' good Gordo, can't wait to see it all finished and shiny
Steve
IP: Logged
09:23 PM
Sep 10th, 2005
Firefox Member
Posts: 4307 From: New Berlin, Wisconsin Registered: Feb 2003
Hey Firefox, you seem to have changed your tune a bit about people painting cars outside? Whats up with that?
From what I can tell, he has a garage and the car and parts were sprayed inside it. No, I didn't change my tune at all, and I'll tell anyone that paints their car outside that they are taking a great chance in screwing up a paint job and that it isn't advisable. If Gordo did paint any parts outside, he was smart enough not to tell everyone that it's ' ok ' to do it.
IP: Logged
02:10 AM
PFF
System Bot
Gordo Member
Posts: 2981 From: East Guilford, NY, USA Registered: Mar 2002
As far as I'm concerned anybody can paint their car wherever they want to (don't recommend doing it in the kitchen tho.) Mine was painted in the garage with the overhead doors shut but you still can't get the place totally bug free. Painting outside would have a couple advantages that I can see. 1.) The light is better. Even though I have six fluorescent fixtures in the garage, you can't have enough light. 2.) There�s more room outside. 3.) Now I have to clean up my garage. There's yellow dust everywhere
Reasons that I painted in the garage, 1.) It�s a controlled environment. No wind (airborne debris) or rain, 2.) Don't like to paint in direct sunlight. The extra heat causes to paint to dry too fast. 3.) Reduced bug population. Actually, I'll bet any insects that I had in there have been fumigated by now.
Got to flip the hood & trunk lid and clearcoat the other side. I�ll post some pics when I start to get things back together.
IP: Logged
04:37 AM
Gordo Member
Posts: 2981 From: East Guilford, NY, USA Registered: Mar 2002
You bringing it out to Fierorama in Chicago this weekend?
Mark
Riiiiiiiiiiiight. I still don't have the brakes on it yet. Actually it may not be on the road until next spring. There's still a lot of details to attend to. I have never driven this car on the road. It was a $400 basket case & we brought it home on a roll back two years ago.
IP: Logged
05:08 AM
Sep 11th, 2005
Gordo Member
Posts: 2981 From: East Guilford, NY, USA Registered: Mar 2002
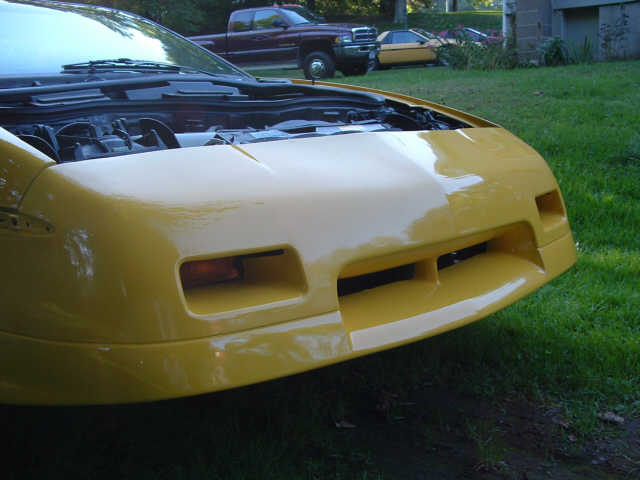
24 - 48 hours after clearcoating I have been color sanding & rubbing out imperfections. 1500 grit - wet sand. 3M Micro Finish & Meguiars Glaze.
I am all together pleased with the results. I'm pretty much down to just rubbing out the hood & doors. It's lots of fun to hang the panels back on and finally see what its going to look like.
I've got to get some wheels & tires for this thing!
Ih yeah, brakes would help too. Still haven't got them on yet.


 )
)


 well maybe it wont blow off, but it will build pressure. which isnt good.6-8inches from panel for spraying, always test the spray before you hit the panel, maybe on a peice of wood or something. filter the paint/clear coat/ primer before you toss it into the cup for spraying it. and usaully a well ventalaited area helps the paint job look better, but those can cost alot, last time i had a friend put primer on in his garage it seemed to blow up all the dust ooff the floor and onto the car....bad thing, lots more sanding...grrrr
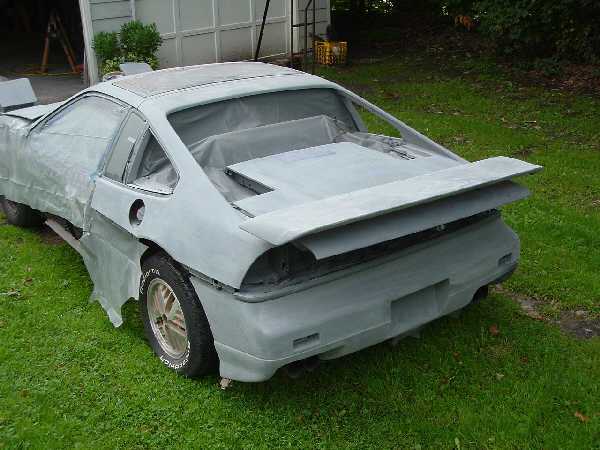


 ....j/k