Finally got about 6 hours to work on my ZR-2 kit today. Weather and working 6 days for 12-14 hours kept me away from it for too long.
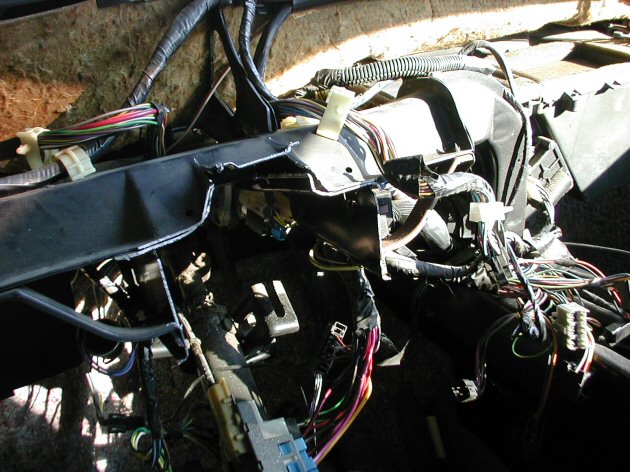
I had already removed all the interior except the door panels and dash, so today I started removing the dash. The job went pretty quick and I got a LOT more done than I expected.
Here are some pics of my progress.
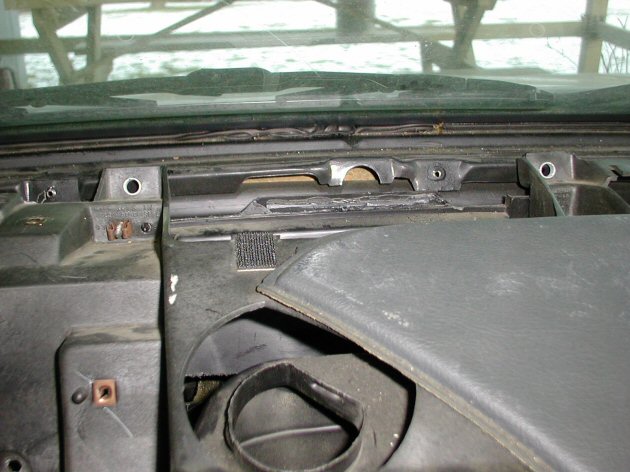
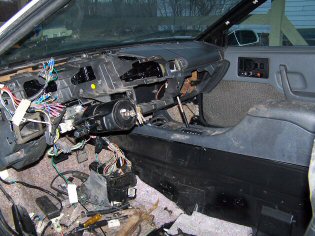
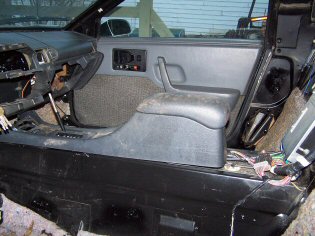
Dash snout cut off flush:
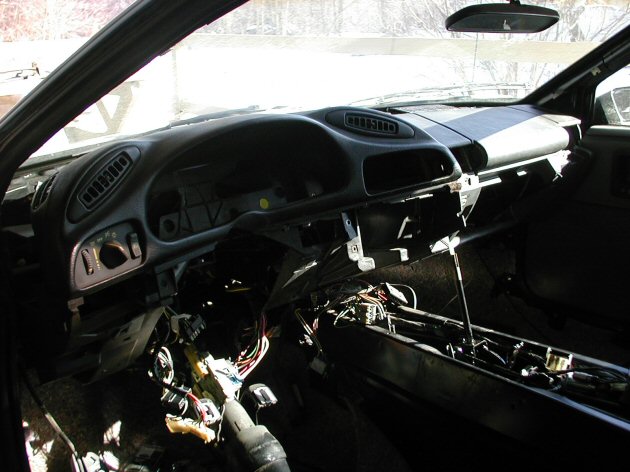
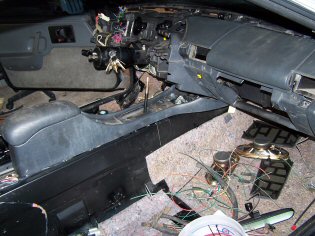
And new dash fitted :
So, not bad for one day I think. Hardest part has been the ductwork. I have used the original Fiero heaterbox and the vent ducting from the donor. Had to cut out a few spots in the ducts to fit, but I can just patch over them with fiberglass. Still need to make the adapter cone to hook the ducts to the Fiero heater box, but the vents come pretty close to where they should be.
I was surprised at how close the mounting tabs on the dash matched up to the Fiero mounting location. I'll have to make a bracket for the far left mount, and a spacer of about 5/16 thick for one other, but 2 of the tabs just need fastened right to the Fiero body.
Dash is from a 1994 Camaro, I got the complete dash with the heaterbox and all the switches, along with one door, complete (Other door had been hit) for a real steal from the wife's cousin who had bought the wrecked car just for the LT-1 in it.
It's great to be able to work with it again. Got a lot ot do before Fierorama!!
------------------
IP: Logged
08:39 PM
PFF
System Bot
Feb 4th, 2005
Rickady88GT Member
Posts: 10648 From: Central CA Registered: Dec 2002
That dash suits the car very well, it looks like it belongs in there. I wish you would have had this car back when I bought that coupe off of ya, I'd love to see it. Maybe I'll make it to one of the shows you plan on attending this year. Great job on the dash!
IP: Logged
08:23 AM
Feb 6th, 2005
Max The Chainsaw Member
Posts: 1140 From: Danville, IL Registered: Oct 2000
Thanks guys, I think it looks pretty good in there too.
Matchmade, I will probably only get to make it to Fierorama, I work every weekend, so I have a hard time making shows. But I took vacation for that week!! Gotta see the prototypes up close!
How is the lttle grey coupe doing? Hope is serves you as well as it has served me.
Have a great day,
Max
IP: Logged
06:16 AM
Feb 7th, 2005
pavo_roddy Member
Posts: 4351 From: State with a city named Gotham Registered: Apr 2004
Since I too am wanting to do this body conversion I'll be watching this thread or future threads with curiousity!! Great job so far...Like that your thinking outa tha box, cuz that dash does look good in there!!!
IP: Logged
01:11 AM
mrfixit58 Member
Posts: 3330 From: Seffner, Fl, USA Registered: Jul 99
Well, guess it's time for an update. Been using what little time I've had working on the ZR-2 getting the dash vent plumbing done. I was going to use flex hose on the vents, but since the vent assy is a structural part of the dash, I decided to cut the Camaro vent assy down to clear the Fiero body and then fiberglass the openings shut. It's almost done.
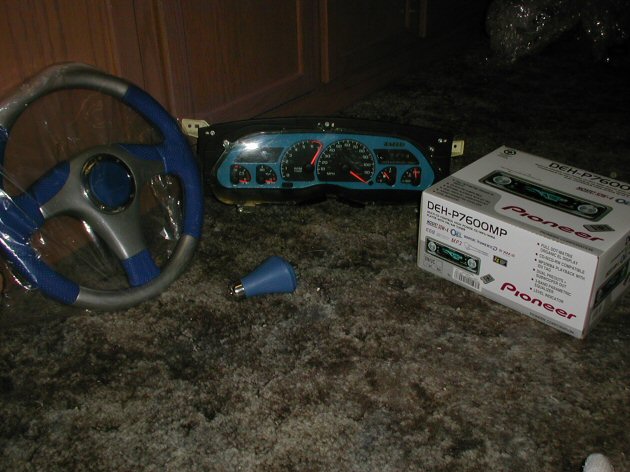
I have also been gathering parts for the swap, some parts pictured here:
Found 2 rotary switches on E-Bay for $15, got a few autodim mirrors, CS alternators, and a Bonnivile HUD at the salvage yard. (Wish they had a Fiero, I need some interior parts....) Not sure yet if i can fit the HUD under the Camaro dash, but I intend To give it a try!!!
Have a great day!
Max
IP: Logged
09:27 PM
jscott1 Member
Posts: 21676 From: Houston, TX , USA Registered: Dec 2001
It looks good. Depending on what year Bonneville HUD you have it is a tight squeeze. I have one on mine, but my dash sits out a few inches more than most.
Your car is going to be interesting when done, resembling a 'vette on the outside and Camaro on the inside. Now all you need is an LT1/LS1 to finish the package.
IP: Logged
10:13 PM
Mar 6th, 2005
Max The Chainsaw Member
Posts: 1140 From: Danville, IL Registered: Oct 2000
It looks good. Depending on what year Bonneville HUD you have it is a tight squeeze. I have one on mine, but my dash sits out a few inches more than most.
Your car is going to be interesting when done, resembling a 'vette on the outside and Camaro on the inside. Now all you need is an LT1/LS1 to finish the package.
Don't remember what year the Bonnie was, but it looks like it's gonna be a REAL tight fit to get it in there. Hmmmm, maybe if I put it in front of the passenger seat where the air bag used to be. The wife always likes to mention my speed anyway.........
I think I'll pass on the SBC..... If I ever do a swap, it's gonna be either a 3800SC or 4.9. Saw a 3800SC in the boneyard but some idiot had stripped all the guts out of the supercharger and left it all open to the rain. (Some guys should be taken out and shot for what the do to the cars in there.... )
Max
IP: Logged
01:08 AM
PFF
System Bot
Mar 17th, 2005
Max The Chainsaw Member
Posts: 1140 From: Danville, IL Registered: Oct 2000
Didn't get to work on my ZR today, had a small problem with my purple 85GT. Alternator went out. Well, when I removed it, found I had a broken Mounting bracket. Soooo it was off to the junkyard.
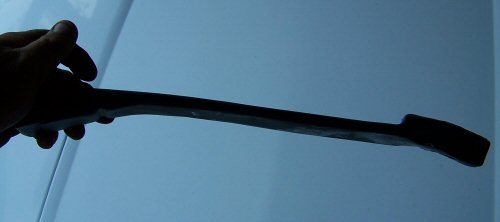
And wouldn't you know it, no Fiero's..... (Guess I musta stripped all of em already. ) So it was on to plan B....... Make something to work. Thought I'd post my fix here in case anyone else runs into this problem.
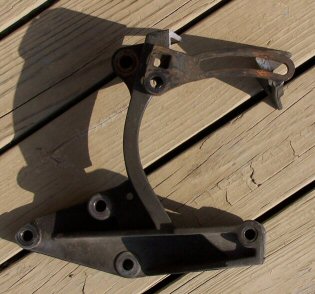
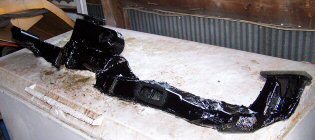
What I did find was this:
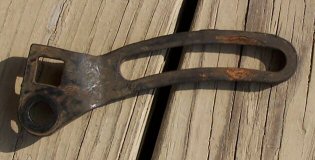
It's a power steering pump mount from a 94 Caprice, I also got one from a 92 El Camino. I would suspect a lot of Chevy vehicles from this time with a V8 would have one. I simply cut off the slide hole part from the Fiero Mount as shown in this picture:
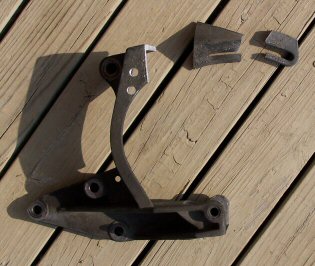
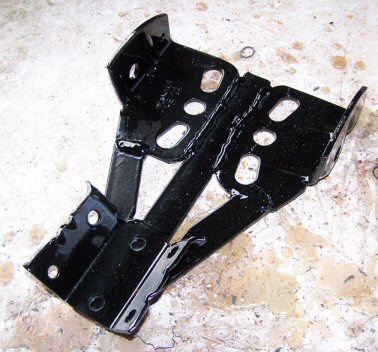
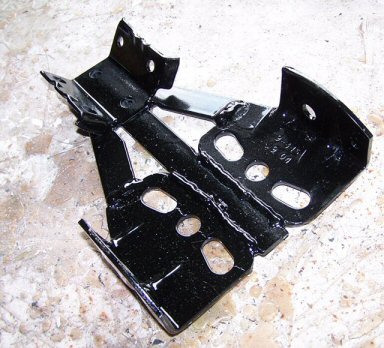
I then put the alternator in the bracket and marked the bracket for drilling holes where the slot lined up with the alternator bolt hole and drilled 2 holes in the Fiero bracket. The mounting lined up like this:
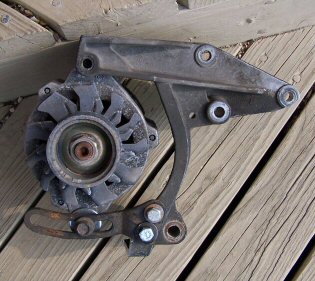
And here is a picture of it all together. Note the flat washer between the mount and the alternator, the mount leaves about 1/16 gap between the alternator and the slot, so this is to fill the gap:
Put it all back in the car and been driving it quite a bit today and it's working great. The belt is a good way away from the bolts and as a bonus, the adustment slot is about 1/2 longer than stock so it gives me more belt adjustment.
Also, if you look closely at the last picture, you'll notice I changed over to a CS130 alternator. What you may not have noticed is that the CS I used won't normally fit a Fiero. The mounting holes are about 3/8 closer together than a Fiero alternator. This alternator is from a late model GM (Can't remember what, sorry) that I've had for awhile and since I had to redo the mount, it worked out great as a way to use this alternator and not have to buy a new Fiero specific one. Hey, I'm cheap and darned proud of it.
I hope this might be able to help someone else who may be stuck with a broken bracket and none to be found. Have a great day!
Edited cause I can't spel.....
------------------
[This message has been edited by Max The Chainsaw (edited 03-17-2005).]
Just a few pics to show how it's going. Dash is bolted in place and I'm starting to fit the console. Console is out of a 98 Grand Am, the auto shift fits better than the Camaro one did. I also modified the shifter bracket and moved it rearward about 1 1/4 inches so the shifter would clear the dash some more. I also plan to shorten it about 1 1/2 inches so I can change CD's while in park.
And last but not least, a pic of the fugly vent duct I made. Can you believe I spent several days making this monstrosity? Thank God it's covered up and out of sight forever.... It WAS my first ever attempt working with fiberglass.....
Well, that's all for now. In a day or two I'll have some pics of my steer column bracket... They don't call me "Captain Overkill" for nothing!!!
Have a great day.
Max
Edit: I really should check my spelling before hitting "Post it"
[This message has been edited by Max The Chainsaw (edited 03-22-2005).]
IP: Logged
07:36 PM
Fiero5 Member
Posts: 8882 From: Arecibo, PR Registered: Jun 2000
It looks tall but if you think about it the Firebird one is just as tall. The Firebird one has more of a gradual slope to it unlike that one which drops off right after the armrest.
Thanks guys. I can hardly waitto get it done. I want to drive it again!!! LOL
The console looks a bit tall, but I think once a seat is in there it might look better. My concern was the space between it and the computer.... can anyone say CUPHOLDERS!!!
Thanks again and have a great day!
Max
IP: Logged
09:22 PM
Mar 31st, 2005
Max The Chainsaw Member
Posts: 1140 From: Danville, IL Registered: Oct 2000
Hey all, not much to see on the dash lately, most of the work has been underneath type work. I modified the Camaro lower dash support rail to attach to the Fiero frame and braced the dash in. It is now permenatly attached. Also been doing some of the wireing under the dash.
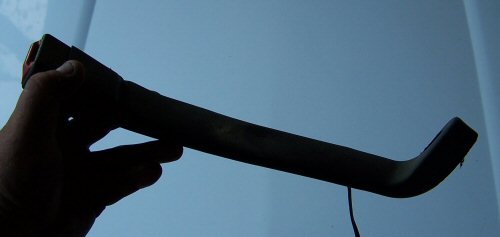
I promised to get you some pics of my steering column support, so here they are.
The end that bolts to the frame channel is made from a couple brackets from a late model Volvo semi tractor suspension air bag, the main rail and support rails are 3/16 X 1 inch steel. All is welded on both sides. It is a VERY substantial piece. I don't expect much give in this mount.
I guess I should of got a picture of it upside down, it kinda resembles a Klingon Battle Cruiser looking from that side.
You all have a great day!
Max
IP: Logged
01:28 AM
Apr 3rd, 2005
Max The Chainsaw Member
Posts: 1140 From: Danville, IL Registered: Oct 2000
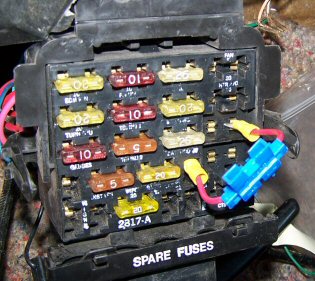
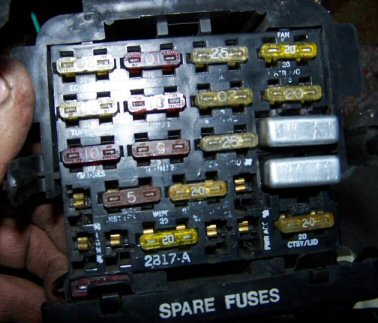
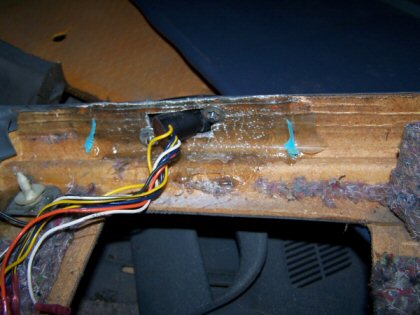
Only had about an hour today, so I thought I'd fix one of my pet peeves while the fuse block is out. The need to have key on for power windows.
You can just put a jumper fuse on the fuse block like this:
While this will work quite well, it looks like crap. If you don't care about looks, this will serve you well. However, if you're like the majority of those on Pennock's, we care about the finer details. So, let's do this right and make it look factory.
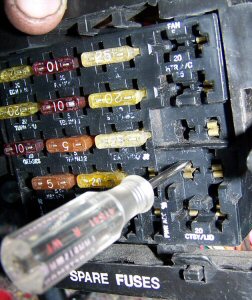
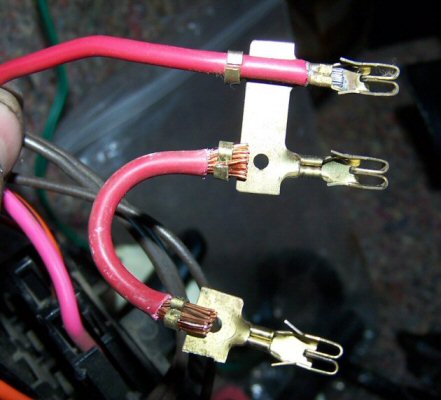
Swing the fuse block down by releasing the 2 latches. Now remove the 2 - 7mm screws in the hinge and all the fuses and circuit breakers from the vertical row that the window breaker is in. Now take a very small screwdriver or any small pointed tool and push it down the top and bottom sides of each of the fuse contacts in the left of the 2 rows. This will release the connectors to come out.
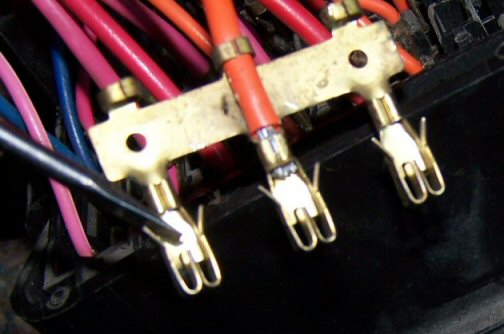
The connectors will look like this:
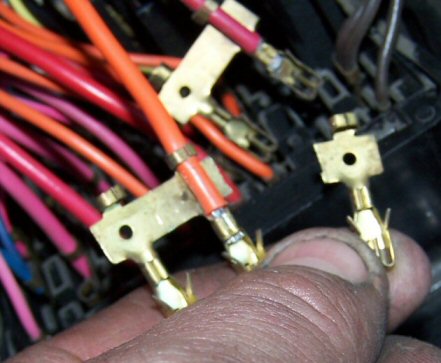
Take your screwdriver and bend the tangs back outward like in the previous picture so they will lock back in when you are done. Notice there is one block with 2 connectors and a red wire, this is the main battery feed to the fuse block row. The other block has 3 connectors and an orange wire, this is the ign feed for this row. The window feed is the one on the end of the 3 terminal block closest to the battery feed block.
Now the fun begins. Take a pair of snips and cut off the window terminal from the end of the 3 terminal block and cut a section out of the metal between it and the middle terminal so it can't touch the ign terminals again. (This would be bad....).
Now all you need to do is cut a piece of 12 guage wire about 2 inches long, crimp it to the open eyelet on the window terminal and the open terminal on the battery terminal block. I recommend soldering it in as well.
Now all you have to do is push the terminals back into the fuse block and reinstall the fuse and breakers, put the screws back in and enjoy your now "Always on" power windows.
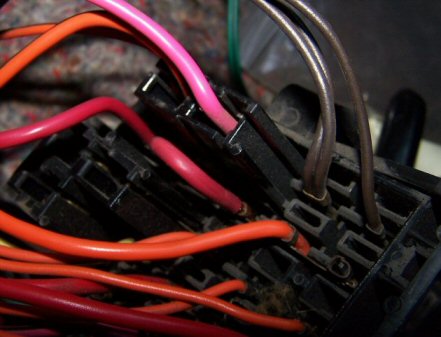
View of complete fuse block rear:
And from the front:
Have a great day!
Max
IP: Logged
05:25 PM
Apr 20th, 2005
Max The Chainsaw Member
Posts: 1140 From: Danville, IL Registered: Oct 2000
Finally finished the wireing of the cluster and HUD yesterday, hooked everything up today and ran the car. Everything works (Well, still don't know if speedo works, kinda hard to drive without steering wheel or seats..... )
Had 2 warning lights come on, ABS and Low oil level. I figured since the Fiero doesn't have either, I could pull the bulbs....
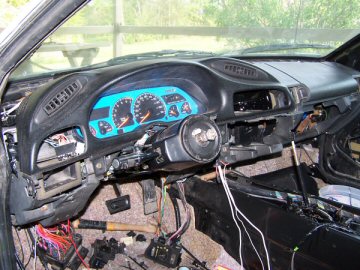
Here is pic with the cluster in, I like it!
Also got a piece of cardboard and traced the part of the Fiero dash that goes against the windshield on it. Then set it in place and kept marking and cutting with scissors till it fit against the Camaro dash. Covered he cardboard with tape and applied 1 layer of fiberglass.
Cut the excess off after it dried and am currently got 3 more layers drying on it. Then it's final cut, smooth, bondo to shape, and prime and paint. Then put in place with velcro. Hope it looks as good in there as it looks like it will.
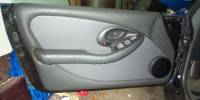
While I have been doing all this I have also been working on door panels (took the ones out of the ZR-2 for now) to go in my daughters 86GT.
Replaced the carpet with vinyl, made a Ford mirror switch too fit in the original manual switch bracket (See Ogre's cave, article by Monkeyman) and got a pair of power mirrors ready to paint for it.
Max
Edit cause I just can't type well on a laptop.....
[This message has been edited by Max The Chainsaw (edited 04-20-2005).]
IP: Logged
07:25 PM
Max The Chainsaw Member
Posts: 1140 From: Danville, IL Registered: Oct 2000
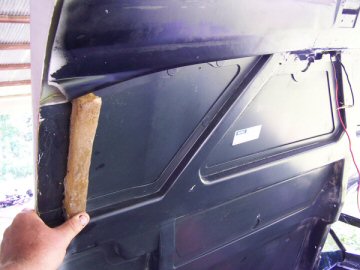
Oh, another tip for you all, ever had the left door panel break apart at the manual mirror opening?
This door panel was like that and here's what I did to fix it:
The area in back of the opening was completly broke out, only the vinyl still holding it together. I cut out all the fiber under the vinyl and more an inch or so past the bad area. I put a piece of heavy electric fence wire (Any solid 14 - 10 guage wire should work) in the slot I made. Then I filled the channel with fiberglass, put a piece of fiberglass mat over the whole area and clamped it between 2 flat pieces of metal. (I had sheet plastic between the fiberglass and the metal to keep them from bonding. ) When it had setup, I just removed the metal and plastic, then cut out the fiberglass mesh to match the original hole.
The piece is as solid as new (Maybe more...) and totally invisible from the outside.
Have a great day
Max
IP: Logged
07:37 PM
Jun 21st, 2005
Max The Chainsaw Member
Posts: 1140 From: Danville, IL Registered: Oct 2000
Wow, has it really been 2 months since I've added to this thread? I'm getting too lazy!! :)
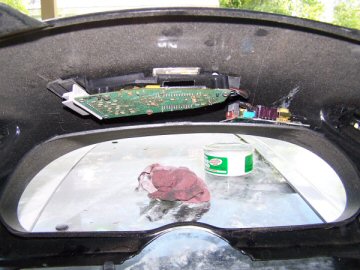
Way past time for an update. I left you off not sure how to put a HUD in the Camaro dash, well I found a way:
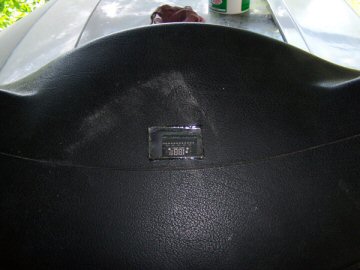
I had to remove the circuits from the HUD unit box, so I lost the magnification mirrors. Makes the image smaller on the glass, but that's OK with me. What I did was to fasten the projector board to the bottom of the panel by cementing a couple plastic brackets to the panel. The other board is fastened in with velcro. I made a small window in the top of the dash from the window of the original HUD box:
The unit works in all modes, still no steering wheel so I can't say yet if speedo works, but the HUD does dispaly "0 MPH"
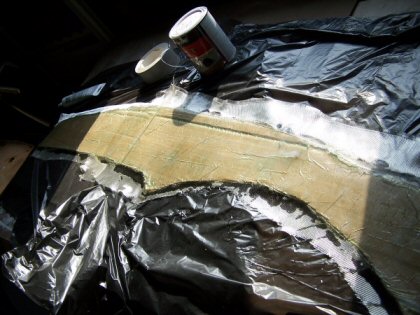
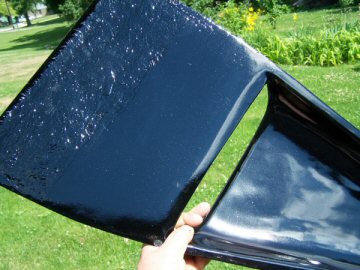
The side scoops were unfinished fiberglass on the inside and visible from the rear of the car over the decklid grilles. I added 2 layers of fiberglass (Had a couple small cracks....) and smoothed with bondo and painted. Looks better now :
The front end didn't need done as it's covered by the car body.
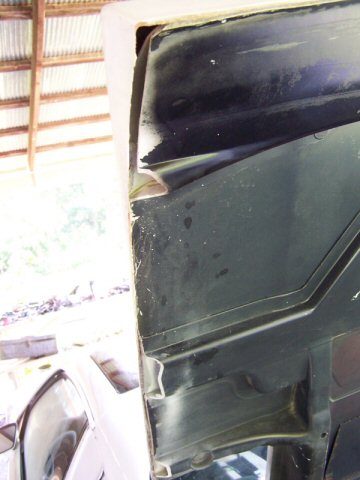
There were some things done by the kit installer I didn't care for. The decklid bonds to part of the original decklid and they didn't finish the ends.
The joint was filled with silicone. I have been removing the silicone and refilling with fiberglass. Also, they didn't make anything to cover the sides of the trunk seal, both sides are open to the weather. I have been working on fillers to glass into the area to seal up the trunk.
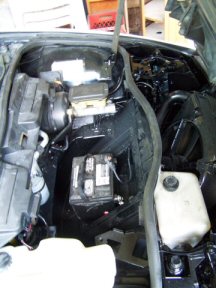
Some other things I have done can be seen in theis pic:
Installed a Norm's Fiberglass battery tray (Original rusted away, also opened the panel where old battery was so air from right side scoop can blow into engine compartment) I ran the cable thru a 5 foot piece of schedule 40 plastic conduit that is fastened under the body beside the fuel tank. Hopefully that should protect it somewhat. Also conevrted to Gen 2 headlights. And the washer tank and recovery tank had broken mounting ears. I made up new ears with fiberglass to repair them.
There is more, but I'm keeping some of it for later.
Have a great day,
Max
IP: Logged
01:18 AM
blakeinspace Member
Posts: 5923 From: Fort Worth, Texas Registered: Dec 2001
I liked your step by step on the always on power windows... I did mine, but I just used wire cutters and wire nuts... no where near as thorough as you.
I did not even know to do whay you did. Also, your ductwork made me giggle. Brought back some memories of me and glass... except I kinda left out the 'well ventilated area' part of the instructions
+ at ya.
IP: Logged
01:43 AM
Max The Chainsaw Member
Posts: 1140 From: Danville, IL Registered: Oct 2000
If ya wanna real giggle about the ductwork. look very close in the center of the duct. You'll see an area thats round and about 10 inches long. It's a Pringles can that's been glassed over on the inside and outside!!!
Max
IP: Logged
01:54 AM
PFF
System Bot
pavo_roddy Member
Posts: 4351 From: State with a city named Gotham Registered: Apr 2004
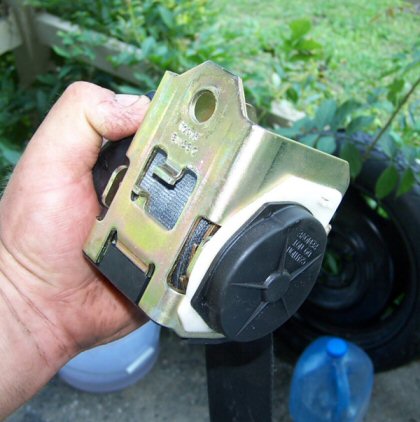
Update time. I have been looking for an alternative seatbelt for this car for some time. The Fiero grey is too light for the interior I'm making. After trying belts from a 94 Camaro, and a 94 Caviler, I finally found these will fit.:
Belts out of a 94 Grand Prix SE. They will need some work. On the back, you see 2 alignment pins. I cut off 1 pin and drilled a hole in the body where the 2ed alignment pin goes.
Then the belts will bolt in using the original Fiero mounting hardware.
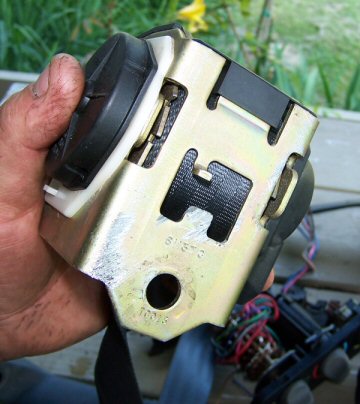
Only thing left to do is fix the bottom of the latch. it's curved to bolt to the floor and we need it to bolt to the side of the tunnel.
Just take a torch and very lightly heat the vinyl cover over the latches and bend it to the desired angle and cool Presto, a straight, albeit crinkly, latch mount.
Slip the cover on the body and every thing fits and works. The latch pieces anr about 1 1/2 inches taller than the Fiero mounts, but I think that will make em a little easier for those like me who are slightly (AKA wayyyyyyyyyyy) overweight.The belts I got are a lot darker grey than Fiero belts. I was hoping to find some in Black, but it seem GM doesn't use black for interiors anymore, just dark greys. :(
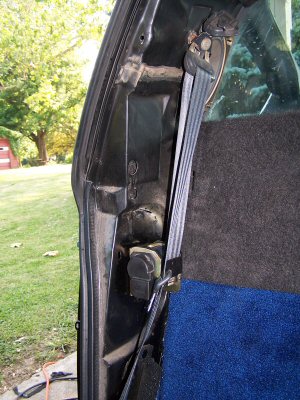
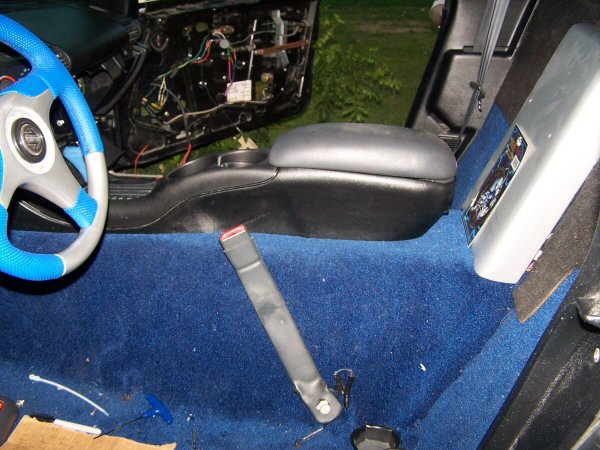
Finally, a pic of it all together.
The belts area single spool type so the latch plate sits up by your sholder rather than be your waist like on the Fiero. In the last pic you can also see a bit of the interior work I've been doing.
Have a great day.
Max
IP: Logged
12:39 AM
Jul 19th, 2005
Max The Chainsaw Member
Posts: 1140 From: Danville, IL Registered: Oct 2000
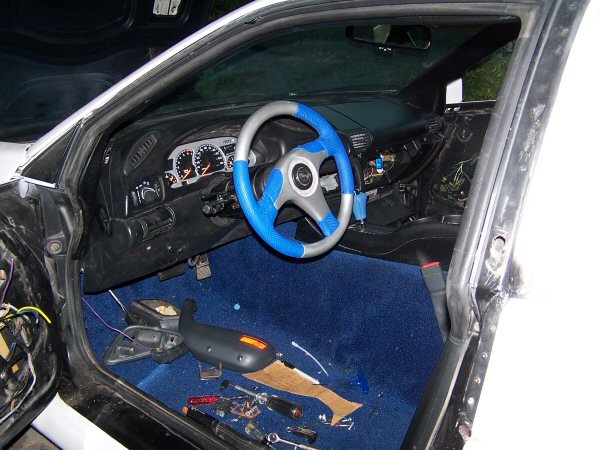
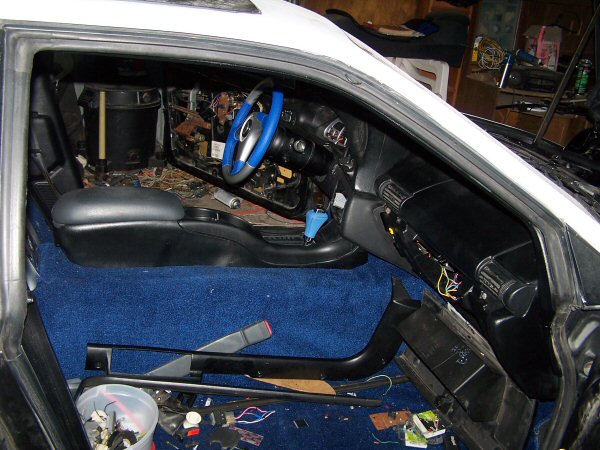
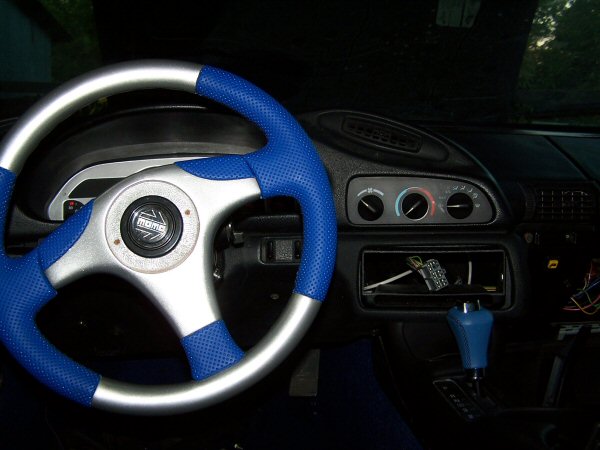
Guess it's time for another update. Interior is near complete, just door panels, seats, and a few minor things. Here is how interior looks like now:
And from the right:
As you can see, I've gotten away from that console so many people didn't like due to its being so tall. Guess what, this console was originally TALLER than the first one..... However the design of this one let me cut several inches off the bottom of it (More from the rear than the front). I wanted to use this console (From a 94 Grand prix) but the one I found had several cigarette burns in it. The others i found had even more. One day at the yard i walked past a 94 Buick and glanced in it, stopped and did a double take, the same console!!! Yeah!!!
Here is a close up:
I shortened the shifter 1 1/2 inches to let me change CD's in park. Drilled a hole in the front of the console compartment and put one of the old ash tray lights in it.
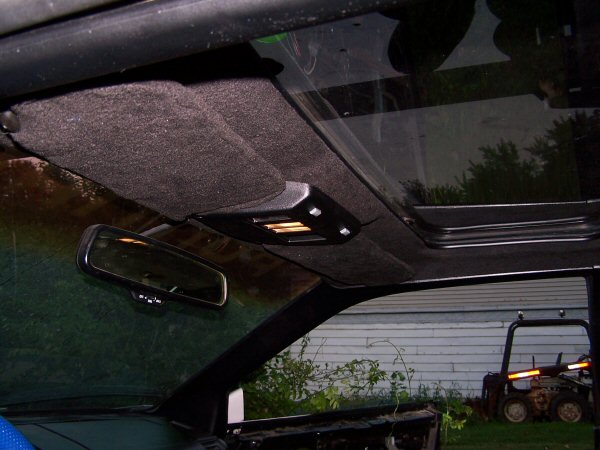
Here is a pic of the headliner and sunvisors:
Material is a dark fleece, has a very soft feel to it.
And lastly, a view from where the driver sits:
So, what do you think of it so far? All comments welcome, positive or negative.
Thanks
Max
------------------
IP: Logged
11:42 PM
Jul 20th, 2005
pavo_roddy Member
Posts: 4351 From: State with a city named Gotham Registered: Apr 2004
Look fantabulous!! Nice job! I think I like this dash more than the more bulbousness of the firebird...1 question though, I know that the zr-2 kit uses the notchie decklid, what is used for the vents, notchie or fastback??
IP: Logged
03:05 AM
Max The Chainsaw Member
Posts: 1140 From: Danville, IL Registered: Oct 2000
Look fantabulous!! Nice job! I think I like this dash more than the more bulbousness of the firebird...1 question though, I know that the zr-2 kit uses the notchie decklid, what is used for the vents, notchie or fastback??
Thank you, I like the dash better myself as well. The decklid vents are notchbacks. They cut off the outer rear mounting tab where the screw holds it down, so it can be slid in place.
Max
IP: Logged
07:19 AM
exoticse Member
Posts: 8650 From: Orlando, Fl Registered: Jun 2003
Your car is going to be interesting when done, resembling a 'vette on the outside and Camaro on the inside. Now all you need is an LT1/LS1 to finish the package.
Aren't you forgetting something else ?? Like the chop !
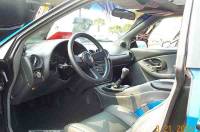
Hehehe found this old photochop in the archives.
IP: Logged
12:26 PM
2.8-4spd Member
Posts: 181 From: Cincinnati,Ohio,USA Registered: Oct 2001
Aren't you forgetting something else ?? Like the chop !
Hehehe found this old photochop in the archives.
Ah man! Didn't even think about that for a license plate!! laugh... oh well MAX ZR 2 will just have to do... Oh Max... you know how I hate clutter... SnoBall is looking mighty cluttered in the floor board department... and you know you can't find a thing after I've cleaned... grin... and I'm so glad you didn't post that awful pic of me tapeing off the engraved fiero plenums (sp?) for Kuro Neko!!
Oh, I think there was only 1 person who said the console was too tall... laugh... and thanks for updating this thread, I got to add it to my favorites so I can keep track of it now... laugh... and you... grin...
You do know that Tsukiko and I can't wait to drive SnoBall once... grin... do you think he will ever be totally "done" ? ? Is there actually such a thing as a fiero being totally done?
Oh I think I agree, I'm not found of the hood scoop either... now if we can just see about those lambo door hinges....
Ummmm that's not SnoBall, is it?? Is there actually another white ZR 2 in Illinois?? Nahhh what am I thinking... well, it could be?
[This message has been edited by Amethyst (edited 07-20-2005).]
IP: Logged
05:09 PM
Jul 21st, 2005
Max The Chainsaw Member
Posts: 1140 From: Danville, IL Registered: Oct 2000
Aren't you forgetting something else ?? Like the chop !
Hehehe found this old photochop in the archives.
Not bad. That's the first pic I've seen of another ZR-2 other than on PISA's web site. I must say that I'm not fond of the hood scoop, or the Corvette emblem on the nose. Now the chop.... jury's still out.


 :
:


 )
)


_1_1CHOP.jpg)


