Intro: One day, february of 2003 I came across a site called Pennock's Fiero Forrum. I decided that i would look around a bit. After a while I came upon a thread that talked about designing a new dash. I started to read through it ::epic music plays:: Three hours later, I finished reading the 11 page entirety of it. The next day I went to the junk yard, and being poor, couldnt buy the parts. I can admit now that I probably could have, but was too afraid to try it. One year later I returned to finish the job.
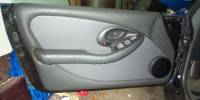
Door pannels: I have installed one side (drivers) the most important one. The other is covered, armor-alled and ready to install, but it tis too dark.
Dash: Yet to recieve. I have purchased it yet I have to pick it up tomorrow.
Door Panel:
------------------ Avid Fiero Enthusiast Daniel Caddell Working on Firebird Interior
[This message has been edited by Malakyt (edited 04-17-2004).]
IP: Logged
11:20 PM
PFF
System Bot
jscott1 Member
Posts: 21676 From: Houston, TX , USA Registered: Dec 2001
Awesome build up thread this is going to be...I can't wait to see the dash when it's installed. Good luck
------------------ If you find my advice useful, then please give me a positive rating, thanks... 1988 GT (Firebird Interior),1988 Coupe (Daily Driver), 1985 SE (Project Car), 1985 Coupe (parts car), Firebird Interior Installation Website
IP: Logged
11:25 PM
PBJ Member
Posts: 4167 From: London, On., Canada Registered: Jan 2001
i am right behind you ... just tore off the fiero door .. waiting to get the firebird doors from ebay . and need to find a dash . i will follow you .. post more pics if you can
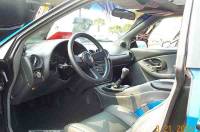
Alright. The date is 4-5-4 (nice engine size) I have removed the entire dash. cluster guages and all. All pieces are to up for sale. PM me if you want ANY piece for the dash/interior. Here are the pics of the progress today.
Taking out center console
Dash removed... But i still got tunes
Here is my mess after i was finished
Here is the donor car i will be picking up the dash from tomorrow... I still can't figure out why the airbags went off.... lol
I plan on doing this sometime as well, you guys that are doing this and that have done this are helping alot of people, thanks and keep the pics comin'!!
------------------ -Josh AIM: swingline1021
IP: Logged
11:31 PM
Apr 6th, 2004
Pegasos Member
Posts: 65 From: Lake in the Hills,Ill. U.S.A. Registered: Jun 2003
Daniel, are you able to mount speakers inside the stock panels? I ended up mounting my speakers to the outside of the panel to make more room for the magnet. I probably could have found thinner speakers or cutout the door structure but I took the simpler path.
Door panels: $100 for both, including all switches, bezels, and handle.
Dash: $229 Including dash(unbroken), hvac controls, guages, bezels, center console, and everything else needed for the conversion.
I bought the material for covering the doors at wal-mart... it is leather(maybe vinyl, i mean come on... its walmart) for $5 a yard. which was enough to do both panels. I will get more so i can make a shift boot and cover other things in the car to give it a uniform look.
That is what i spent... not including the dremel wheels. oh speaking of that... i didnt know it was possible to cut through your finger nail into the skin underneath... never have seen blood squirt quite like that....
------------------ Avid Fiero Enthusiast Daniel Caddell Working on Firebird Interior
[This message has been edited by Malakyt (edited 04-17-2004).]
Hey; I see that ya got your priorities right ta gotta have the tunes thats a prob on my driver 88GT, The radio thinks it has A.D.D.,LOL. it changes channels all by itself. Keep the posts coming I'm probably going to do this on my 88 notchie. Joe
ok jon. I got to thinking. I am going to find some i have to mount outside the pannel. The lip of the speaker will help hold in the bottom of the door panel. Also here is a like to things i am selling now.
I'm almost embarassed how fast Daniel is doing the swap compared to me...but then again I didn't exactly have a pattern to follow...Roy and I were making this stuff up as we went along.
Anyway ladies and gentlemen definitely go to the yard to get your Firebird parts...Daniel paid about half what I did on eBay.
Those speaker pods are pretty small unless you hollow out the door. I didn't want to do that and the speakers do kind of hold everything together if you put them on the outside.
As for the bottom of the panel, there is a natural lip around the whole thing. I used tiny sheet metal screws to hold them to the door. Unless you have lambo doors they are not very noticable. I don't really have a pic of that I can try to take one soon.
On the top I also used screws temporarily, but I'm replacing them with the same clips the stock panels have underneath so they can be easily removed if necessary.
Well technically it has taken me a year. i just started doing it... but i also have read your posts for the past year. Also... that lip... well i cut it. Oh well live and learn. I will prolly use fiberglass to finish off the whole pannel. My question... what do i buy to start doing fiberglass?
------------------ Avid Fiero Enthusiast Daniel Caddell
Working on Firebird Interior If you think i am doing a good job, Give me a positive
[This message has been edited by Malakyt (edited 04-17-2004).]
quik question. is the dash and door panels all the same size to fit on the fiero? as in fits in place without too much trouble? what all do you need to take from the bird other than the panels and dash itself? any electronics or anything? i like the look of it... might try it myself one day. is it mounted easily?
Here are some more pics... it is now 4.6.4 at about 4:00 in the morning. I just finished painting the interior trim... see other pics for the previous ugliness. Here they are
First to paint... I like to spray paint
Then to Admire your work
then to install and smile
Next is to notice in the pictures what just doesnt look right and start on those... not going to point it out. But i will have pics ::looks at watch:: later today if all goes well.
IP: Logged
07:22 AM
Wholf Member
Posts: 379 From: Cleburne, Texas Registered: Mar 2003
Malakyt, you can probably save yourself a lot of time and headaches by using the stock Fiero HVAC controls(see picture) when you get your dash. With a "little" work they fit nice and look like they belong there. Did you cut your door panel bottoms off before or after or email exchange? The shop that is re-doing my panels will use the standard connecters, and not be visible( not that the screws really showed). Anyway you are doing a good job, keep up the good work, and keep us posted.
... that lip... well i cut it. Oh well live and learn. I will prolly use fiberglass to finish off the whole panel
I cut off the lip near the front part of the panel too. I'm using fiberglass reinforced filler, (bondo) to fill in the gaps.
The best way to attach the panels is to epoxy those clips from the stock panels onto the back of the firebird panel and then drill matching holes in the door, (checking for clearance in the door of course) and snap them one. I used screws to get everything lined up then am going back to add the clips...then using the filler to smooth everything out. You could also upholster over the holes and you would never see them.
For the HVAC, the stock is definitely easier, if you go with the firebird expect that to add a couple of weeks to figure that out.
John, If you can i'd like some kind of wiring layout for the new dash. Thanks for the HVAC info... i'll probably keep the stock ones if it looks good. Why the hell not? Anyway if you (john) or anyone have a picture of, or layout to the firebird dash wiring that'd be great. i plan to have it in by the latest tomarrow before i go to work. I realize i might sound a little cocky but i'm working pretty hard and i have another PFF member (and good friend) FieroSkank to help me out. While i'm at work today he's going to prep the dash and paint some trim peices with custom MALAKYT lettering. And Yes there will be pics. Many if they turn out. Again thanks if you can help with the wiring and i will keep you all posted on my journey toward fiero greatness. Oh by the way, the junk yard jipped me on one of the vents... damn them to blasphemous hell!!! But if any of you guys know where i can get one for a low low discount cost... please inform me. Well, i'm off to slave over a hot capaccino machine for "The Man" so as i can continue my fast progression toward Nirvan...Fiero. lol I'll Post Everything i do. And i'll Have Karl (FieroSkank) post if he finishes the trim peices while i'm workin'. Farewell for now.
A couple questions: Does anyone have the link(s) to the other firebird interior buildup threads? Also, has anyone used the stock Fiero gauges instead of the Firebird ones, or would that not look right?
This is FieroSkank... John i found your wiring chart but the problem is we don't have the connectors. Do you have any kind of charts for the pin array to connect the Fieros stock wiring to the firebirds pin array? For the speedo and such? If you do that'd save us a day at least. Please if you or anyone has such a chart or any kind of picture or help ... POST IT!!! Well, i'm going to go ArmorAll the dash because it is a little sun beaten. The gauge cluster looks orgasmic though. 115mph speedo? Crazy stuff. See you guys later tonight with pics to tell you of our day's work. Peace, love and chicken grease... or in this case leather cure Armor All.
The Skank amon: -87 GT 5spd (headnig toward lamborghini kit)
A couple questions: Does anyone have the link(s) to the other firebird interior buildup threads? Also, has anyone used the stock Fiero gauges instead of the Firebird ones, or would that not look right?
Not only would they not look right but, I very seriously doubt they would fit. Thus I Doubt anyone has done it. I haven't seen it anyway.
IP: Logged
09:28 PM
88GT5.0KILLER Member
Posts: 590 From: Watching a once great nation become a 3rd world slum. The power of stockpiles of ammo. Registered: Jul 2002
Go to jscott1 web site..............he has the diagrams. And he can pretty much answer any question you may have. Im not trying to speak for you Jonathan, but you helped me out before with no prob. Good Luck
IP: Logged
09:30 PM
mrfixit58 Member
Posts: 3330 From: Seffner, Fl, USA Registered: Jul 99
As for the instrument cluster, that's the easy part in my opinion, it's just wires. Like I said earlier I didn't have any connectors. It's easier if you have them, but not a requirement. I just soldered onto the pins. I think the earlier clusters have a different pin out than what I show, I'm not sure because I used the 1998 cluster and that's what I know. I think Roy's was the earlier design maybe he has a drawing for that. Here is the drawing I used:
It looks like Roy won't be at Wheatstock...maybe I have a chance to catch up on all those "Best Custom Interior" trophies
If you have any other questions I'd be glad to help.
------------------ If you find my advice useful, then please give me a positive rating, thanks... 1988 GT (Firebird Interior),1988 Coupe (Daily Driver), 1985 SE (Project Car), 1985 Coupe (parts car), Firebird Interior Installation Website
[This message has been edited by jscott1 (edited 04-06-2004).]
Well, I know they won't just fit in there. I would figure some way of mounting them in there and looking like they should be there. But if it's pretty simple to wire in the firebird gauges, I'd probably just do that. Was just asking because I like my silver reverse-glow gauges.
Ok here it goes. Went to get the dash today. Picked all the parts up and got them home...
Dash b4
Console b4
Dash (aft 8 coats of armor-all)
Console (aft the armor all)
Now here is the question i have been trying to ask. I see that you have the wiring chart... but i have no colors coming from the firebird side... here is a pic of what i get to look at...
So i have nothing to go on... any help would be usefull. Gonna go fit the dash and do some more trim.
------------------ Avid Fiero Enthusiast Daniel Caddell
Working on Firebird Interior If you think i am doing a good job, Give me a positive
[This message has been edited by Malakyt (edited 04-17-2004).]
Originally posted by Malakyt: ... but i have no colors coming from the firebird side... here is a pic of what i get to look at...
Looking at this connector the top row is "A" and the bottom row is "B". The numbering is from left to right, so "A1" is the left most pin on the top. Now the tricky part, I have heard that the pinouts changed over the years. My pinout is from a 1998 Firebird, your results might vary. I would ping Roy, (MrFixit58) or Pete (PBJ) because I believe they used the earlier cluster like the one you have. I know Roy was thinking about switching to the newer one, but he didn't want to mess with rewiring. He must have the pinout for the old one.
And as hard as it is to believe I soldered directly onto those little pins and then used "Goop" to hold the wires and provide some stress relief. Goop dries kind of clear so you can see if the wires are still soldered on tight after you are done. That's how I did it, if you can, I would suggest that you look for the connector, (and it will have colors). I put colors on my chart only because I had them from the drawing and for the next time when I do use the connector. I hope that helps.
WOW........Ive been wanting to do this swap for a year also. Looks like you are very determined, great job. One question I have for all you swap experts, did your Fierobird dash come with a metal support brace? Its almost as long as the dash and it looks like thats what its was for. I took mine off, am I supposed to leave it on? I had a hell of a time trying to get her it the Fiero with it on. So i took it off, do I need it?
I'll post more on my mount/brace design later tonight ... or maybe I'll just do it and take a pic. The metal brace ...? Mine didn't come with one and I don't need it. So, yeah I guess not. Oh and John, before I forget ... I was going to do my ducts (AC/Vents) work tomarrow ... How did you set up yours? Do you have any pics or explanations for me? I just want to know it i'll have to cut the firebird dash in any way. If you can help me out (anyone) please do.
-Avid Fiero Slave, Daniel Caddell
------------------ Avid Fiero Enthusiast Daniel Caddell
Working on Firebird Interior If you think i am doing a good job, Give me a positive
[This message has been edited by Malakyt (edited 04-17-2004).]
Ok... sorry about not posting last night. My lady friend was over. Here is the deal. I got a pinout connector from ebay for like ten bucks. It is on its way like next week. Roy never pmed me back... so right now i am kinda stuck. i might just solder wires to the back of the cluster, then test the wires with each other until everything starts to work... lets see if my math serves me corret that is ::counts on his fingers:: 1,156 different combonations... maybe i will get lucky. As for the bracket. I was looking at the steering column and decided that i am going to re mount the bracket further back, attach a piece of metal between the mount up points. Drill 4 holes in the metal and mount in back in place. Hard to explain but it will work. If not i will use roy's way. My brother knows how to weld. Well down to cut more and wire.
Jon. I need to know if you have a layout for the switches on the door (firebird...) wiring... (mirrors, locks and windows?) LMK... also has anyone heard from Mr. Fixit? i really need to start wiring.
-Dan
IP: Logged
05:20 PM
mrfixit58 Member
Posts: 3330 From: Seffner, Fl, USA Registered: Jul 99
.... Roy never pmed me back... so right now i am kinda stuck. i might just solder wires to the back of the cluster, then test the wires with each other until everything starts to work......
-Dan
Sorry for the delay. It's been a heck of a week so I haven't been on-line much. I sent answered your PM. I'll be off-line until Monday. I'm going out of town for the Easter wekend.
Roy
[This message has been edited by mrfixit58 (edited 04-08-2004).]


 amon:
amon: