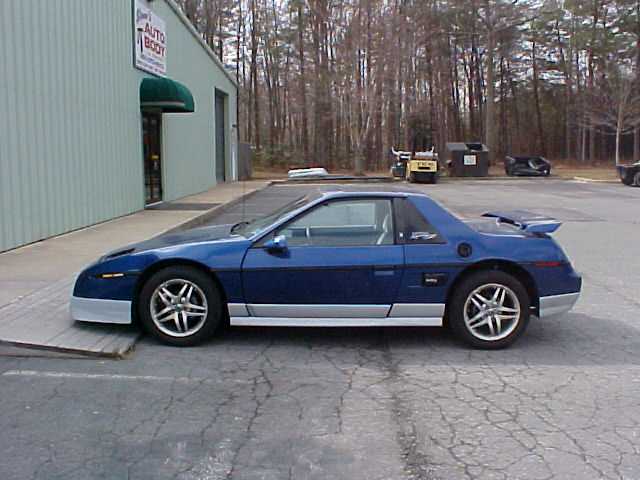
Fierochic has brought me a victum to operate on. Its her blue 85 GT. She wants the car painted all over and some things added but I'll let her tell what exactaully those are. I promised her to send pics of the progress but i thought some of you on the forum may be interested in whats evolved in painting a Fiero. I'll post more pics if theres any interest and feel free to post any questions you may have.
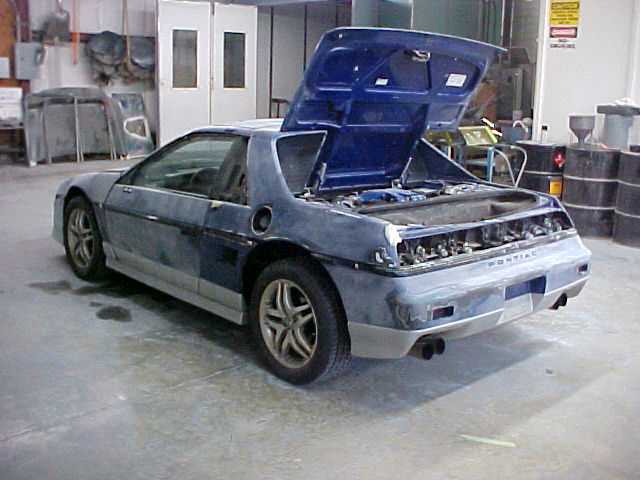
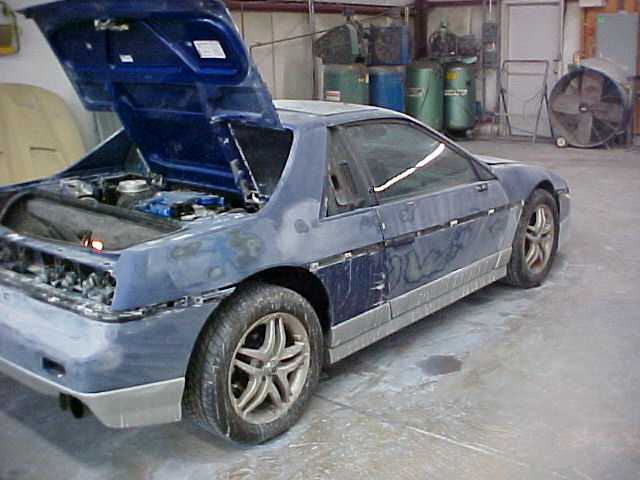
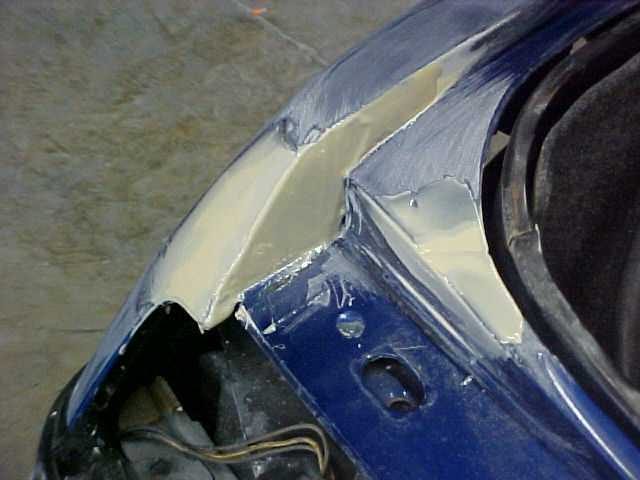
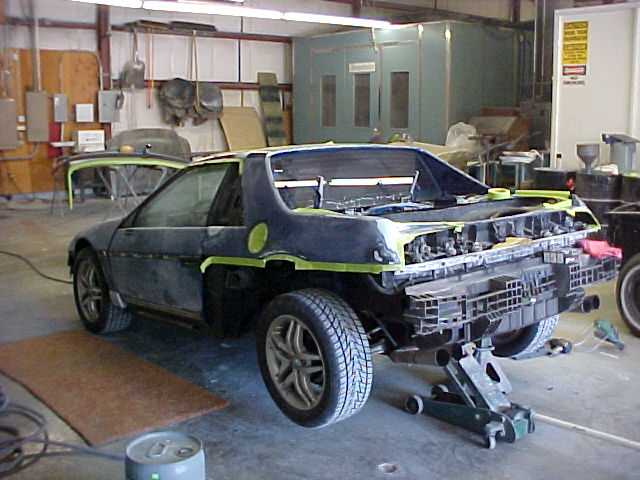
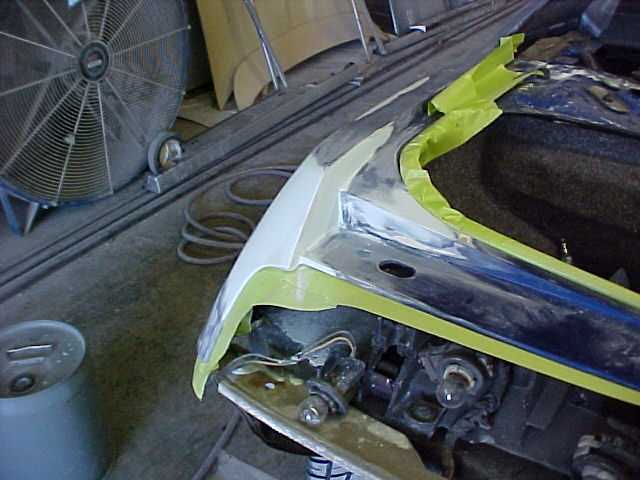
Start.... Pic of her new molded in front air dam.... 4 hours later car is sanded with 320 and chips feathered out. Some parts removed This pic show athe quarter panel repair. this sction was reapired before but has since developed several cracks that need to be repaired. What you see there is FUSOR SMC?Fiberglass repair. Once this sets over nite it will be sanded and formed with 80 grit then covered with polyester putty and sanded with 180 til smooth. Post if want to see more!
------------------ Earl Sessions 1985 Fiero w/ 1998 Supercharged 3.8 V-6 Best ET: 12.689 @ 105.91mph "NO Juice....Just BOOST!"
IP: Logged
11:10 PM
PFF
System Bot
litespd Member
Posts: 8127 From: No where you want to be Registered: Aug 99
Keep 'em coming, Earl! It seems like every couple of weeks, someone is asking about painting a Fiero...would be nice to see a step by step photo journal. There have been a couple of others that have started, but didn't finish. RogerGarrison posted and finished a thread on his Raptor, but the more information out there, the better it is for all of us.
------------------ Mike...86 GT 4 Speed "Sucks to be me..."
yeah, that helps to see what you are doing. It helps to know what grit sandpaper youre using, thanks. I will be repainting my car from maroon to black this summer.
------------------ Help, Someone has lit a Fiero in my a#@!
hey JNCOMUTT...how did your car come out? And cutting the fenders is definitely not in the plans! Unless you want to pay me under the table to sabotage her car since shes probably going to be in your clas at Carlisle.
Car looks great (finally). Its actually back to a decent looking status and ready to be painted. The only problem is I just dropped off a mustang scoop to his shop to get molded to the trunk lid.
I'm aware of the class thing, lol. Too bad my engine bay is UGLY!!
Please tell me you're repainting it the same color! I love that color. In fact, I'm about to paint mine very close to that. BTW, I like the molded in front spoiler.
Actually the cars is going pink with powder blue flames. Should look cool! And the front air dam was done by Fierochic and her boyfriend so i can't take credit for that.
------------------ Earl Sessions 1985 Fiero w/ 1998 Supercharged 3.8 V-6 Best ET: 12.689 @ 105.91mph "NO Juice....Just BOOST!"
Actually the cars is going pink with powder blue flames. Should look cool! And the front air dam was done by Fierochic and her boyfriend so i can't take credit for that.
NO!!!
I loved the Cobalt Blue/Grey
IP: Logged
03:47 AM
rogergarrison Member
Posts: 49601 From: A Western Caribbean Island/ Columbus, Ohio Registered: Apr 99
Looking good. Some people dont realize how fast you can actually go when you get started. Chic, everyone does what they want to their car....but pink !!!!!!!! Never know though, lets see it finished. I did a pink 57 t-bird that looked pretty cool.
Both pieces are flexible, so you have to be sure to use flexible fillers. There are a number of 2-part epoxies that remain flexible when cured. You can find some normal forms of this at your local parts store in the form of "Flexible Bumper Repair Kits" (although, there are numerous other suppliers as well- check with your local automotive body supply store).
Extremely well done! I'll have to wait and see how it looks when it's done before I finalize my decision as to whether or not I'll leave the seam or mould it in as well
Hehe. Pink yeah right! I almost killed my parents when I grew up and realized my room was pink, much less would I paint my car that color.
Don't worry guys, the car is going right back to the same color it was before just with a couple of additions to it. Jnco, when we started the air "damn" project I had no idea you were doing yours that way as well...oh well! You have a cool air scoop and I don't .
Anyways, Earl thanks for the pics! The "secret" part of the project should be mailed soon, there was a delay in the manufacture of it! Hope you guys enjoy watching the paint job!
Jennifer
------------------
IM Username: FieroChic88 Silver 1988 GT Silver 1986 2m4 Cobalt Blue 85 GT 3.4
[This message has been edited by Fierochic88 (edited 03-24-2003).]
hey JNCOMUTT...how did your car come out? And cutting the fenders is definitely not in the plans! Unless you want to pay me under the table to sabotage her car since shes probably going to be in your clas at Carlisle.
What are you guys doing to that car????It looks like someone hit it with a DA? And who did that nose job? Hey JNCOMUTT, did you fill in your spoiler at the seam too? What did you use?
The front bumper was done by my body man. It was ready to paint, but am now plannin something to make it a 'lil different.
As far as the spoiler, its not molded in right now. We're going to put it on the car and see how things work out. We were unsure whether or not slamming the trunk over and over will eventually crack it or not. I'm thinkin I'm going to smooth it in anyways, only time will tell.
IP: Logged
11:06 AM
kslish Member
Posts: 1475 From: Womelsdorf, PA Registered: Apr 2000
Lookin' good! Keep the updates coming! It's nice to see in progress pics. Lots-o-folks don't realize ho wmuch effort goes into prep for a paint job and the need for detail. Roger is correct...it's amazing how much you can do when you set your mind to it and get started, but when you have started, don't stop! Keep going and do it right. Prep is 90% of your paint job.
One question I have.....what color and what kind of primer are you using?
Mark the paint guru
IP: Logged
01:46 PM
V8Dreamer Member
Posts: 394 From: Emmaus, PA USA Registered: May 2001
Looking good....but you guys better slow the hell down. I don't want Jen's car to be started 2 months after mine and still be done first!!! Anyway, that fusor SMC repair is bringing back some bad memories of a cold garage, a cured mixing tip and fusor splooging out the back all over the gun Either way the car looks like it's coming along great. I can't wait to get mind sprayed, I think I'm finished prepping everything except the hood which is at Rockcrawl's place right now. I can see the pros moved quite a bit faster than I did...but that's about what I expected.
Earl, what happened to the wing on your car? I noticed in the background of that second pic the wing isn't anywhere in sight.
One more question. Is there anything special you guys use to ensure adhesion to the plastic moldings and markers? I'd like mine to stay the color they're painted for a long time :-)
Mark-I think this should answer any questions about the paint used and the technique. I had to dig for this information but I'm sure it's accurate. I hope this clears up any questions. LOL Jen's Dad [IMG]http://www.talon.net/jgilbert/Jen/Maaco.jpg [/IMG]
quote
Originally posted by Firefox:
Lookin' good! Keep the updates coming! It's nice to see in progress pics. Lots-o-folks don't realize ho wmuch effort goes into prep for a paint job and the need for detail. Roger is correct...it's amazing how much you can do when you set your mind to it and get started, but when you have started, don't stop! Keep going and do it right. Prep is 90% of your paint job.
One question I have.....what color and what kind of primer are you using?
Mark the paint guru
[This message has been edited by TooManyFieros (edited 03-24-2003).]
[This message has been edited by TooManyFieros (edited 03-24-2003).]
[This message has been edited by TooManyFieros (edited 03-24-2003).]
[This message has been edited by TooManyFieros (edited 03-24-2003).]
IP: Logged
02:00 PM
rogergarrison Member
Posts: 49601 From: A Western Caribbean Island/ Columbus, Ohio Registered: Apr 99
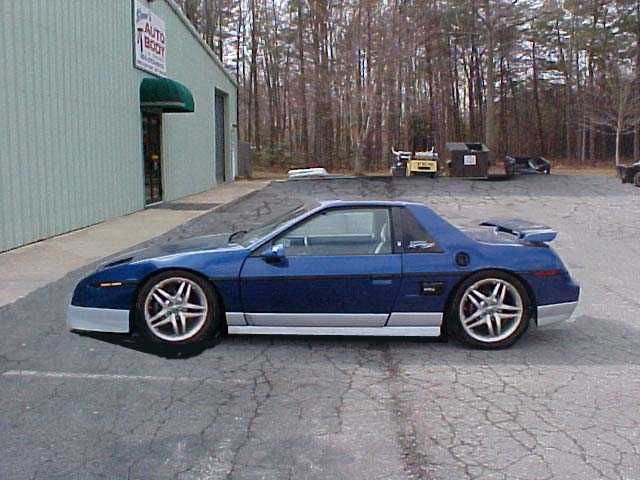
wow this thread has taken off since i last logged on. Lots and Lots of Questions. I hope i can answer them all. First, the car is going back the same shade of blue and silver. Jus without all the chips and scrathces and trash from the previous painter. Fierochis will have to answer all the questions about the front cover. I am jus painting it. While i have it off i could take some pics of the backside if anyone wants it. As for the primer its a urethan based primer. My paint system uses a white primer that i can tint to what ever color i like. Comes in handy when doing white cars. I tinted the primer on her car to help with coverage since the blue i am putting on is mostly pearl and doesn't cover worth a damn.But before puitting on the sandable primer i coated the car with a good clear platic primer to help the primer adhere to the bare plastic.
If i was going to attempt to mold in anything on a Fiero I would use only FUSOR expoxies. I have had the best luck with that line. I have tried Duramix but it never seems to bond very well and creates bubbles when the car sits in the sun.
Dreamer, My spolier is getting repainted thats all. And if i was going to paint the molding i would use a grey scotch brite pad to prep them lightly and then plastic prime the pieces prior to paint.
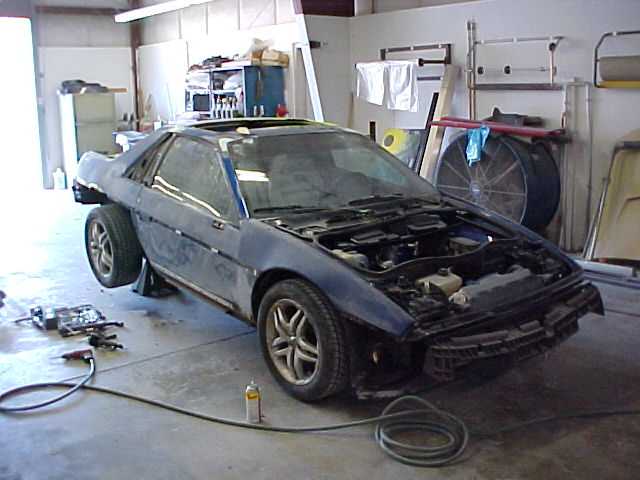
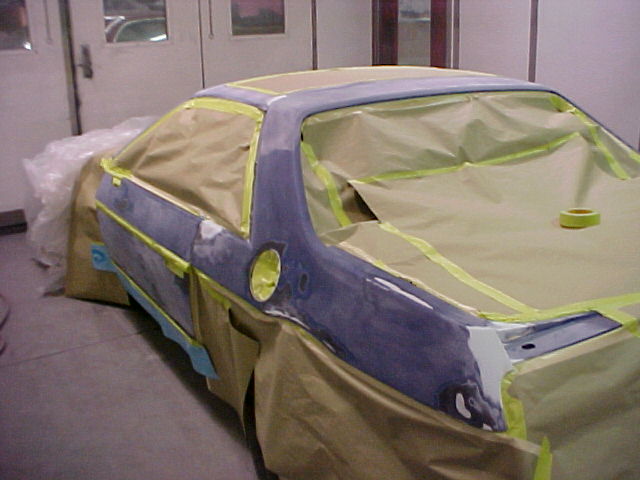
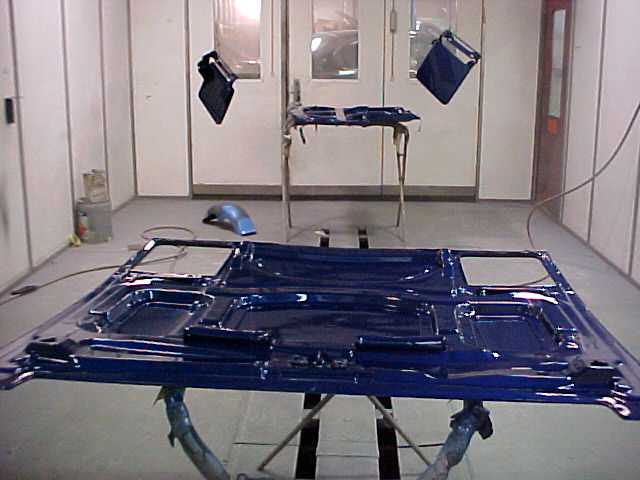
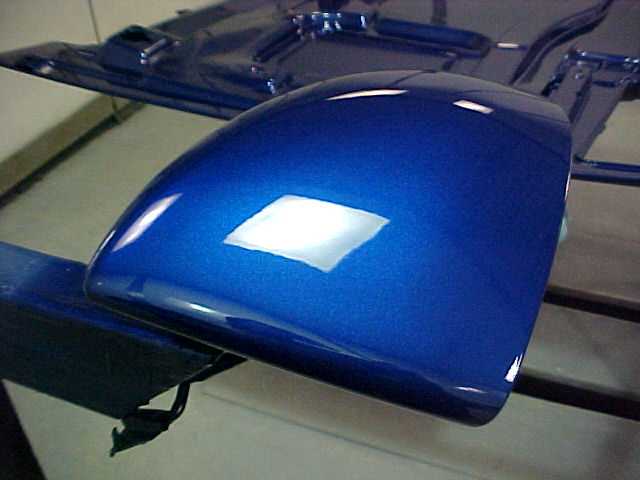
Heres today pics! More parts removed Finished quarter prior to primer in the booth patiently waiting for primer Fresh out of the oven! The tranformation begins. Both decklids cut in and headlight doors and mirrors painted. We,re ROLLING! Close up of the color
well that should keep you guys satified for one more nite.
Later!
IP: Logged
08:21 PM
Tabs31 Member
Posts: 2049 From: Toronto Ontario Canada Registered: Nov 2001
If i was going to attempt to mold in anything on a Fiero I would use only FUSOR expoxies. I have had the best luck with that line. I have tried Duramix but it never seems to bond very well and creates bubbles when the car sits in the sun.
!
Dang I was wondering were those bubbles were coming from..................... FUSOR, is it available at most distributors?
IP: Logged
08:57 PM
fiero go fast Member
Posts: 1728 From: Royersford, PA Registered: Apr 2002
So glad to see you going with the same color! I was literally about to cry when I read that you were changing it. I can't believe it's already getting painted! I'm so slow. I've been working on mine for months!
IP: Logged
09:31 PM
Firefox Member
Posts: 4307 From: New Berlin, Wisconsin Registered: Feb 2003
The car is looking great! I've been painting for quite a few years, and I guess I'm still doing it right. Is this Fiero going to be at the Dell's Run this year?
Mark
IP: Logged
11:15 PM
Mar 25th, 2003
Along For The Ride Member
Posts: 76 From: Oley, PA, USA Registered: Sep 2001
So what is the desired effect from removing all the small parts and painting the separate..?? Is it so you can use different methods on the Polyurethane..?
IP: Logged
09:54 AM
Seanpaul Member
Posts: 1320 From: Santa Rosa, North CA. Registered: Mar 2003
The reason for removing so many parts: you get a better paint job. If you spray a car with the rear deck lid closed, you cannot spray the painted piece between the taillights and the trunk. So, if you don't paint it, you either have to mask it off or let the over spray coat the edges. That looks crappy. The idea behind a paint job is to make it look like a factory paint job.
Use the fuel filler as an example. If you leave it in place, the new paint covers the quarter/sail panel and the fuel cover assembly, and the area that's under the assembly isn't painted. Now, as temperatures change, the plastic from the fuel door assembly expands and contracts at a different rate than the body panels, and the paint cracks and peels. Not very professional.
When you have a tape edge, you run the risk of that edge starting to peel just because it's there. If you don't have an exposed edge, the chances are a lot better that your paint job will look a lot better. Also, when people look at paint jobs, they look for those tape edges. The more that you remove from the car, the better the paint job because you don't have to tape off anything. The Fiero that I'm just finishing has to be reassembled because I pretty much disassembled it....everything was painted off of the car, except the roof and rear clip. This also allows you to repaint the black parts that do show, such as door jambs, and you can also clean up any areas of rust you find. A little fix-it-up now will save you a lot of time and energy later.
Mark the paint guru
IP: Logged
11:38 AM
Along For The Ride Member
Posts: 76 From: Oley, PA, USA Registered: Sep 2001
How did you sand the entire car in under one day. I see you used a DA, but how do you get in spots that are too small for a DA? Any tips and tricks would be great.
A couple examples of trouble spots for me:
-The "Pontiac" in the drivers side headlight -the resessed inlets (where the reflectors sit) in the rear bumper cover
[This message has been edited by David Bartlett (edited 03-25-2003).]