I have 85 se with 2.5. I recently just converted it over to r134a and itll hold while im charging it but let it set over night or a day and its down to almost nothing. I added dye to it when I converted it. but I looked at all the connections and nothing. I cant find the leak at all. any help guys would be much appreciated.
Had the same problem, waited until dark and looked under the car with a UV light. BIG mess. The smaller hard line (discharge line from compressor) had a crack. Also check the back and front of the compressor. With a UV light in the dark, the stuff really glows.
IP: Logged
10:29 PM
FieroSE757 Member
Posts: 59 From: chesapeake,va,usa Registered: Feb 2013
Ok I'll try that tomorrow. Now the stuff I usd was the stop leak and detector. Would it still show up? I've neve messed with ac betore so this is all foreign to me
Never use stop leak, it only causes problems and shortens compressor life. If the 'detector' was UV dye, a UV light should be able to pick it up. Also check the water puddle under the car from the condensate drain, which would indicate a leak in the evaporator.
IP: Logged
10:53 PM
FieroSE757 Member
Posts: 59 From: chesapeake,va,usa Registered: Feb 2013
I only put it in cuz the car had been sitting for a bit fefore I got it a year ago and it had none in it t start with. I don't think it was a uv dye. It was a red dye. But I checked the lines on the back of the compressor and where they connct to run to the front. Ive double checked evwry connection I could find on the car and nothing. But I might go through and replace the o-rings and then go from there. Now would not pulling a vacuum on the system before recharging it cause this? Likebi said I have no clue with ac
I only put it in cuz the car had been sitting for a bit fefore I got it a year ago and it had none in it t start with. I don't think it was a uv dye. It was a red dye. But I checked the lines on the back of the compressor and where they connct to run to the front. Ive double checked evwry connection I could find on the car and nothing. But I might go through and replace the o-rings and then go from there. Now would not pulling a vacuum on the system before recharging it cause this? Likebi said I have no clue with ac
When you converted over, what all did you change out? Did you change all O-Rings? What about the schraeder valves for the high and low side connections? Mine were slowly leaking from these.
IP: Logged
11:24 PM
Jun 18th, 2013
FieroSE757 Member
Posts: 59 From: chesapeake,va,usa Registered: Feb 2013
all I did when I converted it was tighten all the connections and then changed out the ports. I charged it and she got real cold and held while I was messing with it. but I took out the shrader valve first time and the 134 port was leaking. then I changed out the port and put a new valve on the lowside in it. i didn't mess with the high side and then charged it to 10lbs to see if itd leak so I don't waste more Freon.
[This message has been edited by FieroSE757 (edited 06-18-2013).]
IP: Logged
11:41 AM
Dennis LaGrua Member
Posts: 16191 From: Hillsborough, NJ U.S.A. Registered: May 2000
From working on numerous Fiero A/C systems I have found the most common leakage points are:
1. high side Schrader valve 2. low side Schrader valve 3. Compressor flange 4 Compressor line where it attaches near the firewall fitting
Some compressors use O ring seals (in a compressor groove), while others use a compression washer. It is possible to reassemble the O ring compressor fitting using both methods of sealing but this is obviously incorrect. Say if you did not notice the O ring and put the compression washers there, you will have a leak. Its a rookie mistake but it sometimes happens.
------------------ " THE BLACK PARALYZER" -87GT 3800SC Series III engine, custom ZZP /Frozen Boost Intercooler setup, 3.4" Pulley, Powerlog manifold, Northstar TB, LS1 MAF, 3" Flotech Afterburner Exhaust, Autolite 104's, MSD wires, Custom CAI, 4T65eHD w. custom axles, HP Tuners VCM Suite. "THE COLUSSUS" 87GT - ALL OUT 3.4L Turbocharged engine, Garrett Hybrid Turbo, MSD ign., modified TH125H " ON THE LOOSE WITHOUT THE JUICE "
IP: Logged
02:39 PM
FieroSE757 Member
Posts: 59 From: chesapeake,va,usa Registered: Feb 2013
all I did when I converted it was tighten all the connections and then changed out the ports.
OK we've found the problem. At bare minimum, you want to change out the accumulator, the orifice tube, and add the correct amunt (8oz) and type of oil (PAG150 if reusing the old compressor), and vacuum down the system to remove any air. The old accumulator's R-12 desicant isn't R-134A compatible, and is likely already beyond saturated after ~30 years.
thanks man for all the help. I put O-rings on the flange at the compressor and then at the flange where it goes to the front. also I just ordered a new drier from work and gonna change those O-rings as well. now I have one more question, where is the orifice tube located? im gonna get a vacuum pump tomorrow and do that as well.
The orifice tube is located between the condenser and evaporator, in the line below the accumulator. The orifice tube will tell you a lot about the current health of the system, if it's full of metal particles, black tar, etc. The ceap ones are only $2. On 85-88 Fiero's they're in a small removable line, and you can use a pair of pliers to pull it out one end. On 84's, you need the special removal tool.
thanks guys for the help. well I have an accumulator coming tomorrow morning and picked up an orifice tube today. just pulled my old one and well it is black and has pieces of something like shreads of like rubber that is on it. I don't know how to get the picture on here cuz its on my phone.
[This message has been edited by FieroSE757 (edited 06-19-2013).]
IP: Logged
05:31 PM
ltlfrari Member
Posts: 5356 From: Wake Forest,NC,USA Registered: Jan 2002
Dangit. I was hopeing not. But I saw that and I told myself that's black death. Now what in all do I have to go through to flush the system? I have never mess with ac before.and when I do do I have to fhange drier and orifice tube as well again?
If it really is black death, you basically have to replace EVERYTHING. If you want AC, get a donor car or piece the whole system together. I couldn't get anyone to ship me the under car lines to replace mine that had a crack in them, had to drive a ways away to pick some up.
IP: Logged
09:40 PM
FieroSE757 Member
Posts: 59 From: chesapeake,va,usa Registered: Feb 2013
You can flush the lines and the evaporator. Use proper flushing fluid and a flushing bottle (you'll need a compressor or some source of high pressure air to pressurize the flushing bottle). 1/2 gal is enough if you recycle the fluid and filter after each use (coffee filter works) saving some clean stuff for a final flush. Use various sizes of clear plastic tube to attach to the various fittings to catch the waste so you can reuse.
You really need to replace all the other components though. compressor, hoses from compressor (apparently you cannot flush the muffler although not sure if that is actually true or not), condenser (it's duel row and flush goes the easiest route, leaving the **** in there!), accumulator and orifice tube. It's not really that hard. Worst part for me was getting the old condenser out, the rubber mounted nuts that hold it were all perished so I just cut them out in the end and got new ones. Use new o rings on all the joints and nylog to help seal. There's also a joint under the front tub and while you do not 'have ' to change it, I think that disconnecting it makes it easier to work on other nearby parts (like getting the condenser out!) as it lests the hard lines move a little.
You'll also need a vacuum pump and preferably gauges to charge. Put dye in the oil when recharging so you can use a black light to find the leaks.
PS. I am no expert at this, still learning (still got a ruddy leak too so obviously not an expert) but I have learned that the only way to do a/c is to do it properly. You can do a cheap and nasty conversion of a half good r12 system and get away with it (many have) but once it's contaminated there's only one way to fix it unless you like wasting money!
------------------ Anything I might say is probably worth what you paid for it, so treat it accordingly!
ok guys, I flushed out the system and then replaced all O-rings, vacuumed the system, replaced the drier and orfice tube and I recharged the system and it still have a leak in the system and cant find it at all.
IP: Logged
08:28 PM
PFF
System Bot
ltlfrari Member
Posts: 5356 From: Wake Forest,NC,USA Registered: Jan 2002
I haven't really used anything to look for leaks. The only thing I can't really look at is my evaporator. I think ots that. But when I get the money I'll buy the leak detector and uv light we sale at advance.
IP: Logged
10:20 PM
Formula88 Member
Posts: 53788 From: Raleigh NC Registered: Jan 2001
I used the gauge that comes on the ac pro cans of freon. And then used a manifold set to check whwn I pulled a vacuum on it and then when I had a buddy charge it using the manifold set as well
IP: Logged
10:40 PM
Jun 27th, 2013
Raydar Member
Posts: 41607 From: Carrollton GA. Out in the... country. Registered: Oct 1999
When mine was leaking it was at the coupling where the orifice tube is. Check both ends. It was dripping down into the little tray behind the spare tire. Took forever to find it.
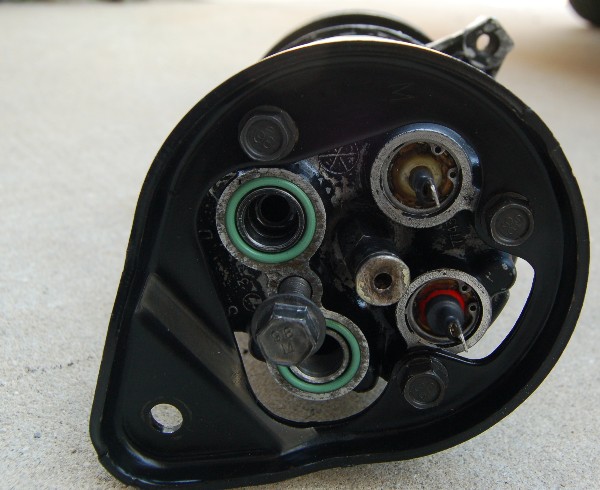
Another place where I've had leaks is the fitting in the left front corner of the engine compartment. It's held together with a 10 mm machine screw.


.jpg)