I put the cradle on two braced saw horses. Working on the ground sucks.
DON"T FORGET to take off the inspection plate from the bottom 'front' of the bellhousing or the flywheel will it on it when you are trying to separate the transmission from the engine.
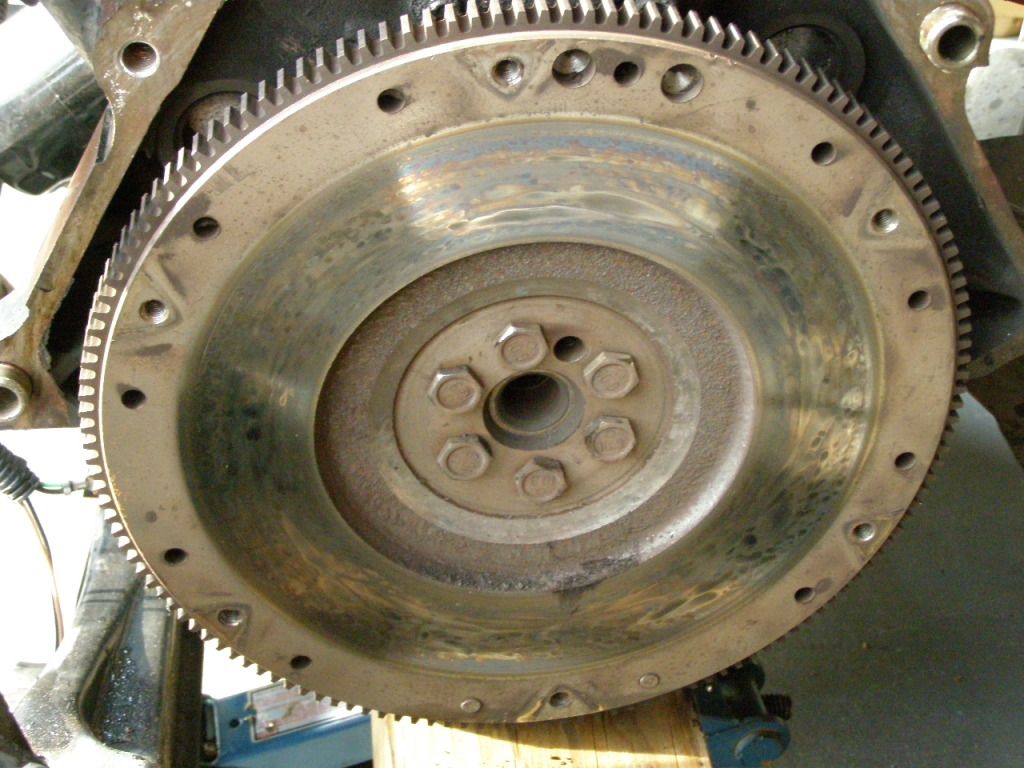
Make sure the flywheel and clutch surfaces are 100% clean before reassembling.
IP: Logged
07:34 PM
Indiana87GT Member
Posts: 258 From: Evansville, Indiana, USA Registered: Feb 2009
Be sure to replace clutch fork and it's bushings when you replace the clutch. Resurface your flywheel, don't skip that. Install new flywheel bolts with threadlock when you do, torque them right, buy a torque wrench if you don't have one. While you're going to this trouble you ought to replace the shift and select cables.
5 bolts I think hold the transmission to the motor, remove starter and inspection sheild as noted above, slide straight back, should not be too hard.
Never tried picking one up, but I know of a couple of 65+ year old men who've single-handedly pulled them from cars at pullapart. They must not be that heavy.
Add to the list of parts you may want to replace, the axle seals, input shaft seals and the CV joint boots. Since you will have the axle shafts out, don't install tires on the hubs and roll the assembly around or you'll have to replace the hubs, too.
are there any tools I need that the typical home mechanic may not have?
how about where to purchase? I really don't have the luxury of ordering from the Fiero Store or anybody it has to be shipped, I need to get it locally 'cuz I only have this week of good weather, it could get real cold or snow anytime after this coming weekend. Luckily the forecast for this week is good. Advanced Auto Parts & O'Reilly have a set for $99, the set includes disc, cover assembly (whatever that is), lube, release bearing & alignment tool
[This message has been edited by ZaraSpOOk (edited 11-19-2012).]
IP: Logged
09:31 AM
Pyrthian Member
Posts: 29569 From: Detroit, MI Registered: Jul 2002
support for the engine. when the tranny comes off, the engine will only be supported from the front mount.
get two of 4-5" bolts which fit the tranny/engine bolts, and cut the heads off (or just get studs, if you can find them) when you remove 2 of the tranny/engine bolts, put these in their place. then, when seperating the tranny, it will be somewhat supported, instead of just hanging by the input shaft. also makes the install much easier. hang on the studs, and slide forward
I see it is also available at AutoZone for $99, I am getting the impression that will be the cost at all the local parts stores includes: Pressure plate, disc, release bearing, alignment tool, bulletin, grease packet, insert does not include pilot bearing
sure was nice working on it yesterday, sun was out, 60 degrees, my garage faces south, so I was in shorts if it gets cold and snows I can shut my garage, but sure won't be fun
[This message has been edited by ZaraSpOOk (edited 11-19-2012).]
IP: Logged
09:46 AM
Cro577 Member
Posts: 110 From: Plain City, Ut, USA Registered: Aug 2010
when i did the clutch in my dads Fiero i just man handled the transmission off after everything was undone. i would have a helper though. it will make it much easier.
IP: Logged
12:06 PM
fierofool Member
Posts: 13020 From: Auburn, Georgia USA Registered: Jan 2002
Disregard the pilot bearing. The clutch assembly is used in other applications that need the pilot bearing. The Fiero doesn't use it. I've used 1 clutch assembly from AutoZone and it didn't hold up very well. I changed to LUK clutches from Pep Boys. Costs a little more but hold up very very well.
IP: Logged
12:30 PM
ltlfrari Member
Posts: 5356 From: Wake Forest,NC,USA Registered: Jan 2002
Not heavy, pretty easy to manhandle off and on for one man. When separating the box from the engine, if you need to use any force, be gentle. There are pegs in some of the bolt holes to locate it and they can stick making separation of the engine and bell housing a bit of a pain but they will separate with patience. If it really won't separate a) make sure you've got ALL the bolts out and b) be gentle with any persuasion. If 'tapping' it with a BFH, use a piece of wood to protect the casting and don't 'tap' too hard! Just support it a little as you remove it from the engine so that it comes off straight and does not sag which might break something.
Do not to force it when bolting it up to the engine. If it won't go, something is hanging it up and forcing it or trying to pull it in with the bolts will break bits of casting (which is not good!).
Automatics on the other hand are a back injury looking for somewhere to happen.
------------------ Anything I might say is probably worth what you paid for it, so treat it accordingly!
Hijack: on this car I'm struggling with getting the transmission to mate back with the engine. I'm using long studs to help with the alignment but the shaft just doesn't want to engage. Turned the crank as well. Any tips?
I certainly don't mind you asking how to get it together since I'll probably need whatever tips you get too but I am wondering if you wouldn't be better off starting a new thread since people looking at the title of this thread will likely think it is only about getting the transmission speperated from the engine, you might get better responses with a new thread
I have the starter and inspection plate off, it looks like I have to pull at least the drivers side axel shaft, or do I have to remove both? and remove the transmission mounts to the cradle which probably means I have to support the engine on that side somehow and the exa=haust crossover pipe, anything else?
IP: Logged
03:40 PM
FieroTony Member
Posts: 1175 From: Conowingo, MD Registered: Feb 2012
Just changed my clutch the other weekend, (because of the spring clip on the T/O bearing). Yes, remove both axles, drain the tranny, (I forgot, what a mess). Also remove the two tranny mounts and support the center of the engine. Good luck.
IP: Logged
04:09 PM
Dave Rodabaugh Member
Posts: 278 From: Columbus, OH Registered: Feb 2002
I'd disregard the advise to change the clutch fork; they shouldn't wear out. I would, however, at least clean the fork shaft bushings. I also like to lube them with some wheel bearing grease, but you'll probably get varying opinions on greasing brass bushings. I see nothing wrong with it.
I don't remember a lot of trouble separating the transmission from the engine or putting them back together. The last time I did a clutch on a Fiero, I did both of these tasks all by myself.
anybody have tips on the mounts, which nuts and/or bolts to remove?
holy crap, removing the axles looks like I should have gone about this differently, now that the cradle is removed it is going to be tough to prevent the hub from rotating while I attempt to remove the axle nut
[This message has been edited by ZaraSpOOk (edited 11-21-2012).]
IP: Logged
11:02 AM
FieroTony Member
Posts: 1175 From: Conowingo, MD Registered: Feb 2012
Not saying that this is right or wrong, but I just removed the control arms, trailing arms and links from the cradle. Then popped the the axles out of the tranny.
IP: Logged
11:56 AM
mcguiver3 Member
Posts: 774 From: Beacon Falls, CT, USA Registered: Jan 2012
Yea, drain the tranny fluid, pull both axles and support the engine with a few 2x4 blocks to the sub frame. Need to remove the clutch slave bracket to access a bolt on the front side. I use a come along to a beam in my shop to lift the engine at the tranny end to assist in the removal. Then lower it to a few wood blocks till ready for re-installation. Do the flywheel as suggested. There are 6 bolts holding the trans to engine one is backwards on the rear of the engine with a stud to hold the VSS wire. It weighs about 80# if memory serves and should come off OK with a wiggle or two. Installation is a hit or miss with sliding on. A wiggle there helps too. The stud trick helps to align things. Don't force anything it will eventually mate up. The issues with pilot bearings is not needed (we don't have them) and just lube the TOB arm and fingers (check for abnormal wear though). Should go OK. Let us know how you make out.
Not saying that this is right or wrong, but I just removed the control arms, trailing arms and links from the cradle. Then popped the the axles out of the tranny.
thanks guys, I cannot believe how helpful you have all been. Am I making this more complicated than it has to be?
Please refer to the picture in the original posting, I am not familiar with the part names I have loosened the nut/bolt that attaches to the long horizontal bar where it attaches to the front of the cradle I have also loosened the nut/bolt that is on the end of the rod that looks like it adjusts toe where it attaches to cradle You cannot see it in the picture but there is a third nut/bolt that attaches to the cradle from a bar that connects to just below and the rear of the disc The fourth nut/bolt I have loosened is what connects the stabilizer bar I am next going to remove the nut on the end of the axel, then finish removing the above bolts and remove it as a unit (I hope) but I am puzzled because the nut measures 29.5mm or 1 5/32”, I was expecting it to be metric, and have never heard of a 1 5/32” socket Am I on the right path ?
IP: Logged
01:16 PM
mcguiver3 Member
Posts: 774 From: Beacon Falls, CT, USA Registered: Jan 2012
Whoa................ The cradle is out of the car right? You are doing more than necessary. The axles will pop out of the tranny without removing them from the spindles. Use a large screw driver or pry bar and wedge them out of the case. They are retained by a spring clip and will pop right out. There is enough play in the suspension/CV joints/axles to move them out of the way. Remove the coolant pipe, clutch slave, shift cable bracket, front engine dampener (small shock absorber). Remove the tranny mount nuts, tranny to engine bolts (6) and assuring the engine is supported wiggle the tranny off. I think that's all... Trust us, it's easier than expected, especially the second-ninth time around.
IP: Logged
04:07 PM
mcguiver3 Member
Posts: 774 From: Beacon Falls, CT, USA Registered: Jan 2012
PS, The sway bar and exhaust Y pipe will have to be removed too My car is an 88 too but set up for racing and is stripped of many of the stuff you have to contend with. It takes me 2.5 hours to drop the sub frame and split the tranny/engine by myself
IP: Logged
04:14 PM
PFF
System Bot
Nov 22nd, 2012
ltlfrari Member
Posts: 5356 From: Wake Forest,NC,USA Registered: Jan 2002
I see you have brake calipers still on. I usually remove them and tie up to car so no need to bleed. With all that off you can remove the bolt that holds the knuckle to the A arm then remove the knuckle. When you pop the axles everything comes off and you can move it out the way. No need to unbolt the axle nut. Just protect the rubber boots on the axle. I usually tape some pieces of carpet around them to protect them, especially the outer one. Also if greasing anything in bell housing, do not use too much. Grease and clutches do not mix well.
------------------ Anything I might say is probably worth what you paid for it, so treat it accordingly!
When I remove the the bell housing bolts I get a piece of cardboard , punch holes in it to match the bell housing layout and put each bolt in its corresponding hole in the the cardboard. That way, when reassembling you know which bolt goes in which hole.
I have the transmission off the engine. I took apart more than I needed to, but that’s OK, I learned something. Once you guys have pointed me in the right direction, Everything up to this point has gone well.. A big thanks to everyone.
Originally, the car was impossible to get in first or second gear with the engine running in neutral. And when in first or reverse the car wanted to move forward (or backward in reverse). I bled everything including the slave, but it still did it. Then I took the pedal out and discovered it was bent, installed a new one but it still acted the same. The good thing is it definately had a little more travel each step, first gained some travel after bleeding, then some more after the new pedal. But it still acted the same, like the clutch would not disengage. So here I am, replacing the clutch.
Up to now it has been sunny and in the 50's & low 60's during the day but the weather just changed, highs are going to be in the 30's
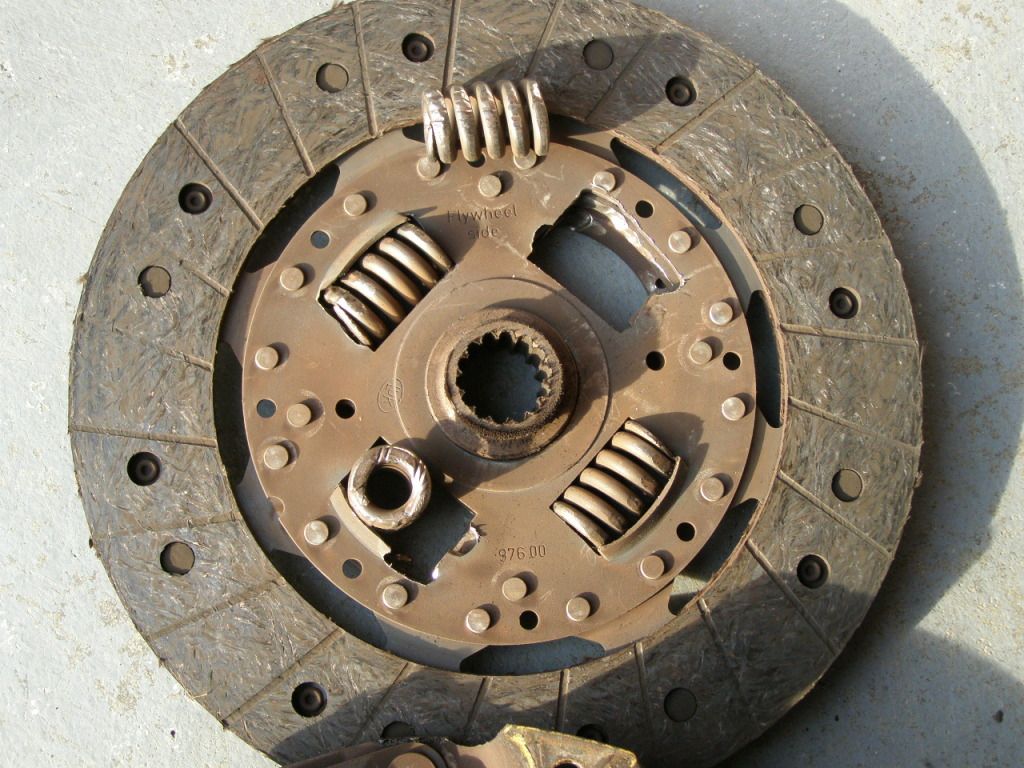
here is a picture of my clutch and flywheel and whatever you call this part, it has two broken whatchamacallits
[This message has been edited by ZaraSpOOk (edited 11-22-2012).]
IP: Logged
02:37 PM
mcguiver3 Member
Posts: 774 From: Beacon Falls, CT, USA Registered: Jan 2012
That's the pressure plate. Yep, need a new clutch Get that flywheel resurfaced too. Have a good torque wrench? You'll need it. How are the tranny/engine mounts? Now's the time to check/change them Rodney has a great set up. Just ordered 4 sets for 4 cars. Planning to do maintenance on 4 race cars this winter.
I thought I'd follow up with a review of the clutch I bought. I got it from Advance auto parts, $99 list, but got 15% off, they always seem to have some sort of online discount. If you are willing to wait 3-4 days they will ship to you for free. If not you can pick up at store. But you have to order online for the discount. first notice the clutch disc has 6 springs instead of 4. Some people claim more is better, but who knows. Also it is made in Korea, which is better than China IMO, and in fact I don't think it is any worse than one made in USA the bearing is made in Japan, again better than China IMO you'd think though, the cheap *$%#@ would have included the plain bearing! look at the old one, I think they are about 5 bucks or less pressure plate is slightly different, but I think it is fine
[This message has been edited by ZaraSpOOk (edited 11-25-2012).]
IP: Logged
09:22 PM
Gall757 Member
Posts: 10938 From: Holland, MI Registered: Jun 2010
I think you have another problem.....the 'plain bearing' you mentioned is actually the sleeve on the input shaft bearing for the transmission.
glad you pointed that out, however, in researching this I am thinking this isn't quite the problem it appears to be first of all the bearing is only a spacer, it is out of convenience that it is an integrated part with the input bearing the input bearing and seal appear to be in good shape only this plain bearing, which is a spacer for the release bearing is in poor shape since the input bearing is no longer available from GM, and it would be a job to seperate the tranny I am thinking it may be best to devise a "spacer bearing" for the release bearing
[This message has been edited by ZaraSpOOk (edited 11-26-2012).]
IP: Logged
01:08 AM
mcguiver3 Member
Posts: 774 From: Beacon Falls, CT, USA Registered: Jan 2012
I think you have a problem too. That part is the sleeve the TOB rides on and is needed to locate the TOB. Rodney has been working on a replacement for some time now and has the part you need. Unfortunately it requires the case be split to install the bearing/sleeve. Perhaps his sleeve can be used without the new bearing. It fastens from the exterior with screws. But the holes have to be drilled and taped to install it. You may want to check with him to see if it's possible.
If your looking for somewhere to get your flywheel resurfaced I would recommend Murgic automotive. Right there in rosemount and hes a racing guy, knows his stuff
IP: Logged
01:34 PM
Austrian Import Member
Posts: 3919 From: Monterey, CA Registered: Feb 2007
it was $30 at O'Reilly, but not all of them do it a new one was $56
This output (or maybe it's called input) shaft bearing situation really bites, the bearing & seal itself are fine, but the sleeve/spacer the TOB rides on needs some sort of resolution, and I am running out of time fast.
I see why Getrag designed it as part of the bearing, saves cost, but really is a bad design IMO. Rodney's design is much better from a service and longevity standpoint, but I question if it will work for me, on his design there is a stepped portion that sits against the bearing, I'm not sure if the bearing he used in the kit is the same as OEM so the sleeve with the OEM bearing may not work. I guess the only way to find out is to ask. But even if it would by the time it would get to me would be too late.
[This message has been edited by ZaraSpOOk (edited 11-28-2012).]
thought I would update this thread in case anyone is having clutch problems, something you should look for to prevent further damage.
if you read the previous couple of posts in this thread by me and others you will see that the sleeve on the transmission input bearing broke off (seperated) from the bearing. Well it caused the Throw Out Bearing to not slide properly on the clutch fork preventing full movement and not allowing the clutch to disengage. It even wore the cluuthch fork a little bit, but not to the point of requiring a new one, but it should be a warning, if you suspect this is the problem with your car, check it out immediately! Clutch forks are not cheap.
IP: Logged
04:54 PM
Dec 19th, 2012
hdryder Member
Posts: 674 From: Virginia Beach, VA, USA Registered: Apr 2011
I have a special consideration going on right now that forced me to do a temporary fix. I had a part machined to act as a plain bearing for the clutch release bearing that rides on the shaft. This will allow me to move the vehicle around my property, but I don’t dare drive it far from home or very long. I considered placing a caged needle bearing on the shaft, I found one that fits exactly, but it is only good for about 300 rpm, IOW, it too would only be a temporary fix with the same result.
[This message has been edited by ZaraSpOOk (edited 12-21-2012).]
IP: Logged
11:41 AM
hdryder Member
Posts: 674 From: Virginia Beach, VA, USA Registered: Apr 2011
MU59-1A, BTW, the pic on their sit shows a 4 spring, but when I received mine it was 6 they always have some sort of discount going on if you buy online
PS, it appears the Dickman part is the only solution, it makes me wonder the wisdom of people doing engine swaps keeping the Getrag, and even more the people swapping autos for Getrags
[This message has been edited by ZaraSpOOk (edited 12-21-2012).]