The concentric rings will precisely located the rotor, so the pattern you need to drill in the rotors only has to allow the wheel studs to pass through. It doesn't have to be super precise and using a simple drill guide will allow you do accomplish this task with common tools.
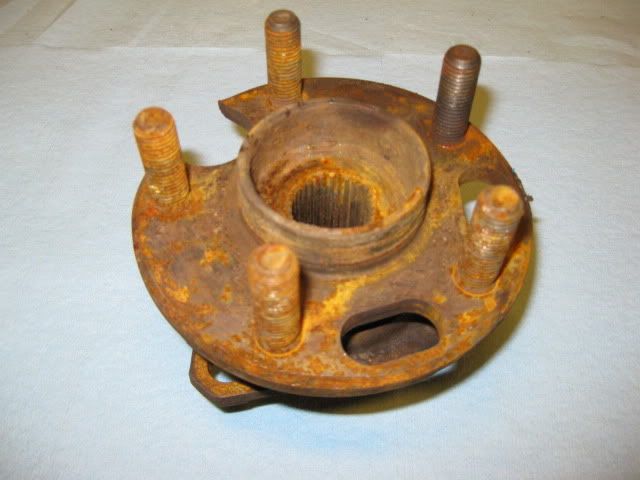
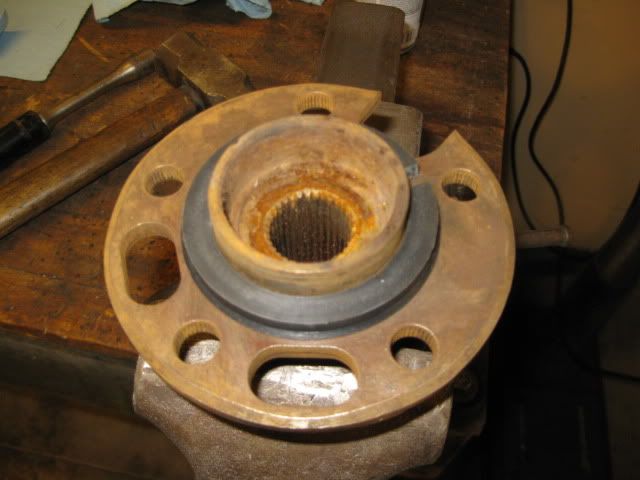
Take a junk rear wheel bearing:
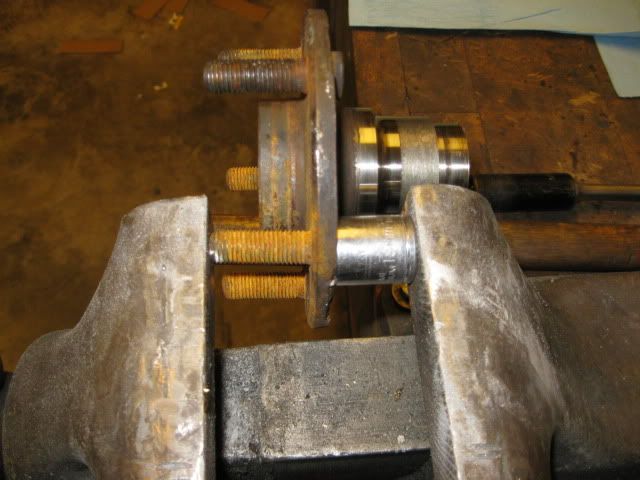
Clamp it in a vice by the bearing housing, use a 13/16" deep well socket against the internal splines and hammer until it comes apart:
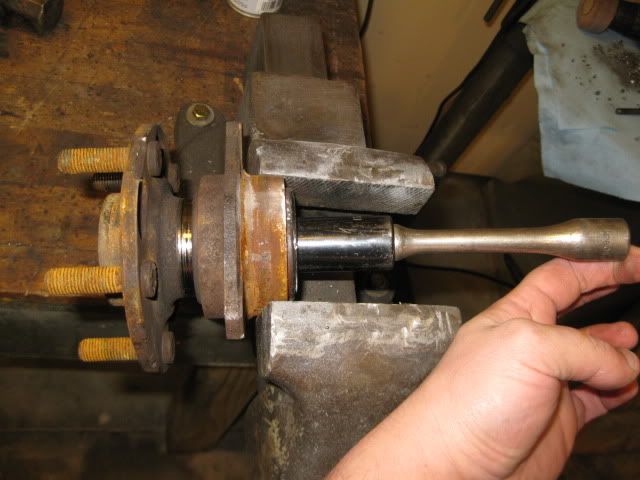
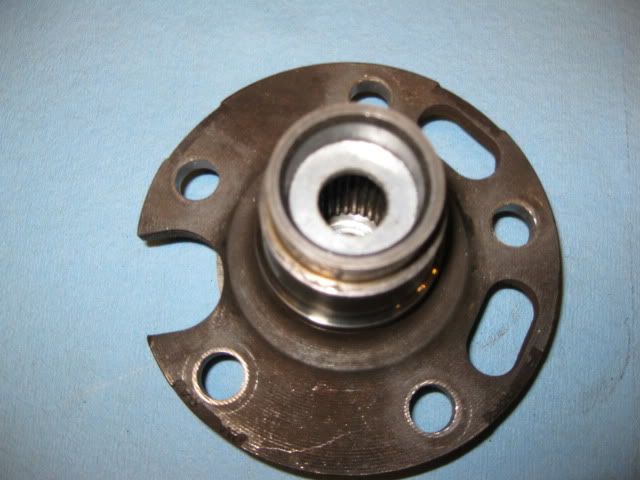
Take the wheel flange and an 18mm socket and clamp it in the vice as shown to press out all 5 wheel studs:
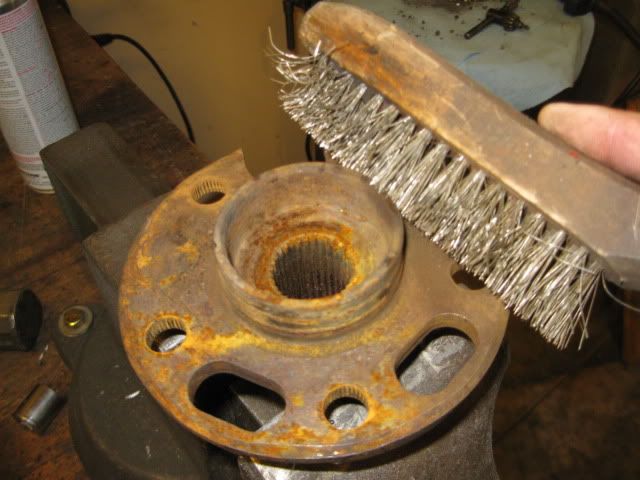
Use a wire brush to clean up the wheel flange and hub:
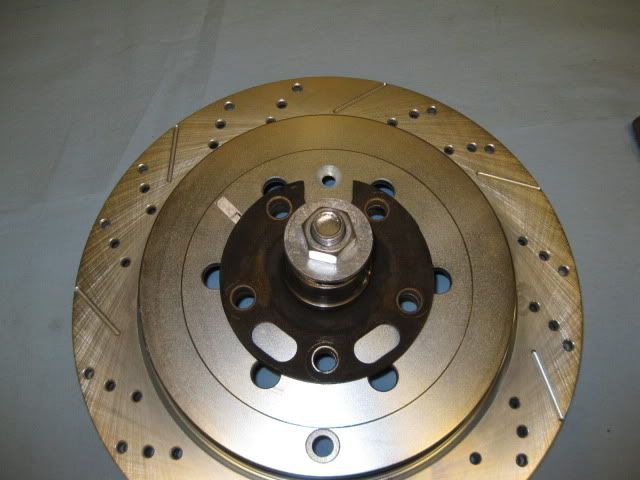
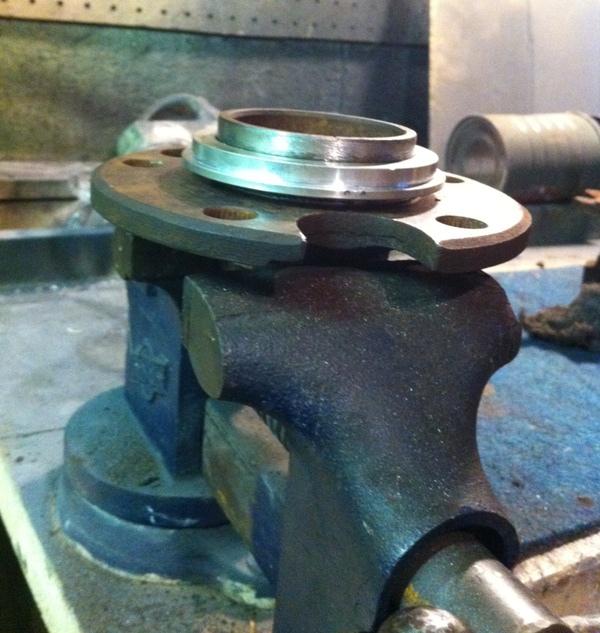
Slide one of the concentric rings from your brake kit onto the wheel flange:
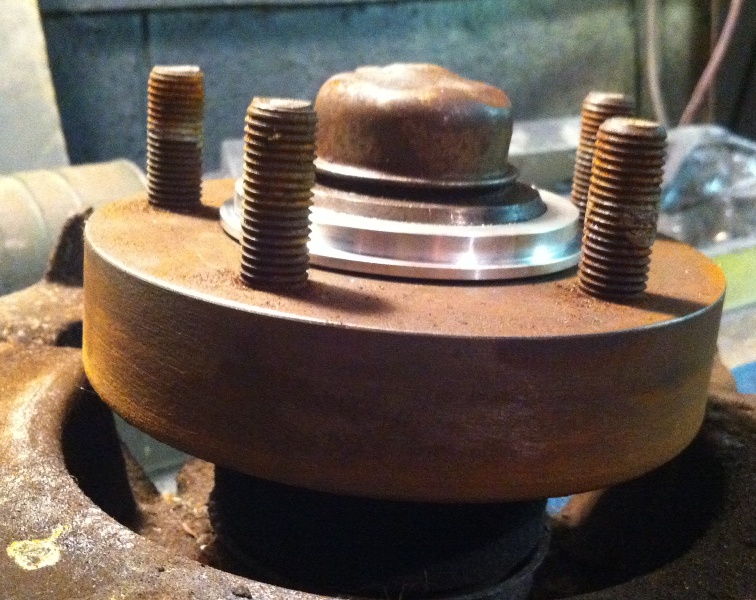
Find a large bolt and washer to allow clamping the wheel flange to the rotor. At the bottom you can use a flat bar vs. the large thick washer I have shown.
Align the open U on the flange with something on the rotor (I used the recessed hole in this rotor) and tighten the bolt to hold it in place (you do not want it to move while drilling):
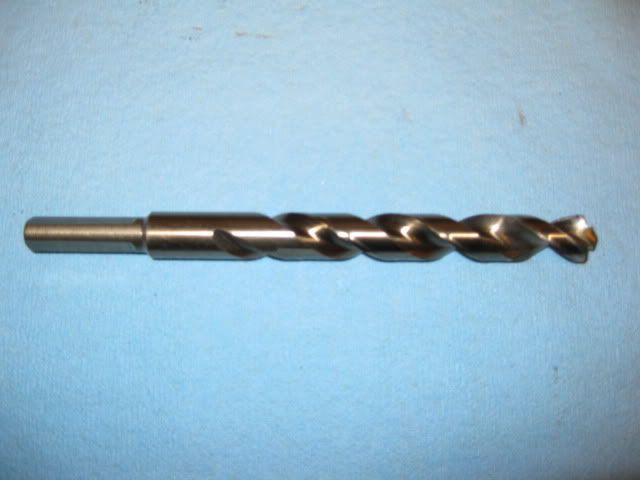
Find a 1/2" drill bit - a pilot point one will allow drilling the hole in a single pass (the one shown is a Dewalt Cobalt with 3/8" shank and pilot point and is available at Lowes).
Use a drill press or in a pinch a hand drill will work. Drill down through the wheel flange (the splined wheel stud holes are just slightly smaller than 1/2" so you will remove some material from the wheel flange) and through the rotor. Repeat for all holes and repeat for all rotors.
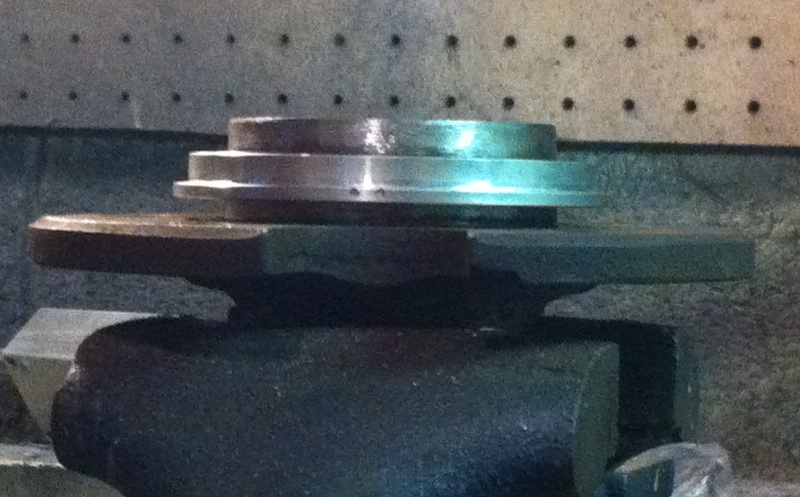
Something to keep in mind is whatever you bolt across the bottom to hold the wheel flange in place will probably be drilled as well. The setup I use has pressed in tight fitting washers for the bolt, a tapered head on the bolt to precisely center the large washer (brake lathe part) and I turned down the large washer so that it just clears the edge of the bolt holes:
That's all it takes.
[This message has been edited by fieroguru (edited 12-28-2011).]
IP: Logged
06:56 PM
PFF
System Bot
Doug85GT Member
Posts: 10062 From: Sacramento CA USA Registered: May 2003
great write up! after this is accomplished, what brake calipers will work?
This "How To" is more a generic how to, and not necessarily tied to any brake kit. The same process could be used for the 12" C4 rotors, the 13" Viper rotors, the 13" rotors I use in my brake kit for the 88's, the rotors for my 12 3/4" brake kit for the 84-87, and pretty much any rotor that does not already have the 5 x 100 mm pattern.
The calipers and more specifically the caliper brackets must match the dimensional requirements of rotors and are often times different for the different rotors.
The rotor in the pic is a 13" rotor from my 13" 88 brake kit that reuses stock 88 calipers.
[This message has been edited by fieroguru (edited 12-29-2011).]
If you are using a Cobalt 1/2" drill bit on a drill press, would you recommend using some type of lubrication while drilling?
I have been machining various metals for 30+ years and I never use any coolant or oil on cast iron. It's not necessary. If you have ever seen a rotor or drum refaced, those machines cut dry as well. Of course, you should use a reasonable drill speed and not feed the drill too fast.
IP: Logged
03:34 PM
fieroguru Member
Posts: 12639 From: Champaign, IL Registered: Aug 2003
I have drilled 16 rotors (80 holes) with the same bit and w/o any lubrication. I prefer to drill at slow speeds dry. It is way too easy to burn up the bit due to heat at high speeds - even with some kind of lubricant/coolant.
[This message has been edited by fieroguru (edited 12-29-2011).]
Awesome! And a BIG thank you for the detailed pics... I hate to read how to threads with out pics of the steps. We don't all speak the same language (some more technical then others) adn the pics bridge the gap! Plus it helps me since I'm a visual learner!
------------------ Rescued & resuscitated 1984 Indy Fiero SE Pace Car Replica #770 presently reversibly modified! SE: Stormtrooper Edition
Everything is the Previous owners fault
IP: Logged
04:55 PM
PFF
System Bot
LZeppelin513 Member
Posts: 761 From: Lake Stevens, Washington Registered: Aug 2003
First I must say, thank you for the detailed write-up, very helpful. I am trying to avoid machine shop costs because my brake upgrade is being done on a VERY tight budget. You mentioned that a hand drill will work in a pinch, I would think as long as I have the hub secured well to the new rotor, and keep the drill as perpendicular to the surface as possible, there shouldn't be any issues. Are you supposed to oil the bit or anything to keep it cool?
I don't know if I have like a baby vice in my house, but when I was trying to press out the wheel studs, they just would not budge at all. I ended up just putting the hub in the vice and whaling on the studs with a hammer until they came out.
I will be installing bmwguru's 12" vette conversion on my 87. I have a couple questions regarding the drilling though. I got my extra rear hub all prepped as my template. Cleaned it up the best I could with a wire brush and steel wool, however the concentric rings will not fit all the way down on the rear hub. I used a file around the hub to get any debris or imperfections out of it, but the ring still will not go all the way down. When I run my finger on the hub it almost seems like it flares out a tiny bit towards the flange. Any suggestions how I can get the ring to fit all the way down on the rear hub, or would it be alright to drill them with that small gap? Here are a couple pics of the gap between the ring and the hub:
The rings fit beautifully my front rotors that have been machined down.
[This message has been edited by zmcdonal (edited 02-06-2012).]
IP: Logged
02:08 PM
fieroguru Member
Posts: 12639 From: Champaign, IL Registered: Aug 2003
First I must say, thank you for the detailed write-up, very helpful. I am trying to avoid machine shop costs because my brake upgrade is being done on a VERY tight budget. You mentioned that a hand drill will work in a pinch, I would think as long as I have the hub secured well to the new rotor, and keep the drill as perpendicular to the surface as possible, there shouldn't be any issues. Are you supposed to oil the bit or anything to keep it cool?
I don't know if I have like a baby vice in my house, but when I was trying to press out the wheel studs, they just would not budge at all. I ended up just putting the hub in the vice and whaling on the studs with a hammer until they came out.
I will be installing bmwguru's 12" vette conversion on my 87. I have a couple questions regarding the drilling though. I got my extra rear hub all prepped as my template. Cleaned it up the best I could with a wire brush and steel wool, however the concentric rings will not fit all the way down on the rear hub. I used a file around the hub to get any debris or imperfections out of it, but the ring still will not go all the way down. When I run my finger on the hub it almost seems like it flares out a tiny bit towards the flange. Any suggestions how I can get the ring to fit all the way down on the rear hub, or would it be alright to drill them with that small gap? Here are a couple pics of the gay between the ring and the hub:
The rings fit beautifully my front rotors that have been machined down.
You really should ask the vendor of your kit about this issue, but since you asked I will share my thoughts (as another brake vendor).
On the 84-87's you should have 2 different ID's on the concentric rings, one set for the front, one set for the rear. The 84-87 front hubs have a built in rotor, so the only hub centering surface is the wheel pilot diameter. The rear hubs have removeable rotors, so they have both a wheel pilot and a rotor pilot diameter with the rotor pilot diameter being slightly larger. The rotor pilot diameter is what your ring is getting stuck on.
I do not think bmwguru is selling the rear versions yet, so the only rings you have are for the front and are slightly smaller than the rears need to be. If you press the aluminum ring onto the rear hub, it will enlarge the OD of the ring and then it might not fit the rotor. Also, if you press it on, you will probably tear it up getting it back off.
You have a few choices: 1. Wait till you get the rear concentric rings 2. Use a junk front hub (vs. the rear hub) to transfer the pattern 3. Cut the ring. If you make a single slice through the rind diameter, it will allow it to expand and fit over the larger rotor pilot OD. But this may make it too large to fit the rotor.
As for useing a hand drill... it will work. As long as the hole is close enough for the lug nut to pass through, then it is a workable solution. Using a 1/2" drill bit for the hole gives each hole about .03" or 1/32" of clearance. If you end up with one hole being off slightly, then just file the offending side of the hole for the needed clearance. The precision of rotor placement is the concentric rings function, the holes just need to allow the lug nuts to pass through. You could make the holes larger than 1/2" if you wanted to.
[This message has been edited by fieroguru (edited 02-06-2012).]
IP: Logged
04:24 PM
zmcdonal Member
Posts: 1682 From: NW, Indiana Registered: Oct 2005
On the 84-87's you should have 2 different ID's on the concentric rings, one set for the front, one set for the rear. The 84-87 front hubs have a built in rotor, so the only hub centering surface is the wheel pilot diameter. The rear hubs have removeable rotors, so they have both a wheel pilot and a rotor pilot diameter with the rotor pilot diameter being slightly larger. The rotor pilot diameter is what your ring is getting stuck on.
That answers my question. Thanks for the input. Glad I didn't force the ring on there, and I would like to avoid cutting it, maybe I can find something to use as a spacer to fill up that gap, or think up a way of using one of the grand am rotors from the previous brake swap for a template somehow. Time for brainstorming.
IP: Logged
05:32 PM
Feb 9th, 2012
bmwguru Member
Posts: 4692 From: Howell, NJ USA Registered: Sep 2006
Fieroguru thanks for the write up and the used hub.
I was amazed as to how incredibly easy the cast rotors are to drill with a proper drill bit (Dewalt Cobalt with 3/8" shank and pilot point and is available at Lowes) and a hand drill.
IP: Logged
03:27 PM
Oct 23rd, 2012
rourke_87_T-Top Member
Posts: 1347 From: Toronto Ontario Canada Registered: Jan 2009
Originally posted by zmcdonal: I have a couple questions regarding the drilling though. I got my extra rear hub all prepped as my template. Cleaned it up the best I could with a wire brush and steel wool, however the concentric rings will not fit all the way down on the rear hub. I used a file around the hub to get any debris or imperfections out of it, but the ring still will not go all the way down. When I run my finger on the hub it almost seems like it flares out a tiny bit towards the flange. Any suggestions how I can get the ring to fit all the way down on the rear hub, or would it be alright to drill them with that small gap?
Rear doesn't use same ring as front. Front uses 1 pilot for rim only. Rear uses 2 pilots... small for rim, bigger for brake rotor. See Hub Centric for GA Rotors in Fiero made easy?
------------------ Dr. Ian Malcolm: Yeah, but your scientists were so preoccupied with whether or not they could, they didn't stop to think if they should. (Jurassic Park)