A bit too pretentious for a title? OK, some of my rambling thoughts first.
There have been a number of dash swaps done and documented on this forum. I’ve read most of them and really admire those that have done this, given the work and ingenuity that they require. But I’ve never found one that I was really thrilled with for one reason or another. There seems to be a choice of putting in a dash from another production car, or a fibreglass kit consisting of all the panels that then have to be covered. This latter choice is a very expensive way to go. I looked into several of those (replicas of Ferrari interiors) and found that a raw fibreglass kit is around $2000 with another $2000 or so for a really nice upholstery job. Then I looked into the cost of air vents for the 355 style dash. Yikes! Upwards of $1000 these days and hard to find. So I would be into it to the tune of $5000 and I haven’t got any switches or instruments yet. No way I can justify that in a car that cost $2000.
So the other choice is to swap in a production car dash. A few Firebird dash swaps have been done, and a couple Stealth/3000GT have been started (don’t know if I’ve seen one finished though). While this does give you a really nicely finished dash (since it is of production car standards) I just have not been thrilled with the look of these in a Fiero. To me, and please understand this is a personal taste thing so there will be those that agree with me and those that don’t, they don’t look like they belong in something small and sporty. Maybe one of the reasons is that I’ve got a Ferrari Dino body on mine so I am after something “sportier” in the look of a dash.
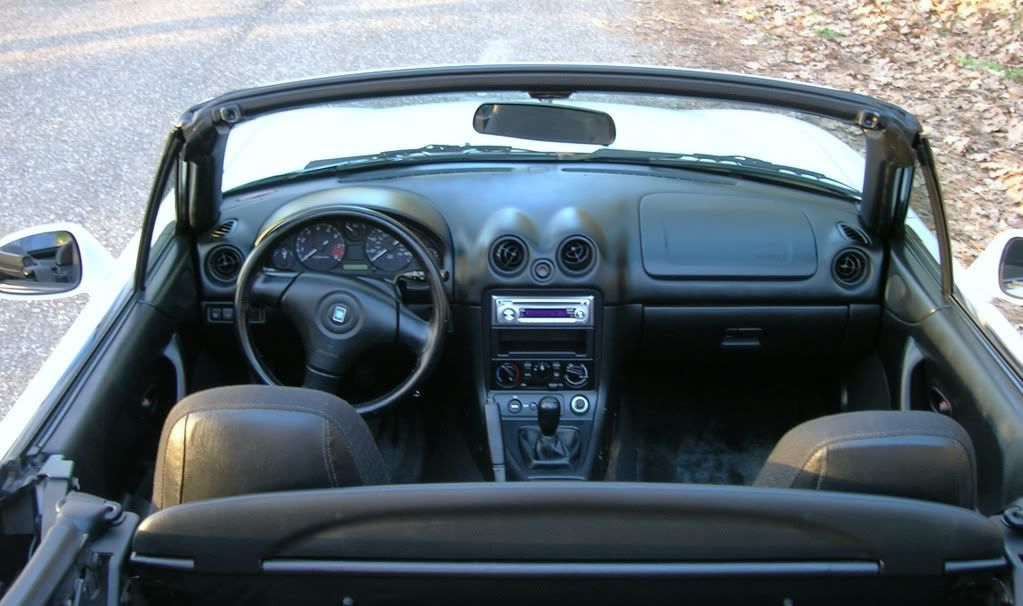
I’ve always liked the Miata, and have owned 2 of them in the past. I like the style of the body, especially the older ones, and the interiors are what I think a sports car should look like. The dashes have that Ferrari’ish look; fairly simple, almost plain in front of the passenger, nice center console area, and then an instrument pod very similar to an older Ferrari. So when I’ve read about dash swaps I always wondered if a Miata dash would work in a Fiero.
Skipping ahead a bit (yes, eventually I will get around to the actual dash swap!), I had pretty much completed the engine swap on my car and couldn’t wait to try out something with the interior. Now the interior was in very nice shape, but what I didn’t like about it was that is looked like a Fiero. Since the outside looks like a Ferrari, the inside should not look like a stock Fiero. A good friend of mine has an original year Miata so I took a few pictures and measurements of the dash some time back; looked like it would fit. It was not as wide as the Fiero, but I thought that was better than being too wide; easier to make a filler piece than cut off some of the dash and then have to finish an upholstered end.
I found a guy that works on Miatas and has a garage full of parts off stripped cars. I bought an early generation dash that was in poor shape but was cheap. If it works out, then I will buy a nicer condition dash. This way I could try it in the car and if it would just not work out at all I hadn’t invested much money into it. For those not familiar with Miatas, these are the “NA platform” cars (easily identified by the pop-up headlights). Nice simple interiors; I bought a dash from one of these. The next generation, the NB cars, did away with the pop-up headlights and redesigned the interior. These dashes, to me anyway, are much nicer than the NA ones; more curves and a little more refined looking. The current generation, the NC cars, seem to have gone the way many sports cars go…bigger…heavier…more luxury and less “sports”. Anyways, I don’t like the interior of these as much, but that may be just me.
So here is what the various dashes look like:
Miata -- NA:
Miata -- NB:
Miata -- NC:
And here is the dash I bought; what a piece of crap, eh? (I’m Canadian so I have to say “eh” now and then. And while I’m on that subject, if I should spell “color” as colour and “center” as centre, well, that’s the way we do it up here ).
OK, with all that miscellaneous rambling out of the way, time to get started. I will try and thoroughly document the swap so when it (hopefully) works out and if you like the look of it, you will be able to duplicate what I’ve done.
This is what I started with. Really nice condition, but not the look I want:
If you’ve never removed the dash before, it’s really pretty easy. I won’t go into the details here since you can find how to do it by doing a search:
Then of course I had to try the new (new??) dash in to see if it fit:
I know the dash itself looks pretty bad (no instrument cluster, no glove compartment door, no switches, no center console stuff, really dirty; that’s why it was cheap!). This was actually quite a big step since I didn’t know if it would line up with the center console and the steering wheel when it was centered in the car. It seems to line up very well at these areas.
I’ve learned a lot of things already and I’ll pass them along. First, there is a different philosophy in the design/construction of the Fiero dash compared with the Miata dash. The Fiero has all of the “structure” in the car (mainly the steering wheel support), so the dash is a very light, simple unit. The Miata must have very little structure in the car in this area, since there is a lot of it in the dash. There is a large tube running across the back of the dash with a lot of metal and brackets attached to it for reinforcing. Looks like the steering wheel mount is part of this structure.
The good news then is that I can cut up these pieces as needed, to fit the dash farther forward; I don’t need this metal for structural support, only to hold the dash together. You can see in the picture that the dash does need to move forward as much a possible.
Since the dash does have the metal in it, as well as part of the center console, it is heavier and bulkier than the Fiero dash. This makes it more awkward to handle when fitting it in the car. Several points learned here. One, I took the steering wheel off to make more room, but will drop the column as well to avoid struggling with the dash to get it over/around it. If you have a nice headliner, protect it with something! Mine is crap and needs to be replaced so I’m not concerned with it, but did bang the dash up into it several times and likely would have torn it (if it were not already in shreds). The first time I sat partly into the car with the dash on my lap I sat more or less on the seat belt plastic cover and broke it off the seat. I’ll have to fix that eventually, but it might be best to remove the seat and give yourself more room to work. I’ll take mine out eventually since I have to get them recovered anyways.
Next step is to see what is preventing the dash from moving farther forward and see what needs cutting away to do this.
Hope you enjoy this.
Rick
IP: Logged
07:40 AM
PFF
System Bot
nosaint Member
Posts: 293 From: Moose Jaw, SK Canada Registered: Aug 2009
The picture is a little deceiving, it's a bit less than 2" short at each side. I think with a filler piece to blend the dash into the side panel of the Fiero it will look good, especially when the dash moves forward another few inches.
Rick
[This message has been edited by couldahadaV8 (edited 05-19-2010).]
IP: Logged
08:49 AM
Blacktree Member
Posts: 20770 From: Central Florida Registered: Dec 2001
Great start; I never liked the Fiero dash, so that is why I installed a 94 Camaro dash in my 87 T-top. Thanks for taking the time to post this. I will be following it with great interest. Jim
IP: Logged
10:14 AM
Mickey_Moose Member
Posts: 7583 From: Edmonton, AB, Canada Registered: May 2001
I can't tell from the pictures, but I know my NB was about a foot narrower than the fiero inside, is that reflected in the dash? I like your idea though, good luck!
------------------ ---------------------------------------------------- Currently in the middle of my 88 + 3800NA swap
IP: Logged
10:43 AM
couldahadaV8 Member
Posts: 797 From: Bolton, Ontario, Canada Registered: Feb 2008
Originally posted by aaronkoch: I can't tell from the pictures, but I know my NB was about a foot narrower than the fiero inside, is that reflected in the dash? I like your idea though, good luck!
I did a quick measurement of an NB dash as well and it seemed to be the same, which is about 3" - 4" narrower than the Fiero. I think making a filler piece that sort of flows the shape of the Miata dash into the extension of the A-pillar area of the Fiero will look good. I'll find out when I get to that stage.
IP: Logged
12:44 PM
aaronkoch Member
Posts: 1643 From: Spokane, WA Registered: Aug 2003
That NC dash looks sexy too.. Kinda reminds me of a BMW dash design.
I still miss my NB every day... I got SO much crap for driving a miata, but that thing was a kick in the pants to drive. That, and I'm 6'4", and my friends said every time i would come down the street, I'd look like big bird.. ROFL.
IP: Logged
07:36 PM
couldahadaV8 Member
Posts: 797 From: Bolton, Ontario, Canada Registered: Feb 2008
Originally posted by aaronkoch: I still miss my NB every day... I got SO much crap for driving a miata, but that thing was a kick in the pants to drive.
Yup, the people that make fun of them have never taken one out on a twisty road on a nice summer day......I'll likely buy another one some day.
Yup, the people that make fun of them have never taken one out on a twisty road on a nice summer day......I'll likely buy another one some day.
Folks call them a "girl's car" - same as my VW Cabriolet. Who cares? Besides, if the ladies like them I'll be glad to take them for a ride... I'd love to add a Miata to my collection one day. Love the dash the OP is using too. Might have to try this myself. ~ Paul aka "Tha Driver"
Two signs of growing old are short term memory loss, and, wait; let me think... oh yeah short term memory loss.
I really like the look of the Miata NB you posted, but the one you choose is cool too.
The dash I'm using now is only for test fitting (that's why it looks worse than the Fiero one that came out!). Once I'm convinced the swap is possible/practical, a better dash will go in (most likely the NB).
IP: Logged
11:20 AM
May 21st, 2010
couldahadaV8 Member
Posts: 797 From: Bolton, Ontario, Canada Registered: Feb 2008
The steering column mounts in the dash have to be cut away. They interfere with the steering column mounts in the car and aren’t really needed. You can see where I was trying to leave as much of it in place as possible, while cutting out the areas that were hitting the structure in the Fiero.
I tried cutting them away a little at a time and then realized that they have to basically be completely removed. This is OK since there is still enough metal to hold the lower dash parts in place (under the steering wheel); nothing structural is needed here. I also cut away most of the flat bracket that sits on the main pipe between these 2 pieces.
The lower center console metal has to be removed as well to allow it to fit down on the Fiero console. With this metal left in place the center console part of the dash sits too high up. There is also a bracket attached to this that supports the back of the radio. I figured that once the dash is in the final position I can make some new brackets to replace these, that will bolt down onto the center console of the Fiero and attach to the metal left in the sides of the Miata dash in this area.
The reinforcing pipe at the left side of the dash (the right side in the above pictures since it is showing the back of the dash) interferes with the steering column mount structure in the Fiero. This is keeping the dash from moving forward. This pipe is partially cut away, but can’t be completely removed since it holds the end of the dash in place. This gets a little tricky since it has to be cut away quite a bit to clear the structure in the car, but leave enough to support the dash. What it is interfering with in the car is the flange that protrudes rearwards from the steering column mount structure. I was really trying to avoid any cutting of the car parts so if this doesn’t work out the Fiero dash can go back in. Cutting part of this flange is not a big deal since it does not affect the installation of the Fiero dash should it come to that. There is a trade-off here between cutting the Miata dash pipe and cutting the Fiero flange; the more you cut of one, the less you cut of the other.
This is the flange that needs to be partially cut away (where the white mark is):
And this is the pipe in the back of the dash, cut away to clear the flange in the Fiero. You can see that I’ve cut away some of the pipe, along with the sheet metal from the dash end, and the plastic dash end itself. Oh, you can also see that the steering column mounts are cut out completely here. Basically I just kept trying the dash in place and marking and cutting away the areas where it was hitting the structure in the car as I tried to move it forwards. Other than the small cut on the Fiero steering column support bracket flange, there is no cutting of anything in the Fiero. I was very pleased with this since in other dash swaps I’ve read about there has been a lot of cutting and fabricating in the steering column mount area.
The plastic on the side of the dash has to be cut away as well to clear the structure in the car. All of this only has to be done on the driver’s side since the passenger’s side seems to clear everything nicely. The trimming of the plastic is not too critical since the plan is to put a filler piece in there (to bridge the gap between the dash and the A-pillar extension area) and it will cover the trimmed part of the plastic dash.
The dash also needs the usual trimming of the forward portion to fit closer to the Fiero windshield. This seems to be one of the major stumbling blocks for dash swaps; how to fill this area so it looks “factory”. With this Miata dash the area to be cut away is moulded plastic with a vinyl texture to it, not actually padded and covered. This may make it easier to match up to a filler piece later.
Rather than make template for cutting, I just used the Fiero dash itself. I clamped it onto the Miata dash in what I thought was the right place to cut. It does take out the Miata defrost vents completely, so they will have to be cut into the dash later in the correct location to match up with the Fiero defrost duct.
I marked it with soapstone (if you do much metal working and don’t have soapstone for marking, get some….cheap and shows up nicely on metal – or black plastic dash). Cutting it was a bit tricky. I started off with an air cut-off wheel which sort of melted its way through. The problem is that as it cuts it melts the plastic and then it re-joins itself behind the cut. Do it a couple times and it will make a cut. A better way was with an air body saw, but that too can melt the plastic if you go too slowly with it.
So with these areas cut away it was ready for another test fitting in the car. This is looking pretty good. I think it is about 3” farther forward now and is fitting pretty nicely.
It doesn’t sit in the same position as it does in the Miata. Notice the lower part of the center console side area. In the Miata this is roughly horizontal. In the Fiero it is on quite an angle. That tells me that the top surface of the dash should be pulled up at the front, or down at the rear to level it out. I can’t pull the front of the dash up or it will start to come too far up the windshield. I can’t push it down at the rear or the center console area (where it will eventually mate with the actual Miata center console) will have to be cut away and thus won’t line up when the center console goes in. I really don’t think this is a big problem if I leave it the way it is. I’ll do a little more trimming and tweaking and see if I can adjust things a little. But so far I like what I am seeing!
IP: Logged
09:22 AM
May 23rd, 2010
couldahadaV8 Member
Posts: 797 From: Bolton, Ontario, Canada Registered: Feb 2008
I’ve given a lot of thought on making a filler panel (between the dash and the windshield) that will look good. Ideally what I want is an extension of the upper dash surface that will go right up to the Fiero windshield. I thought that moulding a fibreglass lip onto the current dash might work. One problem with this is that fibreglass doesn’t bond very well (if at all) to the dash material. I think it will hold well enough to mould it in place, and then maybe I’ll have to take it off and bond it on with some sort of panel adhesive. There are 2 ways to do the seam between this panel and the dash. One is to fill it in and try and hide it; this might require refinishing whole upper surface of the dash. The other way is to leave a definite line where the joint is, as a sort of design feature; this might be the easier of the 2 methods. That’s the thinking right now anyways. But enough thinking, time to start fibreglassing. Often when I’m not quite sure how to do something I’ll just forge ahead with it and assume I will work out the missing details later….it sometimes works.
The portion of the dash, right where it was cut off, is starting to take a downward curve. I don’t want it curving downwards towards the windshield or it won’t fit properly, I want it basically flat. So what I did was to put some strips of duct tape on the top surface of the dash, extending forwards to sort of simulate the area the fibreglass is going to cover. Then I propped the dash upside-down on the bench so the tape now has the sticky side up. Oh, I covered the bench first with a sheet of plastic so I don’t end up bonding the dash to it. I propped up the rear part of the dash, which causes the lip I want to make to be at the correct angle to fit in the car and match up with the windshield. Should be clear in the picture:
I stuck layers of fibreglass mat on the tape and then a final layer that overlaps the dash itself to bond it together, then soaked it with resin.
It didn’t come out too bad. I’m not sure that it matches the contours of the main part of the dash, but that can be fixed with some more fibreglassing and filling.
The contour at the ends of the dash isn’t quite right; the dash takes a weird curve here so I cut off the ends of the fibreglass lip and remoulded this area at each end to flatten it out a bit.
I trimmed the front of the fibreglass lip to match the Fiero windshield and gave it another trial fit in the car. I did notice that the lip is not bonded very strong to the dash, so I had to be a bit careful not to break it off. I think this scheme for a filler panel is workable, but I haven’t decided yet what to do about the seam between it and the dash.
IP: Logged
09:19 AM
Blacktree Member
Posts: 20770 From: Central Florida Registered: Dec 2001
No, the fiberglass will not adhere to the plastic dash. Although, there may be some industrial adhesives that could do the job. Barring that, you could try pulling up some of the upholstery near the back edge of the dash, and putting in some rivets.
IP: Logged
01:08 PM
couldahadaV8 Member
Posts: 797 From: Bolton, Ontario, Canada Registered: Feb 2008
Just looked at this thread out of idle curiosity while browsing the forum.
couldahadaV8 - you're mad but obviously determined, and I'm just very impressed by your ambition. Hope you get the result you are looking for!
But it does seem a bit like the automotive equivalent of a nose job, nip and tuck, or enlargement of other bits of anatomy (some use silicone, some use fibreglass?). Might look OK from some angles, but you can usually see the surgical scars and the joins if you look. Me, I like my Fiero just as it was originally designed. But then I have an 88 Formula...
br1anstorm
[This message has been edited by br1anstorm (edited 05-23-2010).]
IP: Logged
07:06 PM
couldahadaV8 Member
Posts: 797 From: Bolton, Ontario, Canada Registered: Feb 2008
Originally posted by br1anstorm: couldahadaV8 - you're mad but obviously determined, and I'm just very impressed by your ambition. Hope you get the result you are looking for!
Mad? Never thought of it that way, but you could be right. But yes, I am determined to get the result I am looking for, even though I'm not sure exactly what that is right now. I suppose it is something that does not look "Fiero" but looks pretty much like a production car standard.
quote
Originally posted by br1anstorm: But it does seem a bit like the automotive equivalent of a nose job, nip and tuck, or enlargement of other bits of anatomy (some use silicone, some use fibreglass?). Might look OK from some angles, but you can usually see the surgical scars and the joins if you look. Me, I like my Fiero just as it was originally designed. But then I have an 88 Formula...
I suppose we will both have to wait a bit to see how it comes out. I've always like tweaking things, sometimes just to make them different. I see it more as customizing what the factory started. They produce what 99% of the public likes, and the other 1% takes it as a starting point to make it their own. Some will like it, others won't. That's fine since I'm doing this for me, but at the same time sharing it for others to copy or be inspired to try something different. Like I said, I was inspired by the other dash swaps, but just didn't feel that they were exactly what I wanted. Studying what others have done gets me going to try something different for myself. However it comes out (and I will only be satisfied if it comes out looking really good, but "really good" is a personal thing) I am having a lot of fun doing it.
Thank you very much for commenting. Positive or negative, it is nice to have comments since that is why I am going to the trouble of posting this.
Rick
IP: Logged
08:14 PM
br1anstorm Member
Posts: 232 From: Scotland, UK Registered: Apr 2008
As I think they say in some places on that side of the Atlantic....... "Respect!".
I hope you saw my comment as positive (even if a little tongue-in-cheek!).
I have nothing but admiration for what you're trying to do, especially as I have neither the skill nor the bravery to attempt anything like your project.
It's owners like you who discover what's possible - and we all benefit from those who do the pioneering. Go to it!
Best of luck
br1anstorm
IP: Logged
08:58 PM
PFF
System Bot
May 25th, 2010
couldahadaV8 Member
Posts: 797 From: Bolton, Ontario, Canada Registered: Feb 2008
So, decision time. I’ve convinced myself that this swap is worth going ahead with. So how much farther do I take it with this dash before buying a good one? The dilemma is that any work I put into this dash will just have to be repeated on the good one that I buy. If I buy a good one now, what if I find something that will be a show-stopper later and then I’ve spent money on a dash I don’t need. Also, I really like the look of the NB dash (see first post if that doesn’t mean anything to you) and I would like one of those. Of course I don’t know what they have changed in going from the NA dash to the NB one. Maybe the NB one is different enough that it will require different modifications than what I have already done. In that case, it isn’t worth taking the existing one any farther. Then again, maybe the NB one will be a better and easier fit (yea, dream on!). I’m not real happy yet with the way the filler piece is working out, but it isn’t a disaster either, so there is hope that the fibreglass lip method will be OK.
What the heck….might as well go for it. I’ll call the guy up that has the Miata parts and see what he has in the way of a nice NB dash.
I was looking at the earlier post on a filler panel. When I put the Camaro dash in my Fiero, I used .090" 5052 Aluminum for my filler panel. It can be cut with a jigsaw or even a coping saw, and you can bend it to a degree (I don't think you can do 90 degree bends). I drilled, countersunk, and epoxied some mounting screws pointing to the bottom, which I could secure under the dash with nuts. I padded the panel with thin headliner material and covered in Allsport vinyl. Good luck and I can't wait to see it finished. Jim
IP: Logged
09:06 AM
couldahadaV8 Member
Posts: 797 From: Bolton, Ontario, Canada Registered: Feb 2008
That's a very good idea for a filler panel. If I can't make it one piece with the dash, then it really doesn't make sense to try and make it from fibreglass. Trying to mould it in place with the windshield in the way would be very difficult. The aluminum would be good since it can be bent and tweaked until it fits just right. I'll see what the NB dash looks like in that area.
IP: Logged
02:07 PM
May 26th, 2010
couldahadaV8 Member
Posts: 797 From: Bolton, Ontario, Canada Registered: Feb 2008
OK, better sit down for this one (you likely weren’t standing up at your computer anyways!). I picked up a second generation Miata dash. Check out this baby!!:
This one is from a “leather” car; 2 tone leather interior. The tan will go very nicely with the tan interior of the Miata. I’m pretty sure they also come in all black; don’t know if they come in any other colours.
I got this one complete with the instrument cluster, all of the switches, the airbag cover (complete with airbag inside that I am going to have to do something with), glove compartment, and centre console (not shown). Can't wait for a trial fit to see what it looks like in the car. I think this is going to look fantastic in the Fiero.
IP: Logged
07:25 AM
aaronkoch Member
Posts: 1643 From: Spokane, WA Registered: Aug 2003
Looks the same as the one in my NB, and they did offer an all black, that's what i had.. Is that a 2000 dash? Good find, didn't have the blue gauges yet..
IP: Logged
03:21 PM
couldahadaV8 Member
Posts: 797 From: Bolton, Ontario, Canada Registered: Feb 2008
Originally posted by aaronkoch: Is that a 2000 dash?
I think it is a 2000 that I have, but I did notice something strange about it after starting to take it apart. The speedometer should be electric in the 2000's, with a digital odometer (like you are showing in your picture). Obviously the guy I got it from mixed up the gauge cluster with an older one. I may or may not exchange the cluster for the newer one, depending on what I decide to do about the instruments.
Rick
IP: Logged
07:00 PM
May 27th, 2010
couldahadaV8 Member
Posts: 797 From: Bolton, Ontario, Canada Registered: Feb 2008
The first thing that is apparent is that it weighs a ton! If the Fiero dash weighs 10 lbs then this must weigh 40 lbs. Why? Take a look at what’s behind it:
There is also one neat design feature on this dash that is very different than the early one I have (the NA dash). Remember how the other dash is moulded plastic right up to the windshield contact area? This one is padded and vinyl covered up to a point about 4” from the windshield, and then it is moulded plastic. This makes a natural parting line that may make it much easier to adapt a filler piece when matching the dash curve to the windshield curve.
I was anxious to give this one a trial fit in the car, but it is so frigg’n heavy that I decided to take as much stuff off the back of it as I could first. If you are going to do this, protect the dash when you turn it upsidedown on the bench with rags, blanket, etc.
The first thing I removed was all the plastic ducting for the defrost and heating. This is all pretty thin and light, but I didn’t know if it would interfere with anything in the car, so out it came. I took the wiring harness and switches out next, labelling the harness ends in case I want to use them later. Next came the heater control panel from the centre console area. This is a surprisingly big unit and it is always interesting to see how things like this work with the various gears and levers.
OK, bomb disposal time. I was very careful removing the airbag for 2 reasons. Obviously I didn’t want it going off, but I also didn’t want to damage the cover since I am going to use it. I thought maybe I could hinge it and use it as an additional compartment for something. Oh, when I bought the dash I paid extra for the airbag and cover. Obviously I didn’t need/want the airbag, but it is part of the cover and I was told that when they go off during an accident it generally breaks the cover in the process. So if I wanted the cover, I had to pay extra for it with the airbag.
Once a few bolts are removed from behind the dash, the cover with the airbag comes out the front side by carefully prying it off. The airbag is then easily separated from the cover. The cover can be snapped back in place for a factory look, with nothing behind it. I left it off for now; one less thing to damage.
With all of this out, there isn’t too much left of the dash, and it is much lighter now.
The whole metal framework is screwed into the moulded plastic dash, so it is easily removed. I don’t know why I didn’t think of taking it out of the old dash when cutting away the metal to make it fit in the car. Oh well. The dash holds its shape pretty well without all this metal in it, so whatever I have to cut out for clearance in the Fiero shouldn’t be too much of a problem.
Now the dash is very light since there is nothing left in it; easy to move around.
Time for the first trial fit of the dash in the car. This is of course with no trimming just to see how it fits, so it is sitting farther back than, I hope, it will eventually sit. I put the instrument cluster and the airbag cover back on loosely just to complete the look a little. I think it looks amazing!
Man, it sure looks good with the tan of the 2 tone dash matching the interior of the car. That’s it for now. Time to quit on a high note.
IP: Logged
07:05 AM
northeastfiero Member
Posts: 511 From: Norwich / Uk Registered: Mar 2005
Looks great! Keep up the work, I would love to see it finished!
When I did the Camaro dash swap, the airbag had already been deployed and the passenger airbag cover was broken. Biy the canister was heavy. I had to epoxy the cover back together and cover the dash with vinyl. Also, one of the issues to deal with as you fit it is air flow out of the vents. The first Fiero I had, was a 355 w/355 look alike dash. All the air on that one came out the center vents. So when I did the Camaro swap, I took great pains to try to balance flow. Not perfect, but much better. I ended up using half the Camaro ductwork attached to a cut down section of the Fiero ducts. I used the original Fiero defroster vent, with the left side cut down a bit. One thing to think about this is dash install and removal. I set up the ducts so that the Camaro ducts were attached to the dash and joined the Fiero ducts using a butt joint with foam glued on one side. Therefore, when removing/assembling the dash, all you have to do is bolt it in and the duct joints meet and (mostly) seal. By the way, I could not find any glue that would adhere to the Fiero ducts. I tried every kind of glue I could find. In the end, I pop riveted sheet metal to hold pieces together, and then glassed everything over. While the glass would not adhere to the plastic, it stayed put because it was wrapped around the entire duct. I have the install posted on PFF. Jim
IP: Logged
08:39 AM
doublec4 Member
Posts: 8289 From: Oakville, Ontario, Canada Registered: Jun 2003
Originally posted by northeastfiero: I agree it looks right at home there. Keep up the good work and documentation of it.
Thank you. The plan was to document it in enough detail so others could follow it, so I guess I'll keep doing that.
quote
I hope you don't mind if I shamelessly steal your ideas.
Not at all, that's why I'm taking the time to show exactly what I'm doing. I've likely "borrowed" an idea from someone else now and then.
quote
Looks great! Keep up the work, I would love to see it finished!
I would like to see it finished too! I want to get this car on the road one of these days. I agree with you on the ducting issues. I've given it some thought as I've taken the ducts apart and ideally want everything to be in the Miata dash so it is easier to work on (on the bench). Then it would interface with the Fiero duct in the car when the dash is installed.
Originally posted by couldahadaV8: The first thing that is apparent is that it weighs a ton! If the Fiero dash weighs 10 lbs then this must weigh 40 lbs. Why? Take a look at what’s behind it:
The airbag alone probably weighs as much, or more than, the Fiero dash. Those things are heavy! The Firebird dash I bought a few years ago had one in it, and it weighed a ton. Much lighter without it.
IP: Logged
11:43 AM
Fieroseverywhere Member
Posts: 4242 From: Gresham, Oregon USA Registered: Mar 2006
I really like that dash also. Not nearly a bulbous and huge as some of the others I've seen. Lower profile like the fiero dash but rounded like a more modern dash. Great combo! Keep up the good work.
IP: Logged
05:10 PM
grkboy707 Member
Posts: 3019 From: Kingsville, MD Registered: May 2009
Thank you very much for all the feedback. I suppose then I have to continue with it?
With the metal out I noticed that the black piece on the top/front of the dash (the padded vinyl covered part) comes off the main dash part; undo a few screws and it comes apart. This is really good for a few reasons. First, I can take it off while fitting the dash in the car and generally working on it so I don’t damage it. Also, it makes it easier to see where to cut the front part of the dash off where the filler panel will go. And it may make it easier to attach the filler panel since it comes apart at this location. You can see the step on the main moulded part of the dash where the black padded part mates up; the factory spray paints this section black.
Since the dash has to be cut off at the front to allow it to move closer to the windshield, this step is the best place to cut it. So I might as well cut it off now. All the tools required for dash surgery:
At first I cut it off leaving the slots in the main part of the dash that the padded cover piece fits into. You can see the slots and the mating parts of the padded dash in some of the previous pictures. It would actually make it easier join a filler piece onto the dash if it is cut below the slots (removing them completely). The upper padded part of the dash seems to stay in place just fine without the slot arrangement, so I cut it off again a little lower and removed this portion of the main dash. If you look at the picture above showing the main part of the dash you can see one of the slots. You just put the saw blade in the slot and, running it along the bottom, cut over to the next slot. That removes the front portion pretty neatly.
I’ve got a few ideas for making the filler piece that may work out better than the fibreglass extension I tried on the first dash. More to come.
Rick
[This message has been edited by couldahadaV8 (edited 05-29-2010).]


 ).
).