Pennock's Fiero Forum
  Technical Discussion & Questions - Archive
  How to install Sunbird Turbo Tachometer in a Fiero

T H I S   I S   A N   A R C H I V E D   T O P I C
  

Email This Page to Someone! | Printable Version


How to install Sunbird Turbo Tachometer in a Fiero by 2002z28ssconv
Started on: 07-24-2010 10:28 AM
Replies: 21
Last post by: 2002z28ssconv on 11-24-2011 11:35 PM
2002z28ssconv
Member
Posts: 1436
From: Orlando, FL
Registered: Jun 2005


Feedback score:    (27)
Leave feedback


Total ratings: 50
Rate this member

Report this Post07-24-2010 10:28 AM Click Here to See the Profile for 2002z28ssconvClick Here to visit 2002z28ssconv's HomePageSend a Private Message to 2002z28ssconvDirect Link to This Post
First off, the car - 1988 GT 5 speed Getrag.
Modification - 97 Riviera 3800SC II (stock).

How to replace the factory tachometer with a Sunbird's Tachometer (with boost gauge):
In the past, this info has been hard to locate.
I got most of my information from this thread.
Install a Turbo Sunbird tach/boost gauge with me by SCCA Fiero.
As good as it was, I like to have things dumbed down for me a little more than that.
So I'm going to work through it here.

Here is the gauge:


Here is the circuit board on the back of the gauge:


Here is an electrical diagram of the modifications to be made:


Here is a picture of the trimmer: (I bought 3 just becaause they were $0.75 each)


The following areas are the parts that aren't clear to me:
1 - How and where to connect the four wires to the Fiero's wiring
2 - Where to trim the gauge and the cluster housing
3 - How to hook both gauges up at the same time in order to calibrate the tachometer
4 - Where the guage gets backlit from *** Lit from factory dash light in stock location *** Thanks Phonedawgs
5 - What MAP sensor wire gets connected to the existing green wire

I don't think any of this will be too hard though. I will document everything with pictures as I go along.

[This message has been edited by 2002z28ssconv (edited 07-24-2010).]

IP: Logged
PFF
System Bot
phonedawgz
Member
Posts: 17091
From: Green Bay, WI USA
Registered: Dec 2009


Feedback score:    (23)
Leave feedback


Total ratings: 290
Rate this member

Report this Post07-24-2010 12:39 PM Click Here to See the Profile for phonedawgzClick Here to visit phonedawgz's HomePageSend a Private Message to phonedawgzDirect Link to This Post
I'll take the easy one - the lights are alreay in the dash plastic body. If they end up being in the way and you have to move them, then you will also have to figure how to power them
IP: Logged
Blacktree
Member
Posts: 20770
From: Central Florida
Registered: Dec 2001


Feedback score:    (12)
Leave feedback


Total ratings: 350
Rate this member

Report this Post07-24-2010 05:02 PM Click Here to See the Profile for BlacktreeClick Here to visit Blacktree's HomePageSend a Private Message to BlacktreeDirect Link to This Post
 
quote
Originally posted by 2002z28ssconv:

5 - What MAP sensor wire gets connected to the existing green wire

It should be the center wire, which ironically is green.

You probably already know this, but in order to register boost, you'll need a 2-Bar MAP sensor. The one that came with the 3800 SC engine should work.
IP: Logged
2002z28ssconv
Member
Posts: 1436
From: Orlando, FL
Registered: Jun 2005


Feedback score:    (27)
Leave feedback


Total ratings: 50
Rate this member

Report this Post07-24-2010 11:17 PM Click Here to See the Profile for 2002z28ssconvClick Here to visit 2002z28ssconv's HomePageSend a Private Message to 2002z28ssconvDirect Link to This Post
I made a little progress today.

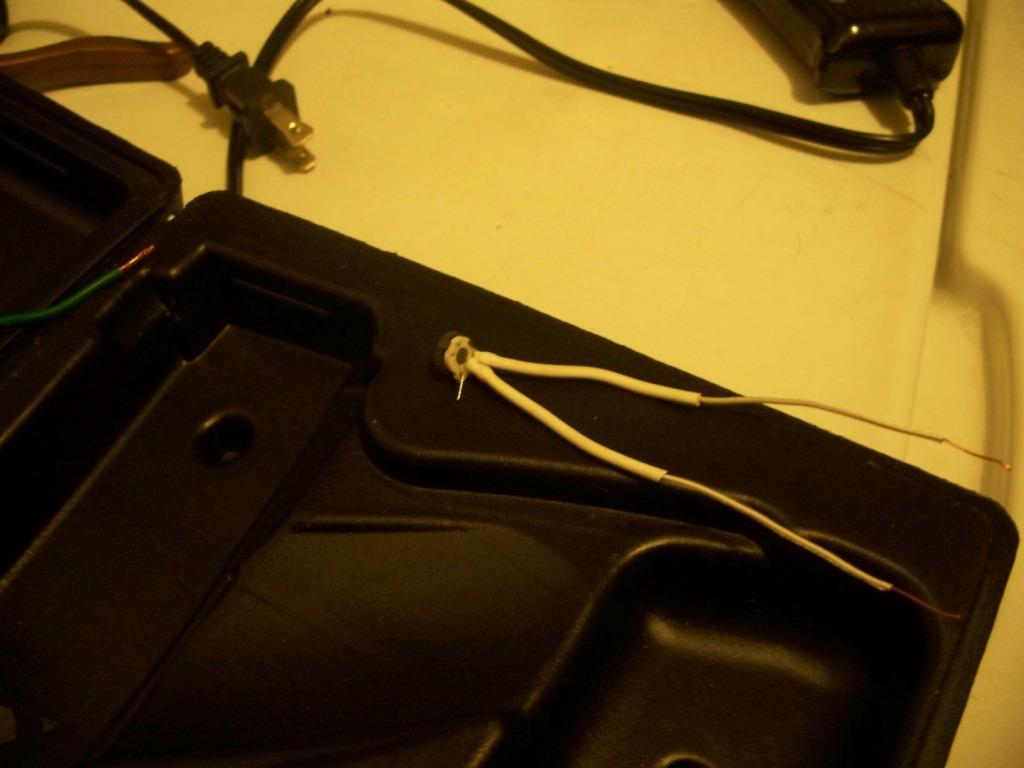
I soldered a thin piece of solid core wire to the trimmer.
I squoze each pin on the trimmer with a pair of needle nose plyers.
Then I wrapped the wire tightly around a needle.
Then I slid the trimmer's pins inside the wire loops.
Hopefully the ridges created by the plyers will help to hold the solder.

I did some reading about trimmers and most sites said that the third pole didn't need to be connected.
Hopefully it didn't matter which end I left off.
The center one has to be connected though.


Then I added some heat shrink to cover up any bare wire.


Then I soldered the wires to the circuit board and gave it the same heat shrink treatment as before.
Once the trimmer is adjusted, I'll cover the entire trimmer with heat shrink.


You can clearly see where I cut the circuit board with a razor.
It's not very visible with just eyes, but for some reason my crappy camera really caught that detail nicely.

Tomorrow... the cluster...
IP: Logged
BMTFIERO
Member
Posts: 1187
From: Beaumont, TX
Registered: Dec 2007


Feedback score:    (18)
Leave feedback

Rate this member

Report this Post07-25-2010 12:37 AM Click Here to See the Profile for BMTFIEROSend a Private Message to BMTFIERODirect Link to This Post
Adding this one to Favs!!
IP: Logged
Cajun
Member
Posts: 1554
From: Youngsville, La., USA
Registered: Dec 2003


Feedback score: (1)
Leave feedback

Rate this member

Report this Post07-25-2010 12:44 PM Click Here to See the Profile for CajunSend a Private Message to CajunDirect Link to This Post

Thanks for sharing the information regarding the tach. I had been struggling with my install. A '86 Sunbird instrument cluster but w/o the turbo boost gauge.

Quick question, does anyone have the wiring diagrams for the complete instrument cluster?


Thanks for your assistance in advance.

Mike
IP: Logged
2002z28ssconv
Member
Posts: 1436
From: Orlando, FL
Registered: Jun 2005


Feedback score:    (27)
Leave feedback


Total ratings: 50
Rate this member

Report this Post07-26-2010 12:18 AM Click Here to See the Profile for 2002z28ssconvClick Here to visit 2002z28ssconv's HomePageSend a Private Message to 2002z28ssconvDirect Link to This Post
Well... This is BIG!
I have started and finished a project in the same weekend.
I don't think... no I KNOW... this has NEVER happened to me before.
So here's "the rest of the story."

I pulled the instrument cluster from the car. I didn't snap any pictures of this as it's common knowledge.


So here is the back of the cluster after it has been removed from the suround.
I have marked the ignition, coil and ground locations.

Remove the lense and the metal plate.


Remove the two screws to the right. The one at the bottom stays.
After the two screws are removed the tach is just held in place by friction.
Pull it out.


Here is a side-by-side. Sorry about having the left one turned.
At this point it was about 1:30 and 95 degrees and I was suffering from heat stroke.
I have marked the areas that needed trimming.


Four areas need to be trimmed on the housing.
Be sure to put some tape or something inside the holes marked by the rectangle.
Otherwise light will bleed through into those cavities at night and you'll be able to read the idiot lights.
Tape 'em. The top one won't need tape. More on that later...


Some more areas on the gauge face that needed to be trimmed.


Then I had an idea... I didn't want to cut and splice my dash harness. These little clips held on to screws from the rear of the stock tach.
Too bad the Sunbird tach's feed screws won't allign with these clips.
So... I dropped in some #6-32 screws.


Then I added some nuts on the backside to hold them in.


This made it super easy to attach both tachs in tandem.


I went back out into the sun and hooked the wire harnesses back up to the cluster.
I started the car and had fun making the tach swing around by twisting the knob on the trimmer.
This was really cool and fun and I was sure that it wasn't going to work. But it did! WOOT!!!
Disconnect it all. Secure the trimmer where it won't be moved and back into the house I go.

I pulled the old tach back out and routed the wires in through an unused bulb socket.


This is where the wires fed through into the tach's area.


Besure to keep the wires away from the bulbs.


Then I started putting it all back together.


Unfortunately, I ran into a little snag. My ground post hit the back of the surround housing.


Nobody's gonna see it. So I drilled a couple holes with a stepper bit.


You can see the ground stud. It doesn't poke through all the way.
Looked good to me...


I put it all back in the car and it worked like a champ.
The boost gauge isn't working yet. The 3800SC II will be going in the car VERY soon.
Then I'll have to take out the center console. I'll run the green wire to the MAP sensor wire at that time.
I'll update this thread again when I do that.

[This message has been edited by 2002z28ssconv (edited 07-26-2010).]

IP: Logged
kikinz24
Member
Posts: 729
From: OHIO
Registered: Jun 2010


Feedback score: (2)
Leave feedback

Rate this member

Report this Post07-26-2010 10:33 AM Click Here to See the Profile for kikinz24Send a Private Message to kikinz24Direct Link to This Post
definitly an awesome thread. im actualy s/c my 2.8 and trying to keep everything stock as can be i didnt want any extra gauges in my car . this is exactly what i was looking to do. and will say i think im going this route!!
IP: Logged
Blacktree
Member
Posts: 20770
From: Central Florida
Registered: Dec 2001


Feedback score:    (12)
Leave feedback


Total ratings: 350
Rate this member

Report this Post07-26-2010 12:12 PM Click Here to See the Profile for BlacktreeClick Here to visit Blacktree's HomePageSend a Private Message to BlacktreeDirect Link to This Post
Nice job, Chuck. It looks like a factory option.
IP: Logged
2002z28ssconv
Member
Posts: 1436
From: Orlando, FL
Registered: Jun 2005


Feedback score:    (27)
Leave feedback


Total ratings: 50
Rate this member

Report this Post09-01-2010 08:29 PM Click Here to See the Profile for 2002z28ssconvClick Here to visit 2002z28ssconv's HomePageSend a Private Message to 2002z28ssconvDirect Link to This Post
I finally got it all buttoned up.
I connected the green wire from the back of the tachometer to the green wire that runs to the MAP sensor.
I cut the wire between the PCM (pin 25) and the MAP sensor (center wire).
I soldered and shrink wrapped the three wires back together.
Works like a charm.

I was giggling uncontrolably for a few minutes after I started it up the first time.

WOOT!

http://www.youtube.com/watch?v=eeb_2_SvkHY
IP: Logged
Sourmug
Member
Posts: 4538
From: Calgary, Alberta, Canada
Registered: Sep 2002


Feedback score:    (29)
Leave feedback


Total ratings: 144
Rate this member

Report this Post09-02-2010 12:11 AM Click Here to See the Profile for SourmugSend a Private Message to SourmugDirect Link to This Post
Very nicely done Write-up. That will be quite helpful.

Nolan

Edit: A + for you!

[This message has been edited by Sourmug (edited 09-02-2010).]

IP: Logged
PFF
System Bot
Blacktree
Member
Posts: 20770
From: Central Florida
Registered: Dec 2001


Feedback score:    (12)
Leave feedback


Total ratings: 350
Rate this member

Report this Post09-02-2010 12:20 AM Click Here to See the Profile for BlacktreeClick Here to visit Blacktree's HomePageSend a Private Message to BlacktreeDirect Link to This Post
cool
IP: Logged
Fastfocusguy
Member
Posts: 143
From: Madison, Wisconsin, USA
Registered: Apr 2007


Feedback score: N/A
Leave feedback

Rate this member

Report this Post09-02-2010 12:01 PM Click Here to See the Profile for FastfocusguySend a Private Message to FastfocusguyDirect Link to This Post
You did a great job! And the result looks Factory ! Thanks so much for sharing this with us! I learned a lot today !
IP: Logged
ALJR
Member
Posts: 3765
From: Massachusetts
Registered: Jul 2009


Feedback score:    (18)
Leave feedback

Rate this member

Report this Post09-02-2010 12:42 PM Click Here to See the Profile for ALJRSend a Private Message to ALJRDirect Link to This Post
Thanks, added to my favs for a future project...

+ for you!

Gotta find me a sunbird tach now

[This message has been edited by ALJR (edited 09-02-2010).]

IP: Logged
ALJR
Member
Posts: 3765
From: Massachusetts
Registered: Jul 2009


Feedback score:    (18)
Leave feedback

Rate this member

Report this Post09-02-2010 12:43 PM Click Here to See the Profile for ALJRSend a Private Message to ALJRDirect Link to This Post

ALJR

3765 posts
Member since Jul 2009
 
quote
Originally posted by ALJR:

Thanks, added to my favs for a future project...

+ for you!


BTW, maybe using 1/4" x 3/32" (instead of 1/2") screws "may" have fit better w/o having to drill the back housing...
IP: Logged
2002z28ssconv
Member
Posts: 1436
From: Orlando, FL
Registered: Jun 2005


Feedback score:    (27)
Leave feedback


Total ratings: 50
Rate this member

Report this Post09-02-2010 04:17 PM Click Here to See the Profile for 2002z28ssconvClick Here to visit 2002z28ssconv's HomePageSend a Private Message to 2002z28ssconvDirect Link to This Post
Thanks for all the kind words and +'s.
This was a very fun project. Hopefully write up this will encourage others.

I think you'll need the hole there no matter what screw you use. Just having the wire terminal there makes it jam up a little getting the cluster in and out of the housing. It's pretty tight right there.

***EDIT***
I forgot to add that I slapped a piece of duct tape over the groove/slot that I cut in this picture. I made sure that the tape got pushed down into the groove so the tach would still slide into it.
Until I did this, the lights from behind the tach would bleed light into the areas behind the two bottom right side lenses. You can kinda see where I'm speaking of in the 2nd picture.


[This message has been edited by 2002z28ssconv (edited 09-02-2010).]

IP: Logged
ALJR
Member
Posts: 3765
From: Massachusetts
Registered: Jul 2009


Feedback score:    (18)
Leave feedback

Rate this member

Report this Post09-02-2010 10:36 PM Click Here to See the Profile for ALJRSend a Private Message to ALJRDirect Link to This Post
Was there not room to flip those 6-32 screws around and have the nuts on the inside? I assume you no longer use the stock tack clamp/spring contact points on the inside (the reason you ran the leads)?
IP: Logged
2002z28ssconv
Member
Posts: 1436
From: Orlando, FL
Registered: Jun 2005


Feedback score:    (27)
Leave feedback


Total ratings: 50
Rate this member

Report this Post09-03-2010 07:13 PM Click Here to See the Profile for 2002z28ssconvClick Here to visit 2002z28ssconv's HomePageSend a Private Message to 2002z28ssconvDirect Link to This Post
You probably could do that. You'll have a hard time holding the nuts in place to get the screws threaded and then tightened down too.
IP: Logged
FieroMaster88
Member
Posts: 7680
From: Mattawan, MI
Registered: Nov 2000


Feedback score:    (43)
Leave feedback


Total ratings: 168
Rate this member

Report this Post11-23-2011 11:35 PM Click Here to See the Profile for FieroMaster88Send a Private Message to FieroMaster88Direct Link to This Post
Nice write up. I'll be doing this on my 88 soon. I have the tach, just need to install it.

------------------

88 Coupe: 2.0L Turbo 4 Cylinder
84 Indy #64: Restoration Project!

IP: Logged
RWDPLZ
Member
Posts: 15013
From: Michigan
Registered: May 2002


Feedback score:    (11)
Leave feedback


Total ratings: 304
Rate this member

Report this Post11-23-2011 11:48 PM Click Here to See the Profile for RWDPLZClick Here to visit RWDPLZ's HomePageSend a Private Message to RWDPLZDirect Link to This Post


Nice Sears and Wesson!

Real nice writeup too! Wish those tachs weren't so hard to find.
IP: Logged
Jfrost
Member
Posts: 1092
From: Brookfield, IL
Registered: Jul 2009


Feedback score:    (29)
Leave feedback

Rate this member

Report this Post11-24-2011 10:32 PM Click Here to See the Profile for JfrostSend a Private Message to JfrostDirect Link to This Post
Awesome write-up! This has inspired me to install my Sunbird tach even though my L67 swap isn't done yet.
IP: Logged
PFF
System Bot
2002z28ssconv
Member
Posts: 1436
From: Orlando, FL
Registered: Jun 2005


Feedback score:    (27)
Leave feedback


Total ratings: 50
Rate this member

Report this Post11-24-2011 11:35 PM Click Here to See the Profile for 2002z28ssconvClick Here to visit 2002z28ssconv's HomePageSend a Private Message to 2002z28ssconvDirect Link to This Post
Thank you. I actually picked up another complete cluster last month. I probably paid too much for it but like you said, you can't find them anymore. I'll be putting this one to use in another 88 3800, only this one will actually have a turbo. I don't know if the boost guage is that accurate or not but I don't really care.

If you need any help or have any questions just send a PM.
IP: Logged


All times are ET (US)

T H I S   I S   A N   A R C H I V E D   T O P I C
  

Contact Us | Back To Main Page

Advertizing on PFF | Fiero Parts Vendors
PFF Merchandise | Fiero Gallery | Ogre's Cave
Real-Time Chat | Fiero Related Auctions on eBay


Copyright (c) 1999, C. Pennock