Wow !!! Thanks a lot for this write up, it's great I have been dreaming about a 3.8SC for a while, and now I am in the process of getting the drivetrain.
Would you please post more info and if possible pictures of the alt bracket you made.
I am just curious about this, are you concern at all about the trans honlding the power from the eng ? or are you planning of driving the car gently?
Please keep us posted and let us know how it feels when you start driving it.
IP: Logged
12:19 PM
darkhorizon Member
Posts: 12279 From: Flint Michigan Registered: Jan 2006
Wow !!! Thanks a lot for this write up, it's great I have been dreaming about a 3.8SC for a while, and now I am in the process of getting the drivetrain.
Would you please post more info and if possible pictures of the alt bracket you made.
I am just curious about this, are you concern at all about the trans honlding the power from the eng ? or are you planning of driving the car gently?
Please keep us posted and let us know how it feels when you start driving it.
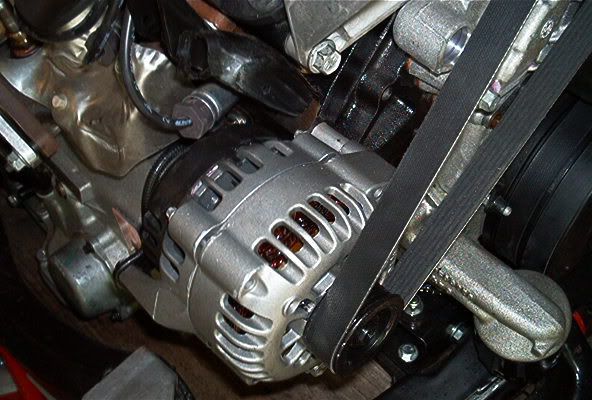
The alternator bracket is basically the same as what Lloyde from Fast Fieros makes. Let me see if I can explain it...
1st, if you want to use the 3800 upper dogbone bracket you have to move it to the opposite side of the engine. Then you have to cut it down where the top bolt goes through. This is where your tensioner will go:
Next you will need another tenioner. I used the same one as is used on the supercharger belt. New ones are about $90 from most places but I found a new one on EBay for $10 plus shipping. You will need to remove the smooth pulley from the tensioner and get a grooved one. You might be able to get away with a 3" pulley, but I went for a 3.5" to provide a little more clearance between the belt and the water pump pulley.
The one I got came from Autozone, part number 231087. You will also need a 79.5" long belt for this setup (assuming stock alternator pulley and A/C (or A/C delete pulley like I have), Autozone part number 795K6.
For the top part of the bracket:
The aluminum piece is cut and drilled to match the base of the dog bone bracket (where it mounts to the head). You will also need some 5" long bolts, and steel or aluminum tubing that fits over your bolts for spacers.
Put your alternator and tensioner on with the long bolts and aluminum plate and figure out where they need to be so the pullies line up with the waterpump and crank. Next measure how long your spacers need to be and cut them from the tubing. You will end up with two short spacers on the alternator bolt (one between the alternator and the dog bone bracket and one between the alternator and the aluminum plate), one small one between the tensioner and the aluminum plate, and one long one on the last bolt.
Assemble all this and the top is done!
For the bottom:
This one is pretty self explanitory. Cut/drill a piece of steel to bolt up where the power steering used to be. Cut/drill a plate that fits the base of the alternator and weld on a couple of nuts. Install your lower alternator bolts to your new bracket, and measure the distance to the plate on the block. Weld in a piece of steel tubing to join your two brackets and you're done.
With this setup you will need to do something about the spark plug nearest to the alternator. The stock boot/heat shield is too long and will hit the alternator. Your best bet is to get a correct length wire with 90 degree boots on both ends.
Hopefully that clears it up for everyone
Paul
IP: Logged
01:15 AM
helmet1978 Member
Posts: 743 From: Boise, Idaho, USA Registered: Nov 2001
Just short of 4 months from delivery and its alive!
Dad came over last night and after a few concering moments involving the alternator and the back of the engine compartment we got the motor in the car. By about 1:00am I had just about all the electrical, cooling and fuel lines hooked up and ready to go.
This morning Dad came back over, along with one of the Idaho Club 3800 members. After re-routing battery cables and tightening up a couple of fuel line connections I was able to get ~30psi at the fuel rail. Next I cranked the engine with no ignition system for about a minute to make sure I had oil pressure. Keven was able to read engine sensor data with his scan tool so I went for the gusto.
After cranking for about 10 seconds it fired up!
We let it run for a few minutes, got up to about 170 degrees and the fan kicked on, and nothing blew up so I'm pretty stoked
I still have to fab up a couple things for the shift cables, figure out why my axle seal is leaking and get a new thermostat cap before I can drive it but I'm extremely relieved to have it running!
Well, axle seal has been replaced. Just need to fab up the shift cable attachment pieces tonight, then get the car to the exhaust shop (hopefully Thursday!).
Paul
IP: Logged
02:13 PM
FastFieros Member
Posts: 2698 From: Dallas Texas USA Registered: Nov 2000
I noticed in a post ( another thread ) you mentioned that my low mount alt inspired you for your build of one also... nice and thanks for the mention.
your spark plug is too close because there is several other things to do in cutting to get around this problem some more. only .200 of room to play with, but .200 is good.. makes the bone line up better too..
you needed to shave the backside of the Prix bracket and get it closer to the valve cover, and this moves the alt out away from the plug... you need to engrave tooooooooo... kidding..
your spark plug is too close because there is several other things to do in cutting to get around this problem some more. only .200 of room to play with, but .200 is good.. makes the bone line up better too..
Hi Lloyde,
Thank you for the additional information. I was wondering why my dogbone was not lining up I got around the spark plug issue, and just ordered a Rodney Dickman adjustable dog bone but I hadn't dug too far into the side to side alignment problem yet. Luckily it should be a pretty easy fix, will just need to make some longer spacers to compensate for removing material behind the dog bone bracket.
Paul
IP: Logged
05:30 PM
Dennis LaGrua Member
Posts: 15145 From: Hillsborough, NJ U.S.A. Registered: May 2000
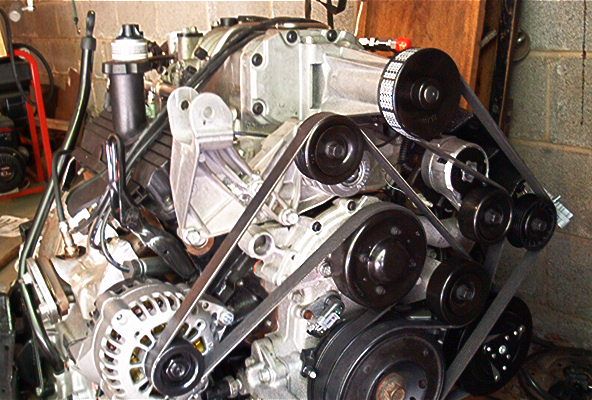
Good aproach but here is how we do it with a 99 Astro 4.3L alternator that is also a C130D model with the right connector. This is a very simple method and there is no interference with the spark plug. It can be changes easily at anytime.
These pics were taken before the dogbone had to be re-engineered and relocated but the alternator with this simple mounting is rock solid.
------------------ " THE BLACK PARALYZER" -87GT 3800SC Series III engine, 3.4" Pulley, N* TB, LS1 MAF, Flotech Exhaust Autolite 104's Custom CAI 4T65eHD w. custom axles, HP Tuners VCM Suite. "THE COLUSSUS" 87GT - ALL OUT 3.4L Turbocharged engine, Garrett Hybrid Turbo, MSD ign., modified TH125H " ON THE LOOSE WITHOUT THE JUICE "
[This message has been edited by Dennis LaGrua (edited 06-09-2009).]
IP: Logged
10:07 PM
Jun 10th, 2009
FastFieros Member
Posts: 2698 From: Dallas Texas USA Registered: Nov 2000
Thats a great looking setup too Dennis, but when someone orders a low mount kit, they usually already have the Prix type alt in hand. They would have to go buy a different one. I looked up your alt on ebay and there is a low price of $50 for a rebuilt. Thats a really good price. However, the 99-07 Prix alts on ebay are as low as $20 used/salvaged...
IP: Logged
01:23 AM
Jun 11th, 2009
helmet1978 Member
Posts: 743 From: Boise, Idaho, USA Registered: Nov 2001
Replaced the driver's side axle seal (forgot what a chore that is) the other night.
Made up some shift cable extensions (sorry no pics of that yet), ground down the shifter stop pin a bit to get all gears. Still a little more tweaking needed there.
Drove the car onto a trailer (guess the clutch is working ) last night and dropped it off at the exhaust shop this morning.
Here's the result!
I haven't heard it run with the exhaust yet, but if it sounds half as good as it looks I'm going to happy as a clam.
Off to the tire shop for alignment tomorrow morning!
Paul
IP: Logged
08:35 PM
PFF
System Bot
Jul 6th, 2009
doublec4 Member
Posts: 8289 From: Oakville, Ontario, Canada Registered: Jun 2003
Finished plumbing in the fuel pressure regulator and running the hard vacuum line. Also I flipped the heater hoses in their bracket, should be easier to hook up to the coolant fill neck this way.
Closer shot
This is all on the lower firewall (towards the front of the car) so it won't really be seen once the engine is in place.
Essentially this makes the returnless series III fuel rail into a return system using a section cut from the series II rails with FPR, and tied into the Fiero hard lines near the fuel filter.
More tomorrow!
Paul
I'm about to install some series III rails on my series II engine as well. Just wondering, in those pictures, that black T fitting, one side goes up to the rails, where does the other side go to?
------------------
IP: Logged
11:47 AM
helmet1978 Member
Posts: 743 From: Boise, Idaho, USA Registered: Nov 2001
I'm about to install some series III rails on my series II engine as well. Just wondering, in those pictures, that black T fitting, one side goes up to the rails, where does the other side go to?
In the picture, the top of the T goes to the rails, the left goes to the fuel pressure regulator, and the bottom goes to the Fiero fuel filter (feed line from tank).
Enjoy!
Paul
IP: Logged
01:48 PM
Dennis LaGrua Member
Posts: 15145 From: Hillsborough, NJ U.S.A. Registered: May 2000
Thats a great looking setup too Dennis, but when someone orders a low mount kit, they usually already have the Prix type alt in hand. They would have to go buy a different one. I looked up your alt on ebay and there is a low price of $50 for a rebuilt. Thats a really good price. However, the 99-07 Prix alts on ebay are as low as $20 used/salvaged...
I do fabrications using a ruler, drill press, mill, saw and mig torch so I tend to favor simplicty. With one approach you reuse the GTP alternator but need to add a new tensioner and a more complex and costly low mount. On the other you buy a $50 Astro alternator ( harness plugs right in) , reuse ( but rework) the GTP tensioner, add a few simple brackets w. spacers and make it easy to change the plugs. There are merits to both methods. Your design ( and this one) looks a bit neater but mine works well and has held up fine. Also I am not sure if this install uses the series III ETC "drive by wire" PCM. If so I would be interested in knowing how the programming was done to prevent the torque management from going into "limp home" mode. As you know the GTP series III engines use a PCM that uses pedal follower technology where the throttle position is constantly being compared to the RPM's, vehicle speed, engine load, trans gear and wheel speed. If you drift too far from what the PCM expects to see the throttle automatically starts to close down and limp home mode results. This can be overcome by using a series II PCM w a cable operated TB but if you add as many mods as I did just be prepared for a big programming task. In the last three weeks many changes to the program have been made but we now have everything under control. The installer here doesn't say much about the program so I am interested in how he approached it.
------------------ " THE BLACK PARALYZER" -87GT 3800SC Series III engine, 3.4" Pulley, N* TB, LS1 MAF, Flotech Exhaust Autolite 104's Custom CAI 4T65eHD w. custom axles, HP Tuners VCM Suite. "THE COLUSSUS" 87GT - ALL OUT 3.4L Turbocharged engine, Garrett Hybrid Turbo, MSD ign., modified TH125H " ON THE LOOSE WITHOUT THE JUICE "
IP: Logged
03:27 PM
doublec4 Member
Posts: 8289 From: Oakville, Ontario, Canada Registered: Jun 2003
In the picture, the top of the T goes to the rails, the left goes to the fuel pressure regulator, and the bottom goes to the Fiero fuel filter (feed line from tank).
Enjoy!
Paul
Makes sense! I had a bit of a brain lapse there lol.
To connect the T fitting and the feed line, what did you use? What kind of fitting fits on the end?
------------------
IP: Logged
04:13 PM
Fierofreak00 Member
Posts: 4221 From: Martville, NY USA Registered: Jun 2001
Also I am not sure if this install uses the series III ETC "drive by wire" PCM. If so I would be interested in knowing how the programming was done to prevent the torque management from going into "limp home" mode.
I used a series II PCM from Sinister Performance (Darth Fiero) and a Northstar TB with 85mm MAF.
quote
Originally posted by doublec4:
To connect the T fitting and the feed line, what did you use? What kind of fitting fits on the end?
These are 6AN Tube Nut/Sleeves. I got them from Jegs, part number 555-110382 (2 nuts), 555-110392 (2 sleeves). You will also need a tube flaring kit. I got mine at Harbor Freight for $10.
quote
Originally posted by Fierofreak00:
I don't know if anybody asked...where did you get the intake tube from?
Also from Jegs. This is made of several components from Spectre's modular intake kit. Some cutting of the inner fender wall is required for the 4" tubing. I was unable to get this intake on without removing the throttle body from the supercharger, and I cut down the black silicone coupler from the ZZP kit a little bit. Not a huge deal but worth noting
Here are the parts used in addition to the ZZP Northstar TB kit (with MAF):
2 - 865-9749 - 4" Aluminum Intake Tube 45 degree 1 - 865-9719 - 4" Aluminum Intake Tube 6" Straight 3 - 865-9706 - Aluminum Collar (also come in other colors) 1 - 599-RU-2520 - Air filter, 5" tapered
I've got some better pics from last weekend's show I'll post up later too.
I used a series II PCM from Sinister Performance (Darth Fiero) and a Northstar TB with 85mm MAF
Not to take anything away from Darthfieros tune as he is a talented mechanic and may have the tuning formula down pat. However,every engine behaves differently and requires a slightly different tune. Since my series III has been on the road I have made over 20 different changes to the program. Its just about there but I still drive scanning with my laptop all the time. The point is that you are driving with a type of hybrid engine installation with a PCM that was originally programmed for a different supercharger, a larger MAF, a larger Throttle body, different size tires and a CAI system that changes the direction of the air going in. These changed elements will result in FAR different air flow characteristics. While the program that you have may be smack on I would continually monitor the LTFT's and the KR's to see where they are. With a good MAF tune the LTFT"s will hover near zero and you should not have more than a couple of degrees of KR in any RPM range. Hope that you enjoy the swap as much as I love drivng mine.
------------------ " THE BLACK PARALYZER" -87GT 3800SC Series III engine, 3.4" Pulley, N* TB, LS1 MAF, Flotech Exhaust Autolite 104's Custom CAI 4T65eHD w. custom axles, HP Tuners VCM Suite. "THE COLUSSUS" 87GT - ALL OUT 3.4L Turbocharged engine, Garrett Hybrid Turbo, MSD ign., modified TH125H " ON THE LOOSE WITHOUT THE JUICE "
IP: Logged
07:09 PM
helmet1978 Member
Posts: 743 From: Boise, Idaho, USA Registered: Nov 2001
Thanks for the feedback Dennis. I did tell Ryan all the mods I had on the engine so he could incorporate them into the PCM before he shipped it. That being said, I agree that further tuning is definately a good thing. Since not all intakes and exhaust flow the same I think there are worthwile gains to be had, therefore I have been working with a couple members of our local 3800 club and running some scans, etc.
I know not everyone will be willing to spend $300+ for a tuner package, but if you do a little asking around you can probably find someone local to help you out with this
Paul
IP: Logged
09:03 PM
Jul 10th, 2009
helmet1978 Member
Posts: 743 From: Boise, Idaho, USA Registered: Nov 2001
You might try to right click the link and save to your desktop. The files are around 9MB so may take a few minutes to download. Also, they are encoded with MPEG codecs, if you don't have them you might have to download and install them first.
Paul
IP: Logged
01:43 PM
RumbleB Member
Posts: 341 From: The Great Lakes! Registered: Aug 2008
This is the first time that I have run across this engine swap thread. You should be very proud of yourself. Just as much as my envy towards your Fiero. I have always liked your ride. Am I going to be able to see it in person at Fierofest? I registered a week ago for the event. This will be my first actual show. Hope to meet you there.
Tony
------------------
IP: Logged
02:25 PM
helmet1978 Member
Posts: 743 From: Boise, Idaho, USA Registered: Nov 2001
This is the first time that I have run across this engine swap thread. You should be very proud of yourself. Just as much as my envy towards your Fiero. I have always liked your ride. Am I going to be able to see it in person at Fierofest? I registered a week ago for the event. This will be my first actual show. Hope to meet you there.
Tony
Thanks Tony!
As long as nothing breaks between now and August 7th it'll be in Richland
Paul
IP: Logged
02:39 PM
RumbleB Member
Posts: 341 From: The Great Lakes! Registered: Aug 2008
I have a question, I have heard a few people say to disable the BBV for better performance and better mileage... Any thoughts on this? mine is a series 1 SC and i'm in the early stages of swapping it, I jsut wanted your thoughts on the BBV.. Thanks.
Also, where did ya get the upper dogbone mount?
[This message has been edited by jsketcham (edited 07-13-2009).]
IP: Logged
07:09 PM
helmet1978 Member
Posts: 743 From: Boise, Idaho, USA Registered: Nov 2001
I have a question, I have heard a few people say to disable the BBV for better performance and better mileage... Any thoughts on this? mine is a series 1 SC and i'm in the early stages of swapping it, I jsut wanted your thoughts on the BBV.. Thanks.
Also, where did ya get the upper dogbone mount?
For the BBV, I have seen opinions both ways. As I understand it the BBV simply allows the boost pressure to be relieved when the engine is not under load. This would seem to marginally improve mileage as there would be less rotational load on the engine at idle and low load conditions. On the other hand, if you don't have the BBV I would think boost would build a fraction of a second faster due to not having to wait for the vacuum to pull the valve open.
Not sure about the series I but on the series II and III motors the BBV is controlled via vacuum as well as by a PCM controlled soleniod. I did see somewhere a list of times when the PCM would activate the BBV but don't remember where right now.
On mine I left the whole BBV system in place since I was able to make it fit along side the Fiero coolant fill neck. I figured if GM put it there I might as well keep it
As far as the dog bone mount, the upper aluminum part is the factory 3800 mount moved from the forward head to the rear head. The alternator mount I used was made based on FastFieros' design using the 05 3800 alternator and spring tensioner.
A little update. Just over 2000 miles on the swap in the last couple months including two 300+ mile interstate trips and the only thing broken are a few traffic laws
Actually I think my transmission input shaft seal is leaking a little. It may have been leaking before the swap but there was so much oil from the rear main seal I couldn't tell.
I've also installed the Intense MPS with 3.6" pulley...might go to a 3.4" if my upcoming tuning sessions look good.
Anyone considering this swap, I say go for it! The power is definately addicting and puts a smile on your face every time you punch it. I can smoke most cars on the road, but still get 30mph on the freeway. I may get a couple of videos later this week just for fun if I can borrow a good camera.
Thanks again to everyone who provided insight and suggestions on this project. You guys rule!
Its been a while since I've updated this thread, but I made it through the Fiero season last year with no engine or wiring related problems!
At the moment I have the tranny out to replace the input shaft seal. I left the motor in the car this time, mainly because I didn't want to mess with draining the coolant. It also gave me a chance to use the engine support bar I picked up last summer but hadn't tried out yet
I never did get the shift cable/bracket, etc working perfectly last year. I'd usually have 1st and 3rd, or 2nd and 4th great but there just wasn't enough throw to get all gears just right. After I get the car back together we'll be re-designing the linkage on the tranny side and maybe the cable relocation bracket if needed.
Here are a couple of shots of the tranny work:
And one of my exhaust:
Sorry, its kind of dirty! This setup is awesome with the 3800SC, and best of all, no trunk cutting needed!
I ended up with the 2.5" downpipe/cat and 2.25" mufflers, so it may be a bit restrictive if you were going for 400+ hp but my exhaust fabricator did say he could build it with 3"/2.5" parts so that may be an option later if I decide to go with a cam/intercooler.
Now, just waiting on my replacement clutch, and am going to switch to an 88 style oil pressure sending unit since my old one is leaking a bit. Just a few more weeks and I should be ready to cruise in the sunshine again!
I've been busy since my last post. The new clutch has been in for around 800 miles now and everything is great so far with the tranny I did have to replace my junkyard fuel press reg due to low fuel pressure (not a cheap part!) and the "universal" MSD wires I bought were actually shorter than the stock ones. I have re-routed the spark plug wires a bit on the trunk side to reduce some mis-firing.
In the last few weeks I've replaced the rear sway-bar end links since the old ones had been on there about 10 years, and were installed incorrectly at some point (inside the bar instead of outside). Also replaced a rear lower ball joint and the driver's side axle seal. After a quick home alignment I think I've finally got my rear suspension issues under control.
Also, since this doesn't seem to be well documented on the forum I've taken some good pics of the Muncie 4-speed transmission shift linkage we made to clear the 3800 exhaust crossover.
Essentially you move the right side cable to the left and extend the threaded piece enough to reach the lever. Then you build a little bracket to hold the left cable. You can see on mine we ended up angling it a few degrees to reduce the angle of the cable end.
This setup is working well and I actually have all 4 gears now.


 You should be very proud of yourself. Just as much as my envy towards your Fiero.