Pennock's Fiero Forum
  Technical Discussion & Questions - Archive
  Splitting Getrag case. Pics of the process.

T H I S   I S   A N   A R C H I V E D   T O P I C
  

Email This Page to Someone! | Printable Version


Splitting Getrag case. Pics of the process. by Fieroseverywhere
Started on: 11-23-2009 12:21 AM
Replies: 25
Last post by: Fieroseverywhere on 07-29-2010 04:22 PM
Fieroseverywhere
Member
Posts: 4242
From: Gresham, Oregon USA
Registered: Mar 2006


Feedback score:    (14)
Leave feedback


Total ratings: 89
Rate this member

Report this Post11-23-2009 12:21 AM Click Here to See the Profile for FieroseverywhereSend a Private Message to FieroseverywhereDirect Link to This Post
Never found a thread like this in the archives. I figured it would be a good referance for those looking to do some Getrag repair themselves. I'm not going to do detailed step by step instructions. This is already done in the link below.
http://www.fieronews.net/fu...Muncie%205%20Spd.pdf
I will post pics of an actual fiero Getrag from an 87GT for a more "true" idea of how to do this. I hope this is helpful to those looking for info in the future.

The first step to splitting a Getrag case is to remove the mounting brackets. You can't split the case with them in place. I would also recomment removing the VSS and dipstick. The shift linkage is not necissary unless you plan on further disassembly above just splitting the case.

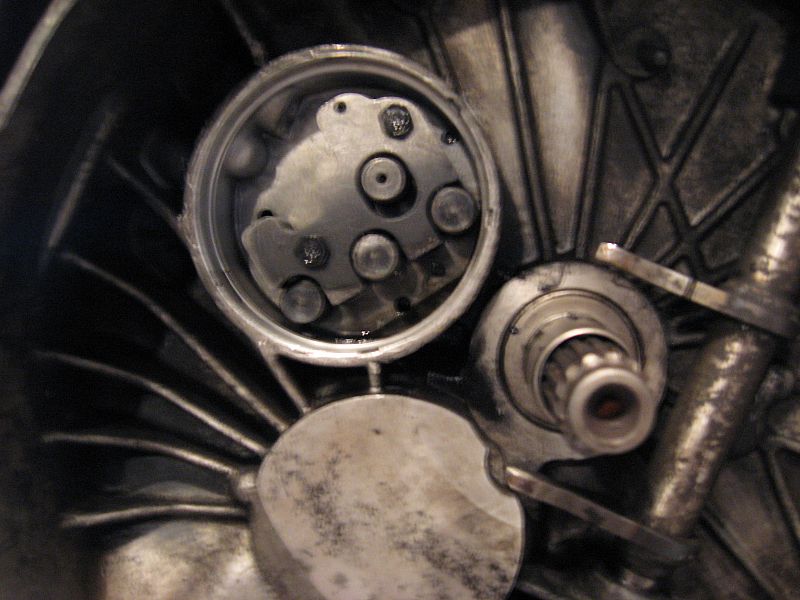
Next is the detent holder cover and shift rail detents inside the bellhousing. My cover was steel and coated with either soft plastic or hard rubber. These are stil available through GM so if you want to replace it you can pn# 14082039. Here is a shot of the cover before removal. Notice this cover has been removed before by someone in this transaxels past.

I removed this cover by prying with a small screwdriver. There were small notches around the seam I could fit the driver into. I had no intention of replacing it so I made sure to get it out in one piece.

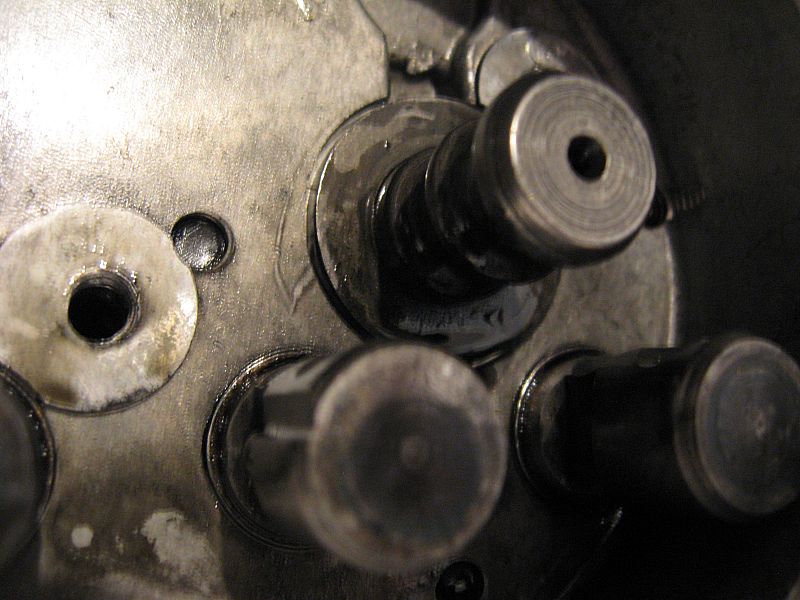
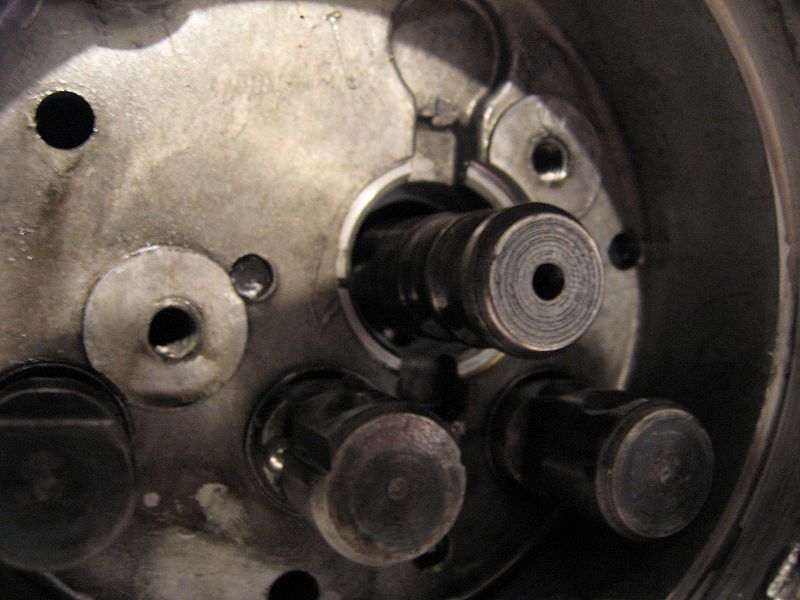
After the cover is removed you can see the detent holder and ends of the shift rails.

There are two 10mm screws that keep the detent holder, detent balls/springs (4 of each), and interlock pins (2) in place. From what I have read some of the earlier models also had an interlock plate that goes on top of the detent holder. Mine did not. If your detent holder is not at least 18mm thick you should have interlock plate in place.

Be sure not to lose any of the balls or springs.

There is also a bushing on the reverse rail. This comes out very easily by using a couple of small allen wrenches to pry it off. There are notches to pry from. You can't miss them.


With the detent assembly removed you can now remove the fifteen 13mm bolts that hold the bellhousing to the trans case.


Once all the bolts are out take a rubber mallet and tap the case to crack the seal. Locktite 518 anerobic sealer is used from the factory, PN 1052942. Mine was put together with silicone from whoever had been into it before. Turn the trans so the bellhousing is face up. Now you can lift off the case. There are two dowel pins also so keep that in mind.

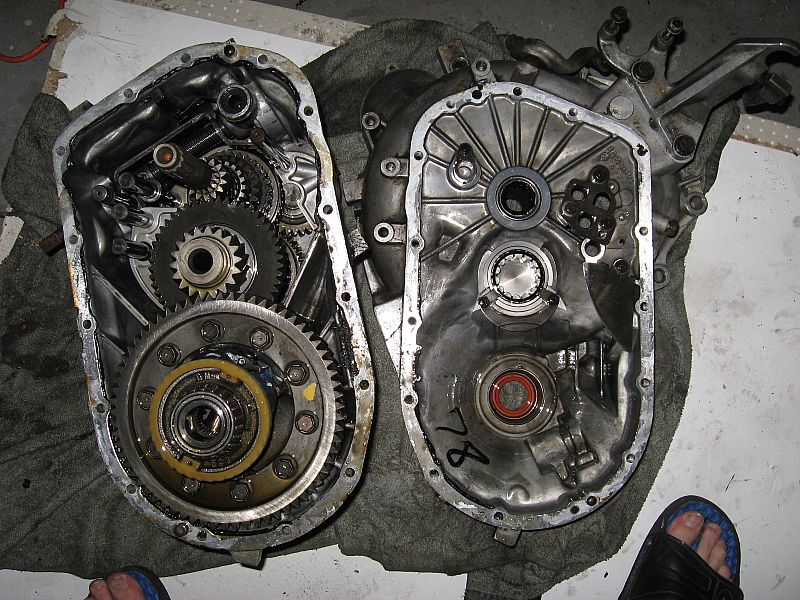
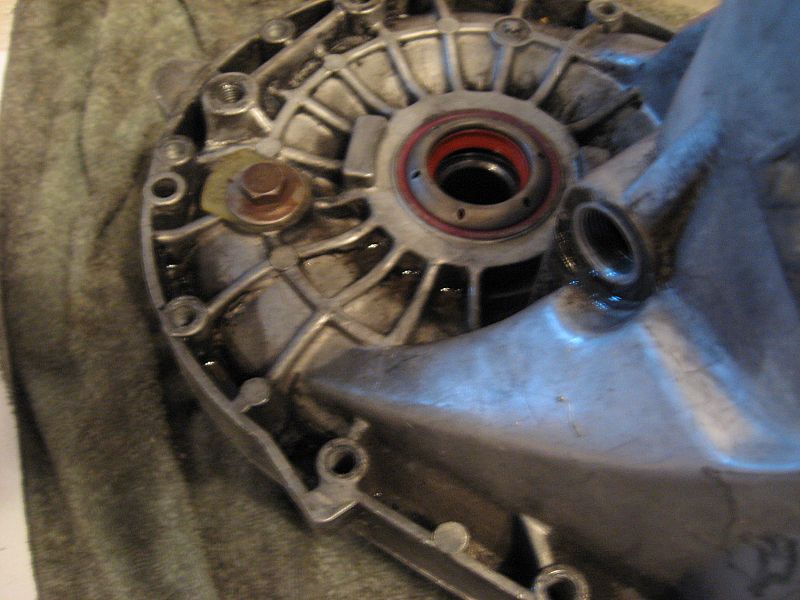
Be careful. The output shaft bearing may stick to the bellhousing. Just keep an eye on it so it doesn't fall into the case or onto the floor.
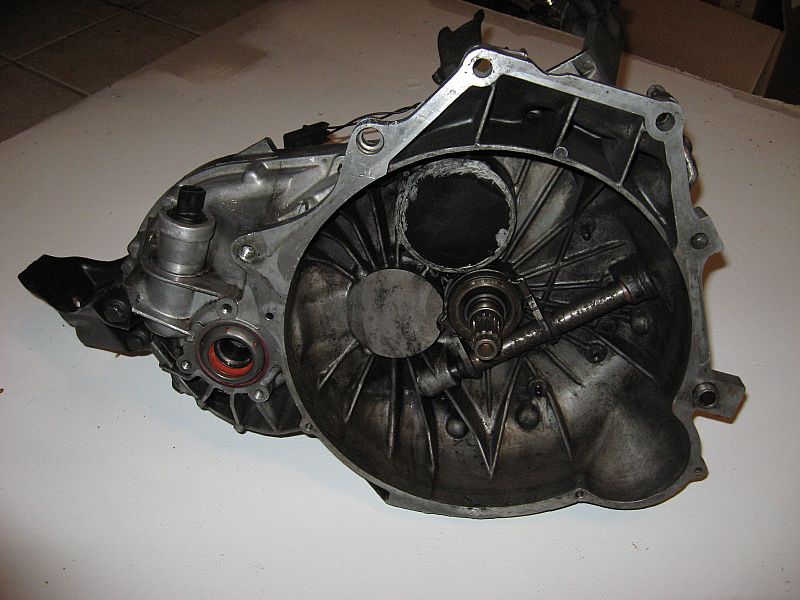
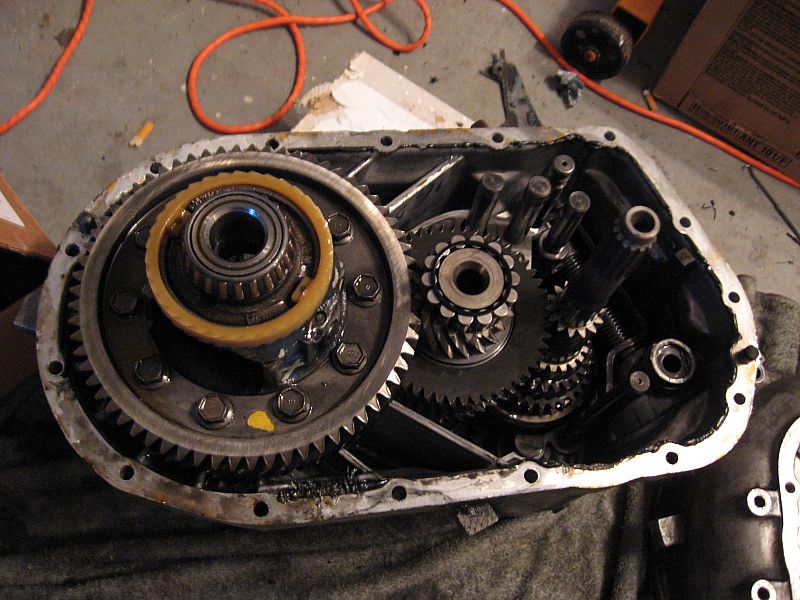

Bellhousing half


Gearbox half


Thats how you split a Getrag case. Hope this takes some of the mystery out of the process. Enjoy!

EDIT 12-11-09
--------------------------------------------------------------------------------------------------------------------------
Probing deaper at the request of several members.


First step to going deeper in is to remove the outer shift linkage. Technically you should have done this before splitting the case if your plan was to dig deeper into the getrag.
Put the trans in neutral and grab yourself a 21mm socket, 1/2" drive rachet, and can of your favorite penatrating liquid. Soak the nut good as they are usually rusty given the age of these transaxels. Hold tight onto the shift lever while loosening the nut. According to the getrag manual liked above you do not want the shift rail to move while loosening the nut.
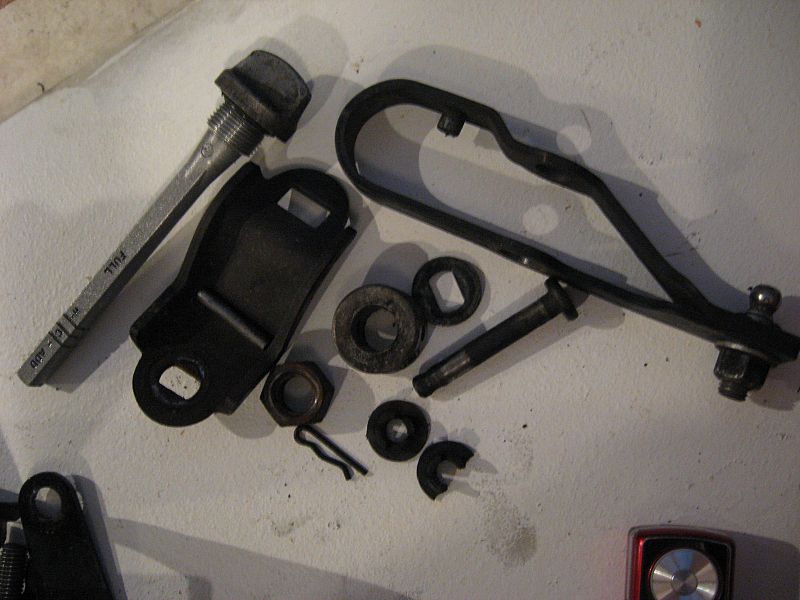
Once the nut is removed take off the washer and shift lever. The next step is to remove the pivot pin for the select lever. Remove the small chip and the pin should slide right out. Check for wear in the pin and bushings. If the plastic bushings are missing or broken replace them. A select arm rebuild kit from Rodneydickman.com is the best of the best for replacements. You can also remove the two 13mm bolts that hold on the pivot pin bracket in place. This is not necissary unless you are replacing the shift rail seal.
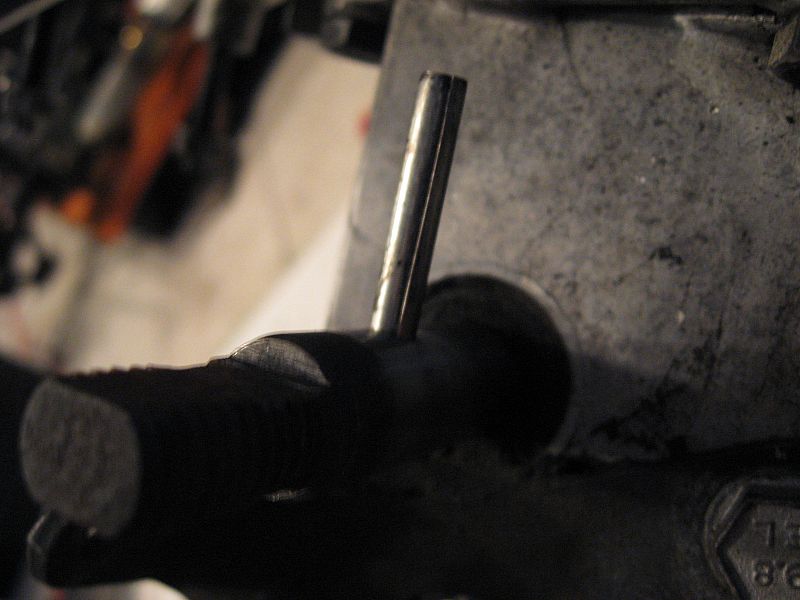
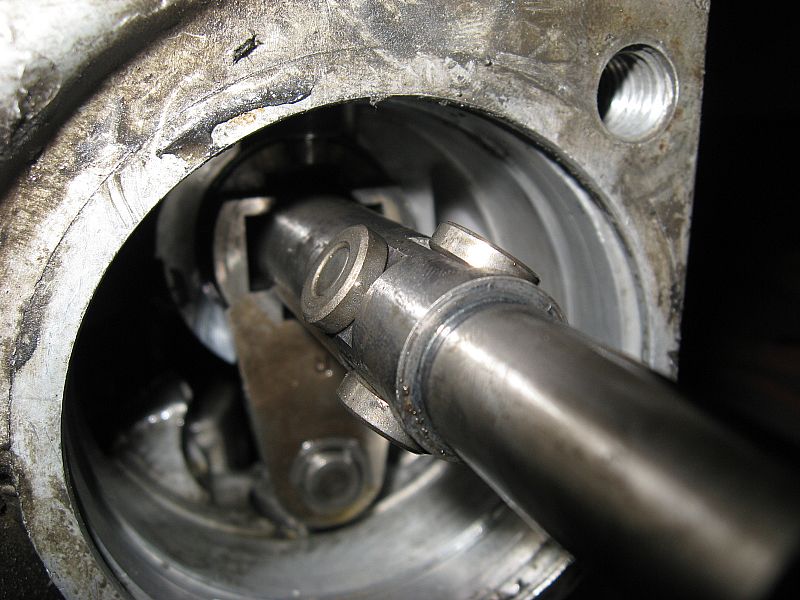
Next part is the pivot collar that slids onto the shift rail. This is held in place with a roll pin. A hammer and 3/16" punch are ideal for removing it. Wipe down the shfit rail threads real good. Check for anything that may keep it from being removed easily, especially if you plan on reusing the seal for it. Use an extremely fine file if you need to remove some burs but be very careful. It must be smooth to slide out properly.


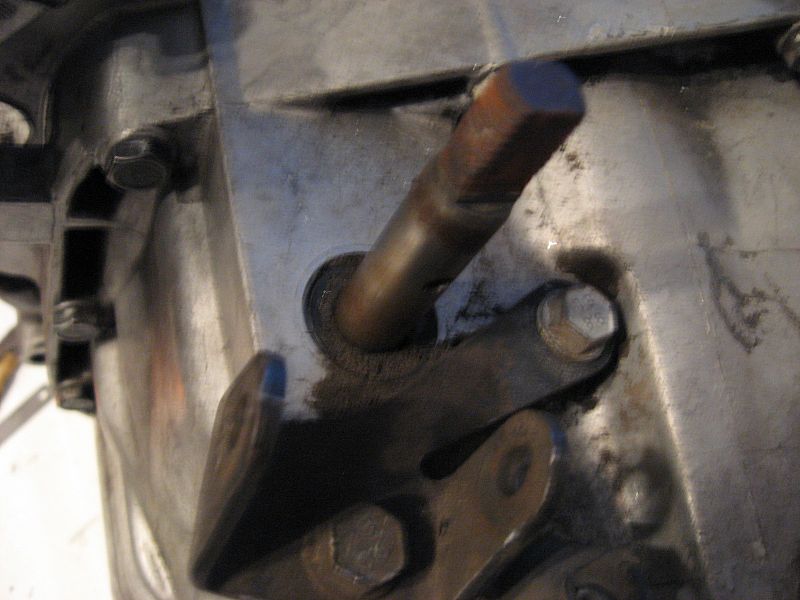
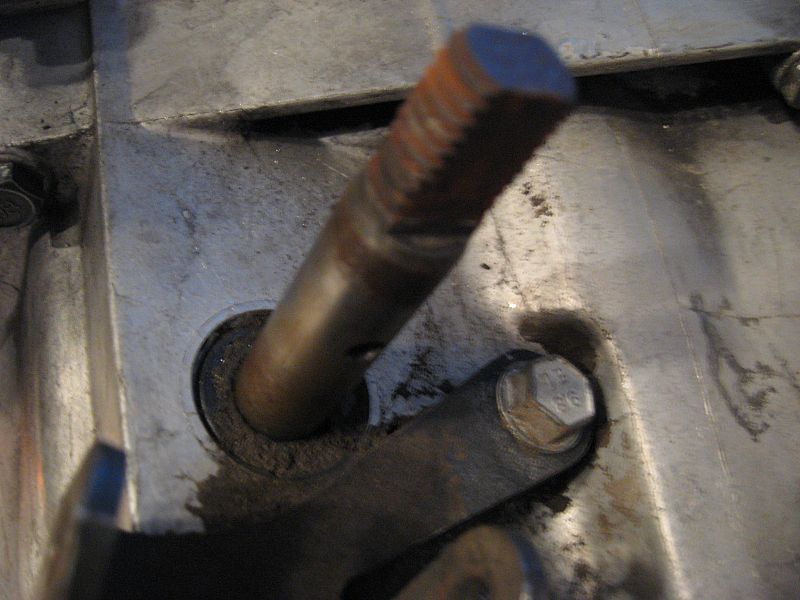
Collar pin located here...


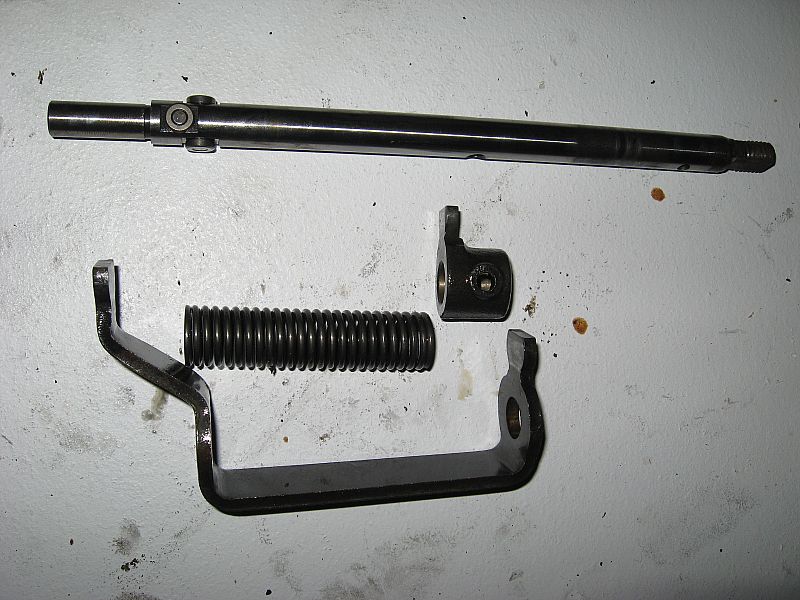
Removed parts. Notice one of my select pin bushings is broken. Going to give Rodney a call for a rebuild kit.


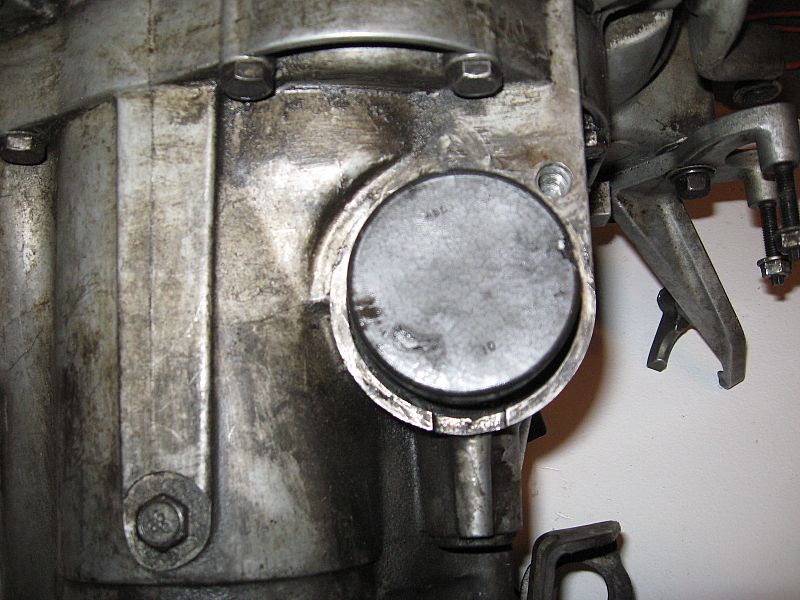
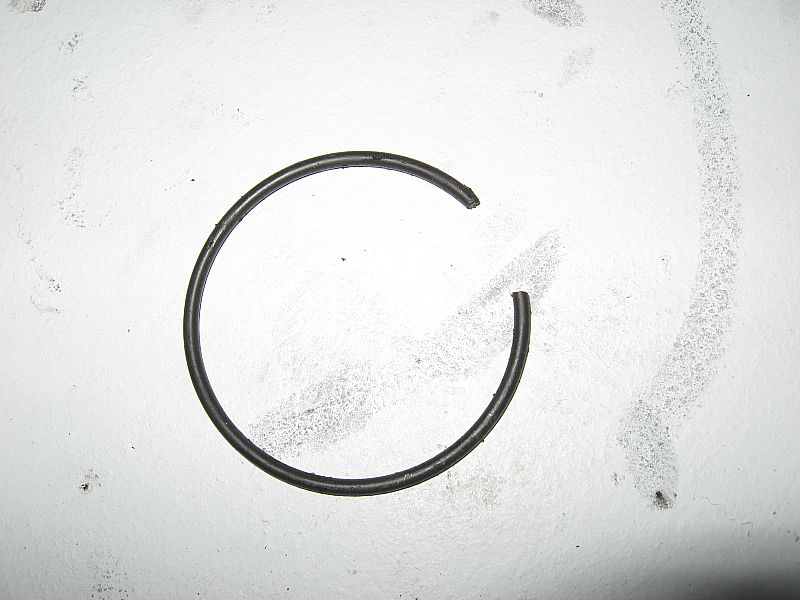
Next up is the removal of the shift rail itself. There are a few steps to this process. First, flip the trans over and find this black cover at the other end of the shift rail. It is held in place with a relatively large "C" clip. A screwdriver workes well to remove the clip and a rubber mallet works on the cover. My cover was also siliconed in place so it was extra fun to remove.

Clip


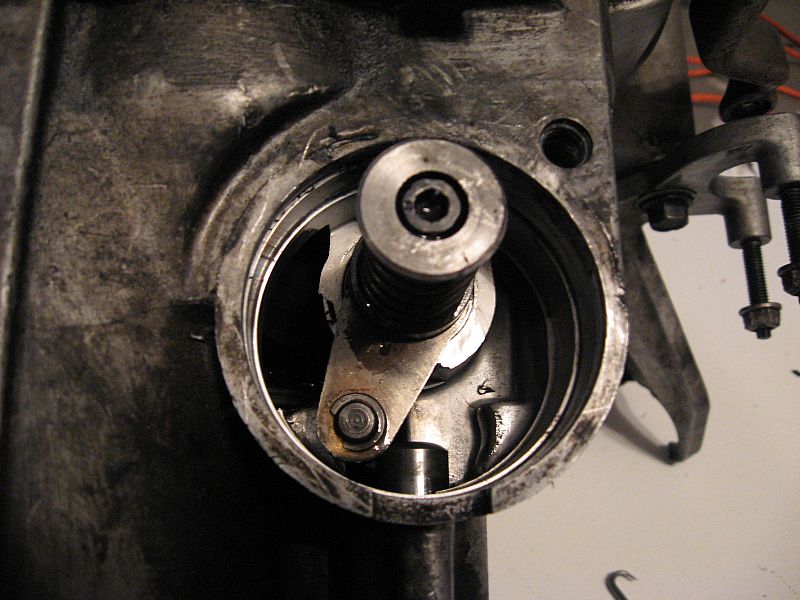
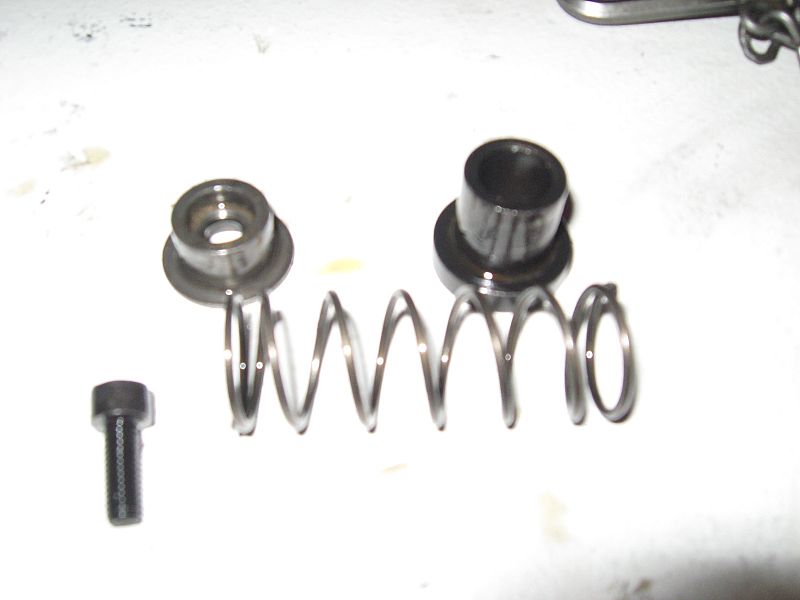
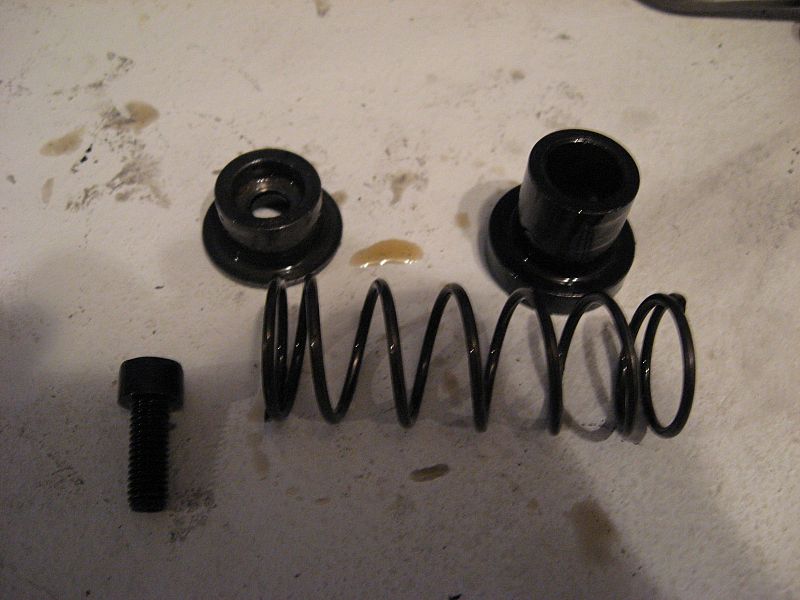
Under the cover you find the shift shaft detent assembly. Included in this is the 5th/reverse bias spring and inner/outer spring seats. Use a 5mm allen wrench or equivelant to remove screw that holds the outer spring seat in place. The spring and inner set come right out after that.


If you haven't split the case yet now is the time....

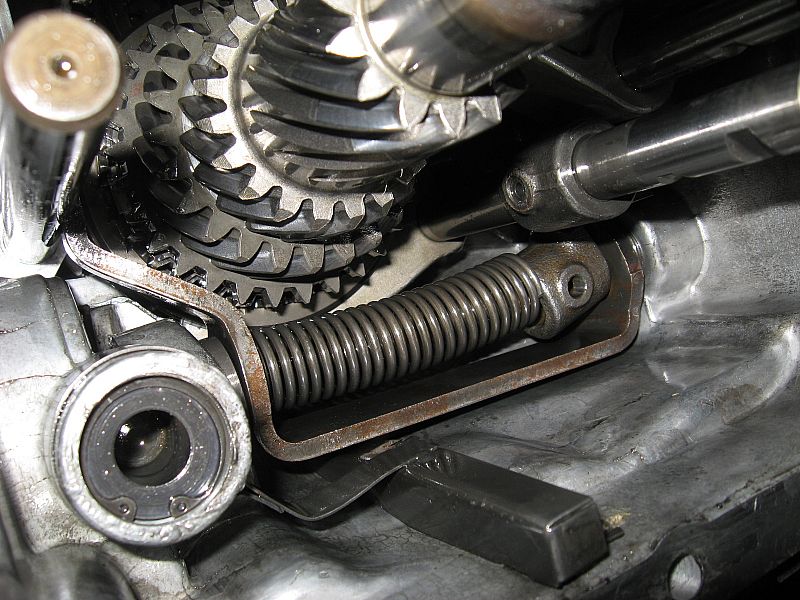
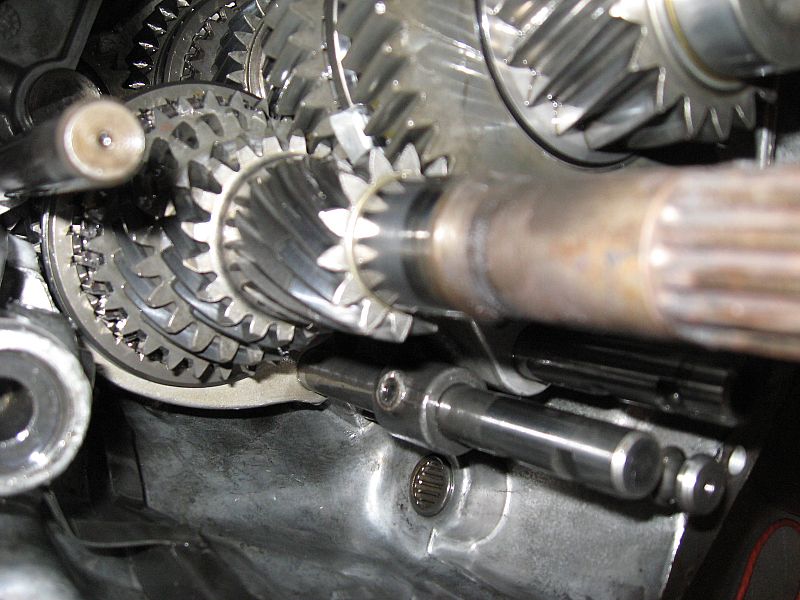
The next part of removing the shift rail is to remove the reverse lever from inside the case. Again it is held in place with a 3/16" rollpin. There is also a spring and the shift lever collar held by the pin. Again use the hammer and 3/16 punch to remove the pin. It may help to engage 4 gear to get the pin in a better position. This is done by pressing down on the 3/4 shift rail. When you get the punch on it the pin will probably fall into the case... unless you have magic fingers. Don't worry about it. It can be retrived later. Better to replace all the pins with new ones anyway.
Reverse lever/spring/shift lever (pin removed).

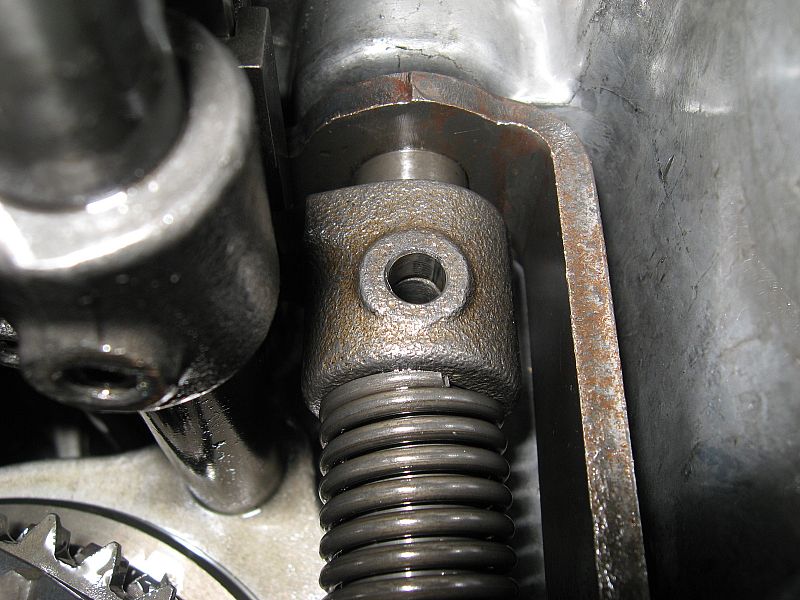
Upclose shot of pin location.


Wiggle the reverse lever out of its position. Now you can slowly and gently slide out the shift rail. Take care not to lose the detent rollers (x4) and pins (x2) while sliding out the rail.

Pic of parts.


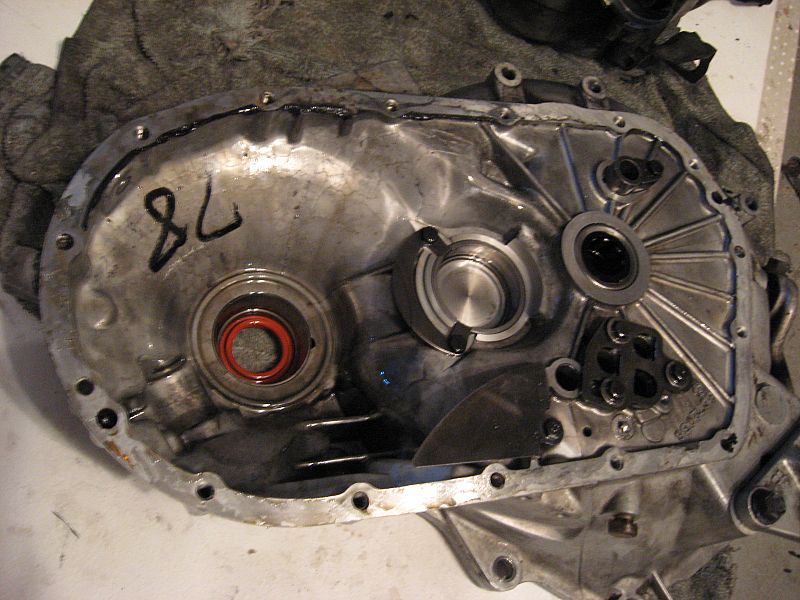
Where the rail used to be...


Next up is the removal of he input/putput bearing retainers.

First engage the 4th and reverse shift rails by pressing down on them. This will lock the trans so the bearing retainers can be removed. To get to the retainers you first have to remove the outer steel cover. There are nine 13mm bolts that hold it in place then tap with you rubber mallet. Under the cover is what the manual refers to as an "oil shield" that sits on top of the output shaft shim. The shim can also fall out so take care not to lose it.

Ever wondered what was under that steel cover on the end of a Getrag?


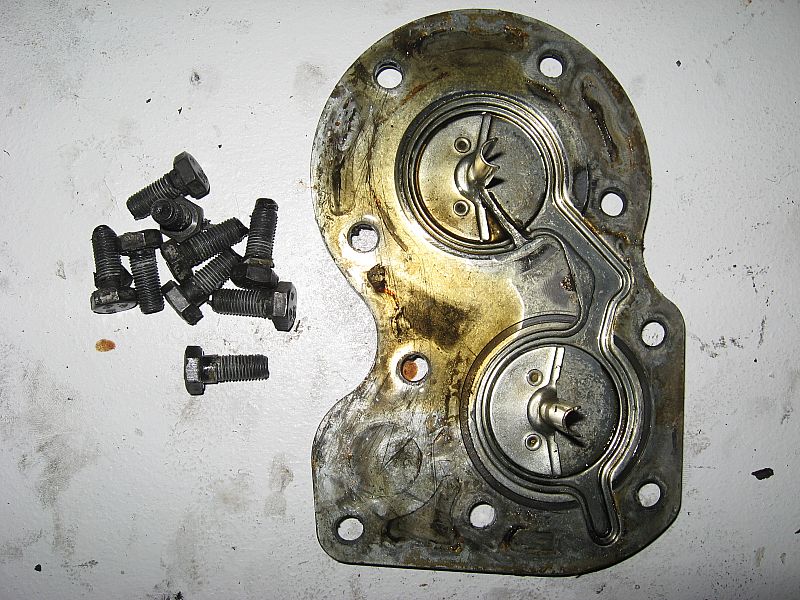
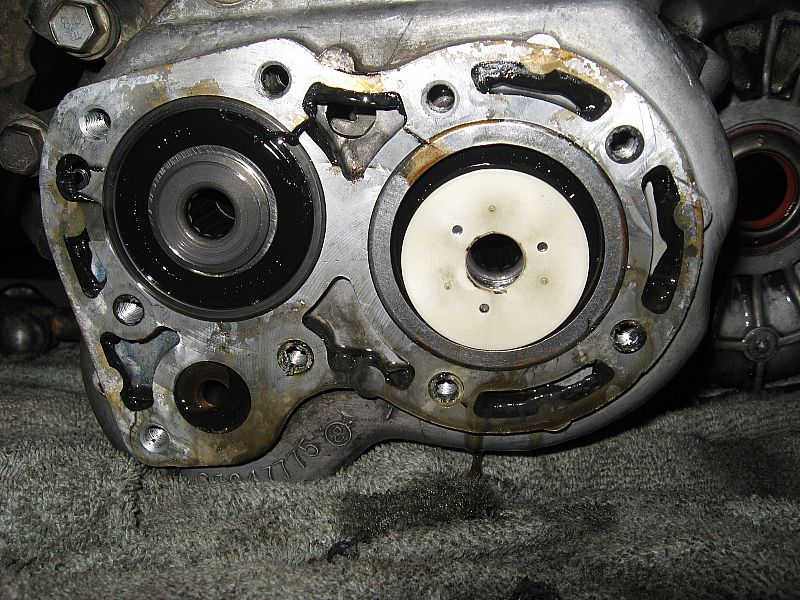
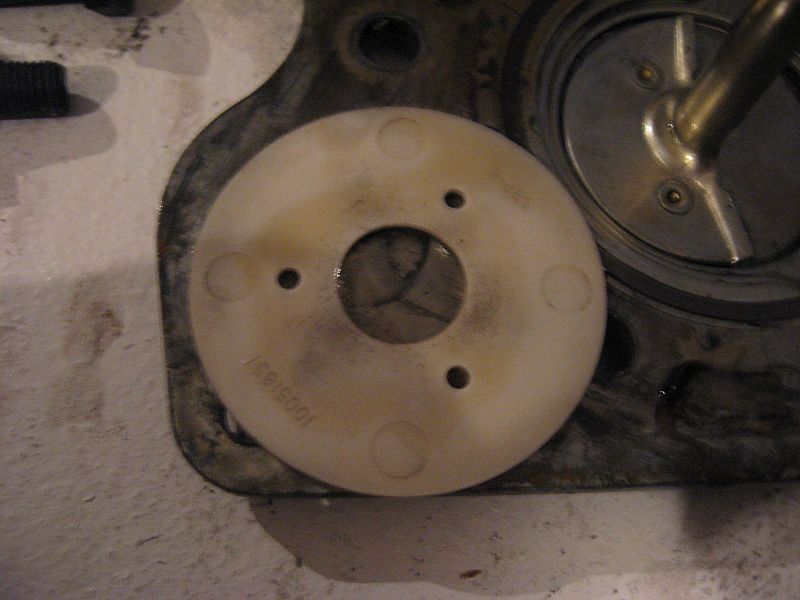
Oil shield. Its just a plastic disc with a few small holes in it.

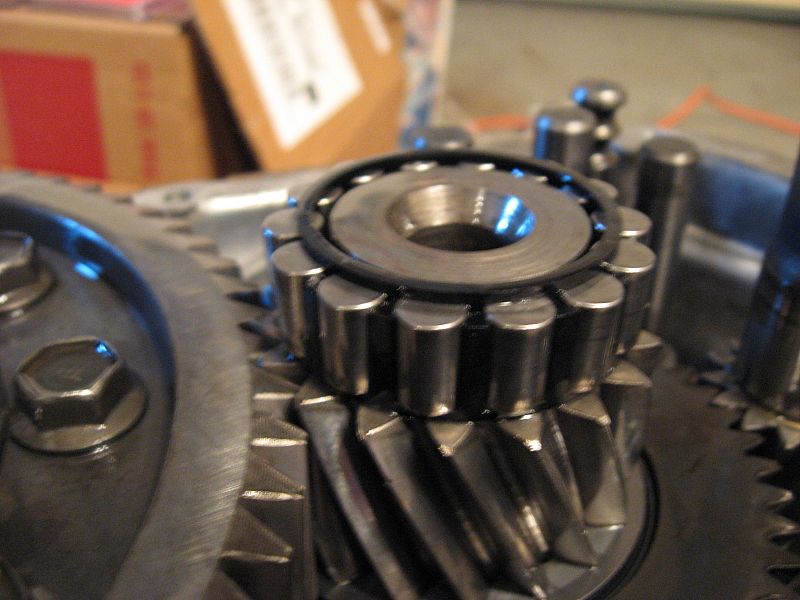
Input & output shaft bearings with retainers inplace. The output shaft shim is still in place in this pic also. Output shaft on the right.


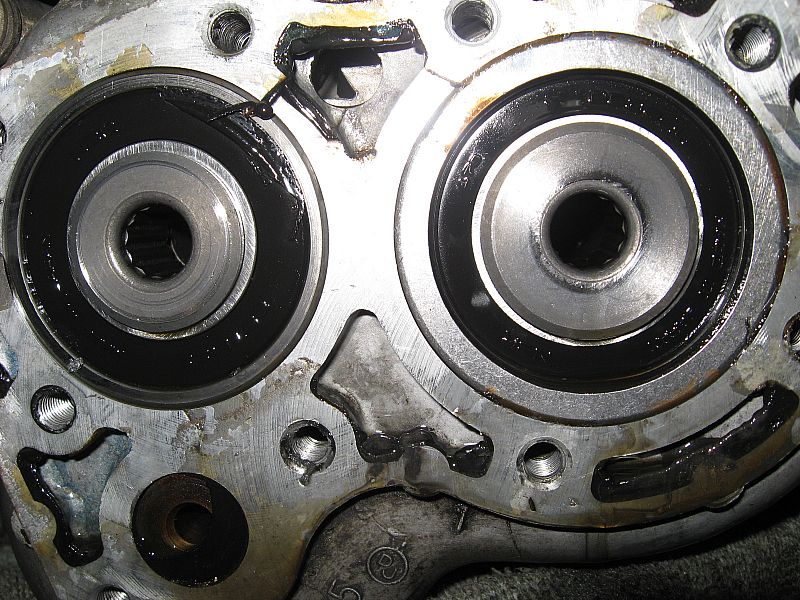
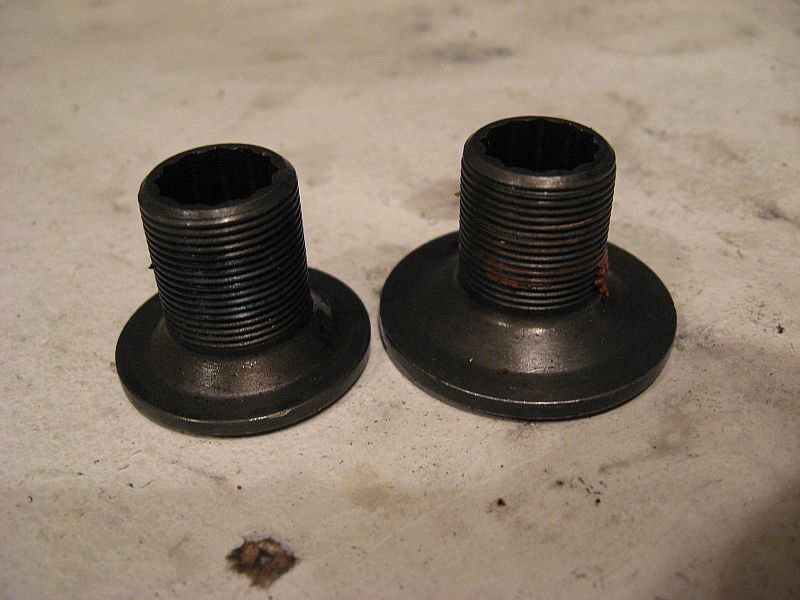
Now you can remove the bearing retainers. The manual says use special tool J36031 or equivalent. Its nothing special, actually just a 1/2" drive 12mm allen socket. The input shaft retainer (left) spins counter clockwise to remove. The output shaft retainer (right) spins clockwise to remove. They are torqued to 85 ft/lbs with locktite to keep them there. Use a large breaker bar to remove them. They are tough.


That is as far as I went with this trans as the moment. To remove the gear clusters you need a 15 ton press. Hope you enjoyed this addition. I'll do a new thread when I actually get around to the rebuild. It may be a while. Fiance is getting layed off end of this month. That pretty much means I have no free money anymore. Later.

[This message has been edited by Fieroseverywhere (edited 12-15-2009).]

IP: Logged
PFF
System Bot
Raydar
Member
Posts: 40712
From: Carrollton GA. Out in the... country.
Registered: Oct 1999


Feedback score:    (13)
Leave feedback


Total ratings: 460
Rate this member

Report this Post11-23-2009 01:49 AM Click Here to See the Profile for RaydarSend a Private Message to RaydarDirect Link to This Post
Good show!

Thanks for sharing.
IP: Logged
Fiero1Fan
Member
Posts: 4364
From: Brachttal, Germany
Registered: Sep 2005


Feedback score:    (19)
Leave feedback


Total ratings: 100
Rate this member

Report this Post11-23-2009 02:35 AM Click Here to See the Profile for Fiero1FanClick Here to visit Fiero1Fan's HomePageSend a Private Message to Fiero1FanDirect Link to This Post
Thanks for the info and the pics... + for you.

------------------
Fiero1Fan

Fieros Europe

IP: Logged
Fieroseverywhere
Member
Posts: 4242
From: Gresham, Oregon USA
Registered: Mar 2006


Feedback score:    (14)
Leave feedback


Total ratings: 89
Rate this member

Report this Post11-24-2009 08:56 PM Click Here to See the Profile for FieroseverywhereSend a Private Message to FieroseverywhereDirect Link to This Post
If anyone is interested I have more pics from digging further into the trans. I actually took it apart right to the point where you have to press out the gear clusters to procede any further. Lucky for me I was able to do my repair without actually removing the input/output gears. I can post these pics also if anyone wants to see them.
IP: Logged
kwagner
Member
Posts: 4257
From: Pittsburgh, PA
Registered: Apr 2005


Feedback score: (3)
Leave feedback


Total ratings: 62
Rate this member

Report this Post11-24-2009 11:25 PM Click Here to See the Profile for kwagnerClick Here to visit kwagner's HomePageSend a Private Message to kwagnerDirect Link to This Post
The more pics, the better Thanks for doing this, I've been wondering what all is involved.
IP: Logged
88GTS
Member
Posts: 104
From: North Vancouver, BC Canada
Registered: Oct 2004


Feedback score: N/A
Leave feedback

Rate this member

Report this Post11-25-2009 11:35 PM Click Here to See the Profile for 88GTSSend a Private Message to 88GTSDirect Link to This Post
Yip, please post more. Technical details are always useful.

Thanks!
IP: Logged
aaronkoch
Member
Posts: 1643
From: Spokane, WA
Registered: Aug 2003


Feedback score: N/A
Leave feedback

Rate this member

Report this Post11-26-2009 10:59 AM Click Here to See the Profile for aaronkochSend a Private Message to aaronkochDirect Link to This Post
Awesome, now you can show us how to throw a LSD in there.

Lest you think I'm an ingrate, + to you for the pics and info.
----------------------------------------------------
Currently in the middle of my 88 + 3800NA swap

[This message has been edited by aaronkoch (edited 11-26-2009).]

IP: Logged
Fieroseverywhere
Member
Posts: 4242
From: Gresham, Oregon USA
Registered: Mar 2006


Feedback score:    (14)
Leave feedback


Total ratings: 89
Rate this member

Report this Post11-26-2009 09:09 PM Click Here to See the Profile for FieroseverywhereSend a Private Message to FieroseverywhereDirect Link to This Post
Just finished getting mine back together this morning so I know the process now. It was in suprisingly good shape. Only minor repairs needed. The reverse gears are a little chewed from being ground together and the 3-4 shift fork had lost its retaining pin. Reverse will be OK as long as I don't beat on it and I was able to replace the roll pin without removing the gear cluster so I consider myself lucky. I don't have a 15 ton press and that is the tool needed to remove the gear cluster. Everything else can be taken apart with basic tools. I'll get those pics up in the next few days.
IP: Logged
Fieroseverywhere
Member
Posts: 4242
From: Gresham, Oregon USA
Registered: Mar 2006


Feedback score:    (14)
Leave feedback


Total ratings: 89
Rate this member

Report this Post11-26-2009 09:13 PM Click Here to See the Profile for FieroseverywhereSend a Private Message to FieroseverywhereDirect Link to This Post

Fieroseverywhere

4242 posts
Member since Mar 2006
 
quote
Originally posted by aaronkoch:

Awesome, now you can show us how to throw a LSD in there.


That wouldn't be difficult at all. Ones like the Gr8 grip or phantom grip would only require splitting the case as I've already outlined.
IP: Logged
Fieroseverywhere
Member
Posts: 4242
From: Gresham, Oregon USA
Registered: Mar 2006


Feedback score:    (14)
Leave feedback


Total ratings: 89
Rate this member

Report this Post12-08-2009 05:59 PM Click Here to See the Profile for FieroseverywhereSend a Private Message to FieroseverywhereDirect Link to This Post
Got my car back together only to find out I have a bad 3rd gear synchro. I will be doing a rebuild in the near future. I figured I would just do a write up then and cover all the bases at one time. I'll start a new thread when the rebuild begins.
IP: Logged
White88Formula
Member
Posts: 434
From: Illinois
Registered: Aug 2009


Feedback score: N/A
Leave feedback

Rate this member

Report this Post12-08-2009 06:21 PM Click Here to See the Profile for White88FormulaSend a Private Message to White88FormulaDirect Link to This Post
Mine was leaking where the halves meet, good luck trying to find a gasket for the middle, Trans guy I took it too had to use Silicone Gasket form
IP: Logged
PFF
System Bot
Lambo nut
Member
Posts: 4442
From: Centralia,Missouri. USA
Registered: Sep 2003


Feedback score: (2)
Leave feedback


Total ratings: 262
Rate this member

Report this Post12-08-2009 06:25 PM Click Here to See the Profile for Lambo nutSend a Private Message to Lambo nutDirect Link to This Post
 
quote
Originally posted by White88Formula:

Mine was leaking where the halves meet, good luck trying to find a gasket for the middle, Trans guy I took it too had to use Silicone Gasket form


The two main halves, don't use a gasket. Machined fit, and use anaerobic sealer.

Kevin

IP: Logged
Fieroseverywhere
Member
Posts: 4242
From: Gresham, Oregon USA
Registered: Mar 2006


Feedback score:    (14)
Leave feedback


Total ratings: 89
Rate this member

Report this Post12-08-2009 07:37 PM Click Here to See the Profile for FieroseverywhereSend a Private Message to FieroseverywhereDirect Link to This Post
There is a GM part number for the correct loctite if you prefer to be totally factory about it. Its listed in the muncie manual linked in the original post. Silicone works well though and it cheaper and easier to find.
IP: Logged
proff
Member
Posts: 7393
From: The bottom of the world
Registered: Oct 2004


Feedback score: N/A
Leave feedback


Total ratings: 87
Rate this member

Report this Post12-09-2009 05:35 AM Click Here to See the Profile for proffClick Here to visit proff's HomePageSend a Private Message to proffDirect Link to This Post
Are parts adv. for this
I really needed this infomation a week and a half ago
I will get my broken getrag back and see what i can do

i took mine apart and the 2 halves only came apart about half an inch to 3/4 of an inch
Why does it not want to come apart totally ?
Do i have to remove the round platic cover in the bell housing?
There is the selector shaft and has a black metal cup over the end, This is held in with a circlip. i got both off but the black cup is damaged. the selector shaft has about 1/8 inch sideways play in it. I can't see that being ok.
There are 4 small washers around some dowl pins on the lower part of the selector shaft and out of the 4 washers 2 are broken in half.

[This message has been edited by proff (edited 12-09-2009).]

IP: Logged
proff
Member
Posts: 7393
From: The bottom of the world
Registered: Oct 2004


Feedback score: N/A
Leave feedback


Total ratings: 87
Rate this member

Report this Post12-09-2009 05:58 AM Click Here to See the Profile for proffClick Here to visit proff's HomePageSend a Private Message to proffDirect Link to This Post

proff

7393 posts
Member since Oct 2004
 
quote
Originally posted by Fieroseverywhere:

If anyone is interested I have more pics from digging further into the trans. I actually took it apart right to the point where you have to press out the gear clusters to procede any further. Lucky for me I was able to do my repair without actually removing the input/output gears. I can post these pics also if anyone wants to see them.


Yes please
I am doing this right now , well on the weekend really


IP: Logged
Fieroseverywhere
Member
Posts: 4242
From: Gresham, Oregon USA
Registered: Mar 2006


Feedback score:    (14)
Leave feedback


Total ratings: 89
Rate this member

Report this Post12-09-2009 10:32 AM Click Here to See the Profile for FieroseverywhereSend a Private Message to FieroseverywhereDirect Link to This Post
Follow the link in the first post of this thread. The pics in the first post should help also. You will not be able to seperate the case halves until you remove the shift rail detents under that cover in the bellhousing. Thats why you can't get it completely split.

I wanted to wait for the rebuild to toss up the rest of the pics but I don't have to. I will try to put them up tonight if I have time. They will cover removal of the outer shift linkage, reverse lever, shift shaft, and input/output bearing retainers under steel end plate. Thats all I have right now.

I was able to score one of the original GM getrag toolkit (See note below) and assembly pallet (J-36182-1) off e-bay. Guess they are from a dealership that closed down in this last year. Anyway, I will be using those for the rebuild. I can provide part numbers for the toolkit pieces when they arrive and I verify whats there. I may take pics of the tools aswell to have a record. Maybe even some measurments for those who have the equipment to remake them (paging Mr. Dickman!!). They should be here on friday.

Still looking for a good quality rebuild kit other then drivetrain.com. If you have a source please let me know. Mantrans store on ebay is the best price but the quality of the synchros is not to my standards.

NOTE:
Getrag toolkit included pieces...
J36190, J36039, J36184, J36185, J28412, J35821, J36027, J36033, J36030, J36189, J35823, J36038, J35822, J36029-2, J36034
I will need to verify this when it arrives but according to the pic it looks pretty accurate.

[This message has been edited by Fieroseverywhere (edited 12-09-2009).]

IP: Logged
Fieroseverywhere
Member
Posts: 4242
From: Gresham, Oregon USA
Registered: Mar 2006


Feedback score:    (14)
Leave feedback


Total ratings: 89
Rate this member

Report this Post12-11-2009 03:04 PM Click Here to See the Profile for FieroseverywhereSend a Private Message to FieroseverywhereDirect Link to This Post
Just got off the phone with a local company. They have a decent price on a full overhaul kit for this getrag. Still waiting on a callback regarding bearing and seal manufacturers. Apparently they have GM original synchro rings. Working on finding out quantities available for others that may be looking for OE parts. I'll keep you all posted. I may start a new thread on these. I'll ask about arranging a group buy if the quantities are there and enough other people are interested.

The tool kit showed also. It is indeed as described. I will start a new thread with details and pics of each tool. Just want to document this while I have a complete set handy. Hopefully before the weekend is over.

[This message has been edited by Fieroseverywhere (edited 12-11-2009).]

IP: Logged
DLCLK87GT
Member
Posts: 2694
From: South Jersey, USA
Registered: Feb 2009


Feedback score:    (9)
Leave feedback

Rate this member

Report this Post12-11-2009 04:19 PM Click Here to See the Profile for DLCLK87GTSend a Private Message to DLCLK87GTDirect Link to This Post
Awwww the pictures aren't working. Was thinking about cracking mine open before putting it back in. Was curious about the condition of the inards.
IP: Logged
carbon
Member
Posts: 4767
From: Eagan, MN
Registered: Apr 2004


Feedback score: (2)
Leave feedback


Total ratings: 132
Rate this member

Report this Post12-11-2009 05:33 PM Click Here to See the Profile for carbonSend a Private Message to carbonDirect Link to This Post
 
quote
Originally posted by DLCLK87GT:

Awwww the pictures aren't working. Was thinking about cracking mine open before putting it back in. Was curious about the condition of the inards.


no pics... I don't know why people are so anti-PIP...
IP: Logged
Lambo nut
Member
Posts: 4442
From: Centralia,Missouri. USA
Registered: Sep 2003


Feedback score: (2)
Leave feedback


Total ratings: 262
Rate this member

Report this Post12-11-2009 06:00 PM Click Here to See the Profile for Lambo nutSend a Private Message to Lambo nutDirect Link to This Post
 
quote
Originally posted by carbon:


no pics... I don't know why people are so anti-PIP...


If you can't get it ot work, no matter what you try, gets pretty frustrating. I had it working at one time, but after visiting another Fiero site, it never worked again. Strange timing, I don't know. I use photobucket now.

Kevin
IP: Logged
Fieroseverywhere
Member
Posts: 4242
From: Gresham, Oregon USA
Registered: Mar 2006


Feedback score:    (14)
Leave feedback


Total ratings: 89
Rate this member

Report this Post12-11-2009 07:47 PM Click Here to See the Profile for FieroseverywhereSend a Private Message to FieroseverywhereDirect Link to This Post
Uh oh. What happened? They were working earlier today!? They are hosted on captfiero.com. Its just as permanent as this forum. David is a fiero guy for life.

PIP no longer works for me. I had to find another solution. I'll get it figured out.

EDIT: Oops. My fault. I changed the directory name and didn't update the pics. Fixed now.

[This message has been edited by Fieroseverywhere (edited 12-11-2009).]

IP: Logged
PFF
System Bot
Fieroseverywhere
Member
Posts: 4242
From: Gresham, Oregon USA
Registered: Mar 2006


Feedback score:    (14)
Leave feedback


Total ratings: 89
Rate this member

Report this Post12-11-2009 09:41 PM Click Here to See the Profile for FieroseverywhereSend a Private Message to FieroseverywhereDirect Link to This Post
More pics added to initial post.
IP: Logged
SCCAFiero
Member
Posts: 1144
From: Boca Raton, Fl USA
Registered: Apr 2006


Feedback score: N/A
Leave feedback

Rate this member

Report this Post12-12-2009 11:02 PM Click Here to See the Profile for SCCAFieroSend a Private Message to SCCAFieroDirect Link to This Post
I used these guys for a rebuild kit with seals, blocker rings and cover plate.

http://www.zbag.com/index.p...egory_id=16&Itemid=5

Hardest part (besides the actual ring replacement) was getting all those shift detent balls and pins back together. Anyone know the secret for that part?

IP: Logged
Fieroseverywhere
Member
Posts: 4242
From: Gresham, Oregon USA
Registered: Mar 2006


Feedback score:    (14)
Leave feedback


Total ratings: 89
Rate this member

Report this Post12-14-2009 10:40 AM Click Here to See the Profile for FieroseverywhereSend a Private Message to FieroseverywhereDirect Link to This Post
 
quote
Originally posted by SCCAFiero:

Hardest part (besides the actual ring replacement) was getting all those shift detent balls and pins back together. Anyone know the secret for that part?


I used a very skinny pair of needle nose. They worked pretty well and it was still a pain.
IP: Logged
proff
Member
Posts: 7393
From: The bottom of the world
Registered: Oct 2004


Feedback score: N/A
Leave feedback


Total ratings: 87
Rate this member

Report this Post01-26-2010 04:06 AM Click Here to See the Profile for proffClick Here to visit proff's HomePageSend a Private Message to proffDirect Link to This Post
]
There are two 10mm screws that keep the detent holder, detent balls/springs (4 of each), and interlock pins (2) in place. From what I have read some of the earlier models also had an interlock plate that goes on top of the detent holder. Mine did not. If your detent holder is not at least 18mm thick you should have interlock plate in place.


These Pins and small washers don't seem to have anyting holding them on.
Do i really need them and what do that do?
EDIT 12-11-09[/QUOTE]

[This message has been edited by proff (edited 01-26-2010).]

IP: Logged
Fieroseverywhere
Member
Posts: 4242
From: Gresham, Oregon USA
Registered: Mar 2006


Feedback score:    (14)
Leave feedback


Total ratings: 89
Rate this member

Report this Post07-29-2010 04:22 PM Click Here to See the Profile for FieroseverywhereSend a Private Message to FieroseverywhereDirect Link to This Post
 
quote
Originally posted by proff:


These Pins and small washers don't seem to have anyting holding them on.
Do i really need them and what do that do?
EDIT 12-11-09


I don't know how I missed this.

Yes they are necissary. They are held in place when the shift shaft is all the way in. They are actually roller bearings of a sort and help reduce friction of the shaft at it both rotates side to side and slides in and out. Without them the detent assembly wont work.

Sorry for the long delay on the response. Only 7 months.

[This message has been edited by Fieroseverywhere (edited 07-29-2010).]

IP: Logged


All times are ET (US)

T H I S   I S   A N   A R C H I V E D   T O P I C
  

Contact Us | Back To Main Page

Advertizing on PFF | Fiero Parts Vendors
PFF Merchandise | Fiero Gallery | Ogre's Cave
Real-Time Chat | Fiero Related Auctions on eBay


Copyright (c) 1999, C. Pennock