The one in the pic and 2 with a friend up in IL (one of those had the rear cradle mount perches bent and replaced with rectangular tube).
I am working on getting another near complete 88 coupe parts car (wrecked front/rear & minus engine) and a spare 88 rear cradle as a package deal... they are 15 miles from me.
IP: Logged
06:30 PM
Nov 22nd, 2009
fieroguru Member
Posts: 12127 From: Champaign, IL Registered: Aug 2003
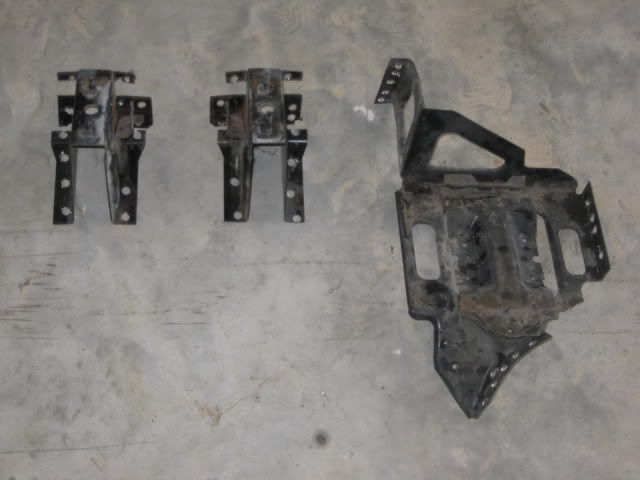
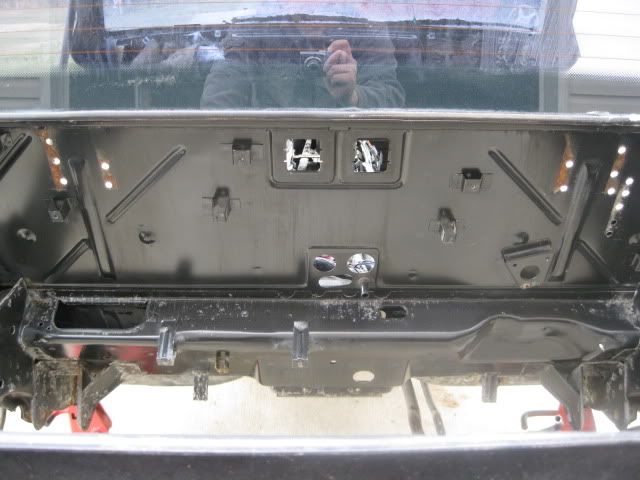
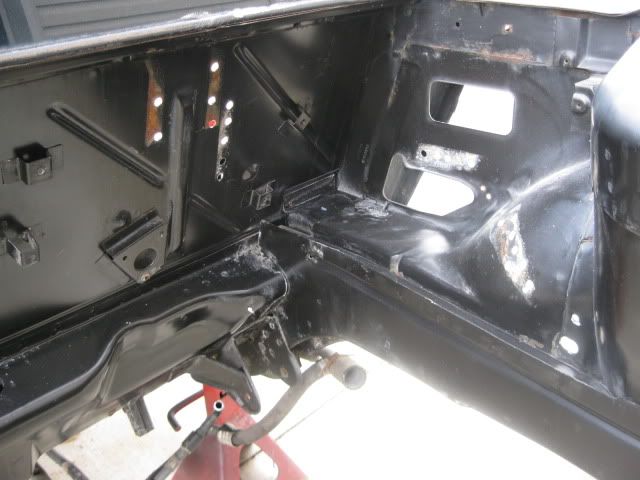
Spent a good part of today tearing apart what was left of the parts chassis and cleaning it up. I decided to keep all the metal tabs and dogbone brackets in the chassis incase I need to mock up a near stock install someday. Along those lines, I wanted to remove the decklid hinge boxes and the battery tray, but need to be able to reinstall them to check clearances depending on engine swap, so I drilled out all the spot welds with a 3/8" bit ensuring they could be removed without distruction to them or the chassis. When I need to put them back in, I can use a few 3/8" bolts to put them back where they belong.
I wanted to remove the decklid hinge boxes and the battery tray, but need to be able to reinstall them to check clearances depending on engine swap, so I drilled out all the spot welds with a 3/8" bit ensuring they could be removed without distruction to them or the chassis. When I need to put them back in, I can use a few 3/8" bolts to put them back where they belong.
Looking good. I'm loving how clean it looks with the hinge brackets removed.
IP: Logged
08:15 PM
fieroguru Member
Posts: 12127 From: Champaign, IL Registered: Aug 2003
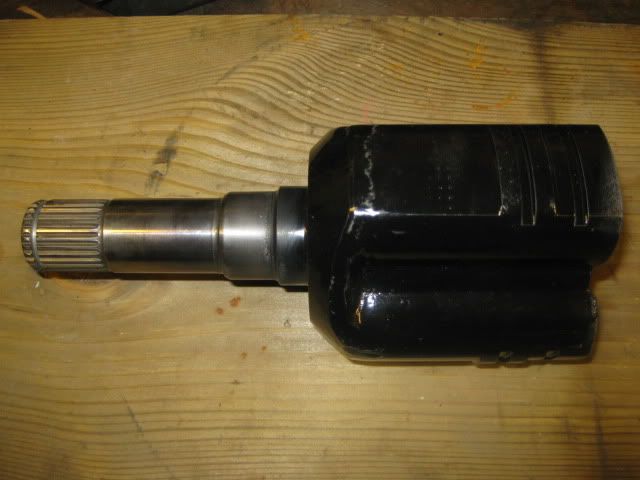
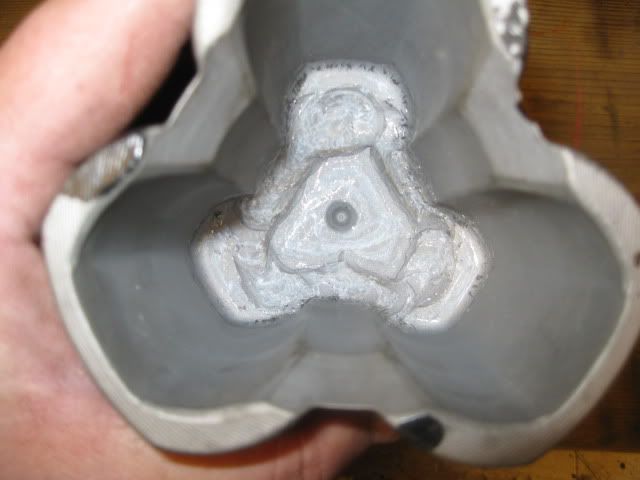
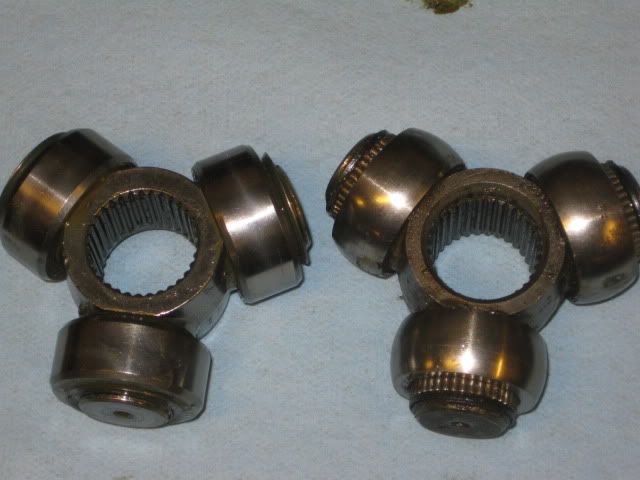
Over thanksgiving I visited Russ Fiero (BMW V12 swap guy) and had him make me one of these using the Saab 9-5 spline and a stock fiero tripod cup:
The cup was machined off the saab piece leaving just the splined shaft and a round flange where the tripod used to be. Then take the fiero tripod cup and cut off the spline shaft and machine a recessed area to accept the modified saab part. Then assemble and weld inside and out.
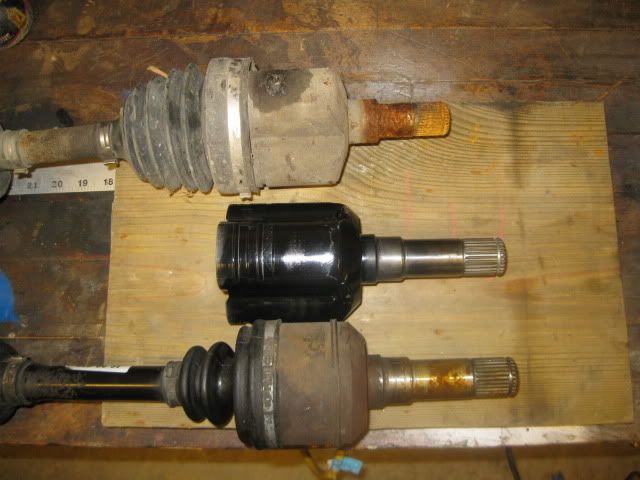
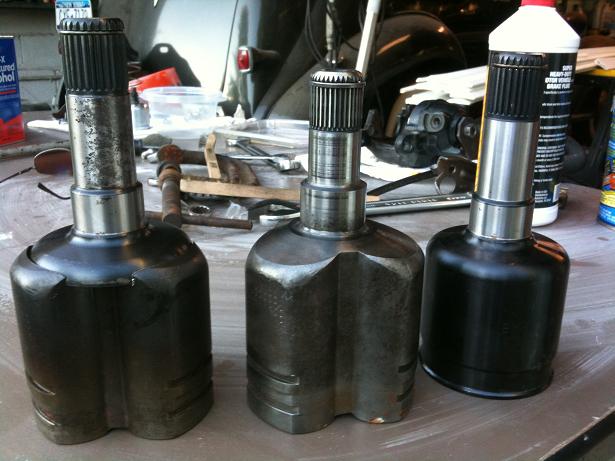
Here is the hybrid piece (center) along side a stock fiero axle (top) and a stock 9-5 axle (bottom):
I got the idea from:
quote
Originally posted by Fierobsessed: Heres the ingredients, and the semi finished product. To the right: an equinox cup, center: Fiero cup, Left: combination of the two.
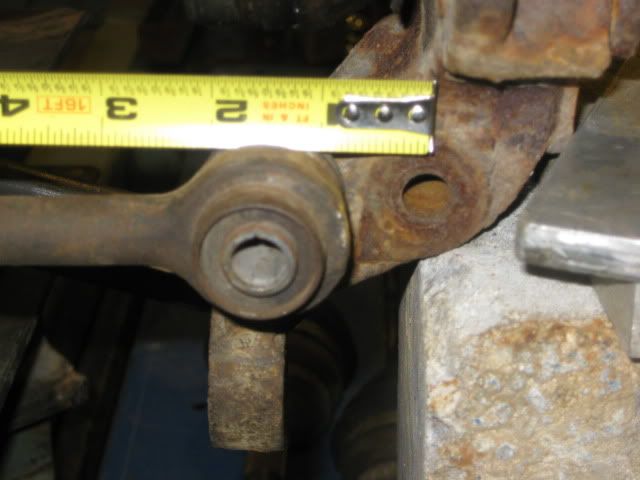
This allows the use of the fiero inboard tripod assy which is very common and the fiero tripod has about 2 1/8" of movement from full compression to full extension (rollers flush with outer face) and will allow more variations in acceptable axle lengths.
With this new tripod assy and using a stock manual axle, the driver side is 1 1/2" too long at full compression. Adding 1" to center the tripod and it is about 2 1/2" long. The 96 V6 Corsica PS axle is fiero compatible and about 1 1/2" shorter than the stock DS manual fiero axle. Still too long, but I am going to get one anyway to play with it. For starters, all the axles are spec'd by total compressed length that includes the spline and threaded ends. Variations in the design of these ends can make the axle appear too short or too long by up to 1" and the only way to know the actual shaft length is to get one and check it out. Since I am looking for about an inch less in length, I may be able to move the snap grooves on both ends to shorten the axle from 1/2 to 1". Lastly, I could bias the final engine placement to the passenger side (I need to leave enough room to install the serpentine belt) and gain up to 1/4".
The passenger side with the stock DS manual fiero axle is 2 3/4" too short when fully compressed. Add 1" to center the tripod and it is still about 1 3/4" too short. So I need to find a fiero compatible axle (32 splines) that is around 24 7/16" fully compressed.
[This message has been edited by fieroguru (edited 12-01-2009).]
IP: Logged
03:20 PM
Nov 30th, 2009
Isolde Member
Posts: 2504 From: North Logan, Utah, USA Registered: May 2008
Congrats on this progress!! I hope to see you do some 6000-rpm launches on drag radials or drag slicks before I trust welded up hybrid tripods, but at least you'll be able to get the car moving under it's own power.
IP: Logged
12:43 PM
Dec 1st, 2009
fieroguru Member
Posts: 12127 From: Champaign, IL Registered: Aug 2003
Congrats on this progress!! I hope to see you do some 6000-rpm launches on drag radials or drag slicks before I trust welded up hybrid tripods, but at least you'll be able to get the car moving under it's own power.
I have zero intentions of doing 6K clutch drops... there just is no need for it. If I want to do a burnout, all I need to do is apply the throttle and the tires will light up pretty much anywhere in 1st or 2nd. My current and future engine will have excess low end torque so I doubt I will ever launch any higher than 3K at the strip or run slicks for that matter.
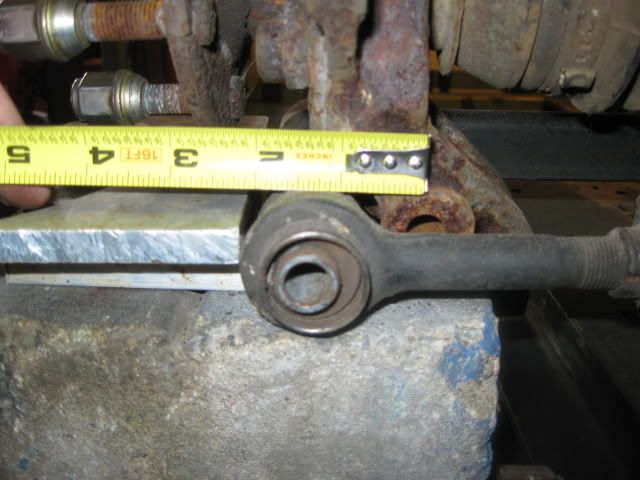
I am not sold on using the hybrid tripods, but wanted to go through the exercise and see what the possibilities are. I also have an OEM equinox axle on it way (should be here today) so I can see what the hardware on the tripod joint and CV was from GM vs. the way EMPI made their version to see if there are other possiblities.
The best part about them is it makes the passenger side fiero axle a simple and viable option. Fully compressed, the hybrid tripod and the stock PS manual axle is 1 3/8" too short. Centering the tripod get you within 3/8" which. This should be well within the tripod acceptable range, but moving the engine to the PS or using a spacer between the CV and wheel bearing and it could be made to be perfect. The only issue to resolve is some additional tripod support and to seal up the tranny. An axle stabilizer bearing with integrated seal the right size might be just the ticket.
This might be the axle route I take for my 4.3/F40 daily driver...
[This message has been edited by fieroguru (edited 12-01-2009).]
IP: Logged
08:32 AM
Isolde Member
Posts: 2504 From: North Logan, Utah, USA Registered: May 2008
What's the point of more power if you can't hook it up? Even with your current combo, you should be running drag radials all day every day anyway. And why go to the track if you're not going to do everything possible to get the best number? I just don't get that. Aside from MPG, what other reason is there for the F40 than the torque capacity? It would be best to try to break the welds as soon as possible, because if they don't break then you have more peace of mind forever after.
IP: Logged
11:49 AM
fieroguru Member
Posts: 12127 From: Champaign, IL Registered: Aug 2003
What's the point of more power if you can't hook it up? Even with your current combo, you should be running drag radials all day every day anyway. And why go to the track if you're not going to do everything possible to get the best number? I just don't get that. Aside from MPG, what other reason is there for the F40 than the torque capacity? It would be best to try to break the welds as soon as possible, because if they don't break then you have more peace of mind forever after.
I have never been (and probably never will be) drag racing focused... the whole premise is flawwed in that you do a bunch of specialized stuff, with specialized hardware, at a specialized destination, for a specialized length and see what the car will do under those circumstances, then repeat as necessary till something breaks, blows, or the wallet is empty. I would much rather build a fun car to enjoy driving and know what it will do on any given day, any given street, and any given distance.
I am doing the F40 install for the additional torque capacity, increased MPG on the highway, lower replacement cost and to have fun with the R&D. I am a manual tranny guy and the F40 is the strongest factory rated GM FWD manual, so I want to run it in both my swapped fieros. They happen to be dirt cheap too, but need some creative lower cost solutions to the installation issues.
The rebuilt getrag cost me $1200 (kept the core), so my goal is to find the right combination of parts to install the F40 for under $1200 (it will cost me more than that to find the right combination, but I would like for it to be repeatable for $1200)... might be a pipe dream, but I like challanges... and this has given me the opportunity to learn more than I ever would have thought of in regards to Axles, CV and tripods.
IP: Logged
12:29 PM
PFF
System Bot
Dec 5th, 2009
fieroguru Member
Posts: 12127 From: Champaign, IL Registered: Aug 2003
I really like the new garage. Woke up today and it was 26 degrees and I spent the majority of the day in the garage in a t-shirt... Now if only it had a taller roof so I could bring the twin post car lift down...
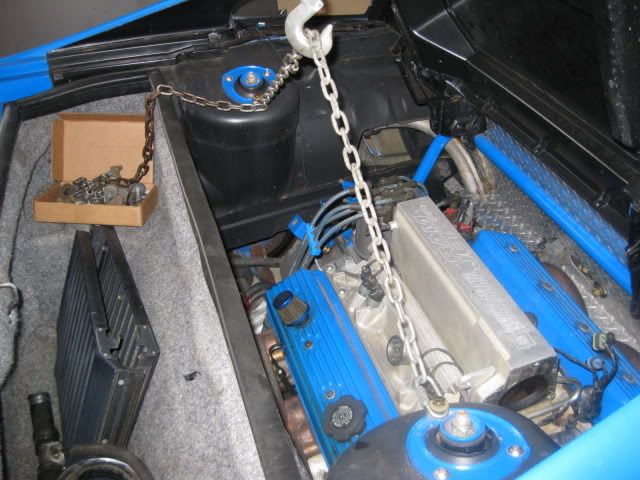
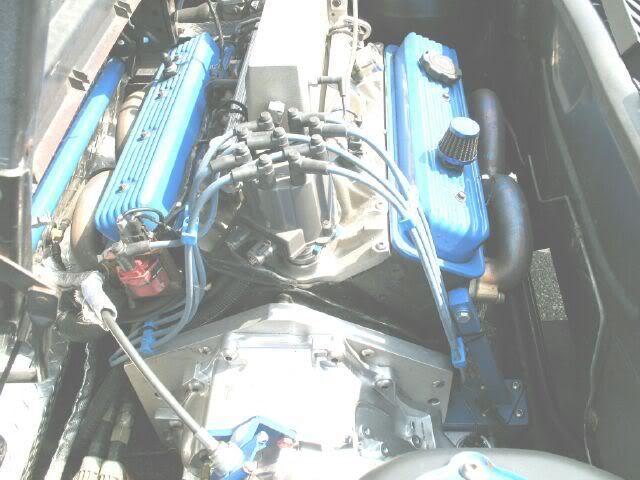
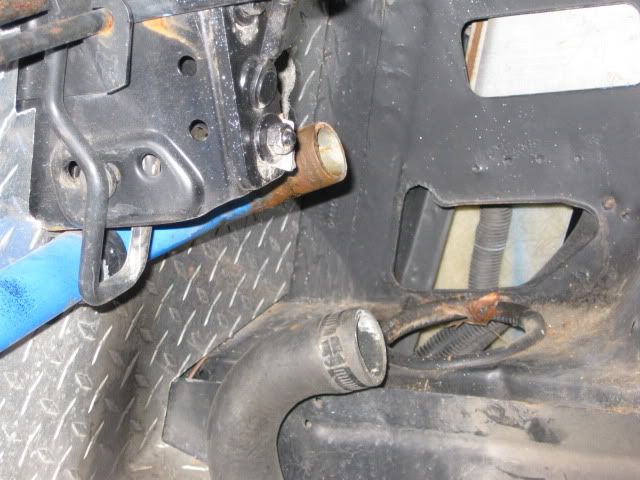
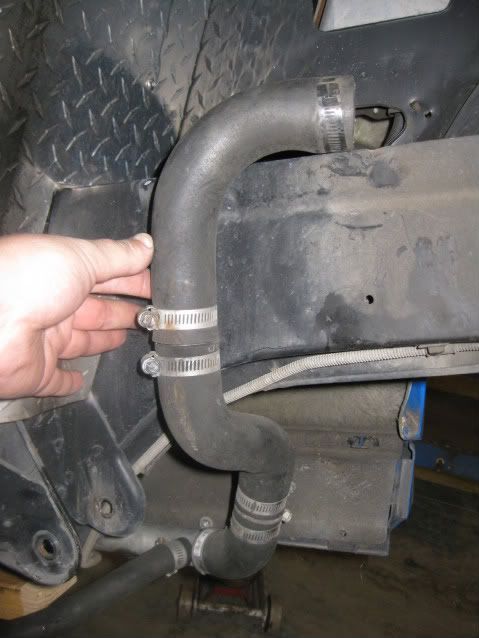
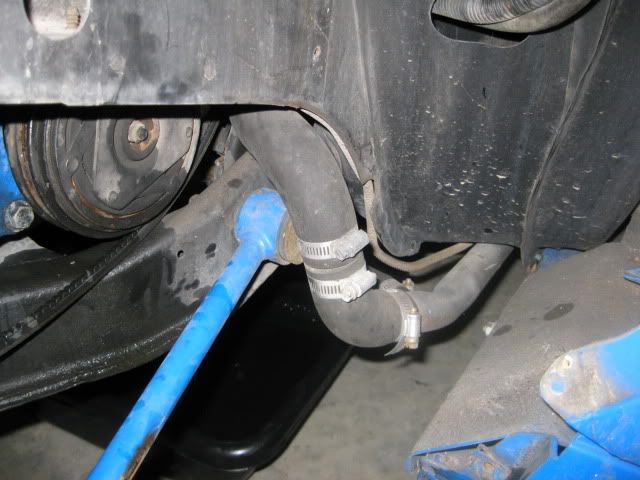
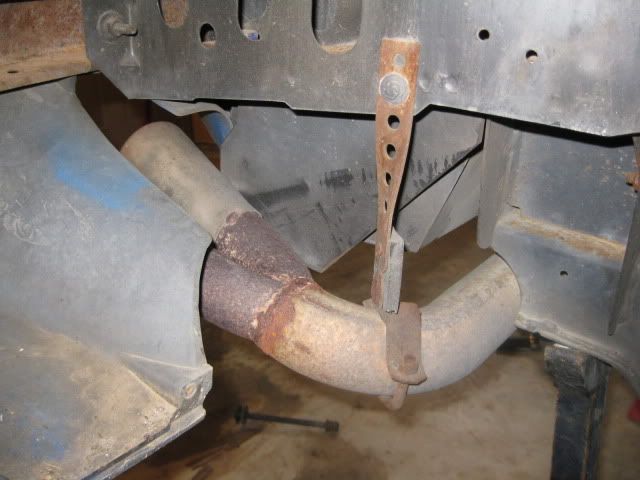
Since my 97 Chevy 4x4 truck dumped about 2 gallons of antifreeze into the oil pan, I decided to pull the current SBC setup early and use its engine to replace the truck one. This will save me from spending about $1500 fixing the truck and gives me an excuse to build a new engine for the fiero... It also allows me to sell off all the parts associated with this setup that I will not be reusing - they are posted in the Mall.
Here are some pics with the old setup coming out:
IP: Logged
05:34 PM
Dec 7th, 2009
fieroguru Member
Posts: 12127 From: Champaign, IL Registered: Aug 2003
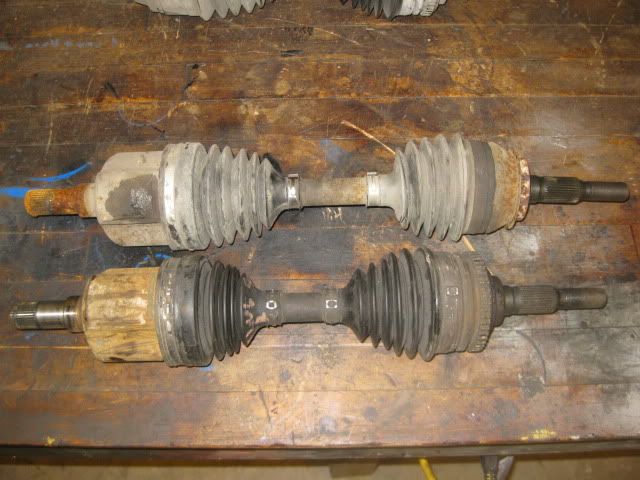
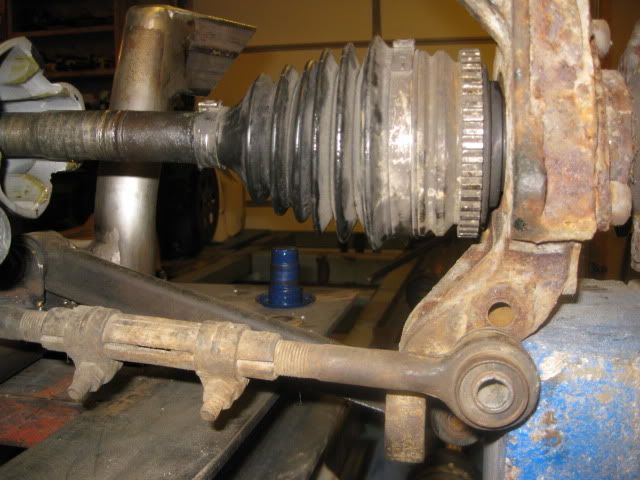
The 96 corsica axle came in today. It is indeed shorter than the fiero manual axle (top in picture) and has fiero compatible splines on both ends.
The tripod rollers are slightly different with the corsica ones being more flat:
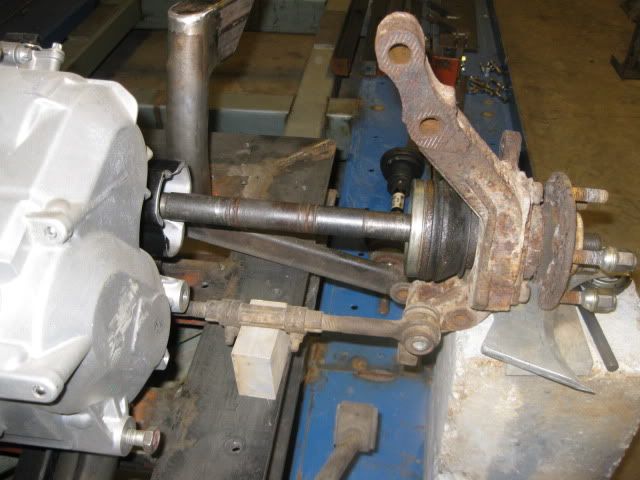
The shaft spline is the same as the fiero manual, so I just swapped the roller ends and mocked it up with the hybrid tripod. The fully compressed length will just about align the upright to the lateral links, so it needs to be shorter to allow full range of motion without binding. Moving the snap ring and fine tuning engine/tranny placement might just get me there.
IP: Logged
06:09 PM
Dec 8th, 2009
Fierobsessed Member
Posts: 4782 From: Las Vegas, NV Registered: Dec 2001
Congrats on this progress!! I hope to see you do some 6000-rpm launches on drag radials or drag slicks before I trust welded up hybrid tripods, but at least you'll be able to get the car moving under it's own power.
I was too a bit concerned with welding up my tripods. But, what sold me on it was the fact that some people with TH-425's in their Fiero's do it, and pull wheelies pretty easily. If you are still concerned after that point, then you could cut some circular pieces of metal, trace the tripod's exterior dimentions into it, cut it out and weld those in to improve strength.
My biggest issue was cutting the Fiero's tripod's metal. That stuff is hardened/Forged, Lots of smoke, time at the grinder with the tool piece, and lots of patience went into cutting that tripod apart. So there is a bit of a chance that welding it might cause a HAZ to form, weakening the metal at the point of the weld. This is why I chose to weld them only at the most extreme diameter to ensure that the strength remained most towards the shaft.
I trust that the hybrid tripod will be stronger then the roller bits that go inside it, I've seen those break.
I wouldn't worry about supporting the passenger side axle stub, Its got more plunge depth then the getrag axle had, and a bigger diameter. If you cut yourself a .835" deep collar, with the same contour as the one already on the axle, a couple of thousandths narrower then the shaft in diameter, you can do what I did. Heat it up good and hot, drop in onto the shaft. It will shrink on permanently. Make sure that its profile is not a rectangle, but rather a parallelogram. Longest dimension being .835".
I actually used the original fiero axle stub, and cut the metal down till all I had was the collar I needed.
My engine is nowhere near done, so I haven't had any chance to test this whole concept, and it looks like it won't be for a while.
IP: Logged
03:02 AM
Dec 10th, 2009
Isolde Member
Posts: 2504 From: North Logan, Utah, USA Registered: May 2008
Not much going to happen with this till after the new year.
The truck engine replacement should be done this weekend and over New Years I will be helping a friend reinforce a chassis for a roadster project. Once these two items are done, this project should get back to the front burner.
IP: Logged
06:07 PM
Dec 26th, 2009
Isolde Member
Posts: 2504 From: North Logan, Utah, USA Registered: May 2008
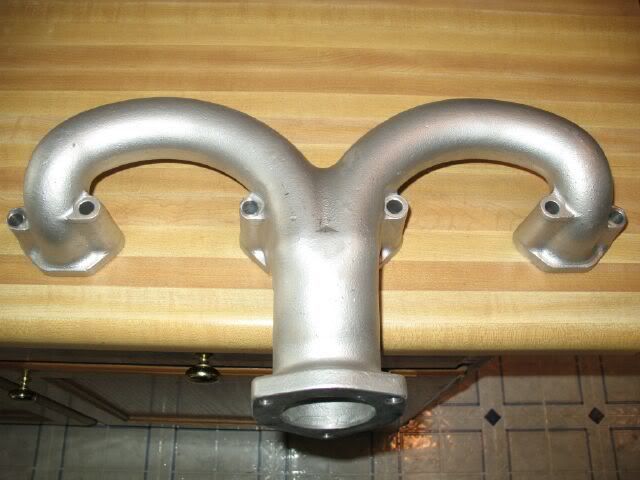
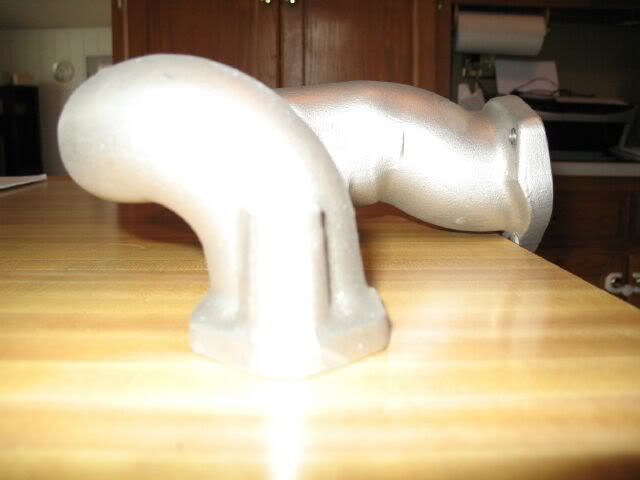
Those exhaust manifolds from Speedway, that were in the Fiero, have you had a chance to compare them to Ram's Horns? How's their short turn radius, and how's the fit to the Fiero itself?
IP: Logged
01:26 PM
fieroguru Member
Posts: 12127 From: Champaign, IL Registered: Aug 2003
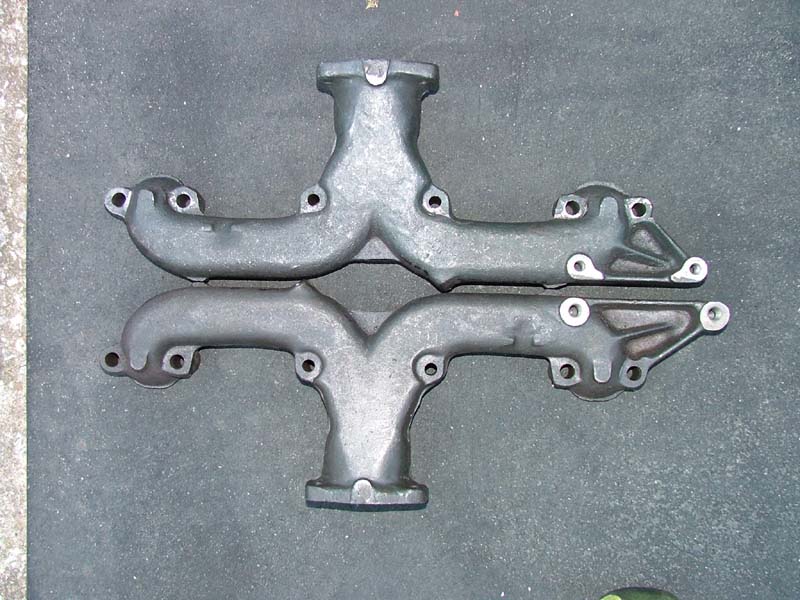
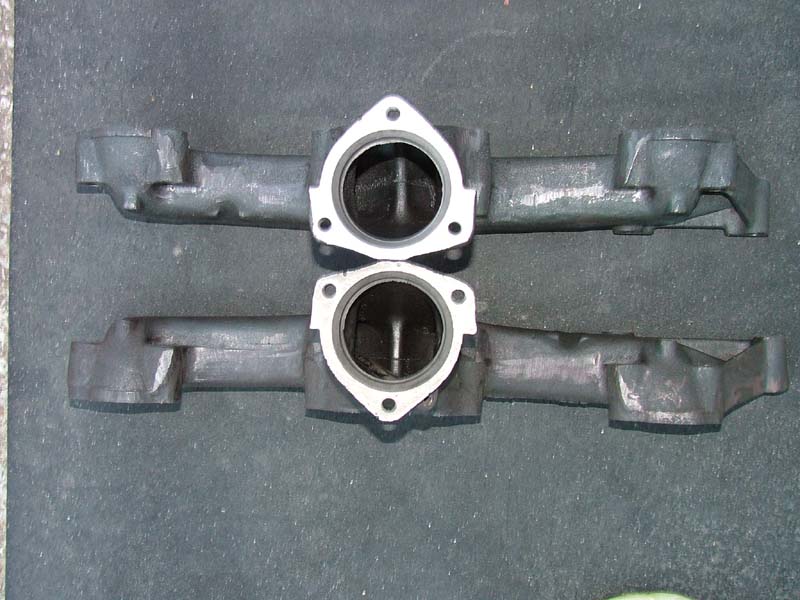
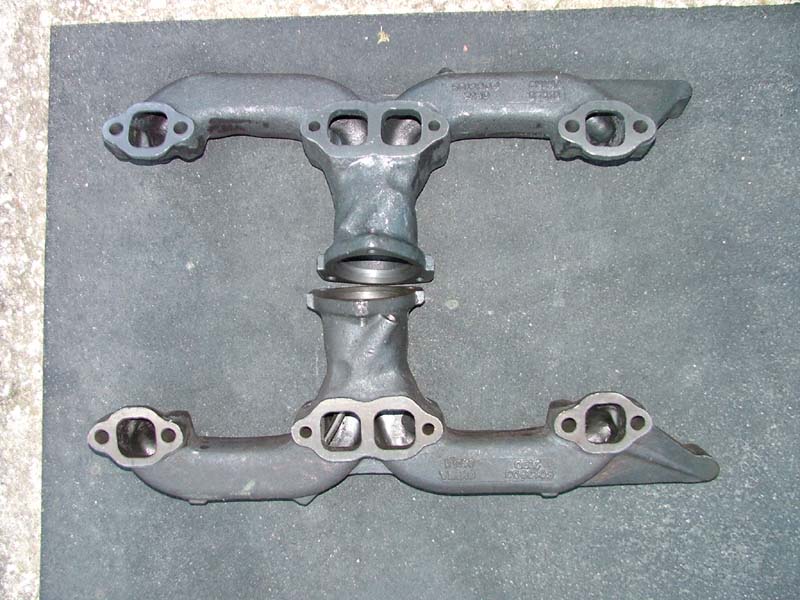
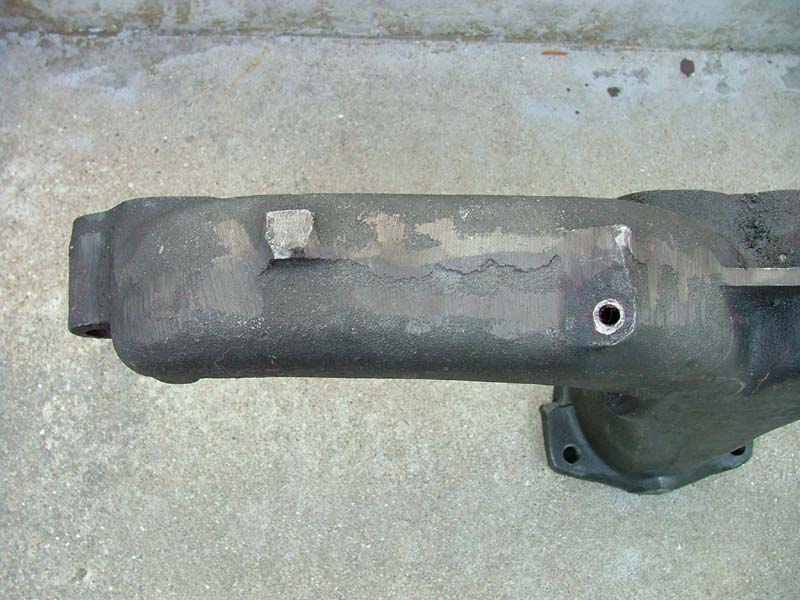
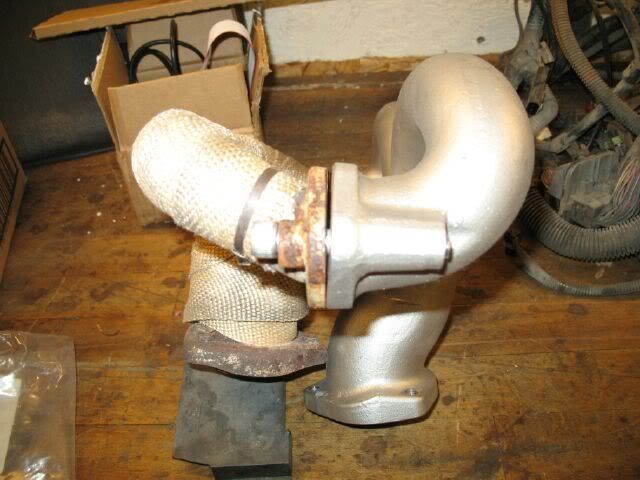
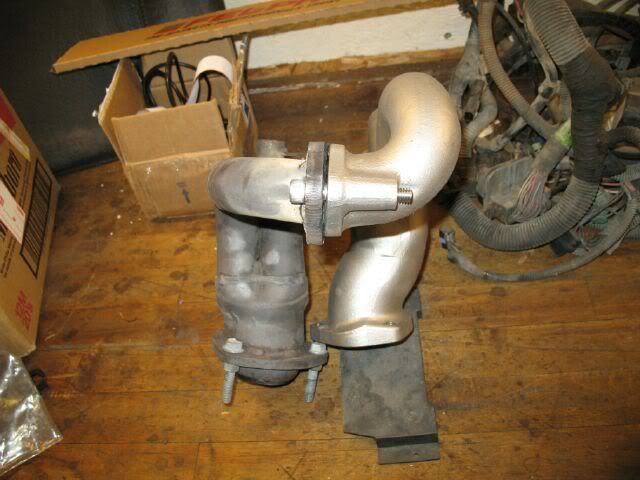
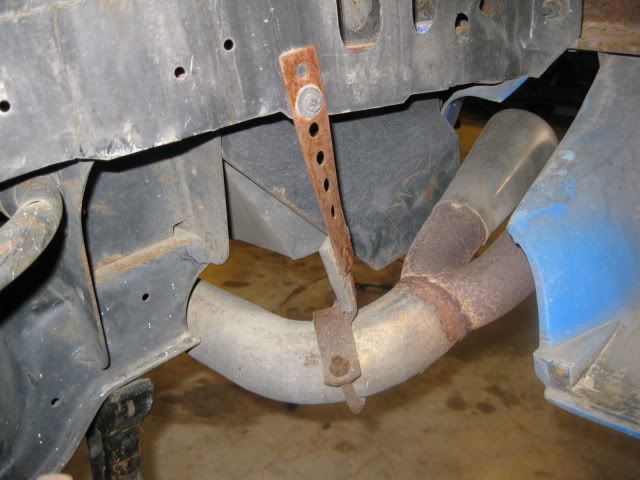
Those exhaust manifolds from Speedway, that were in the Fiero, have you had a chance to compare them to Ram's Horns? How's their short turn radius, and how's the fit to the Fiero itself?
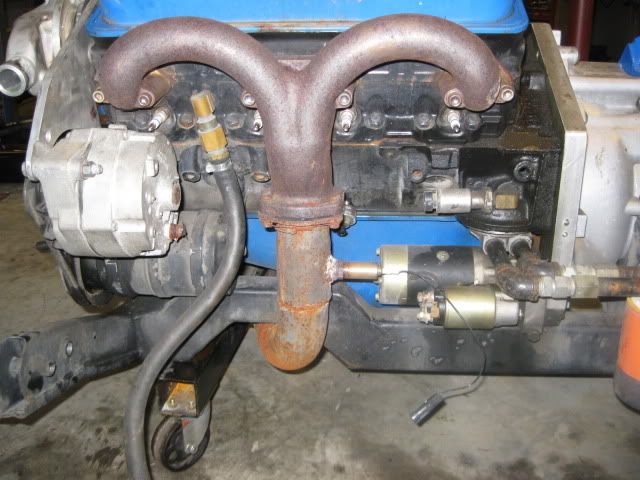
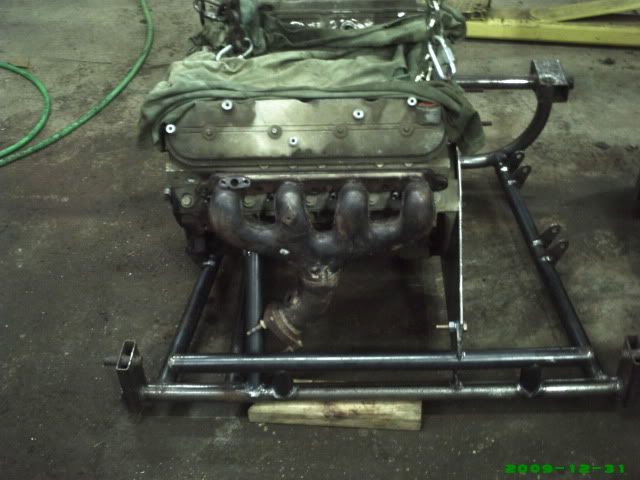
I have never had a set of ramshorns to compare them against, but here are the pics when I got them and installed them:
Do you know if there is any performance difference between the stainless speedways and the cast iron speedways? Just not sure that the extra 100.00 is worth the cost.
Pat
IP: Logged
08:39 PM
Dec 27th, 2009
fieroguru Member
Posts: 12127 From: Champaign, IL Registered: Aug 2003
Do you know if there is any performance difference between the stainless speedways and the cast iron speedways? Just not sure that the extra 100.00 is worth the cost.
Pat
The cast iron and cast stainless are of the same design, so they should perform the same.
Hard #'s for the truram performance is hard to pin down - I haven't found any dyno data with the exception of my car, but I didn't have any #'s from when it was running the 81 tubular manifolds or the pacesetter LT1 headers to compare them.
Brzezinski now sells their modified Tru-Rams along side their modified 2.5 RamsHorns and they say their modified TruRams (6hp more than stock TruRams) outperform their modified RamsHorns. http://www.castheads.com/corvette_systems.php
IP: Logged
07:59 PM
Dec 30th, 2009
Isolde Member
Posts: 2504 From: North Logan, Utah, USA Registered: May 2008
Oh wow! So much more than I dared hope for. Now I can see paying more for the true rams. I'm more inclined to have them extrude honed and then coated, but even so, for durability, iron manifolds far surpass any aftermarket headers. Extra thanks to guru!
IP: Logged
01:36 PM
PFF
System Bot
fieroguru Member
Posts: 12127 From: Champaign, IL Registered: Aug 2003
Oh wow! So much more than I dared hope for. Now I can see paying more for the true rams. I'm more inclined to have them extrude honed and then coated, but even so, for durability, iron manifolds far surpass any aftermarket headers. Extra thanks to guru!
Glad I could help. I went with them for a high flow cast manifold because I was tired of fixing cracks every few months on the other 2 sets of headers. Once they were installed with the copper collector gaskets, never messed with them again. Mine will be up for sale, but would prefer to sell them with the cradle and exhaust (these were built to work together).
IP: Logged
07:08 PM
fieroguru Member
Posts: 12127 From: Champaign, IL Registered: Aug 2003
If any one is interested the the vast majority of my removed SBC hardware, I am looking to sell it either as a total package or individually if I get enough interest for the individual pieces. If you are interested in all or part - please PM me and not clog this thread with the bartering.
Here is a list of everything that is up for grabs.
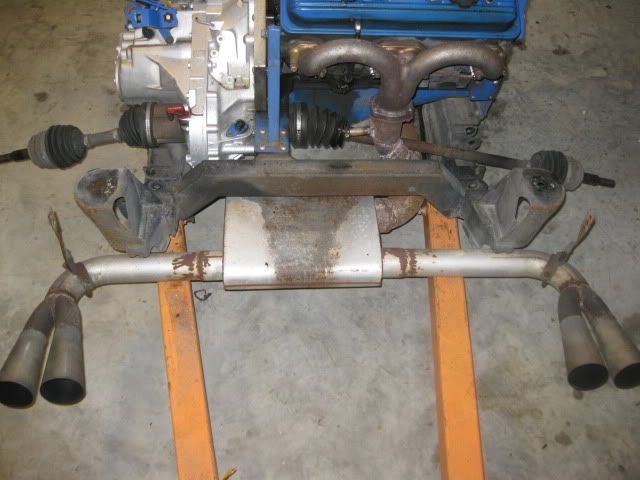
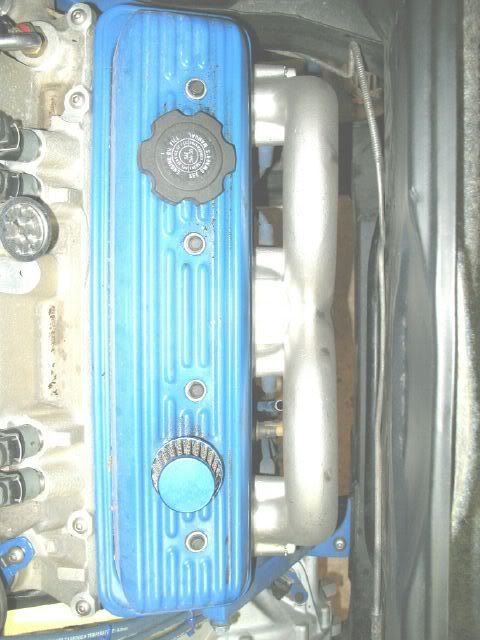
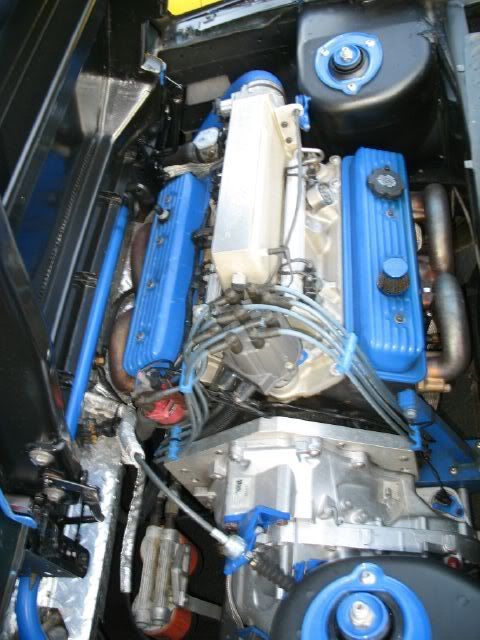
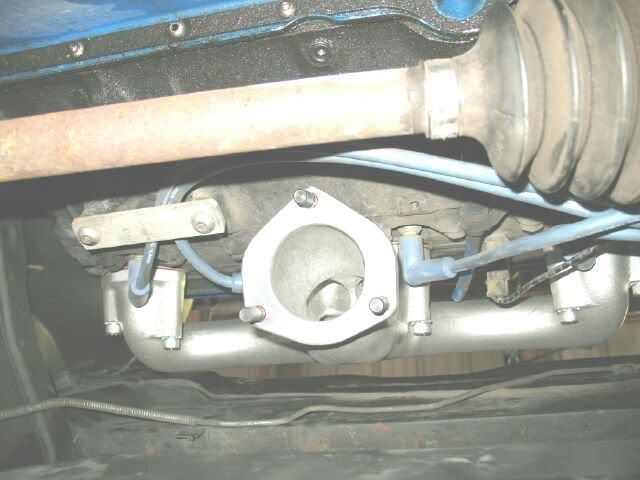
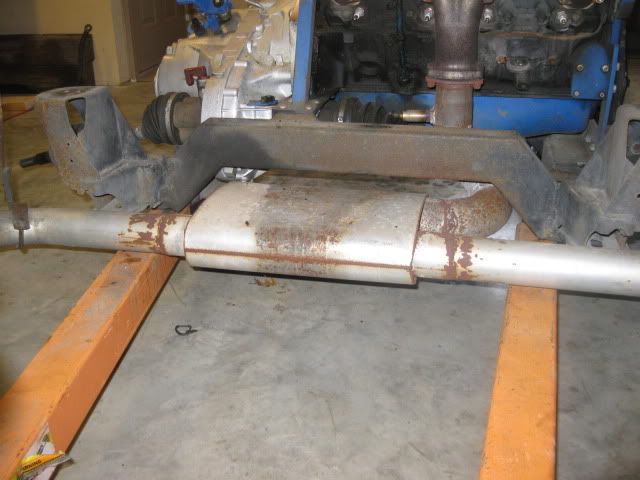
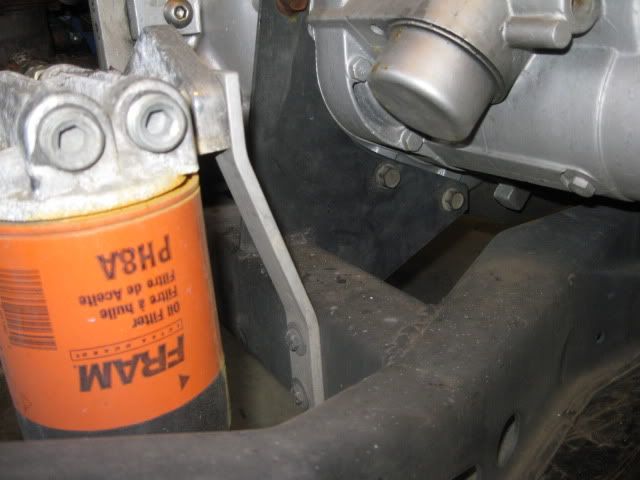
Archie Economy SBC kit (Pre -86) includes - Adapter plate, flywheel, harmonic balancer, engine mount/AC mount, and alternator bracket. (adapter plate, engine mount and alternator bracket modified slightly) Summit Racing Mini Starter Oil filter bypass with dual filter setup - hard plumbed - no hose Inline coolant filler with hose to connect it to the crossover tube Crossover tube that runs along the firewall under the hinge boxes and the connecting hose to the 88 coolant tubes Custom belt driven water pump and custom offset housings that allow it to fit without any cutting/denting of sheet metal while keeping the belt drive within the engine bay. The only wear item is a stock 3.4 TDC water pump insert that is stocked at most parts stores for under $40 Connecting hoses and down tube to connect water pump to the 88 coolant tube Speedway motors cast stainless steel tru-ram manifolds. They are an aftermarket upgraded version of the RamsHorns - includes the copper gaskets at the heads and collectors Custom exhaust using mandrel bends and stainless steel expansion joint with 2 1/2" tubes from the manifolds, merging into a 3" in dual 2 1/2" out flowtech afterburner muffler and dual 2 1/2" tubes with modified Fiero GT megaphones
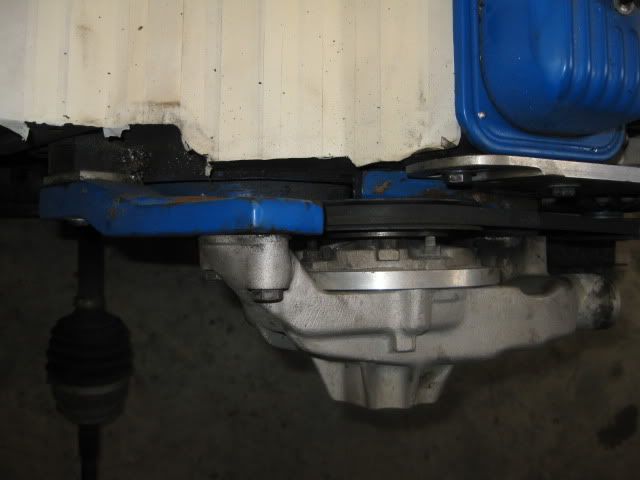
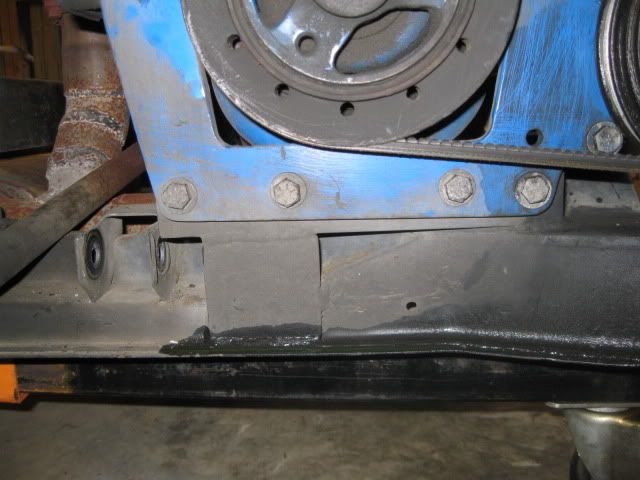
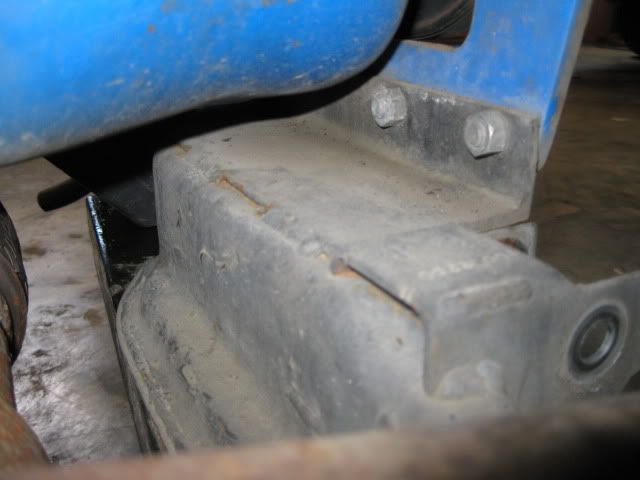
88 cradle (no suspension parts) modified with 2x3 crossmembers front and rear with welded on engine/transmission mounts/brackets - engine/tranny are solid mounted
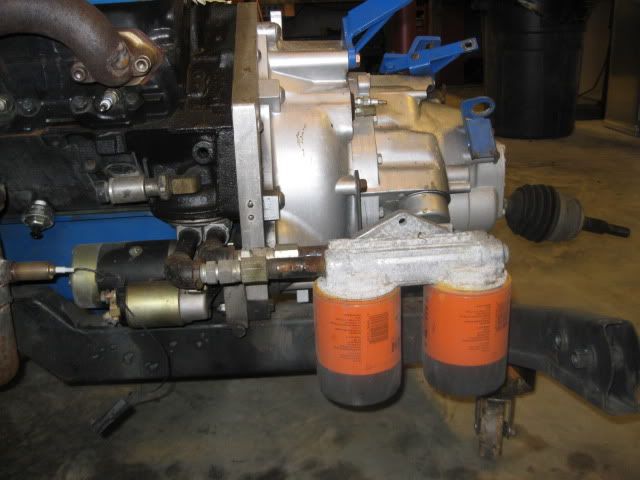
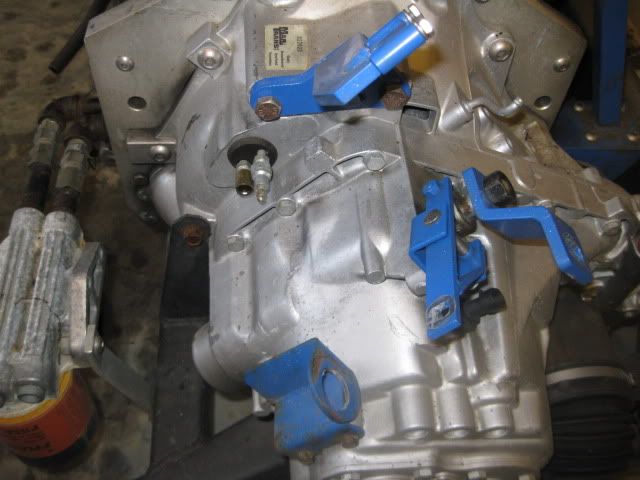
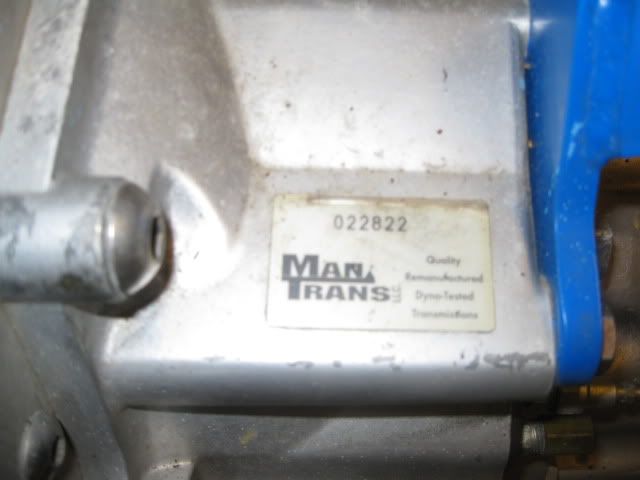
1992-1994 Getrag with the HTOB and larger differential spider gears. Rebuilt about 15K miles ago from Mantrans - Installed in May 2007 Rodney Dickman FWD getrag conversion shift brackets for the HTOB tranny (no slave bracket) Dakota Digital speedo converter (FWD VSS) Spec Stage 3+ clutch with about 15K miles (installed with rebuilt tranny)
Here are the pictures with everthing still assembed and 2 years of road debris/muck (again the engine they are attached to is not for sale).
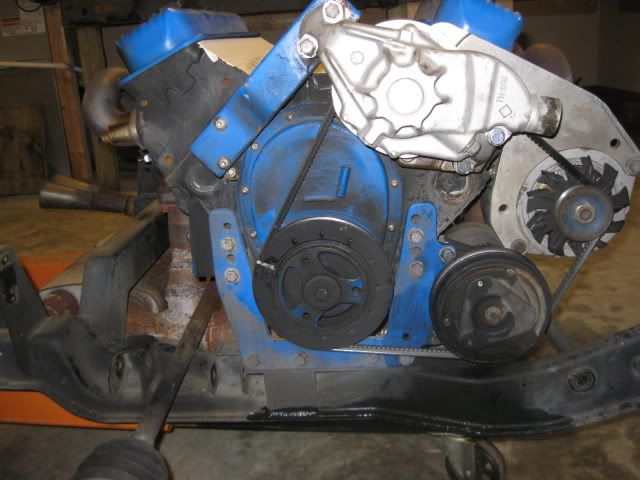
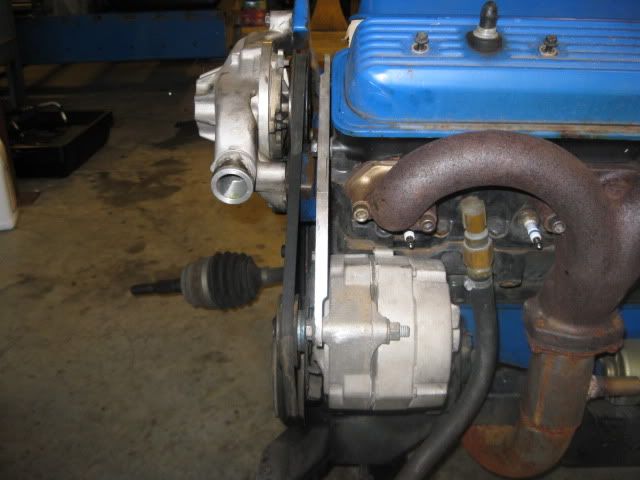
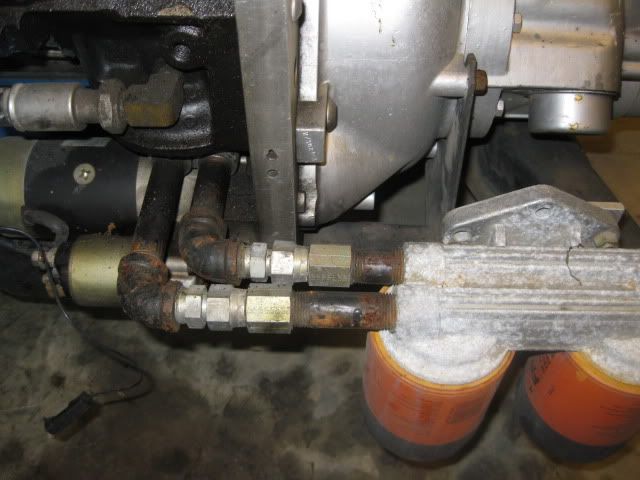
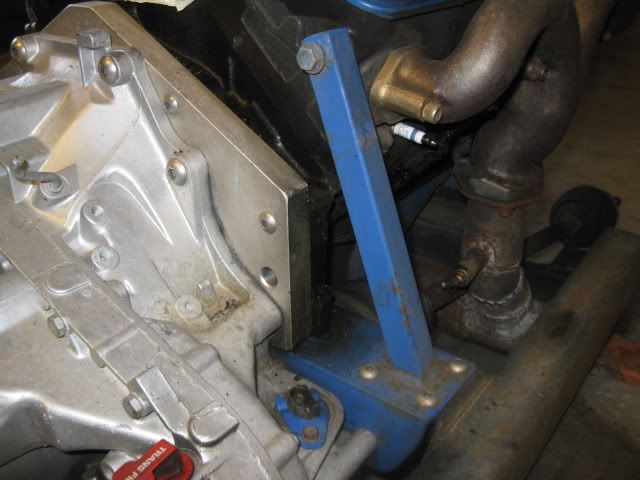
Accessory drive with custom water pump, alternator and AC. The belt drive is on the back side of the pump to clear the frame rails. The water pump is supported on custom 1 3/4" offset housings to shift it forward and rotate it to clear the frame and wheel well.
Front side overall pic - tru-ram manifold, exhaust, 2x3 crossmember, starter and oil filter relocation with dual filters:
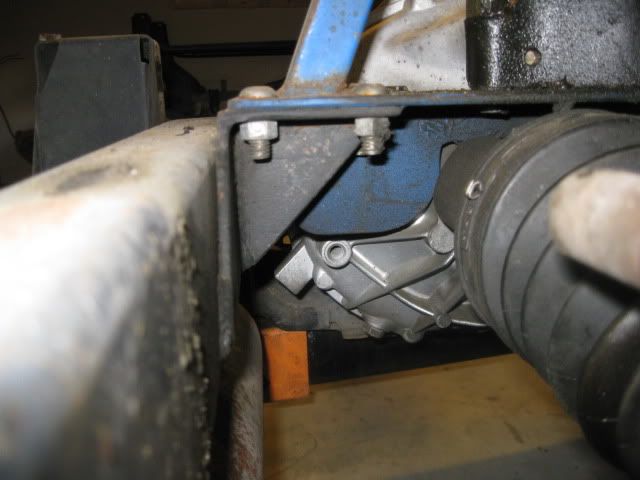
92-94 Rebuilt HTOB getrag (no fiero slave!) and Rodney Dickman FWD conversion and HTOB getrag cable brackets:
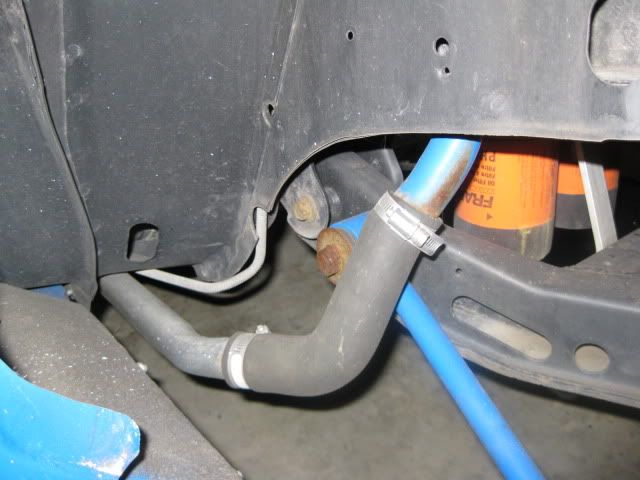
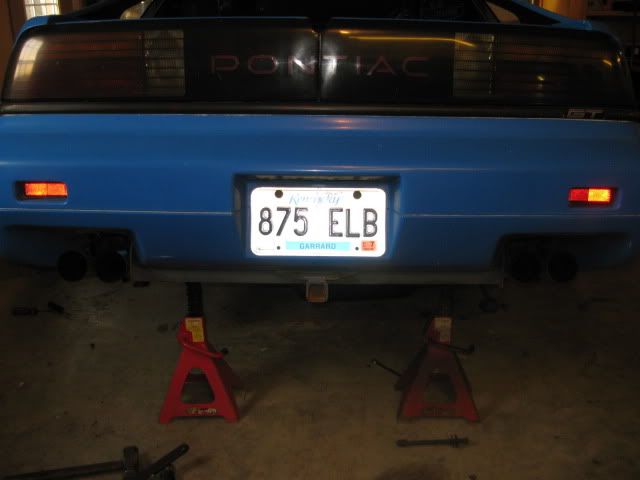
Overall rear view with raised 2x3 crossmember and Flowtech afterburner muffler (clears stock unmodified trunk):
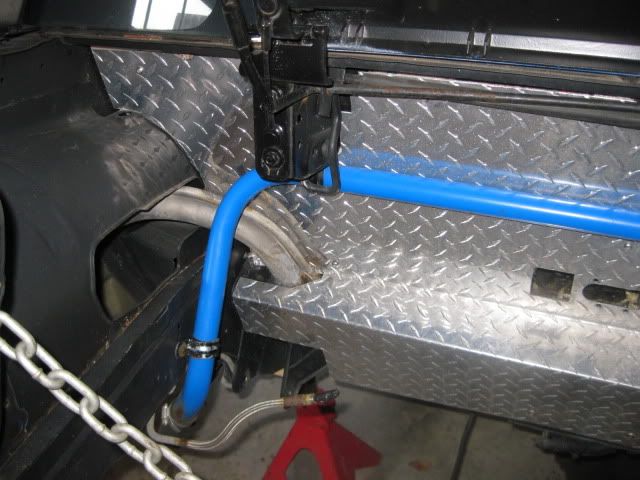
Engine and tranny mounts (there are 2 additional bolts at the corners of the engine bracket):
If you would consider selling the adapter plate by itself please let me know. My V8Archie kit is so old it has the steel adapter. And while I have the engine out of the car right now, it would be the perfect time to upgrade it and shave a few pounds.
[This message has been edited by Formula350 (edited 12-31-2009).]
IP: Logged
01:02 AM
Jan 19th, 2010
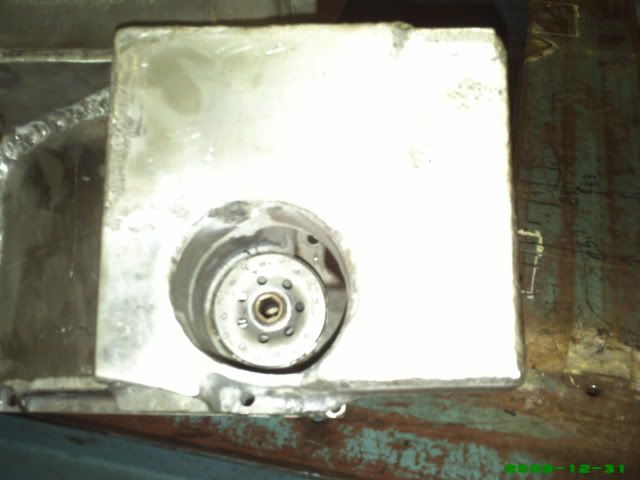
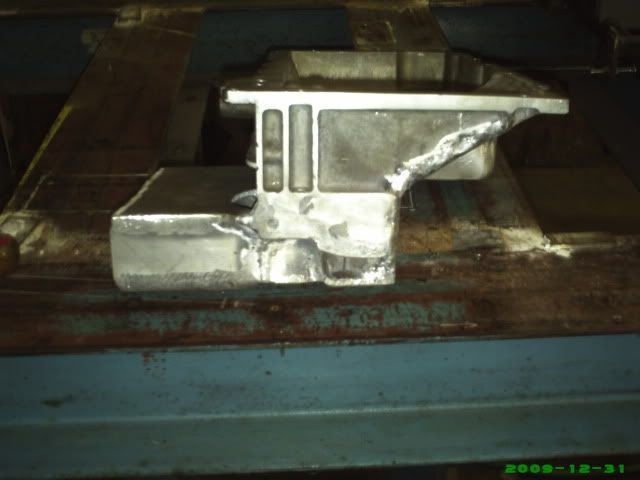
Russ Fiero Member
Posts: 32 From: Windsor,Ill,USA Registered: Dec 2007
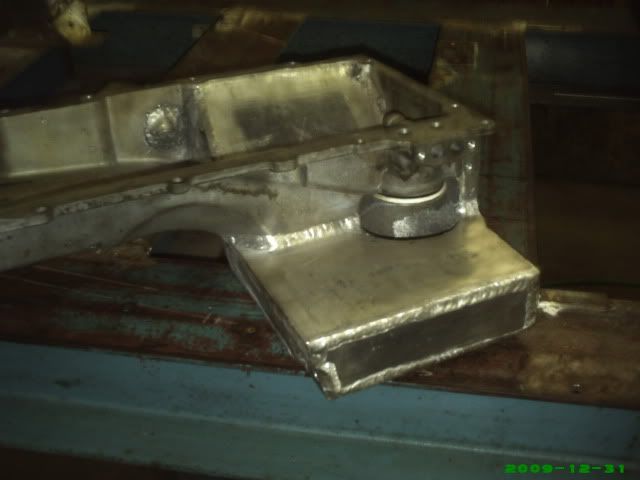
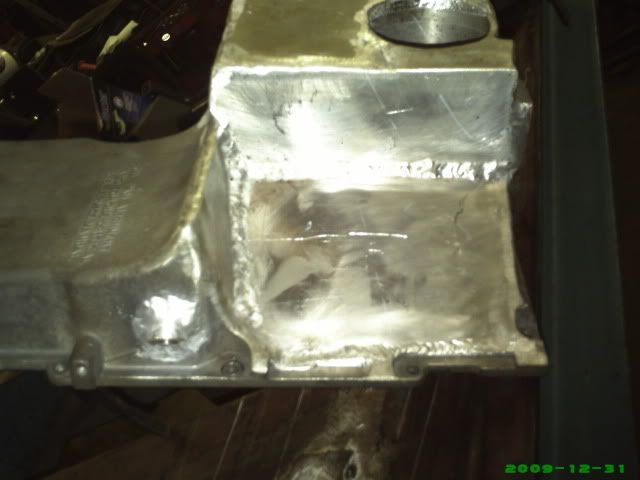
Just thought I would show you what I did with that aluminum you gave me. I got a 5.3 truck engine and reworked the oil pan for a starter. The adapter plate only needsto be 1/4 thick. Plus the LS block is about 1 1/2 shorter than the small block. Got some corvette stainless manifolds off e-bay.
IP: Logged
07:55 PM
fieroguru Member
Posts: 12127 From: Champaign, IL Registered: Aug 2003
Just thought I would show you what I did with that aluminum you gave me.
Great to see you posting again! Did you survive the artic blast the last few weeks?
Now you are just showing off with the aluminum oil pan! Makes me wish I could weld aluminum...
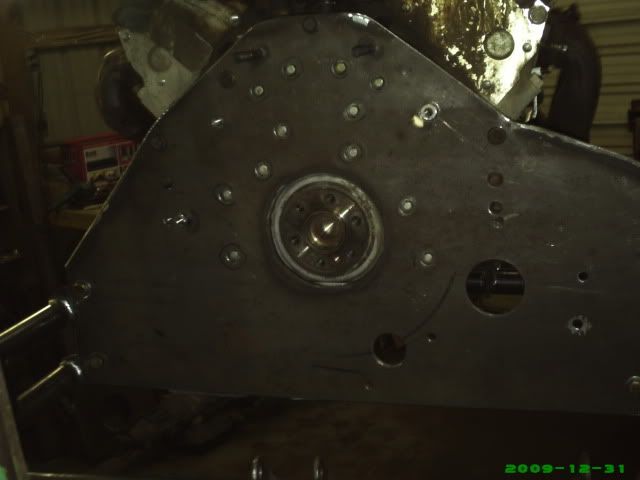
That cradle doesn't happen to be an 88 does it? I have a blue 88 that is sitting engine less at the moment and could do some R&D driving it around.
Pretty much all the hardware from my old SBC swap has been sold (cradle/manifolds/exhaust to one person and Archie kit/starter/oil relocation/waterpump to another) and the proceeds will be used to buy a vertical mill... so if you know of one please let me know.
IP: Logged
09:23 PM
Jan 20th, 2010
blackrams Member
Posts: 31841 From: Hattiesburg, MS, USA Registered: Feb 2003
Russ, most of that metal in the bellhousing area should be cut out to reduce weight. I know you did some work to dtill all those holes for the LSx rear cover, but only the top 4 are necessary, all the rest are in metal that should not even be there. You are getting NO benefit from keeping it. Other than that, your alterations of the oilpan won't work with a stock '84-'87 cradle. Your work looks first rate.
IP: Logged
02:31 PM
Jan 27th, 2010
fieroguru Member
Posts: 12127 From: Champaign, IL Registered: Aug 2003
I do not really have a great place for it, but I will find somewhere in my 2car garage for it. As for 3 phase... that is what they sell phase converters for.
The nice thing about this one is we have one exactly like it (serial numbers within 400 of each other) at work.
IP: Logged
05:01 PM
PFF
System Bot
Jan 28th, 2010
SGS Member
Posts: 706 From: Sherwood Forest Registered: Jan 2010
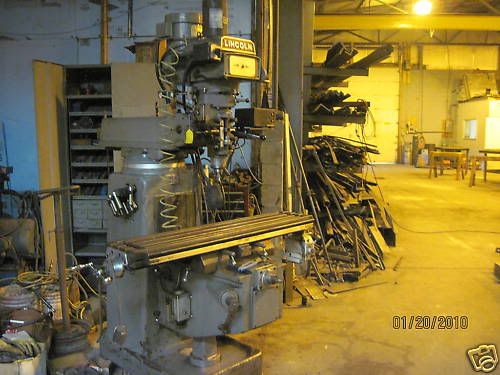
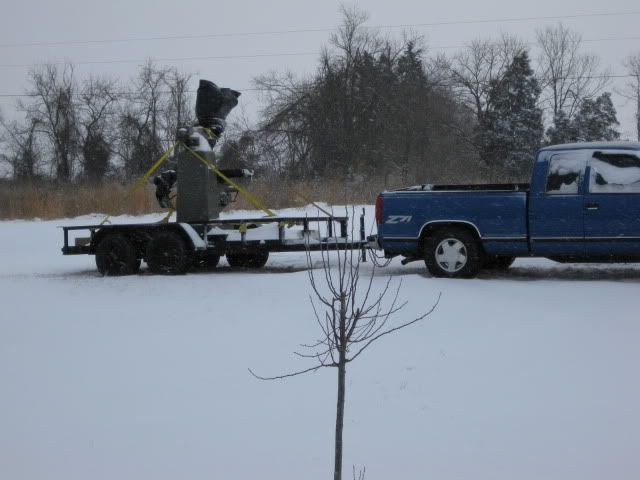
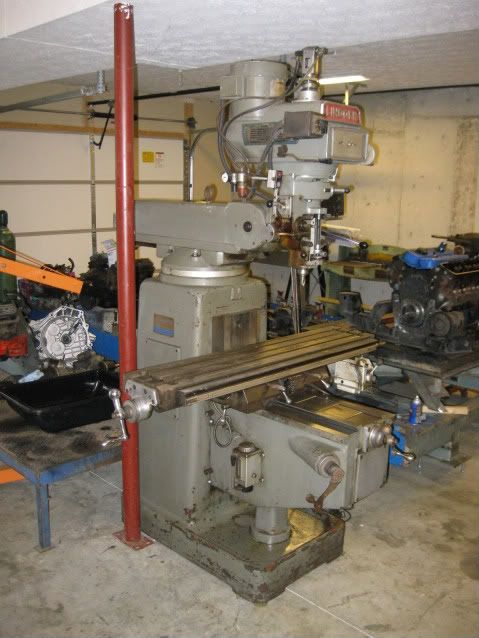
844 miles and a 15 1/2 hr trip and the Lincoln mill made it home safe and sound. Only casualty is the black cap over the top of the spindle assy took flight... so I will see if I can find a replacement or make a new cap. Biggest issue is it decided to snow and blanket the place including my steep drive to the garage. I opted not to back down it last night before the snow started and now it will be staying put for a few days till the snow melts.
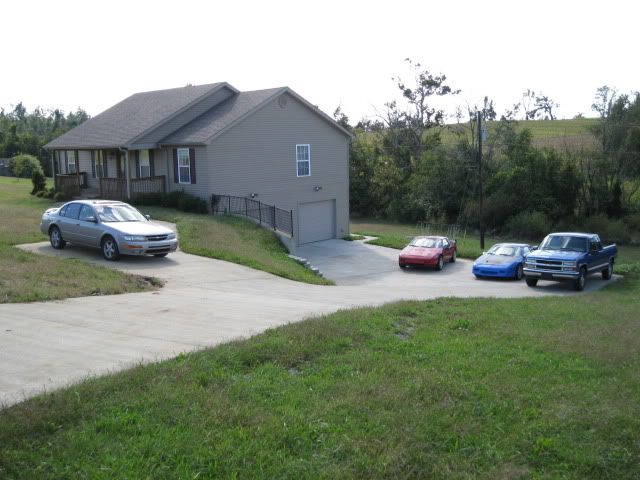
This is the drive I have to back down with roughly a 16 foot elevation drop from the road to the garage landing. After the landing there is a grass hill that goes down another 20 feet...
[This message has been edited by fieroguru (edited 01-30-2010).]
IP: Logged
09:49 AM
SGS Member
Posts: 706 From: Sherwood Forest Registered: Jan 2010
Hard to say for sure, but easily over 3,000. The bridgeports are in the 2600 range and at work we have a couple of bridgeports and a clone of this one and it is about 25% beefier in the body and head structure so I assume it is heavier.
I ran some 6x6x12' timbers under it to spread the load to all the crossmembers on the trailer before heading out of town. Once I did that and strapped it down it pulled like a champ.
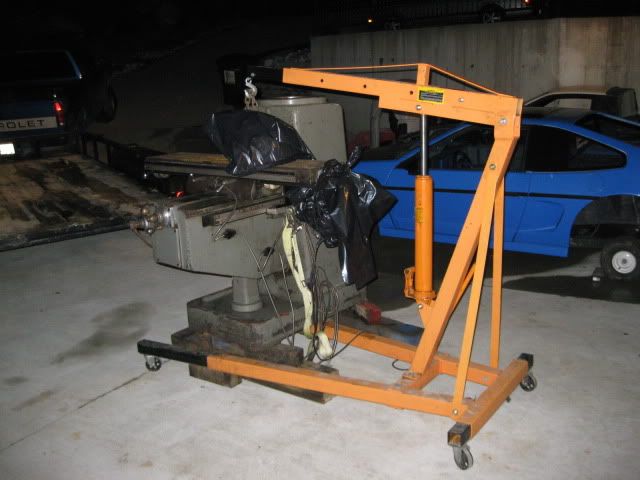
I am pretty sure it is too tall for it to go under my garage door in 1 piece, so I am planning to take atleast the head off of it. My cherry picker is rated for 4000 lbs at the shortest setting and I was planning on using it to move it into the garage. If that does not work I have a buddy with a bobcat that can pick it up.
Guru, I helped a friend move a bridgeport into his garage last year. He had an accident while towing it home, so a tow truck ended up delivering the trailer. We used the tow truck crane to lift the mill off the trailer and set it down on the ground. We then used 4 or 5 pipes under the base of the mill to roll it into the garage and into final position. With the mill head rotated down slightly, and 90 degrees horizontal, it just barely cleared the garage door.
Marty
IP: Logged
07:57 PM
Feb 3rd, 2010
fieroguru Member
Posts: 12127 From: Champaign, IL Registered: Aug 2003
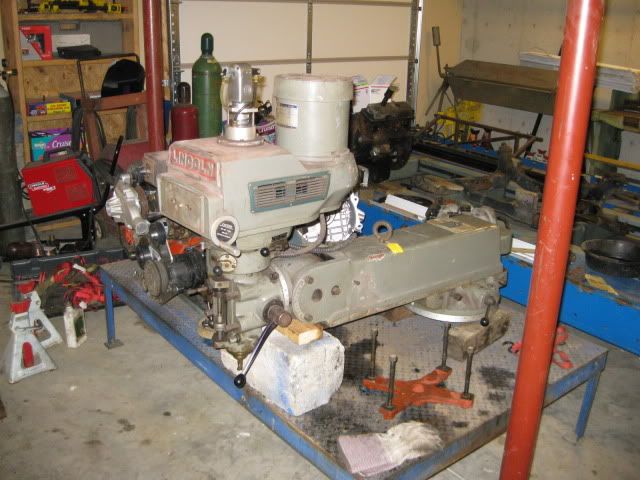
It has been a slow process, but the head is now in the garage and the rest of it is off the trailer. I am hoping by the end of the weekend to have it put back together in its new home.
Russ... next time I am in Mattoon, I want to buy your cherry picker (if you still have it)!
[This message has been edited by fieroguru (edited 02-03-2010).]
IP: Logged
07:01 PM
Feb 7th, 2010
fieroguru Member
Posts: 12127 From: Champaign, IL Registered: Aug 2003
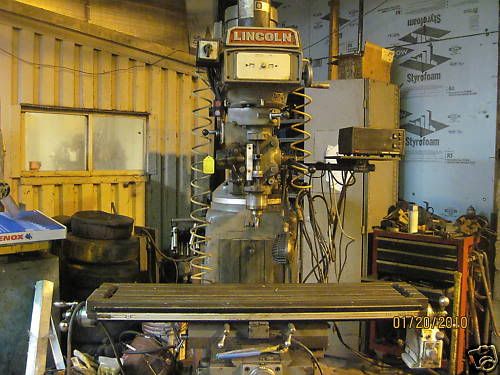
Mill is in place, assembled, leveled and the cleaning has started.
My trucks water pump started leaking and once it was replaced the alternator bearings started making noise within 24 hrs... so $200 of my funds for the mill need to be replaced now. It will be a week or two before I save up enough for the phase converter, a R8 1/2" drill chuck and some assorted endmill bits...
The table on the mill is 10" x 50" and I have 15 5/8" x 31 1/4" range of travel on the table - large enough to drill all the bellhousing bolt holes and dowel pin locations on my adapter plate with a single setup - which is why I chose to go with a larger mill vs. a bench type where I would be limited to about 8" x 15". The motor is 3hp, so with the phase converter at 2/3's power, I should still have 2hp available to use.
I still need to do more cleaning and flush all the old oil/grease. Once I have the phase converter mounted on the mill, I will wire up some 120V recepticals on the mill with a switch for the work light, DRO, power feed and 1 unused outlet for some other application.
When I sell my 92-94 rebuilt getrag, I will start looking for a good lathe (something in the 8x24 range)...
[This message has been edited by fieroguru (edited 02-08-2010).]
IP: Logged
06:19 PM
Feb 14th, 2010
fieroguru Member
Posts: 12127 From: Champaign, IL Registered: Aug 2003
When I got back into town this afternoon, the $65 new static phase converter from ebay was waiting for me. So I wired it up in temporary fashion just to see if I wasted $65 and it actually worked!
[This message has been edited by fieroguru (edited 02-14-2010).]
IP: Logged
07:40 PM
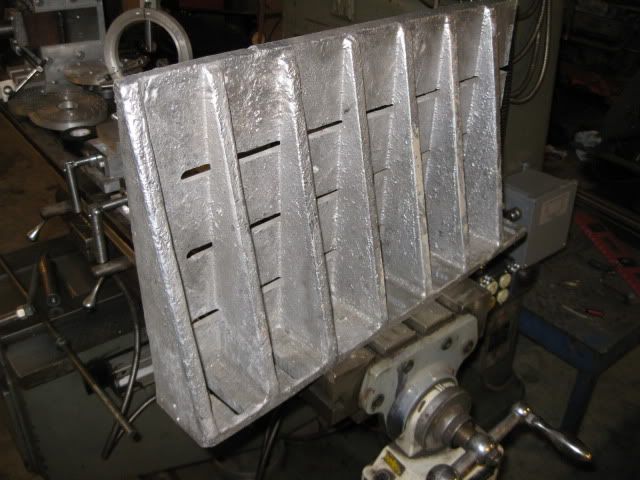
Feb 27th, 2010
fieroguru Member
Posts: 12127 From: Champaign, IL Registered: Aug 2003
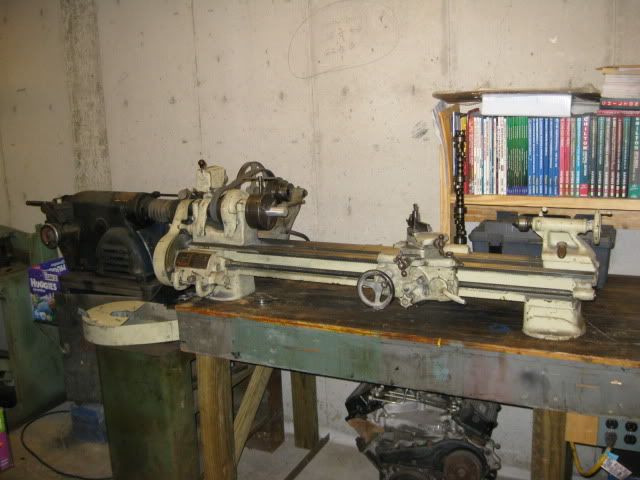
Well the rebuilt getrag sold, so I spend the last week looking to score a lathe.... did that and them some!
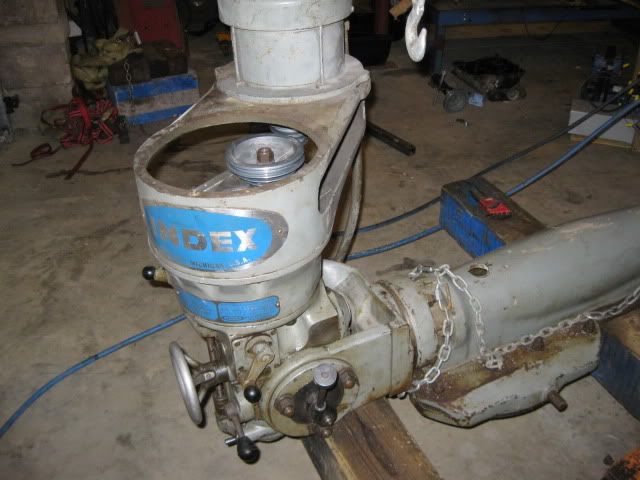
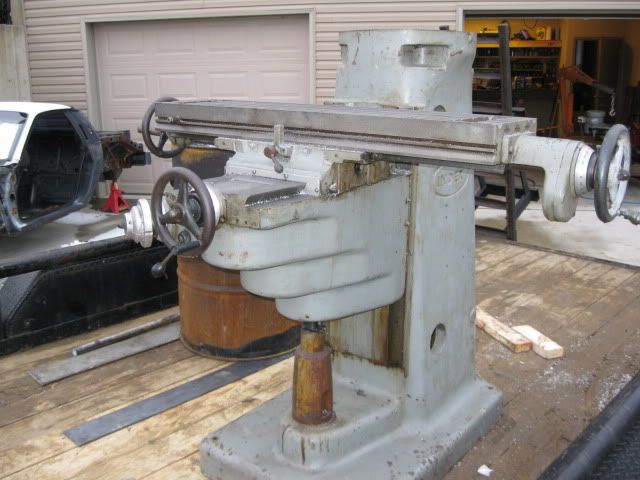
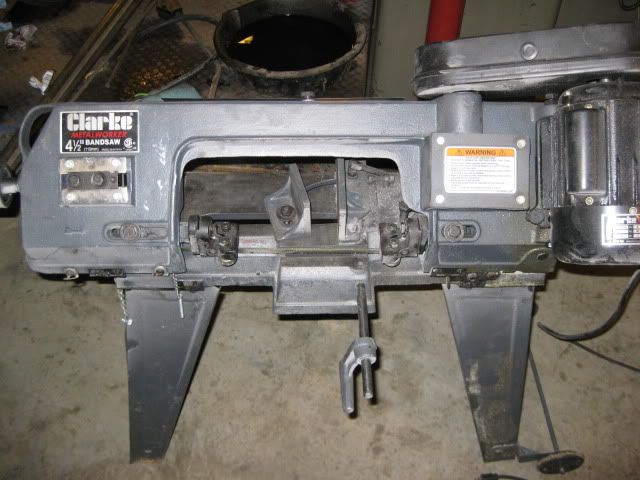
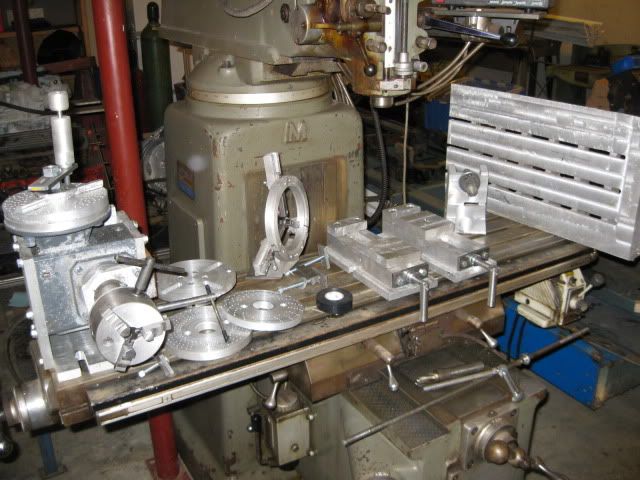
I cam across a package auction for a 9" Southbend Lathe, 1hp Index Vertical mill (10 x 30 table travel), a clark 4 1/2" bandsaw and a home built furnace to melt aluminum with casting forms/sand/piles of aluminum... all for less than I paid for my Lincoln Vertical mill. I am planning to sell the Index Mill and might be able to sell it for what I paid for all the other stuff... I am pretty happy right now.
Southbend lathe w/ 9" swing - I need to finish mounting it, take the flat belt into work and have it relaced, and do some cleaning up on it:
Index mill - I plan to replace the belt, install a phase converter, and repair some of the spinners on the hand cranks... Then I will post it up on craigslist to get rid of it... Might trade it for some LS based engine.
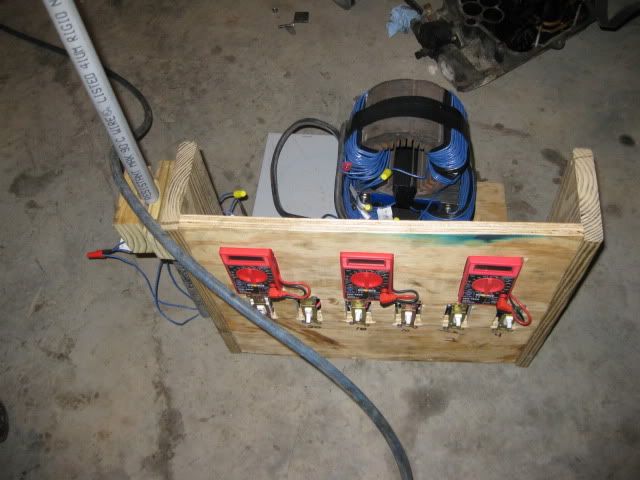
Electrocution waiting to happen... home made phase converter for the mill, I will be salvaging the multimeters and trashing the rest.
Bandsaw - I plan to make this into a bench mount vertical bandsaw.
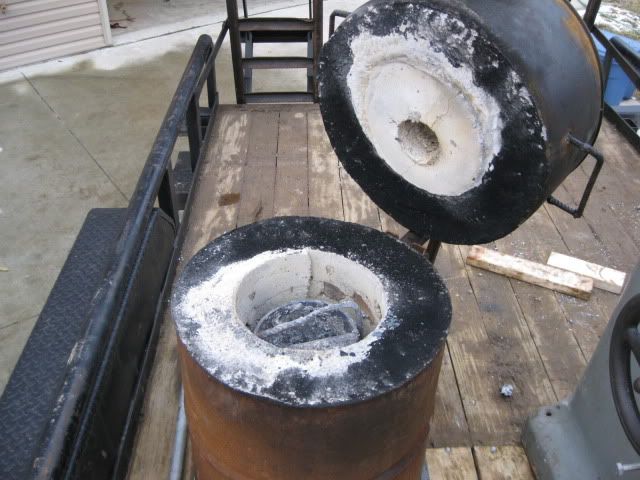
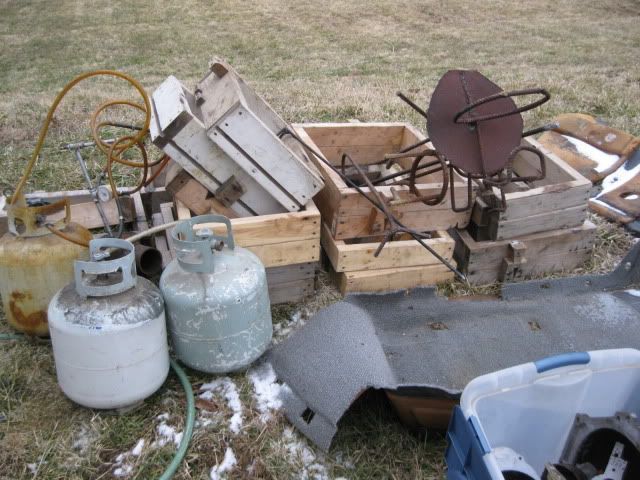
Here is the oven (all 600 lbs of it) to melt aluminum and other stuff... It runs off propane pilot light and used motor oil. It also comes with all this other stuff...
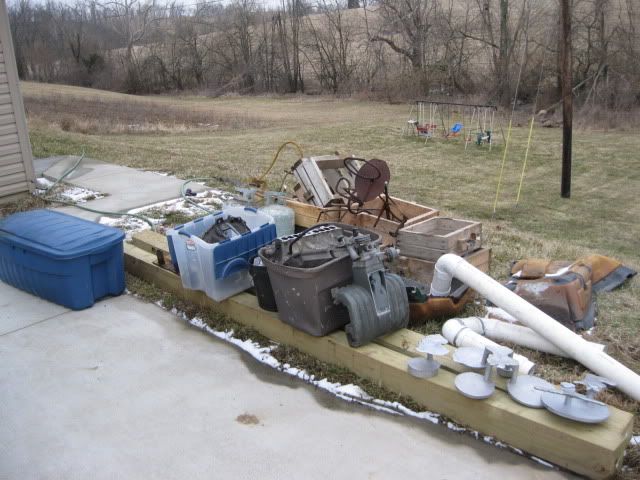
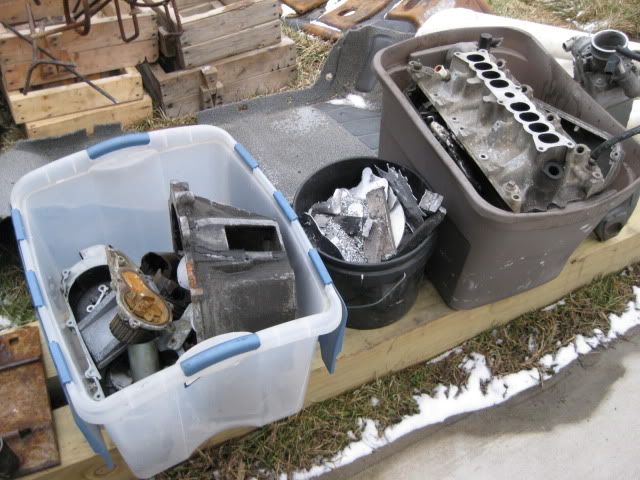
Here were his last cast pieces... was planning to use them to make some aluminum gears:
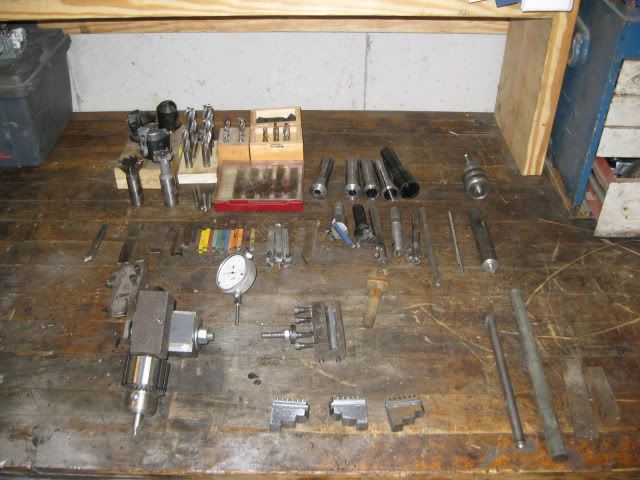
Oh yeah, the mill also came with all this tooling, aluminum vices, indexing head, and other aluminum supports (the guy made all of these from cast aluminum).