Follow along with my quest for budget-minded coilovers on the front of an 88.
Yeah, I know the 88 already handles nicely, but without an available aftermarket spring with spring rates as high as 450+, I'm gonna try coilovers. My plans for the car include track days, autocross events, trips to the Dragon and who knows what else. Plus it's my wife's daily driver. I agree that 450# is way too much for the street but I'll be able to swap in a softer spring without changing alignment geometry if she complains too much.
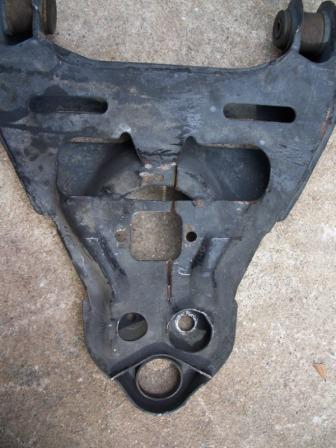
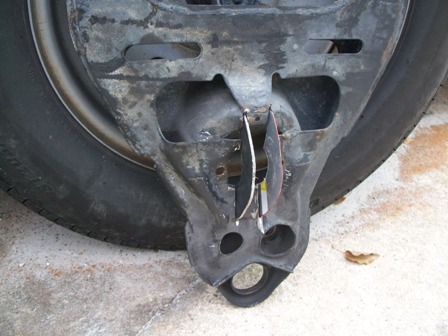
This is what I've got so far: I pulled the entire front crossmember from an 88 4cyl 5spd. This only took about an hour and was very easy with the car suspended on blocks. Now I can make adapters for my C4 Corvette brakes that are on the way without having a car torn apart in the driveway. (Stupid code enforcement nazis!) But that will be a different thread if at all. It has been covered in depth already. The car in the picture is NOT the donor.
The only problem was a broken bolt removing the steering rack. I should have used more PB. I used the last dribble on the crossmember boles. Of course it had to be on the passenger side. I also have plans for a C4 Vette power steering rack. If it was in the driver's side bracket it would just get chopped off with the rest of the mount. I'll have to drill this one out.
Check out these sway bar bushings! This guy must have spent hours cutting hose and wrapping it around the sway bar end links with plastic zip ties. I had to laugh when I saw this. I nominate the previous owner for the award for the most time wasted trying to save the least amount of money. They're on the top and bottom of both sides. All 8 bushings are zip tied hoses.
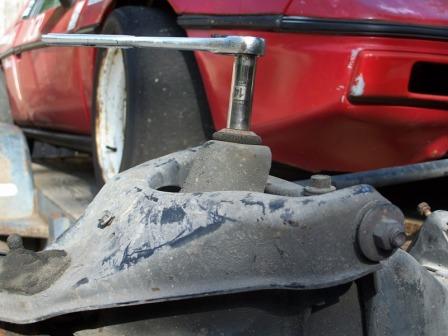
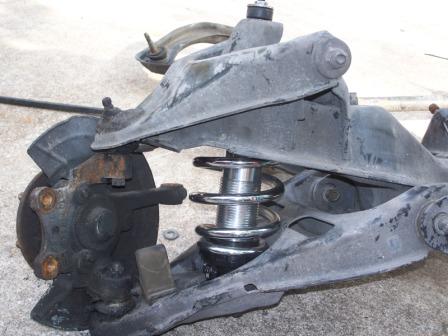
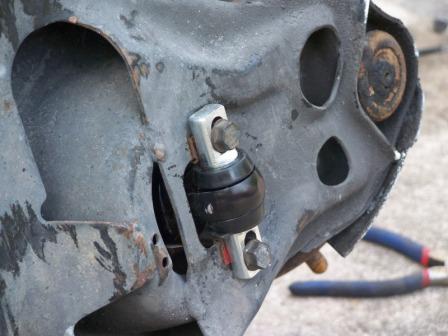
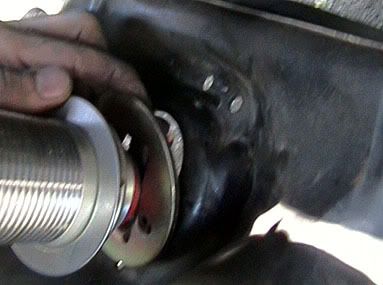
I first removed the pins and loosened the castle nuts on the ball joints. Instead of using a ball joint tool, I just hit the surface around the ball joint shaft with a BFH. It takes a couple hits but works every time.
Once they popped I removed the nut from the top of the shock. The control arms are still under tension from the spring. So be careful.
I removed the shock and then the sway bar end link. The sway bar was still holding the control arm and it jumped a little when the nut came off too. But it was obviously going to happen so I kept my fingers clear. Then when I removed the castle nuts from the ball joints it jumped a little again but I had shoved a long pry bar down the center of the spring where the shock used to be, just in case the springs decided to liberate itself. Once the ball joints were disconnected, the hub assembly was removed and the spring was popped free with the pry bar. I took the upper control arm off too.
Here's a tip... When you take a bunch of stuff apart, put the bolts back where they came from rather than in a bucket or plastic bags.
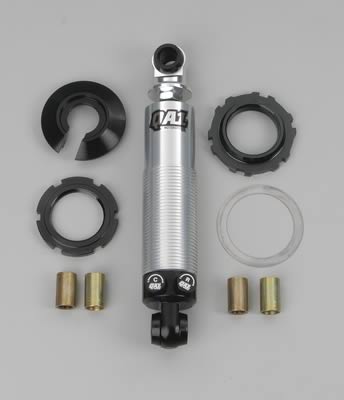
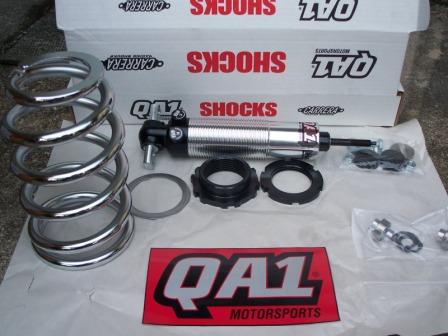
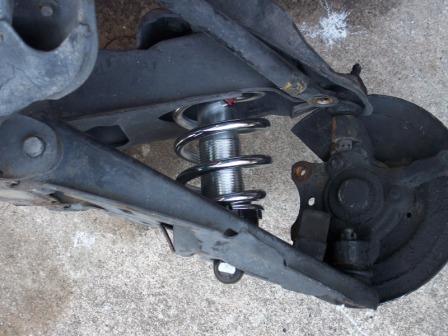
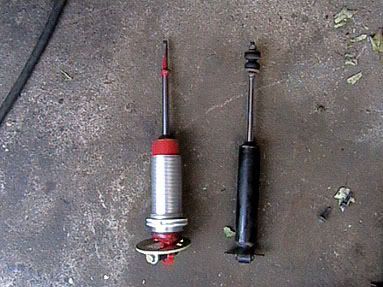
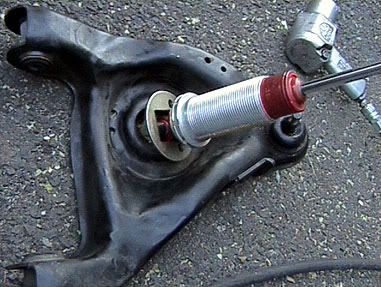
I plan on modifying the upper shock mounts and lower control arms to mount a set of coilover shocks like these.
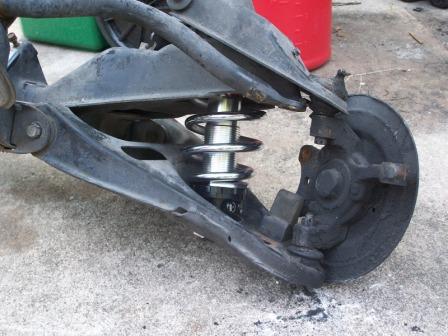
The problem is that the stock shock measures around 7.5 inches completely compressed and 11.5 extended. The QA1's measure 9.5 and 12.625 respectively. I will have to drop the shock half an inch lower in the control arm and an inch or so higher at the top mount if I want to keep the most suspension travel possible. The stock shocks' normal travel, according to the wear marks, was closer to 9-11.5.
So throw out any ideas that come to mind or problems you see with anything I do. I'll have some more pictures later.
IP: Logged
08:25 PM
PFF
System Bot
Toddster Member
Posts: 20871 From: Roswell, Georgia Registered: May 2001
This is going to be a good thread and I will be watching closely!
I have bottomed out the front shocks on my lowered 88 so if I would do this, I would shift the shock placement to allow 1" more travel before bottoming. The orginal bumpstops prevent this from happening, but mine have been cut down to be about 3/4" tall and I have bent the lower shock cross bar almost 1/4" from bottoming the shock (before I increased the spring rate).
This is gonna be sweet! (Love the racer, too!! Is there a thread on that one?)
Tagging this thread so I can keep up.
------------------ ~Michael Project IMSA Formula Coming Soon! '85 GT 4sp white - SOLD | | '85 2M6 Auto red - SOLD | | '84 2M4 bare chassis - SOLD Crap, I'm out of Fieros! Time to buy another!! - "Your mileage may vary."
IP: Logged
09:11 PM
Formula88 Member
Posts: 53788 From: Raleigh NC Registered: Jan 2001
You're not going to use tubular lower control arms?
According to Held Motorsports: " The OEM Fiero lower control arm is a fairly substantial piece, though it was not designed to take the pin point pressure forces of a coil-over shock. "
Keep in mind the spring load will not be spread out over the large spring seat - but concentrated on just the shock absorber bottom mount. If you've already taken this into account, sorry for pointing out the obvious, but just in case it's something you should be aware of.
IP: Logged
10:47 PM
May 14th, 2008
2002z28ssconv Member
Posts: 1436 From: Orlando, FL Registered: Jun 2005
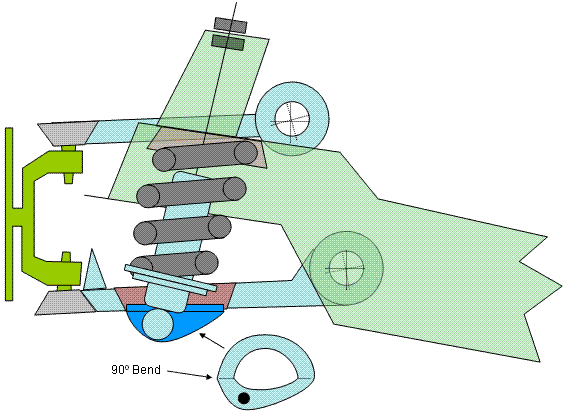
Right, I'm not going to be using the stock shock mounting locations. If you look at the Held tubular control arms (in this image borrowed from Held's website) ... you'll see what looks like a flimsy little thin piece of metal that the shock attaches to. Imagine a larger piece of metal that is welded across the spring perch. That is what I will be doing. I'm planning on using the stock arms for simplicity sake but strengthening the mounting locations to spread out the load. From my initial measuring of the shock tower and coilover hat's width, it is either going to be really tight or it won't fit at all. I'll get some more measurements tomorrow but it looks like most of the shock tower will have to be removed and reconstructed with a wider tube. I'm thinking I'll make it as stout as I can by closing in the top except for a hole for the shock to come through. We'll have to see where my creativity leads me when I get some steel and a welder in my hand... lol
I may just create a new spring perch for the spring top inside the shock tower and not use the hat, kinda like what we do in the back.
The wife says I can't lower the car so it will stay "almost" stock ride height. You can get shorter shocks that might be less likely to bottom out when lowered with softer springs. As the shock body gets shorter the extended length shrinks at twice the rate because the shaft has to shrink along with the body. I want to retain as much suspension travel as I can.
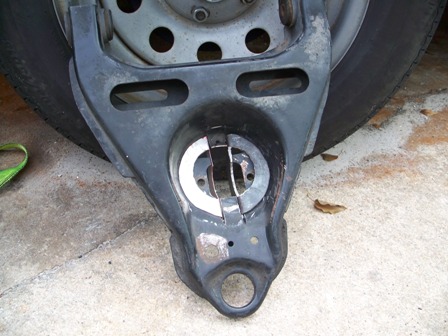
I did a bunch more measuring today. It's confirmed. The coilover spring hats are too wide to fit inside the shock towers. Even if I reconstructed the towers, they would interfere with the mounting of the upper control arms. However, if I don't use the hat and instead create a 2.5 inch diameter spring perch where the original is, I should still be able to use a 7" spring. I could go with a 6" if necessary but I'll try the 7" first. I will probably have to let the shock protrude from the bottom of the control arm from .5 to 1.0 inches lower than the factory mounting location.
It will definately be cheaper. I have never seen a Held setup for an 88 so I can't comment on the "better" part. I'm not going to be producing these. What I'm hoping to be able to do is document the shock & spring sizes needed and how you could adapt the stock components to accept the coilover system. Cutting and welding on the crossmember will likely be necessary so this isn't a mailorder solution. There are some very inexpensive coilover shocks that would fit just as well as the QA1's. That's one component that I'm definately not taking the econo route on. The shocks alone will be $600 but I want the double adjustables. Single adjustables are a lot cheaper and non adjustables are even cheaper than that.
UREKA! I just had a break through. Things just got even easier!
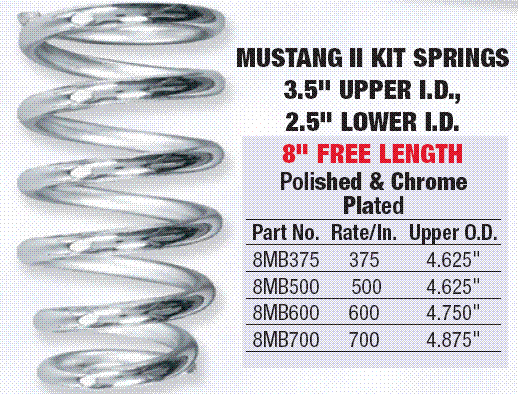
Check out these springs. They are conical. Inside diameter at the top is 3.5" with outside diameter of 4.625". The bottoms taper in to 2.5" ID. Guess what size the stock spring was. Just a bit narrower than 3.5" ID. So if I get a set of 8" conical springs I can use the stock upper spring perch without any modifications to the crossmember.
I still have to call QA1 tomorrow and see if I can get the same shocks shown above but with a stud upper mount like the stock shock.
IP: Logged
08:52 PM
May 21st, 2008
2002z28ssconv Member
Posts: 1436 From: Orlando, FL Registered: Jun 2005
I ordered DGMP1 shocks which are double adjustable coilover shocks with a compressed height of 9" and an extended length of 13" according to the QA1 tech line. The shocks have a stud mount at the top like the stock shocks so no modifications will be needed there. However, the bottom mount on the shock is a T bar which is the same as the stock shock. But my plan has the shock body one inch lower using either a poly bushing or a spherical bearing, either of which is easy to convert the shack body to. I'm going with the spherical bearing just in case my welding isn't perfect there won't be stress on one side of a poly bushing.
They'll be here by the weekend and I'll post more updates then...
BTW I have the springs mentioned earlier on the way too.
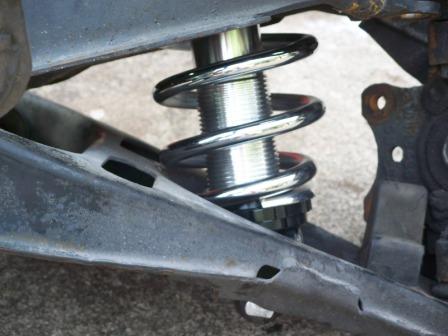
I just had to slap one in to see how my measurements were.
Talk about perfect!
I'm so happy with the fit so far. I mounted it first without the spring to check for shock travel. When the bump stop hits the crossmember at full compression there is still almost an inch of shock travel. That will translate to even more wheel travel so that inch is quite plenty. And if I extend the shock out the bottom of the lower control arm a little, that's even more room. When The suspension was fully extended the upper control arm hit the crossmember limiting the travel in that direction. So the shock travel experiment passed with flying colors. Sorry I forgot to take pictures of the travel without the spring. Maybe I'll get some when I break it apart next time. The only thing I'm worried about is how much the springs will compress once the weight of the car is on them. Right now I have the collars adjusted all the way down and I was barely able to get the control arms back together. But even with conventional lowering springs, the springs are tight during assembly and the right height still drops. So hopefully it will all be good. I really want to be able to lower it about an inch from stock ride height.
Here are some more pics...
IP: Logged
09:58 PM
May 24th, 2008
sjmaye Member
Posts: 2468 From: Hendersonville, TN USA Registered: Jun 2003
I would take a 1/4" steel ring and weld it to the lower A-arm to spread the load out. I too would install the largest diameter grade 8 bolts as possible for the shock/spring fastener.
Looks very promising though!
IP: Logged
08:56 AM
2002z28ssconv Member
Posts: 1436 From: Orlando, FL Registered: Jun 2005
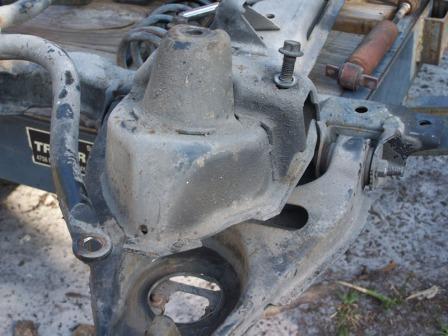
I won't be mounting the lower anything like the pictures. It's a little hard to make out but I picked up a kit to get rid of the T-bar/poly bushing and replace it with a sperical bearing. Then the bolt that attaches it to the control arm will be parallel to the ground rather than two vertical. QA1 actually supplied a couple nice looking bolts with nuts that would have worked nicely. The bearings are at the bottom right of this picture.
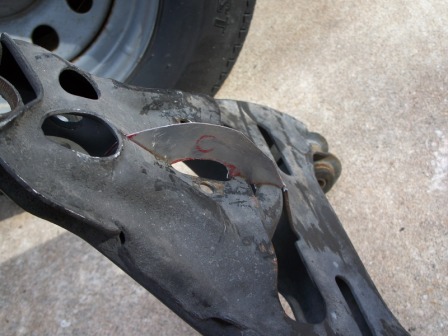
My plan is to cut out the inner lip of the lower spring perch and a small area between the shock and the spindle with a plasma cutter. Then I'll box the small area back in. This is for room to adjust the shocks. There's plenty room now but when thew sit deeper in the pocket it will be tighter. Then I'll make an insert that the shock will bolt to. My plan for that is a circular base with the center removed. Then there are tabs that drop down for the shock mounts. That gets welded into the original spring bucket. That's why I'm cutting off the inner lip, so that the adapter will have more surface area to weld to. Here's my sketch...
[This message has been edited by 2002z28ssconv (edited 05-24-2008).]
IP: Logged
11:04 AM
May 29th, 2008
2002z28ssconv Member
Posts: 1436 From: Orlando, FL Registered: Jun 2005
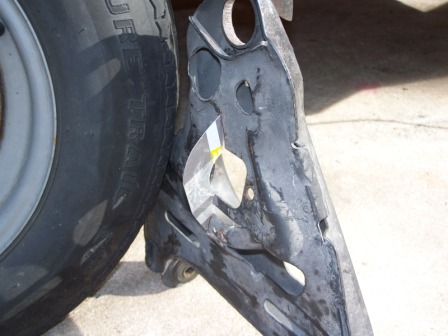
I spent an hour or so on it again today. I got a good template made up for my lower mounting brackets out of some really thin stuff. This picture shows the top of the control arm. The inner lip has been removed from the spring bucket. You can also see a slot I cut for the bracket to slide into.
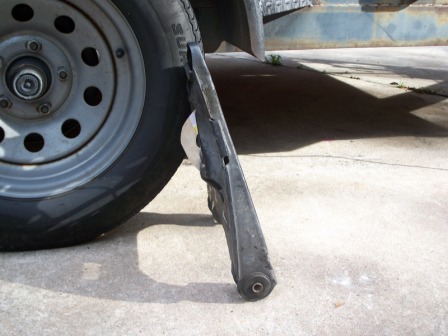
Bottom view...
This is the final template...
The template fit into the slot in the control arm...
These show how much surface I will be able to weld to...
This is how far it sticks out of the bottom of the control arm...
I should be able to make a duplicate and bend it the other direction for the other side. I also plan on welding in some strips to connect the two brackets together below the control arm for more rigidity.
Tangent thought #1: at least you've found a double adjustable shock option, even if all else fails...
Tangent thought #2: are you absolutely sure that the setup can't be used like you had it mocked up? I understand that HMS has claimed that it is too weak, but from the picture it looks like it is the same thickness of metal that the balljoint is pressed into - and the balljoint mount area would see more pressure due to leverage. I understand that there are flimsy clips that the bolts are threaded into, but why not just remove those and use a nut on the other side and clamp to the arm? What if the bottom layer was seam welded to the original spring seat on the top side of the arm?
edit: here is where I'm suggesting the seam welds: edit 2: Following this line of thought, I wondered if there were any other cars that might have a similar lower control arm that mounts the shock like ours. Looked at control arms on ebay and noticed that s10 arms looked similar in design, with a shock mounted in the center of the spring to the lower side of the control arm. A quick search on the s10 forum found the following pictures.
That is a carrerra (now QA1) kit for the s10. The part that is interesting is the lower plate that sits in the old spring pocket with mounting tabs that poke down where the old shock mounted. I don't know if that exact plate could be used (holes need moved a tad) but it sure looks like an easy approach.
[This message has been edited by fierogt88 (edited 05-30-2008).]
IP: Logged
11:43 PM
May 30th, 2008
Steven Snyder Member
Posts: 3323 From: Los Angeles, CA Registered: Mar 2004
Originally posted by fierogt88: I understand that HMS has claimed that it is too weak, but from the picture it looks like it is the same thickness of metal that the balljoint is pressed into - and the balljoint mount area would see more pressure due to leverage.
Notice that the metal the balljoint is pressed into is formed? It's not flat. It's much stiffer and stronger that way. There is actually more material there. I think it's slightly thicker too. Also, the balljoint mount sees LESS force than the shock mount area. The leverage you're talking about increases the force toward the inside of the arm...
Notice that the metal the balljoint is pressed into is formed? It's not flat. It's much stiffer and stronger that way. There is actually more material there. I think it's slightly thicker too.
Well, I see a lot less material (width) , but yes, it is formed. That is why i suggested the seam welding. I don't know about the thickness, but I'll be sure to measure this weekend.
quote
Also, the balljoint mount sees LESS force than the shock mount area. The leverage you're talking about increases the force toward the inside of the arm...
You know, I struggled with that thought a lot. I may have mis-represented my thoughts there. I'm still struggling with how to communicate the point I'm trying to make about leverage. Yes, basic leverage at the distance of the spring is higher than the distance of the balljoint. A-B-C points on the line with a as the pivot, point b sees more leverage than point c.... But I'm talking about sideways/lateral/different vector leverage that is applied by the ball joint as you go through turns/hit bumps.... The only better way I know to explain it is if you (theoretically) had a 10 foot long ball joint it would tear out of the mount easier.... I know, I'm not explaining this very well... but the spring is only pressing down on a fairly wide mount with no horizontalleverage while the ball joint is seeing lateral/horizontal forces that want to pry it out from the mount when you go through turns or brake...
So, the leverage YOU'RE talking about, the basic arm leverage, yes you're right. but I'm talking about a different leverage vector....
[This message has been edited by fierogt88 (edited 05-30-2008).]
IP: Logged
01:09 AM
2002z28ssconv Member
Posts: 1436 From: Orlando, FL Registered: Jun 2005
Even as it is now, I'm worried that the ride height might be lifted from stock height even when the adjuster is moved all the way to its lowest setting. I hope not but I won't know for sure until it's on the car. That's why I wanted to drop the shock out the bottom, which in turn lowers the spring perch thus lowering the ride height. Removing the lip gave me 3/4" or so. Plus once I dropped the mounting point the lip got in the way of the shock body and spring perch. If I put it on the car and it ends up 2" or 3" lower than stock then leaving the lip on will be an option. Welding the seam between the upper and lower layers might have worked too (I'll be welding it anyway). But I feel a lot safer having the attachment bracket resting above the entire arm. If the weld between the layers cracked, the lower layer would certainly bow out and destroy the whole A arm. Welding the seam and adding a ring on top that the bolts would attach through was also a consideration. But my concern for ride height won out. Plus I'm using the spherical bearing on the lower mount because I was worried about the bushings not being lined up perfectly. Their mounting bolt is horizontal, not two verticals.
IP: Logged
08:40 AM
May 31st, 2008
EMX5636 Member
Posts: 577 From: Sellersville, Pennsylvania Registered: Mar 2002
I'm going to call QA1 on Monday and see if they will sell the S10 lower mounts by themselves. Then I think to allow a longer shock/spring, I'll weld them to the bottom of the control arm, and enlarge the top hole to fit around the shock shaft. Of course, this may not be feasible, and I don't have a LCA in front of me. I almost wonder too if Rodney's .5" or 1" lowering balljoint for the 88's would help with the shock length issue? Must watch this thread!!
Justin
------------------ 1988 Fiero Formula 4-spd- 3400sfi intercooled turbo Haltech ECU. Here comes 350+whp 1990 Mitsubishi Eclipse GSX - T72, under the knife 1992 S10 4x4 - lowered, bike/quad hauler, dd 1995 Kawi Ninja zx7r 2003 Honda 440ex #33W
1987 Yamaha Warrior - for sale
IP: Logged
12:04 PM
Jun 15th, 2008
2002z28ssconv Member
Posts: 1436 From: Orlando, FL Registered: Jun 2005
Sorry for the lack of progress lately. I've been working primarily on brake brackets, watching it rain, prepping the race car for an autocross last weekend, and spent 4 days in Vegas too since I posted last.
This weekend I finally got one front and one rear bracket made for my C4 Vette brakes and then it started to rain again. I packed up all the tools and then the rain fizzled out.
So I decided to work on the control arms a bit. Less tools involved...
I got the control arm slots where they need to be and one bracket. It's made from 1/8" mild steel.
Here are the pics but I'll probably tweak them some more before I weld them in.
The one on the left is my model made from thin material.
I will probably remove some of the control arm metal between the brackets by the ball joint. I want to slide the lower shock mount a little further out.
This picture shows the final grooves cut into the control arms.
IP: Logged
07:21 PM
Jul 5th, 2008
TG oreiF 8891 Member
Posts: 776 From: Cleveland, Ohio; USA Registered: Aug 2004
I know it is a bit of work, but for the rest of us, I wish you had put it on the car as it was. Then we would know if, for average driving heights, we really need to drop the bottom mount. On that note, is this for a race / autocross car, or for a daily driver? How much lowering are you looking for? What I'm getting at is, when you say it won't drop it enough, might it still be fine for normal (non-race) drivers, or are we really talking an increase in ride height?
Awesome work anyway, I commend your efforts.
IP: Logged
12:08 AM
Jul 10th, 2008
Doug85GT Member
Posts: 9472 From: Sacramento CA USA Registered: May 2003
I know it is a bit of work, but for the rest of us, I wish you had put it on the car as it was. Then we would know if, for average driving heights, we really need to drop the bottom mount. On that note, is this for a race / autocross car, or for a daily driver? How much lowering are you looking for? What I'm getting at is, when you say it won't drop it enough, might it still be fine for normal (non-race) drivers, or are we really talking an increase in ride height?
Awesome work anyway, I commend your efforts.
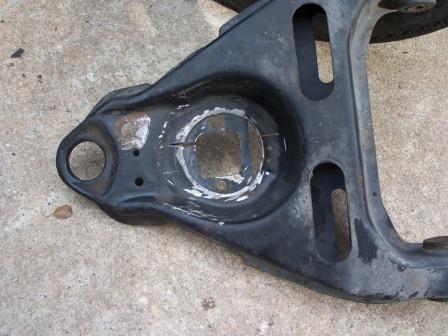
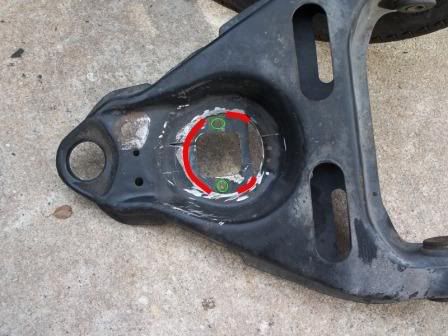
In my opinion, using the original shock mounts on the control arms would not have held up under normal driving conditions either. As you can see in this picture the shock bolts into a layer of metal that doesn't normally support the car's weight. As seen in this picture there are only two small welds that would be keeping the bottom layer from bulging downward and probably tearing. Either way, it would not be a very good thing to have happen.
This is my wife's daily driver. One day I hope to finish my 3800 and put it in this car too. But it's not going to be driven in anger very much. Maybe a couple autocrosses a year.
I'm only looking for an inch of drop. The wife said NO DROP but what does she know? LOL! She'll love it. It's at the body shop getting painted Crystal Red from a 2008 Caddy DTS paint code for the next couple weeks.
I was going to work on the coilovers when I got home today but it started storming again. EVERY DAY!!!
quote
Originally posted by Doug85GT:
Is this the same thing that you ordered only in a single kit?
On further reading, this is not the same thing as what you are building. I wonder if it would work though....
The big thing to look for in a shock is a compressed height of less than 8" and extended as close to 12" as you can get. Summit doesn't seem to want to share the dimensions of the shocks but I think these single adjustables will probably be the same height as mine. http://store.summitracing.c...491+115&autoview=sku The QA1 guys were very quick to answer any questions I had.
IP: Logged
07:25 PM
Doug85GT Member
Posts: 9472 From: Sacramento CA USA Registered: May 2003
I emailed them and they said that there are no kits for our cars (I already knew that) and then they gave me the name of a dealer that does custom fabrication. I also asked for the measurements but they did not give them.
I looked further on Summit Racing and found some general Pontiac and GMC front coilover kits. They look promising but without the measurements, then we won't know for sure. I guess I'll email them again and just ask for the measurements.
Here are the GM coilover kits. They look promising:
You did email QA1, right? Summit will be of very little help with the actual dimensions. I called QA1 and asked very specific questions. I wouldn't even tell them it was for a Fiero at first. Once they understood that I was not looking for an easy 6 bolt installation they gave me the shock height info I was asking for. The inner retaining ring that holds the top of the spring measures 4 3/8" in diameter. So make sure that the inside diameter of the top of your springs are at least that wide too. The set I have is 4 5/8" I.D.
IP: Logged
08:07 PM
Jul 15th, 2008
TG oreiF 8891 Member
Posts: 776 From: Cleveland, Ohio; USA Registered: Aug 2004
In my opinion, using the original shock mounts on the control arms would not have held up under normal driving conditions either. As you can see in this picture
the shock bolts into a layer of metal that doesn't normally support the car's weight. As seen in this picture
there are only two small welds that would be keeping the bottom layer from bulging downward and probably tearing. Either way, it would not be a very good thing to have happen.
I understand. But I am not as good of a fabricator as it seems you are. I feel comfortable strengthening the existing mounts by putting a ring of material on the underside and adding additional weld beads; however, I am not able to do the custom fabrication you are doing to mount the shocks below the arms. At this point, I feel that level of work is above me. I'll be watching this thread to see how you progress.
IP: Logged
08:42 AM
FierOmar Member
Posts: 1639 From: Glendale, California, USA Registered: Dec 2001
Originally posted by 2002z28ssconv: the stock shock measures around 7.5 inches completely compressed and 11.5 extended. The QA1's measure 9.5 and 12.625 respectively. I will have to drop the shock half an inch lower in the control arm and an inch or so higher at the top mount if I want to keep the most suspension travel possible. The stock shocks' normal travel, according to the wear marks, was closer to 9-11.5.
quote
Originally posted by 2002z28ssconv: The big thing to look for in a shock is a compressed height of less than 8" and extended as close to 12" as you can get.
Wouldn't the stiffer spring tend to limit the travel somewhat (e.g. 500# vs. approx. 200# front spring)?
Since the range of travel with stock springs, could a shorter shock with a range of travel (completely compressed to fully extended) limited to 3 inches work (particularly when the stiffer springs are factored in)? (The QA1's measure 9.5 and 12.625 respectively, allowing for 3.125" of travel.)
There are some other QA-1 adjustable shocks that might work. Look on Summit's web site for "HAL MS 1500" These shocks have a range from 7.625" ciollapsed to 11" fully extended.
FierOmar
IP: Logged
07:17 PM
Jul 18th, 2008
2002z28ssconv Member
Posts: 1436 From: Orlando, FL Registered: Jun 2005
The big thing to look for in a shock is a compressed height of less than 8" and extended as close to 12" as you can get...
Those measurements were wrong. I looked at a sheet of paper on my desk. But those were early estimates. I posted the correct numbers earlier. The shocks need a compressed height of less than 9 and an extended height of more than 11.5 if the mounting points stay the same as stock.
Sorry about that.
If you can get shorter, conical springs that would be nice. With the 8" springs I'll have tons of room to adjust the ride height back up but very little if any to bring it down. I may have to use Rodney's ball joints. We will see.
I should have another update on Monday. I won't have it on the car yet as it's still in the paint shop. But hopefully I'll finish up the control arms.
Those "HAL MS 1500" shocks would also let you mount the shock higher than mine so it might be easier to make the mounting points tie into the stock spring perches. I don't know how short you could get the springs though. 6 inches?
[This message has been edited by 2002z28ssconv (edited 07-18-2008).]
You are looking in the wrong place for what you are trying to do, I asked about this subject a few days ago and after coming across this thread suddenly thought to look in my Coleman Racing catalog included with the rear coil over setup I purchased last year. Their catalog lists numerous extended and compressed heights as well as springs of various lengths and rates. The best of all is a shrink-on threaded sleeve that may work for you with a different shock. They have some really good stuff with all the specs, you need their catalog.
The shock has been perfect from day one. What has been so frustrating on this is finding a way to attach the shock's lower mount to the control arm in a way that I would not worry about my wife driving the car to work everyday. A shock sleeve would still have the same problem. I'm moving the lower spring perch and all forces being applied there under normal configuration to the shock mount which will not support such a load.
And yes, I have been getting Coleman catalogs for many years. I think I probably have one in every room of the house. And I have looked through it many times looking for ways that I wouldn't have to reinvent the wheel on this project.
[This message has been edited by 2002z28ssconv (edited 09-28-2008).]
IP: Logged
09:33 AM
2002z28ssconv Member
Posts: 1436 From: Orlando, FL Registered: Jun 2005
That's pretty much it unless you want to make the brackets yourself.
They said that they would sell me their lower mount brackets for well under a hundred bucks. I didn't ask permission to post the exact amount so I won't say what he quoted me. They sell the entire setup for $495. The bad news is that you still have to cut your original lower control arms and weld in their brackets. I talked with the guy for quite a while on the phone and he was very willing to tell me just how to make my own brackets. Pure genious in simlicity too. I feel so stupid for muddling around trying to solve issues with clearance between the shock body and the bracket. Hiso uses an adapter for the top of the spring rather than a conical spring. His springs are also 7" and he said that it has a very limited amout of drop available after it is installed.
Here's the short version. Front to rear it looks like this. Bracket - 1" spacer welded to bracket - Shock - 1" spacer welded to bracket - bracket.
DUH!
I whipped out a couple spacers and brackets last night, loose fitted them in the control arm, bolted up the shock, slipped on a spring, and installed it in the crossmember.
I'll get some pictures later today.
Also - I contacted the spring manufacturer listed above by FierOmar (http://www.bluecoilspring.com/). He said he could make conical springs (really just a barrel spring cut in half) of varying spring rates and whatever length we needed too. I told him that I already had a set of 8" QA1 springs that I wishe they were just a bit shorter. He said he could heat them up set them at 7" and retemper them to be 7" instead. I think he said it would cost less than $75 to do it too. If you don't have the springs yet just order what you want from the start.
I also spoke with HMS. They wanted more for two lower control arms as RCC wanted for their entire coilover setup. So I declined...
[This message has been edited by 2002z28ssconv (edited 09-28-2008).]