So I was wondering if anyone knew how to go about baking the intake parts to:
#1 harden the carbon on the inside. #2 heat to make paint stick to the out side.
I have striped all the paint off the intake so it's down to the raw aluminum. And as I was thinking of painting it, a hard chunk of carbon deposit fell out. I scarped what I could reach, cleaned with acetone, and brake cleaner...but hard carbon deposits keep falling out, and I don't want to put it on my new engine!
So I was talking to a friend at a machine shop and he said to put it on the oven at broil for an hour, then take it out and let naturally cool. He said most of the crap should fall out. But I'm afraid to do this because I know aluminum can warp. Anyone done this before??
IP: Logged
01:16 AM
PFF
System Bot
87antuzzi Member
Posts: 11151 From: Surrounded by corn. Registered: Feb 2009
So I was wondering if anyone knew how to go about baking the intake parts to:
#1 harden the carbon on the inside. #2 heat to make paint stick to the out side.
I have striped all the paint off the intake so it's down to the raw aluminum. And as I was thinking of painting it, a hard chunk of carbon deposit fell out. I scarped what I could reach, cleaned with acetone, and brake cleaner...but hard carbon deposits keep falling out, and I don't want to put it on my new engine!
So I was talking to a friend at a machine shop and he said to put it on the oven at broil for an hour, then take it out and let naturally cool. He said most of the crap should fall out. But I'm afraid to do this because I know aluminum can warp. Anyone done this before??
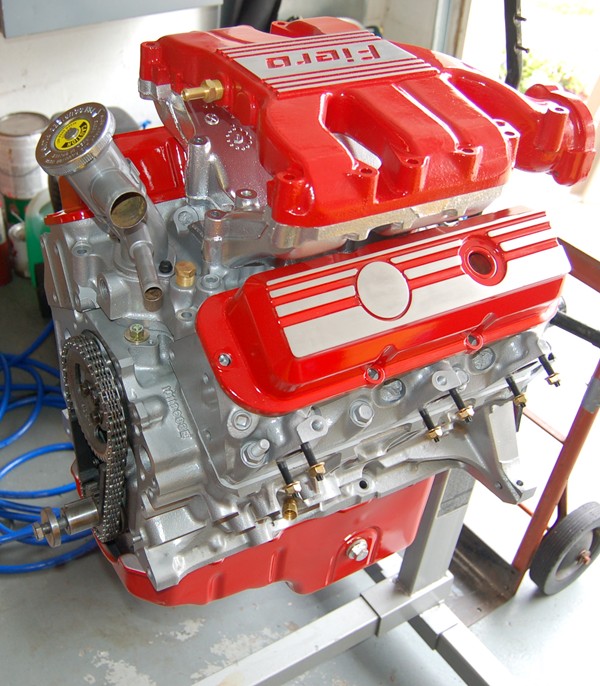
I used "TALSTRIP" brand gel paint remover. I filled the inside of the upper intake plenum with it and let it sit for about 30 minutes. Hosed it out and it looked like it just came from the casting foundry. Bright clean cast aluminum. Not a trace of carbon.
I then spray painted the manifold and my valve covers with VHT high temp aerosol and when dry I shot it with Duplicolor clear wheel paint, (several coats). They then went into the oven @ 200 degrees for 60 minutes. Removed and allowed to air cool, and VOILA!
Same internal cleaning process with the middle and lower intake manifolds but I skipped the clear gloss coat and oven bake on them when I painted them.
[This message has been edited by randye (edited 03-10-2010).]
IP: Logged
02:34 AM
Seanpaul Member
Posts: 1320 From: Santa Rosa, North CA. Registered: Mar 2003
When done with the paint, how did you get the tops of the valve cover and intake shaved back to the aluminum? Problem with the painting is I louse that half paint, half aluminum look.
And what Color (brand and code) did you use?
[This message has been edited by Seanpaul (edited 03-10-2010).]
IP: Logged
04:30 AM
Seanpaul Member
Posts: 1320 From: Santa Rosa, North CA. Registered: Mar 2003
When done with the paint, how did you get the tops of the valve cover and intake shaved back to the aluminum? Problem with the painting is I louse that half paint, half aluminum look.
And what Color (brand and code) did you use?
You just sand the red paint off , sanding in one direction only..lengthwise... along the raised ribs before you seal everything with clear. The clear coat helps prevent the bare aluminum from oxidizing.
I used VHT brand, "Universal Red" and clearcoated with Duplicolor clear wheel paint.
[This message has been edited by randye (edited 03-10-2010).]
IP: Logged
08:26 PM
Mar 11th, 2010
Seanpaul Member
Posts: 1320 From: Santa Rosa, North CA. Registered: Mar 2003
You just sand the red paint off , sanding in one direction only..lengthwise... along the raised ribs before you seal everything with clear. The clear coat helps prevent the bare aluminum from oxidizing.
I used VHT brand, "Universal Red" and clearcoated with Duplicolor clear wheel paint.
What grit sand paper?
When used Duplicolor years ago, after a year or so of engine heat it tinted brown. Leaving my aluminum looking dirty.
[This message has been edited by Seanpaul (edited 03-11-2010).]
IP: Logged
02:35 AM
87antuzzi Member
Posts: 11151 From: Surrounded by corn. Registered: Feb 2009
Beautiful! Next question: What oil pan is that? The fitting on the side looks like a perfect place for an oil temperature probe.
Its the stock 3.4 oil pan, (95 Camaro if I recall correctly). That port had a low oil level sensor in it, but was a perfect fit for a short M12 bolt with a rubber seal washer. Not sure, but I suppose you could use the 3.4 oil pan on a 2.8, (with the proper late model timing cover), and the requisite adjustments to the dipstick length.
IP: Logged
11:56 AM
Seanpaul Member
Posts: 1320 From: Santa Rosa, North CA. Registered: Mar 2003
how did you remove the tb warmer tube from the t stat housing?
Can you do that? I mean doesn't the TB warmer help warm the fuel for better combustion? Would be cool to get rid of it, anythign to clean up the engine.
BTW: is that a 3.4 or 2.8?
ohh PS. What grit sand paper did you use to clean off the paint on top of the valve covers?
[This message has been edited by Seanpaul (edited 03-11-2010).]
Doesn't matter really unless where you live gets pretty cold during the winter. Here in Oklahoma we never get iced TB's,though I do run across a few IAC's that have gotten iced every year. The iced IAC's are generally intake mounted and not TB mounted. The TB ports on my tgp engine will be deleted. I'm basically going to just leave the plate with th ports off the bottom of the TB when I mount it up. There is just an empty space that coolant stays in and circulates through,mine has a gasket and plate over it.
I'm considering piping the cooler liquid charge from my liquid/air intercooler through it to see if it makes a difference. I'm just going to test when I get everything in to see if it makes a difference.
IP: Logged
01:12 PM
ltlfrari Member
Posts: 5356 From: Wake Forest,NC,USA Registered: Jan 2002
Easy off oven cleaner works great on grease and carbon build up. Spray it on, let it foam and sit about 30 minutes and then rinse. Not the nicest thing for painted surfaces, but perfect when you plan to repaint them.
Can you do that? I mean doesn't the TB warmer help warm the fuel for better combustion? Would be cool to get rid of it, anythign to clean up the engine.
BTW: is that a 3.4 or 2.8?
ohh PS. What grit sand paper did you use to clean off the paint on top of the valve covers?
I am not sure what GM had in mind when the designed those tubes to the throttle body. It does absolutely nothing to warm the fuel, (the fuel comes in through the injectors). The incoming air flows so fast through the throttle body that I can't believe it would be warmed appreciably by the added heat. My *guess* is that it was added to prevent icing, but even that really shouldn't be a problem with all the ambient heat in the engine compartment. The throttle body gets *plenty* warm sitting above the exhaust "Y-pipe"
It's a 3.4 that I built.
I'm sorry I don't recall what grits of sanding media I used, but you can make the bare aluminum as brushed, or as smooth, as your personal taste dictates. The only caveat is that the manifold and valve covers are cast aluminum and you will have a a lot of pits and imperfections if you attempt to highly polish them.
IP: Logged
02:03 PM
Marvin McInnis Member
Posts: 11599 From: ~ Kansas City, USA Registered: Apr 2002
I am not sure what GM had in mind when the designed those tubes to the throttle body. ... My *guess* is that it was added to prevent icing, but even that really shouldn't be a problem ...
See this thread for a discussion of the issue. The purpose is to prevent throttle plate icing that could prevent the butterfly from closing completely, and it's far more likely to occur at moderate ambient temperatures than when it's below freezing. Think "uncontrolled, unintended acceleration" here ... a symptom somewhat similar to Toyota's current problems.
[This message has been edited by Marvin McInnis (edited 03-11-2010).]
IP: Logged
03:18 PM
Seanpaul Member
Posts: 1320 From: Santa Rosa, North CA. Registered: Mar 2003
See this thread for a discussion of the issue. The purpose is to prevent throttle plate icing that could prevent the butterfly from closing completely, and it's far more likely to occur at moderate ambient temperatures than when it's below freezing. Think "uncontrolled, unintended acceleration" here ... a symptom somewhat similar to Toyota's current problems.
Thanks Marvin. Just as I assumed. I'm still thinking that conducted and radiated heat in the engine compartment warms the entire throttle body sufficiently to preclude icing. The throttle body is likely never really "heat soaked" as the variations of air flow through it would probably cause some temperature variation between closed and WOT operation. It seems counterintuitive, but doubtless true, that closed or partially open throttle plate position would create a lower local temperature at the "venturi" with less mass air flow through the throttle body than it might at WOT. Considering the safety issues involved, I understand GM adding the lines. I just hadn't heard of any throttle plate icing issues with the Fiero, so to clean up some of the clutter, I removed them. I have not experienced any problems with the modification, but I also allow my car to warm up a *lot* before driving it. I have noticed an occasional odd problem at idle, (when the IAC is in control), but have not previously thought to correlate it to relative humidity.
[This message has been edited by randye (edited 03-11-2010).]
IP: Logged
04:10 PM
Nazareth Member
Posts: 730 From: morristown, TN Registered: Aug 2003
The best and easy way I found to bring to bare any intake part is to take it to your local machine shop and ask them to "hot tank" it. They will charge you a minimal fee well worth the time/pain to do any other method. Parts come totally clean of everything and ready to paint or powder coat.
Do not exceed 400 degrees on aluminum parts. Not only will they warp but the microstructure of the metal weakens and can crack.
Plus it will really make your paint that you're trying to *cure* look just awful... I noted 200 degrees F for curing the paint, but thanks for the heads-up.
It doesn't matter how long you let the car warm up. The throttle body may never heat soak as long as there is cold air flowing through it.
In certain conditions, I have had IAC icing which restricted movement of the IAC pintle (and left me with a high idle), even after running the car 1/2 hour (having reached normal operating temp long ago). Once warm though, an engine shutdown of a minute or so was enough for engine heat to melt the ice. Restarting after this allowed my idle to drop to normal.
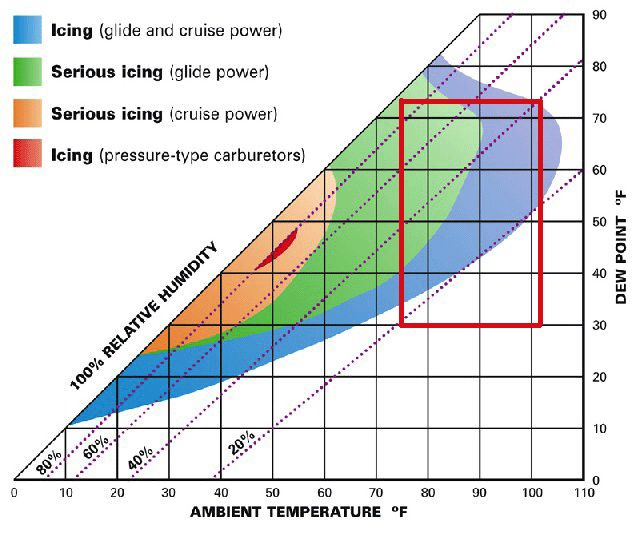
I think most all of my driving here in Florida probably falls within the area defined in red on this chart: I suppose icing is a potential problem, but I honestly have had no evidence of it, other than the possibility of the occasional odd idle issue I previously mentioned. It could also be that because I've installed a CAI with K&N filter that all sits *inside* the engine compartment, that I'm sucking up much warmer air, (especially at idle), than I otherwise would be with the ducting connected outside the engine compartment.
Edit to add: I actually think the operational envelope I defined is probably "generous" to say the least. My car is not a daily driver.
[This message has been edited by randye (edited 03-11-2010).]
IP: Logged
04:39 PM
phonedawgz Member
Posts: 17091 From: Green Bay, WI USA Registered: Dec 2009
ltlfrari I'm highly interested in this! Can you post more detailed directions?
Low/Med/High on BBQ? Temp if available? How long?
Is the product "VHT Wrinkle Plus in red" ??
I don't think the local stores here sell VHT products.
Just use like regular paint, clean the part and polish the flat parts that are to remain unpainted then mask and apply the paint. I think I had the barbie pretty low. You just need to make sure NOT to leave them on there too long else the paint will burn/blacken. The rocker covers did slightly but I also did the intake and it's a lot better because I didn't leave it on as long.
Yes, it's the VHT Wrinkle Plus in red. There's a black as well. I couldn't fond it locally and was looking at buying online, then noticed the place I was about to order from was just down the road, so off I toddled.
The only down side is that because it's a mat finish it seems to be a little porous, so if you stick your oily finger on the surface you will end up with a mark that's hard to impossible to remove. I like it though as something a little different.
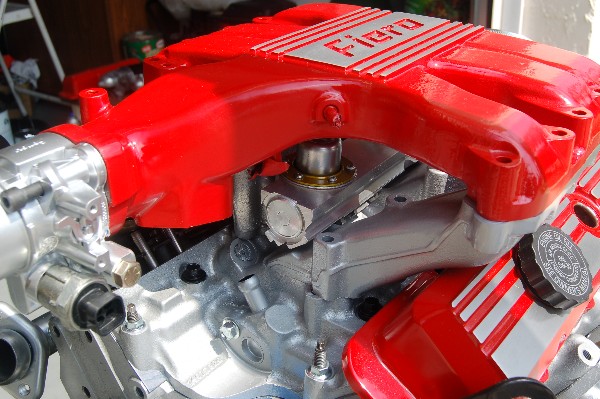
To propose an answer to Randye's question above, what I notice about the intake plenum, other than the beautiful paint, is that the casting part lines have been ground smooth. It makes for quite a good impression. Subtle but effective.
To propose an answer to Randye's question above, what I notice about the intake plenum, other than the beautiful paint, is that the casting part lines have been ground smooth. It makes for quite a good impression. Subtle but effective.
Ken
BINGO! I'm glad someone noticed.
I should have removed the casting part lines from the middle manifold too, but I got tired of grinding!!
[This message has been edited by randye (edited 03-12-2010).]
IP: Logged
11:36 AM
ltlfrari Member
Posts: 5356 From: Wake Forest,NC,USA Registered: Jan 2002
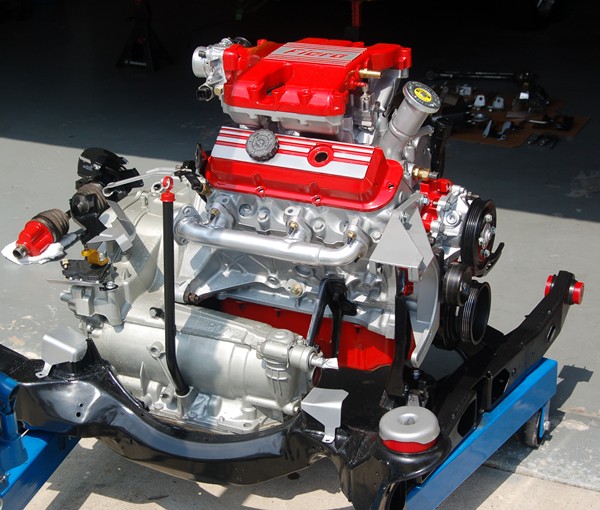
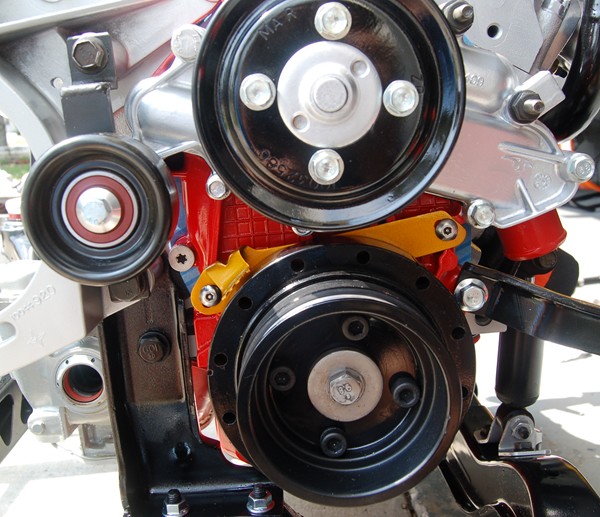
In this state (pretty bare) I have to say that the 2.8 is a pretty decent looking engine (especially this one!):
The problem is that by the time you get all the accessories, wires, hoses and other junk installed and hooked up, it looks like a pile of vomit! I'm pretty sure the designers had some sort of competition to see how crap they could make the motor look.
Be careful with the "Hot Tank" and also oven cleaner. Both use caustic cleaners which react with the aluminum,usually causing sulfur dioxide and etching/melting the part. So if you leave it on a few hours or overnight in a tank you likely will have just a mess on your hands (or nothing from a hot tank).
I use muriatic acid diluted with water,and allow it to sit and burn a minute and rinse it off with water. Foaming wire wheel cleaner is good also,but contains some of the same acids so be careful and don't breathe it in after you spray it on. This is stuff I use to clean the outside of aluminum,helps alot on the inside also.
In this state (pretty bare) I have to say that the 2.8 is a pretty decent looking engine (especially this one!):
The problem is that by the time you get all the accessories, wires, hoses and other junk installed and hooked up, it looks like a pile of vomit! I'm pretty sure the designers had some sort of competition to see how crap they could make the motor look.
You're right. I was really pleased with the look of my 3.4 at that point, but the more parts that got added, the more "busy" it got. I didn't spend a whole lot of time trying to simplify things, but the overall Fiero engine really could use some major clean-up as far as bracketry, hoses, wiring and accessories go. I just did the best I could at the time to keep thinks neat and clean.