Pennock's Fiero Forum
  Technical Discussion & Questions - Archive
  88 Rear Poly Suspension Bushing Install Writeup?

T H I S   I S   A N   A R C H I V E D   T O P I C
  

Email This Page to Someone! | Printable Version


88 Rear Poly Suspension Bushing Install Writeup? by Formula Owner
Started on: 11-09-2009 10:20 PM
Replies: 13
Last post by: Formula Owner on 11-15-2009 08:27 AM
Formula Owner
Member
Posts: 1053
From: Madison, AL
Registered: May 2001


Feedback score: N/A
Leave feedback

Rate this member

Report this Post11-09-2009 10:20 PM Click Here to See the Profile for Formula OwnerSend a Private Message to Formula OwnerDirect Link to This Post
Is there a writeup for installing poly suspensions bushings on the rear of an 88? If so, please point me in the right direction. I've looked and I can't find one. I found plenty asking about where to buy, which ones to buy, how harsh, etc, but no install writeups. I'm looking for a step by step with a list of tools needed.
IP: Logged
PFF
System Bot
katatak
Member
Posts: 7136
From: Omaha, NE USA
Registered: Apr 2008


Feedback score:    (8)
Leave feedback


Total ratings: 82
Rate this member

Report this Post11-10-2009 12:56 AM Click Here to See the Profile for katatakSend a Private Message to katatakDirect Link to This Post
It's not difficult at all if you are talking about just changing out the old bushings for Poly.

Tools:
Jack & Jack Stands
16, 17, 18 and 19MM end wrench's - because I can't remember what size the bolts are.
16, 17, 18 and 19MM 3/8 or 1/2" drive sockets and ratchet - maybe a breaker bar too! Or you could use air tools if you got them.
Butane (plumbers) torch.
File, sandpaper, rotory tools, etc.
Good hammer and a drift punch - to pursuade rusty bolts out.
PB Blaster or other suitable penatrating oil.
New suspension bolts - depends on how rusty yours are.

Jack the rear of the car up, place jack stands under the cradle on both sides and lower the car onto the stands letting the suspension hang on the strut.

Remove the tire.

Soak all the suspension bolts with PB blaster and let it sit for awhile while you gather the tools.
1 bolt on the lateral arm at the cradle, 1 bolt on the adjustable link at the cradle - I think these are 18mm?
1 long bolt through the lateral arm and the adjustable link at the knuckle - this one can be a bugger if you have a lot of rust. May require heat, lots of PB blaster and some choice words to get it out. If you have a lot of rust, it's best to replace all the bolts. I think Fiero Store carries them.
1 bolt on the radius arm at the knuckle and 1 on the other end of the radius arm on the cradle. I believe these are 18 or 19mm.

After soaking in PB Blaster, start with the long bolt at the knucle for the lateral arm and the adjustable link. Loosen it and remove it.
Remove the cradle bolt for each arm/link and then you can remove the arm/link. Remove the 2 bolts for the radius arm. 5 bolts total per side.

Now there are a few different schools of thought when it comes to removing the old bushing. I prefer the "burn" method. It's messy but it's quick and easy. I live in a sand box so I just go out in the back yard and let the melted ruber drip into the sand then scoop it up with a shovel later. I have also positioned the arm over a bucket full of water and let the melting rubber drip inot the bucket. Others will tell you to use a drill and drill several holes through the bushing till you can push it out? I tried this once and just busted my knuckles when the drill grabbed and twisted me up in the drill. However you do it, you need to be sure and not destroy the outer metal shells of the bushings on the lateral arm and the adjustable link. These are needed for the Poly install and need to remain in place in the arm/link. The radius arms do not have this metal sleeve as the rubber bushing is pressed into the end rod.

To burn them out, I use a oxy/act torch but a butane "plumbing" torch can be used. I put the heat on the metal center sleeve. After a while, it will get red hot and will actually push itself out of the rubber. By the time the sleeve does this, the rest of the rubber will either be able to be pushed out with a screwdriver or will be completely burned out. Once the rubber is out, I will use a fine round file, sand paper on a dowel rod, flapper wheel on a dremel tool, whatever you got and smooth (polish) the inside of the remaining metal sleeve. Clean them up real good and get them as smooth as possible. Clean and paint the rods/arms, links and then install the poly. Use plenty of the silicone lube supplied with the poly kit. Get extra. You can not use too much here. Push the poly bushings in first then slide the inner metal sleeves in second. Reinstall in reverse order.

Now you may need, and I would suggest, that you get the car aligned once complete. The last 88 I did was aligned a month before I swapped it to poly. When I pulled the adjustable link's, this is what I found:

Note how the inner sleeve is not centered? The car was aligned this way and when I installed the new poly, it was off about 1/4" on each side.
Here's a few shots to help in the visual:

Before removal:

Another shot of the off center bushing:

One side ready to go back in:

Installed:


Ready for the wheel:


Good luck!

Pat

[This message has been edited by katatak (edited 11-10-2009).]

IP: Logged
traderguy
Member
Posts: 82
From:
Registered: Oct 2008


Feedback score: N/A
Leave feedback

Rate this member

Report this Post11-10-2009 01:10 AM Click Here to See the Profile for traderguySend a Private Message to traderguyDirect Link to This Post
How about one for the front susp.
IP: Logged
katatak
Member
Posts: 7136
From: Omaha, NE USA
Registered: Apr 2008


Feedback score:    (8)
Leave feedback


Total ratings: 82
Rate this member

Report this Post11-10-2009 03:47 AM Click Here to See the Profile for katatakSend a Private Message to katatakDirect Link to This Post
That's a little tougher.

The hardest part or should I say most dangerous part is removing/installing the Coil spring. Again, I am not sure what size all the bolts are.

Tools:

Jack & Jack Stands
Assorted metric send wrenches
Assorted metric sockets and ratchets with breaker bars - air tools if you got them.
Ball Joint separator - pickle fork.
Tie rod seperator tool. May be able to rent/borrow one from AutoZone or Checker
Coil Spring compressors?
Hammer with a drift punch
Various pliers and other hand tools.
Ball Joint Press
Chain
Long pry bar

Since you have to separate the spindle from the A Arms, it's a good time to replace the upper and lower ball joints. Also a good idea to replace inner and outer tie rod ends and rack boots. Look at the bushing on the right side of the rack - replace if worn. If you install new bushings but do not install new ball joints, tire rods, etc. the alignment shop may not do the work due to worn parts. Best practice is to replace everything.

Jack up the car and place the jack stands under the car on the frame and lower the car allowing the suspension to hang.

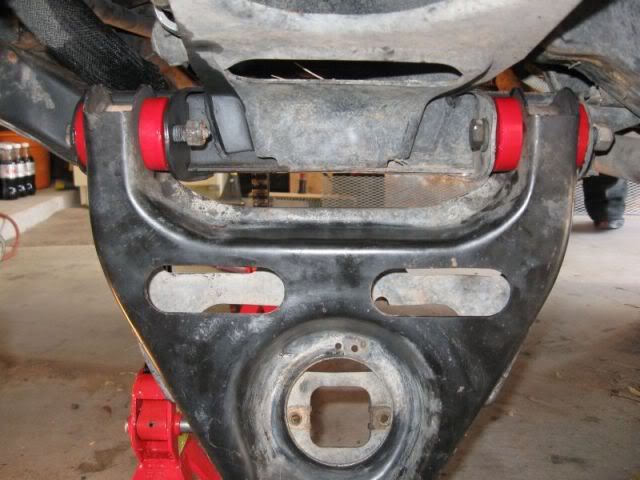
Remove the tire and use the PB Blaster generously on all the bolts. 2 in the upper a arm on the frame/crossmember. 2 on the lower a arm at the frame/crossmember. 1 on each ball joint - clean the dirt and grease off of these first and 1 on the tie rod at the spindle. again, amount of rust will determine the amount of PB Balster required. Another good practice is to get new bolts for the upper and lower a arms and new paddle nuts for the upper a arms (depends on how rusted they are). There is a nut on the top of the shock and 2 bolts on the bottom that need PB Blaster too! Also the bolts for the sway bar are usually rusted bad and will break when taking them off. Naother thing you may want to d oat this time is new sway bar mount bushings and links. I use RD's zero lash sway bar links and love them. Some of the full poly kits will come with new bolts and sleeves with poly link bushings.

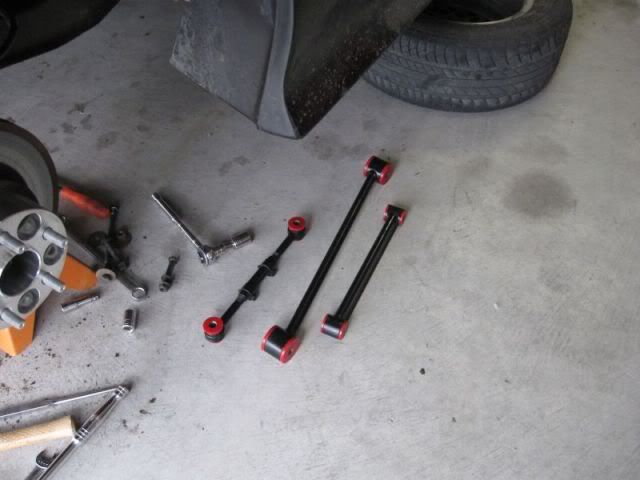
Here's the parts I used on the last 88 I did:

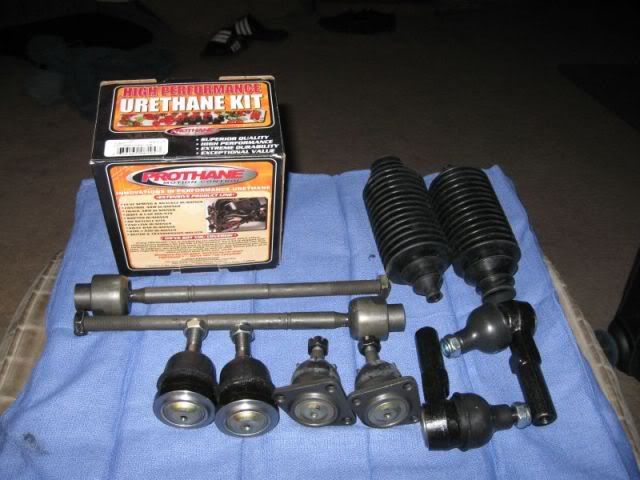
Not pictured is Rodney Dickman's brass rack bushing and zero lash sway bar links.

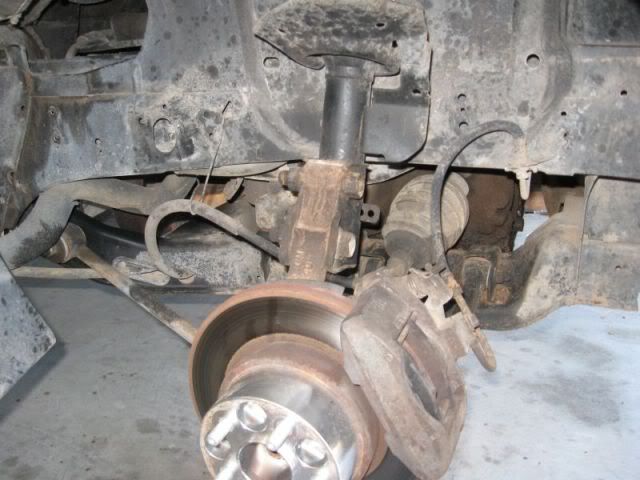
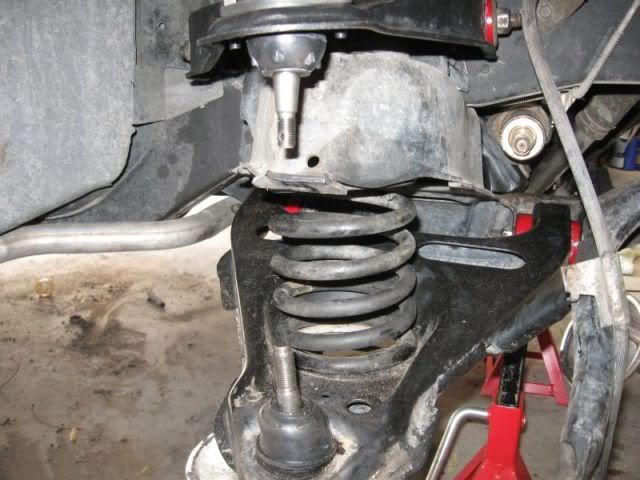
Start by placing the jack under the ball joint on the lower a arm and put some "weight" of the car on the jack/suspension. Remove the nut from the top of the shock. Sometimes these can be rusted and may require the destruction of the shock to get it out. Remove the 2 bolts under the lower a arm that holds the shock in place and remove the shock.

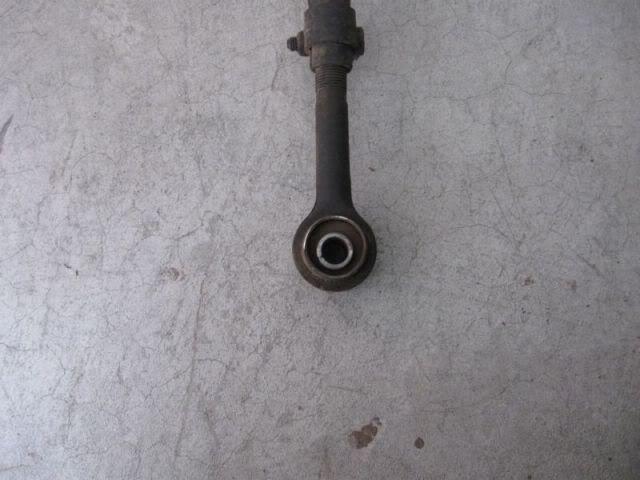
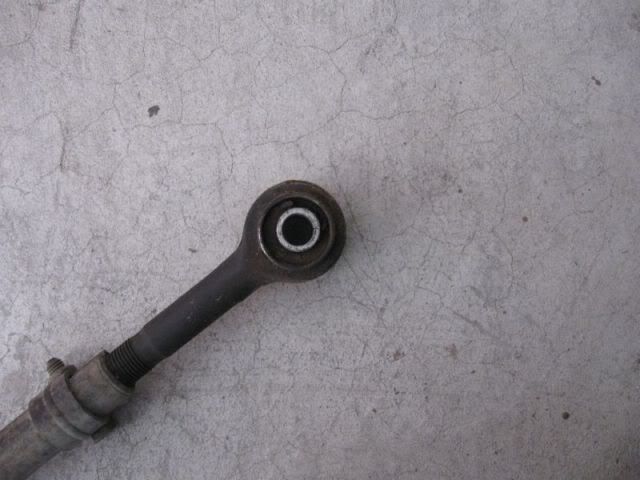
Remove the tie rod nut and seperate the tie rod from the spindle.

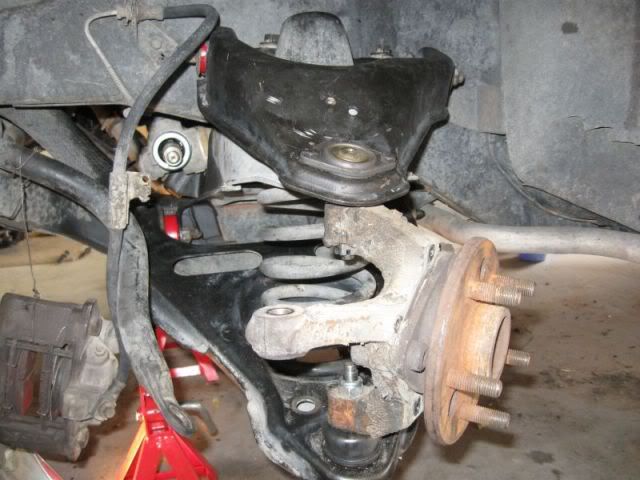
Remove the upper ball joint nut - there should be a cotter pin too. Using the pickle fork, seperate the ball joint from the spindle. Remove the 2 top a arm bolts at the frame/crossmember and remove the upper a arm.

Remove the nut from the lower ball joint. Use the pickle fork to seperate the spindle from the lower ball joint/a arm. Use care here as the spindle is heavy and awkward. Have some bailing wire or a bungee cord close by so that you can "hang" the spindle/rotor/caliper from the car - use care not to put too much pressure/weight on the brake line.

Now here is the dangerous part and I am not sure there is a "good" way to do this. I use a short piece of chain and loop it around the coil spring and through the lower a arm - loose enough to have some slack but tight enough to prevent the spring from jumping out at you. I have heard of folks using some type of spring compressor but I have been unable to find any that will fit in the tight space of the Fiero. Others will tie or strap the spring in a compressed state. For me, the chain thing has worked everytime without fail. Once you have the chain in place of use some type of spring compressor, get yourself off to the side of the car and slowly lower the jack. Sometimes, this will not allow you to remove the spring due to the a arm not traveling downward enough. Use extreme caution when dealing with the spring. For me, once I have the pressure off the jack, the a arm is pointing almost straight down and the spring is just sitting in the spring cup enough to keep it from falling out. Using a long pry bar, I pry the spring out fo the cup and remove the spring. I can't strees the use of caution here. That spring can cause a lot of damage should it come flying out of there. Others may chime in here and have better idea. The chain will keep it from flying around.

Once the spring is out, you can remove the 2 lower a arm bolts and remove the a arm.

If you are replacing the tie rod ends, now is the time. Remove the rack boots. On the rack side of the tie rod, there should be a swedged spot on the end of the tie rod. This "locks" the tie rod from spining as it is threaded onto the rack. Some will grind the swedge down and others will just get a big ass wrench in there and spin the rod off. Once the tie rods are off, you can inspect the rack bushing on the right side - some were plastic and some were metal. Grab the rack rod and see how much play there is in the bushing. I have not seen a plastic one that was not worn out. If it's worn out, you will want to replace it. If you planned ahead, you will have one of RD's bushings in hand. Follow his enclosed instructions to install it. Pay close attention to the part about cleaning all the rust off the rack rod before installing the new bushing. Clean and smooth is the key here. Both on the rack rod and the inside of the rack case where the bushing will fit into. The plastic bushing is a PITA to get out. I took the rack completely out - and paid a big price for doing it because 3 of the 4 bolts that hold the rack in the car broke. It took me more time to fix those 3 broke bolts than it did to rebuild the whole front end. Anyway, Once the rack bushing is in, you can install the new tie rods. Thread them on and tighten them down then "swedge" the lip to lock it in place.

Now you should note that I did not say to remove the old outer tie rod from the old inner tie rod. You can use the old parts as a gauge to set the length of your new ones - this will get you close enough to being aligned to get you to the alignment shop when you are done.

Once the new inner tie rod is installed and locked down, you can slide the new boots on. Some boots come with plastic zip ties to hold them in place. I went to the speed shop and picked up some stainless steel zip ties used for header wrap. Before you tie the boots down, thread the lock nut and the new outer tie rod onto the inner tie rod. Use the old tie rod as a gauge to set the length of the new tie rod(s). Now you can tie the boot in place. You may want to add some lithium grease to the rack rod - turn the steering wheel from side to side so you can coat as much of the rack rod as possible.

Now you can remove the old bushings. Same as above - your choice. Just remember that you will need to leave the outer shell of the bushing in place on the a arm. Too much heat and you can melt these because they are thin. Concentrate the heat to the center of the bushing/inner sleeve. Also, on the upper a arm, the control rod will remain in pace because you are not removing the outer shell. You should be able to slide the rod to one side while you heat the opposite side bushing - these are small bushings and do not take too much heat to burn them out. With one side out, you can slide the rod the other way and get the other one out. This rod may be rusted solid in side the sleeve and can be a little tought to get apart. You just have to work at it.

Now it's time to take out the old ball joints. The bottom one can be "pressed" out with a hammer and some wood blocks or a press. Easy way is to take it to a shop and let them do it for you. Press the old one out and the new one in. Otherwise you will need to rent/borrow or purchase a ball joint press and it can be a pain to get it to go straight. The upper ball joint, if it's never been changed, will be riveted to the a arm. Simply grind the heads off of each (3) rivets and drive the rivet out with a punch. The new ball joint will bolt back in place. Obviously if they have been changed before, they may be bolted in and that makes it a little easier. Once you have the new ball joints installed, you can claen and paint the a arms and make sure that the inside of the shells where the new poly will be installed is clean and smooth.

Install the new poly. I have read some discussion about the bushings on the lower a arm - there is a "thrust" washer - it's a cupped shaped poly unit. Some have said that they had to trim it because it would not fit in the mount on the frame/crossmember. I have never experienced this and have never had to trim the thrust washer. I would say that if it does not fit, something in the monut may be bent or the poly bushing is not correctly installed in the a arm. Again use lots of the silicone lube, push the bushings in first then slide the inner sleeve in. It may take a little nudge to get the sleeve in. Reinstall the parts in the reverse order.

When putting the spring back in, again, use extreme caution. The spring sits in the cup a certain way. When you place the spring back in there, make sure that it is lined up with where it will sit. Place the chain around it and then slowly raise the jack raisiing the lower a arm. You may have to coax the spring to sit in the cup. Sometimes you will have to twist it slightly to make sure it is going in the cup in the right place. Take your time and remember that that spring wants to hurt you. Best bet is if you can find some kind of spring compressor that you can get in there and then back out once it's all together? Once you have the spring back in and in place with the weight of the car on the jack, reinstall the spindle on the lower ball joint, install nut finger tight, install the upper a arm and ball joint/nut finger tight. Install the shock. With the wieght of the car on the jack, go around and tighten all the bolts and nuts to spec. Reinstall the sway bar links. Put the wheel on and head for the other side.

One more suggestion. If you are going to do the rear, do the front too or vice versa. Cheaper to pay for one alignment than 2 and if you do the rear and not the front, the shop may refuse to do the alignment due to worn parts up front. Do it all one time.

Here's some pics for the visual:

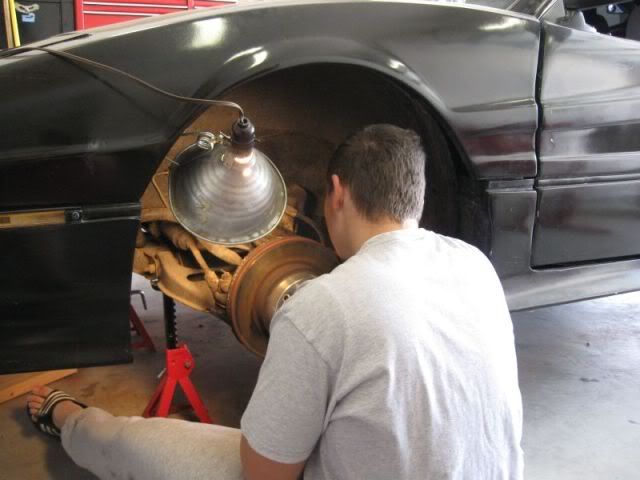
Starting them young:

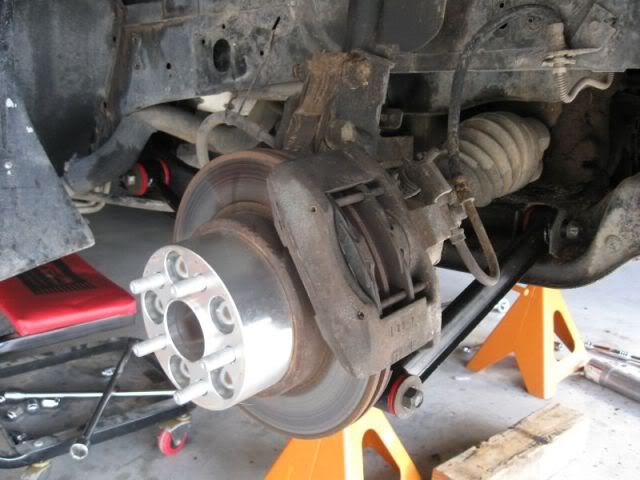
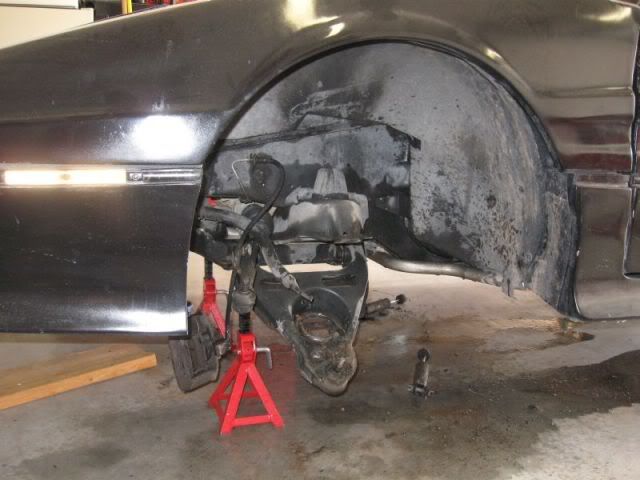
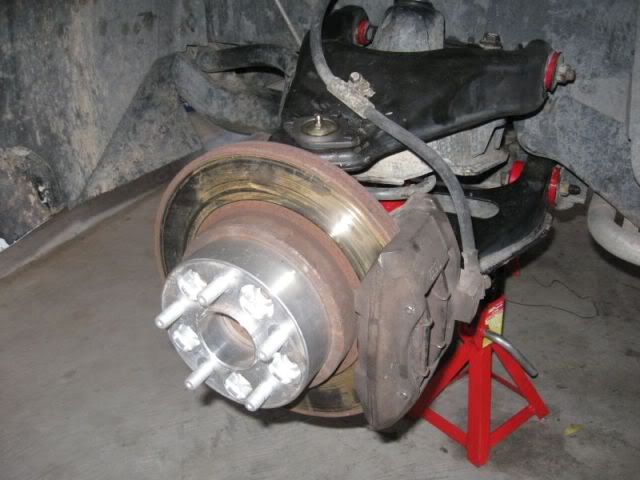
I removed the calipers because I did a brake job at the same time:

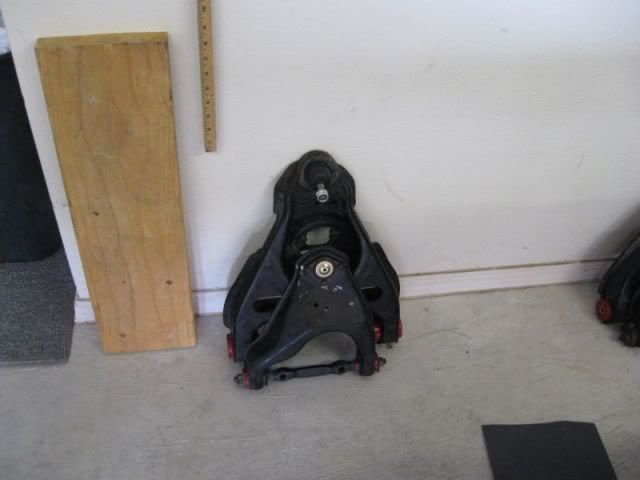
Upper a arm out -- jack in place:
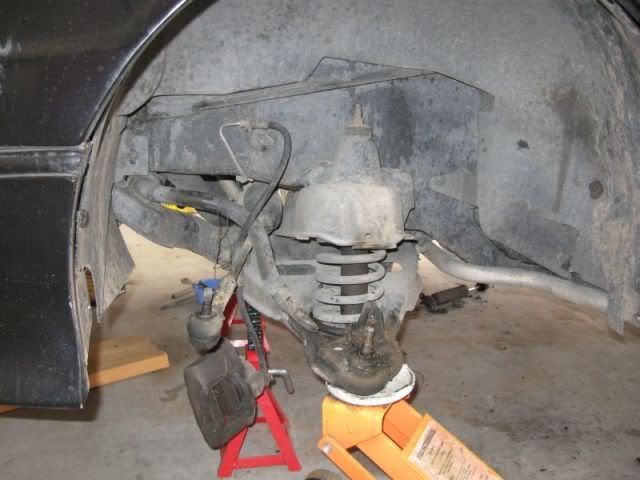
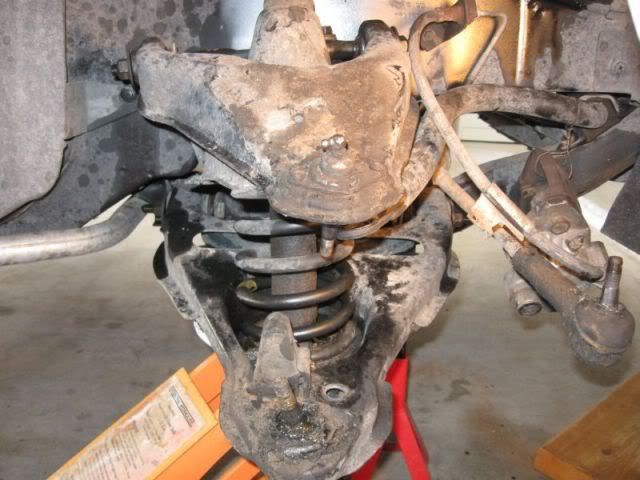
Spring out:

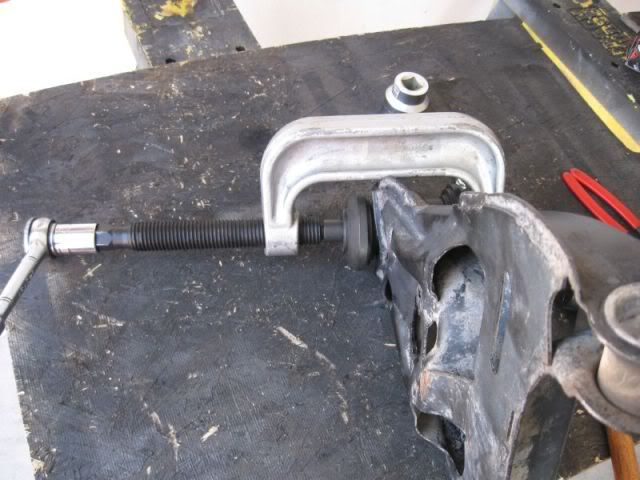
Pressing the new ball joint in:
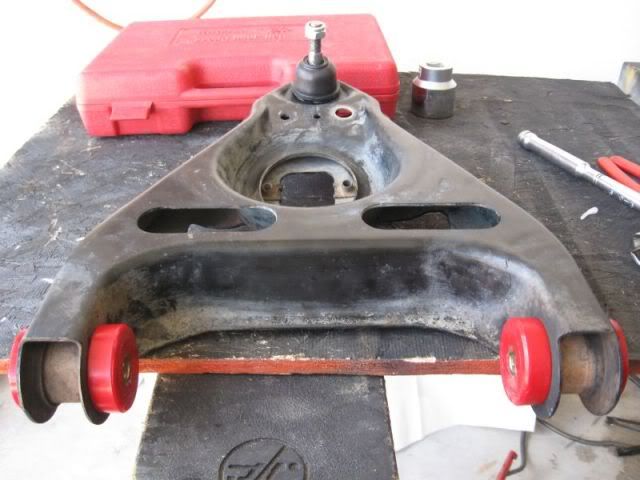
One lower done:

A pair ready:

removing the old tie rod. This one had a plastic cover - I removed it and could get to the slots for the wrench:

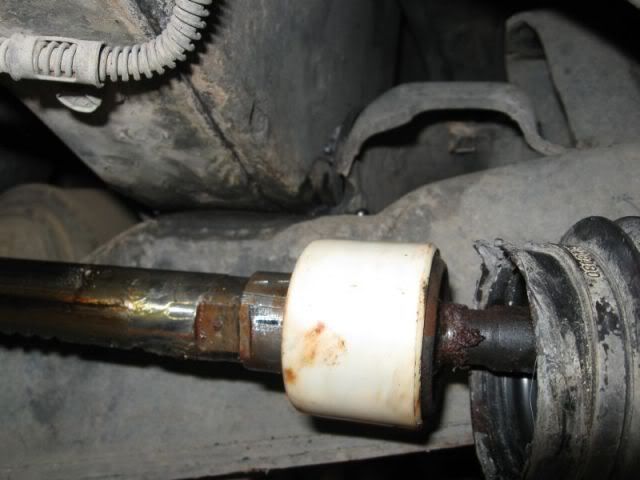
The dreaded plastic bushing:

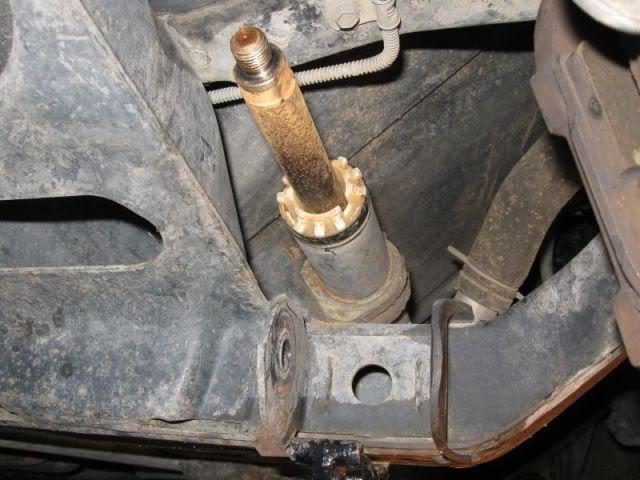
Rack out - RD's bushing installed:

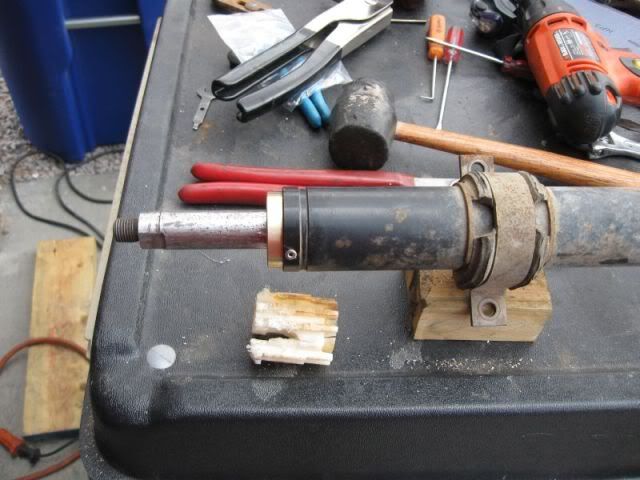
Going back together:


Now it's late and I may have missed something here. I'm sure some will chime in with some better ideas/ways to this. I have just relayed to you how I do it with the tools I have. Just remember to use a lot of caution when dealing with the spring.

Good Luck

Pat


IP: Logged
Formula Owner
Member
Posts: 1053
From: Madison, AL
Registered: May 2001


Feedback score: N/A
Leave feedback

Rate this member

Report this Post11-10-2009 08:25 AM Click Here to See the Profile for Formula OwnerSend a Private Message to Formula OwnerDirect Link to This Post
katatak, Wow! Thanks for the writeup. I wasn't really asking for someone to go to all that trouble, but I appreciate it. I have a couple of questions regarding the rear bushings.

- How do you install the bushings into the links? Can I just use a bench vise?
- Where does the lube go? Inner surface only? Outer? Everywhere? How about between the bushings and the metal washers?

Thanks.

[This message has been edited by Formula Owner (edited 11-10-2009).]

IP: Logged
BMTFIERO
Member
Posts: 1187
From: Beaumont, TX
Registered: Dec 2007


Feedback score:    (18)
Leave feedback

Rate this member

Report this Post11-10-2009 10:03 AM Click Here to See the Profile for BMTFIEROSend a Private Message to BMTFIERODirect Link to This Post
Thanks Pat, for taking the time to write this up. I will be using this info this weekend.

Tim
IP: Logged
katatak
Member
Posts: 7136
From: Omaha, NE USA
Registered: Apr 2008


Feedback score:    (8)
Leave feedback


Total ratings: 82
Rate this member

Report this Post11-10-2009 11:18 AM Click Here to See the Profile for katatakSend a Private Message to katatakDirect Link to This Post
 
quote
Originally posted by Formula Owner:

katatak, Wow! Thanks for the writeup. I wasn't really asking for someone to go to all that trouble, but I appreciate it. I have a couple of questions regarding the rear bushings.

- How do you install the bushings into the links? Can I just use a bench vise?
- Where does the lube go? Inner surface only? Outer? Everywhere? How about between the bushings and the metal washers?

Thanks.


Use the lube on the outer and inner part of the poly bushing. Also on the inside of the a arm/rod and the outside of the new center sleeve. You basically want lube everywhere metal contacts poly and where poly conacts poly.They should push into the rod/a arm with some pressure. A "C" clamp / large channel locks or a vice will work along with a coule blocks of wood and a mallet.

It was no trouble. I am going to do this to another 88 this weekend so to prepare myself I just went thgoughthe process and wrote it down. Like I said, there may be better ways. This is what works for me. Good luck and watch out for that spring.......Don't ask me how I know.

Pat
IP: Logged
katatak
Member
Posts: 7136
From: Omaha, NE USA
Registered: Apr 2008


Feedback score:    (8)
Leave feedback


Total ratings: 82
Rate this member

Report this Post11-10-2009 11:21 AM Click Here to See the Profile for katatakSend a Private Message to katatakDirect Link to This Post

katatak

7136 posts
Member since Apr 2008
 
quote
Originally posted by BMTFIERO:

Thanks Pat, for taking the time to write this up. I will be using this info this weekend.

Tim


Hey Tim,

If you find a better way during your suspension job, let us know how/what you did. I will be doing a complete Fiero this weekend too. Good luck!

Pat
IP: Logged
Formula Owner
Member
Posts: 1053
From: Madison, AL
Registered: May 2001


Feedback score: N/A
Leave feedback

Rate this member

Report this Post11-10-2009 11:45 AM Click Here to See the Profile for Formula OwnerSend a Private Message to Formula OwnerDirect Link to This Post
 
quote
Originally posted by katatak:


Use the lube on the outer and inner part of the poly bushing. Also on the inside of the a arm/rod and the outside of the new center sleeve. You basically want lube everywhere metal contacts poly and where poly conacts poly.They should push into the rod/a arm with some pressure. A "C" clamp / large channel locks or a vice will work along with a coule blocks of wood and a mallet.

It was no trouble. I am going to do this to another 88 this weekend so to prepare myself I just went thgoughthe process and wrote it down. Like I said, there may be better ways. This is what works for me. Good luck and watch out for that spring.......Don't ask me how I know.

Pat

Thanks for the info. I know what you mean about that spring. I did my front a while back, and I screwed up on one side. I disconnected the shock before supporting the LCA, thereby releasing the spring tension, but I got lucky and didn't have any important body parts in the way.

Interesting... I just noticed that you appear to have the same floor jack I do.
IP: Logged
katatak
Member
Posts: 7136
From: Omaha, NE USA
Registered: Apr 2008


Feedback score:    (8)
Leave feedback


Total ratings: 82
Rate this member

Report this Post11-10-2009 03:13 PM Click Here to See the Profile for katatakSend a Private Message to katatakDirect Link to This Post
 
quote
Originally posted by Formula Owner:

Thanks for the info. I know what you mean about that spring. I did my front a while back, and I screwed up on one side. I disconnected the shock before supporting the LCA, thereby releasing the spring tension, but I got lucky and didn't have any important body parts in the way.

Interesting... I just noticed that you appear to have the same floor jack I do.


Well now I do not feel alone. Thats how I learned the important lesson about the front spring except I could not get the nut off the top of the shock. I had the jack in there but moved it to get closer to the shock to try and get the nut loose. Out of frustration, I grabbed the torch and cut the shock off. Just about the time I cut clear through, I remembered the jack - too late - Kawang...... It did not hit me but I never moved so fast scrambling to get out of the way. I am sure it was a 100K video moment but no camera was around. Picture in your mind, a 340 pound old man sitting on the floor with a lit cutting torch and a spring bouncing around. Sounds hilarious now! Anyway, glad I could help.

Pat
IP: Logged
Formula Owner
Member
Posts: 1053
From: Madison, AL
Registered: May 2001


Feedback score: N/A
Leave feedback

Rate this member

Report this Post11-11-2009 09:38 AM Click Here to See the Profile for Formula OwnerSend a Private Message to Formula OwnerDirect Link to This Post
 
quote
Originally posted by katatak:


Well now I do not feel alone. Thats how I learned the important lesson about the front spring except I could not get the nut off the top of the shock. I had the jack in there but moved it to get closer to the shock to try and get the nut loose. Out of frustration, I grabbed the torch and cut the shock off. Just about the time I cut clear through, I remembered the jack - too late - Kawang...... It did not hit me but I never moved so fast scrambling to get out of the way. I am sure it was a 100K video moment but no camera was around. Picture in your mind, a 340 pound old man sitting on the floor with a lit cutting torch and a spring bouncing around. Sounds hilarious now! Anyway, glad I could help.

Pat

Well, my experience wasn't nearly as "entertaining". I used a nut splitter to break the nut off the top of the shock, at which point....
IP: Logged
PFF
System Bot
Formula Owner
Member
Posts: 1053
From: Madison, AL
Registered: May 2001


Feedback score: N/A
Leave feedback

Rate this member

Report this Post11-14-2009 09:33 PM Click Here to See the Profile for Formula OwnerSend a Private Message to Formula OwnerDirect Link to This Post
I'm about halfway through the installation on the rear. A correction to your tool list. The nuts & bolts holding the links are 18mm and 21mm. You can also use a 13/16 in place of the 21mm. Also, you forgot to mention how hard it is getting the links aligned in the brackets on the cradle.

I sure hope this fixes my problem with wandering all over the road. It's almost scary on the interstate, and changing lanes is always an white knuckle affair as the car tries to follow the grooves in the road. The rubber bushings didn't look that bad. I hope that they were worse than they appeared. I'll try to get some photos on the other side.

Also, I never realized that grease could be sticky.
IP: Logged
katatak
Member
Posts: 7136
From: Omaha, NE USA
Registered: Apr 2008


Feedback score:    (8)
Leave feedback


Total ratings: 82
Rate this member

Report this Post11-15-2009 12:11 AM Click Here to See the Profile for katatakSend a Private Message to katatakDirect Link to This Post
Go Man Go! Thanks for the update and sharing your fun. Were the links really that tough to get lined back up for the bolt to go through? Did the links fit real tight in the mounts? I amy have "selectively" forgot that part of it. If I think back, I may have even invented some new words duing that process. Did you get any pics of the old bushings before you burned them out. Just curious of thier condition. So I can relate it to your "wandering" problem.

Pat
IP: Logged
Formula Owner
Member
Posts: 1053
From: Madison, AL
Registered: May 2001


Feedback score: N/A
Leave feedback

Rate this member

Report this Post11-15-2009 08:27 AM Click Here to See the Profile for Formula OwnerSend a Private Message to Formula OwnerDirect Link to This Post
The rear most link was the one that gave me the most trouble. It was VERY reluctant to go in. I tapped on it with a hammer for about 30 minutes before I got it aligned well enough. The tow link only took a few minutes. It was a cakewalk in comparison. I haven't put the radius arm in yet, but it looks trivial, so long as I can get enough torque on it.

No pics on side 1. I figured that I'd do everything wrong first, so no reason to make photos. I'll try to get photos on side 2.
IP: Logged


All times are ET (US)

T H I S   I S   A N   A R C H I V E D   T O P I C
  

Contact Us | Back To Main Page

Advertizing on PFF | Fiero Parts Vendors
PFF Merchandise | Fiero Gallery | Ogre's Cave
Real-Time Chat | Fiero Related Auctions on eBay


Copyright (c) 1999, C. Pennock