Pennock's Fiero Forum
  Technical Discussion & Questions - Archive
  88 V6 engine compartment wire harness/loom HELP :)

T H I S   I S   A N   A R C H I V E D   T O P I C
  

Email This Page to Someone! | Printable Version


88 V6 engine compartment wire harness/loom HELP :) by ALJR
Started on: 07-15-2009 10:00 AM
Replies: 15
Last post by: Robert 2 on 07-17-2009 05:39 PM
ALJR
Member
Posts: 3765
From: Massachusetts
Registered: Jul 2009


Feedback score:    (18)
Leave feedback

Rate this member

Report this Post07-15-2009 10:00 AM Click Here to See the Profile for ALJRSend a Private Message to ALJRDirect Link to This Post
Uhhhh Ohhhh...

Its been a while (over 10 years) since I started this project and I am now finally in the home stretch with my baby. However, I forget the proper roughting of the engine wire harness. It is the harness that exits the back side of the ECM; the left plug if facing it. As you can see from the pic below, I left the harness attached to the chassis/ECM and disconnected everything else on the engine. The harness leads tot he left, where it is attached tot he fire wall. A smaller loom exits off and leads behind the air box to the relays.

The remaining harness rorughting is where I need HELP
There is also a metal bracket on the loom (also pictured below) that secures somewhere?? I assume to prevent it from making contact with something it shouldn't..
Also, if anyone could help with the proper ground locations?

My baby is an 88gt 3.1L auto converted to 5spd.

Thanks,
AL


IP: Logged
PFF
System Bot
ALJR
Member
Posts: 3765
From: Massachusetts
Registered: Jul 2009


Feedback score:    (18)
Leave feedback

Rate this member

Report this Post07-15-2009 03:28 PM Click Here to See the Profile for ALJRSend a Private Message to ALJRDirect Link to This Post
19 views and no one can help me

I have read through some of the other posts and a bunch of you guys know these cars inside and out...

Please help if you can! I don't want my newly rebuilt motor going up in flames because I ran the harness wrong...

ANY help would be usefull

Thanks,
AL
IP: Logged
jaskispyder
Member
Posts: 21510
From: Northern MI
Registered: Jun 2002


Feedback score:    (22)
Leave feedback


Total ratings: 205
Rate this member

Report this Post07-15-2009 03:47 PM Click Here to See the Profile for jaskispyderSend a Private Message to jaskispyderDirect Link to This Post
Passenger side of the engine... connects to one of the three bolts that go to the front heat.... where the upper A/C bracket mounts. I believe it is the lower, rear bolt, but I can't remember. I just installed my last weekend, but I can't remember exactly. I believe... yes.. the bolt had a stud on the head and another nut screwed to the top. This bracket is bolted down by the stud/nut.

Hope that helps

J.
IP: Logged
ALJR
Member
Posts: 3765
From: Massachusetts
Registered: Jul 2009


Feedback score:    (18)
Leave feedback

Rate this member

Report this Post07-15-2009 05:08 PM Click Here to See the Profile for ALJRSend a Private Message to ALJRDirect Link to This Post
 
quote
Originally posted by jaskispyder:

Passenger side of the engine... connects to one of the three bolts that go to the front heat.... where the upper A/C bracket mounts. I believe it is the lower, rear bolt, but I can't remember. I just installed my last weekend, but I can't remember exactly. I believe... yes.. the bolt had a stud on the head and another nut screwed to the top. This bracket is bolted down by the stud/nut.

Hope that helps

J.


Thanks J!

In the below pic, is that the bracket & bolt you were refering to? I assume the harness stays as close as possible against the rear firewall behind the heat shield?
Also, there is a braided grond strap attached to the right deck lid bracket. Do you remember where it grounds to?

Thanks again,
AL

[This message has been edited by ALJR (edited 07-15-2009).]

IP: Logged
sjmaye
Member
Posts: 2468
From: Hendersonville, TN USA
Registered: Jun 2003


Feedback score:    (13)
Leave feedback

Rate this member

Report this Post07-17-2009 04:43 AM Click Here to See the Profile for sjmayeSend a Private Message to sjmayeDirect Link to This Post
OK, I was confused at first, but I think I see what you did now. You did not remove the harness with the engine. You disconnected everything from the engine before pulling and reinstalled the engine before connecting everything. Most people pull the engine with the main harness ( I call the umbilical) still connected to the engine.

I am going by memory here so bear with me. First thing, the rough routing of the harness is this


You should have a metal loop mount on the fire wall as the harness leaves the ECM


This guides the harness toward the air cleaner where it will connect a sensor or two on the air cleaner as well as a couple relays mounted on the firewall.


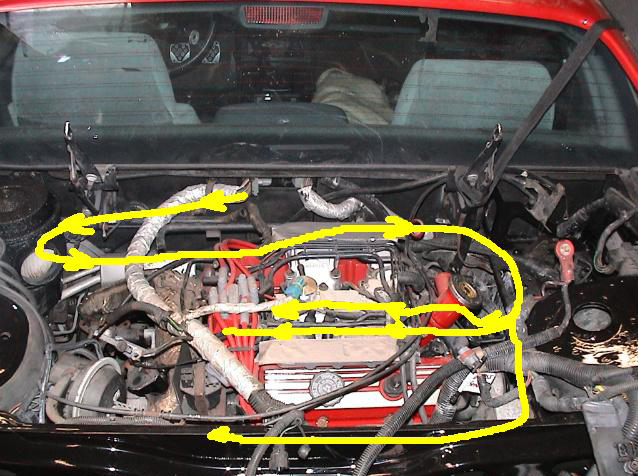
After that it heads toward the "front" of the engine (side nearest the firewall). Here is the general routing


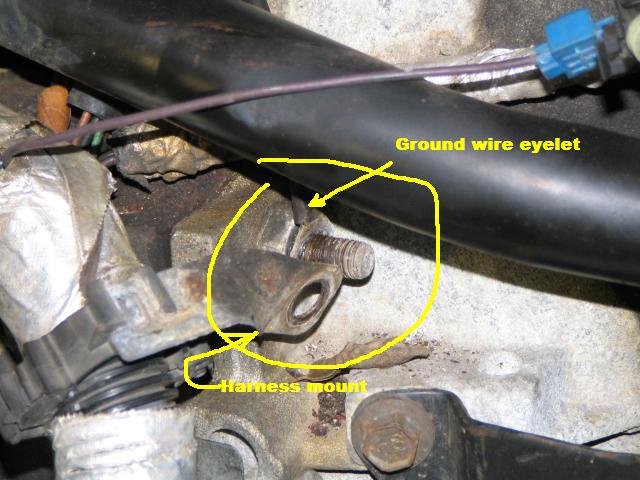
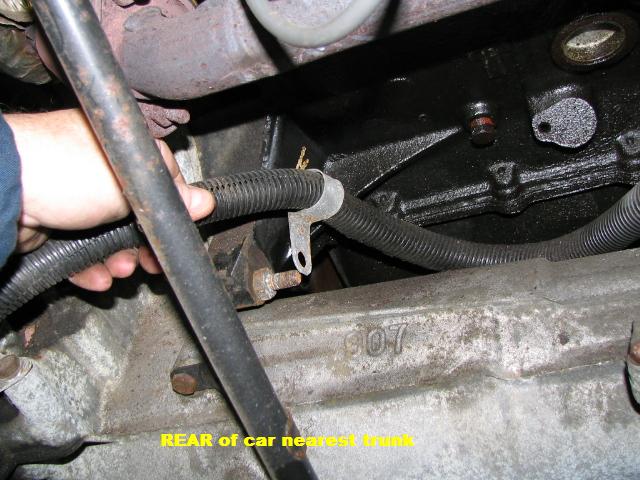
A close up of the harness mount coming off a trans mount bolt near the coolant crossover pipe


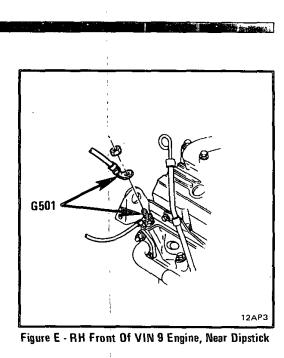
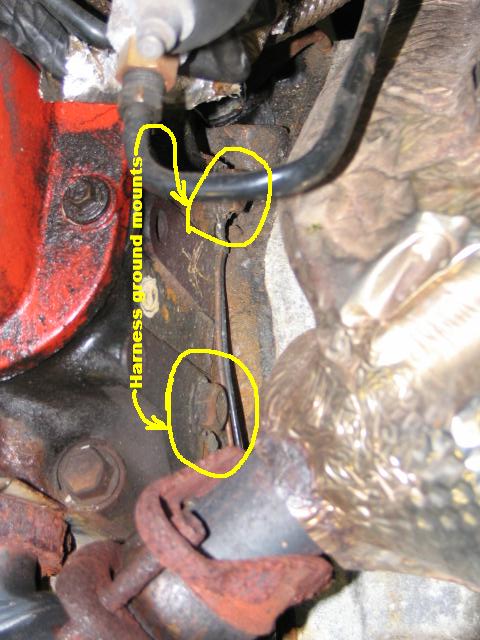
At about this point there are a couple ground leads running to a couple bolts on the head


Here is an overall shot with another mount and connections


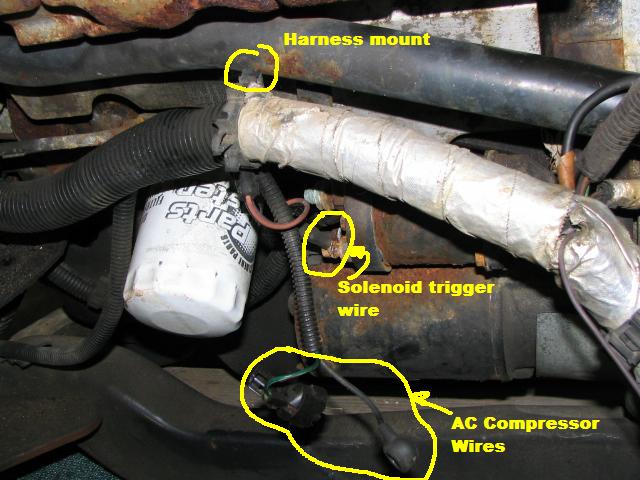
Another shot as it heads up behind the ac compressor


You can here see it heading up toward the water neck.


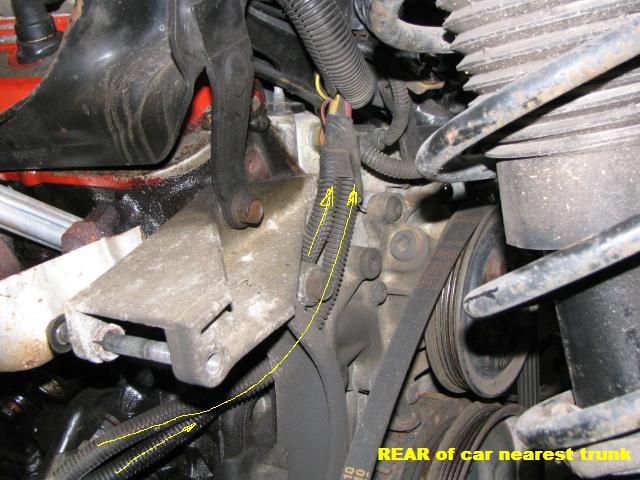
NOW ON THE TRUNK SIDE

Here is the general routing on the side nearest the trunk.


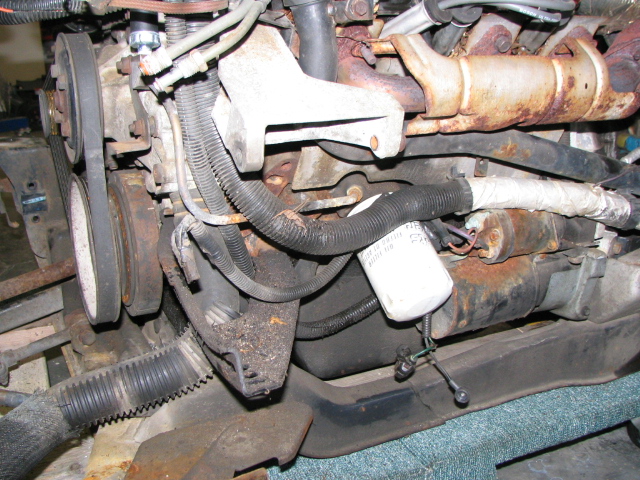
Here is as the harness heads down from the water neck area down behind the alternator bracket


Here is behind the alternator


This photo more clearly shows the wiring sliding behind the alternator bracket


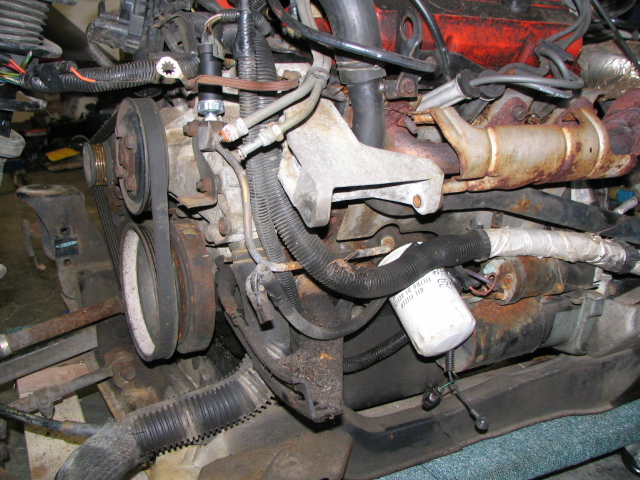
Here is a harness support just behind the alternator


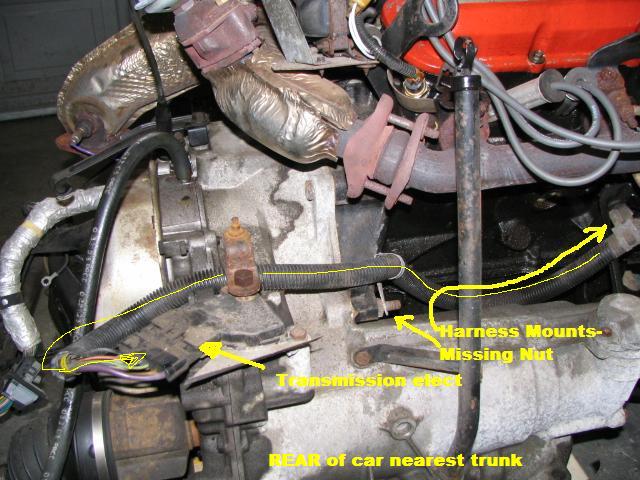
Here is the harness mount on one of the trans mounting bolts as the harness goes to the auto transmission.


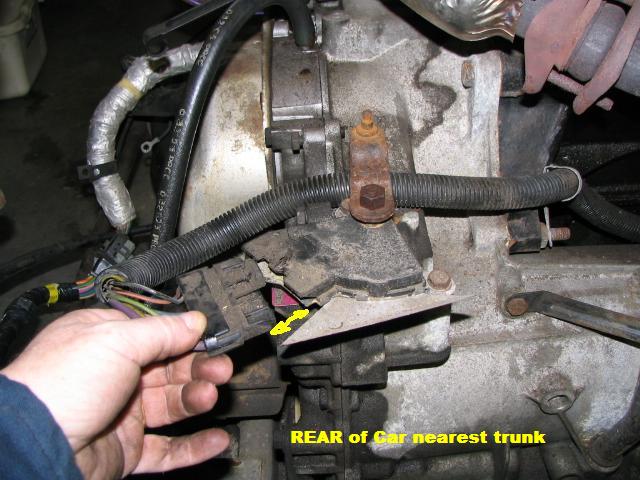
As for the harness bracket you are holding. It looks like one of the ones that mounts to a transmission mounting bolt, but I would know better if I knew about where it was on the harness.

I don't envy you. Getting the harness in after the engine is installed will be like threading a needle with your wire harness.


Good Luck.

Steve

[This message has been edited by sjmaye (edited 07-17-2009).]

IP: Logged
Nosferatu187
Member
Posts: 697
From: Texas
Registered: Mar 2007


Feedback score: N/A
Leave feedback

Rate this member

Report this Post07-17-2009 07:06 AM Click Here to See the Profile for Nosferatu187Send a Private Message to Nosferatu187Direct Link to This Post
Wow, excellent job sjmaye!

Here's the location of that mystery bracket:


The braided ground strap and negative battery cable bolts to the engine here:


Mike
IP: Logged
Bloozberry
Member
Posts: 7760
From:
Registered: Jan 2009


Feedback score: N/A
Leave feedback


Total ratings: 311
Rate this member

Report this Post07-17-2009 08:13 AM Click Here to See the Profile for BloozberrySend a Private Message to BloozberryDirect Link to This Post
Hey sjmaye, lots of work and time to take and edit those pictures there. Even though I didn't need the info, I give you a well deserved "+" for the effort to help others out.
IP: Logged
Pyrthian
Member
Posts: 29569
From: Detroit, MI
Registered: Jul 2002


Feedback score: (5)
Leave feedback


Total ratings: 342
Rate this member

Report this Post07-17-2009 08:20 AM Click Here to See the Profile for PyrthianSend a Private Message to PyrthianDirect Link to This Post
the service manual pics do show the wiring routing
and also the brackets & things
IP: Logged
Robert 2
Member
Posts: 2401
From: St Hubert Quebec Canada
Registered: Jan 2006


Feedback score: (4)
Leave feedback

Rate this member

Report this Post07-17-2009 09:34 AM Click Here to See the Profile for Robert 2Send a Private Message to Robert 2Direct Link to This Post
Real good explanations
IP: Logged
ALJR
Member
Posts: 3765
From: Massachusetts
Registered: Jul 2009


Feedback score:    (18)
Leave feedback

Rate this member

Report this Post07-17-2009 12:56 PM Click Here to See the Profile for ALJRSend a Private Message to ALJRDirect Link to This Post
sjmaye, YOU DA MAN!

Thank you Thank you Thank you Thank you. You do not realise how much I appreciate it! I was just out in my shop scratching my head. I had an Idea on the "general" path, but the "proper" path, mounting locations AND termination points is invaluable

Thanks again,
AL
IP: Logged
ALJR
Member
Posts: 3765
From: Massachusetts
Registered: Jul 2009


Feedback score:    (18)
Leave feedback

Rate this member

Report this Post07-17-2009 12:57 PM Click Here to See the Profile for ALJRSend a Private Message to ALJRDirect Link to This Post

ALJR

3765 posts
Member since Jul 2009
 
quote
Originally posted by Pyrthian:

the service manual pics do show the wiring routing
and also the brackets & things


Factory service manual for the 88 is about $90
IP: Logged
PFF
System Bot
Pyrthian
Member
Posts: 29569
From: Detroit, MI
Registered: Jul 2002


Feedback score: (5)
Leave feedback


Total ratings: 342
Rate this member

Report this Post07-17-2009 01:45 PM Click Here to See the Profile for PyrthianSend a Private Message to PyrthianDirect Link to This Post
 
quote
Originally posted by ALJR:
Factory service manual for the 88 is about $90


yes - but there are also online versions somewhere - and it would be mighty helpful to print out them diagrams
or, if someone has one, maybe they can post them pics.
IP: Logged
Robert 2
Member
Posts: 2401
From: St Hubert Quebec Canada
Registered: Jan 2006


Feedback score: (4)
Leave feedback

Rate this member

Report this Post07-17-2009 02:02 PM Click Here to See the Profile for Robert 2Send a Private Message to Robert 2Direct Link to This Post
But the workshop doesn't describe as good a these images .

[This message has been edited by Robert 2 (edited 07-17-2009).]

IP: Logged
ALJR
Member
Posts: 3765
From: Massachusetts
Registered: Jul 2009


Feedback score:    (18)
Leave feedback

Rate this member

Report this Post07-17-2009 02:43 PM Click Here to See the Profile for ALJRSend a Private Message to ALJRDirect Link to This Post
 
quote
Originally posted by Robert 2:

But the workshop doesn't describe as good a these images .


Amen to that!
IP: Logged
CarverToo
Member
Posts: 374
From: Winchester, VA 22603
Registered: Apr 2009


Feedback score:    (12)
Leave feedback

Rate this member

Report this Post07-17-2009 04:18 PM Click Here to See the Profile for CarverTooSend a Private Message to CarverTooDirect Link to This Post
 
quote
Originally posted by Nosferatu187:

Wow, excellent job sjmaye!

Here's the location of that mystery bracket:


The braided ground strap and negative battery cable bolts to the engine here:


Mike

Hey Mike - That water pump has my interest. Will it fit the 1986 2.8?
IP: Logged
Robert 2
Member
Posts: 2401
From: St Hubert Quebec Canada
Registered: Jan 2006


Feedback score: (4)
Leave feedback

Rate this member

Report this Post07-17-2009 05:39 PM Click Here to See the Profile for Robert 2Send a Private Message to Robert 2Direct Link to This Post
 
quote
Originally posted by ALJR:


Amen to that!


When i did mine i had the 1988 workshop manual , the Haynes and the Mitchell , but what helped me most were the pics from i think Dodgerunner in Photobucket .
IP: Logged


All times are ET (US)

T H I S   I S   A N   A R C H I V E D   T O P I C
  

Contact Us | Back To Main Page

Advertizing on PFF | Fiero Parts Vendors
PFF Merchandise | Fiero Gallery | Ogre's Cave
Real-Time Chat | Fiero Related Auctions on eBay


Copyright (c) 1999, C. Pennock