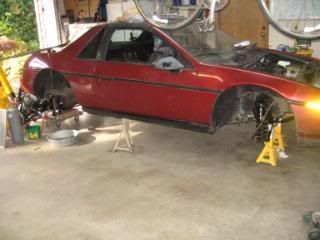
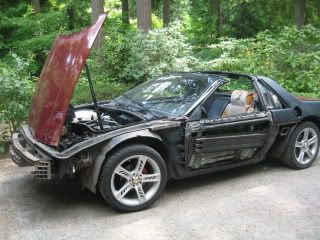
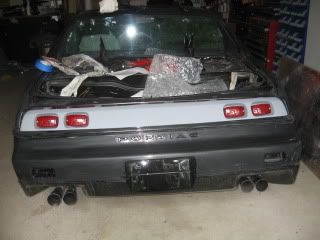
The car is a 62K mile 87 5speed T-Top coupe which had been sitting for 13 years with a piston through the block. Since the car was completely rust free and never in an accident, it was an excellent candidate for a complete redo. The driveline and brakes have been completely redone, now it is time for the interior. This thread documents the ongoing project started a few months ago to install a 94 Camaro dash and other interior parts from a mid 90's Bonneville SSE. Thanks to Jcott1 (Jonathan) for all of his pioneering work on Camaro/Firebird dashes, it was most helpful. After the interior has been completed, I will repaint the car red.
I purchased an excellent 2.8 engine out of a pristine 86, from an owner who was installing an electric motor. I also snagged an 86 parts car with a blown engine and from that, moved over the tilt column, AC, power windows, power door locks, power mirrors, power trunk release, 17" wheels and Z rated tires to what had been a stripper car. Strange that someone would put a T-top on such a basic car.
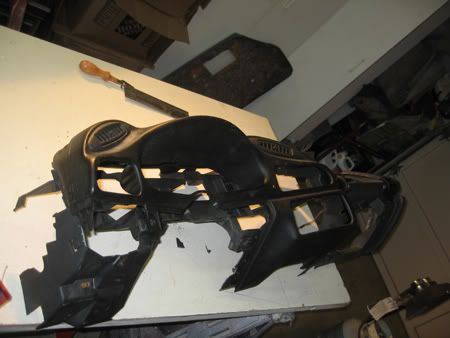
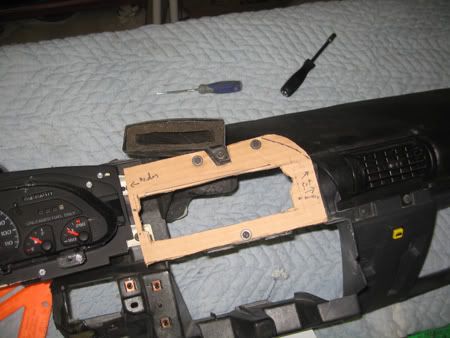
The dash that I am installing is from a 94 Camaro V6 that I got from the local pull-a-part for $72. The passenger airbag was blown, as well as a little breakage when someone else grabbed the steering column. Like the Fiero dash, the major portion of the AC ducting is bolted to the Camaro dash. The 94 Camaro has a passenger airbag, with a lot of metal bracing around it. I discarded the blown airbag and the brackets associated with it. There is a metal brace running along the bottom of the dash that I retained, but had to cut in half to mount to the Fiero.
For the first trial fit, I cut away some of the left and right sides of the dash, part of the most forward portion (to clear the defroster ducts) as well as the area under the gauge cluster. I will use the Camaro headlight switch, but retain the Fiero AC controls.
For the right side I probably cut a little too much, but not a big deal. As you can see, I ended up cutting a notch on the right top side of the dash to clear the A pillar.
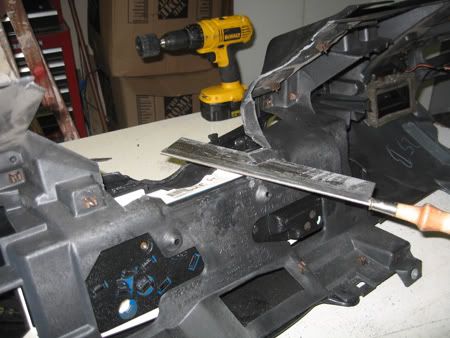
Here, I am cutting away material from under the gauge cluster:
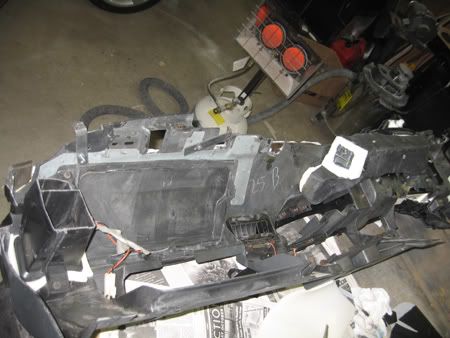
The first trial fit shows the dash high and to the left.
Then I cut off the center part of the Fiero steering column mounting snout, leaving the rear most mounting bolts. I was not as bold as Roy or Jonathan who cut off more of the Fiero frame, including the rear most bolts.
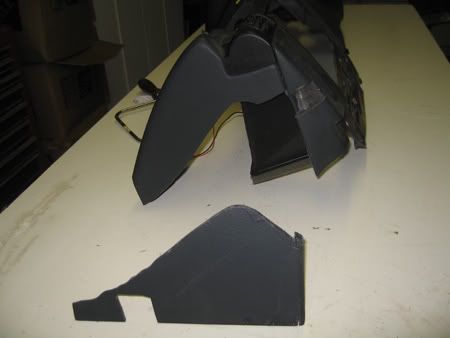
another trial fit too high but centered. Notice that the airbag door is missing. This makes fitting a lot easier. Later, I will replace the airbag door, and cover the right side of the dash.
After a little more cutting off the bottom of the gauge cluster, and a few other areas, I was able to get it lower. This does not provide a position as low as Jonathan's, but I am working on a filler for above the column. I did snag a filler piece from the Bonneville, but have not tried to fit it yet.
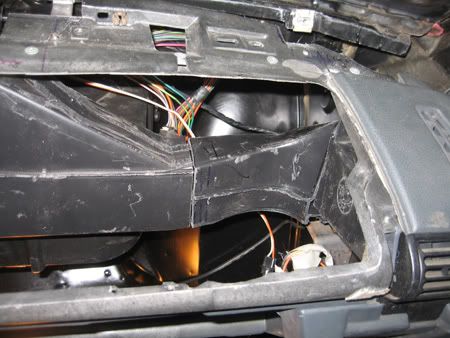
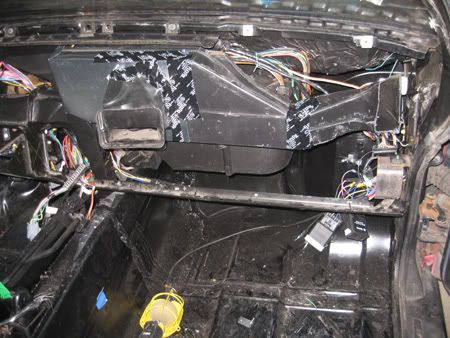
Now it was time to work on the ducts. My last Fiero was an 86 with a 355 body kit + 355 fiberglass dash (unknown origin of either). I bought the car after the body kit was installed, but with an incomplete interior build. I completed the interior which gave me a lot of experience to tackle this job. One of the problems with the 355 dash kit, was that while it had AC ducts, all the air came out the center duct. Here, I will try to better balance the flow, using internal vanes, and balancing the opening sizes to the various ducts. My goal is to provide airflow to the vents on either side of the cluster (top), the center opening, and the right vent. This leaves the vent on the lower left of the dash not supplied with air. I have too many other items (fuse panel, gauge adapter) on the left back side of the dash to allow room for this plumbing and still allow access for repairs, etc.
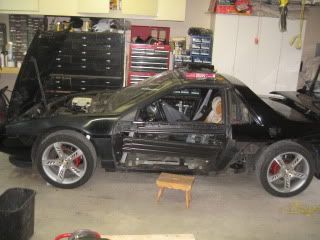
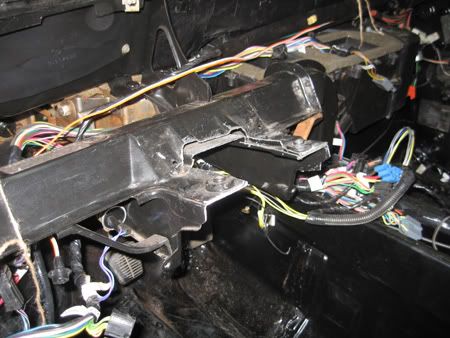
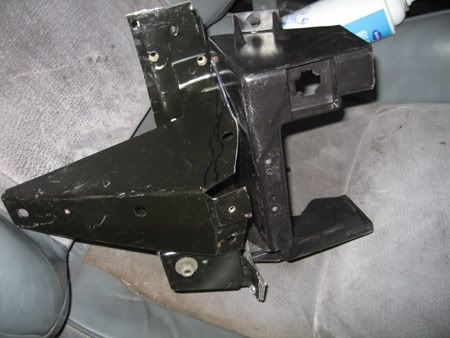
To mount the dash, I started with the Camaro lower dash bracket (runs inside the bottom part of dash from side to side) and cut away that portion that goes around the steering column, and mounted it in place on the Fiero. I had to move it later, but the first fit was not bad. It is now in two pieces. The right piece bolts to the right side of the car with a custom bracket, into the original Fiero mounting hole, it is screwed to the center console with a short custom bracket, and to the right of the steering column using an L bracket. I had to remove one small brace on the Fiero steering column mount, and the transistor used for the dash light dimmer. The left portion of the Camaro dash bracket mounts to the left of the steering column with two bolts, with one of them bolted to a custom bracket.
In order to make the ductwork easier, I will make two air ducts. The "left duct" will be made up from Camaro dash ductwork, augmented with some custom sheet metal. It will be permanently bolted to the Camaro dash. It runs from the vent left of the cluster vent to the vent to the right cluster and then to an opening with a foam gasket. This opening will mate to my "right duct" which will be fixed to the Fiero body. Foam will be used as a compression gasket, providing a seal when the dash is installed.
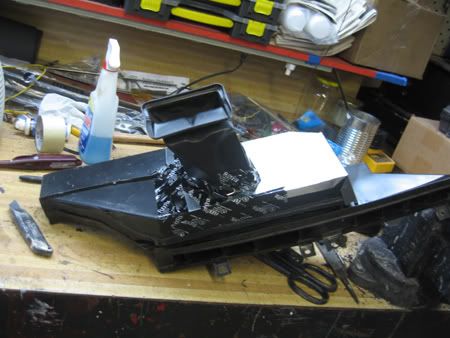
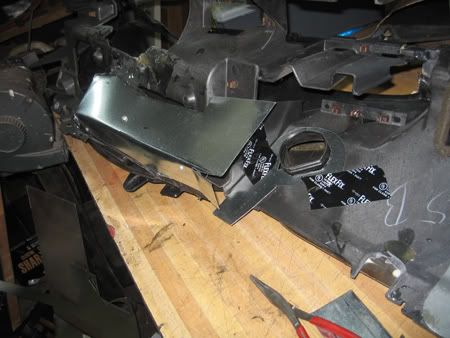
For the "right duct" I started with the original Fiero dash duct. Here it is shown cut, and held in place to the Fiero defroster duct by a temporary bracket.
I took the left side Fiero dash duct elbow, cut it down, rotated it 180 degrees, and connected it to the right side. I also cut down the right side Camaro supply duct (used for the right dash vent). You can see the trial fit, not bad. The three pieces are Left: cut down Fiero dash duct, Center: elbow from left side of Fiero dash turned around, and Right: Camaro right side duct which leads to the right vent. The "right duct" is screwed to the unmodified Fiero defroster duct which is then screwed to the dash using the standard Fiero mounts. The Camaro right side supply duct was cut shorter, and screwed to the Camaro dash via the standard Camaro mounting screws. The joint on the left of the elbow will be permanently connected to the shortened Fiero duct, and the joint on the right of the elbow will be joined with foam, for a compression seal.
Here is a first mockup of my "right duct" which includes the Camaro center vent duct taped to the Fiero duct
Now with some added sheet metal. The mating supply from this duct to the "left duct" will be on the left end, which is not visible in this view.
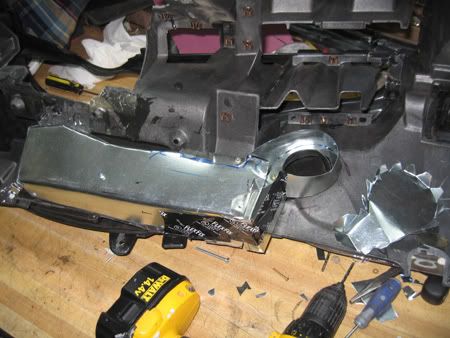
Now it is taped in place on the car for a trial fit, before it is permanently assembled.
I was satisfied with the placement, so I pop riveted together.
It is now wrapped in glass cloth and painted. Notice the mating flange, which is cut from aluminum, on the right side. A foam gasket will be glued here, and it will mate to the right Camaro dash vent, when the dash is mounted. I tried every glue I could find to glue up the ducts, but nothing stuck. So I decided to just wrap everything in fiberglass cloth and resin. By wrapping it all around, it is held together mechanically. Also notice that there is a bracket added behind the upper right side of the duct. This will bolt to a hole in the Fiero body. I think this hole was used for holding a plastic piece that wires went through.
The dash part of the Fiero ductwork was bolted to the defroster part, and mounted. This forms the "right duct". Notice the white foam on the left (you can only see the edge) to join the "left duct" and the white foam on the right to join the right Camaro dash vent. The foam gasket for the center vent is in the dash and not shown.
Now it is time to work on the "left duct". As you can see, I have started on the fabrication with sheet metal and a cut down piece of Camaro ductwork. The round hole feeds the vent to the right of the gauge cluster.
More pieces have been added on the Camaro dash.
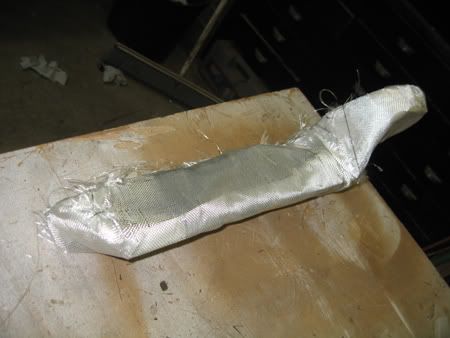
The "left duct" was removed and pop rivited together.
I wrapped it in glass cloth. I sewed the cloth to hold it together before the resin was applied.
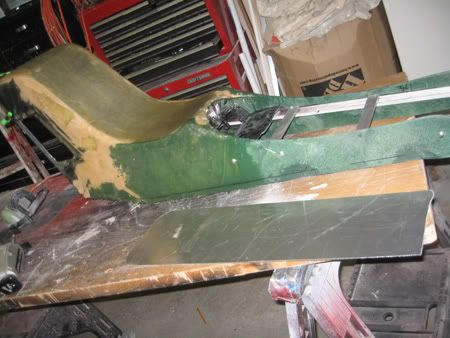
The dash is now shown looking from right side. The "left duct" is mounted. You can see the edge of the white foam gasket used to seal the right of cluster vent, and the square opening which will mate to the "right duct" when the dash is installed. Also you can see that the airbag door has been epoxied in place. The brackets used to mount the dash to the standard Fiero mounting points are also visible at the top of the picture.
I epoxied the airbag door back on and sanded it smooth, to allow it to be covered.
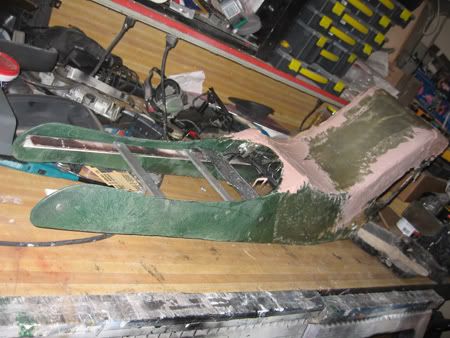
The Camaro dash, as mounted, does not allow for mounting of the fuse panel in the stock location, so, I mounted it to the left half of Camaro dash bracket. You are looking at the bottom of the Camaro dash bracket.
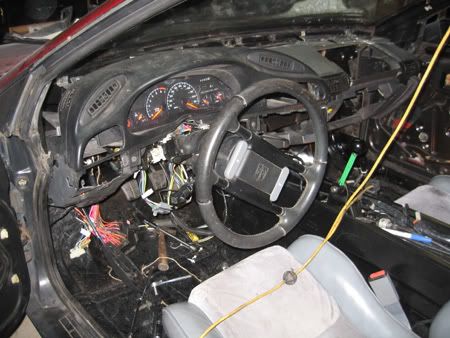
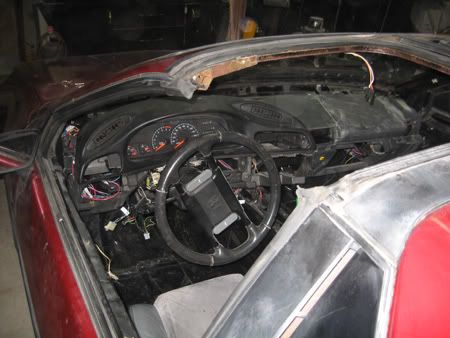
Another trial fit of the dash. Notice that the airbag door is installed, but the dash is a little high.
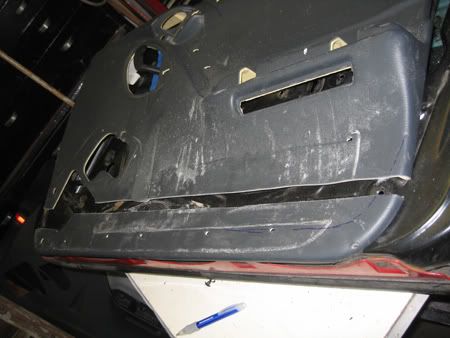
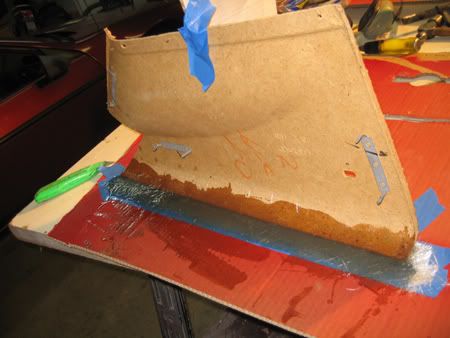
When I did all the trial fitting of the dash, I did not have the cluster in. When I placed it with the cluster in, the dash was too high, so I removed it, cut more off the bottom of the cluster, and also cut the rear most steering column bolts shorter, so they do not protrude from the top. I removed the cluster, and cut a little more from the bottom, and cut the steering column bolts shorter so they do not protrude from the top. This is where I am as of Jan 19. Just for interest, here is a picture of the Bonneville door panels:
Work to come...more dash and Bonneville door panels. The Bonneville door panels are too tall and not wide enough. I was not able to find Firebird door panels locally for a price, and I did not like the Camaro door panels. I paid $20 for the Bonneville door panels...with speakers, window switches, PDL switches, mirror switches, and express down module and a remote trunk release button. They also have some cool lights.
More to come Jim
EDIT: I corrected some spelling and picture references. Next time I will use Preview.
------------------ Jim 86 SE 355 Body Kit w/3.1 Auto (Sold) 87 T-Top Coupe 2.8/5 Speed new project
[This message has been edited by bowrapennocks (edited 11-10-2009).]
IP: Logged
10:53 AM
PFF
System Bot
RCR Member
Posts: 4454 From: Shelby Twp Mi Registered: Sep 2002
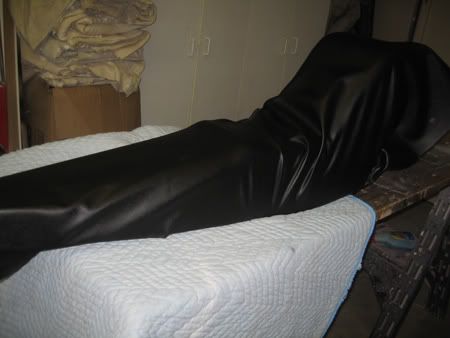
I covered the dash with Allsport. I used Allsport on my 355 Fiero dash and console. It was designed for snowmobile seats, so it is tough. You can stretch it around complex curves without wrinkles or seams without the need to heat it.
First, I glued down headliner material as a padding, foam side down with 3M 8088 glue applied to both sides. Then, I applied glue to the back of the Allsport, but only to the edges of the dash. That way you can stretch the vinyl without having it stick in the middle. You first place the Allsport, but can pull the glue edges up and reposition. That way if you are covering complex curves, you can work your way around the piece several times, pulling it a little more each time. I will use it for the door panels, center console and waterfall. It comes in about 10 colors. Black is available in both a non-stick (on the surface) or sticky (so you can put somerthing on the covering that will not slide) finshes. Jim
------------------ Jim 86 SE 355 Body Kit w/3.1 Auto (Sold) 87 T-Top Coupe 2.8/5 Speed new project
Originally posted by bowrapennocks: Thanks to Jcott1 (Jonathan) for all of his pioneering work on Camaro/Firebird dashes, it was most helpful.
That's one thing I was wondering.... Would an 80's Camaro interior fit into a Fiero? I really like the dash and door panels for that particular generation... and happen to have one sitting in my yard to pull from, it's just burried under too much snow to get in there with a measuring tape ATM.
I am not sure if you are talking about second ( 70-81) or third generation (82-92). As I recall, the third generation gauge cluster is much wider than the fourth generation and would probably not work well. I do not remember what a second gen dash looks like. Sorry, I was not of much help. Jim
------------------ Jim 86 SE 355 Body Kit w/3.1 Auto (Sold) 87 T-Top Coupe 2.8/5 Speed new project
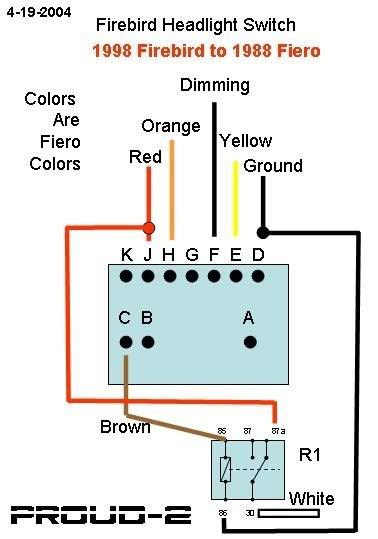
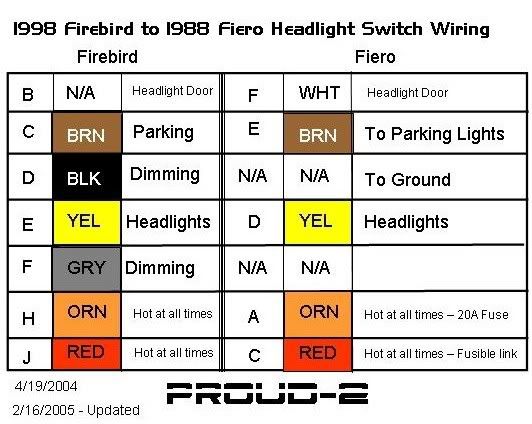
I wired the headlight switch according to jscott1s diagrams (copied below) with one exception as discussed.
The following diagram is from jscott1:
The following diagram is from jscott1:
Pin B controls the headlight door, and is not present on the Camaro connector. However, the switching for it is in the headlight switch. So I found a junk connector in my parts box, pulled the pin, and put it in the Camaro connector, and wired it to the Fiero wiring. The headlights now work.
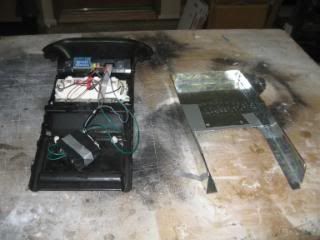
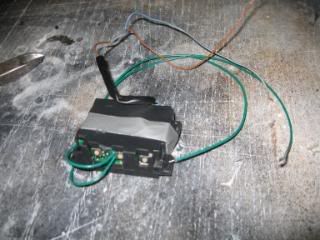
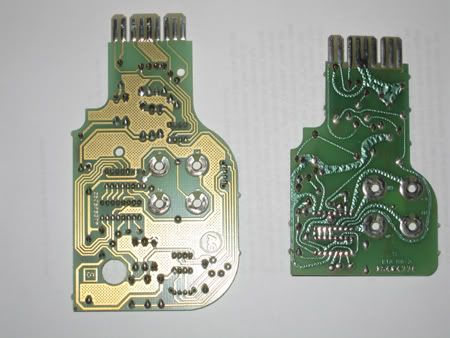
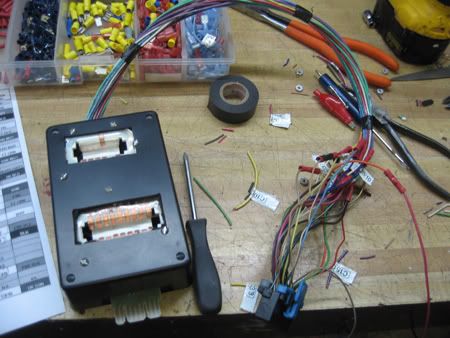
I built an adapter box to connect the Fiero connectors to the Camaro cluster, as previously introduced by jscott1. I also found a speedometer board from a 1988 Fiero, which has the VSS buffered signal on pin “M”. The picture below shows a 1988 speedometer board on the left and a 1986 speedometer board on the right. This (non GT) speedometer board does not have access to the buffered VSS signal. GT speedometer boards have access to the buffered signal.
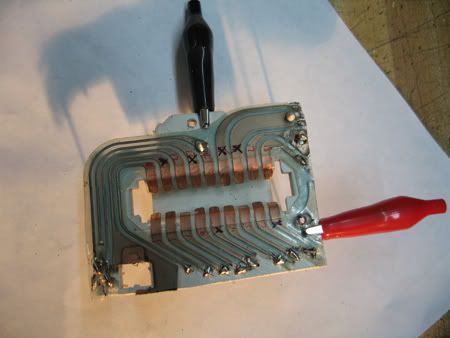
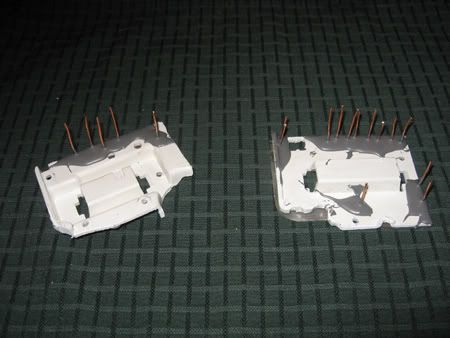
I sacrificed a Fiero speedometer cluster for the connectors and cut the plastic down for the connectors. I drilled holes though, put solid copper wires through the holes, soldered them to the traces on the Mylar panel, and epoxied them to the hard plastic
I bought a plastic box from Radio Shack to mount them all
When I first plugged it in, the speedometer did not work. Later I found out that the speedometer needled was pegged, and you have to get up to speed before it resets itself. Now it all works.
Next project: AC controls and stereo.
------------------ Jim 86 SE 355 Body Kit w/3.1 Auto (Sold) 87 T-Top Coupe 2.8/5 Speed new project
I am not sure if you are talking about second ( 70-81) or third generation (82-92). As I recall, the third generation gauge cluster is much wider than the fourth generation and would probably not work well. I do not remember what a second gen dash looks like. Sorry, I was not of much help. Jim
I meant the 3rd Gen. I just really like the interior on that.
I did look at an 89 Firebird in the junkyard when I was looking for the "yellow box" (They had a yellow plastic box under the glovebox which is a VSS speed buffer, another choice if you can't get an 88 or GT speedometer board). The dash would probably fit, but I think the very wide gauage cluster would not look good....my opinion though. BTW, when I pulled the 94 Camaro dash out, it is a lot more work then removing a Fiero dash.
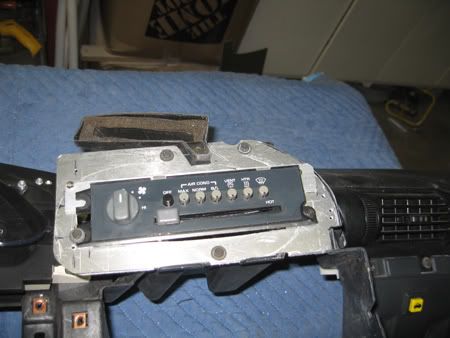
Back to my coupe. Yesterday, I mounted the AC controls.
First, I made a cardboard template.
Once satisfied, I cut the shape in some .080” Aluminum, here shown with the AC controls mounted.
I made a bezel out of the same aluminum stock, and covered it with Allsport (no padding)
Now the finished assembled product
------------------ Jim 86 SE 355 Body Kit w/3.1 Auto (Sold) 87 T-Top Coupe 2.8/5 Speed new project
IP: Logged
09:14 AM
jscott1 Member
Posts: 21676 From: Houston, TX , USA Registered: Dec 2001
I wired the headlight switch according to jscott1s diagrams (copied below) with one exception as discussed.
The following diagram is from jscott1:
The following diagram is from jscott1:
Pin B controls the headlight door, and is not present on the Camaro connector. However, the switching for it is in the headlight switch. So I found a junk connector in my parts box, pulled the pin, and put it in the Camaro connector, and wired it to the Fiero wiring. The headlights now work.
Thanks for the Props! I just noticed this thread. It's nice to see someone building a box based on my idea.
You already discovered the trick with the headlights. The two drawings show the evolution of my idea. I first used a relay (in the top drawing) then I discovered that the B pin (which doesn't have a connector in the firebird connector either) will control the headlights if you add the pin.
Good luck with the swap.
IP: Logged
10:29 AM
PFF
System Bot
jscott1 Member
Posts: 21676 From: Houston, TX , USA Registered: Dec 2001
One of my great finds is the ALLDATA database. This is available at my local library, but not on their website. This database has an incredible amount of service manual information for every car I have tried. It is much more comprehensive then Haynes, almost as much as a genuine service manual. This has been most helpful for getting wiring diagrams on the Camaro and Bonneville. It also has module locator pages, so you can find items such as RAP (remote accessory power), compass modules, etc.
------------------ Jim 86 SE 355 Body Kit w/3.1 Auto (Sold) 87 T-Top Coupe 2.8/5 Speed new project
The V6 Camaro tach does not work correctly on my 2.8. It seems to be correct up to about 3500 RPM. If I push the engine past 3500, the tach either remains at 3500 or seems to drop off slightly. Any suggestions?
Jim
------------------ Jim 86 SE 355 Body Kit w/3.1 Auto (Sold) 87 T-Top Coupe 2.8/5 Speed new project
IP: Logged
02:31 PM
jscott1 Member
Posts: 21676 From: Houston, TX , USA Registered: Dec 2001
I don't know any reason the tach should do that. Either you have a bad Camaro tach or something has gone hinky on your own vehicle, (like a tach filter).
If you have access to a freq generator test the Camaro tach across full scale and see what happens.
Jonathan, Thanks. I do not have access to a freq generator, but I will go back and connect a regular Fiero tach, when I get a chance to see what happens. I have to remove the dash to get to the adapter box, so it will be a while.
The dash is finally done…except for the front filler panel, which I will do later.
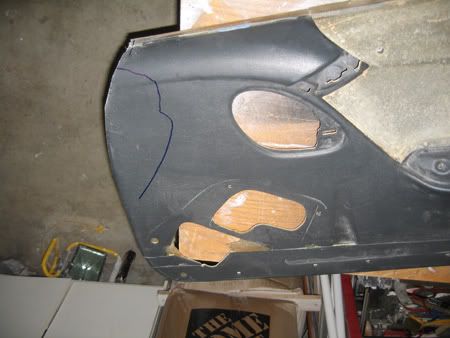
Now on to the Bonneville door panels. The door panels are too high, and not wide enough.
First I sectioned it. This was the first attempt. In the end, I made it too tall, and had to take it apart and reduce the height by 1/2".
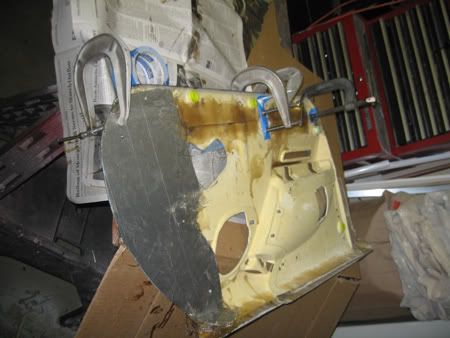
Then I added material on the top of the panel to extend it to the door, In the following picture, you can see the extension to the door top, shown in the bottom of the picture, as well as the fiberglass cloth and resin used to glue together the panel after sectioning.
Then added material on the insert panel
Trial fit of the door handle. Note it is screwed on with big washers so it can be positioned exactly before making the final attachment (with two tabs through holes) and one screw.
I then taped the door panel on and marked the cutouts for around the dash
I cut it out, and glued a .090” 50/50 Aluminum sheet, to extend the panel to the front. I have used this Aluminum previously in custom interiors. It is soft and can be cut with a jigsaw or even a coping saw with a wood blade. It bends a little (if you bend it too much, it work hardens and breaks). On my 355, I even hammered it into a complex shape for the rear speaker surrounds.
I added bondo to provide a slope on the transition from the raised to the flat part.
The door panel will be covered in Allsport. I will be able to stretch it, and there will not be any wrinkles. I plan on black on the main panel and red on the cardboard insert. ------------------ Jim 86 SE 355 Body Kit w/3.1 Auto (Sold) 87 T-Top Coupe 2.8/5 Speed new project
[This message has been edited by bowrapennocks (edited 01-27-2009).]
IP: Logged
10:00 AM
jscott1 Member
Posts: 21676 From: Houston, TX , USA Registered: Dec 2001
The door panel will be covered in Allsport. I will be able to stretch it, and there will not be any wrinkles. I plan on black on the main panel and red on the cardboard insert.
That looks awesome... can you give a link with more info on "Allsport" I've been looking for a covering material that's easy to work with and doesn't wrinkle.
Okay I should have googled it, I need to order some.
I bought my Allsport at Rochford as they were the cheapest place. I think I paid about $19/yd + shipping. See the picture below of the console on my 355/Fiero. I stretched it all around without the need for heat. You can heat it, but I did not have to. The magic in using it is to glue headliner material foam side first. I use 3M 8088 spray adhesive. Then apply adhesive to the Allsport, but only the edges of where you are going to glue it. Do not put glue on the areas where you want to stretch it, as it will not slide. You start by placing it down in one direction. Then go 90 degrees, pull tight. Then you go back and lift off the previous one and stretch it tight. You keep going round and round streching a little more each time. In that way, I covered the center console (below) with about 45 minutes of re-stretching. I used Allsport on the console, door panels, dash ( 3 pieces) and waterfall with no seams. It comes in some pretty bold colors. Black is available in two styles, one that is duller and kind of grippy. The idea being that stuff will not slide off of it.
Jim
------------------ Jim 86 SE 355 Body Kit w/3.1 Auto (Sold) 87 T-Top Coupe 2.8/5 Speed new project
IP: Logged
03:09 PM
Jan 28th, 2009
jscott1 Member
Posts: 21676 From: Houston, TX , USA Registered: Dec 2001
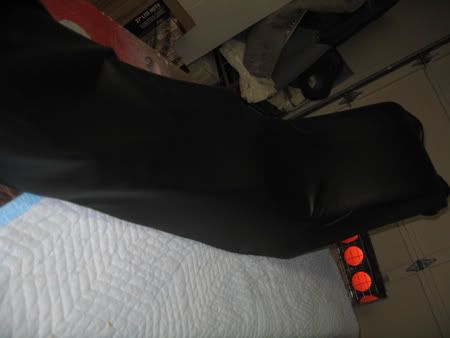
I put the door panels aside for a while and started on the center console. I wanted a less angular and more swooping look to the console.
I started with a Fiero console back piece for the base, and stripped off the covering because I did not need it. I purchased a center console from a 98 Bonneville SSE, and took it apart. In the Bonneville, there is a small compartment towards the back, but using the door would have been too narrow, and too tall. So I just used the side pieces.
Then a did a mockup with hard foam and cardboard
Then I turned to 50/50 Aluminum for the missing pieces. This time the local supplier had .0100” in stock, so that is what I bought. I cut it to shape, and started to bend it
After final bending
Next…fill in the blanks and fiberglass it over. The Fiero and Bonneville console pieces are ABS, so resin does not bond real well. I will try to maximize adhesion mechanically. In the end, I will be covering this with Allsport, which will be glued on the back side, so all should hold well. The main part will be black. I will be cutting more aluminum for the center portion. This will be covered in red Allsport, and an aluminum plate that I already had will be used for the shift boot surround. I originally wanted to use an Audi TT boot/ring, and I could not find any locally or on Ebay. One local junkyard just sold one for $30. Audi wants over $200 for both pieces.
------------------ Jim 86 SE 355 Body Kit w/3.1 Auto (Sold) 87 T-Top Coupe 2.8/5 Speed new project
To continue with the console… I bolted two lengths of angle aluminum to the sides of the console (on the inside). These will rest on the Fiero center console frame and be used to mount the console via sheet metal screws.
I used bondo to fill in all holes and major imperfections
After sanding, I applied two layers of fiberglass cloth and resin
Then filled in voids with more bondo, and later sanded smooth
I used headliner material for the padding under the Allsport. I sprayed 3M 8088 spray contact adhesive on both the console and headliner material (foam side down)
I also made a plate for the center out of aluminum and bent it to fit
I covered it in headliner material followed by Red Allsport
I applied 8088 to the back of the black Allsport and only to the edges of the console….If you put it on the headliner material, you can’t stretch the Allsport.
Now little by little I worked my way around and stretched it
And now the top..the final area that was stretched
And finally done…no wrinkles
It took me more than an hour to keep working my way around and stretching the Allsport to a factory finish. I was in the garage, where it was about 60 degrees. You can heat the Allsport, but it was flexible enough even at the cooler temp that it stretched fine.
------------------ Jim 86 SE 355 Body Kit w/3.1 Auto (Sold) 87 T-Top Coupe 2.8/5 Speed new project
IP: Logged
09:36 PM
PFF
System Bot
Jan 31st, 2009
Dan_Seattle Member
Posts: 235 From: Seattle, WA,USA Registered: Jan 2007
Today I rebent the Bonneville mounting brackets for the door pull, added the map pocket with speakers, and now have a door panel assembled. Just have to wire the speakers and cover it. Then the drivers side
------------------ Jim 86 SE 355 Body Kit w/3.1 Auto (Sold) 87 T-Top Coupe 2.8/5 Speed new project
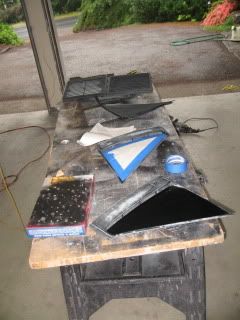
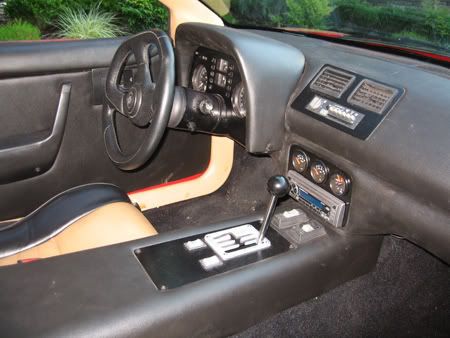
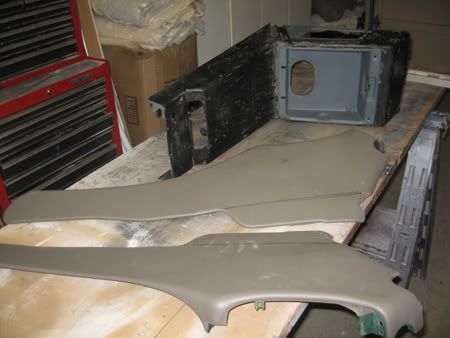
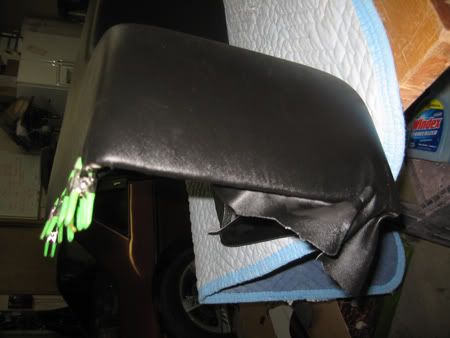
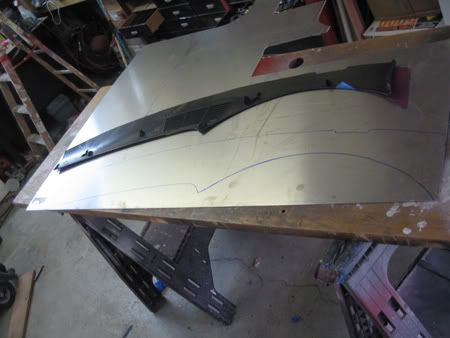
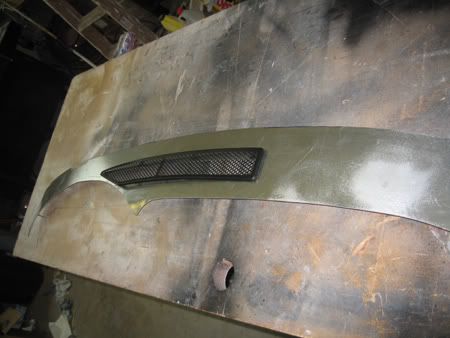
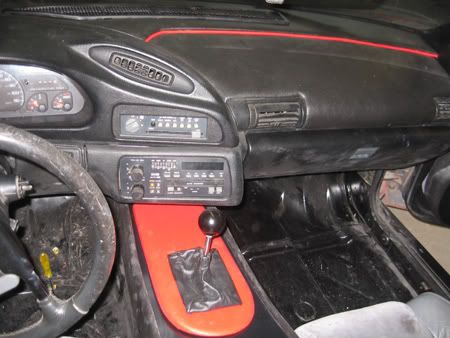
Now back to work and the dash. I cut down the Camaro dash filler panel and used it as a template to make a new one out of aluminum that spans the entire dash. Note the carboard extensions taped on the end.
I cut the corner off of the defroster vent and resectioned it.
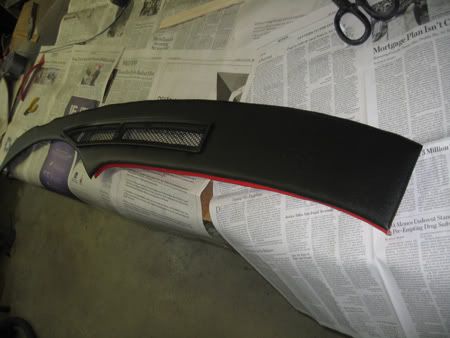
And covered the filler panel in black Allsport with a piece or cording made from red Allsport
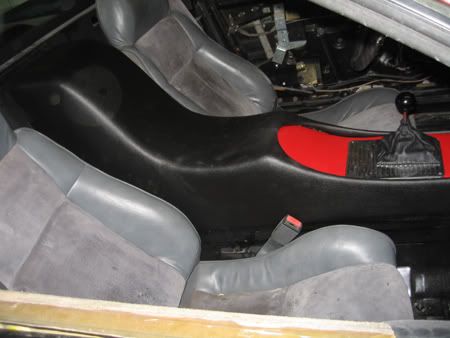
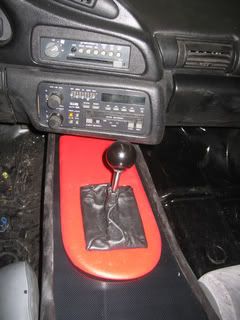
I covered the center of the console with Carbon fiber from Rvinyl.com and made a new center piece and covered it in Red Allsport
and now the dash is finished!
------------------ Jim 86 SE 355 Body Kit w/3.1 Auto (Sold) 87 T-Top Coupe 2.8/5 Speed new project
IP: Logged
02:41 PM
DeLorean00 Member
Posts: 4251 From: Sacramento, CA / Reno, NV Registered: Aug 2005
Thanks for the bump. I am still working on the car and will post pictures soon, I redid the door panels...to get rid of the bulging map pockets, added a 5.8" touchscreen stereo/GPS, Mr Mikes black leather seats with red piping, and a Grant steering wheel. The car is mostly apart as I am doing a panel off paint job in Black with body panels from an SE parts car that I had. I plan on bringing the car to the Jet City Foeirs Arlington WA picnic on June 6.
Jim
------------------ Jim 86 SE 355 Body Kit w/3.1 Auto (Sold) 87 T-Top Coupe 2.8/5 Speed new project
IP: Logged
10:16 AM
Tony Kania Member
Posts: 20794 From: The Inland Northwest Registered: Dec 2008
Looks great Jim! I have to pull the intake manifold on my Fiero and will hopefully have it done before next weekend. I plan on being at Arlington as well.
Dan, sorry to hear about the problems with your engine. I have been following your install and hope you can get it running with some new gaskets. It reminds me of when I started my T-top project. The car had a Duke with a rod through the block. Here are a few of my pictures along the way of getting mine on the road:
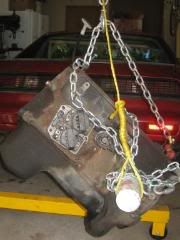
I removed the engine from the bottom by picking up the car by the trunk latch:
The DUKE
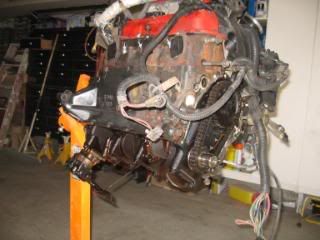
I bought a great running 2.8 from a pristine 86 GT that the owner was doing a different sort of transplant….electric. I also got the exhaust system, gas tank, cooling system and everything else that dealt with a gas engine. In retrospect, I would now probably have done a 4.9 Cad or 3800.
I removed the engine and I did a compression check: all cylinders were within 5 PSI of 165. I pulled the pan in prep for seal replacement:
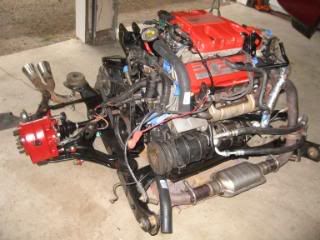
I did a total teardown of the cradle and installed poly bushings, new mounts and the KYB kit from the Fiero store
On the engine, I replaced the timing chain, water pump, all seals and gaskets, except that I did not remove the heads. My first problem in putting the engine together was the three broken exhaust manifold bolts. I got two out easily and broke an Easy-out off in the third. I ended up grinding it out with a diamond tipped Dremel bit and was able to save the threads in the head. I chased all threads with a tap and replaced the manifold bolts with studs. I also had the injectors cleaned and flow checked by Dr. Injector. The engine came together fine. I had the flywheel resurfaced and installed a new HD clutch from the Fiero store. Rather than reseal the transmission (Izzy), I bought a brand new one from Arkansas Transmissions for $375. Now I have a good used one if I blow up 2nd gear.
I rebuilt all the calipers and installed new hoses and a master cylinder, purchased cheaply from NAPA
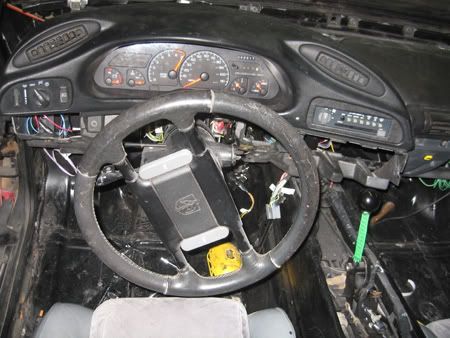
The old dash
AC before install
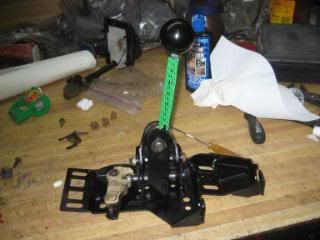
Rodney short shift kit
I buttoned it all up and went to start the engine. After getting the timing right, it ran poorly. After tracing everything through, I found that the fuse panel was corroded and connections to one of the injector fuses was intermittent. This was sort of strange as the car was very dry inside when I bought it and otherwise did not have any rust or corrosion on the inside.
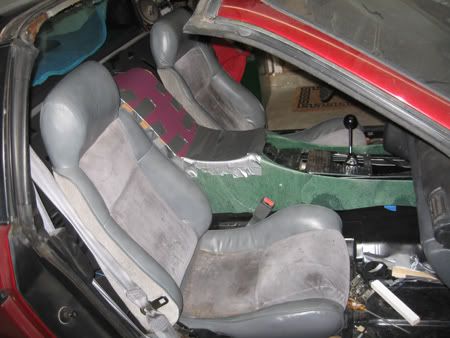
Luckily, I had purchased a parts car, which I thoroughly stripped. The cruise, AC, power windows, locks and mirrors went into my T-top.
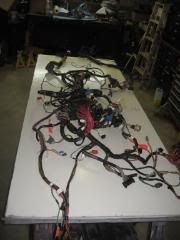
To solve the fuse block, I swapped in the main harness, which required a little extra wiring as the parts car was an auto.
Now back to the interior
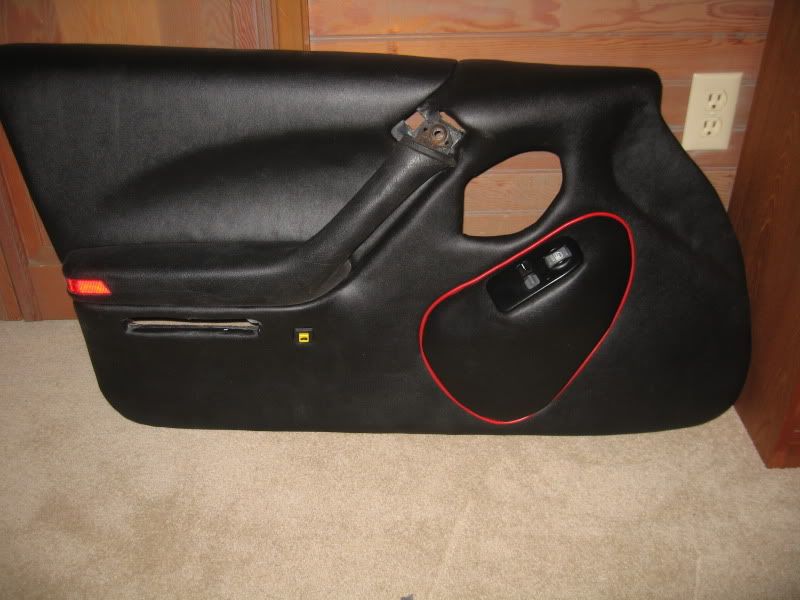
I was not happy with the bulging map pockets on the doors, so I removed them and fabricated pods for the power window switches
I went to pull a part and got an overhead console from a 93 Dodge Caravan with compass and outside temp. I cut it down and mounted it
I also pulled a Home link garage door opener out of a Cad Catera. It was in the mirror, so I connected wires in the switch and ran those to the right button on the overhead console. The Homelink is now mounted in the console
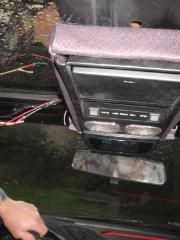
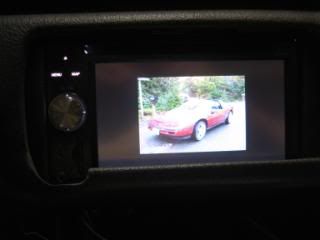
I wired up the equalizer radio out of the parts car and found that it was dead, so I bought a new Pioneer Radio/GPS. It is a double DIN but fit into the Camaro dash with a slight amount of cutting on the bezel
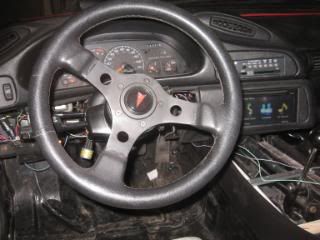
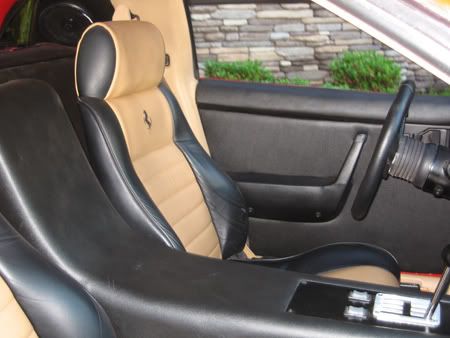
I got a free bonus on my previous 355 Fiero when I bought it. It had a brand new Grant steering wheel sitting behind the seat, which I mounted.
Mr Mikes seats in black leather with red piping
Next step…panel off repaint
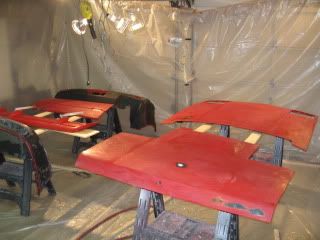
Here are the panels from the SE parts car prepped and ready for paint
------------------ Jim 86 SE 355 Body Kit w/3.1 Auto (Sold) 87 T-Top Coupe 2.8/5 Speed new project
IP: Logged
11:11 AM
Jul 2nd, 2009
aeffertz Member
Posts: 798 From: Ladysmith, WI Registered: Feb 2009
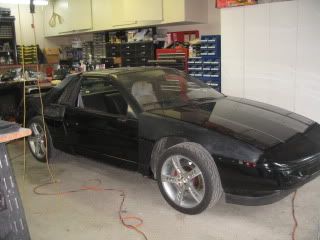
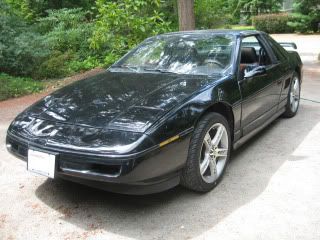
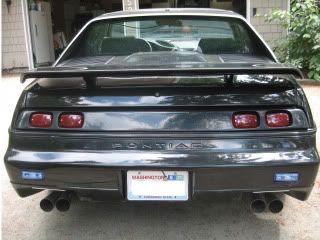
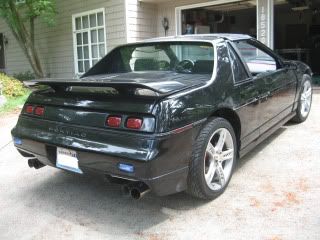
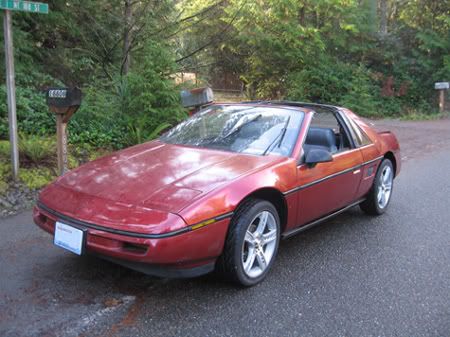
The car is now painted and mostly back together. I also bought new taillights from Allen Lindsey in FL. These are like mini ZR1s. They look great. I will post pictures next week when I return from vacation. Thanks for asking. Jim
------------------ Jim 86 SE 355 Body Kit w/3.1 Auto (Sold) 87 T-Top Coupe 2.8/5 Speed new project
I made a paint booth in the garage by hanging sheets of 4 mil plastic from 1”x2”x8’ wood. I used PPG Epoxy primer w/flex catalyst and DCC Urethane single stage paint applied with my HVLP gun.
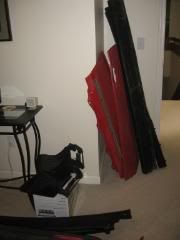
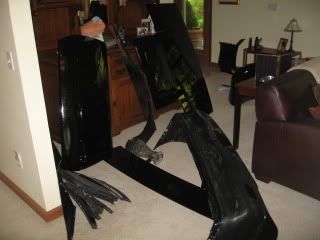
Temporary storage in living room
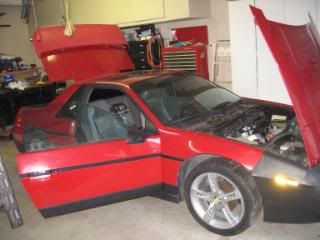
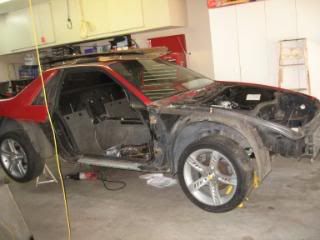
The body shell painted
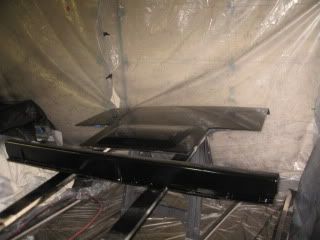
Assembly starts
Installing brackets for Aero rocker panels w/ my new 1/4" pop rivet gun
A find: NOS Dew wipes still in GM wrappers
New taillights (in primer) from Allen Lindsey. (Spacecoast Fieros). What a great addition!
Repainting miscellaneous trim items
More body panels on and start of color sanding
After power buffing with my variable speed buffer in three stages: course, fine, and swirl removal w/foam pad
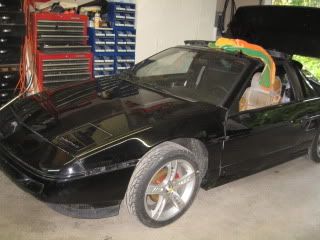
Mr Mikes seats put back in
New taillights
I started with an 87 T-top 5sp stripper coupe and 14” tires with only one extra: base radio
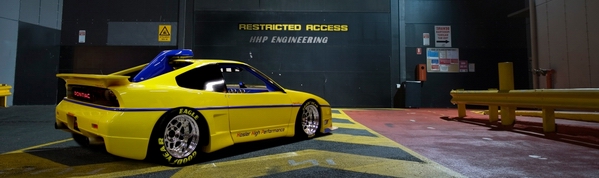
Added: 2.8L with all new seals, gaskets, water pump and Rodney Dickman cat and low temp fan switch New Old Stock transmission + HD Ram clutch w/Rodney Dickman short shifter All poly bushings KYBs + rear sway bar Rebuilt brake hydraulics New clutch master and slave cylinders Fiero store cross drilled rotors and high performance brakes From parts car: 17” wheels and Z rated tires, AC, cruise, tilt wheel, PW, PM, PDL, remote trunk release, rear wing, aero side moldings and rear bumper Mr Mikes leather seats From Bonneville SSEi: express down modules – both windows, modified door panels, and modified console From 94 Camaro: dash From 93 Dodge Van: overhead console with lights, compass, and outside temperature indicator From Cadillac Catera: integrated Home Link garage door opener Pioneer AVIC GPS/Video/Stereo w/Kicker speakers. Subwoofer to come. Tail and backup lights by Allen Lindsey
Now back to work with focus on T-top seals and reassembling the interior.
------------------ Jim 86 SE 355 Body Kit w/3.1 Auto (Sold) 87 T-Top Coupe 2.8/5 Speed new project
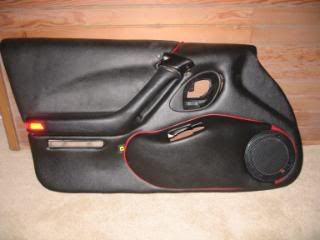
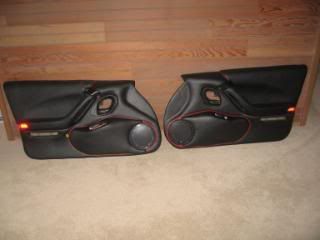
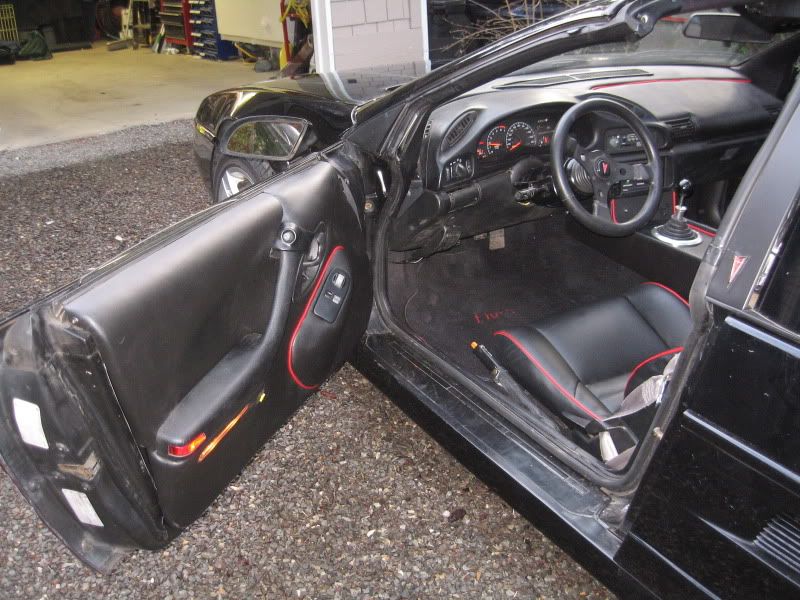
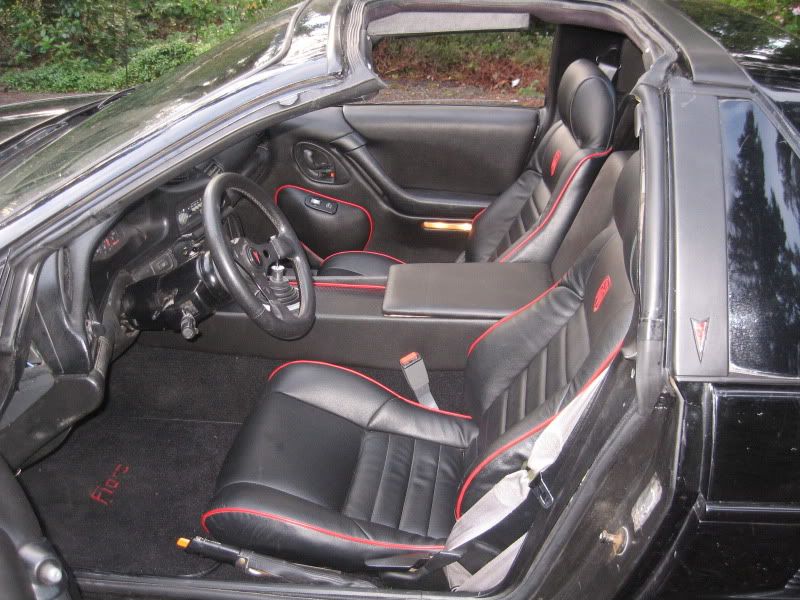
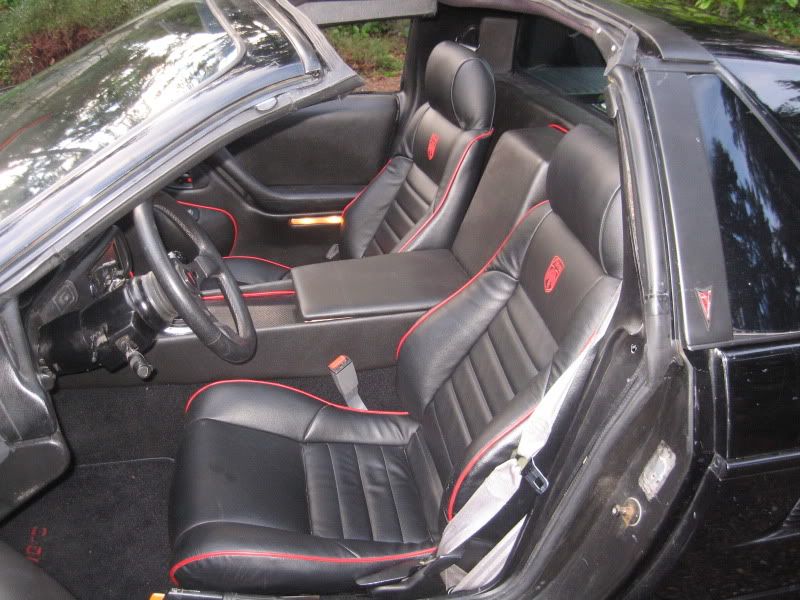
I have been working on the car, and here is the final update on the interior. I decided to redo the door panels, because the pods I had intruded too much on the interior. I also was able to snag an Audi TT shift boot/ring and decided to make a new console out of aluminum.
New door panels
New Console Pictures of the interior And the complete car
IP: Logged
10:50 AM
Fie Ro Member
Posts: 3735 From: Soest, The Netherlands Registered: Sep 2001


 I just noticed this thread. It's nice to see someone building a box based on my idea.


 I too will be at Arlington.