i don't know when it started, or even when the sunroof was installed, it was on it when i bought it
i didn't even know it was a custom sunroof til firefox told me, and he said that it would leak, and sure enough he's right
i didn't even notice until i moved some stuff from the back of my seat and it was damp, because it doesn't leak when i'm driving and it's raining (i think that it just leaks when it's sitting)
here is what i noticed:
when i pour it directly on the sunroof (on the glass) the water sits, then slowly disappears,(AFTER ABOUT 45 SECONDS) going in between the rubber around the glass, i think, i might be wrong, but the water on the glass just slowly goes away, i don't know if this is suppose to happen, or if it's suppose to pool, and then hold
after pouring water on the glass, then waiting for it to disappear, i crack open the sunroof, feel around, it is dry everywhere excepth for the passenger side corner near the rear window (litlle wet) and the driver side corner near the rear wear window. near this corner, i stuck my fingers up there and the water slowly trickeled down my arm.....is the water suppose to drain in there.....the weird thing is though, that if i didn't stick my hand up there, i didn't notice any water dripping, but on the roof of the car in both corners, it was damp
is the water suppose to drain from the glass, or is it suppose to pool up on the glass?
if it isn't suppose to drain, can i just use some kind of water-proof putty around the rubber thing (i'll call it weather stripping, thats what it looks like) and prevent it from draining?
any insight is helpful
IP: Logged
10:58 PM
PFF
System Bot
shermdizzle Member
Posts: 375 From: Chicago, IL, USA Registered: Aug 2007
the only thing i can suggest is you do what GM did with the factory sunroof.
i'll be back in a sec with some links...
ok, sorry. i didn't know how to edit videos when i made this.
and
umber 86-10-1 Date 1/86
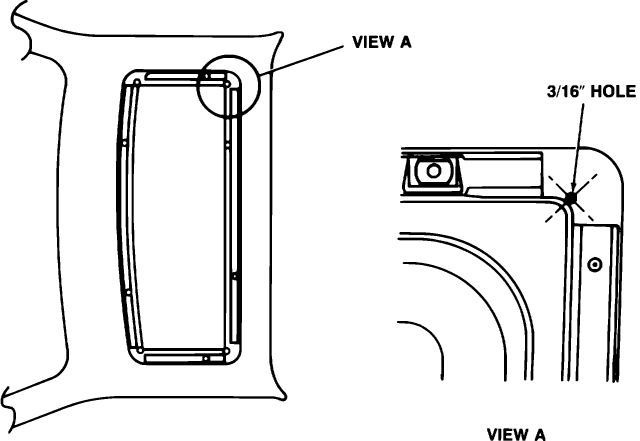
Subject: VISTA VENT WATER LEAKS
1984-86 FIERO (WITH AD3) Conditions, which contribute to water leaks on 1984 to 1986 Fiero vista vents, can be repaired by adding drainage holes to the plastic roof outer panel and replacement of hardware nuts at the hinge and latch locations on the glass panel..
This bulletin contains procedures for the addition of holes to the plastic roof outer panel, description and part numbers of new hardware nuts as well as proper sealing patterns for weatherstrips (if weatherstrip replacement is necessary).
The addition of holes provides a water drain system and are to be drilled through the Plastic Roof Outer Panel Only. The holes are to be located in all four (4) corners of the weatherstrip mounting area. Figure 1 shows the location of the holes with the weatherstrip removed for illustrative purposes.
The recommended procedure for adding holes to the roof outer panel is as follows:
1. Remove the vista vent glass assembly from the vehicle and place on a clean work surface.
2. During the following drilling operations, it will be necessary to hold the weatherstrip out of the way to prevent damage. Using an electric drill motor and 3/16" drill bit, drill one hole (through the plastic roof outer panel only) in each corner of the weatherstrip cavity as shown in Figure 1, view A.
3. Reinstall the vista vent glass assembly to the vehicle and water test to insure an acceptable repair.
4. After water testing, remove the vista vent glass assembly and dry the roof inner panel by blowing compressed air through the holes in the roof outer panel. Apply a small amount of GM P/N 1052856 anti-corrosion compound (or equivalent) through the holes in the roof outer panel to protect the metal roof inner panel from corrosion caused by damage done during drilling operations.
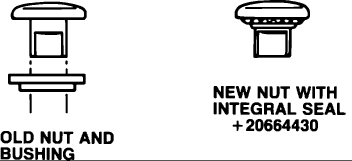
If water leaks are noted at the hinge and latch locations, a new hardware nut is now available and provides improved appearance and sealing. (Refer to Bulletin 86-10-3.) The new hardware nut has an integral seal and no longer requires the use of bushings (Figure 2).
Due to the lower profile and improved appearance, the new nut should be used in all locations (hinges and latches) when service operations on vista vents are performed.
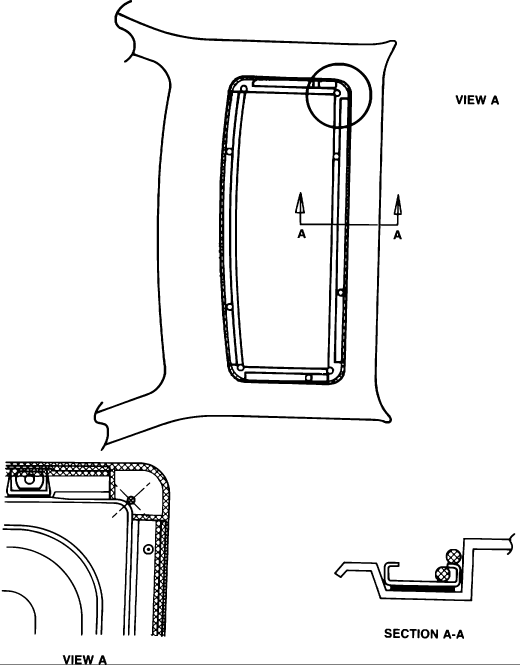
If the vista vent opening weatherstrip is damaged and requires replacement, it is important that the weatherstrip be properly installed and sealed that the weatherstrip be properly installed and sealed to the retainers and body panels.
The shaded areas shown in Figure 3 (view A and section A-A) show the correct locations and sealing patterns to be used when resealing or replacing weatherstrips. Use 3M 08011 weatherstrip adhesive (or equivalent) when resealing or replacing weatherstrips.
[This message has been edited by buddycraigg (edited 01-11-2008).]
IP: Logged
12:51 AM
shermdizzle Member
Posts: 375 From: Chicago, IL, USA Registered: Aug 2007
Originally posted by shermdizzle: what does drilling holes do for me?
hopefully the same thing it does for everybody else...
quote
Originally posted by shermdizzle: where does the water drain to? inbetween my roof now??
yes, it drains through the holes, on to the metal part of the roof and then down the A piller and B piller, under the roof skin. but thats with a factory setup. i dont know if it will help you.
your sunroof is smaller than normal. so it may not extend over the metal part of the roof.
IP: Logged
09:49 AM
tjm4fun Member
Posts: 3781 From: Long Island, NY USA Registered: Feb 2006
ok it's not too clear form the picture, so I'll ask! the part that you say this, the small seal, ist that part of a frame around the glass? when you open it, does that part go upw ith the glass? asking cause I dont; see any bolts thru the galss like many aftermarket sunroofs, so I am guessing that there is a metal frame around the glass that has all the hardware attached to it. If that is the case, (take a pic with the sunroof open, the I'll know) it is leaking aroudn the frame, a common problem in framed glass roofs. there a number of ways to fix this, some pretty and hard to do, others will get the job done and not look bad if you take your time. Post an open pic, and maybe add a closeup of the corner from the top slightly off to the side so we can see the profile a little.
IP: Logged
11:00 AM
shermdizzle Member
Posts: 375 From: Chicago, IL, USA Registered: Aug 2007
I have a factory sunroof. When I bought it it had a very minor leak. I bought a new gasket thinking it would fix it. After installing it the minor leak got a little less minor. It would then seal OK, but would leak when going through one of those touchless carwashes. Then I had my car painted. The seal was removed and put back in after paint. Now the leak is even less minor. I went through a car wash and had a reasonable stream flowing on top of my wife. She was not impressed.
1- Will the hole drilling help? 2- It just seems the glass is not pulling down to the seal in the back. Are there adjustments I can't see? 3- Should I consider just removing the seal and and reinstall so I know it was done correctly?
In retrospect I guess I should have just left the factory seal in there. Just got worse from there on out.
IP: Logged
04:59 AM
JumpStart Member
Posts: 1412 From: Central Florida Registered: Sep 2006
It looks like your glass is not sealing against the rubber seal.
Either something has happened and the handle is not pulling the glass all the way down or the seal is collapsing. If it is the seal and it has an opening all the way around through it, you might try threading a small piece of nylon rope through it to help give its original form back and something for the glass to seat to.
Good Luck,
Steve
IP: Logged
09:05 AM
pswayne Member
Posts: 1282 From: Lawrenceville, GA USA Registered: Sep 2006
Don't drill the holes mentioned above in an aftermarket sunroof. There is a special kind of RTV that you can probably find in an auto parts store that is designed to flow into small cracks. I think that would fix the problem you describe.
IP: Logged
09:47 AM
PFF
System Bot
Larryh86GT Member
Posts: 1757 From: Near sunny Buffalo NY Registered: Jan 2008
If it is the rubber seal around the glass leaking can you lift the rubber where it meets the glass to run a small bead of clear silicone all the way around to seal it??
IP: Logged
11:08 AM
JumpStart Member
Posts: 1412 From: Central Florida Registered: Sep 2006
If it is the rubber seal around the glass leaking can you lift the rubber where it meets the glass to run a small bead of clear silicone all the way around to seal it??
I dont think that silicone would be thick enough and if the seal is like the factory seal,there is a "tunnel" that runs through the entire thing. Anything you put under the seal will just press up the lower part. People on here have threaded in a piece of nylon rope all the way around inside the seal which keeps the "tunnel" from collapsing and holds the top part tight against the glass.
Steve
IP: Logged
07:26 PM
pswayne Member
Posts: 1282 From: Lawrenceville, GA USA Registered: Sep 2006
That's just it -- this thing is way different from a factory unit. In the factory unit, the glass is unframed. In this unit, the glass is framed, and, according to his picture, it's the frame that's leaking, not the seal against the car. So the flowing RTV wouild probably be the way to fix it.
IP: Logged
10:00 PM
JumpStart Member
Posts: 1412 From: Central Florida Registered: Sep 2006