You'll be happy to know that I'm going to resume working on the swap. Sorta took a vacation from it, but it's time to get back to work. Stay tuned.
I thought we lost you..... Glad to hear your back to the swap. After a long sabbatical I'm back to working on my 3.4DOHC swap too. Seeing all the nice modified Fieros at Pontiac Nationals gave me some inscentive to get mine going. This pic is from a couple weeks ago...the engine is now about 98% done and I'm cleaning up the trans and cradle.
IP: Logged
01:15 AM
Steven Snyder Member
Posts: 3323 From: Los Angeles, CA Registered: Mar 2004
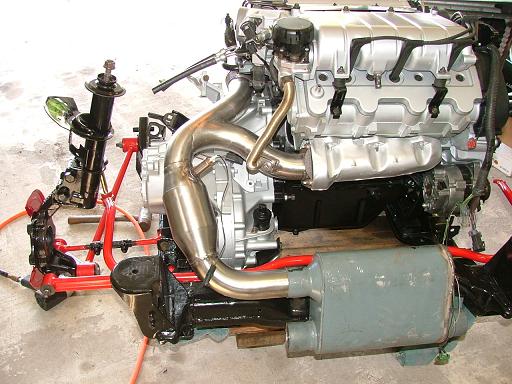
Wow! Nice Y-pipe! That sure simplifies exhuast routing and you still get to do it shorty style (out the back). That's all stainless? Are those special bends or did you just grind down the seams where you welded them together?
IP: Logged
06:27 AM
ltlfrari Member
Posts: 5356 From: Wake Forest,NC,USA Registered: Jan 2002
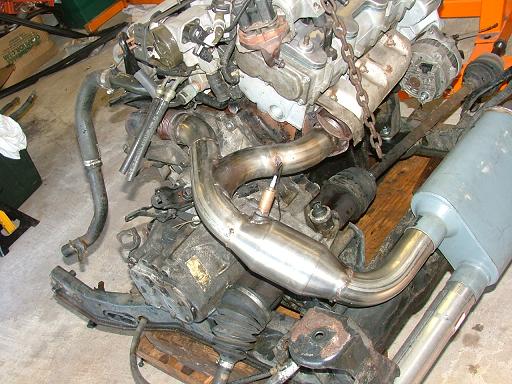
That's a nice solution to a common issue with this swap, where to route the bloody exhaust. Is that bulge on there a cat? got part numbers/supliers for the parts? I'm sure I am going to have to redo mine eventually.
Wow! Nice Y-pipe! That sure simplifies exhuast routing and you still get to do it shorty style (out the back). That's all stainless? Are those special bends or did you just grind down the seams where you welded them together?
All stainless. I used half of the stock 3.4 crossover...cut it off after the expansion joint and the rest is 5 in radius J bends cut and welded and ground down and polished...it took a while. All the pipe came from WWW.PERFORMANCE-CURVE.COM and the cat I bought off of ebay for around $40. I got two of these http://www.performance-curve.com/index.asp?PageAction=VIEWPROD&ProdID=601 at about $40 each shipped and will need one more and a straight section to do the tail pipes. Here's a pic of it all slopped together and just tack welded.
I'm not so sure that I'm keeping the converter in there....might get replaced with a turbo some day.
P.S. Don't mean to pig up this thread.
[This message has been edited by SKIDMARK (edited 09-01-2006).]
I like the looks of the exhaust routing. Am I missing something? Seems that it is more simple then stock (does not go down the front and under the cradle). Is there any thing that this solution would interfere with?
IP: Logged
12:27 PM
Nov 7th, 2006
SKIDMARK Member
Posts: 1350 From: Chardon, Ohio, USA Registered: Sep 2001
I like the looks of the exhaust routing. Am I missing something? Seems that it is more simple then stock (does not go down the front and under the cradle). Is there any thing that this solution would interfere with?
With the routing that Blue Shift is using he does a good job of addressing the clearance and thermal issues on page 7 of this thread. The concerns I have with my exhaust are that it's not flexible so I may have to hang the muffler and tail pipes by springs and tolerate some rattles or add a flexible union somewhere. I'm hoping with 5 motor mounts and 2 torque struts that I won't have much engine movement. I also have a concern with the heat generated by the converter because it's only 1 1/2 inchs from the trunk area and brake line. I will have to come up with some type of heat shield for this area. My exhaust routing would be more difficult on a pre-88 cradle because of the inboard tierod mounts being in the way. On the 88 cradle it clears the trans, cradle, sway bar, and everything else pretty well.
Don
IP: Logged
10:59 AM
Nov 17th, 2006
Fierofreak00 Member
Posts: 4221 From: Martville, NY USA Registered: Jun 2001
Alright guys. It's time to return to work on the project. Sorry for the long wait.
Today I took time to dust everything off, and examine what I have left to do. I took out the old, rusty battery tray, since I won't be needing it - I intend to replace it with a custom built ECM holder bracket. Other than that, I dropped the tank to pull out the Carter made 87 Corvette fuel pump that managed to sieze up while it sat - and that was before the 6 month "vacation" from the project, too.
I think I'm going to go with a Walbro 255LPH pump. One thing I wonder is with so much extra fuel pump, if circulating so much fuel has any negative consequences like heating up and vaporizing more of it, and beating up the fuel pressure regulator - which isn't replaceable on this engine. Any input?
Here's the list of remaining tasks: - Wiring harness: the motor itself is already completely wired, which has to be spliced into the C500, ECM, and firewall passthrough where required. Fitup, splicing, sealing, and looming of the harness, then testing and verifying it all. - Fuel pump replacement: Just a matter of picking which pump, and reinstalling. - Battery relocation - I'm probably going to excercise all the fiberglass skills I learned working on my boats to build a lightweight, sturdy front mount box. Hopefully it won't suck. - Interior: Replace select cable (shift is fine), rebuild shifter ass'y, install my AFR gauge (possibly buy/install WBO2 to drive it), run the rest of the wiring, reassemble interior. - Final assembly: Finish up routing things like hoses, installing the motor, dogbone, rebush entire suspension with poly (add zerk fittings), assemble everything - Testing: Drinking gas, kicking ass. I hope.
Work is packed for the next few weeks, but I hope I'll be able to work on the project after or before work from here on out.
IP: Logged
05:33 AM
ltlfrari Member
Posts: 5356 From: Wake Forest,NC,USA Registered: Jan 2002
I have a walbro on mine, it's a little too noise for my liking but no problems other than that.
The fuel pressure regulator IS replacable (I replaced mine), it's on the fuel rail under the plenum of course so a pain to do since you have to remove the plenum then you need a new upper gasket which you can only get (so far as I know) with the lower ones and the set is like $50!
Is there any disadvantage or problem with using the OEM stock V-6 Fiero fuel pump? I replaced mine a few months before starting the swap and assumed it was sufficient for the DOHC. What benefits do you get from the corvette or other pumps?
IMHO, I didn't think there was much of a difference between the stock 2.8 fuelpump, and the 87 Corvette fuel pump. Both were exactly the same form factor (drop in). I strongly suspect a V6 fuel pump in good working order would feed your average 3.4DOHC, but does anything ever remain "average" when enough HP isn't enough?
I just assembled the fuel tank hanger assembly with a new GSS307 Walbro pump. This thing looks like it's built like a brick. I'm not surprised that people report them to be highly reliable. The GSS307 is the "normal" pressure 255L/Hr fuel pump, while the F20000169 is the "high" pressure pump. I thought installing a fuel pump with 70 PSI capability that the high pressure pump is capable would be absurd for my requirements, so I went with the standard pump. Keep in mind that it's "standard pressure", but still capable of 500 HP.
Another important issue: If you have to have a drop in pump cuz you don't want to change anything, and want a Walbro, get the F20000169. The GSS307 has a center inlet, and you'll need to grind a little off of your fuel pump hanger to get it to fit right. It only takes 10 min, tops, but just throwing that out there. Mind you, the pressure regulator will keep your fuel pressure where it needs to be, it's just that the F20000169 will still crank out fuel at up to 70 PSI if need be.
Alright, it's been awhile but I've been getting some real work done on the car lately. I know, it's a miracle. It will be done by summer, so help me God...
I started out by going through my shifter assembly and dropping in Rodney's shift kit and the transmission side shifter rebuild kit as well. I have to say that this kit is well made and well executed, the shift action is tighter than stock now. In addition to that, I replaced my binding/sticky select cable (when I used to drive this car every day, my right arm got bigger than my left), and I designed, machined, and installed a short shifter shaft to replace the (literal) hack job the previous owner did of taking a hacksaw to the stock shaft. I think the end that goes into the existing pivot piece is .625" x 1.00" long, and .700" dia for my aftermarket shift knob. What? It's not rice...I had to have it cuz it's blue, it matches... Um. Yeah.
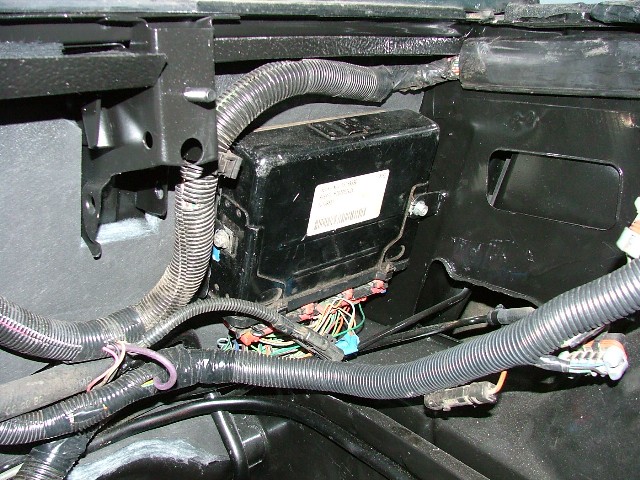
Then I moved on to the engine bay. I built another set of fuel lines from steel brake line (cuz I busted my previous ones tweaking them too much) then surrounded them with rubber heater hose to shield them from the heat. These ones run up against the firewall away from the exhaust, and around behind the gas tank filler neck. Instead of the piece of heater hose, I bent some aluminum hard line for the vacuum booster since it's on the wrong side of the bay for the DOHC. You can get the 1/2" aluminum tube at OSH, and it bends by hand easily enough that you don't need a bender if you're careful. 6 Feet should do the job. The old battery tray was rusty and no longer needed so I cut it out, wirebrushed all the rust, then painted that area. I also bent up a new hard line to the overflow tank since the battery acid ate up the old one. I mounted the ECM in that area by making some brackets out 2" lengths of angle iron. I cut a slot for the studs on the side of the ECM to slide into, and welded them to the wall there. Be careful, cuz it's pretty thin and super easy to burn through. It looks stock, and puts the ECM right where my wiring will be.
And now I'm finally working on the part I've long dreaded and did all of the above trying to procrastinate: The wiring. Take your time, concentrate and it's not so bad at all. Everybody will take a different approach here, and there are numerous sources of good information out there. I highly recommend Sinister Performance/Darth Fiero's GMtuners page, as he has tons of wiring schematics up there. One thing I've disliked about the job is the firewall passthrough - if you're using an engine bay mounted ECM, there ends up being a lot of extra wires in the passthrough with no use, clogging the whole thing up and adding clutter factor. Though I originally intended to do so out of spite, it turns out that boiling the passthrough in a pot of water softens up the sealant and will allow you to disassemble it, put in the wires you need, remove those you don't, then click it back together! I would highly recommend it. Custom passthrough eliminates all the clutter, and if you leave it unsealed, you can quickly add or remove wires in a couple seconds, but retain the factory look.
Glad to see you back at it and making progress. I put the ECM in the engine compartment too but turn it 90 degrees and tuck it up under the back window ledge. The wiring loom needs some work but is basically done.
I just need to get off my @$$ and finish installing the engine in the car for the last time, then work on some of the details.
Alright, some more progress to report. I've been working hard on this thing trying to get it finished and we're getting close! I'm happy to report that all of the wiring and power harness is done - now I just hope and pray that I didn't make a mistake somewhere... The ECM is powering on, cycling the fuel pump, and reporting a code 12, followed by other things that aren't plugged in yet. All that means is that it has power, and the fuel pump relay is connected right. We'll see when it's time to test it out. The cradle has remained installed for good.
The rest of the time has been spent putting things back on the motor, painting things, and the millions of little unforseen "oh yeah" projects that seem to come up. Seriously, if you don't run into surprises and a lot of them, you're either lucky or experienced with this swap.
I hadn't installed poly on this car yet, so before the rear A-arms go in, I decided to burn out the stock bushings (yeah! yeah! FIRE! FIRE! heheh, cool... ahem, sorry) and install them now before installation. The A arms deflect quite a bit in their stock bushings with even the 2.8, so it's a real good idea when swapping in more power. Heat the sleeve and work the heat around to melt the seal between rubber and metal, and push it out with a stick. It burns like napalm so don't get it on you. Don't ask me how I know, either... http://img.photobucket.com/...k/BurningBushing.jpg
You'll need to do something about the thermostat housing. You can either use the stock 3.4 gooseneck piece and associated thermo with a filler cap welded on, or amongst other things, you can do like I did - I took the 2.8 filler neck, and bolted it on. I found, to my amusement, that a Rochester 1 barrel carburetor base gasket fits great here. It works as is, though I modified my filler by slicing it apart where its brazed together and turning the radiator hose outlet to where I wanted it, then welded it back on. I also cut off the larger fitting on there, and welded a cut down hose barb. Please excuse the embarrassing welds. Beadblasting and painting works wonders... http://img.photobucket.com/...rk/ThermoHousing.jpg http://img.photobucket.com/...0Work/HeaterHose.jpg
Oil cooler painted up and installed. Yes I know the filter is painted - you can screw on two oil filters, one on each side of the oil cooler to seal it off when cleaning or painting it - you DO NOT want ANYTHING getting in there - the convoluted shape will trap foreign objects and send them straight into your mains when you start it up. Not cool. I washed mine out like 15 times with various solvents, and was getting flakes of something - likely oil varnish coming out. After a week sitting in gas, it came out clear enough... We shall see. http://img.photobucket.com/...20Work/OilCooler.jpg
I found the cut down 2.8 radiator hose I had. I know it's split at the top, though not where it seals - I'll likely be changing it out, but I wanted to double check that it fits. For reference this is a 87' GT, different year cars may have different style pipes going to the radiator, and need different solutions. http://img.photobucket.com/...PassengerRadHose.jpg
Fuel hoses. I cut these hoses from their stock location coming from the filter, leaving a 1" hard line barb on each. I have hard lines going from above the stock fuel filter location, across that "shelf" on the firewall, then around behind the metal fuel filler gooseneck, stopping short of the air filter pot. Then a short piece of Goodyear fuel injection hose (use fuel injection hose ONLY) links up to these hoses with the fittings. They attatch right to my fuel rail fittings, and look stock. http://img.photobucket.com/...20Work/FuelHoses.jpg
This is where I'm currently at. The motor is only missing it's EGR system, and intake at this point. And it's oil and coolant - I had better not forget that part... http://img.photobucket.com/.../CurrentProgress.jpg
It's starting to look less like a project, and more like a car! I have to install that EGR system, intake system, the other A-arm, vacuum hoses and emissions stuff, fluids, an oil pressure sender, my air fuel gauge pod, a clip for my select cable, and the decklid and rear fascia, and I'll be more or less ready to test this bad mother out! It's been over 2 years now? I even have Dave beat on time to completion, and I haven't even started it yet! Anyways, stay tuned, the news will be coming pretty soon.
Alright. We're finally getting somewhere with this project, started back in 2004. I'm closing in on finally starting this beast up, and barring any serious problems, taking it on a test drive! Nothing better for motivation than realizing you're almost done!
Anyways, I've been hard at work on this thing. Since the last post, I've done the following:
- Swapped the fuel rail out for a spare (regulator leaked after pump turns off), painted, re tested and cleaned injectors - Built a dogbone - Reinstalled the brakes, bled - Tried to bleed the clutch, broke the slave cylinder bleeder clean off (exactly like Steven did), got mad, welded it back together, painted it, bled clutch sucessfully - Routed battery cables from motor to front of the car (still have to build/install a box and the battery) - Plugged the CPS into the ICM (ignition system = live, now!) - Filled motor with oil, cooling system with coolant, tranny with syncromesh fluid - Millions of other little things that I'm having trouble remembering, yet took up so much time
Instead of the 88 lateral link, you can use a proper poly dogbone bushing and find a short piece of steel pipe that the bushings will press into. Notice that the bushing from the lateral link has too big of a core to use the stock fiero dogbone bolt, though you can shorten the steel sleeve from the swaybar endlink and insert it into the core of the link bushing for a perfect fit. The link bushing is also a bit shorter so you'll need a spacer. I only used the link cuz a friend had one left over from a crash, and it had the bushing and round end already. Note that I was going to cut those reinforcing gussets into triangular shape, but I realized that I forgot after I had bead blasted and halfway painted them. Oh well, its sturdy, and gives you the option of using the 91-93 vacuum block with MAP mounting point - if it'll fit under the decklid.
This is more for my sake, but this is a list of what I have yet to do: - Create a solution for mounting battery in front compartment, connect cables - Obtain 3.1 intake hose, DOHC charcoal can, Fiero parts that went missing during the project - Install PCV valve, vacuum lines - Install charcoal can, purge solenoid, route vacuum lines - Install rear fascia, trim/sidemarkers, lights, decklid - Wire AFR gauge pod, reassemble interior - Breakin/testing
Phase 2: - Install AIR manifolds, pipes, pump, divert valve - Inspect/fix anything out of order - BAR/Smog certification
At some point: - Coilovers - Brackets and calipers for 12" vette rotors I have - Paint, hood scoops - Turbo/Intercooler!
IP: Logged
07:11 AM
Steven Snyder Member
Posts: 3323 From: Los Angeles, CA Registered: Mar 2004
Ok, I don't have time to post any pictures yet, but I can tell you that I'm at the stage where I'm cranking the motor over to build oil pressure. Except there's one problem: there's no oil pressure. At all. Nothing.
I've resorted to using a shop vacuum to pull a vacuum on the boss where the oil filter screws on until the vac was sucking up oil, then I go to crank - nothing. Nada. Zilch. Wtf? I pulled the filter off, crawled under and shunted the starter with a screwdriver - not a dribble of oil, spare the stuff that was already dribbling from the experiment with the vacuum.
The only explanation is that the oil pump isn't pumping, and I have no idea why. I've cranked for a couple minutes in total now with the plugs out and I worry how much the assembly lube has left before it goes away - can't afford to crank it until I figure it out. If anybody has any ideas, let me know!
... Ok, well I found out what it was. Repeat after me: "When assembling the engine, don't forget the oilpump driveshaft!" AGAIN! "When assembling the engine, don't forget the oilpump driveshaft!"
Good. Now that we got that out of the way... I have more work to do.
Well, I might have just destroyed a brand new motor. That's 800 in engine, 2650 in machining, and like 600 in parts. That might not include the heads either, which were 700, I recall.
First, all the cranking it over with the plugs removed to try to prime the motor - after a few minutes of total cranking time it became obvious that the oil pump simply wasn't working. The assembly lube only stays put so long. Then on top of it, it turns out that I had went around and gone through the tedious process of removing plug wire boots and cracking the plugs loose to remove them - but forgot the 10 second process of removing plugs - putting harsh load on the bearings at best, and allowing anti seize to be sucked into the cylinders at worst.
Then it turns out that the gurgling coming from my fuel rail wasn't air being sucked up by the pump in an empty tank, but a stuck fuel injector (they all tested good earlier, several times in a row) filling a cylinder with fuel. With a freshly charged battery, it must have tried to compress a liquid to thousands of PSI before the starter motor stalled. If the closer it gets to being just enough to stop the piston from going over the top, the worse. That may have just destroyed that bearing, and/or blew the head gasket right there.
The only thing left to do is try to start it and just drive it till it fails completely, then start all over again. Even if it runs, I'll never know how long I have until rod knock shows up one day. There is nobody to blame but me - each of these mistakes were simple enough as to be inexcusable, but for some reason I didn't have the clarity of mind to see each glaring mistake when it was right there.
I wish I had happier news - we'll see if we can get this thing to run at all soon, but I'm exhausted.
IP: Logged
09:18 AM
SKIDMARK Member
Posts: 1350 From: Chardon, Ohio, USA Registered: Sep 2001
Well, if it gives you any more confidence, assembly lube is pretty durable stuff and only gets washed away by the oil. With a little luck you'll come out of this fine. I had a similar problem with a Honda motorcycle engine that I rebuilt and it's been running now for about 18,000 miles without a glitch. There are a lot of similarities in this engine with the cams riding in aluminum carriers and such so hopefully you will be as lucky as I was.
Ok, I've cleared the cylinder (#6 was hydrolocked from fuel leaking out of the dead injector), and the oil pump is giving me up to 40 lbs of pressure at cranking speed. Provided that the bearing on 6 isn't wiped out (nor the other 5 from all the cranking in vain trying to build pressure), one would figure it'd start, right?
Not quite. It's sputtering and trying to fire, but backfiring and won't catch. Something else is wrong. If memory serves, it seemed to behave the same way the first time I tried to fire it up before the rebuild, but that may not mean anything, since my memory isn't putting on a good show lately, eh?
Possible culprits: - Intake and Exhaust cams switched on accident (It does happen) - ICM or coils are out of whack - ECM not right - I got the motor with a shorted injector which could cause driver damage, though it's reporting a code 12, so... - Something else simple, stupid, and requiring swearing and engine disassembly to fix!
Plug wires switched?....this happened to me on my pushrod 3.4 SE and I though I had a bad engine! Although mine started right up it didn't run very well.
Big vacuum leak?
Bad ground on the coils?
Bad Temp Sensor?
Well, is it running and if so, where's the sound clip or movie?
Well... I took it on the first sucessful test run today! WOO-HAH!!
After swapping in the set of 97 injectors I had, clearing the cylinder(s) of fuel, it turns out I had taken coilpacks off of the ICM at some point - and put them back on wrong, and installed spark plugs according to the markings on the coils! Oops...
Then after that, it turns out the radiator crapped out from sitting so long - the seal along the tank to the core had rotted out, allowing coolant to gush out. I only found out when I couldn't keep my temp gauge from pegging out. Then, on top of that, I found I had the wrong coolant temperature sensor for my guage pod - mixup at the car parts place. After that, all was well, and break in took place without a single hitch!
Once I get some drive time in, I'm going to go back and detail all the work up until this point, including videos, of which I have many. Update soon!
Alright, still working on some bugs before I go back and detail everything to this point. Videos are on the way - I have them edited up, but unfortunately, I'm having trouble getting them uploaded though I should have that solved soon.
The mystery of the day is as follows: I changed the first oil out at maybe 10-15 miles - it was foggy, reddish tinged... and had millions of little sparkly particles in it. So I pull out a magnet.. and the particles won't come to the magnet. Not good at all - it's not ring dust. The reddish tinge is easy - the bright red Redline Synthetic assembly lube, and its not clear, its opaque so ok. The sparkly stuff? Either bearing bits OR graphite bits from the moly graphite assembly lube. I tried to mix some fresh moly/graph lube into clean engine oil - and it WILL NOT mix at room temp. I'd strongly recommend against this type of lube since it'll plug up everything. After further review of the first oil, there appears to be a heavy sludge of moly/graph lube settling on the bottom of the glass I had the sample in. But I'm not sure that there isn't bearing particles in there. Not catching rod knock IMMEDIATELY will result in going through the whole rebuilding phase of the project again, and personally, I'd rather be driving than building motors.
So I sample the second oil last night. I had let it sit for an hour or two. Nowhere near as saturated with sparkles as the first oil... but it seems that there's still **** in there. Including what looooks like a couple copper colored flecks - which could ONLY be bearing material. I had to press the clutch in while doing all that cranking, so could it be flanges of the thrust bearing? Not good...
So remember ladies and gentlemen: when doing your build, avoid moly/graphite assembly lube. ESPECIALLY the stuff made by STA-LUBE, cuz it will clog stuff up and give you false particles in your oil, which could hide real particles of concern. Also: don't forget the oil pump driveshaft, PREOIL by cranking the motor over with the plugs FULLY out, and ECM/ICM disabled, as opposed to cracking them loose and forgetting to remove them, and then you can test start. And make sure everything is good before you start, and go out immediately to break in, once at temperature. Mmm-kay? Good!
Back with more updates as it comes up, and eventually, the backlog of all the work, including the battery box, cables, intake system, and the like.
[This message has been edited by Blue Shift (edited 03-09-2007).]