I looked into those. Pretty nice, but they're saying only 9.25:1 or 9.3:1 CR. If I'm going to shell out for new slugs, I want something that'll generate a little more compression ratio so I can get a little more power out. I'm not sure what they'd cost.
BTW... I know I asked already, but does anybody know if you can put 96+ pistons into a 91 motor for increased compression? Looks like they have .006" higher compression height, and a .040" dome. Will you end up with roughly 9.7:1CR like the 96+ motor, or are the 96+ combustion chambers different too? Will it become interference? If I can do this and get a boost in performance, I might just buy the Sealed Power cast 96 spec pistons with a newer ringset. My only worries are that the motor will become interference, and that I'll have to run premium gas all the time.
since you're looking into it, have you considered 'Gapless' rings? I would be curious to know; if you do find out.
I am sure the 96-7 combustion chamber IS quite different; it is a more distinct 'clover' shape rather than the round 'hemi' shape of the earlier ones. That might be the source of the slightly higher compression? Not sure but possible. It looks smaller, volume-wise.
What I am also wondering now is whether (assuming I could FIND them) the 96-7 top end - heads (and cam carriers I guess) would fit on the earlier block.......??? anyone know?
Might fix a bunch of little issues like ease of cam timing (pulley ends etc), better ports, detachable TB, compression and flow etc.
was running the engine to pull log data for darth when I noticed steam condensing on the coolant lines in front of the TB.. seemed to be coming out of the exhaust heat shield.. I'm hoping it was just pooled water from when it rained but this stresses me out thinking about having to pull the engine.
what proceedure did you use to fill the coolant and purge the air?
IP: Logged
07:13 AM
AaronZ34 Member
Posts: 2322 From: Colorado Springs, CO Registered: Oct 2004
since you're looking into it, have you considered 'Gapless' rings? I would be curious to know; if you do find out.
I am sure the 96-7 combustion chamber IS quite different; it is a more distinct 'clover' shape rather than the round 'hemi' shape of the earlier ones. That might be the source of the slightly higher compression? Not sure but possible. It looks smaller, volume-wise.
What I am also wondering now is whether (assuming I could FIND them) the 96-7 top end - heads (and cam carriers I guess) would fit on the earlier block.......??? anyone know?
Might fix a bunch of little issues like ease of cam timing (pulley ends etc), better ports, detachable TB, compression and flow etc.
The 96-97 heads bolt onto a 91-95 motor with no issues. The cam cogs are different, so if you use the cams, youneed a 96-97 timing belt. I will be using a 91-95 block, with 96 heads, not 97 (97 had a different valve train), and 95 cams/cam carrier.
They will add compression,t he 96-97 heads are 2.5cc smaller.
Thanks guys for keeping this out of the archive... I was just gonna give myself a self bump until I "revive" the thread.
As it stands, I still have my motor apart at the machine shop. My block has just been decked and bored, and the heads can't be too far from done as well (different section of the shop, and I only talked to the engine/block guy today). I just need to order my pistons, bearings, and bring them and my rods, crank, harmonic dampener, clutch pressure plate, and even the bolts that hold them together (yes, the bolts) for a balance. Why the bolts? The guy showed me how he balances the rotating assembly. He showed me this precision scale, which he turned on and zeroed. He said "stand right there... now blow on it". I was 2 feet away but I wasn't surprised at all to see the scale deflect with the mildest puff of air. Sweeet. It may be neutrally balanced - but his definition of "neutral" is different than GM's...
I'm planning on going with .030"/.5mm oversize 96+ spec pistons from Sealed Power (part number H684CP), along with the matching late style rings. They're hypereutectic and have a coated skirt as well. Interesting part is that they have a 1.464" Compression distance, as opposed to 1.458" on the earlier spec slugs. They also have a .040" dome as well. I figure they'll be good for a little extra compression over my flat top stockers. I figure that without the smaller 96+ combustion chambers, I'll end up somewhere between 9.5:1 and 9.7:1 CR counting the head and block deck and overbore. Don't want to go higher and lose the ability to run regular gas if I can help it. It says the late model piston will replace early style with the late style rings (thinner topring and oil ring). They also show up as an option when I look up my 91' spec so I doubt there will be any problems.
As for bearings, has anybody heard of Clevite's new "Tri-Armor" bearings? Clevite now sells a version of their tried and true TM-77 trimetal bearing, but with a teflon/moly/graphite coating. Coated bearings for much less than getting them sent out for a coating. Only problem is that even the machine shop isn't sure of where to get them. Does anybody know if they're making them for the 60 degree motor, and if they're even available yet? Be really cool to make use of some of these... While we're on the topic of bearings, the machinist told me that GM has been known to put special under/oversize bearings in their motors right out of the factory. We're not talking .010"/.020" over, things like .00015" or .002" that aren't available. Sometimes a different size on every journal. He showed me an example from a mid 90's Camaro (LT1?): every single bearing was a different (special) oversize or undersize! The best part: On the thrust bearing, the bottom half was standard size, but the top half was under or oversize!! WTF!?!? Now THAT'S jacked up. So I just went outside... sure enough all my main bearings say "GM" and ".016 US" on them. Damn it. Looks like a line bore for me. Check your bearings on your motors!
was running the engine to pull log data for darth when I noticed steam condensing on the coolant lines in front of the TB.. seemed to be coming out of the exhaust heat shield.. I'm hoping it was just pooled water from when it rained but this stresses me out thinking about having to pull the engine.
what proceedure did you use to fill the coolant and purge the air?
Kohburn - if you were asking me, I haven't actually gotten to run my motor the generally approved way - with coolant. I'll be getting right to it as I get my motor back in place and ready to go again. The motor end is higher than the radiator, no? I wonder if you can make use of that air bleed on the gooseneck tube that goes to the thermo? I still haven't decided where to put my fill cap but I think I'm gonna do what Steven did and get a rad cap welded onto my gooseneck, since it's cheap and effective.
IP: Logged
02:52 AM
Steven Snyder Member
Posts: 3323 From: Los Angeles, CA Registered: Mar 2004
Fill overflow container to first mark. Open the radiator cap, open the filler cap on engine, and fill through engine filler until radiator is full. Put radiator cap back on. Fill to the top on engine filler. Take off heater hose (the one coming out of the LIM is easy to get to). Fill to top of it so the block has coolant in it (when you filled through the filler the first time the block stayed dry since the thermostat is closed). Reinstall heater line and filler cap. Run engine up to operating temperature (make sure your temp sensor is working and that there is definitely water in the block!). You should probably have the air bleed valve open while running it up to operating temperature. Close it when you're getting liquid instead of steam coming out. Let the system cool and make sure the overflow still has coolant in it (the system will suck it in when it cools). That's how I did it and I had no problems except some coolant escape from my filler due to an incorrect pressure rating on the filler cap (I think its supposed to be non vented, since the radiator cap is vented).
[This message has been edited by Steven Snyder (edited 05-05-2005).]
this is how i did my filler recycled from the old 2.8 - spliced the fill neck onto a section of the old coolant crossover tube and used the stock rubber end hoses from the crossover.
I'm thinking about plumbing in a bleeder on the heater line since the thermostat is trapping air in the block
I haven't been able to run the engine for more than about 1 minute watching the temp rise to about 200 then shutting it down
on a side note - I was able to get the clutch and shifter up and running with the 4 speed last night. I had cut the end off the stamped metal clutch arm and welded a large nut on the end and filled the back of it in to act as a cup for the slave rod. in the process i shortened the arm maybe 1/4-3/8" - everything fit great and worked like a charm. the new cable bracket was a little more complicated but it works and the car can now move under its own power (though it has no brakes untill I get the front 11.25" brakes on and bleed the system)
[This message has been edited by Kohburn (edited 05-05-2005).]
well I installed a "flush kit" into the heater core line at the top of the engine to be able to purge the air from the system after afterwards I now need a bit of squeeking coming from the belt area... I'm really hoping the damn water pump or timing belt idler isn't going bad
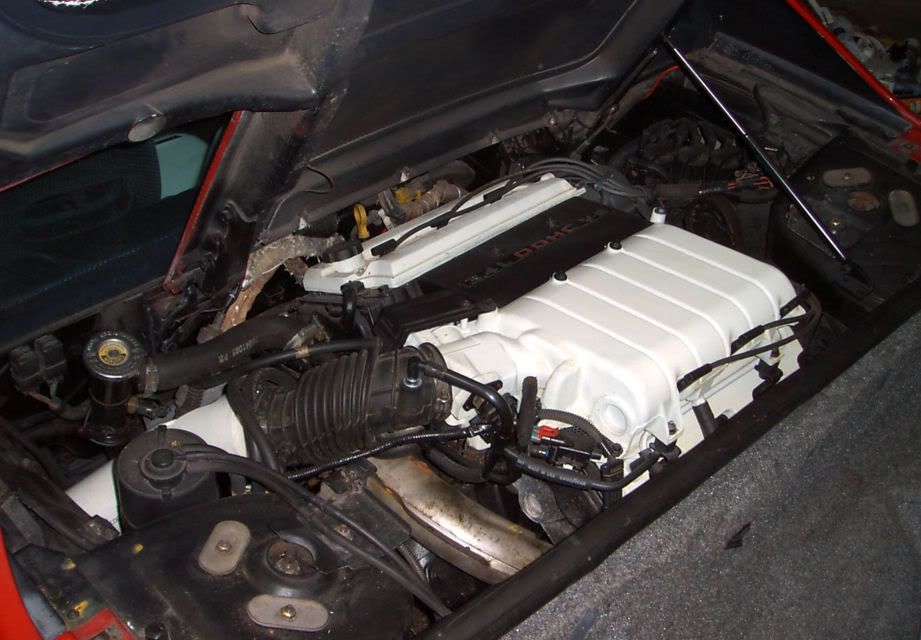
Well, I figured I'd post a little update on what's going on with the project in order to keep the thread out of the archive. I've been ordering all the parts I need to rebuild the engine and waiting for them to arrive so I can take them to the machine shop. Words of wisdom - don't expect any parts place to have a set of 96' Lumina Z34 pistons or rings just sitting on the shelf...
This is what I'm going with:
- Sealed Power H684CP Hypereutectic pistons .5mm oversize for a 96-97 DOHC engine. They have a .006" taller compression height, .040" dome and use a 1.2mm topring, 1.5mm second ring and 3.0mm oil control ring. They also feature a coated skirt - I figure the Federal-Mogul lightning bolt emblem on such a critical component should easily be worth 20 Hp or so.
- Sealed Power E928K Ringset .5mm oversize - to my great displeasure, they appear to be ordinary iron with a moly faced topring. I previously had a Perfect Circle standard size ringset (before I had to rebore) for the 91-95 motor with 1.5mmx1.5mmx4.0mm rings and they were steel with a moly faced topring. In a backwards step, neither company makes steel rings for the 96-97 motor. Damn.
- Clevite 77 Trimetal bearings .25mm undersize for both rod and mains.
- Clevite Aluminum cam bearings (the intermediate shaft uses the same bearings as a 2.8 or 3.1 does - the cam carriers don't have cam bearing inserts - the carriers ARE the bearings - keep that oil clean!)
- Fel-Pro HS 9113 PT-1 (Head Set) - Contains all of the gaskets/seals used in the top end. - Fel-Pro CS 9113 (Conversion Set) - Contains all of the bottom end gaskets/seals. Hell of a deal - costs about as much as a rear main seal ALONE from Kragen, Autozone, etc. - Fel-Pro headbolt set x2 per engine
- AE Clevite Oil Pump
- Cloyes Timing Chain Part Number C382 - Cloyes "Tensioner" Part Number 9-5308 - appears to be an incorrect part for this application
- ARP Rod bolts for a 2.8L, part number ARP-133-6002 - ARP Flywheel bolts for a 2000CC Pinto 10mm ARP-151-2801
- Anything else I forgot
The mandatory pictures and the secrets of removing the pain in the ass cogs, gears, and chains:
Steven came up with a good way to pull the timing belt cog off of the intermediate shaft - thread 3 of the 6 holes in the cog with a tap, and use an ordinary harmonic dampener puller on it. I threaded mine and installed M10x1.5mm permacoils (had them laying around) so I could use common M10 bolts:
I figured out an easy way to remove the timing chain without damaging it or having to press off the crank cog: Use a pair of locking pliers or something to clamp the tensioner shut - this may require using a flat tool to unlock the tensioner so you can squeeze it closed. Then remove the intermediate shaft cover (inside the bellhousing). Simply slide the intermediate shaft out the bellhousing end of the block and let the shaft timing cog slide off into your hand. I wish I would have thought of that before I pulled the crank cog partially off.... Here's a picture of the "camless cam" - it looks just like a 2.8 cam without any lobes: http://img.photobucket.com/albums/v249/pyromaniacal/TDC%20Swap%20Project/Engine%20Rebuild/Intermediate_Shaft.jpg
damn blue shift. when did u move to cali? maybe you could help me with something. being the 1st motor i ever pulled apart the machinist informed me i did everything right except 1 thing. can you tell me which way the rods are facing installed in the motor?
Um... I never did leave CA - born and raised here. Though I may leave sometime in the not too distant future... You sure you got the right "BlueShift"?
As for the rods... I THINK the bevel on the end of the cap (where they grind to balance) faces the front of the motor, though I could easily be wrong. I'll have to double check myself as I'll be installing the rods again when I get my motor back. I'll make sure to post it up when I'm actually sure.
CRAP! After all the fanfare about my pistons and rings finally showing up so I can take them to the machine shop, the shop calls and tells me that they made a mistake in telling me to get .5mm oversize - it turns out they did a .030" overbore, which is .75mm oversize!
So now I'm playing the order and wait game all over again...
that sucks
atleast it keeps you from embarasing me with my lack of work on mine for the last month and i have no real excuse other than having other business to take care of
I've been basically sitting on my butt, waiting for things to happen. I guess I could go finish my wiring harness, but it's hard to do without the engine and car both available for fitting. Same goes for the dogbone, coolant hose work, and exhaust I have to finish. It should be quick work when I get the darn thing back together though. I've obtained the new pistons/rings and they went to the machine shop yesterday (muuch faster this time, I suspect they "resized" a .030"/.75mm piston set when I ordered .5mm pistons, as they had one size stamping over another unreadable stamping, while these have just one. Hmm.) So I'm waiting on the machine shop. The block is bored, awaiting honing and piston fitting. I'm having the rods recon'ed and fitted with ARP bolts, rotating assembly thouroghly balanced, cam bearings installed, and my heads gone through with a couple simple tricks like 5 angle valvework, etc. It seems like Don (who does the cylinder heads for everything from CAT diesels down to import 4 bangers) is backed up, so I hope my heads are done before the shortblock.
Anyways, soon as I get it all back freshened up and ready to rock, I'm gonna start dumping pictures and picking the thread back up as I finish off my build. I'm hoping that nothing else breaks, blows up, or ends up wrecked, cuz things are starting to be a little bit expensive! But hey, it's all good as long as you're having fun, right?
It has begun! I have all of my shortblock parts back and I'm going to start assembling my shortblock when I get the time to do it. I'm also waiting to see if I can get ahold of new main bolts - nobody seems to sell them. They don't appear in the GMPartsdirect catalog, and Rockauto, Kragen and anybody else doesn't have them. There's no recommendations to replace them in any literature I know of either. My only hesitations in reusing them is that every single critical bolt has been replaced except for these (ARP in the rods and flywheel, and new headbolts) . The torque specs also call for 37 Ft-lbs + 75 Degrees. Isn't that typical of a torque to yield bolt? If that's the case, using yielded bolts in an expensive rebuilt engine is baaad. I'm going to check with a dealer, but it'd be nice to find a less expensive source for them if possible.
Here's a list of work done on the shortblock (I'll write about the heads when I get them back in the next couple days):
Line hone mains +.002" Remove/replace freeze plugs Clean block (hot tanking) Prep and magnaflux block Surface block Bore block Hone block Sonic clean block after machining Remove/install cam bearings Clean and magnaflux rods Rebuild rods +.002" Sonic Clean rods Assemble rods and pistons + align Clean and magnaflux crank Grind crank Sonic clean crank Balance rotating assembly
Here's some pics of the parts before I start assembling them:
Thank you. Uhhhhhmm, watch out - the machine shop did a .030" bore on mine too and accidentally told me to buy .5mm pistons! .5mm is .020", .75mm is .030" and 1mm is .040". I had to ship em back and order the correct size. Now would be a really good time to make sure you didn't do the same thing!
813CP - Early application (91-95), 1.5mm topring 1.5mm second ring 4.0mm oil control ring. They have a .040" tall dome for a little more compression (my stockers were dead flat). Cool thing is that you can buy moly faced STEEL rings for these pistons, which must be great for boost or a shot of NAWWWWZ! Application guide says you can also use these in the later model year motors if you use the corresponding rings for these pistons.
684CP - Late application (96-97), 1.2mm topring 1.5mm second ring 3.0mm oil control ring. They have .006" higher compression height compared to the early style piston, and also have the .040" dome as well. I used these in my early (91) motor, looking for a little extra kick. The dome, extra compression height, .030" overbore, and block and head deck will probably make for a nice compression boost without getting too wild. I have no clue if it's going to become interference, but I don't plan on finding out the hard way. The guide says that you can use these in the earlier mtor as long as you use the corresponding rings for obvious reasons. At least they had better work for the early application or I'm F%^&ED! Unfortunately, I was only able to find molyfaced plain iron rings for this piston application, but they should be fine for my needs. Oh, and for some strange reason the later style rings are like 50% less costly than earlier style rings - go figure.
Again, more than one application guide said "will replace early style with [corresponding ring part number]". When you go to look up pistons for a 91-95 motor, they'll also suggest these to you, so I think they'll be fine.
IP: Logged
11:53 PM
Jun 9th, 2005
t76racer Member
Posts: 233 From: Salt lake, Utah, Salt Lake Registered: Nov 2004
Thanks, I apreciate the info. The motor is already built by the shops builder, I also have JE pistons, Premium Sportsman's Series rings #J614F4-3642. My invoice say's "BORE UPTO 04" and the machinest told me it is 30 over. So with the piston from above what problem will I encounter if it is the wrong size? I would really like to understand "why" especially if you had to send these same sized pistons back for a .030 bore? I havent even put the motor in yet so now would be the time to correct it if there is a problem.
Originally posted by t76racer: ... My invoice say's "BORE UPTO 04" and the machinest told me it is 30 over. So with the piston from above what problem will I encounter if it is the wrong size? I would really like to understand "why" especially if you had to send these same sized pistons back for a .030 bore? I havent even put the motor in yet so now would be the time to correct it if there is a problem.
!!! You better check and be sure!
My block is bored .030" over. The machine shop accidentally told me .5mm after a temporary episode of CRS (can't remember ____ ). It's not, .75mm oversize is the same a .030". The guy joked that "we could just drop them in there and let em' bang around" heheh. If you were to put .5mm pistons into a .030" overbored cylinder, you'd have 10 THOUSANDTHS extra clearance between the piston and cylinder wall, which would quickly allow the pistons and rings to smash themselves, the cylinder walls, and the heads too. You'd end up trashing out the block, crank, rods, and heads. I get the impression in the back of my mind that it might ruin your day?
I was reading a story in some automotive magazine, and this guy who's being sent to the new GM Performance Build facility to write an article recalls the story of the first engine he built - a 455 Olds for a jetboat. It blew up the first time they took it out - it turns out he ordered the wrong size pistons. Oops...
Check with the machine shop now, or forever hold your piece(s)...
[Edit]: To say that if you had the engine assembled by any competent machine shop, I find it hard to believe that they'd let something critical like that slip by. I'd call them for sure and check - they may have made a mistake in what they said they bored the block to or something along those lines. However, it's definitely worth confirming.
[This message has been edited by Blue Shift (edited 06-09-2005).]
Bah. GMPD is saying that my timing chain tensioner will ship out by the end of NEXT week. Now that I've also verified the existence of replacement main studs for this motor, I'm going to order those too - so no engine assembly until I get at least the studs. I have the part numbers for those studs - I think that you could also use these in a 2.8 to attatch a 3.4 DOHC windage tray. As a matter of fact, I think this is what the Fiero Store is doing. Try it at your own risk, of course.
Bolt: 476543, pack of 5 (3.02 from GMPD) Stud: 10162001, pack of 4 (1.50) from GMPD)
Cheap insurance, eh? I don't feel right about putting my old main bolts back in, especially with the 75 degrees of torque thing, which sounds like a torque to yield bolt to me. You only need 1 bolt (d'oh!), and 7 studs in the TDC. However, I found that my 91' motor has studs in all 8. WTF? It had all factory bearings and such too - including GM factory "shim" type bearings on the mains that only GM has access to. So unless somebody took out the bolt and stuck in a stud for fun... Anyways, what I'm saying is that I'm just going to order 2 packs of studs and be done with it. Hopefully this fills in the big black hole of information on this topic I found.
manomanoman..... the more I read about the "shim" bearing used right from the factory the more apprehensive I get -about just "using" a used motor as-is. I mean, what about maintaining manufacturing tolerances and quality control? Where did they go? What were they testing if anything? This sounds like an episode similar to the rotten con rods they put in the early 84's that really blew up in their faces. (this airplane was built by the lowest bidder....) They suddenly couldn't guarantee that the crank or the saddles or BOTH would be a certain size? (Something they managed somehow thru decades with zillions of other engines.... ) Were they experimenting with different manufacturing or assembly methods? What gives with shim bearings AND ........ what else have we missed that they did as well?
So I will go ahead and put in my unknown (really) engine and get it running but I am starting to plan now for a complete and quality rebuild if I want this thing to be a serious and reliable runner.
Well, I guess you could look at the fact that they somehow knew they needed to shim up or down .0005" at a time and feel reassured? I guess they just hogged em out quick and if they were a little tight or loose, they'd tweak oil clearance with bearings designed just for that purpose, and end up with a perfectly serviceable motor. Is it how any hobbyist person or machine shop would build a motor? No way. Hell, the machinist showed me like a 60 something SBC that had numbers stamped below the bores - so that the assembly person knew which size pistons to throw in to maintain proper fit! Crazy.
I guess if you think about it, your clearances will be ok (unless the motor is worn out) - it's when you gotta rebuild the motor that it sucks, cuz you gotta line bore and grind the crank and start fresh, which is what I did. If the motor starts and runs fine, then go with it - you'll know quickly if something isn't right.
are your heads all done? ie all assembled? The reason I ask is looking at that 'cross hatch' pattern that has been cast into the cam carrier top. While I have to figure it is done for a reason......... it also is going to retain oil; at least slow down its return back to the oil pan. SBC (and others) have been doing little mods to their engines for decades to try to SPEED the return of oil to the pan...... polishing some areas, even painting insides of the motor with high gloss paint so the oil will 'slip' down there faster, etc etc.
There are other oil control things that would get done too; tapping and plugging SOME of the holes and enlarging and smoothing others so that you would decrease oil dropping directly on the crank and thus windage losses.
Anyway I am looking at my heads now putting together a little shopping list of things to do and check out. I can't see that the cross hatch is going to add that much strength...... the carriers are pretty beefy anyway and .....only hold the cams, right? So I am going to polish away the pattern at least in areas where it starts to let the oil return. Might see about enlarging the hole(s) or at least making sure it is smooth and polished too.
Oiling seems to be a prob (or can be) so I am going to pay extra attention to that. Also checking out oil pump minor mods and possibly a remote cooler and remote/bigger filter. gp
I don't have my heads back yet, but I'm going to see if the shop is open tomorrow so I can pick them up. I was just having a conversation about speeding the oil return to the pan. I have a couple of reasons to believe that prolonged 7000 RPM operation is a surefire way to smear or spin bearings and dry your oilpan out. Obviously, speeding the rate at which oil drains back into the pan would help. Does anybody know if you can open up the oil return holes in the heads/cam carriers some to speed oil return? I have no clue if there happens to be any coolant passages or the like nearby. I've also wondered if anybody makes a performance/racing 2.8 pan? If I could find a winged or deep sump style pan for the 2.8, it wouldn't be too hard make it work for the 3.4 as well. I don't think an extra capacity oil pump is the ticket, here. More oil = less chances of premature engine death.
A most excellent post. My 3.4DOHC is still down in the basement waiting for me to finish up my "clean room" rebuild shop down there. Complete with parts washer, compressed air, and a few machine shop tools.
On the shim bearing thing. I remember very clearly in the mid to late seventies, when I worked in a Chevy dealership as a auto tech (the word mechanic was still in use, and the new term was being phased in). I rebuilt about 100 engines during my years there, and I used plastigage to determine clearances on new stock size bearings, if the crank journals looked good. If one was a little loose, then I could go up to the parts window, and request those "shim" undersize bearings right there. Sometimes I could use a half-shell undersize to get it back into rebuild specs.
I wonder if you could still walk up to a GM dealership parts counter, and still get those for the small block V8's. Many things have changed in 30 years.
Please keep up with your posts. To me, this is the best thing about the forum.
I wonder if you can get the shim bearings too. For people on a budget, it might save you the cost of a line bore/crank regrind. I chose to grind it all and fix it, but it cost a pretty penny.
I'm still laughing about that butchered up LT1 with half of a shim bearing and half normal size on the thrust bearing. I bet whoever owned it wasn't, though...
Ok, I got a day off so I started putting my engine together. I didn't realize how it can be a combination of tedious and nervewracking at the same time! Nervewracking because everything is so expensive, precision, and delicate. That and how you assemble the engine determines how long it's service life is. I found out that trying to wipe the bearing saddles with any cloth, regardless of how "lint free" it is results in little cotton fibers sticking to all the sharp edges. I ended up blasting it with compressed air (I shot the compressed air at a clean white cloth to verify my compressor isn't shooting oil, water, or rust particles out), then used a clean finger to wipe the saddle free of any contaminants. I had all of the shells in the saddles when I realized all the sudden that I had installed the bottom halves into the upper (block side) saddles! The "upper" shells go into the BLOCK, duh. I guess we don't need pressurized oiling to the mains, right? Oops... Once I got the bearings reinstalled correctly, I plastigaged the oil clearances. With a very thin layer of assembly lube on the bearings, I got a reading of .001" oil clearance - on the tight side but within spec, especially considering extra space taken up by the lube. Cool. Once plastigaged, I lubed up the bearings, laid the crank in, installed new GM main studs and cranked them down to spec. I have to find out more about my rings and filing them to spec before I continue on.
I guess I didn't cover a crucial step in installing the crank that's easily and often overlooked. When I talked to the machinist today, he strongly recommended setting the endplay on the crank. To check this requires a dial indictator, but fear not - I bought one from Harbor Freight tools for the princely sum of 6 bucks and change. Yes, 6 bucks. The magnetic base cost 17 bucks. Definitely worth the peace of mind. You can also use it to check actual top dead center, runout, shaft straightness, you name it. I love cool tools.
The idea is to set the magnetic base into a flat surface on either the front or rear side of the motor. Then you press the spindle into the end of the crank. Use a screwdriver to (carefully) pry the crankshaft towards one end of the block. Zero your dial indicator. Then pry the crankshaft the other way and take note of how far the crankshaft shifted - your end play is the amount that the crankshaft will slide back and forth. Mind you that you're measuring distance the crankshaft can freely travel - it's possible to simply keep prying until something breaks, so don't do that. Observe:
That's with assembly lube in there, so it's probably around .005" or so without the lube. Just about perfect.
So what happens if your end play is wrong? If it's too tight, as the machinist told me "You'll burn that $%^*ing thing [the thrust bearing] right outta there!" When you lay the crankshaft in before you tighten the thrust bearing cap, you're supposed to tap the crankshaft from both ends with a rubber/wooden hammer to seat the thrust surfaces. Another approach seems to be holding the crankshaft against the thrust surfaces with a screwdriver as you tighten the main studs. Staggered thrust bearing caps can lead to overly tight endplay clearances. Another thing he told me, was that if the clearance is too snug, even with a perfectly aligned cap, that you can take the bearing inserts and rub the thrust flanges against a piece of very fine wet type sandpaper, backed with a suitably flat surface such as glass until the clearances are correct.
This concludes crankshaft endplay 101 for today...
thanks for all the info; I am taking notes for when I unavoidably rebuild mine!
Question for you on the dial indicator tho'............. if one full sweep of the needle is 1.0" as the face indicates, then the mark "10" is actually 0.1 inch, right? That makes the individual graduations .01 inch? So the needle seems to be sitting at .04 inch plus 'some' which is the smaller dial (sitting at the "4" mark)........? So this is showing 0.044 inch, to me.
I am not sure how your indicator works; maybe it does multiple sweeps for one inch; I don't know. But that is what I get from a direct read off that dial..... I am very ready to be corrected on this, by the way.
Great thread and much appreciated. gp
IP: Logged
08:41 AM
ltlfrari Member
Posts: 5356 From: Wake Forest,NC,USA Registered: Jan 2002
On that last pic just behind the neede there's something that looks like this ->| |-< = .001 in so I think each division on the main face is 1/1000 of an inch. I guess the small dial measures to 1/10,000, i.e. it rotates once per division of the main needle, so that dial is reading 4.4 thousandths of an inch.
Dave, I'm sure you're right; I was just working from the 'big end down' rather than the 'small end up'....... so to speak. But I figured that .044" would be REALLY noticeable end play (think spark plug gap!!) so it had to be something else.
On that last pic just behind the neede there's something that looks like this ->| |-< = .001 in so I think each division on the main face is 1/1000 of an inch. I guess the small dial measures to 1/10,000, i.e. it rotates once per division of the main needle, so that dial is reading 4.4 thousandths of an inch.
Dave - you're just about dead on. That thing on the main (big) dial that says "->| |-< = .001" refers to each increment on the main dial. Each big dial increment is indeed .001" and one trip around the dial = .100" The small dial to the side is complete revolutions of the main dial, from 1-10 x .100". So this thing measures one whole inch, in smallest increments of .001". Never mind the side dial at the moment - it just says how many revolutions in the main dial is at. I just pressed the spindle in a few revs for preload (4, to be exact), then zeroed in the main dial so it was pointing at 0 and read thouandths of deflection only. So mine was reading a bit over .004" - somewhere like .0043 or so with lots of lube slapped in there, so I'd guestimate that it's going to be around .005" dry, which is right where my machinist says is optimal. If you end up with .044" of endplay, you're SOL! Time for that new billet crank... Obviously, I don't feel like undoing all of my fresh main studs to pull the crank and clean all lube out to take a reading now that I have it together but the way it looks, it's nowhere close to being off so I figure we're good to go. For the record, do this BEFORE you lube it all up. Plastigage, too.
[Edit]: To correct some decimals... Time to go back to school! [Double Edit]: What 308 said - how is your project going, Dave? I'm at the 6 month mark so I'm catching up...
[This message has been edited by Blue Shift (edited 06-21-2005).]
A little more on piston rings and the big, headache inducing, head banging on hardwood desk causing lack of information regarding ring gap on these motors. I took them back off of my pistons (I do everything backwards...) and test fit them in the bore and measured their clearance.
... Ok. GM (96+) spec says .008" - .018" for the top ring, and .022" - .032" (!!!) gap for the second ring. That's a big ass gap, from what I know. My machinist also says that even .024" gap on certain KB hypereutectic pistons is extreme, and .032" is nuts. I called the Federal Mogul tech line and after telling him it was a basically stock rebuild, he said something along the lines of "well um... just put them at GM spec, or something, yeah." Great. The most interesting thing was when I looked up rules of thumb for high performance motor building (SBC's mostly). They say .004" per inch of bore for the top ring, and 80% of the top ring gap for the second ring gap. Guess what that turns out to be? .0146" --> .015" for the top gap! Second gap computes at .01168 --> .012" which is really close to the .013 I'm getting! Are these things already ready to drop in, with performance use gaps already set up? There's no mention of ring gapping on the box, or anywhere. In fact there's no indicator that I should file at all, except for the glaring mismatch between what GM wants and what the second ring is set up at. I'd personally rather not file if I don't have to, but I gladly will if that's what I gotta do.
I'm so incredibly confused that I don't know what to do. I'm not going to take a chance with what has to be one of the most critical components in an internal combustion engine. Can anybody give me a couple pointers here, and perhaps shine some light on the big ring gap mystery? I'm pretty much out of places to ask, my machine shop says stay where they're at, and perhaps file a little on the second ring. Another machine shop (that didn't rebuild the motor) says file them to GM monster gap specs. The rings themselves are perfectly gapped for performance specs that may or may not apply to my engine. I'm totally out of places to ask and have no clue who to believe. Anybody have any ideas? This is the only thing holding me back at the moment.
wow sounds pretty weird....... Why not call up JE Pistons, Total Seal (maybe them first!) and Keith Black and throw yourself on their mercy; tell them what you have and what the problem is and see what they say. I bet one of them would help you out. For some reason I couldn't open JE or Total Seal websites tonite.....???
I think the only thing the ring has to 'worry' about is 'growing' due to thermal expansion. So the longer the ring, the longer (again) it will get when heated. So ie a 350 chev piston ring SHOULD actually get longer (than a 3.4) simply due to normal heating and that is reflected in the comment you made about bore size. It is actually circumference, or length of the ring, but it works out to the same thing.
I would think that one of the above would help you out. But the lack of info is amazing.......... and a bit alarming. good luck and keep up the info; it is helping others! gp


 and i have no real excuse other than having other business to take care of


