Kohburn ... Your guess is correct, when they increased the tank capacity in later years, to get the amount they wanted and still fit, the expansion had to be moved outside the tank, if upgrading an older car to the '87&'88 fuel tanks it would be wise to grab that tank out of the donor. Norm
plugged off my TB lines to simplify things - the holes were already tapped
as for the AC lines I'm going a route I don't think anyone else here has.. I'm splicing the new and the old together.. AC lines are very simple other than the special material of the flexible hose the connections are just your basic slide over and crimp - there are union connectors available that can use these same crimping ferules or special band clamps.. I purchased two stainless unions and 8 of these clamps (two on each end of each union - redundancy is a good thing in this case)
I'll post picks when the stuff arrives. its only about 20$ in materials and they are rating for 150psi
IP: Logged
08:21 PM
FieroReinke Member
Posts: 1065 From: St James, MO Registered: Feb 2003
Why are you blocking off the heater coolant connection? I understand blocking off the TB coolant lines to simplify things. I would think a heater would be very important in maryland.
------------------ Chris 3.4 TDC SWAP COMPLETED...this is going to be a fun car
Why are you blocking off the heater coolant connection? I understand blocking off the TB coolant lines to simplify things. I would think a heater would be very important in maryland.
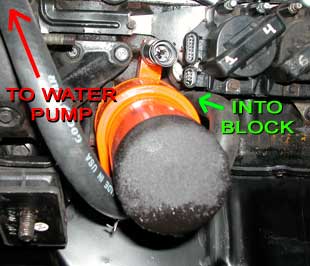
well the TB coolant lines are inline part of the heater line - however it is routed around from the front side of the engine from the waterpump tot he TB then out -- I removed the pipe from the waterpump tot he TB so i can connect the heater lines straight to the water pump - heater will function as normal - just bypassing the TB
IP: Logged
10:16 PM
FieroReinke Member
Posts: 1065 From: St James, MO Registered: Feb 2003
The coolant flows up the engine, down the radiator in the 3.4L DOHC. The coolant from the heads mixes in the LIM, then some goes up to cirle around the throttle body, then it flows down, around the engine, bypassing the radiator. The water that flows through the TB does not pass through the radiator. Also in the LIM, water goes into that heater line that you blocked off. That is where water enters, and then it goes to the core, and returns back near the water pump, also bypassing the radiator. The rest of the water flows through the T-stat, then back to the radiator. The line that you plan on using for the heater is actually a suction line, it is at vacuum, the water pump sucks from it, it doesn't pump into it.
Here is a quick paint shcematic of the 3.4L DOHC coolant lines. This is a FWD setup, stock configuration, the top of the pic is the front of the engine. Feel free to ask if you have any questions.
Also, the TB coolant lines play a vital role. They prevent heater core damage when the enigne is at high RPM and at cold temperature. In these conditions, the T-stat is closed, and the water pump will build pressure at the heater core, damaging it. Therefore when this happens, the excess pressure is fed through the TB cooling lines instead.
------------------ 1988GT 5-speed Black with grey leather, I pick it up this May! 1992 Lumina Z34 5-speed 14.78 @ 92.688, high 13s at sea level 1992 Lumina Z34 5-speed Stock, new crate engine and trannsmission
[This message has been edited by AaronZ34 (edited 03-03-2005).]
I haven't gotten that much done. I've made and installed a set of steel fuel lines - the way I did mine seems so simple and inexpensive that I'm halfway concerned that it isn't going to work in the grand scheme of things. I was going to originally going to run rubber FI hose to make the whole fuel line location thing nearly plug and play - but a fuel fire I had in my 2.8 awhile back has "reignited" my respect for gasoline fires, so steel it is.
I also unwrapped my TDC wiring harness and washed off all the oily muddy crap liquid that the first blown TDC hemmorhaged all over - nasty. I had to carefully use some paint thinner to get all of it off, cuz my normal degreasing methods weren't working at all. It certainly seems to be a big jumbled mess, but as soon as I can sit down and start matching up schematics and stuff, it shouldn't be so bad, I figure. I guess the key for me (being unable to concentrate on several things at once) is to do it slowly, a wire or a pair of wires at a time - thinking about all of it will be overwhelming.
And last, but not least, I took a look into using a passenger side 2.8 coolant hose on the passenger side of the TDC. After trimming about 1" off the motor side, it seems to fit alright. It's kind of a tight fit and the much tighter bent 3.4 hose seems to hit the firewall, so I'm not sure yet. I have to find out what I'm going to do for the drivers side coolant lines. For the heater hoses, I'll probably just route (surprise) heater hose to get it all connected up.
Pictures, as always:
I had to pull my tank to check on a fuel vapor smell I was getting - it turns out that one or two of the steel pipes coming out of the fuel pump assembly had cracked the solder connection, allowing them to move free. Not good. So I removed all the plastic stuff and resoldered:
I have a question for fuel system people: The fuel vapor vent line - on the "disk" that locks into the tank, there appears to be some sort of valve or liquid separator that this pipe is connected to. Out of curiosity, I tried to blow or suck on the pipe to see if anything would flow through this valve/separator - no dice. Is this some sorta strange vapor passthrough that only lets fuel vapor out, or only at a certain pressure? I hope I didn't cook the damn thing shut, cuz then the vapors are going to be building up pressure bad if that's the case... + for anyone who knows the scoop on this.
This is my fuel pump (there are many others like it, but this one is mine!) - uhm, sorry... Anyways, it's a pump from a 1987' Corvette. The cool thing about this is that it's a direct drop in = it plugs right into the wiring, and drops right into place with no mods. Seems slightly noisier (could be that I cranked my tank down tighter), but it cost me like, 3 dollars more than a Fiero pump so I figured it'd be worth it. I've read that it performs no different from the Fiero fuel pump (opinions, anybody?) but it brings me peace to know that it was OEM approved for a 275+ HP 350 V8.
My fuel lines came out good and they were inexpensive and easy to make. I was going to relocated the fuel filter and lines to the drivers side, but realized that it'd be much easier to leave them in the stock location, and cut it just short of where the flex hose begins (leave 1" of steel tube on the ends of the flex hose). I then used a short piece of rubber FI hose to connect them up to two steel lines that run along the "shelf" on the firewall. It seems to be tucked out of the way here, away from the heat - especially with the heatshield in place. I ran them straight for 33", made a 45 degree bend up, and towards the trunk, then like 3 inches later made another 45 degree bend so the lines run paralell with the ground along the drivers side frame. I cut them right where they end up under the Evap can, bent the ends of the pipes out so there would be room to hose clamp the rubber lines on while keeping the steel lines close together, then I used a short length of rubber FI hose to connect to the OEM flex hoses (I left 1" of steel line on them for this purpose). Worked out great, and it cost me 13 dollars in steel pipe, of which you'll need 60" of 3/8" and 60" of 5/16". I managed to wreck a set, so make sure to get acquainted with your bender before you do it.
Now for routing the hosing. I tried a passenger side Fiero coolant hose on the passenger side of the TDC, and it seems to end up right at the correct place, though I'm not sure if it'll have room not to pinch. I trimmed it back 1" on the motor side. I'll get back to you later on how that works:
I'm not sure yet what I'm going to do for my drivers side coolant tube - 86GT3.4DOHC mentioned these part numbers:
"Coolant return: Advance auto parts #D70923(CS) Almost a perfect fit E71035 is the drivers side hose"
Advance Auto appears to be east coast/midwest only... though it also appears to be in with the whole PartsAmerica thing with Kragen and those guys. Some digging around, and this is what I have: #D70923(CS) = Dayco 70923? and E71035 = Dayco 71035? or Drive-Rite E71035?
These parts are cheap, but they're also order only - which means they better be right, cuz there's no returns on order items, I believe. Anyone have any experience or information on these parts? +'s awarded for helpful info, as always.
And the last thing on the list, my freshly cleaned wiring harness and ECM:
Wow, anybody actually reading? Not feelin' the TDC love today...
(/self bump)
i'm reading - very good info you are posting - I spent last night doing my front battery conversion and lifting the fuel tank back up in with my new walbro fuel pump inside. the next step may actually be dropping the craddle to put the TDC on so i'm just a few steps behind ya
IP: Logged
08:37 AM
AaronZ34 Member
Posts: 2322 From: Colorado Springs, CO Registered: Oct 2004
Yop, I'm watching. And trust me, I am always full on DOHC love. In fact I just sold one of my 3 or 4 tonight, my white car is gone to help finance the black GT.
IP: Logged
12:10 PM
PFF
System Bot
Mar 11th, 2005
qwikgta Member
Posts: 4659 From: Virginia Beach, VA Registered: Jan 2001
Im watching and reading. But im a few thousand miles away, so I can't do much. Im living my swap through your thread. Keep it up, its one of the best yet.
Rob
------------------ 88 TTop coupe (CJB #95), 96 3.4DOHC/5 speed in progress
Life on hold again for Uncle Sam. Deployed somewhere in the world, fighting the Global War on Terrorism.
Sometimes you take one step forward and two steps back. I think that's what I did today. As it stood, I was trying to use the Fiero passenger side coolant hose on the passenger side of the TDC - with some trimming, it seems to work alright, but I haven't raised the cradle into place and connected it up to see yet, though I think it'll be alright. I figured that I'd route some of the heater coolant hose. Now the Fiero has a heater return that taps into the return coolant line right before it connects to the rubber hose, so I decided to go with that for the fact that you don't have to touch anything. I removed the return fitting on the TDC water pump and put a 1/2" plug in it's place - just like the Fiero 2.8 water pump has. So I have the passenger side coolant tube and heater return done. So I looked into the drivers side - I still haven't seriously looked into what I can use on the passenger side yet, and I haven't figured out what I'm going to do for an inline filler either, though I have some ideas I'll try when I get time. I was working on the heater outlet side under the throttle body - there's a fitting screwed into the lower intake manifold, and one of those "clip" type heater fittings connecting to a piece of metal pipe. The parts puller cut the rubber hose right after it's crimped onto the metal pipe so I figured that I'd use a pipe cutter and cleanly cut the metal pipe, and hose clamp a piece of hose onto it and route it to the passenger side to the heater inlet hose. Then I got a bright idea - take the straight barb fitting I removed from the water pump, and install it in place of the fragile (and leaky) clip connection fitting on the LIM - it should thread right in. Well, the fitting broke off like it was made of styrofoam! That SUCKED! I put like 2 ft/lbs on it and it busted right off like nothing - musta been on it's way out. It's made out of some really cheap, cast alloy and it looks like it was installed with some sorta sealant that's hardened or a threadlocker. Damn! So I go and get ahold of an EZ-Out and try that... and end up cracking the lower intake manifold! **** **** **** ! This is not good. Well, it turns out that there's a Pick N Pull half price event going on this weekend, they have like whole motors for 74 bucks and transmissions from 30 some bucks! Anybody wanna go junkyarding? I'll need to find a replacement, plus I could use some extra connectors and sensors as well as any other goodies I can find. Since I had to remove the LIM anyways, I decided to reroute my PCV hose and clean things up a little while I was at it as well. That's pretty much where it stands for now.
Steven Snyder - I think I totally just took the lead for "most stuff broken during a TDC swap". Stock, the TDC has this heater fitting screwed into the LIM beneath the throttle body which has a connection which "clips" into it. With just about every one of these I see, they leak and they break really easy. So I decided to remove it, and use the straight barb fitting from the water pump that I removed instead. If anyone intends to remove this fitting from the lower intake manifold, make sure you torch it or something, as it really doesn't want to come out. It's made out of crappy alloy so it's not very strong: http://img.photobucket.com/albums/v249/pyromaniacal/TDC%20Swap%20Project/LIM/Busted.jpg
Something interesting. When I picked up one of the LIM gaskets, I noticed there was a date stamp on it: "96". As I had suspected, somebody has been through this thing. It makes me wonder how somebody managed to jack up a brand new motor in 5 years though (91 model year car)...? It could even be possible that the entire engine is a replacement - there are things that would lead me to believe that it's possible, however doubtful. Photo: http://img.photobucket.com/albums/v249/pyromaniacal/TDC%20Swap%20Project/LIM/Gasket_Date.jpg
Oh man, do I feel your pain.. That fitting in the LIM beside the thermostat is a PITA.. Mine came broken so I decided to use an easy-out like you.. It yielded nearly the same results.. I cracked the intake in the same places you broke yours. I fixed it by V-ing out the cracks and mig welding it with aluminum wire.. I found it easiest to use a die grinder to get the old fitting right down to the original threads and then use a 1/2" NPT pipe tap to clean the rest of it out.. Now I'm going to coat the threads of the new fitting with JB Weld and screw it in so it has no chance of leaking.. I'm also going to give the area I welded a skim coat of JB Weld just to make sure there aren't any leaks there..
wow so glad mine came out easily and went back in no problems..
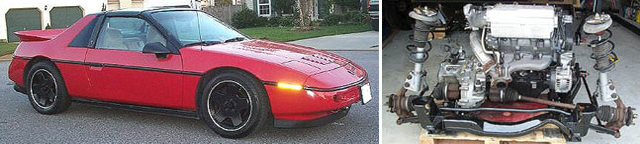
is the oil cooler a water to oil cooler? like you run the bypass line through the spin on sandwich adaptor?
I just today converted my quick-reslease heater core feed line, the one from the LIM, to a barbed fitting with a couple of hsoe clamps. No longer leaks, and it is almost easier to remove...lol
Yes the oil cooler is a water-cirulated cooler. It is basically an adapter between the filter and the block, and water flows around it, oil flows through it.
------------------ 1988GT 5-speed Black with grey leather, I pick it up this May! 1992 Lumina Z34 5-speed Stock, new crate engine and transmission
Want custom equal length headers for your V6 Fiero?
IP: Logged
07:12 PM
Mar 16th, 2005
ricksmastermix Member
Posts: 588 From: Commerce, GA 30529 USA Registered: Nov 2001
I just today converted my quick-reslease heater core feed line, the one from the LIM, to a barbed fitting with a couple of hsoe clamps. No longer leaks, and it is almost easier to remove...lol
Yes the oil cooler is a water-cirulated cooler. It is basically an adapter between the filter and the block, and water flows around it, oil flows through it.
yeah I should have specified I used a nice 1/2"npt to 5/8"barbed brass fitting as a replacement..
the water/oil cooler sounds interesting.. does it pull its water straight from the blocks waterjacket?
IP: Logged
10:01 AM
AaronZ34 Member
Posts: 2322 From: Colorado Springs, CO Registered: Oct 2004
As much as I hate to say it, I really don't know. But I will take a look next time I work on my red Z34, so tomorrow, and I will figure out where the coolant runs from/to.
As much as I hate to say it, I really don't know. But I will take a look next time I work on my red Z34, so tomorrow, and I will figure out where the coolant runs from/to.
*does happy dance*
sweet stumped mr.dohc
it'd be a lot easier to run one of those on a mid engine setup than an air cooled - oil cooler
IP: Logged
11:51 AM
PFF
System Bot
mrfixit58 Member
Posts: 3330 From: Seffner, Fl, USA Registered: Jul 99
the water/oil cooler sounds interesting.. does it pull its water straight from the blocks waterjacket?
I've got a 350 TPI from a 89 Firebird that I've put into a 68 Camaro and it came with a water/oil cooler. It gets it's feed from the heater hose that leaves the motor and returns it to the radiator (I believe). The way it was explained to me is the hot water exiting the motor acts like a pre-heater for cold oil and a cooler for the hot oil.
I've got a 350 TPI from a 89 Firebird that I've put into a 68 Camaro and it came with a water/oil cooler. It gets it's feed from the heater hose that leaves the motor and returns it to the radiator (I believe). The way it was explained to me is the hot water exiting the motor acts like a pre-heater for cold oil and a cooler for the hot oil.
Roy
yeah - it would make sence on the 3.4 to run the heater return line to the cooler then to the pump..
IP: Logged
01:36 PM
Mar 17th, 2005
AaronZ34 Member
Posts: 2322 From: Colorado Springs, CO Registered: Oct 2004
Originally posted by Blue Shift: Steven Snyder - I think I totally just took the lead for "most stuff broken during a TDC swap".
I stripped a LIM hole last night
quote
Originally posted by Kohburn: he water/oil cooler sounds interesting.. does it pull its water straight from the blocks waterjacket?
Here's a pic: EDIT: For clarification, since the pic is at a bad angle, we're looking at two seperate hoses, one goes to the outlet port the other to the inlet port on the cooler. It looks to me like the cooler could be used on anything that uses a similar oil filter as long as you can get the coolant out of the block or someplace else..
[This message has been edited by Steven Snyder (edited 03-18-2005).]
Originally posted by Steven Snyder: I stripped a LIM hole last night
DOH! You'll need yet another coil kit to fix that one, I figure? Hey - It turns out I have a fried fuel injector - does that count for the wall of shame? Heh, heh...
Update very soon... sleep now...
IP: Logged
06:10 AM
Fierobsessed Member
Posts: 4782 From: Las Vegas, NV Registered: Dec 2001
Get some M8 Threaded rod, and some M8 nuts. thread through the LIM If possible, and put a nut on the bottom, if not, then you can at the very least catch several threads at the bottom. Then you should not have to worry anymore... just a suggestion.
the LIM is soft aluminum - so easy to strip threads or crack it.. would be wise to keep helicoil kits around for this engine its not quite like working on the old 2.8 iron everything
but hey, i'd rather strip a thread than break a bolt off in it
thanks for the picture of the oil cooler.. very nice.. I'll have to look around for one now
IP: Logged
06:49 AM
Steven Snyder Member
Posts: 3323 From: Los Angeles, CA Registered: Mar 2004
I went junkyarding - my buddy and I hit the Richmond Pick-N-Pull and went browsing around. I found a 95' Cutty Supreme and pulled the LIM, Fuel rail and injectors, and some other miscellaneous parts from it. I noticed that the heater fitting appears to be galvanized steel instead of the crappy potmetal my first LIM fitting was made of - however it still decided to strip some threads even after the oil and torch treatment... It's alright cuz' I got the new fitting in ok but still... damn heater connectors!
Congrats on having the coil kit on hand for yours...
Time to report in with what I've been doing, however much that's been...
As you know, things kinda came to a halt when I broke off that POS heater quick disconnect fitting at the lower intake manifold on the 3.4. When I tried to remove it - crack, the LIM casting itself broke. Never use an EZ-Out on busted off fittings inside castings... Anyways last weekend (I think? I live in a timeless world...) there was a Pick-N-Pull half price thing going on, so I grabbed one of my buddies and went junkyarding at the Richmond yard. Not only did I manage not to get shot, but I found a 95 Olds Cutlass Supreme with just about everything on it so I pulled the LIM, the fuel rail and injectors, clipped a bunch of harness connectors, the dipstick, and pulled "DOHC 24 VALVE" badges off the car since they were still there. I "accidentally" dropped the dipstick in my toolbox, but they searched it (never had that happen before) and they swiped it back from me! Oops. Well, back to work on the project anyways...
Pictures:
http://img.photobucket.com/albums/v249/pyromaniacal/TDC%20Swap%20Project/LIM/LIM_Comparison.jpg These are the two LIM's side by side. The 91' and 95' pieces are pretty much identical in every way. The heater fitting on the later piece appears to be galvanized steel or something harder and stronger than the soft potmetal that the 91' fitting was made of. Even so, the crusty factor from being immersed in coolant for 10 years still caused it to strip some threads after applying a torch and oil! Still managed to install my straight fitting alright though. Whew.
http://img.photobucket.com/albums/v249/pyromaniacal/TDC%20Swap%20Project/LIM/LIM.jpg LIM being put back into place - notice the two vertical bolts used to "pull" the LIM down into position so all the manifold bolt holes line up. Nice touch, but you'll have to supply your own bolts - don't crank them down past where the mani bolts line up. Oh, and I forgot to remove mine, but that's alright.
http://img.photobucket.com/albums/v249/pyromaniacal/TDC%20Swap%20Project/Fuel/FP_Test.jpg I decided to take the fuel rail and attach the fuel lines directly to it, then I used a battery charger to energize my fuel pump to test the fuel pressure regulator and injectors. Here's my fuel pressure... looks right on, as far as I can tell. I have the fuel rail sitting across my trunk, if you can't tell in the pic.
http://img.photobucket.com/albums/v249/pyromaniacal/TDC%20Swap%20Project/Fuel/Injector_Test.jpg 2000 Watts of halogen light... 12V battery charger, 45 PSI of fuel, enclosed area, and one hell of a way to start a Car-B-Que... Well, I *was* careful and managed not to do that - I was testing my fuel injectors, which I'm glad I did. I just got done reading about how early Multec type fuel injectors like to short out (which must be hell on your ECM injector drivers), and sure enough my #2 injector was dead (shorted) when I tested them. Good thing I grabbed that spare fuel rail. Test your TDC injectors for shorts, people! I swapped out all of the 91' injectors for the matched set of 95's to keep things balanced. Some of them stuck part open on first test fire, but a couple test pops quickly seated them and they worked fine after that. These injectors are interesting compared to the pintle type 2.8 injectors - there's 4 ports up inside the hollow nozzle of these injectors - when it fires, it actually produces two main streams - one aimed at each intake valve - cool! Ok, maybe I'm just a nerd...
http://img.photobucket.com/albums/v249/pyromaniacal/TDC%20Swap%20Project/Fuel/Injectors.jpg 95' Injectors Vs the 91' injector at the bottom. I noticed something - aside from minor difference in the case, there are two colored plastic "rings" on the neck of the later injectors. I can only assume that they're color code for how many lb./hr they flow - does anybody know more about this? The 91's didn't have them, but the 95' injectors do.
http://img.photobucket.com/albums/v249/pyromaniacal/TDC%20Swap%20Project/Hosing/Heater_Connection.jpg I removed the stock quick disconnect heater hose (mine is leaking, no surprise) and clamped some 5/8" heater hose to the end. I'm routing it along the "shelf" on the firewall, but I'm tying to keep it away from my fuel lines so my fuel stays cool. I can only imagine that hot fuel is going to cause problems (not to mention lowering any natrual charge cooling effect on those hot days).
http://img.photobucket.com/albums/v249/pyromaniacal/TDC%20Swap%20Project/General/Badge.jpg Oh yeah, almost forgot about these - they should be good for at least 25 Hp, I figure. What do you guys think, cool or too stodgy (from an Olds)? Yea or ghey? I was thinking they might look cool behind the front wheelwell or underneath the GT on my quarter windows. Feedback welcome.
Another small post, since I have nothing else good going on at the moment.
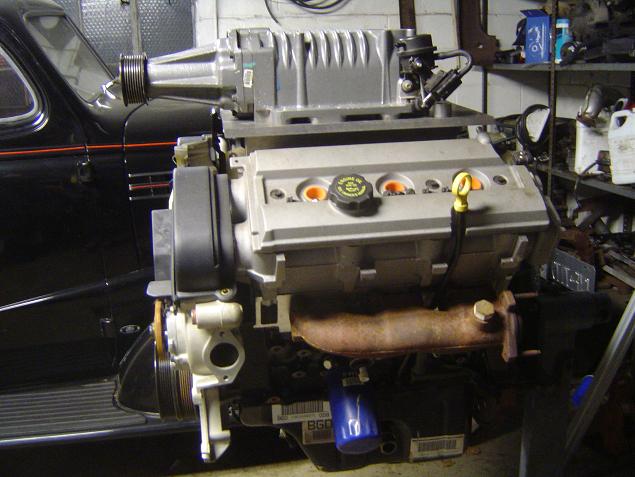
A couple days ago, I recieved my new crate motor! Thanks Blkpearl! It's a pre 96' crate motor (manufactured 97' according to the label on it). It differs from my current 91' junker motor in that it has the later style harmonic balancer, reinforced timing belt cover, and cam position sensor for the 94-95 MAF/SFI applications (won't need this for speed/density). My plan is to get my swap running on my junker, and get everything all tuned properly - it'd be a shame to wreck a new motor getting the bugs out. I also want to see how my rod bearing job and timing set hold up to my driving, not to mention proving to myself at least that I got a "running" motor from that damned JM yard... I'll probably do my BAR inspection on the 91' as well, since things may get interesting trying to get the blessing on a motor not specifically set up for any specific vehicle's emissions equipment. Anyways, this motor is sweet! It's all new with fresh gaskets and everything, 0 miles. Even the exhaust ports are shiny and new as cast... makes ya not want to get it all dirty by firing it up! I bet that THIS is the stuff that AaronZ34's dirty dreams are made of, eh? Hahahah, just kidding man. Only thing I can nitpick is that from sitting, dust and debris has settled down in the intake ports (and the open valves). I'll have to pull the heads and clean it out so it doesn't F my cylinders up, but I've been meaning to see the inside of one of these bad boys anyways, so it's no biggie. One advantage of OHC motors - no pushrods!
Only thing I'd have to "fix" on this one is cleaning some of the debris which fell into the intake ports as it sat. The debris would rapidly destroy the cylinders so there's no choice but to clean it out. I've been looking for an excuse to pull cylinder heads anyways, so here's my opportunity: http://img.photobucket.com/albums/v249/pyromaniacal/TDC%20Swap%20Project/Crate%20Motor/Debris.jpg
You just gave me flashbacks of when I got my crate 3.4 DOHC... mine was 446 lbs on the crate, and it was a 96-97. I still can't believe that I am going to take the whole thing apart. It seems so perfect when its fresh out of the box eh? I was suprised as well to find that the motor was as dressed as it is. If, more like when you decide to pull the heads, change the distributor plug O-ring with one that will last a long time. Another note: it doesnt have pushrods, but it DOES have a mess of lifters, and they WILL fall out of the cam carriers when you remove them. So turn the engine so the bank you are un loading is facing 90 degreese or more, maybe even turn the motor upside down. (empty it first!!!) You don't want to risk damaging the brand new lifters.
But of course, we all have different things we want to do with our projects...
[This message has been edited by Fierobsessed (edited 03-21-2005).]
IP: Logged
05:21 AM
AaronZ34 Member
Posts: 2322 From: Colorado Springs, CO Registered: Oct 2004
It's not an M90. Its an M112 and it cost me $500. I would love to own a Whipple, but it cost more then 6X as much, (twice as much as the engine, the M112, the custom forged pistons, the mains and the modified 4340 steel rods) and has a much higher displacment. The M112 is already more efficient then the M90, and its displacment is probably already more then I need to make close to 400 if not more. I expect 350.
IP: Logged
06:34 PM
AaronZ34 Member
Posts: 2322 From: Colorado Springs, CO Registered: Oct 2004
It's not an M90. Its an M112 and it cost me $500. I would love to own a Whipple, but it cost more then 6X as much, (twice as much as the engine, the M112, the custom forged pistons, the mains and the modified 4340 steel rods) and has a much higher displacment. The M112 is already more efficient then the M90, and its displacment is probably already more then I need to make close to 400 if not more. I expect 350.
Ok I understand, but, neither of those 2 blowers are any good. But I understand that if cost is the issue, than there is no argument. And making good supercharged horsepower isn't all about the blowers displacement.
blueshift; great thread and I am green with envy at the crate motor..... Niiiiiiice! do you think the new timing belt cover and caps would fit on the 91-92 motor? I guess you'll have to pull them to take the heads off - which is prob good insurance to do, by the way. What are you going to do about head gaskets?
I'm totally stoked about the crate motor for sure! Unfortunately, I don't happen to own an M90, an M112, a whipple blower, or a nice turbo, but if I did... Boosted TDC... aaahhh.... huh? Oh, um, yeah anyways back to what I was saying... Yeah I have a sound clip of a turbo 3.4 TDC/DOHC on my computer running the dyno (who was that?) and it sounds so damn good that it's almost scary.
I have little doubt that the ribbed style cam belt covers and inspection covers will bolt right onto a 91-93 - there's essentially no difference between this motor and my 91' motor except for the addition of a cam position sensor, newer style harmonic balancer, and maybe something else I'm forgetting. Maybe the ribbed cam belt covers won't crack and break like the earlier ones...
and the cam cogs+retainers.. 91-93 are a pain to remove - 94-95 are easy and making tweaking the timing easy
my timing cover only broke when i dropped the whole engine on its face in the dirt .. nothing a little plastic welding tip on my soldering gun couldn't fix
[This message has been edited by Kohburn (edited 03-22-2005).]
Been busy lately, and when I haven't been busy, I've been lazy. I've still managed to get some stuff done, though. I fabricated my power steering eliminator pulley, remounted my front transmission mount, and got the plug wires and injector harness cleaned up and fitted in place. I guess that means that I've officially started "wiring" the motor? Hahah, I wish. Anyways, I'm going to keep this short and I'll post another update soon.
Power steering idler project:
I decided that if I were going to go through the trouble of swapping a whole motor into my car that wasn't designed to go in my car, that dealing with a power steering pump that wasn't supposed to be there shouldn't be an issue. I used an approach much like Darth Fiero did, with some revisions of my own. BTW Darth, sorry if it seems like I'm jacking all your ideas... but they are good ideas! I bolted an idler pulley (Part number factory air 45971) to the top hole of the C shaped power steering mounting bracket, but instead of threading the top hole, I drilled through it and used a nut and bolt to secure the pulley. I machined a "hat" out of steel on a lathe which the pulley fits over, and the bolt goes through. You can probably find this "hat" already made, and save yourself the machine time. It woulda turned out better if I actually had the time to do it right. In addition to all this, I also added a 1/4" steel backing plate, which should prevent the casting from breaking or flexing, which some were concerned about in taking this approach. I doubt it's really needed, but I like overbuilding stuff. The washer which holds the pulley bearing in place is from my first TDC's accessory tensioner, to which I superglued a hardened washer for a couple reasons. Just cranked down against the pulley, the retaining washer was rubbing against the plastic instead of pressing on the hardened steel "core" of the bearing. The washer spaces it out, the glue keeps it concentric with the bolt untill torqued down. I love superglue.