ok my suspention got totaly fubared... and i have no idea how to get the spring back in.. i have a spring compressor but it gets in the way every time i try to install it... ive tryed 4 different ways... How do I do this?
IP: Logged
08:30 PM
PFF
System Bot
sanderson Member
Posts: 2203 From: corpus christi, texas, usa Registered: Sep 2001
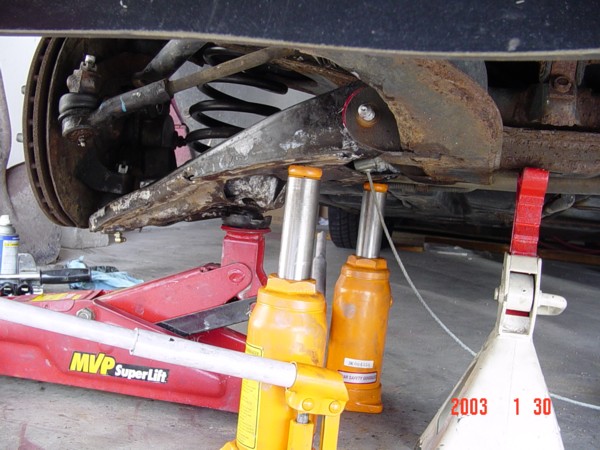
If the car's an 84-87 you should be able to drop the lower control enough to get the spring to catch in place and then jack up under the control arm to compress the spring. Make sure to put a safety chain or cable on the spring in case it comes loose during the jacking process.
On my 88 I had to do a three point jacking method as shown in picture below ( I'd already let down the car jack when I took this picture). This allowed my to bring the control arm up level and then I put the control arm bolts in and attached the ball joint. I used a cable comealong to hold the control arm in place and tweak the postion to get the bolts back.
[This message has been edited by sanderson (edited 10-28-2007).]
IP: Logged
08:48 PM
lord_gufi Member
Posts: 78 From: Spring Valley, CA Registered: May 2007
thats just it... it wont fall low enough... i think i may have to pull theupper control arm off set the thing on... and jack it up from there... what a pita.
IP: Logged
08:57 PM
Rodrv6 Member
Posts: 1910 From: Ball Ground, Ga. Registered: Nov 1999
You shouldn't need to touch the upper control arm. You will need to seperate the lower ball joint from the steering knuckle. Then, the lower control arm will swing down far enough to get the spring in. You may need to loosen the pivot bolts on the lower control arm to allow it to drop all the way.
------------------ Rod Schneider, Woodstock, Ga. "You can't have too many toys!" 1988 Fiero GT 1966 Porsche 911 Van's RV-6 airplane-under construction
IP: Logged
09:00 PM
Oreif Member
Posts: 16460 From: Schaumburg, IL Registered: Jan 2000
Do you have rubber bushings or poly? Since you appear to be having a problem I assume they are the rubber ones.
They may be limiting the control arm movement. The bolts that hold the lower control arm are suppose to be torqued with the suspension loaded. (car weight on the suspension) To install the spring, loosen the lower control arm bolts which will allow the control arm to point straight down. Install the spring using a jack (like pictured above). Once the spring is installed and the ball joints tightened support the suspension with a jack and then torque the control arm bolts.
[This message has been edited by Oreif (edited 10-28-2007).]
IP: Logged
09:15 PM
Oct 29th, 2007
lord_gufi Member
Posts: 78 From: Spring Valley, CA Registered: May 2007
the suspension design is on other gm cars and theres a really nice tool for compressing the springs that puts the fingers inside of the spring where the strut goes(i have an 88) so you can compress the spring on the lower control arm and just lift it up enough to get the spindle on and release the spring. check a tool truck, or good auto parts store, i got mine from snap on.
IP: Logged
11:50 AM
lord_gufi Member
Posts: 78 From: Spring Valley, CA Registered: May 2007
If you've got factory shop manual its got alot of really good information in it including how to disassemble and reassemble just about every part on the car. If you don't have one I'd suggest getting one, its AWESOME, they're still printed off from time to time and I've seen them on e-bay too. They usually go for about $100+, its white with some red striping and has a big 88 at top center, you can't miss it. I'm not talking about the (in my opinion) crappy Haynes manual but the actual GM Pontiac factory service manual.
VERY FIRST I'd recommend finding a spring compressor that will work in the tight space... since you and I appear to have searched far and wide and couldn't find one that fit try this. I eventually went with the factory manual technique anyways and I still have 10 fingers and toes, and to date no broken bones
DISCLAIMER: READ and KNOW the ENTIRE process before you try this... you don't want to be rushing off to the computer to read what you're doing next while the spring is half compressed, also DON'T leave this process half complete not for dinner or a phone call, you want the spring in place and locked before leaving it. DON'T let kids, pets or anybody else play with a half compressed spring and have somebody who can help you if something does (god forbid) go wrong.
VERBATIM FROM THE MANUAL page 3C-8:
1. Position the spring and spring insulator into the upper spring seat. Align bottom of spring with the LCA seat and install. 2. A safety chain through the spring as a safety precaution. 3. Use a jack to slowly raise the LCA and compress the spring 4. Align the control arm bushings to the crossmember and install pivot bolts. Tighten slightly, but do not apply final torque. 5. Remove safety chain. 6. Shock Absorber. 7. Stabilizer bar. Torque bolt to 17 Mm (12 lb. ft.) 8. Remove jack supporting lower control arm and lower vehicle to the ground. With suspension system at its normal standing height, torque LCA pivot bolts
Here it is in English... ie explained
Attach the UCA (upper control arm or A-arm)to the shock tower/chassis using the paddle nuts/bolts
Screw on but don't apply final torque to the UCA bushing hinge nuts
Attach the knuckle to the UCA balljoint, make sure the UCA is secured to the knuckle
Attach the LCA (lower control arm or A-arm) to the knuckle using the lower balljoint, make sure this is also secured to the knuckle
Leave the whole assembly dangling this way, don't attach the LCA bushings to the chassis yet.
TAKE CARE ON THE NEXT STEPS
Put the UNSPRUNG spring into position between the shock tower and the LCA spring seat with its little rubber pads make sure it is twisted into place correctly so it seats properly, you can see the LCA has a depression to accept the end of the spring in a certain way
IMPORTANT: Dangle the chain through the whole assembly (Through the shock tower, spring and hole in the LCA) I used a carabiner to clip both ends together so it would stay in place, a master lock will work too. This is your safety catch if the spring decides to go somewhere you didn't want it to, NOT likely but still safer than not having it
What you should have now is an UCA attached to the chassis with the knuckle and LCA dangling from that with the spring sitting in the middle (unsprung of course). It resembles a large jaw biting the spring and facing towards the center of the car.
Now maneuver the whole "jaw" assembly into position and place a hydraulic jack under the LCA in the center so it doesn't wobble around (it shouldn't)
Slowly raise the LCA, it will pivot from the balljoint attached at the knuckle and the bushing ends will close the jaw towards the hingepoints on the chassis
The LCA will raise to be about 1-2 inches under the hingepoints before the spring starts to compress with any real force, before this point is where you want to maneuver the jack and LCA into place so all it has to do is rise into place, after this point is where you want to be careful with your fingers since the spring will be compressed.
Slowly raise the LCA into position compressing the spring and raising the bushings up towards their hingepoints, if you do it carefully there is very little chance of losing control of the spring as it will be caged in place by the LCA lip at the bottom and by the shock tower at the top, and is safety chained too. You really only have 1-2 inches to actually compress the spring (its actually almost in place with lowering springs).
When the LCA is in position put the hingebolts through the chassis and bushings and screw on their nuts but don't tighten them down yet,
The "jaw" is now pinned closed so once everything is fully in place you can release the jack from the LCA and the "jaw" assembly will become a "box" assembly holding the spring in it and the suspension will be at full down deflection
MAKE SURE ALL THE BOLTS HOLDING THIS TOGETHER ARE IN PLACE you don't want to release the jack with one of the 4 "box" sides (UCA, shock tower, knuckle, LCA) able to release
Take the chain out,
Reassemble the shock, sway bar, bearing, brake dust shield, rotor, caliper and wheel like they are supposed to be and put the car back on its tires.
Once the car's weight is on the tires push down on the nose of the car a couple of times before you can apply the final torque to the UCA and LCA hinge bushings, don't tighten them until the car's weight is back on the tires or you will have a preloaded torque from the bushings acting like the spring to keep the car higher than its resting ride height. Rubber bushings are usually worse about this than poly in this respect.
Thats it... actually very simple to do, the first one took me an hour to do the second took about 20 minutes. Just take care and make sure you feel comfortable with the process before you start and always remember a half compressed spring is a BOMB so put it in and get it secured, just don't rush it!
IP: Logged
06:22 AM
squisher86SE Member
Posts: 1350 From: Franklin, IN, USA Registered: May 2005
Hmm. After I installed my poly bushings, I used a prybar to wedge the spring into place.
I pushed the lower control arm until it was almost straight down, then I seated the top of the spring into its cup and used my hand to start pushing the bottom of the spring towards the cup on the LCA.
As I was holding the spring like that, I started pushing up on the LCA with a floor jack. Not enough to get tension on the spring, but to bring the lower cup (perch?) up to touch the bottom of the spring. Then I positioned the pry bar with the end in the valley of the perch and pushed up a little (trying to force the spring the rest of the way back.
I applied a little more pressure with the jack (Helps to level the spring perch so you're not pushing as much uphill). Once I had the LCA pushing against the spring a bit, I put my weight against the pry bar (36 or 42", big mofo) in earnest. It took about 3 attempts to refine my techniqe on the first one, but once you get it all lined up right the spring pops into place. Then you use the jack to push the LCA up about level and bolt in your steering knuckle.
Rinse and repeat for the other side of the car.
Doing it that way, if the spring slips, it is pointed straight at the ground, plus you don't have very much pressure on the spring until it's fully seated in the spring perches.
IP: Logged
07:05 AM
PFF
System Bot
sanderson Member
Posts: 2203 From: corpus christi, texas, usa Registered: Sep 2001
This method works on my '84 but not on my '88. With the '88 I couldn't get the spring to catch on the lower control arm with the control arm in the down position.
IP: Logged
10:37 PM
Oct 31st, 2007
James Bond 007 Member
Posts: 8872 From: California.U.S.A. Registered: Dec 2002
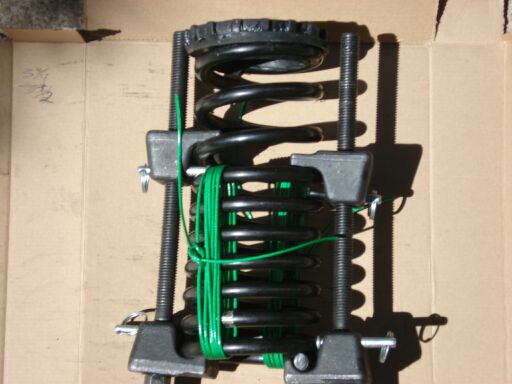
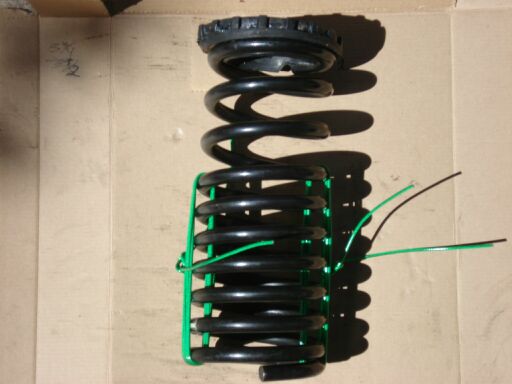
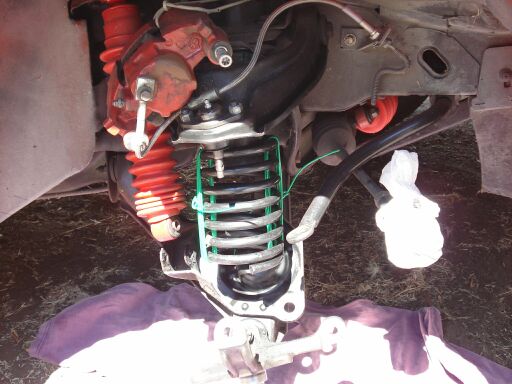
Wait for pics to load (self explanitorey).Compress the coils as much as you can,to clear the hump on the lower A-arm.The vinal coated cable wire is avalable at Home Depo and is 1\16.The 1\8th is too thick.You will need Two,6ft to 8ft lengths of cable wire.There is less slipage with the vinal coated wire.Remember that one end of the coil springs is smaller than the other.When finished,jack the lower A-arm,up.The cable wire can be cut or worked free when everything is bolted back together,but your probubley better off trying to work the cable wire free because you'll need to do the other side (and no the cable won't break).