But first I thought I would give you guys some info on the car itself.
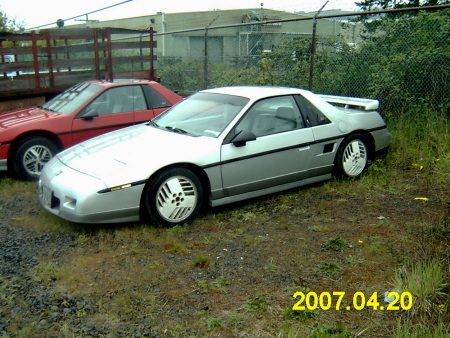
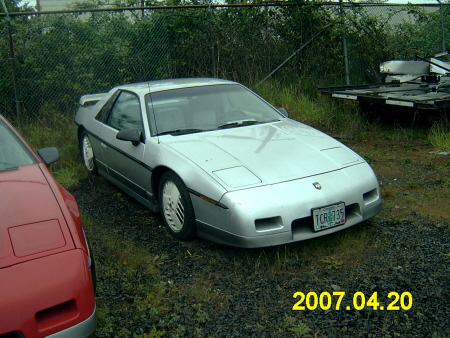
We came accross this car by chance. One day on his way back to town the previous owner had decided to stop into the Harley shop for a look at the new bikes. He ran into my dad and they somehow got talking about Fieros (This subject, suprisingly, comes up alot at the shop). He had mentioned that he had an 85GT 4 speed that had an 88 motor in it. Unfortunately it had a nasty knock. After taking a look at it we decided to make the owner an offer of 200 dollars. He accepted and this is what we ended up with...
Keep in mind this is after a 2 hour session with the pressure washer and some simple green. It was filthy but everything seemed to be good and functional. Someone had painted the gauge needles and such trying to change the color of the dash. That sucks but its no big deal. The new gauges are on their way anyway. They also removed the stock stereo and put in an Alpine Cd player (those bastards! ). Along with that they installed 4 inch two ways in the firewall, near the top, near each pillar. Someone also converted the headlights to an H3 version. And I'm sure you all noticed the wheels. Apparently they are from a 90ish grand prix. That 16 inches of the ugliest things you ever seen. These will be replaced with some grey 87GT rims, for starters. Did notice the rear cradle has been hit in the front bending it a little. We have an extra anyway along with Darryl Morse alluminum cradle mounts. It also had a tow hitch welded to it. Appearently he loved to go jet and water skiing.
Well this is where the story started anyways. I decided on the 4.9 because I want a V8 without the weight of the SBC. It is a road car not a race car. I also wanted the reliability of the 4.9. No flaming here please. This is the engine I have chosen with lots of consideration. We have done a 2.8-3.1 build up, balanced and blueprinted, ported and gasket matched heads. We have also done a 2.8-3.4 build up, balanced and blueprinted, ported heads, gasket matched, roller rockers, and a huge cam. That one is really fun to drive. But now its time for more power. We also have a race prepped 327 ready to go into a fiero eventually. Balancing and blueprinting along with porting and gasket matching is standard procedure with all rebuilds for us. The little 2.5 can move pretty good with some work. So do the 2.8's.
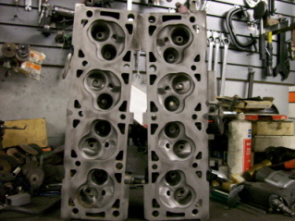
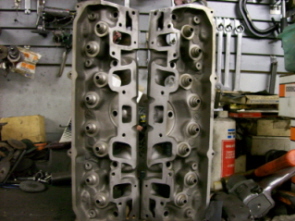
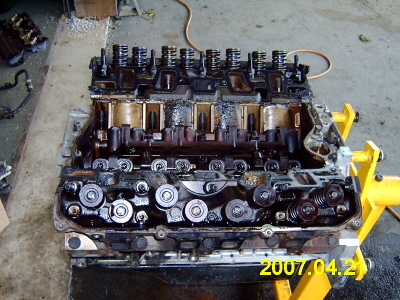
After the teardown, the cleanup started. Here is some pics of the heads. Keep in mind they are clean but they are not even close to being done.
Experiancing technical difficulties......stay tuned. Lots more pics to come as soon as I re-size again. Stupid computer operator anyways.
[This message has been edited by Fieroseverywhere (edited 06-03-2007).]
Just got mine completely torn down. Now I am on the way to start cleaning up everything. Please let me know how to do all of this, and any problems you have on the way. I hope to have all parts cleaned and painted during the week, so I can start assembly next weekend. Hope yours is coming along. Thnaks for this thread. This will be a lot of help not to have to go through this alone. I'm not a professional at this, and don't want to miss something big.
Thanks again, Darren
------------------
IP: Logged
09:32 PM
Fieroseverywhere Member
Posts: 4242 From: Gresham, Oregon USA Registered: Mar 2006
Sorry about that I was trying some different sizes and found out that they were all dropped into the same folder. Rather than try to sort and delete, I decided to delete and re-copy from the SD card. Plus if you hit ESC before you post, it will erase everything you have typed and all the pics you have already posted. Oops
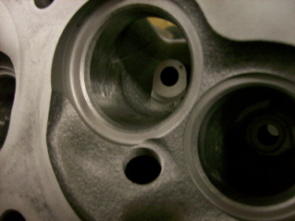
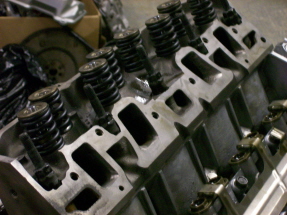
Here are those pics of the heads... They are far from done but some of the material has been removed around the valves...
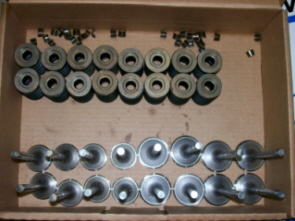
The vavle train came out nice. There is one intake valve that need to be replaced. Its only 10 bucks from Rockauto.com...
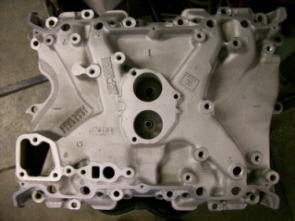
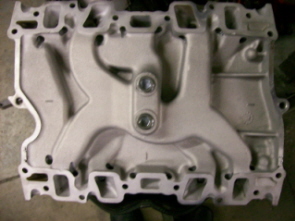
The intake manifolds came out very nice...
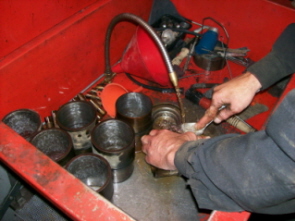
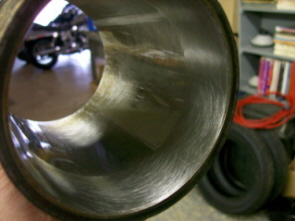
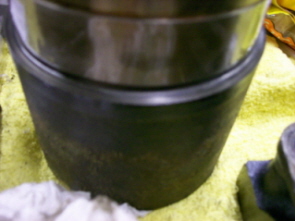
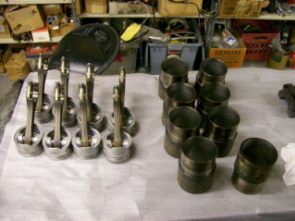
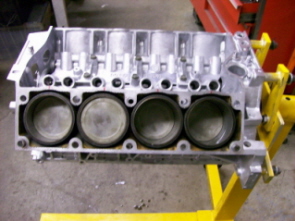
Sleeves getting cleaned up in the solvent tank. This is after the 3 stone hone was run through them to de-glaze and check for imperfections. Next we ran a ball hone through to give it that nice cross pattern. Make sure that this surface is clean and that is is not damaged in any way. Also make sure the matching serfice in the block is completely clean. I used scotch bright, brake cleaner, and the edge of a dull screwdriver to clean it. Make sure you dont scratch the block in any way. It is soft and you dont want to damage it.
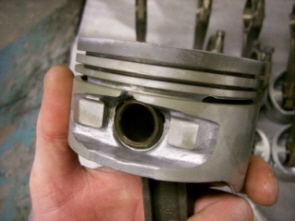
The pistons came out nice also. All of the pins and rods were in great condition. Almost no wear at all. Rod bearing are being replaced...
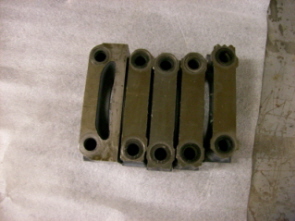
The maincaps were in good shape also. Main bearings will be replaced.
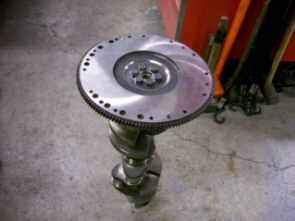
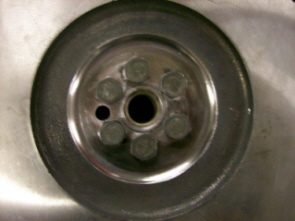
The crank cleaned up nicely and the flywheel has been plugged and re-drilled...
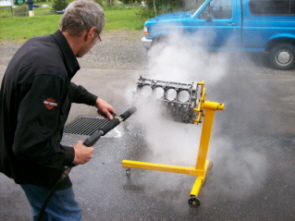
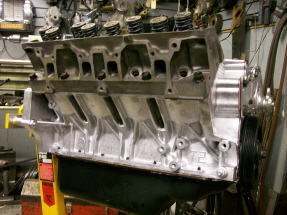
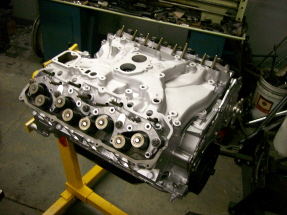
Last but not least we start the final cleanup on the block. Using my dads favorite tool, yep you guessed it...
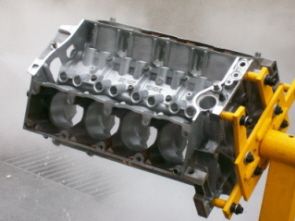
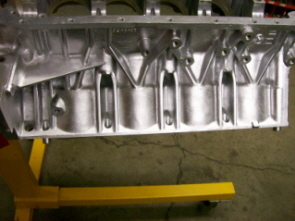
After a dusting of some high temp paint we get a ver nice, tried and true block. All 40 lbs of it ...
Now that all the parts are clean we can get started on the build. Good thing most of the parts came in on friday.
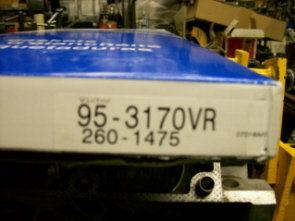
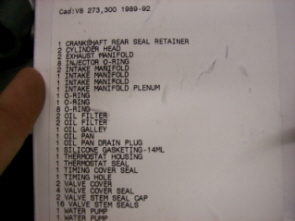
First off the Victor Reinz gasket set is here... Here is the part number and contents list. I believe you can buy them at http://www.victorreinz.com/ .
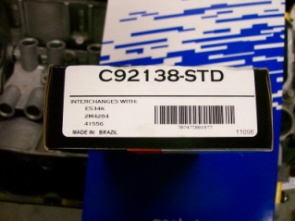
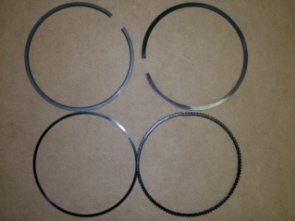
The new rings came in also. They are EngineTech chrome/moly rings. Also part number.
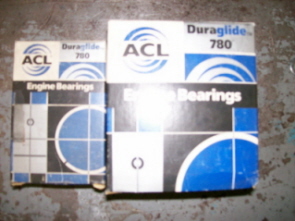
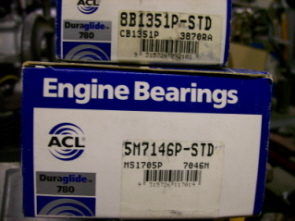
The bearings are ACL dura glide. part numbers aswell.
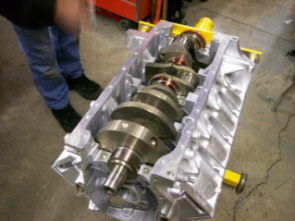
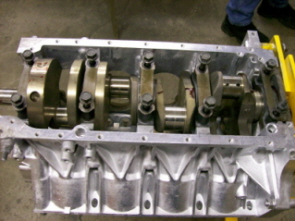
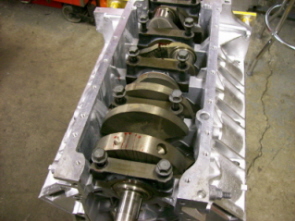
Main bearing go in followed by the crank. Lots of assembly lube on both. Also the main seal on the end...
Next we put on the main caps, again with lots of lube. Torqued the bolts to 25-35-55-65 and finally 85 lbs. Rotating the crank each time to make sure every thing still turns...
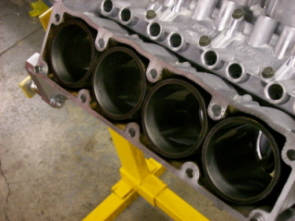
After checking clearance everything looked good so in go the sleeves, piston/rods, and new rod bearings. Make sure the sleeves seat correctly before you put on the orings. Move them around to get them the way you want them. We used a .150 feeler gauge and a strait edge to be sure they were level and not below the block in any way. Then put on the o-rings with some hylomar to help the seal. We used ring compressor, 20-50 oir and yet more assembly lube. Make sure you oil any bolts that you need to torque. You will not get a good torque reading if they are dry.
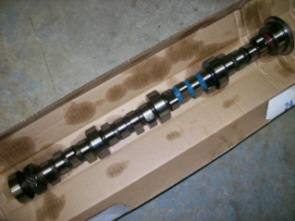
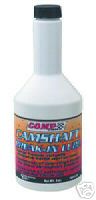
Next comes the new cam. It is a delta cam part number 825R-BP568I. Delta says 450 lift 203 diration. Looks like its actually 480 lift. With lots more lube it went right in. No problems at all
More to come in a couple of weeks. Right now we need a new intake valve, timing chain, and torque specs on the rod caps before we can continue. And exhaust manifolds before we can finish up the heads.
Questions? Comments? Need more details? Enjoy!
[This message has been edited by Fieroseverywhere (edited 05-07-2007).]
IP: Logged
09:59 PM
AquaHusky Member
Posts: 1234 From: Sedalia, Mo Registered: Dec 2006
And sorry about the small pics. Next time I will lower the resolution to get bigger pics. If anyone would like to see full size pics let me know and I will e-mail them to you. They are huge and will easily fill the screen.
[This message has been edited by Fieroseverywhere (edited 05-07-2007).]
IP: Logged
10:43 PM
May 8th, 2007
Fieroseverywhere Member
Posts: 4242 From: Gresham, Oregon USA Registered: Mar 2006
SPEC stage 3 clutch came in yesterday. I will try to post pics tonight. I will also be setting this and the teardown threads as V-books to help sort some of the info better.
What type of assembly lube are you using, and where do you get it, and the Hylomar?
Thanks, Darren
Just the standard RED assembly lube. Real sticky stuff. You should be able to find it at any auto parts store. Here is a link to the Hylomar website. It is spendy here but you can find it elsewhere for less. This will give you all the info about the product itself. Sorry I don't know where you can buy it. We had some around that has been there for years.
[This message has been edited by Fieroseverywhere (edited 05-08-2007).]
Not really. I am currently waiting on a new intake vavle, timing set, and the exhaust manifolds (going to get those tomorrow) that I plan on using. We have decided to go with a dual exhaust since we will be making it anyway. Once this stuff is in we can finish up the heads, intake, install cam, and the rest of the top half of the motor. This is holding up the rest of the rebuild. I should have them in by the middle of next week sometime. The rebuild will resume on 5/18. I should have more pics posted by 5/20. Unfortunately the shop that the car ands engine are at is 125 miles away from me and we didn't find out that these parts were needed until we completed the cleaning of the parts in the beginning of this thread. We will be wiring as a 91 Seville-Eldorado and be using the Superchip programing with the dual O2 sensors (courtesy of Aaronrus on the forum). All emmisions will be retained with 2 cats and 2 mufflers. I could register it at dads house where there is no emissions but I believe that they should be there whether its the law or not. You may lose a little performance but I believe helping lower emissions is something everyone should be involved in despite what your local laws are. More to come stay tuned...
I am currently working on the v-book for the teardown followed by one for the rebuild. This should make it easier to search out the info.
Any other questions?
[This message has been edited by Fieroseverywhere (edited 05-10-2007).]
Bump to the top in hopes that you got some more pics coming along. I think I am going to wait a little longer till I can get some new crank and piston bearings. So I am on hold for a few more weeks till I can get some overtime. Work is totally dead right now, so checks are to little to do much. Hope your's is coming along.
Darren
------------------
IP: Logged
08:58 AM
PFF
System Bot
Fieroseverywhere Member
Posts: 4242 From: Gresham, Oregon USA Registered: Mar 2006
We did a little on Friday. Unfortunately we did not have a camera. Then Saturday morning something bad happened so we did not get any pics or continue with the rebuild. It was a very sad day. I will make up for lost time on the next trip. I don't want to go into datails here of what happened but the rebuild WILL continue at a later date (probably 6/2 and 6/3). I will try to give as much detail as I can and will get the pics next time. Here is what we did on Friday...
First thing we did was put on the heads (no gaskets) to hold the sleeves in. We only used two bolts in the center of each head for this. We then rotated the engine on the stand and torqued the rod bolts to 22 ft/lbs.
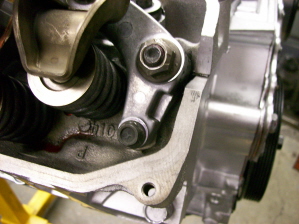
Then we installed the timing gears and chain making sure that the timing marks are alligned. Also make sure that the #1 cylinder is at TDC at this point.
We followed that by taking apart the water pump into the three pieces and cleaning it up in the solvent tank with a brass wire brush. Make sure to remove any rust or loose paint to keep it out of the engine. Be sure not to scratch any of the sealing surfaces during the cleaning process. We then bolted the three pieces back together using a good gasket sealer on both sides of the gaskets. Also, install the new seal in the timing cover. Then we reinstalled it onto the engine.
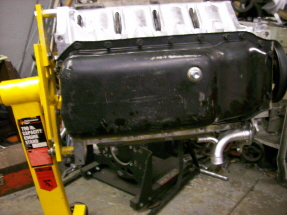
Next up was the oil pump, oil pan, and all associated gaskets. First we pulled the tube that the oil pump goes into to make sure it was clean and to replace the O-rings with new ones (included in the kit). We then put the tube back in and installed the oil pump with the three bolts that hold it in. We followed this with a bead of silicone on the oil pan surface where the gasket goes. Then we put on the gasket and gave it another bead on the other side. On goes the oil pan with the twenty bolts that hold it on. You only tighten the bolts to the point where the gasket starts to squeeze out. This will ensure a good seal.
This is all we did to the engine this weekend. The rest of the time was spent on the heads. We did some more clean up on the valve ports to remove some of the material and to give them a smooth finish. We also started to clean up the intake side ports, removing some material from there. I also took some time and glass beaded the exhaust manifolds that I picked up from the junk yard last weekend. They are off of an 86 deville. We still havent decided to use them or make headers out of the flanges. I will get lots of pics next time either way. More work on the heads will happen some time this week. All of the ports will be gasket matched. We then did a 3 angle valve job. This only took about an hour as they were not bad at all. We ground them at 30, 45, and 60 degrees if anyone wants to know. We decided against the 5 angle job because its not really worth the extra time involved with this particular rebuild. The heads are NOT complete and I will still get lots of pics later.
I know we missed some pics and I will make up for it later. The good thing is what we did that I can't take pics of now is all pretty easy stuff and should not cause you any problems. I will get as many pics of the stuff I just described as soon as possible. More to come...
Questions? Comments?
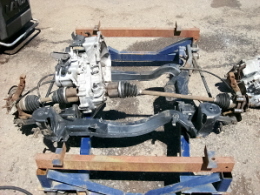
EDIT: I picked up the 88 cradle on thursday night. It had all of the suspension attached along with the e-brake cables and axels. However it did not have calipers or rotors. Still it was an excellent deal at only 50 dollars. We took it over and dropped it off at the shop saturday morning before the incident. We also dug out two isuzu trannies and the brackets to go with one of them. We will figure out which one is the best of the two and use it. The 88 cradle was out of a coupe and originally had one of those isuzus in it. I had bought both trannies from the guy just before I actually got the 4.9. This should be a nice car when it is complete. With a rebuilt engine, newer suspension, poly bushings, new brakes, and an 88 cradle it should be a very nice road car and should give me years of fun!
I will detail the install of all of these parts also. So stay tuned as this car WILL be completed before summer is over.
I will be selling the Darryl Morse cradle mounts and the 84-87 rear control arms with poly already installed. If anyone is interested send me a PM. I will post here when they are gone.
[This message has been edited by Fieroseverywhere (edited 05-20-2007).]
Good write up. Thanks for keeping us up to date. I am very sorry to hear that saturday was a bad day for you. Hope things get better for you. I know there are a lot of people who you are helping out so keep it coming if you can.
Thanks again, Darren
IP: Logged
09:19 PM
May 21st, 2007
Fieroseverywhere Member
Posts: 4242 From: Gresham, Oregon USA Registered: Mar 2006
Don't worry. There is lots more info coming. Still need to...
Finish the rebuild - heads finished up, intake manifold, sensors/accessories, belt routing, ect, the list goes on... mount to the cradle - Build mounts, 88 cradle. I will take tons of pics here and try to make a template for others to follow. install 88 cradle into 85GT - held adapters, hole drill 86-87 GT gauges - Going in with the wiring wiring - time, time, and more time exhaust - this is still up for decision.. stock routing? True dual? Headers? suspension - new shocks/struts, lowering front, coilover rear, poly bushings. brakes - could use some help here... 88 rear, 85 front??
So as you can see there is still lots to do and though I missed one day of pics and one day of work there is still lots more to go that I can make up for.
As always if you have any question feel free to ask.
[This message has been edited by Fieroseverywhere (edited 05-21-2007).]
IP: Logged
10:04 AM
Jun 1st, 2007
Fieroseverywhere Member
Posts: 4242 From: Gresham, Oregon USA Registered: Mar 2006
The clutch on my 85SE went out a couple of days ago. I've had to drive the truck. I hope there is enough left to get it down to the shop (125 miles). I will be continuing the rebuild this weekend. I think I might get the heads and intake done and on the engine. I will make sure to bring a camera this time and I will take extra pics to make up for what I missed. Expect an update Sunday (bastards are making me go to work and cutting my weekend short) or Monday evening. More to come.
:EDIT: Car made it just fine. Dad thinks the pressure plate is going out. I'm thinking clutch plate. We have a bet going.
[This message has been edited by Fieroseverywhere (edited 06-03-2007).]
IP: Logged
09:47 AM
Jun 3rd, 2007
Fieroseverywhere Member
Posts: 4242 From: Gresham, Oregon USA Registered: Mar 2006
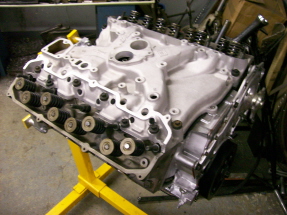
Got quite a bit done this weekend! Well on my way to actually driving it.
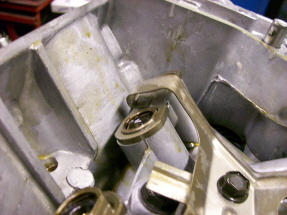
First off I got a couple pics of the installed waterpump and oil pan that I had missed earlier.
First thing I did this trip was take all of the lifters apart to clean them out and make sure there was no internal problems with them. They all showed very little wear. If you do this make sure you do them one at a time becaue you can't mix and match parts between them. I would recommend just buying new ones if you can. You can get them for about 8 dollars a piece from Rockauto.com. If you would like to know how to take them apart send me a PM and I will explain it to you. After puting them all back together. Make sure you pump them up with lots of oil before they go back in. Thisd goes for new ones as well. We then put them into their slots in the block using lots of camshaft lube. Next step is to install the lifter brackets. These are the little piece of steel that keeps the lifters from spining. There are 8 total and each one holds two lifters together. Make sure that you put them right side up. It is marked on the brackets so just pay attention.
Once all of these are put in you can install the hold down for them. It goes in with two 12 mm bolts. They are threaded into alluminum so be carefull when you tightning them down. You dont want to strip the threads. Make sure that the hold down brackets sits on top of the lifter brackets like this...
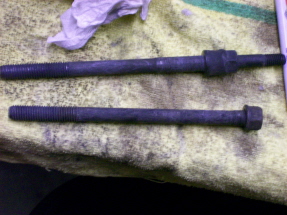
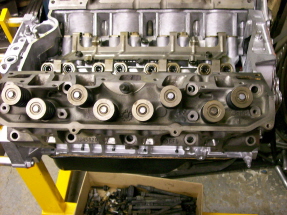
Next I finished up the heads. A nice 3 angle vavle job to make sure the vavles seat well. With the porting and gasket matching done we could start puting the valves, seals and springs in. Make sure to use plenty of assembly lube on the vavles and the seals. Valve goes in, seal slides over the end and is tapped into place using a seal sleeve. You can buy these at any auto parts store. Be very careful not to damage the seals. Also make sure you are completely done with the heads. Once the seals are on they are nearly impossible to remove without damaging them. At this point we grabbed a spring scale off of the wall and thought we would weigh one of the heads. It was complete with valves and springs. It weighed in at 36 lbs. Keep in mind this is only an estimate but its pretty close. Its funny, each head weighes almost as much as the block. Next step is to install the head onto the block. This isnt that tough but it takes a while to do. There are 20 heads bolts in all. 10 of them are studs and the others aren't. The studs go inward towards the center of the motor. They look like this..
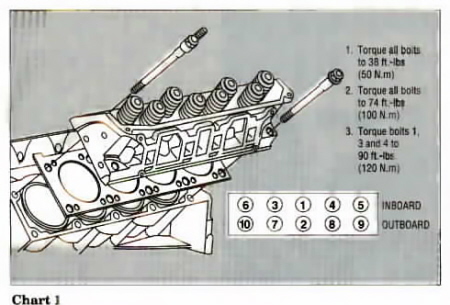
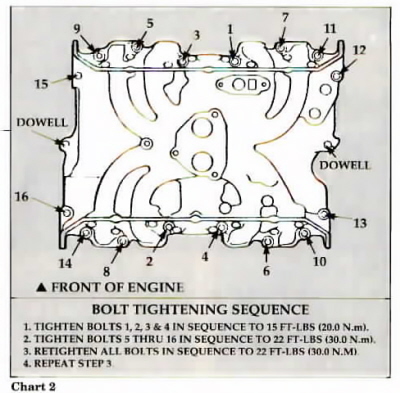
The heads need to be torqued in a particular sequence. Also make sure that you oil the head bolts very well. Both the threads and the seat of the bolt where it meets the head. If they are not lubed they will not torque right. First off if you have not read the "Evolution of the Caddy" article located on Rockcrawls site, you should. I will refer to it as EC from here on out. It has been the most help that I have ever found for this rebuild. You can find a copy here, bottom of the page... http://www.fieroaddiction.com/caddy49b.html
Now for torquing the head bolts look at this page (page 16) of the EC. They are 17mm bolts and there are 20 of them. Here is the torque specs and sequence.
I have to run to work now. I have more pics to post just no time to do it right now. I will get the rest up later tonight. Stay tuned!
[This message has been edited by Fieroseverywhere (edited 06-04-2007).]
IP: Logged
07:16 PM
Fieroseverywhere Member
Posts: 4242 From: Gresham, Oregon USA Registered: Mar 2006
Well, I went all the way to work just to find out that I don't need to go in tonight. Would have been nice for them to give me a call.
Oh well, on with the rebuild.
Just as a referance if you are using a "clicker" type of torque wrench make sure that that the final torque of the bolts is done as slowly as you possible can. You want to hold the wrench as close to the clicking point as you can without actually having it click. This will ensure that you are giving the bolts proper torque. Inexperianced people tend to rush through it and figure they are done just because the wrench clicked. The slower you go the better torque you will get on each bolt. One of the standard dial types work very well also.
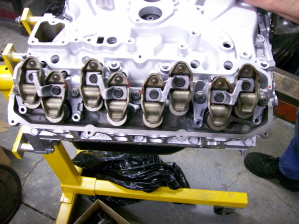
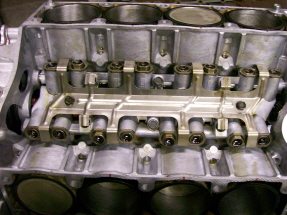
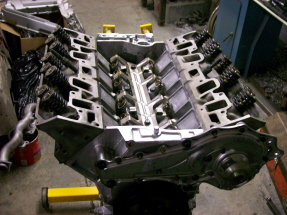
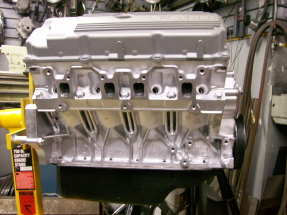
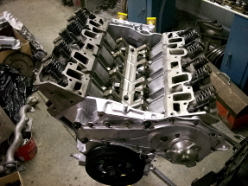
Here are some pics of the heads installed on the block.
Next up is the intake manifold. This one took quite a while. There are a total of sixteen 10mm bolts. They come in three different lengths so make sure they are in the right places before you torque them. You can tell by the height of the intake manifold as it sits on the heads. There is also a sequence for torqueing them aswell. This is all you really need but I still definately say that anyone doing a rebuild on these 4.9's should read the EC.
Make sure that all of the gasket surfaces are clean (gasket scraper). Be very careful when doing this though, the intake manifold is alluminum and can be damaged pretty easy if your not. Make sure that you use some silicone sealant at the points between the rubber end gaskets, front (crank pully side) and rear of motor (bellhousing side) and the head to intake gaskets. You don't need to cover everything just the little corners where the two type of gaskets meet. Top and bottom on the rubber end gaskets. Put on the manifold, remember the two dowel pins. If you have an cordless drill with a socket adapter bit use it. But remember you are not tighening them your just running them down so you can torque them. The gaskets need time to settle. You will need to re-torque all of the bolts slowly at least 3 times to ensure they are to spec. Then do it one more time, just to make sure.
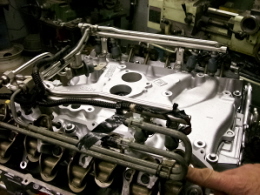
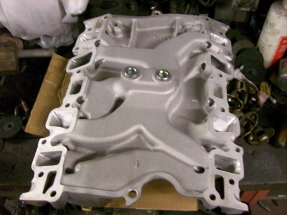
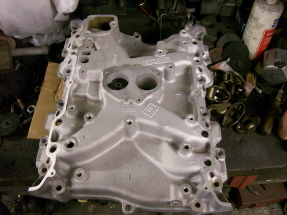
Here are some pics of the intake manifold after gasket matching and final cleanup.
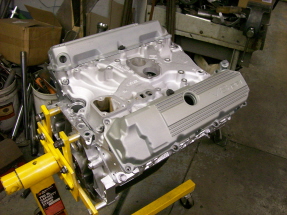
Here is a pic of the intake manifold installed.
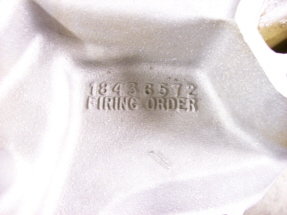
Taken off of the intake manifold, might come in handy later. I have huge, full size, files of this and all of the other pics. If you want to see one copy and paste it into a PM and I will e-mail you a huge, high resolution copy. Make sure you give you addy if you don't have it on screen.
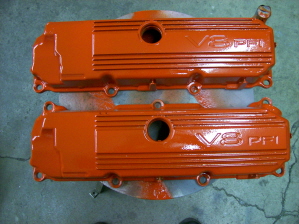
Here is a few with the rocker covers (primered only) put on, just for the fun.
At this point we only had about 20 minutes left in the day so all we could do is install the rocker rails. These are very easy. Each one has five, self locking nuts, 15mm. We used a little red loctite just as an extra precaution, but it is not necissary. These nuts were then torqued to 37 ft/lbs as listed on the last page of the EC.
We've done alot so far. But this is just the beginning, there is still so much to do. I was looking around today and found that Dad has a silver fastback clip and decklid lying around. I talked him into trading me for my red fastback conversion pieces. I have a set of GT taillights and harness (most of it) and have 2 of the last, brand new, sets of quarter windows (Originals still in the boxes) that GM had, sitting in a closet........ hmmmmm, wonder what I might be able to do with that.
Anyways, more to come in a couple of weeks. Probably around the 17th or 18th.
Questions? Comments? Need bigger pics?
[This message has been edited by Fieroseverywhere (edited 06-04-2007).]
IP: Logged
09:25 PM
81 4.9L X-11 Member
Posts: 167 From: S. FL, err now Philly !! Registered: Sep 2006
Thanks guys! I appreciate the kind words and the +'s. I was just looking at some of the pics full size and I noticed how blurry some of them were. I will try to do a better job with the camera in the future. Cant tell if its me shaking the camera or just out of focus.
By the way Bobadoo, love the black betty build. One of my favorites. How is your carbed 4.9 coming along?
I was in permanent "Lurk Mode" for a couple of years on this forum. I just didn't have what I needed to get registered. Now that I'm in I can contribute some. I snapped some pics of the other 14 fieros this weekend and was thinking of starting a thread with pics of all the makes and models. Maybe a list of the differences between years and models. We are missing a few but I'm sure there are enough people to fill in the blanks here. We have 20 fieros total including the 4 parts cars and not one freakin 87 in the bunch. Oh well, the garage (34x40x10) should be done in a month or two and then we will start on some major rebuilds and projects. There is at least one that will be completely scattered.
Thanks again guys.
[This message has been edited by Fieroseverywhere (edited 06-04-2007).]
IP: Logged
12:58 PM
tjm4fun Member
Posts: 3781 From: Long Island, NY USA Registered: Feb 2006
Very nice writeup. all the correct pertinent tech info and procedures, with pics to back it up, will be a great help for any new builders here. Oh, a question asked earlier, that assembly lube is most likely called Clevite 77, that;s what I use, red sticky stuff, most excellent for any engine build. the only place I don;t use it is on the cam lobes, that gets a black moly assembly grease/lube I have in a small tub, was made by crane, and I don;t know if it;s available anymore, great for breakin on a cam.
Again, great writeup! keep up the good work there!
IP: Logged
06:14 PM
PFF
System Bot
Fieroseverywhere Member
Posts: 4242 From: Gresham, Oregon USA Registered: Mar 2006
Very nice writeup. all the correct pertinent tech info and procedures, with pics to back it up, will be a great help for any new builders here. Oh, a question asked earlier, that assembly lube is most likely called Clevite 77, that;s what I use, red sticky stuff, most excellent for any engine build. the only place I don;t use it is on the cam lobes, that gets a black moly assembly grease/lube I have in a small tub, was made by crane, and I don;t know if it;s available anymore, great for breakin on a cam.
Again, great writeup! keep up the good work there!
Yep. Thats the stuff. Clevite 77. I couldn't remember the name at the time. I've heard of using the moly grease before but I've never tried it myself. I use a camshaft break-in lube on the cam and rollers of the lifters. Its black as can be. Great stuff and it limits the wear during the break-in period. Mine comes in a bottle and in a little thicker then oil but is still pourable. Worked perfect for pouring onto the cam with the lifters out. This is the stuff I used.
Thank you for the compliments!
[This message has been edited by Fieroseverywhere (edited 06-04-2007).]
Which ones do you want? I have all of them and they are huge. I'm talking 2848x2132 big. I had to re-size them to 10% of their original size to fit within the size constraints of this forum. I can probably e-mail a few at a time depending of how big of a file your e-mail account will allow you to recieve. Just copy and paste the ones you want into a PM and I will send you the full size copy's.
IP: Logged
07:36 PM
Fieroseverywhere Member
Posts: 4242 From: Gresham, Oregon USA Registered: Mar 2006
I ordered some more parts last night. Here is a list of what I got.
1) one 93 camaro 3.4L belt tentioner assembly - Rockauto $29.79 ( per this thread: https://www.fiero.nl/forum/A...050818-2-052483.html ) 2) one 90 Chevy Astro 4.3L w/o AC tensioner pully - Rockauto $11.19 (per same thread as above) 3) one Gates premium 180* t-stat - Rockauto $5.95 (only because I'm using the 91 seville Superchip programing) 4) one CSI inline filler neck part #csi-973 - Summit $27.95 (as listed on Rockcrawls site) 5) one 20lb radiator/thermo cap red with built in temp gauge - Summit $19.95 6) one set 88 poly trailing arm suspension bushings - Summit $51.39 7) one set camber adjusting bolts - Summit $9.95
I will edit this post later to add some pics of the items bought for anyone who would like to see them.
Still needed.
1 engine oil cooler. (Summit - PermaCool p/n 691 engine oil cooler per Rockcrawls site) $42.39 1 three wire temp sending unit - I have the part numbers at nome and will post later - Monsterpartsonline.com $13
I'm sure there is more but I can't think of them at the moment. More to come
Have any of you 4.9 guys out there ever used the Summit 4.9 AC delete bracket before? http://store.summitracing.c...751+115&autoview=sku I cant decide whether it will work or not. I'm thinking it will put the belt too low and without the P/S pump it will interfere with the water pump pully. Anyone have any experiance with it?
[This message has been edited by Fieroseverywhere (edited 06-12-2007).]
IP: Logged
12:46 PM
Jun 7th, 2007
Fieroseverywhere Member
Posts: 4242 From: Gresham, Oregon USA Registered: Mar 2006
1st) He told me that he has a front 4.9 mount bracket that I can buy off of him. 2nd) I got a speedo circuit ordered 3rd) He solved my brake upgraded delema. My problem was, How do I upgrade 85 front brakes and 88 rear to match? I was talking to him about the 88 cradle swap and how I wanted to use 12" corvette rotors and 88 calipers all the way around. I was originally going to try to buy the 12" brackets/centering rings for an 88 rear from him and make my own brackets for the 85 front for use with the 88 calipers. After a short conversation I found out that he has already done this exact thing on an 87 recently. He told me that he could make me a set. He will also be selling the 12" vette rotors pre drilled with the fiero bolt pattern. I'm still in shock. That man knows his $hit! With a couple messages back and forth I got more info and more accomplished then my last month searching on this forum.
That pretty much covers it for parts I'm going to need for this swap. If anyone can think of anything I'm missing please let me know. Estimated total build cost including car itself is in the 2500-3000 range. I have all the reciepts and will post a total when completed along with a complete parts list.
I really can't wait to drive it!
IP: Logged
07:28 PM
Jun 8th, 2007
Frizlefrak Member
Posts: 2921 From: El Paso, Texas Registered: Aug 2003
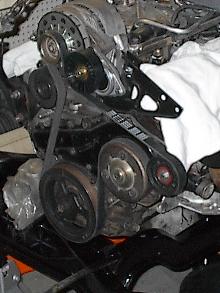
No need to use the A/C delete bracket. Your belt will just come up from the crank pulley, back over the water pump, and then straight to the idler.
One word of caution....pulley alignment is absolutely critical. I learned this the hard way. Cranked up my 4.9 and the belt howled like a banshee. Took a while, but we finally figured out that the idler pulley was shimmed too far out, causing the belt to slide over the water pump pulley at an odd angle. One fewer shim, and it hushed up nicely. A quiet belt is a very nice thing
I used the Camaro tensioner, and the idler is from, if memory serves me correctly, a 2001 Dodge Dakota 5.9 engine. I just asked for the smallest 6 groove pulley they had.
Here's how mine looks...
You will love the 4.9 when it's finished. It will be worth all the trouble and then some.
IP: Logged
02:44 AM
Fieroseverywhere Member
Posts: 4242 From: Gresham, Oregon USA Registered: Mar 2006
Thats what I thought. At first I was thinking of using the AC delete pully instead of the idler but figured it wouldn't work without the powersteering. So I got the one (idler pully) on the way with the tensioner also. I have a 90" six groove belt that we will use to measure the size of the belt needed. Thanks for the advice!
[This message has been edited by Fieroseverywhere (edited 06-08-2007).]
IP: Logged
09:45 AM
Jun 9th, 2007
aaronrus Member
Posts: 870 From: bradenton, FL USA Registered: Nov 2003
Thats what I thought. At first I was thinking of using the AC delete pully instead of the idler but figured it wouldn't work without the powersteering. So I got the one (idler pully) on the way with the tensioner also. I have a 90" six groove belt that we will use to measure the size of the belt needed. Thanks for the advice!
OUT OF CURISOTY.. wHATS THE DEAL WITH NOT RUNNING A/C IN THE CAR?.. PROPS FOR THE BUILD THREAD.. ME GUSTA...
IP: Logged
05:59 AM
jeffndebrus Member
Posts: 2772 From: Jacksonville, Fl- usa Registered: Aug 2001
I am amazed at you guys that have attempted a 4.9L rebuild. That's one difficult powerplant to rebuild. If you want some good 4.9L info, try locating Rick Stewart on this forum. Rick did one of the neatest and high $$$$ 4.9L performance builds that I've ever seen. Last I spoke to him at Carlisle he had the engine up and running and was in the tuning mode. If you were at Carlisle Ricks Fiero was the 4.9L with the Allante long runner intake.
------------------ 87GT 3.4 Turbo- 0-60 5.2 seconds 2006 3800SC Series III swap in progress Engine Controls, PCM goodies, re-programming & odd electronics stuff " I'M ON THE LOOSE WITHOUT THE JUICE "
IP: Logged
11:07 AM
Fieroseverywhere Member
Posts: 4242 From: Gresham, Oregon USA Registered: Mar 2006
OUT OF CURISOTY.. wHATS THE DEAL WITH NOT RUNNING A/C IN THE CAR?.. PROPS FOR THE BUILD THREAD.. ME GUSTA...
There is only one reason why I'm not running AC in the car. The car did not have it form the factory. I know I can and may add it later but it is a lot if extra to equip a car that is not set up for it. Thats it, nothing more. Its wierd this is the only GT I've ever seen that had all of the options deleted. It only has power windows and decklid release. It would be nice to have AC but at the 600-700 dollar range for a complete install it just isn't worth it yet. It only gets above the 100 degree about 1 week per year here in oregon. I can drive something else during that week so I think It'll be ok.
[This message has been edited by Fieroseverywhere (edited 06-09-2007).]
IP: Logged
12:30 PM
Fieroseverywhere Member
Posts: 4242 From: Gresham, Oregon USA Registered: Mar 2006
I am amazed at you guys that have attempted a 4.9L rebuild. That's one difficult powerplant to rebuild. If you want some good 4.9L info, try locating Rick Stewart on this forum. Rick did one of the neatest and high $$$$ 4.9L performance builds that I've ever seen. Last I spoke to him at Carlisle he had the engine up and running and was in the tuning mode. If you were at Carlisle Ricks Fiero was the 4.9L with the Allante long runner intake.
You might be suprised. People have made this rebuild out to be difficult. Its not any harder then any other engine. It just requires a little more attention to detail and care. I've talked to Rick a couple of times in this and the teardown threads. He had some good advice both times. I found his build thread very helpful also.
One nice thing about the area I live in is the options for racing that are close by. There is the Woodburn 1/4 mile strip about 30 min away. There is an 1/8 mile track about a hour away. PIR (Portland International Raceway) is about 20 min away and they have autocross and road course races during certain times of the year. Not the mention the hundreds of miles of curvy mountain roads that line the countryside which is what I'm actually building the car for. Its a curse sometimes, I just like to drive fast and take the corners. I guess its the only time I really feel at peace.
EDIT: The CSR inline filler showed up yesterday. Expected delivery on the rest of the stuff is the 12th and 13th. The rebuild will continue next weekend (6/16-6/17) as scheduled. Garage is getting close to being done and will help tremendously when it comes time to install into the car. I'm also considering adapting a 4.1 dogbone bracket to work with this install as the third mount point. If anyone has any experiance with them let me know. Stay tuned!
[This message has been edited by Fieroseverywhere (edited 06-09-2007).]
If you're out at the bone yard, you might look at the 4.9 out of a Seville as well. I am almost positive they had a dog bone mounted to the side of those as well. Might be a little better or at least a little different, so you can see which one might work better. As far as the brackets on the Seville go, I think the only difference might be that you might need to get the trans dipstick out of that car as well. The brackets look to bolt right up.
Darren
------------------
IP: Logged
10:52 PM
Jun 10th, 2007
Fieroseverywhere Member
Posts: 4242 From: Gresham, Oregon USA Registered: Mar 2006
Nice. Thanks for the heads up. The local u-pull yard has the best prices I have ever seen in a yard. They also have about 15 4.x caddys to choose from. I will go check it out today and see what I can find. Thanks again.
[This message has been edited by Fieroseverywhere (edited 06-10-2007).]
our yard is really reasonable too. They have a ton of 4.9's nowadays. They used to be hard to find but now theres a dozen out there all the time. Have even seen 2 northstars out there, but the engines were gone before I was there. Probably pulled by the owners before they set the bodies out in the yard, if they knew what they were doing. Good luck on the hunt. Anxious to see what you get figured out on the dogbone. Thnaks for all the updates.
Darren
------------------
IP: Logged
03:19 PM
Jun 18th, 2007
Fieroseverywhere Member
Posts: 4242 From: Gresham, Oregon USA Registered: Mar 2006
Its time for a few more updates. First off I finished the deal with Rockcrawl. On its way is a main 4.9 engine mount. This will save me a bunch of time. Second, there is a set of brake caliper brackets coming. This is a special set made to use the 12" corvette rotors and 88 calipers on an 85GT with an 88 rear cradle (get all that? ). Rockcrawl was nice enough to remove a set from one of his cars to make me up a set specifically for this use. What a guy!
I also got most of the parts from Rockauto order. The camaro tensioner and 180* t-stat showed up but they sent the wrong idler pully. Instead of a tensioner pully from a 90 Astro van they sent the idler pully from one. The difference is the idler pully has no grooves in it. So after a quick call to get it all figured out I sent back the idler pully and they sent out the tentioner pully. It is scheduled for delivery tomorrow.
The Summit order also showed up. First up was the CSR inline coolant filler. The next day the 88 rear poly bushings, temp gauge radiator cap, and one of the rear camber adjusting bolts showed up. Oops, looks like there "set" only includes one of the bolts. Seems to me that a set should include enough to to at least two of the wheels. I ordered up another and paid there stupid 10.95 handling fee again. Oh well, it is scheduled for delivery tomorrow also.
We did a little on the rebuild this weekend although most of the time was spend working on a Schwinn scooter for a friend of mine. Kind of an interesting little bike there. The engine is a 49.5cc single piston overhead cam engine. It is connected to a CVT (constantly variable transmission). It supposedly gets 117 mpg.
Anyways back on topic. We also spent some time cleaning up the cradle to get it ready to mount the engine since we are getting pretty close to that point.
I have some pics of what we did on for the rebuild along with the cleanup up of the cradle and tranny. One thing I found out this weekend is that there are minor differences between an 85 isuzu and 88 isuzu trannies. I took some side by side pics for comparison purposes if anyone is interested. I also found out this weekend that the EGR valve is garbage. I will have to pick up another. Unfortunately, they are 70 bucks each but since I have no choice...
I will post pics and continue the thread later tonight.
[This message has been edited by Fieroseverywhere (edited 06-18-2007).]
IP: Logged
09:13 PM
Jun 19th, 2007
Fieroseverywhere Member
Posts: 4242 From: Gresham, Oregon USA Registered: Mar 2006
Alright. First thing I did this weekend was throw the first coat of paint on the rocker covers. I used Ford red, as we usually do, because it is the closest match that we have been able to find for the original Fiero red. It looks a little orange in the pic but let me assure you it is very close to the original color. They will need one more coat and some outlining. I will hand paint all the detail parts for the added custom look. I am still deciding if I want to do the detail in black or silver.
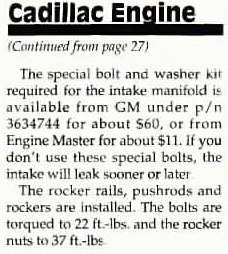
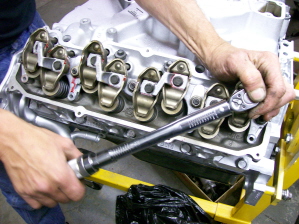
Next we moved on to the valve train. The rocker rails were already on and bolted down so we started by puting the rockers on followed by the rocker hold downs. Make sure to use plenty of assembly lube between the rockers and the hold downs. Here is a little cliping from the rebuilder article with the torque specs for the rocker nuts (37 ft/lbs) and the rocker bolts (22 ft/lbs).
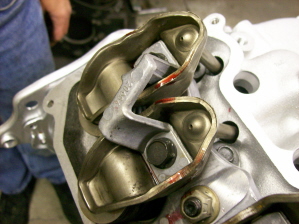
When puting the rocker hold down brackets don't worry about how they go on. There are 8 total. 4 of them go one direction while the other 4 go the opposite direction.
Dont forget about the 8 smaller bolts that go into the rocker rails, we almost did. We put a little locktite on these also just as extra insurance.
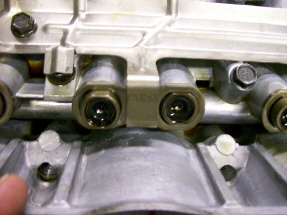
We pressure washed the fuel rail. Here is a pic of it showing the direction it is installed as a referance. I cant go on before the rocker covers though.
At this point we were running out of time and the shop was closing soon. The rest of the time was spent cleaning, testing, and painting various parts. I glass beaded and painted the alternator bracket and thermostat housing. We also installed the waterpump pully. We put a vaccum pump on the EGR and found that it would not hold any. That was it for the day. We will do the official spin test next time. We may (or may not) also add oil and an additive that shows up under a black light to check for leaks. The freshly painted parts will be installed next time after the testing. We will also do the pully set-up. Would have done it this time except for Rockauto sending the wrong pully and holding it up.
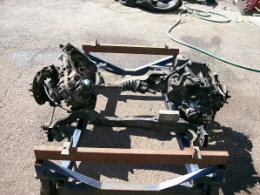
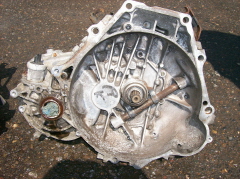
The next day we decided to go over to the shop and clean up the 88 cradle and tranny. We took two of the trannies (both isuzus) over so we could figure out which one would work best. This was a good idea as it actually showed some of the differences between the years. Here is a pic before we got started.
Here is a pic of everything on our cart. We are going to modify the cart for use in the install.
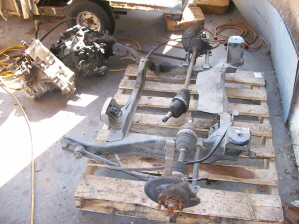
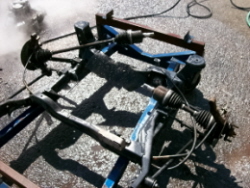
The cradle cleaned up quite nicely. It still needs paint, poly bushings installed, the brake caliper brackets installed, and new mounts for the tranny. Both of the axels came with it along with the e-brake cables. Can't beat that for 50 bucks!
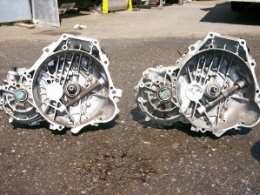
The trannies cleaned up OK also. Here is a pic of them side by side for comparison. 88 isuzu on the left, 85 isuzu on the right. There is actually quite a few differences between the although they are all minor differences.
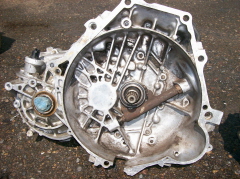
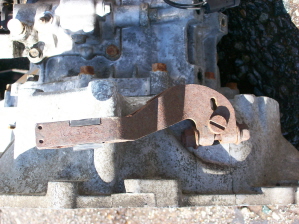
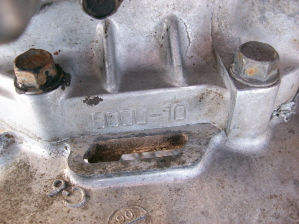
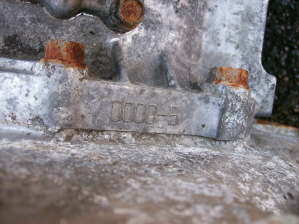
You will notice that the 88 has more webbing inside the bellhousing. The 88 also has a cut out section for the starter. The fork is different along with the throwout bearing Here is a couple of closer pics of the two. 88 85
88 85
88, notice the vent that the 88 has while the 85 has none. 85
Honestly there are even more minor differences but I wont go into that any more here. As you can imagine there really was no real choice. Quite simply the 88 tranny seems to be better in every way. Not to mention the fact that it actually felt better through all of the gears. Here is a pic of the clean tranny set on the clean cradle ready for paint, mounts, bushings, brakes/brackets, and of course the 4.9. Its only set on there and is not mounted in any way at all.
That is the extent of the work this time around. The rebuild will continue in a month. I'm going to take an extra day off from work to get the rest finished up then. I'm thinking probably 7/14-7/16, maybe sooner if everything works out well enough. Its time to put some more money away for the few bigger purchases such as the brake calipers, rotors, mounts. I just need to gather more parts and get everything ready so we will have enough to do for a few days.
More to come. Questions? Comments? Need bigger pics?
[This message has been edited by Fieroseverywhere (edited 06-19-2007).]
IP: Logged
12:37 AM
Jun 22nd, 2007
Fieroseverywhere Member
Posts: 4242 From: Gresham, Oregon USA Registered: Mar 2006
Another update coming later tonight! I got the brake brackets and 4.9 mount from Rockcrawl today and they are just beautiful. He even powder coated them for me! I will post some pics tonight. I will also edit the earlier post to include pics with the parts list and prices.


 ). Along with that they installed 4 inch two ways in the firewall, near the top, near each pillar. Someone also converted the headlights to an H3 version. And I'm sure you all noticed the wheels. Apparently they are from a 90ish grand prix. That 16 inches of the ugliest things you ever seen. These will be replaced with some grey 87GT rims, for starters. Did notice the rear cradle has been hit in the front bending it a little. We have an extra anyway along with Darryl Morse alluminum cradle mounts. It also had a tow hitch welded to it. Appearently he loved to go jet and water skiing.


 I will make up for lost time on the next trip. I don't want to go into datails here of what happened but the rebuild WILL continue at a later date (probably 6/2 and 6/3). I will try to give as much detail as I can and will get the pics next time. Here is what we did on Friday...
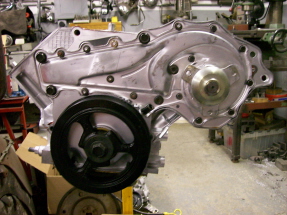


 ). Rockcrawl was nice enough to remove a set from one of his cars to make me up a set specifically for this use. What a guy!