Originally posted by Spiff: Yes thats what I was referring to. Thanks
Edit.... I own page 3
Well here you go: The belt I used on the alternator is 817k6 from AZ ( not Arizona) which is 81.7" lg x 6 ribs.
here is a sketch to illustrate the made up spacer at the bottom alternator leg
Remember that I am using a belt tensioner Im using is p/n 305217 and is strangely enough for a Ford Winstar 3.8 l. And the aluminum dog bone bracket from the GTP machine down to a thickness of 1.010" in the area pictures below.The pictue Ive posted is not the bracket Ive used because it was machine too thin and I had my son redo it. Machine only the area need to achieve a flat mounting surface for the back of the tensioner. Youll see a pin on the back side of the tensioner. Drill a hole in the newly machined bracket to allow this pin.
If I can be of anymore help let me know.
There is one more bracket I added as an after thought and because the holes were there in the back of the alternator and the engine block. I adds a little more stabilty and a good place you tie the alternator and oil pressure sender wires to.
this is a picture from page 1 where I talk about priming the oil pump that just so happens to show this bent bracket
I'll get some better pictures of this later. The car is jacked up in the front so I can put the springs on and is difficult to get under the rear to get good pictures.
------------------
" DRIVE IT LIKE YOU LOVE IT"
[This message has been edited by ohio86se (edited 04-24-2006).]
IP: Logged
03:38 PM
Apr 25th, 2006
ohio86se Member
Posts: 1308 From: akron, ohio, summit Registered: Mar 2002
Originally posted by SKIDMARK: The springs themselves were easy...just take the front wheels off, support the lower control arm with a jack, remove the shock bolt and stabilizer link, pop the tie rod and lower ball joint, and the old spring should come out with a little effor when you release the jack. The new one goes in very easy because it's shorter. You have to modify your bump stops while the springs are out.....shorten them about 3/4". Most people just cut the rubber stops but I still had problems once in a while with it bottoming out so I shortened the cone shaped metal piece that the rubber mounts to. Check WCF web site for details.
Don
Just a quick discussion about modifying the bump stops. Im installing the intrax sport springs on a 86se 1.8" front x 1.7" rear lowering. In the box came the following instructions. It did not list the Fiero as needing to cut the bump stop. I called Intrax and talked with Tech Support and he verified that the bump stops dont need cut. He was very quick with his answer and he said he has had the very question ask to him a number of time and he assured me that the list of cars is up to date and correct. Im just opening up for a discussion..
------------------
" DRIVE IT LIKE YOU LOVE IT"
[This message has been edited by ohio86se (edited 04-25-2006).]
IP: Logged
08:33 PM
Apr 26th, 2006
ohio86se Member
Posts: 1308 From: akron, ohio, summit Registered: Mar 2002
Any comments on the bump stop cut or not? I have this swap on the road and will be taking to get the alignment on May 2. I ended up cutting about 1/2" off of the rubber bump already and have driven just a short while. There seems to be about 3" or so of travel before the bump stop will hit. I dont think I should have cut the stop at all. I probably go in there and replace them with new ones later.
Ill be getting a video together of it being driven after the alignment. ------------------
" DRIVE IT LIKE YOU LOVE IT"
[This message has been edited by ohio86se (edited 04-30-2006).]
IP: Logged
08:51 AM
May 12th, 2006
ohio86se Member
Posts: 1308 From: akron, ohio, summit Registered: Mar 2002
hehe, good video. amazing what sound effects do, sounds like he;s doin 100 mph, but looks more like 30-40 mph if you turn off the sound and watch the landmarks.
as fo your bumpstop, fwiw, I used the 1" lowering springs on front from fierostore, and never cut the bumpstops on my 88, and judging by the lat time I looked at the dirt marks, it hasn;t fully hit yet. looks like it may have touched, but with the steep driveways and roadcrowns, I would have expected to see more. I may trim 1/4 inch off if I think of it.
IP: Logged
10:40 PM
May 24th, 2006
ohio86se Member
Posts: 1308 From: akron, ohio, summit Registered: Mar 2002
Remember that I am using a belt tensioner Im using is p/n 305217 and is strangely enough for a Ford Winstar 3.8 l. And the aluminum dog bone bracket from the GTP machine down to a thickness of 1.010" in the area pictures below.The pictue Ive posted is not the bracket Ive used because it was machine too thin and I had my son redo it. Machine only the area need to achieve a flat mounting surface for the back of the tensioner. Youll see a pin on the back side of the tensioner. Drill a hole in the newly machined bracket to allow this pin.
If I can be of anymore help let me know.
Hey ohio: I don't think I'm understanding the part about machining the dogbone bracket down to 1.010 thick. Either that or I have a different bracket than you.
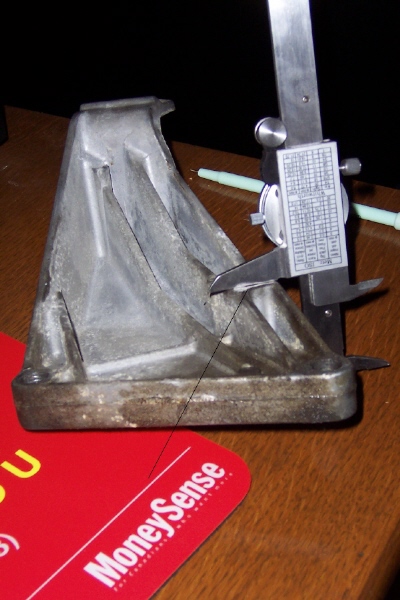
Is this the same bracket you have. This came from a 98 GTP. It measure 1.575 where I have the caliper placed in the pic above. There is a light black line pointing to the area I mean. The bulk of the mounting area is about .750. I wonder if you meant that you took 1.010 off from the point where the caliper is placed in the pic or am I missing something?
You have the correct part in your picture. The black like you have sketched is about right for the area of metal to be removed to get to a 1.000-1.010 thickness. The hole where your caliper is at is the hole that the tensioner bolt will be at. Remember that the tensioner is for a 95 Ford winstar. In my thread you see a picture of a already machined bracket that illustrates the area needed for the tensioner. Please note that the bracket shown was machined too thin. Beware that I have already broken the machined down bracket during one of my spirited driving episodes. I have Rodney Dickmans poly mount all around but I still managed to snap my DB bracket. You see when this bracket gets machined down it creates a stress point in tne worst place. Im trying to develope a steel bracket. If you dont want to run a DB just put a spacer plate at 1.000" thick and drill holes to mount it and the tensioner.
quote
Originally posted by Dave E Bouy:
Hey ohio: I don't think I'm understanding the part about machining the dogbone bracket down to 1.010 thick. Either that or I have a different bracket than you.
Is this the same bracket you have. This came from a 98 GTP. It measure 1.575 where I have the caliper placed in the pic above. There is a light black line pointing to the area I mean. The bulk of the mounting area is about .750. I wonder if you meant that you took 1.010 off from the point where the caliper is placed in the pic or am I missing something?
Dave
------------------
" DRIVE IT LIKE YOU LOVE IT"
IP: Logged
09:54 AM
Dave E Bouy Member
Posts: 1465 From: Kettle Point Ontario Canada Registered: Sep 2004
wow , i want to see this car drive..... i kind of have the urge for a 3800 sc got any videos?
Sorry no videos yet. I just bought dvd camcorder and as soon as we unfreeze and dry up here in ohio ill get a video up. I have driven it all last summer. I will do a video when the weather breaks here in Ohio.
thanks for the wow. ------------------
" DRIVE IT LIKE YOU LOVE IT"
[This message has been edited by ohio86se (edited 02-25-2007).]
IP: Logged
08:07 AM
Feb 22nd, 2007
ignorant prodigy Member
Posts: 621 From: taunton, ma, usa Registered: Mar 2006
what are the part numbers for the earl's fittings?
I'd like to try this setup for my rails
I have updated the pictures of the fuel rail arrangement to include p/ns for the fittings. Keep in mind to be patient when bend the fuel rail tubes. Use a bending spring so as not to collapse it.
IP: Logged
08:46 AM
ignorant prodigy Member
Posts: 621 From: taunton, ma, usa Registered: Mar 2006
Are you referring to the fuel rail? Its the 3800sc line that I polished. The fuel lines that run from the fuel rail fittings to the fuel filter and return line is the an6 braided fuel line.
------------------
" DRIVE IT LIKE YOU LOVE IT"
IP: Logged
12:15 AM
tuner2m6t Member
Posts: 406 From: Adrian, Michigan USA Registered: Nov 2005
Yeah I was referring to the braided lines. I was getting ready to order some but was unsure of what size to get.
that would be the 6an size for both the pressure and return line. this braided hose is a little tricky to work with as far putting the fittings on. Ill try and find some instructions and post them. There are special tools that some sell and are rather expensive and I managed to do without. The key is not to fray the braiding with cutting the hose for length. Tightly wrap tap at the location where you are going to cut. I used a hack saw with a fin tooth blade and put a steel pipe inside the hose when making the cut. Later you can flush the hose to make sure all the shavings are out. Ill find the instructions and post.
------------------
" DRIVE IT LIKE YOU LOVE IT"
[This message has been edited by ohio86se (edited 02-24-2007).]
IP: Logged
05:17 PM
Legacy Member
Posts: 134 From: Colona,Illinois, USA Registered: Sep 2006
To add information on the assembly of the fuel hoses. Here are some pictures of the braided hose and fitting assembly
APPLY TAPE TO PREVENT(MINIMIZE) FRAYING OF THE BRAIDS USE WOOD BLOCKS IN VISE SO AS NOT TO SCRATCH THE FITTING. ONLY CLAMP DOWN ENOUGH TO HOLD THE FITTING IN PLACE !!!DO NOT CRUSH IT!!! BE PATIENT HERE!!! SLOWLY PUSH THE HOSE INTO THE FITTING. YOU MAY HAVE TO USE A SMALL FLAT SCREW DRIVER TO PERSUADE THE STRAGGLING STEEL BRAIDS INTO THE FITTING. IT HELP TO APPLY A VERY SMALL AMOUNT OF OIL ( OR JUST GET THE ASSEMBLY GREASE ) TO THE INSIDE OF THE FITTING. WITH A TWISTING BACK AND FORTH, PUSHING MOTION PUSH THE HOSE INTO THE FITTING TO IT COMES TO JUST BELOW THE THREADS OR AT THE LEDGE JUST BELOW THE THREADS.
AFTER THE HOSE IS INTO THE FITTING PUT A MARK ON THE OUTSIDE OF THE HOSE TO BE USED AS AN AID TO ASSURE THE HOSE DOESN'T BACK OUT WHEN ASSEMBLING TO THE MATING FITTING.
WHEN ASSEMBLING KEEP AN EYE ON THE MARK AND BE ASSURED THAT THE HOSE DOES NOT BACK OUT UPON TIGHTENING THE FITTING. I USED TWO CRESANT WRENCHES AND PUT SOME TAPE ON THE JAWS SO AS NOT TO SCRATCH THE FITTINGS. YOU'LL SEE WHEN TIGHTENING THE HOSE WILL BULGE VERY SLIGHTLY AT THE FITTING. STOP TIGHTENING AT THE POINT. !!!!REMEMBER THESE ARE FUEL LINES!!!!!!! CHECK AND DOUBLE CHECK. IF YOU HAVE ANY DOUBT ITS NOT RIGHT.....DO IT AGAIN. I HAVE EVERY BIT OF CONFIDENCE IN THE PROCEDURE I USED HERE OTHERWISE I WOULD NOT PUT MYSELF AND MY WIFE AND TAKE OFF ON TRIPS. I SUPPOSE YOU COULD RIG SOME SORT OF AIR TEST ...BUT ALWAYS CHECK FOR LEAKS BY TURNING ON THE KEY ALLOWING THE LINES TO PRESSURIZE...CHECK FOR LEAKS...START VEHICLE WITH A FRIEND AT THE WATCH......ALWAYS HAVE A FIRE EXTINGUISHER HANDY AND READY. I DON'T WANT TO SCARE ANYBODY ....ITS JUST GOOD PRACTICE WHEN WORKING AROUND FUEL LET ALONE HIGH PRESSURE AND A CUSTOM SET UP.
ENJOY!!
------------------
" DRIVE IT LIKE YOU LOVE IT"
[This message has been edited by ohio86se (edited 02-25-2007).]
IP: Logged
09:18 PM
PFF
System Bot
Mar 1st, 2007
ohio86se Member
Posts: 1308 From: akron, ohio, summit Registered: Mar 2002
------------------ 1986 Pontiac Fiero SE | 3.4L Conversion Click here to view ----------------------------------------------------------- My Portfolio site | JustinChristie.ca
Hey, I am working on my 3800SC swap and i really like your polished alluminum strips on your valve covers. Is there any way you could give me a list of materials to do the strips like yours. Also could you tell me how you did it and did you install the strips before or after you painted the valve covers. Thanks Daniel
IP: Logged
12:48 AM
ohio86se Member
Posts: 1308 From: akron, ohio, summit Registered: Mar 2002
Well I first cleaned the 3800sc valve covers and lightly sanded them down to assure that the paint would adhere. A friend of mine who runs an engraving shop cut me some strip of aluminum. Then I glued them to the valve covers using gorilla glue. Be careful not use to much or to little of this stuff. I allowed the strips to dry. Then I masked of the strips and painted the covers. I also gave the strips their initial polishing prior to paint so as not to get buffing compound on the fresh paint. Sorry I didn't document this step in my build.
------------------
" DRIVE IT LIKE YOU LOVE IT"
[This message has been edited by ohio86se (edited 03-16-2007).]
IP: Logged
02:58 PM
Mar 26th, 2007
daniel87fierogt Member
Posts: 1793 From: Northern California Registered: Oct 2003
Better way to cut the braided steel line it to tape the end where it needs to be cut then get a sharp chisel hammer and anvil and hit the chisel hard the first time so you dont have to hit it twice it cuts it nicely


.JPG)
.JPG)
.JPG)
_2.JPG)
_4_2.JPG)
.jpg)
.jpg)


_(Small).jpg)


_2_2.jpg)
_1.jpg)
_1.jpg)


.JPG)
.JPG)
.JPG)
.JPG)
.JPG)
.JPG)
_1.JPG)


