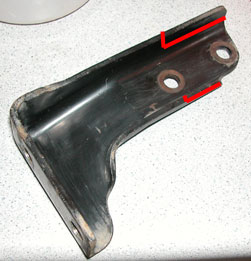
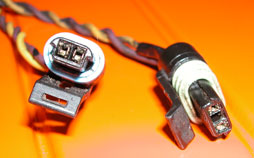
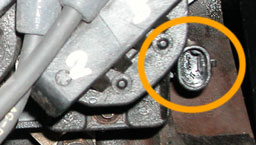
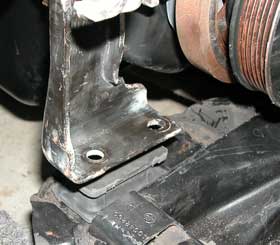
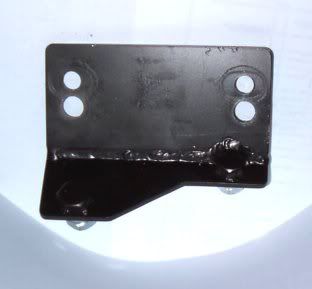
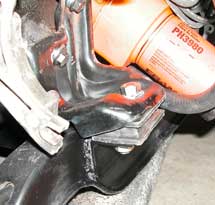
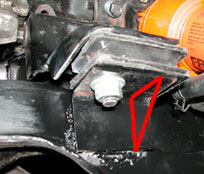
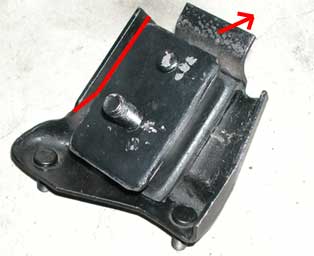
Went to the junkyard today and got a motor mount bracket from a V6 Fiero. After removing the alternator bracket I was actually able to remove the mount without having to lift the engine. It wouldn't fit as is.. I had to trim it so it would clear the front cover of the 3.4 DOHC. The red marks in the above pic indicate where material has to be removed. A few minutes with a grinder took care of interference. With all of my mounts handy, I was ready to install the clutch/pressure plate/flywheel, mate the engine to the transmission, and set them up level on the cradle. After twenty minutes of pushing things around to get the tranny in the right place and the engine at the right height, I realized they would not be coming together. My transmission has a locating sleeve in the same hole as the engine! Either my duke left its sleeve behind or the 3.4 stole one from its tranny as a souvenir. I spent another twenty minutes hammering a screwdriver behind the sleeve, but it stopped moving after the first millimeter. It has the same inner diameter as the hole it ends at in the tranny, so I can't press it out. Argh! Tips, anyone? Another incompatibilty I have encountered is my crank sensor cable. It has a three pin connector with the center pin missing and a two pin connector. However, both the DIS module and sensor have two-pin connectors. Perhaps they gave me the wrong sensor at the parts store. I didn't get one with my engine so I can't compare. Could someone else check their connectors and let me know? My cable: This is where it goes.. right?
-Steven
[This message has been edited by Steven Snyder (edited 03-20-2005).]
IP: Logged
12:28 AM
Mar 21st, 2005
Steven Snyder Member
Posts: 3323 From: Los Angeles, CA Registered: Mar 2004
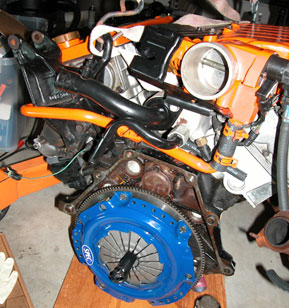
I removed the sleeve in the tranny and got the transmission and engine together. I spun it around a few times to make sure the pressure plate isn't hitting the housing as I heard of some interference with the Isuzu and larger aftermarket clutches. It doesn't seem to catch anywhere. Getting the transmission and engine lined up was quite exciting. After adjusting the engine to level it out while it was hanging from the hoist, I heard a very subtle tearing sound. My first instinct was to check the strap... sure enough, it was starting to tear before my eyes! I quickly lowered the engine so it was resting lightly on the cradle and added a second strap. A minute later the original one snapped. Lesson of the day: double strap everything and use new straps! I can't imagine what sort of mess there might be if the engine broke free of the hoist while raised up a significant distance.. I removed the alternator to gain some clearance for installing the front mount and started to line everything up. It seems that somehow either the engine is too far to the left side of the cradle or I can't use the holes from the original 4cyl mount that are in the cradle. Front to back it seems to be pretty well lined up, and in any case it doesn't appear that a few degrees off will hurt anything. Now to just get the mount to line up...
-Steven
[This message has been edited by Steven Snyder (edited 03-21-2005).]
IP: Logged
01:09 AM
Erik Member
Posts: 5625 From: Des Moines, Iowa Registered: Jul 2002
After adjusting the engine to level it out while it was hanging from the hoist, I heard a very subtle tearing sound. My first instinct was to check the strap... sure enough, it was starting to tear before my eyes! I quickly lowered the engine so it was resting lightly on the cradle and added a second strap. A minute later the original one snapped. Lesson of the day: double strap everything and use new straps! I can't imagine what sort of mess there might be if the engine broke free of the hoist while raised up a significant distance..
-Steven
to be safe as possible use a heavy duty chain one can never be too careful with that type of stuff
Odd... When I trimmed my V6 mount, I only had to shave a little from the "right" (towards the nose of the car) side of the mount so it'd slide under the big ass timing cover on the TDC. However, looks like you, Darth, and others trimmed the "left" (trunk) side of the mount as well so you could slide it over enough to bolt it down. On mine with a 91 TDC and 87' Fiero mount, it'd kinda touch the cover on the left side of the mount, but both bolts could be bolted in alright without any extra clearancing, so I left the left "ridge" on the mount for extra strength.
How much interference did you get with your 93 motor, or did you just trim and go?
[edit]: "ridge", not "ride"
[This message has been edited by Blue Shift (edited 03-21-2005).]
IP: Logged
01:59 AM
Steven Snyder Member
Posts: 3323 From: Los Angeles, CA Registered: Mar 2004
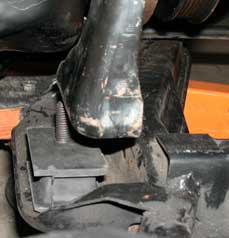
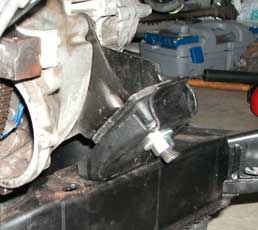
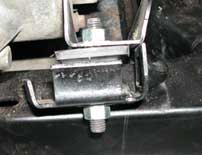
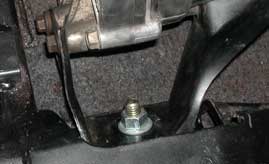
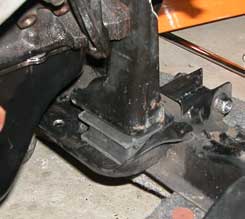
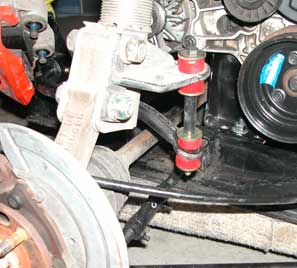
I took some pics of my issue with the front mount. Does it look like my engine should be further to the left? It seems like in the pics 86GT3.4DOHC took of his front mount, his engine is further to the driver's side of the cradle. That could easily have been a trick of the camera angle though. It doesn't look like there's any way to move the tranny back anymore though.. there isn't much more clearance for the brackets. I'll probably just drill a new hole for my rubber mount, but here's the pics anyway in case someone can see that I did something glaringly wrong.. otherwise hopefully some of you will find these useful! Note that I have the front end of the engine lifted up almost an inch in these pics..
Front engine mount: Front transmission mount: Rear transmission mount:
quote
Originally posted by Blue Shift: Odd... When I trimmed my V6 mount, I only had to shave a little from the "right" (towards the nose of the car) side of the mount so it'd slide under the big ass timing cover on the TDC. However, looks like you, Darth, and others trimmed the "left" (trunk) side of the mount as well so you could slide it over enough to bolt it down. On mine with a 91 TDC and 87' Fiero mount, it'd kinda touch the cover on the left side of the mount, but both bolts could be bolted in alright without any extra clearancing, so I left the left "ride" on the mount for extra strength. How much interference did you get with your 93 motor, or did you just trim and go?
With the alternator removed I can see clearly now that I didn't need to trim the mount on the left side much if it all. It may only be necessary if you're trying to slip it in from below rather than the side. I really didn't remove much material; I actually just tried to cut the edge off since it wasn't interfering with the whole lip.
[This message has been edited by Steven Snyder (edited 03-21-2005).]
Hmm ok cool - I was wondering if I happened up on some secret trick for trimming the front mount, or if I was headed towards a cracked block or timing cover...
As for your front mount, a suggestion if I may - The way I did mine, was to measure the stud spacing and location of the stock mount, and overlay the top and bottom stud positions on paper. Measure up your stock mount and draw where the bottom studs (which go into the cradle) are, and then draw where the top studs (which go into the motor bracket) go in relation to eachother on paper. Then I used that info to place my holes so the front mount would be located in exactly the same X/Y position as the 2.8 (same block type as the 3.4) was stock, just lower due to the dodge mount.
What just dawned on me (tired), is that you're going from a 4 banger to 3.4, so you don't have the location of the stock 2.8 front mount as a reference. However, If you can find out where a stock 2.8 WOULD go, that you could then easily do the same thing. Man, if you had the 6 in a pre 88' car, I could give ya a couple measurements and you'd be dead on. Sorry bout that!
I had to cut mine down to about half its original height.. I suspect that it will vary depending on your stock brcaket - they are fter all just stamped metal and probably very a bit from part to part
IP: Logged
06:37 AM
Mar 22nd, 2005
Steven Snyder Member
Posts: 3323 From: Los Angeles, CA Registered: Mar 2004
I got the front mount done today. I took the engine bracket off and lined up the mount so it was pretty much centered underneath, then drilled a new hole for it. I then reinstalled the bracket with the mount attached and let the engine down to see where I would need a hole in the cradle. I ended up having to cut out a small part of the the cradle to make room for a nut as there's a lip that sticks out underneath the mount plate. Now I just need to make some spacers to get everything level, as the engine sits a bit too low in the front.
I got the front mount done today. I took the engine bracket off and lined up the mount so it was pretty much centered underneath, then drilled a new hole for it. I then reinstalled the bracket with the mount attached and let the engine down to see where I would need a hole in the cradle. I ended up having to cut out a small part of the the cradle to make room for a nut as there's a lip that sticks out underneath the mount plate. Now I just need to make some spacers to get everything level, as the engine sits a bit too low in the front.
maybe you should do what I did (though I haven't installed it on the cradle yet) and modify a dickman poly front trans mount to drop it
I just don't trust the rubber truck mounts up front since darth has torn them apart quickly and I used to tear up the front trans mount witht he stock 2.8 - the rest should be fine rubber..
his mount came with the upper holes drilled and a 1/4" spacer between the poly mount and the bracket - I removed the spacer and drilled new holes about 3/4" lower should drop the front end atleast 1/2" if not 3/4"
[This message has been edited by Kohburn (edited 03-22-2005).]
IP: Logged
08:41 AM
Steven Snyder Member
Posts: 3323 From: Los Angeles, CA Registered: Mar 2004
I'll probably modify my front trans mount bracket to accept a poly mount if I have any problems with the current setup. As far as alignment, its the front of the engine (pulleys) that sits too low. The transmission is perfect, so I'd rather not mess around with it. I plan on using an additional side mount on the engine in addition to the dogbone, so I can't imagine it is going to move enough to break any mounts... if it does, I'll try to find a poly mount with similar dimensions to the dodge truck mount and just replace it. Does anyone make a poly mount similar in dimensions to the dodge truck mounts? If that pic you have is of the modified mount on the left, it looks like I'd be raising the front of the tranny enough to definitely throw off how level it is right now.
I just validated Kohburn's concern a couple days ago by separating my front tranny mount - (No, I haven't completed my swap that fast!) Hmm... It didn't like being squeezed and stretched from the constant lifting and sitting back down of the fitting process. I think I pinned my cradle on the way up into the car and subjected it to unusual tensile/shear force, but still...
HOWEVER, when I installed my front tranny mount the first time, it was pretty "tweaked" - the steel plates of the mount were not parallel, off by a degree or two (more like 2 or 3) and it the two plates weren't lined up over eachother either. Not sure what I was thinking, but I figure the rubber would deal with it. I had to grind off a "wall" on my front tranny mount that I experimented leaving the mount pressed against which would limit how much I could "adjust" the mount. Guess it needed more adjustment. So I ground it off and the mount appears almost perfect now... Not tweaked at all now. I HOPE that it makes as critical of a difference as I think, we shall see.
IP: Logged
05:31 PM
PFF
System Bot
Steven Snyder Member
Posts: 3323 From: Los Angeles, CA Registered: Mar 2004
Yeah, I'd be wary if the mounts were stressed just getting them lined up. You wouldn't need to add much more stress in the same direction for it to break. Mine are all sitting with the plates perfectly parallel. I just read the thread where Darth mentioned breaking the mounts and its my understanding that one failure appeared to be due to a defective mount and the other due to the mount being pre-stressed when installed. I ended up raising the front of the motor using some spacers I made. They're just flat metal plates cut to the same size as the motor mount plates, with holes drilled to allow the stud to pass through. The engine is now perfectly level in the direction parallel to the axles. I don't really care about the other direction as long as it isn't tilting toward the firewall. Some extra tilt toward the rear of the car could only help with oil fill and front spark plug clearance. I also test fitted the crossover pipe to see how much interference there is with the clutch release arm. With the crossover in place the arm cannot move at all! I drilled out the spot welds on the heat shield and removed it to see if it is just the heat shield in the way. Sadly, the pipe itself interferes. I'll shorten it as Erik did with his swap, so the crossover sits closer to the engine. If I still don't have enough clearance I guess I'll need to make a new clutch release lever and slave bracket or a custom crossover. Neither of those sound like much fun, so hopefully the modified crossover works out.
IP: Logged
08:39 PM
Mar 23rd, 2005
Steven Snyder Member
Posts: 3323 From: Los Angeles, CA Registered: Mar 2004
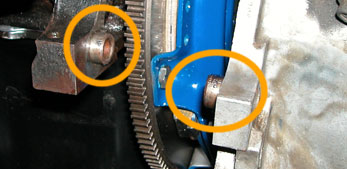
My side engine mount, using anchor part # 2266 rubber mount and some angle iron I found laying around the garage: The metal is pretty thin so I'm going to add a triangle or two for support as shown when I get a chance to: With all the mounts installed I checked for any new clearance issues. There are two locations that will need some attention: Here on the transmission next where the starter mounts, and on the front transmission mount brackets: I'll cut the cradle and remove some of the tranny mount bracket (cradle side) to fix these areas.
I also snapped a pic of the exhaust crossover's interference with the clutch release arm. As you can see, the crossover would have to be either tilted upward or moved in quite a bit for there to be enough room for the release arm. The arm isn't pushed in at all in this pic: I wonder if shortening the crossover would give enough clearance. I'll have to measure the total travel of the clutch arm to see. Otherwise I will modify the arm so that it can pass under the crossover. I might even be able to get away with just slotting the holes for the slave cylinder to get it low enough. Any other ideas out there?
-Steven
[This message has been edited by Steven Snyder (edited 03-23-2005).]
ah I mistook which mount you were lifting -- how much did you have to raise your front engine mount? I may just pick up another one of these poly mounts to use for the front engine mount
for the clutch arm - two ideas,
1. modify the cross over to give enough clearance 2. rotate the clutch arm clockwise on its shaft and make a new slave mount bracket that possitions it properly
[This message has been edited by Kohburn (edited 03-23-2005).]
IP: Logged
07:18 AM
Steven Snyder Member
Posts: 3323 From: Los Angeles, CA Registered: Mar 2004
ah I mistook which mount you were lifting -- how much did you have to raise your front engine mount? I may just pick up another one of these poly mounts to use for the front engine mount
9/16". It could probably even go a bit higher, but its close enough now for me. You could probably get away with using the poly mount and not have to space it higher. Better to start too low and just space it than to have to lower it somehow though..
quote
for the clutch arm - two ideas,
1. modify the cross over to give enough clearance 2. rotate the clutch arm clockwise on its shaft and make a new slave mount bracket that possitions it properly
Ah, duh! Thanks for the idea! I didn't think about the fact that I can just loosen the clutch arm and rotate it; that would make things much easier. I was thinking I had to make a new one! I'll definitely look into this before modifying the crossover.
-Steven
[This message has been edited by Steven Snyder (edited 03-23-2005).]
Ah, duh! Thanks for the idea! I didn't think about the fact that I can just loosen the clutch arm and rotate it; that would make things much easier. I was thinking I had to make a new one! I'll definitely look into this before modifying the crossover.
-Steven
no problem - can you tell that It's been on my mind?
oh don't forget that the clutch arm bolt passes through a notch on the shaft - you would have to grind that notch at the new location for the bolt to pass through
i was also thinking about modifying a stock arm for clearance.. I even have one of the stamped metal arms.. i could weld in reinforcements - cut it up and adjust and weld back together.. maybe i'll try that first - seems like i tmight be the easiest
[This message has been edited by Kohburn (edited 03-23-2005).]
i'm only a few steps behind you right now - got my mounts all modified up last night - decided to pick up another of the poly mounts for the front engine mount and its working great - just have to trim the bottom "preload" shim plate to fit inside the craddle frame and it bolts to the stock holes then drill two new holes in the engine bracket and bolt it on..
I just have to do my poly control arm bushings and might have pics of the craddle going back in this weekend.
edit: ok well maybe not for some reason I forgot I still have to weld up my exhaust
[This message has been edited by Kohburn (edited 03-25-2005).]
IP: Logged
10:43 AM
mrfixit58 Member
Posts: 3330 From: Seffner, Fl, USA Registered: Jul 99
One concern about lowering the engine: My rear swaybar bolts are already real close to the CV boots on the hub end with the stock 2.8. For those who have their motor lowered, how's your clearance from the top of the swaybar bolt to the CV boot? Pictures would help.
Roy
[This message has been edited by mrfixit58 (edited 03-26-2005).]
IP: Logged
12:03 PM
qwikgta Member
Posts: 4659 From: Virginia Beach, VA Registered: Jan 2001
I am still loving everything about this thread..... BUT, is all this worth it, when you could have just used the stock motor mounts/trans mounts and not had to modify / cut anything. Just asking, cause one of the things I loved the most about this swap was all I needed to do was order a set of trans/engine mounts from WCF and attach them to the motor, then drop the motor on the cradle. That was it. The 3.4 block is the same as the 2.8 and the trans is the same one that was in the car. I understand lowering the motor, but you just keep haveing to modify things.... Anyway, great thread, keep it up. Can't wait to get back home to my cable modem to see all the pics.
Rob
------------------ 88 TTop coupe (CJB #95), 96 3.4DOHC/5 speed in progress
Life on hold again for Uncle Sam. Deployed somewhere in the world, fighting the Global War on Terrorism.
the majority of the modifications are required no matter what - modifying the trans mounts and engine mounts only took about an hour all the rest of the cutting of the decklid hinge- the dogbone strap etc - cross over for people with a 4speed or isuzu tranny - all required and infact some are reduced by lowering the engine and rocking it rearward to gain easier access to the front plugs/dipstick, and oil fill.. an hours work to make those things easier is definately worth it in my book.
[This message has been edited by Kohburn (edited 03-25-2005).]
IP: Logged
12:45 PM
Mar 26th, 2005
Steven Snyder Member
Posts: 3323 From: Los Angeles, CA Registered: Mar 2004
Originally posted by qwikgta: I am still loving everything about this thread..... BUT, is all this worth it, when you could have just used the stock motor mounts/trans mounts and not had to modify / cut anything. Just asking, cause one of the things I loved the most about this swap was all I needed to do was order a set of trans/engine mounts from WCF and attach them to the motor, then drop the motor on the cradle. That was it. The 3.4 block is the same as the 2.8 and the trans is the same one that was in the car. I understand lowering the motor, but you just keep haveing to modify things.... Anyway, great thread, keep it up. Can't wait to get back home to my cable modem to see all the pics.
It significantly cheaper to just use different mounts and lower the motor while doing so instead of buying new mounts all around. The WCF mounts total $195 + S&H and that doesn't even include any brackets. Not only are 88 V6 motor mount brackets hard to find but they also break behind the 2.8. The easier to find pre-88 V6 bracket will not line up with the mount on an 88 cradle as far as I know.. For less than $50 and a few hours of work I have a motor that will have better clearance all around (thus making maintenance and installation of a dogbone easier), a lower center of gravity, and mounts available at any auto parts store for $5 each. I also have an additional mount to reduce front to back motion to help out the dogbone.
quote
Originally posted by mrfixit58: On concern about lowering the engine: My rear swaybar bolts are already real close to the CV boots on the hub end with the stock 2.8. For those who have their motor lowered, how's your clearance from the top of the swaybar bolt to the CV boot? Pictures would help.
Not sure what you mean.. they aren't even close on mine. This is on my 88 with the lowered engine: I imagine it would be much different on the pre-88s, since they didn't have a factory rear swaybar so you could mount it a variety of ways.
IP: Logged
02:47 AM
PFF
System Bot
Fastback 86 Member
Posts: 7849 From: Los Angeles, CA Registered: Sep 2003
Yeah, pre-88s are another story. You mount the sway bar end links to the A arms, and it ends up putting the bolts right under the CV boots. I put plastic caps over the tops of my bolts so if they did ever touch the boot, they wouldn't damage it. And with my engine at stock height, they do rub the CV boot if lean on the car hard enough in a turn. No damage to the CV yet, but you can tell it rubs.
IP: Logged
03:40 AM
mrfixit58 Member
Posts: 3330 From: Seffner, Fl, USA Registered: Jul 99
I imagine it would be much different on the pre-88s, since they didn't have a factory rear swaybar so you could mount it a variety of ways.
You are correct. I've got an 87 GT with the typical swaybar mod... a front bar reversed and installed on the rear. The bolts are probably 1/4" away from the CV boot. I guess, if needed, I could shorten the top bushing to gain more clearance.
great thread and info and pix Steven; thanks for being so diligent about photos (others too). I agree that the lowering 'should' be worth it; I am guessing the 3.4 might have a bit higher C of G than a 2.8 for example (with its heads and cam carriers and double cams etc) so lowering it is going to help if you are willing to do it.
When all is said and done, tho' - I might suggest an 'executive summary' of the motor mount business (Kohburn too if you don't mind); ie what mounts finally did you use and what ones did you decide weren't suitable and what are your impressions of them. I didn't see that Darth separated one of his so I am glad you noted that here! I have been trying to keep up to date on that topic and my motor mount list is growing so a summary would be helpful.
Super thread and thanks again; keep it up. GP
IP: Logged
09:49 AM
Fastback 86 Member
Posts: 7849 From: Los Angeles, CA Registered: Sep 2003
You are correct. I've got an 87 GT with the typical swaybar mod... a front bar reversed and installed on the rear. The bolts are probably 1/4" away from the CV boot. I guess, if needed, I could shorten the top bushing to gain more clearance.
Roy
Thats what I did, and I used the lowest profile nut I could find.
IP: Logged
01:34 PM
Steven Snyder Member
Posts: 3323 From: Los Angeles, CA Registered: Mar 2004
Originally posted by fiero308: When all is said and done, tho' - I might suggest an 'executive summary' of the motor mount business (Kohburn too if you don't mind); ie what mounts finally did you use and what ones did you decide weren't suitable and what are your impressions of them. I didn't see that Darth separated one of his so I am glad you noted that here! I have been trying to keep up to date on that topic and my motor mount list is growing so a summary would be helpful.
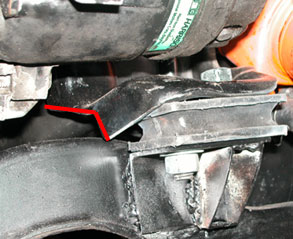
For the front transmission mount, a '75 dodge truck motor mount (Anchor part # 2265) was used. After removing the original front tranny mount, the rubber must be burned off of it and the exposed hole expanded to 1/2". The mount has to be trimmed so that it lays flat against the bracket. The amount of trimming necessary will vary, as the mounts are made to awful tolerances. Stud spacing may be different as well, so expect to slot your brackets to move things around a bit if they don't quite line up. I had to bend the front "tab" on the mount out as shown by the arrow to provide some more clearance. Again, this depends on the dimensions of your specific mount The safety interlock part of the mount bracket from the old rubber mount will have to be ground off so the transmission bracket won't interfere. The transmission mount bracket hole for the front mount must be expanded to 1/2" and may need to be slotted to get it in place. I slotted mine but the stud ended up where the original hole was anyway.. so it just helped me get the transmission in place as it has to rotate in (I engaged it with the rear mount first). I also cut out a small notch from the transmission bracket to clear the locating hump on the rubber mount.
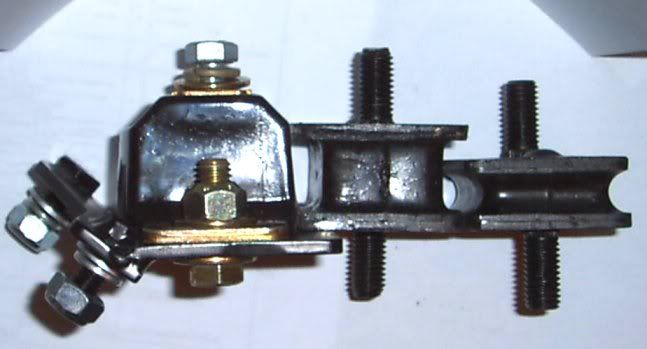
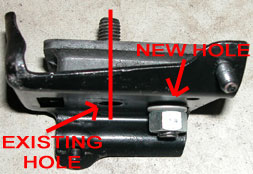
For the rear mount, I originally planned on using the Anchor #2266 mount so I could tilt the tranny/engine back to gain more clearance for the front oil fill, dipstick, and spark plugs. These pictures show the 2266 mount, and I drilled the holes so it would be lined up for the 2266 mount. However, I swapped it out for a 2265 mount while trying to get everything lined up. The stud spacing on the 2265 mount is slightly different, but it doesnt seem to have made a difference for me, as I had enough adjustment with the slots in the cradle to make sure the tranny was still perpendicular to the front and rear members of the cradle. In any case, after burning off the old rubber new 1/2" hole has to be drilled that will place the upper stud in the same place as the original rubber mount stud was. I assumed it was directly over the existing hole in the bracket. This may not be the case.. so to make things easier just measure where the stud is before you burn off the old mount. The transmission bracket hole must be expanded to 1/2" and the edge ground down to clear the locating hump. Alternatively, you could flip the mount over and drill a hole in the cradle bracket to clear the locating stud. In my case, the mounts interfered with the brackets when oriented that way, as the studs were offset to one side.
For the front motor mount, a pre-88 Fiero V6 bracket is used. It must be cut like so to clear the front cover on the 3.4 DOHC: I drilled out the existing holes in the cradle and bracket to 1/2" hoping one of them might work, but I couldn't get the mount lined up that way. I ended up drilling a new hole in the cradle that placed the mount as close to the rear right corner of the mount plate as it could go, with 1/4" or 3/8" clearance for when the engine moves on the mount. Then I drilled a matching hole in the motor mount bracket to get it lined up. I also had to cut out the "ledge" on the bottom of the cradle under the mount plate to make room for a nut and washer. Anchor part #2265 was also used for this mount. The motor ended up being significantly lower on the engine mount side of the cradle, so I made some spacers out of 2" wide, 3/16" thick steel cut to the length of the motor mount. I drilled two holes in each spacer; one to clear the stud and the other to clear the locating hump. I ended up needing 3 spacers; I put one between the engine bracket and mount, and two between the cradle and mount, so that I still had plenty of threads for the nuts. It looks like it may still be too low, but I wont know for sure until i get it all the way into the car. If it still ends up too low its easy enough to just make some slotted or U-shaped spacers that will slip under the bracket without having to lift the motor all the way over the stud.
For the additional motor mount, I used an existing mount bracket from the 3.4 DOHC that bolts onto the block behind the A/C compressor. It must be cut down to clear the cradle as shown: I made this mount last, after I got everything lined up on the other mounts, as it had to be welded in place. I guess you could just bolt a bracket to the cradle to make room for adjustment, but it was easier for me to just do it this way. The outermost hole in the motor bracket must be drilled out to 1/2". The rubber mount doesn't really fit very well into the bracket, so I just cranked down the nut on it to secure it. The bracket was made using a piece of angle iron and a triangular piece cut out of some rectangular tubing. It really doesn't matter how you do it, just make sure its not going to break or bend significantly when the engine wants to rotate back on hard launches. I used my leftover 2266 mount for this one, but you could just as easily use the same 2265 mount that was used everywhere else. Again, you'll need a 1/2" hole in the bracket for the mount stud. I installed my mount onto the motor bracket first, then made the hole in the cradle bracket, then bolted them together, spot welded it, pulled the engine away, and welded it all up. 1/2" coarse thread nuts were used on all the brackets along with flat washers. If I forgot to cover something just let me know and I'll write it up.
-Steven
IP: Logged
01:55 PM
Fastback 86 Member
Posts: 7849 From: Los Angeles, CA Registered: Sep 2003
I modified rodney dickmans frotn transmission mount bracket to drop the front about 1/2"-3/4" used an Anchor brand part #2266 mount for the rear transmission mount - modified about the same way as Steve - and used a poly trans mount Energy Suspension part # 3-1108 (same one that rodneys mount uses) for the front engine mount
pics can be seen on my build thread
[This message has been edited by Kohburn (edited 03-28-2005).]
Originally posted by Steven Snyder: Could someone else check their connectors and let me know? My cable: This is where it goes.. right?
-Steven
was just looking back through the thread and saw this the independant cable running from the sensor on the rear of the block to the DIS goes to the left side of the DIS unit - the receptacle has 3 prongs.. there is a 2 prong cable from the main wiring harness that goes to the right side
IP: Logged
09:12 PM
AaronZ34 Member
Posts: 2322 From: Colorado Springs, CO Registered: Oct 2004
was just looking back through the thread and saw this the independant cable running from the sensor on the rear of the block to the DIS goes to the left side of the DIS unit - the receptacle has 3 prongs.. there is a 2 prong cable from the main wiring harness that goes to the right side
God I was going to say that too, but I thought maybe I was wrong and had forgotten since its been a few months, wish I had. Sorry
------------------ 1988GT 5-speed Black with grey leather, I pick it up this May! 1992 Lumina Z34 5-speed Stock, new crate engine and transmission
Want custom equal length headers for your V6 Fiero?
IP: Logged
11:51 PM
Mar 27th, 2005
Steven Snyder Member
Posts: 3323 From: Los Angeles, CA Registered: Mar 2004
Say what? My dad was home today so he helped me get it in the car before I had to go in to work.
The engine is still visibly lower on the pulley side, and has practically zero clearance to the front firewall... (plenty of clearance to the rear!) ...so I'm going to pick up another 2266 mount tomorrow to use it for the rear tranny mount as I originally planned. This should bring the engine back a bit and lower the tranny side enough to balance it out side to side. I will update my engine mount post when I get it worked out.
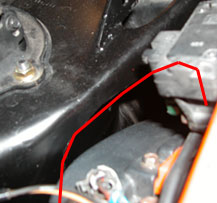
I had to cut a section out of the dogbone bracket support that comes off the right strut tower to make room for the rear timing belt cover. I didn't take a pic while the engine was out of the way so I traced the outline of the cut into this one:
I would hate to do this swap in an 88 without the lowering mounts. It looks like the decklid hinge would have to be trimmed back even further. It would prevent use of the middle spring hole, mandating a stronger decklid lift strut or a double strut setup. The dogbone mount and strut tower would have to be trimmed further to make room for the rear valve cover and timing cover, making the dogbone setup even more challenging. It also looks like there would be issues with notchback decklid clearance. It would also make it impossible to use the factory wiring passthroughs in the center of the firewall.
quote
Originally posted by Kohburn: here is a link to the first page of engine assembly / mounting on my build thread
Hah! I didn't even know you had a build thread. I was only looking out for threads with "3.4 DOHC" in the title. By the way, thanks for the info on the crank sensor connector. I was hoping somebody would be able to answer that for me.
-Steven
[This message has been edited by Steven Snyder (edited 03-27-2005).]
IP: Logged
03:44 AM
PFF
System Bot
Apr 4th, 2005
Steven Snyder Member
Posts: 3323 From: Los Angeles, CA Registered: Mar 2004
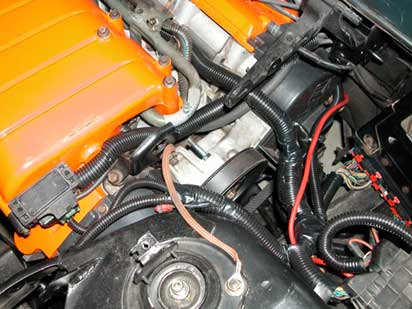
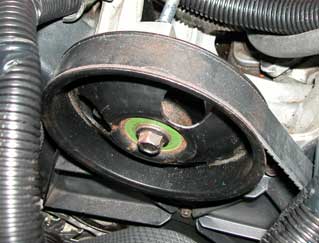
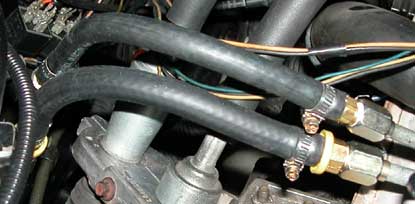
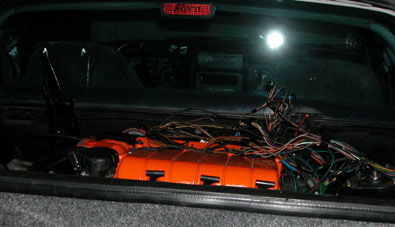
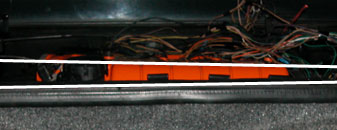
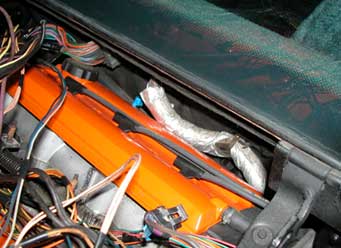
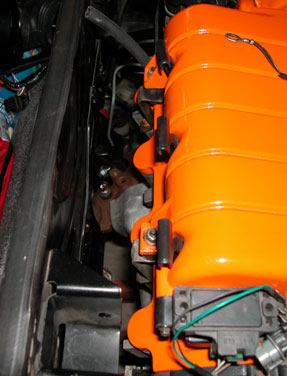
Spring break is over . I did get a lot done, though. I replaced the rear tranny mount with a 2266 as I had originally planned on using. I had to pry things around a bit to get it lined up and in the end the engine really didn't move anywhere. I think it just stretched the mounts when I tightened the nuts. Oh well. I'll just work around the clearance issues. I'll replace the 2266 with a 2265 if I ever feel like getting around to it or if my front mount breaks from being stressed and then shockloaded from a hard launch. It's incredibly easy to change out but I just want to drive it! I finished up my wiring harness and covered it in high temp wiring loom that I ordered through Rossi's Engine & Drivetrain in Gilroy, California. For $30 I got a package of convoluted tubing that came with 10 feet of each of the following: 1/4", 3/8", 1/2", and 3/4" inner diameter sizes. Thats a lot of loom! Paul Rossi called Taylor's technical department for me to make sure it was good for high temperature applications. I can't remember the temperature exactly; it was either 600 or 700 degrees, I think. Plenty for even a Fiero's engine compartment. It also comes split down the middle for easy installation. It's not really as bad as it looks. Most of it will be covered up by the fuel rail cover and the right side decklid vent. The ECM will be mounted like so, as soon as I figure out the best way to secure it to a bracket and secure that bracket to the firewall. The power steering delete idler pulley bracket was much easier to make than I though it would be. I just roughly cut a piece of steel to fit in front of where the power steering pump mounted, and drilled holes in the same bolt pattern as the power steering pump. I drilled a hole in the bracket right where the power steering pump pulley would have been, as my idler pulley has the exact same dimensions. It's from an 80's S10 2.5L with no A/C. I don't know if 2.5 Fieros without A/C used the same pulley but its a possibility. I spaced the pulley out with three 10mm washers and secured it using the original bolt and a M10x1.5 nut and washer. The bracket itself is secured with three M8x1.25 bolts. I tried using socket head bolts but in either orientation (head on engine side or head on pulley side) they hit the pulley itself.. so I ended up having to use thinner-headed hex head bolts. The pulley may need to be spaced out more or less.. I just sorta eyeballed it. I guess I wont know until I start throwing belts or not. Please excuse the way too long bolts; I had them laying around so I just test fitted it with them. I'll pick up something prettier next time I'm at the hardware store. I also made up some temporary fuel hoses for use until I get some pretty braided hose. I had the metric fittings removed from the fuel rail lines and replaced them with standard tube nuts and flared the lines. I also added tube nuts to my hard lines on the chassis and connected them to the fuel rail using rubber fuel injection hose clamped to barbed fittings. I'm getting some braided hose tomorrow. Perhaps now you're wondering why I went through the trouble of getting those rubber fuel hoses if I'm just replacing 'em with braided hose anyway... (continued)
IP: Logged
12:40 AM
Steven Snyder Member
Posts: 3323 From: Los Angeles, CA Registered: Mar 2004
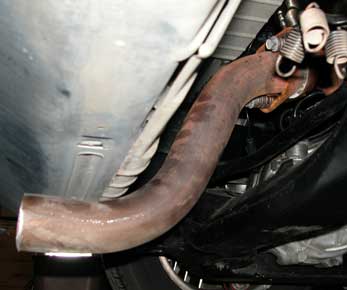
I wish I had a sound clip to explain, but I was just too eager to see if it would run. It sure does! And with this exhaust system: It's friggin loud! I also don't have the brake booster vacuum line or canister purge solenoid vacuum line hooked up... so it was idling pretty high. It sounded like a BEAST. I have to figure out whats wrong with my fuel pump relay or wiring though. The first time I tried to start it I didn't hear the fuel pump prime. It just kept cranking. When I turned it off, THEN I heard it run. Weird. So I tried again and it fired right up. Scared the heck out of me. The whole car was shaking! This was at 2 AM by the way. I woke up the house if not the neighborhood. Yesterday when I started it again it ran for a bit, changing idle speed randomly, then it just stalled out.. it acted like there was fuel pressure but the fuel pump wasn't running, so it just ran until the pressure was too low. Now I can't get the fuel pump to prime at all. Hmm. Seems like everyone who has done this swap initially had problems with the fuel pump.. so whats the common mistake, eh?
[This message has been edited by Steven Snyder (edited 04-04-2005).]
IP: Logged
12:44 AM
Fastback 86 Member
Posts: 7849 From: Los Angeles, CA Registered: Sep 2003
I didn't realize you got so far on it! Way to go! I can't wait to go for a ride when its done. Let me know if you need help working on it again. I take it the front timing cover cleared the hinge ok?
I hope someone has some ideas on the pump, cause I do not want to pull that thing back out again, especially with engine in the car this time.
BTW, I picked up a SpinTech muffler at WCF. Think I can borrow your MIG welder sometime?
IP: Logged
01:53 AM
Erik Member
Posts: 5625 From: Des Moines, Iowa Registered: Jul 2002
I wish I had a sound clip to explain, but I was just too eager to see if it would run. It sure does! And with this exhaust system: It's friggin loud! I also don't have the brake booster vacuum line or canister purge solenoid vacuum line hooked up... so it was idling pretty high. It sounded like a BEAST. I have to figure out whats wrong with my fuel pump relay or wiring though. The first time I tried to start it I didn't hear the fuel pump prime. It just kept cranking. When I turned it off, THEN I heard it run. Weird. So I tried again and it fired right up. Scared the heck out of me. The whole car was shaking! This was at 2 AM by the way. I woke up the house if not the neighborhood. Yesterday when I started it again it ran for a bit, changing idle speed randomly, then it just stalled out.. it acted like there was fuel pressure but the fuel pump wasn't running, so it just ran until the pressure was too low. Now I can't get the fuel pump to prime at all. Hmm. Seems like everyone who has done this swap initially had problems with the fuel pump.. so whats the common mistake, eh?
I dont know what how you have your wiring harness configured but if you are using the DOHC fuelpump relay from the RS electrical center make sure that your grey wire on the fuel pump relay is putting out 12v for a few seconds to the L pin(tan/white wire) on the c203 when you initially turn the ignition to the on postion That will tell you that the prime signal is working and that the continuity to the L pin from the grey wire terminal on the relay checks out ok. If you are running the stock Fiero FP relay then make sure that the tan/white wire on the relay is putting out 12v to the L pin on the C203 for a few seconds when you initially turn the ignition on to the on position. Once you crank over and build up oil pressure then the ECM will send voltage to the relay coil and pull the circuit closed and the fuel pump will continue to run if you have everything connected correctly.
[This message has been edited by Erik (edited 04-04-2005).]
IP: Logged
02:07 AM
Steven Snyder Member
Posts: 3323 From: Los Angeles, CA Registered: Mar 2004
I didn't realize you got so far on it! Way to go! I can't wait to go for a ride when its done. Let me know if you need help working on it again. I take it the front timing cover cleared the hinge ok?
Yup! Cleared perfect. I'm so close to finishing, I don't think I'll need anymore help but I'll let you know if I do. I'll call you as soon as its ready to drive so you can check it out.
quote
I hope someone has some ideas on the pump, cause I do not want to pull that thing back out again, especially with engine in the car this time. BTW, I picked up a SpinTech muffler at WCF. Think I can borrow your MIG welder sometime?
I don't think the pump is the problem. It's either my wiring or the ECM. As far as borrowing one of the welders, I'd have to ask my dad as they are both his, but I doubt he'd have a problem with it. Be sure to get some pipe to practice on if you haven't MIG welded exhaust pipe before... easy to burn through!
quote
Originally posted by Erik:
I dont know what how you have your wiring harness configured but if you are using the DOHC fuelpump relay from the RS electrical center make sure that your grey wire on the fuel pump relay is putting out 12v for a few seconds to the L pin(tan/white wire) on the c203 when you initially turn the ignition to the on postion That will tell you that the prime signal is working and that the continuity to the L pin from the grey wire terminal on the relay checks out ok. If you are running the stock Fiero FP relay then make sure that the tan/white wire on the relay is putting out 12v to the L pin on the C203 for a few seconds when you initially turn the ignition on to the on position. Once you crank over and build up oil pressure then the ECM will send voltage to the relay coil and pull the circuit closed and the fuel pump will continue to run if you have everything connected correctly.
Thanks Erik! I'll have to check that to rule out the fuel pump itself. I'm thinking its a faulty relay though.. Seems like I double checked my wiring for the fuel pump circuit many times.
-Steven
IP: Logged
02:49 AM
Erik Member
Posts: 5625 From: Des Moines, Iowa Registered: Jul 2002
Thanks Erik! I'll have to check that to rule out the fuel pump itself. I'm thinking its a faulty relay though.. Seems like I double checked my wiring for the fuel pump circuit many times.
-Steven
No problem. Here is the relay circuit ..maybe it will help
I wish I had a sound clip to explain, but I was just too eager to see if it would run. It sure does! And with this exhaust system: It's friggin loud! I also don't have the brake booster vacuum line or canister purge solenoid vacuum line hooked up... so it was idling pretty high. It sounded like a BEAST. I have to figure out whats wrong with my fuel pump relay or wiring though. The first time I tried to start it I didn't hear the fuel pump prime. It just kept cranking. When I turned it off, THEN I heard it run. Weird. So I tried again and it fired right up. Scared the heck out of me. The whole car was shaking! This was at 2 AM by the way. I woke up the house if not the neighborhood. Yesterday when I started it again it ran for a bit, changing idle speed randomly, then it just stalled out.. it acted like there was fuel pressure but the fuel pump wasn't running, so it just ran until the pressure was too low. Now I can't get the fuel pump to prime at all. Hmm. Seems like everyone who has done this swap initially had problems with the fuel pump.. so whats the common mistake, eh?
there is the downpipe I need.. I'm going to be welding up my exhaust this week and really can't find a flange to mount it to the manifold..
wow, Steven; you make me green with envy! A few questions etc for you if you don't mind; first THANKS for posting that info on the motor mounts; that is a great summary and guide for others.
I have watched other threads and saw where Cryzone had dogbone failure/probs and wrecked part of the engine; to the point that he decided to get rid of it; too bad! That makes me think of both the motor mounts and dogbone issue; are you doing something special about the dogbone mounting? It suddenly has my attention for that reason!
Idler pulley alignment: if you can (and at this point prob can't) get a straightedge across some of the pulleys that will tell you if your idler is aligned with them or not. Eventually if it does throw a belt) you'll be looking at them anyway so that is an idea.
Might be too late on this but I started a thread on an EXCELLENT exhaust article if you are just getting to that now; it is at https://www.fiero.nl/forum/Forum2/HTML/061365.html and for $3.99 isn't even the cost of one (wrongly selected) fitting. I have read the whole thing and going thru again and it will become one of my guidelines. I can't recommend it enough.
I hope you can get a sound clip up eventually; I love the sound of these things. And congrats on your diligence and progress. [/greenwithenvy] gp
IP: Logged
08:56 AM
Erik Member
Posts: 5625 From: Des Moines, Iowa Registered: Jul 2002


 of the motor mount business (Kohburn too if you don't mind); ie what mounts finally did you use and what ones did you decide weren't suitable and what are your impressions of them. I didn't see that Darth separated one of his so I am glad you noted that here! I have been trying to keep up to date on that topic and my motor mount list is growing so a summary would be helpful.
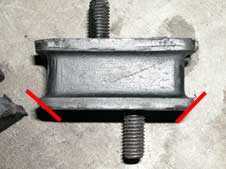
 . I did get a lot done, though.