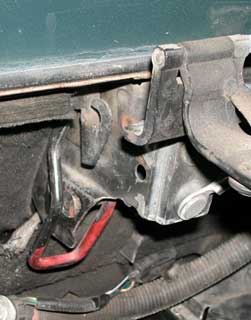
According to note I got from Darth when he did my chip, you can leave D22 floating. It may throw a code but mine hasn't yet. There again mine is still not running but I do not think it is because of the D22 connection since I've tried it both earthed and floating, no change.
Originally posted by ltlfrari: According to note I got from Darth when he did my chip, you can leave D22 floating. It may throw a code but mine hasn't yet. There again mine is still not running but I do not think it is because of the D22 connection since I've tried it both earthed and floating, no change.
Thanks Dave! Now I just have to get those connectors I'm missing and the harness is essentially done!
quote
Originally posted by Exotic Rida: another 3.4 DOHC fiero on the road welcome to the club!!!
Well, not quite on the road yet but it's getting there. I'm hoping by mid-Feb I'll be cruising around with it. :-D
-Steven
IP: Logged
03:22 PM
crzyone Member
Posts: 3571 From: Alberta, Canada Registered: Dec 2000
Looking good, keep up the pictures. We liiiike pictures
I installed my 3.4dohc stock, but there are a few performance tricks I'm going to do to my spare engine. If you do all of these it will cost a few $$ but it shoud add up to a 300+hp 3.4tdc.
Switch to a 96-97 style upper and lower intake, documented on 60* V-6 Deck the heads to bump compression closer to 10-1, I am not worried about making it an interferance engine, I plan on keeping the timing belt pretty fresh. Custom ground cams, there are companies around that can weld material on to existing cam lobes and regrind for a little more lift and more duration, this is the 3.4s bottleneck. Porting the heads, and lower intake, this can be done for $500 or less, PM me for details. And lastly some headers.
Lots of work, but the gains are pretty impressive for a 3.4L V-6.
------------------ Buy a fiero, become a mechanic
IP: Logged
04:18 PM
AaronZ34 Member
Posts: 2322 From: Colorado Springs, CO Registered: Oct 2004
I agree with all that except for the head port. Although it will help (of course), the gains aren't that much. But if and when you put headers on it, be sure to spend the time and money to get them right. I was amazed at how much equal length headers did for my Z34. With those mods above, and a few more, 300 is pretty easy. Cams would be huge, but no one yet has done it so we are a bit iffy on specs. The 96-97 intake swap is good, or better yet, custom build your own. The swap was my next mod to my white car until some kid said he'd buy it...
IP: Logged
05:38 PM
Steven Snyder Member
Posts: 3323 From: Los Angeles, CA Registered: Mar 2004
Right now I just want a well-running stock engine. 200 hp is plenty enough for now. Once I have some time and money I will buy another engine to do all the performance stuff to, then drop that one in when I'm ready. As for an intake, I want to custom-build one. Its easy enough to remove and reinstall the intake that I'd have tons of fun starting with one design then changing runner length and whatnot to see how the powerband changes. I may put headers on this engine, but I am not going to consider it until I have a working exhaust system with the stock manifolds. I'm still not sure exactly how I'm going to do it.
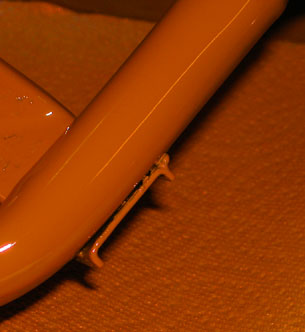
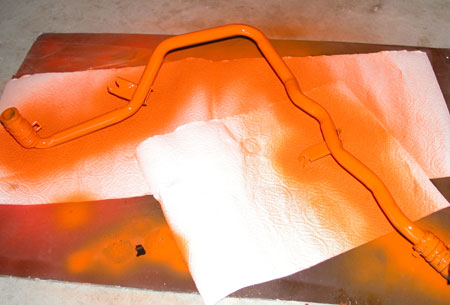
Today I was happy to find that OSH now carries my favorite color of paint, Rustoleum's safety orange: I picked up a couple of cans and went home to look for something on the engine to paint. With the engine upside down I'd rather not take off the valve covers and have to deal with a bunch of oil pouring out, so I looked for brackets and whatnot... and found myself a big ugly rusted coolant pipe going around the side of the block. The perfect candidate! Here's how I painted it; my standard procedure for doing parts using spray can paint. The prep-work is very important to getting a good finish. I began by scrubbing the pipe with Dawn dishwashing soap, then I rinsed it off with hot water. After drying it, I found a fresh piece of 150-grit sandpaper and sanded through all the areas where the paint was flaking off or rust was showing through. I also scuffed up the paint wherever I didn't have to sand otherwise. For some paints you have to go to finer grits but Rustoleum fills in 150-grit scratches perfectly. Next, I washed it again with Dawn to get rid of all the sanding residue, then wiped it down with Prep-All, a wax & grease remover available at WalMart and some auto parts stores. Even if you scrubbed the part very well with Dawn, you'll still get a lousy finish if you don't use a good wax & grease remover. It is important that you wipe the Prep-All onto the part using one cloth and then wipe it off using another cloth. Otherwise you just smear around the grease/wax on the surface. That's not good for paint adhesion. While doing the prep work, I had the spray can soaking in warm water in the sink. This helps the paint mix better and increases the gas pressure in the can to better atomize the paint. It makes a HUGE difference. I forget where I picked up this trick, but I see it used all the time in various car magazines now. Just plug your drain and fill up the sink enough that you're covering about half of the can. Make sure the water is just warm; if its too hot you may come back to find a big mess or someone might get hurt. After the can warmed up (give it five or ten minutes), I dried it off and shook it up real well for a few minutes, then sprayed for a few seconds to make sure there was no water in the nozzle and that the spray pattern is right. If you get orange peel or the paint lays strangely on the surface of your part, quickly wipe it off with some thinner and spray the paint for a longer period of time to get the water out of the nozzle. If the prep work is done correctly and the paint can is working, it should go on glassy smooth. Like this: The result: I still have to flip it over and spray the other side once this side dries. Next I will prep the intake for paint and make it look pretty as well.
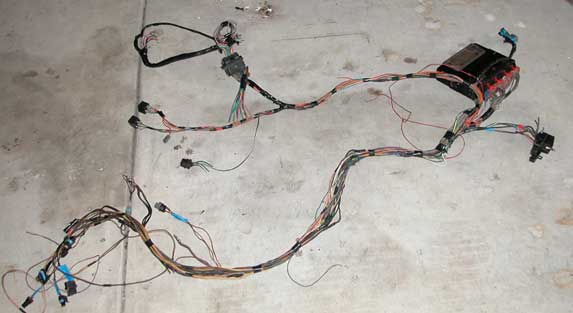
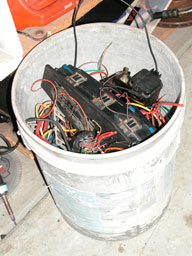
Here are some pics of the (almost) finished wiring harness. Looks simple without that RS electrical center junk, eh? Note that I haven't organized the connector wires yet; they're just bundled up so I don't tangle the harness up when I put it on the shelf. This is all the stuff I eliminated from the harness:
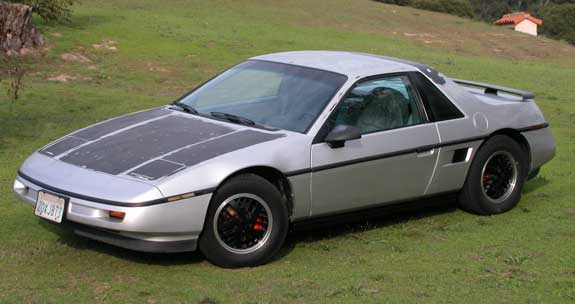
For those who haven't seen it, below is the car that will be receiving the 3.4L DOHC V6. I plan on painting it dark silver after I finish the engine swap. I started the prep work for painting a few months ago but got sidetracked after I bought the 3.4. Here's the 2.5L that'll be replaced: The engine only has 55,000 miles on it and it runs great, so I plan on keeping it for when I find an 88 5spd that I can put the engine into then give to my girlfriend.
That's all for today!
-Steven
IP: Logged
08:59 PM
Fastback 86 Member
Posts: 7849 From: Los Angeles, CA Registered: Sep 2003
Looking good Steven! Its going to be all ready to rock by the Rally, right? Thats gonna be a very nice car with the new engine and paint. Course, that Duke of yours goes like hell too, but like that 3.4TDC will.
IP: Logged
09:57 PM
Jan 16th, 2005
Steven Snyder Member
Posts: 3323 From: Los Angeles, CA Registered: Mar 2004
Looking good Steven! Its going to be all ready to rock by the Rally, right? Thats gonna be a very nice car with the new engine and paint. Course, that Duke of yours goes like hell too, but like that 3.4TDC will.
It will most certainly be ready for the Rally. Paint will probably have to wait until summertime, as there are some body mods I want to do beforehand. I also have a custom dash designed that I will start work on after I finish the engine and my taillight mod. I've already made some progress on the taillights, but I'm not going to talk about those until they're done. I expect to have them on the car for the Rally, too.
-Steven
IP: Logged
04:40 PM
AaronZ34 Member
Posts: 2322 From: Colorado Springs, CO Registered: Oct 2004
I will be in California this summer building up the 3.4L in my sig, and I'd love to see it. And I may be able to help out with some things that you'd like to do to your 3.4L DOHC. I will be making equal length headers for DOHC Fieros once I get mine built and ready, so expect late 2006.
About that coolant line, if and when you build your performance 3.4, it will be removed since it is for the TB coolant line so it will be unnessecary with a custom intake. I'd advise replacing the lower and building the entire thing custom, liek what I'm doing, but the LIM sin't that bad, it just could be better. As far as headers go, it is amazing how much they help this engine breathe. You have to see/feel it to believe it.
------------------ 1992 Lumina Z34 5-speed For Sale, modified(high 13s), or stock 14.78 @ 92.68 1992 Lumina Z34 5-speed Stock, takes my butt to work...Sometimes... 3.4L TDC V6, getting built to about 430hp at 8000rpm for a 88GT
IP: Logged
06:20 PM
crzyone Member
Posts: 3571 From: Alberta, Canada Registered: Dec 2000
Aaron, I'm running 2 front manifolds and a mandrel bent 2.5" system with a magnaflow muffler. It seems to flow pretty good. I want to try some headers some day, see how much it really helps. The biggest gains with this motor are going to be in the cams, it needs more duration. Then you'll see some gains.
IP: Logged
07:24 PM
Steven Snyder Member
Posts: 3323 From: Los Angeles, CA Registered: Mar 2004
Originally posted by AaronZ34: I will be in California this summer building up the 3.4L in my sig, and I'd love to see it. And I may be able to help out with some things that you'd like to do to your 3.4L DOHC. I will be making equal length headers for DOHC Fieros once I get mine built and ready, so expect late 2006.
Let me know when and where you're gonna be around in CA and we can arrange a meet.
quote
About that coolant line, if and when you build your performance 3.4, it will be removed since it is for the TB coolant line so it will be unnessecary with a custom intake. I'd advise replacing the lower and building the entire thing custom, liek what I'm doing, but the LIM sin't that bad, it just could be better. As far as headers go, it is amazing how much they help this engine breathe. You have to see/feel it to believe it.
Can I eliminate the coolant line while I'm using the stock 91-95 intake? As pretty as it looks now I'd rather just remove it if I can.
-Steven
IP: Logged
09:28 PM
PFF
System Bot
AaronZ34 Member
Posts: 2322 From: Colorado Springs, CO Registered: Oct 2004
Yes you sure can. First, totally remove the line you painted. Then you will need to plug off the nipple at both the water pump inlet and the underside of the throttle body. The nipple screws out (with force mind you...they get tight), and you screw new plugs in. And that is all there is to it, pretty easy. You won't see any noticable gains, but it is one less non-essential part that could leak. Plus getting that line out to pull off the plenum is a major pain, so this makes plenum removal much easier. Lastly, and I know from experience, it makes getting headers in a whole helluva lot easier when it isn't there....lol
quote
Originally posted by crzyone:
Aaron, I'm running 2 front manifolds and a mandrel bent 2.5" system with a magnaflow muffler. It seems to flow pretty good. I want to try some headers some day, see how much it really helps. The biggest gains with this motor are going to be in the cams, it needs more duration. Then you'll see some gains.
That is pretty much the system I was running on my Z34, except with some other Magnaflow components and factory manifolds. They do not flow well. Your manifold back does, but the manifolds are the bottle neck. They are big, really big, but they just aren't the same. In my case, when I added my 2.5" system to my Z34, I didn't notice ANY gains, it just sounded better. But no real performance. But with the headers, it changed the car. I respectfully disagree with you on the camshafts. They aren't great by any means, but I think with a perfectly tuned length custom intake and some really nice headers, you will see much more power than you will with just cams. Now the cams with a custom intake, and you will see truly awesome power. Custom cams would help tremendously no doubt, I just feel that there is more power to free up with headers and intake manifolds. But this is not fact, just what I have seen and been able to experience while playing with my Z34s.
I would really like to get some custom cams, and we have companies to do it, but no one has a clue as to what settings to choose. Some speculate Quad 4 W41 settings will work wonders, but others get custom settings from desktop dyno. And for the motor I'm building, I'll need a totally different cam. It isn't like SBCs where all you do is pick a RPM range, and Comp figures out the rest. So I really don't know. I figure I'll build the motor how I want, then adjust the stock cams, and when the day comes when i have ideas and $$$, I will look into custom regrinds and such.
I will be in CA sometime this summer with my block and its parts if everything follows plan, we will be building it in San Diego since I have a great machine shop lined up down there and a good friend that has built many motors with me there (a few 350s, 383 strokers, and most recently a blown 406 small block)
IP: Logged
10:35 PM
Jan 17th, 2005
Steven Snyder Member
Posts: 3323 From: Los Angeles, CA Registered: Mar 2004
Originally posted by AaronZ34: Yes you sure can. First, totally remove the line you painted. Then you will need to plug off the nipple at both the water pump inlet and the underside of the throttle body. The nipple screws out (with force mind you...they get tight), and you screw new plugs in. And that is all there is to it, pretty easy. You won't see any noticable gains, but it is one less non-essential part that could leak. Plus getting that line out to pull off the plenum is a major pain, so this makes plenum removal much easier. Lastly, and I know from experience, it makes getting headers in a whole helluva lot easier when it isn't there....lol
Thanks Aaron.. It looks easy enough... however, I just did some more research on the bypass as I recall reading on the 60* forums about issues with pressure buildup. I contacted Darth Fiero about it, as he has a lot of experience with these engines. According to Darth, the coolant through the TB is NOT just for de-icing like most setups, but also to reduce carbon buildup on the throttle blade... and more importantly it is a water-pump bypass for high-RPM situations when the thermostat is closed, to prevent excessive pressure buildup that could collapse the thermostat or damage the heater core. I'll be leaving it on for now. When/if I build a custom intake I will look into other options for retaining it or somehow incorporating another bypass.
quote
I will be in CA sometime this summer with my block and its parts if everything follows plan, we will be building it in San Diego since I have a great machine shop lined up down there and a good friend that has built many motors with me there (a few 350s, 383 strokers, and most recently a blown 406 small block)
I'm almost 7 hours from San Diego.. But maybe there will be some Fiero event on the central coast or in LA that I will take my car to if you want to check it out still.
-Steven
[This message has been edited by Steven Snyder (edited 01-17-2005).]
IP: Logged
06:25 PM
AaronZ34 Member
Posts: 2322 From: Colorado Springs, CO Registered: Oct 2004
I honestly never even thought about pressure buildup at high RPM. But after sitting here for about 10min, here is what I have come up with. First I will be using an electric water pump that acts as its own T-stat and removing my T-stat, so that is not an issue. I would suggest you change over to an electric pump if and when you build your custom intake or even before. More flow, better cooling, more power, post shut down run modes, etc. And about carbon buildup, I don't see how the TB coolant passage would help, but it can be cleaned rather easily anyways, so that should be of little concern.
IP: Logged
10:29 PM
Jan 20th, 2005
Steven Snyder Member
Posts: 3323 From: Los Angeles, CA Registered: Mar 2004
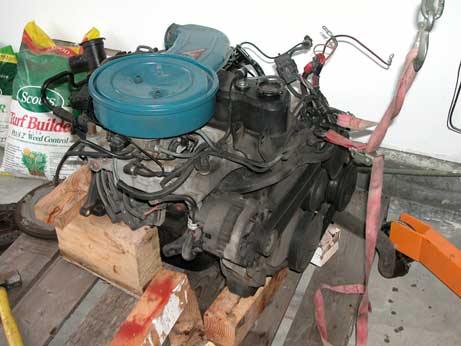
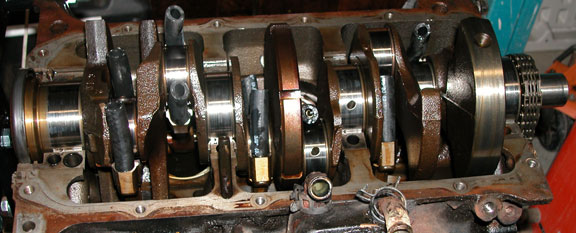
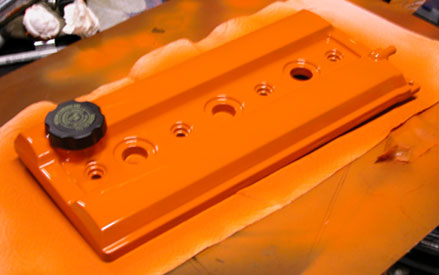
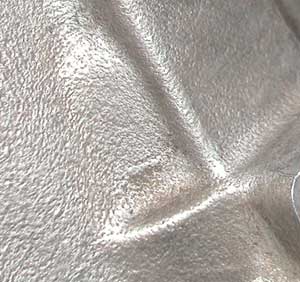
I got a bit done over the past few days. I made a trip to a few nearby salvage yards and found the connectors I need to complete my harness. I'm still trying to figure out how to get the crankshaft sprocket off. It looks like I might just have to cut the chain and remove the sprocket with the crank out. Yesterday I removed all the bearing caps to prepare for removal of the crank. Tomorrow I will cut the chain if I haven't found another option. Then its off to the machine shop for a regrind, polish, and new bearings to match. Yay. Here's the crank all ready to be pulled out except for that darn timing chain: Today I took off one of the valve covers and painted it. Surprisingly, I didn't have to catch a whole bunch of oil as I took the valve cover off. As shallow as it is, the valve cover caught all the oil without it spilling over the sides. Mmmmm.... orange... I found that a brass-bristled brush works very well for cleaning dirt and other caked on gunk off of cast aluminum surfaces. It seems to polish the surface a bit too. Looks freshly cast, eh? I plan on polishing or painting every visible part of the engine while I'm waiting for the crank to be done. It's gonna be pretty ;-) I also made some progress on my taillights tonight. They might be done by the end of next week if I can figure out the lamp sockets.
-Steven
IP: Logged
04:18 AM
Jan 21st, 2005
Steven Snyder Member
Posts: 3323 From: Los Angeles, CA Registered: Mar 2004
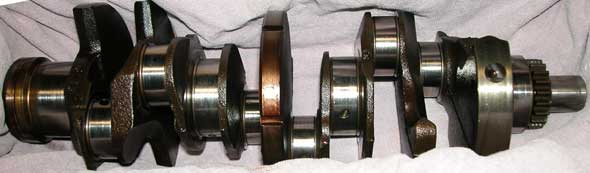
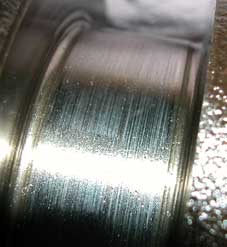
I ended up grinding the head off one of the linkpins on the timing chain to dismantle it. I'll buy a new GM one when I put everything back together. If anyone has a part # for the chain and/or the tensioner assembly please let me know. The crankshaft is now out! With it removed I got a better look at the cylinders. They still look crosshatched. I wouldn't have thought an engine with 89,000 miles on it would still have crosshatching on the cylinder walls. Maybe someone got in here and redid the piston rings at some point. That would explain my very good compression. Here's the crank: The main bearing journals look baaaaaaad. A pic of the worst one: Ouch! I'm dropping the crank off at the machine shop tomorrow.
-Steven
IP: Logged
01:19 AM
ltlfrari Member
Posts: 5356 From: Wake Forest,NC,USA Registered: Jan 2002
According to GMPArtsdirect part num is 10110599 (that's for a 95 old cutlass supreme 3.4 which is what my engine is out of) Here's the list of appliable models/years for that part num from the web site. No doubt yours will be on there if not in this list.
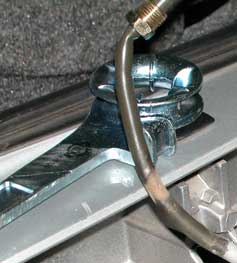
Thanks Dave. By the way, I asked Ryan about the D22 connection and he said to wire it up so its grounded when the clutch pedal is at rest and floating with the pedal pushed in. He put up a diagram here: http://dtcc.cz28.com/fiero/fmods.htm Not sure if thats the cause of any of your problems, though. -Steven
IP: Logged
12:51 AM
ltlfrari Member
Posts: 5356 From: Wake Forest,NC,USA Registered: Jan 2002
I've tried just tying it to ground as it would be most of the time with the switch. It made no difference. I really need to get of my backside and get back to working on the car. Jsut not too enthused right now, and it's ruddy cold out there as well. Must be getting soft in my old age
Update!! I haven't done too much in the last week or two. The place my machinist sends cranks to for regrinds lost my crank with the timing chain sprocket on it, and then charged him the $150 core charge. After he/we get that sorted out and I get a good crank I'll put the engine back together for the last time. I got all my timing components and whatnot so I have everything I need except for two bolts (intermediate shaft sprocket bolt and one of the belt tensioner bracket bolts), and of course the crank. I'm gonna stop by the shop tomorrow to see if there's any news. I did remove the spring that holds up the right side of the decklid and installed a gas strut in its place. It came from an early 90's Bonneville. I think it was a 93. PickNPull had a sale on hood struts for $2 each so I picked 'em both up. Sadly I didn't see any others in the yard or I would have got more. It's the same strut that Darth Fiero used in his buildup for yellowartero's car, so I just followed his directions. Thanks Darth! My next project is the completion of my front-mounted battery. I ordered some battery cable today and already did the box a few months ago. I just need to make a hold-down for the battery and run the cables. Hopefully I'll have time to do this next weekend. Here you can see the tray I made from underneath the car. As you can see, it does cause obstruction of radiator airflow. It's not enough to cause cooling problems but I imagine the additional turbulence will do nothing good for the high pressure buildup at high speeds. I will definitely be installing some sort of hood scoop to help relieve pressure.
-Steve
IP: Logged
12:40 AM
Feb 5th, 2005
Steven Snyder Member
Posts: 3323 From: Los Angeles, CA Registered: Mar 2004
So.. the crank mysteriously materialized at the place that does the regrind. They fixed it up and sent it off yesterday and I picked it up today. Looks goooood! Also got that sprocket off so I can get the timing chain back on once the time comes. It was really hard to find a puller that fit behind the darn thing but it finally came off. I'm itching to get this thing back together. Tomorrow I'll sneak the crankshaft in with the dishes to get the coating and whatnot off it. I need to get some brushes to clean out the oiling passages too... otherwise its all ready to go back in. Final assembly will commence on Sunday and there will be plenty of pics!
I got too excited about putting the engine back together and forgot to take pics. So far the crank is installed with new bearings, and the front cover is mounted. I still have to install the seals and the oil pan, then all the timing belt components and accessories. After I do the timing I'll install the intake and accessories, fit the wiring harness, and I'm done! I hope its as easy as it sounds.. hehe.. I do need a few misc parts though before I can finish. I'm looking for an intermediate shaft sprocket bolt in good condition (the head on mine is mashed up), as well as the torx bolts that holds the timing belt tensioner bracket to the rear head. My PCV hose off the block was broken so I need to source one of those as well. I also need the crank pulley mounting bolts, as mine are visibly stretched. I'll probably make a trip to the dealer tomorrow to see if they have the parts in stock. I'm taking President's Day weekend off from work to drop my duke out and get this screamer mounted on the cradle. It'll be running by the end of the month if everything goes as planned ! In other news, some SUV driver smashed in my driver's side door while I was at work, and of course they left no note. Apparently they it took them awhile to realize they hit me (if they realized at all) and just kept on backing out of the parking space, leaving a long mark along the side... also the door frame is bent inward, the door panel is cracked around the handle, and the molding is all scraped up. So much for having perfectly straight body panels! They also left a ridiculous tire mark on my quarter panel. Argh.
-Steven
[This message has been edited by Steven Snyder (edited 02-11-2005).]
IP: Logged
02:04 AM
AaronZ34 Member
Posts: 2322 From: Colorado Springs, CO Registered: Oct 2004
"My PCV hose off the block was broken so I need to source one of those as well."
I would replace that anyways, they go bad commonly, and are a B1TCH to replace. Might as well do it when the intakes are all off, assuming this is the one coming from the intermediate shaft cover (aka lifter galley).
------------------ 1992 Lumina Z34 5-speed For Sale, modified(high 13s), or stock 14.78 @ 92.68 1992 Lumina Z34 5-speed Stock, new crate engine and trannsmission 3.4L TDC V6, getting built to about 430hp at 8000rpm for a 88GT
IP: Logged
01:32 PM
Erik Member
Posts: 5625 From: Des Moines, Iowa Registered: Jul 2002
"My PCV hose off the block was broken so I need to source one of those as well."
I would replace that anyways, they go bad commonly, and are a B1TCH to replace. Might as well do it when the intakes are all off, assuming this is the one coming from the intermediate shaft cover (aka lifter galley).
I use braided hose on that ..no more problems
IP: Logged
02:22 PM
Feb 12th, 2005
AaronZ34 Member
Posts: 2322 From: Colorado Springs, CO Registered: Oct 2004
I've made lots of progress over the last week. The car is finally torn apart in my garage! Fastback 86 came over on President's Day weekend to help out. Thanks!
There's a lot to take apart before dropping the engine out! The first order of business is to get the A/C system discharged by an A/C shop; it's illegal to vent R12 into the atmosphere. Best to do this before disconnecting other stuff so you can actually get the car to an A/C shop under its own power! After getting that taken care of, the fuel pump fuse is removed and the engine is run until it stalls. Gotta make sure to turn it over a few times after that too. That gets the pressure out of the system, so you don't have fuel spraying all over when you disconnected the lines. We actually forgot to do that until after disconneting the wiring harness, but luckily we hadn't started to take apart the fuel lines. Thank goodness we didn't have to reconnect more than the ECM wiring to run the engine. Don't forget it! Coolant must be drained at least to the bottom of the hoses. The easiest way to do this is to unscrew one of the coolant pipe drain plugs at the back end of the rocker panels. Rate of flow can be controlled by removing the thermostat housing cap to allow air in. With the coolant drained out, its easy to remove the coolant hoses; just undo the clamps and pry about using a screwdriver to loosen the hose from the metal pipe.
Fuel lines vary depending on the engine.. on my 88 2.5L flexible lines attach to hard lines to the left of the battery tray. With two wrenches of the proper size (I think it was 20mm and 16mm, but I'm not sure), the fittings can be carefully unscrewed. Its easy to twist and break the lines if you don't use two wrenches. Just in case there's some fuel left in the lines, make sure to put a container under the connection to catch any. You don't want it spilling on the possibly hot catalytic converter right below!
Disconnecting the wiring is easy if you just leave everything connected to the engine but take it apart where it attaches to the car. The C500 connector is located by the battery tray. It is solidly attached to the chassis with a standard size bolt; I think it was 1/4". There are too actual connectors there; one is for the taillights and can be left attached, while the other half goes out with the engine. Some of the power distribution block must also be unscrewed; this is all the red wires with the fusible links right below the C500.
There are a few connections in the car under the center console/armrest. The C203 (clear-white connector), cruise control (small black or gray connector), and two ECM connectors must be removed. Then the firewall pass through can be released by pulling out the U-shaped plastic piece that locks it in place. Just stuff all the wires/connectors through the hole into the engine compartment so nothing gets torn off when the engine is dropped out.
Also don't forget to unscrew all of the chassis grounds (one on the decklid, one near the battery, possibly elsewhere too), and the fuses from the firewall to the left of the left side decklid hinge. Speaking of the decklid hinge... everything went a lot easier with that darn decklid off. Just open it up all the way and disconnect the four bolts holding it to the hinges (leave the security torx bolts in place!).
Don't forget about the dogbone. It's held on by two bolts with nuts; you only have to unscrew one, then you can swing the dogbone out of the way.
The shift cables must be removed by unscrewing the nuts that hold each on. The throttle cable is easy, just twist the pulley to give the cable slack and push the stop up through the hole. It's easy to forget the brake booster vacuum line. Disconnect that sucker from either the firewall or the engine. It should pass through the firewall right in the center. On the 4cyl it goes to a hard line leading to the intake manifold. Not sure about the V6..
Only a few things left! The A/C lines are held on using just one long 10mm screw on the left side of the engine bay. Remove the screw and pop off the tubes to make sure they don't bend when the engine is dropped. Finally, the 13mm nuts attaching the strut tops to the strut towers must be removed. The engine is now ready to come out! Or did I forget something?
Sure did! Don't tear off your brake lines... instead, disconnect the calipers from the hub assembly and hang them with wire. Yep, the e-brake cables do have to be removed. I know its a pain in the arse to reinstall them. It's the price you pay.
You've also got to get remove those pesky "wheel" things (support the car on jackstands as far back as you can get without using the cradle jack points, and block the front wheels), and the fender well liners too so you can fit the engine out the side..The screw in rivet thingers that hold these in don't like to come out most of the time. Pliers are a necessity. The liners are also attached to the body panels using those ever-present 7mm screws. I think thats everything now.
Here's the crazy little Duke ready to go!
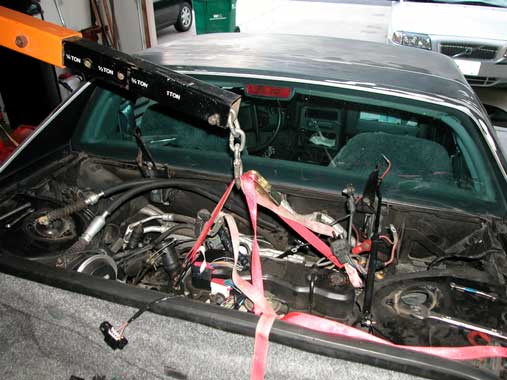
Using an adjustable tow strap and a hydraulic hoist, we supported the engine/tranny/cradle assembly by the engine lift brackets. There may be a better way to do it; I noticed one of the lift brackets got bent from the stress after we finished getting it out. With the cradle supported by the hydraulic hoist (make sure your strap(s)/chain/whatever is taut), the rear cradle bolts are removed first. These come out easy enough. The front ones are a bit trickier; they go in sideways, allowing the cradle to pivot down if you let down the back end. After removing the nuts, the front of the cradle must be supported with a jack or two to take the weight off these bolts so they can be pulled or knocked out. You don't the cradle to swing down when they come out!
With all four cradle bolts removed, the hoist can be slowly released to lower the cradle onto a dolly. Slowly. Keep checking all around the engine compartment, above and below, to make sure nothing is binding or was reconnected by evil gnomes hoping to spoil your fun (it does happen). The engine/tranny/cradle weighs a lot and will certainly tear off anything that is still connected.
With your Fiero's heart and soul sitting on a dolly, its time to lift up the car itself. With the rear bumper removed, you can hook onto the bumper reinforcement or the holes in the frame at the rear inner side of the wheel wells. I chose the latter, and used a 6000-lb test toe rope. I had to knot it up to get the length short enough that the hoist could lift up the car to clear the engine.
Make sure your front wheel chocks are secure! Now, ass was done when lowering the cradle, go slowly and watch out for things that may catch or rub. The only thing that rubbed in my case was the strut mounts as the struts wanted to bend inward. They didn't catch on anything so it wasn't a problem for me. Once the car is high enough to clear the highest point on the engine, the cradle dolly is pulled out through one of the wheel wells. The car is then lowered onto the jackstands, and fear of the head-high Fiero ceases. A job well done!
IP: Logged
01:06 AM
AaronZ34 Member
Posts: 2322 From: Colorado Springs, CO Registered: Oct 2004
Where will it be going? It might be able to power my lawn mower...But I doubt it...lol
------------------ 1988GT 5-speed Blakc with grey leather, I pick it up this May! 1992 Lumina Z34 5-speed 14.78 @ 92.688, high 13s at sea level 1992 Lumina Z34 5-speed Stock, new crate engine and trannsmission
IP: Logged
01:11 AM
Steven Snyder Member
Posts: 3323 From: Los Angeles, CA Registered: Mar 2004
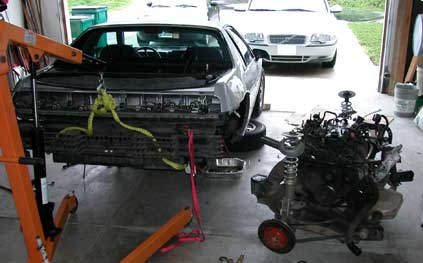
With the cradle assembly sitting out of the car, there was still a problem. The Duke was still attached to the tranny! With the exhaust removed, disconnecting the engine it was a simple matter of removing the bellhousing bolts and the engine mount. With a pull, a lift, a tug, and a gentle prying with a screwdriver, the Duke was at last detached. Here it sits. It's final resting place? Only time will tell.
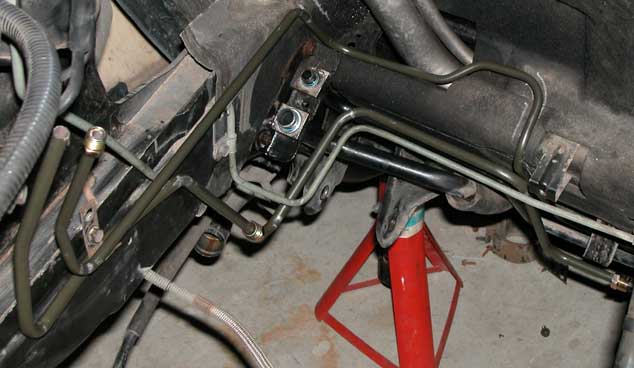
After getting the mess of parts organized, it was time to start prepping the chassis for the 3.4 DOHC. First order of business: the fuel pump! Dropping the tank was easier than I thought. Then again, Fastback 86 disconnected those painful hose things so perhaps my perspective skews the truth. With a jack supporting the front of the tank and another supporting the rear, the strap nuts and main support bolts can be removed. The whole assembly then just drops out and can be slid out from under the car for easy access. The only problem we had in replacing the pump was the ring at the bottom of the bracket that holds the fuel pump in place. The rubber pad that came with the new fuel pump did not fit the shape of the ring, and the rubber pad for the old pump didn't fit the new pump. It took some gentle persusasion to get the new rubber pad to fit. The pump isn't going anywhere after that. With the new pump installed (along with 2 feet of fuel injection hose for both the return and high pressure lines), I was ready to bend the new fuel lines. The 3.4 DOHC engine requires that the lines end at the driver's side of the engine bay. However, with 6 feet of 5/16" and 3/8" line from Autozone and a cheap fuel bender, I wasn't getting anywhere. The bender just kinked the line. I ended up talking to Paul Rossi (Rossi's Engine and Drivetrain in Gilroy) about tube bending and got some of the tools he uses. Each is made for a specific size of tubing. It has a double hinged lever that pulls the tubing around a radius in such a way that the tube is only slightly flatenned; not kinked at all. The Good: The Bad (and the Ugly): The final result: I'm probably going to relocate the charcoal canister (you can see the bottom at the top left of the pic) to clean things up a bit. The fuel filter will be located where the gold connector is at the bottom right of the pic. It's in essentially the same position it is in with the 88 2.5L but on the other side of the fuel tank. We originally flipped over the filter and line and bolted it up with the stock bracket and everything, but when I did the final version of the lines I decided to move it a bit to make fitting the lines easier so I'll need to make up a new bracket.
[This message has been edited by Steven Snyder (edited 09-04-2006).]
IP: Logged
01:36 AM
PFF
System Bot
Steven Snyder Member
Posts: 3323 From: Los Angeles, CA Registered: Mar 2004
Originally posted by AaronZ34: Where will it be going? It might be able to power my lawn mower...But I doubt it...lol
Contrary to popular belief, a well-kept Duke is actually surpsingly quick with a 5-speed behind it.. just talk to some of the guys at Westfest, the Coast Run, and the Rally Through the Valley. They've seen that thing go! I have had no problem keeping up with the V6 guys once we get into the curves. The straights I get left behind... but I still got 32 mpg on average, and thats not driving like a granny. I'm hoping to find an 88 5-speed coupe with a blown engine that I can put this duke in. Then I can keep the car as a daily driver and push the 3.4 DOHC car to a position as a weekend fun car, or give the duke-powered car to my gilrfriend.
IP: Logged
01:40 AM
Steven Snyder Member
Posts: 3323 From: Los Angeles, CA Registered: Mar 2004
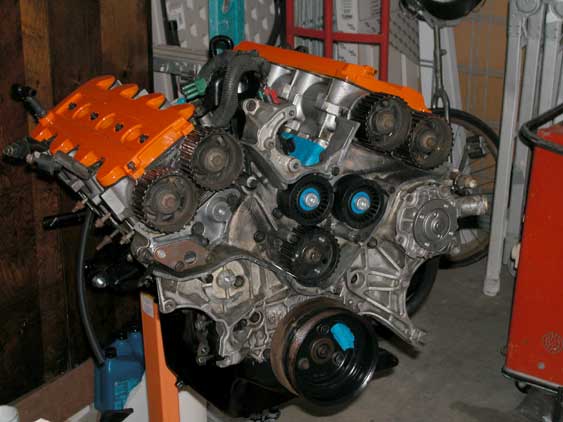
With the fuel lines finished, I moved back to assembling the engine itself. I'm currently trying to get the cam timing done. I went to OSH and got some 1/2" steel bars and a pair of M8x1.25x45mm socket head bolts to make my cam hold down tools with, but I can't figure out how to hold the cam cogs in place while I take off the bolts holding them on. I tried doubling up on the bars holding the cams flat but ended up just bending the total of 1" thick steel. The torque wrench was reading almost or just over 100 lbs. Those things are tight! I also accidentally stripped out the threads for the hold down tool in one of the cam carriers. I didn't get all the oil out of it so the bolt bottomed out prematurely, and I kept spinning it because it wasn't yet torqued to spec (22 ft-lbs). I used a thread repair kit from Autozone to fix it up. The threads were stripped out so perfectly that I didn't have to drill out the hole to clean it, I just tapped it with and installed the coil. I did of course still have to deal with metal bits though.. so I coated the tap and hole in grease (thanks for the tip JazzMan!) to gather everything. I don't know that I got everything out of the bottom of the hole, so I'll put something in to cover the hole before I run the engine so the grease doesn't get thinned out by motor oil, thus letting the metal bits go free. The engine sure looks awesome without the timing belt cover on. Look at all those pulleys! There's still five more to install, too! I am currently riding to school/work on the unicycle in the background, hence the reason I'm taking my time on the swap. I love roadsters! With the engine on hold, I started on the poly bushing installation. I did all the links so far except the adjustable links, as I wanted something to hold the strut/spindle assembly in place so I didn't have to deal with axles popping out prematurely (I hadn't train the transaxle fluid yet). With the transaxle drained and removed from the cradle, I can do the adjustable link bushings tomorrow. I'll take some pics of how its done in case anyone needs help. It's pretty fun using the torch ;-)
IP: Logged
01:57 AM
Fastback 86 Member
Posts: 7849 From: Los Angeles, CA Registered: Sep 2003
Get the AC discharged before you start disconnecting things.
Don't forget that coolant hose back by the trunk.
Screwdrivers aren't meant for prying dukes away from their transmissions.
You get what you pay for - tubing benders are no exception.
Getting 17 year old rubber tubes off of metal tubes sucks.
I think that covers everything so far. Did you get a picture of how bad we mangled that piece of tubing trying to get the cheap bender to work, Steven? And you're welcome for the help!
IP: Logged
02:02 AM
Steven Snyder Member
Posts: 3323 From: Los Angeles, CA Registered: Mar 2004
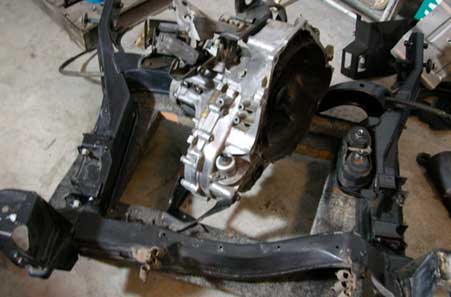
Yes there's more! It's even out of chronological order! I forgot to mention that the famous "decklid hinge mod" has been performed. The cut has been made! We left the middle hole intact so that the spring can be tight enough to hold up my spoiler-equipped decklid. Will it clear? I hope so! The engine will be mounted Darth Fiero-style with the four Dodge truck mounts, so it should be low enough. Note all the little metal bits embedded in the rear window. Oops. Here's the new rotary engine mounted to the craddle. I had to rotate it clockwise so the exhaust could clear. Just kidding.. its the Isuzu tranny, silly. I tried to lift the thing out of the cradle onto a piece of cardboard but I'm too weak, so it ended up like this in the middle of the cradle. I thought it looked kinda neat.
IP: Logged
02:08 AM
Steven Snyder Member
Posts: 3323 From: Los Angeles, CA Registered: Mar 2004
Originally posted by Fastback 86: You get what you pay for - tubing benders are no exception.
Oh but I didn't pay for the good ones!
quote
I think that covers everything so far. Did you get a picture of how bad we mangled that piece of tubing trying to get the cheap bender to work, Steven? And you're welcome for the help!
Thanks again for the help! This is the best shot I've got: Heating up the tubing with a torch just made it kink more easily.
looking good - just so you know the concensus on removing the cam cog bolts is impact gun - after that torque to spec and you should be able to remove with a wrench after that
IP: Logged
07:00 AM
bigjoe25 Member
Posts: 266 From: cincinnati, oh Registered: Jan 2005
Here's the 2.5L that'll be replaced: The engine only has 55,000 miles on it and it runs great, so I plan on keeping it for when I find an 88 5spd that I can put the engine into then give to my girlfriend.
That's all for today!
-Steven
Man that is the cleanest l4 Ive seen. Of course comparing it to mine is the only other one ive seen so heh. I was about to say, even thoguh its jsut a tech4, it would of been a waste to just sit idley by.
great thread and info Steven; keep it up! and plusses to you for taking care of the A/C and refrigerant the RIGHT way; it is too easy to take the cheap and easy way out! I look forward to all the updates and especially how the Dodge mounts work for you; make sure you keep your level of detail as you are; that is great and helpful. gp
IP: Logged
08:18 AM
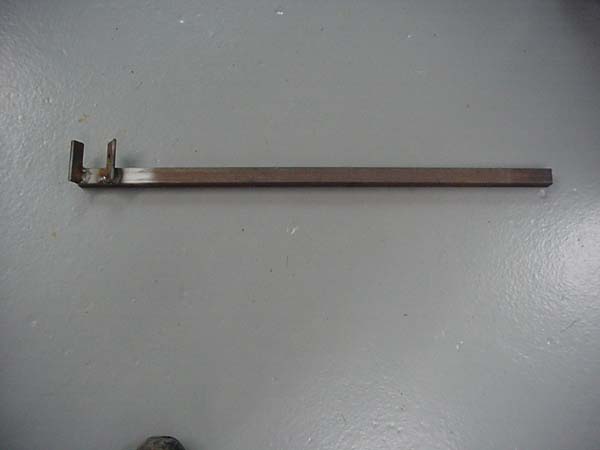
WHEELIE Member
Posts: 267 From: ROBBINSVILLE NC USA Registered: Mar 2002
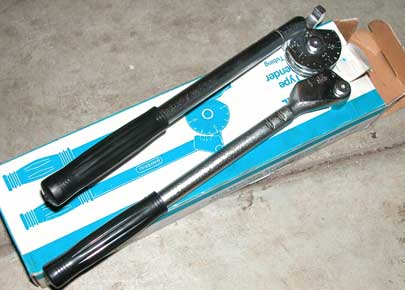
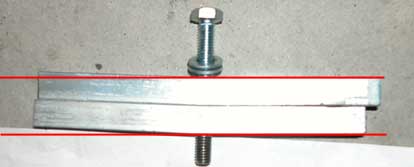
Lets try this again Here is a tool I made to hold the cam sprockets on my 3.4 Made it out of 1" square tube about 2 1/2 feet long. Worked like a champ wheelie
------------------ WHEELER'S PERFORMANCE MOTORCYCLE SHOP NEAR DEALS GAP check out TAILOFTHEDRAGON.COM 318 curves in 11 miles #1 RED 85 GT MY DEAL'S GAP DRAGON SLAYER # 2 white 86 gt fastback project. UPDATE 3/03 IT LIVES!! 6 months,many broken bolts and only two engine fires later!! ... needs 3.4 anybody got one for sale? UPDATE 12/03 3.4 dohc is here,this winter's project 12/04 still this winter's project #3-84 parts car.. for sale $50 #4-84 se parts? project? for sale $100 I AM NOT ADDICTED.... BUT Now # 5 formula project. runs but needs work(so what's new?) # 6 2/05 update FIERO # 6 86 GT BLACK It runs but needs work like a new engine!! damn !! It's an auto I want a 5 speed


 !
!